Chapter 10. Creating Relationships Between Tables
In the real world, relationships can be pretty complicated—just ask anyone who has an older sibling. In QuickBase, luckily, relationships actually make your life easier. After all, the tables in your applications have a lot to talk about—they live in the same neighborhood, they hold related information, they might even share a couple of fields. Table relationships get your tables talking—and make your work easier. This chapter explains everything you need to know about creating and using relationships between tables in a QuickBase application—or even between two tables in different applications.
How Table Relationships Work
In the world of QuickBase, a relationship is a link between two tables—a record in one table links up with one or more records in another table. For example, suppose you’re using QuickBase to keep track of tasks in a project. So you create a Tasks table. For each task you add, you also list information about the person who’s assigned the task: name, email, phone number, and so on. At first, this works out great. But later, as you assign multiple tasks to the same people, you get tired of having to add the same employee information to the Tasks table over and over again. Besides, your Tasks table is getting hard to read with all those extra fields thrown in. You’d rather have it focus on tasks, priority levels, due dates—things like that.
Wouldn’t it make more sense to have a separate table that stores relevant data about your team and feed that info into the Tasks table somehow? What if you could click an Employee’s name and bring up all the details you needed about that person? Well, that’s exactly what relationships between tables let you do. By creating different tables and linking them, you keep relevant data together and each table focused on a particular kind of record. As a result, your application is better organized and easier to manage.
Relationships also minimize data-entry errors (not to mention repetitive-stress injuries), since you only have to enter each piece of information once. And because that information lives in only one place, mistakes are easier to correct when they do crop up. In fact, you can use relationships to avoid typing in data completely by creating a custom drop-down list of, say, existing employees. Anyone creating a new task chooses from the list to assign it, so no one can assign tasks to someone who’s not in the Employees table. (That way, you won’t get any smart alecks trying to give Hercules a thirteenth labor by assigning him to write the system spec for Project HYDRA.)
Note
In QuickBase, you can create a relationship between any two tables for which you have administrative privileges. Usually, you’ll create relationships between two tables in the same application. But you can create cross-application relationships, as well—see Creating a Relationship Across Applications for details.
The One-to-Many Relationship
The relationship that QuickBase creates between two tables is a one-to-many relationship: a record in one table links to one or more records in the other table. The “one” side of the relationship—the table holding single records that link to many records in the other table—is called the master table. The “many” side of the relationship—the table that holds many records linking back to a single record in the other table—is called the details table.
Here’s an example to show how a one-to-many relationship works. Imagine you’re using QuickBase to catalog all the novels in your vast library of rare books. You create two tables:
Novels. Information about the books you own, such as title, author, edition, and year of publication.
Authors. Biographical information about each author: date of birth (and death for deceased authors), nationality, and other facts.
You want to link these tables in a one-to-many relationship. First, you must figure out which table should be the master table and which should be the details table. The best way is to ask yourself the following questions:
Does one novel have many authors?
Does one author have many novels?
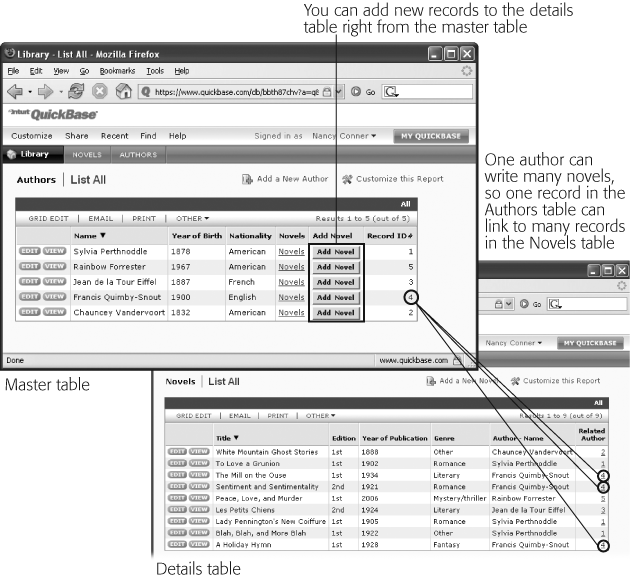
Because most novels are written by a lone author laboring away by candlelight in a garret somewhere, it’s far more likely that one author will have written several novels than that one novel will have several authors. So it makes sense to make the Authors table (one author) the master table and the Novels table (many novels) the details table. Figure 10-1 shows how this works.
Creating a Relationship
Once you’ve chosen a master table and a details table, you’re ready to start a new relationship (er, in QuickBase, that is). To set up a relationship between two tables, here’s what you do:
Open the application that contains the tables you want to relate. Choose Customize→Tables, and then click the Relationships tab.
The Tables page opens to the Relationships tab (Figure 10-2).
Figure 10-2. On the Tables page’s Relationships tab (circled), you can see the relationships that exist (if any) in a multi-table application. In this example, the application doesn’t yet have a relationship between its two tables. To create a new relationship, click the upper-right New Relationship button (also circled).Click the upper-right New Relationship button.
The Create Relationship page (Step 1 of 3) opens. This page has two drop-down lists that let you select tables from your application.
Use the drop-down lists to choose the two tables you want in your relationship, and then click Next.
The Create Relationship page (Step 2 of 3) opens. As Figure 10-3 explains, this page helps you determine which table you want as the master table and which you want as the details table. (In the master table, one record can relate to many records in the details table.)
Figure 10-3. QuickBase uses diagrams to help you understand the master table–details table relationship. In a one-to-many relationship, the master table is the table in which one record can relate to many records in the other table (the details table). One author can write many novels, so the Authors table is the master table and the Novels table is the details table.Turn on the radio button next to the diagram that best illustrates the master table–details table relationship you want to create. Click Next.
The Create Relationship (Step 3 of 3) page opens, as shown in Figure 10-4. Most of the time, you won’t need to make any changes here, so you can simply click Save. (You do have other options, though, as the box in Linking Tables explains.)
Click Save.
QuickBase opens a box that lets you choose fields that it will add to the forms in each table, as Figure 10-5 shows.
Turn on the checkboxes for fields you want on the named forms (the Linking Tables box explains your options), and then click OK.
QuickBase creates the relationship and displays it on the Relationships tab of the Tables page.


Creating a Relationship Across Applications
You don’t have to live in the same house or work in the same office with people to have relationships with them. You can be friends or colleagues with people who live in a different neighborhood, state, or even country. In QuickBase, a cross-application relationship is much like a long-distance friendship—two tables living in different applications hook up and share their data.
Say you have a Products table in your Manage Inventory application and an Invoices table in your Sales application, and you want to be able to pull details from the Products table and display them in the Invoices table. Creating a relationship between two tables from different applications is essentially the same as creating a relationship within the same application—the main difference is that you’ve got to do a little prep work first.
Note
Cross-application relationships can happen only if both applications exist in the same billing account. You can’t create a relationship, for example, between an application in your company’s billing account and an application in a client’s billing account.
Before you can link two tables in different applications, you need to open up communication between those applications. Here’s how:
Open the application that holds the table that will become the master table in the relationship. Then choose Customize→Application.
QuickBase opens the application’s Settings tab. In the left-hand list is a link called Cross-Application Relationships.
Click the Cross-Application Relationships link.
The Cross-Application Relationships section opens. If the application already has a relationship with another application, it shows up here.
In the Access Level section, click the Add Application button.
The Select an Application box, shown in Figure 10-6, appears.
Figure 10-6. The Cross-Application Relationships section of the Settings tab is where you select another application to link to this one. Click the Add Application button (circled) to bring up the Select an Application box, from which you choose the application that holds the table that will become the details table in the new relationship.Turn on the radio button next to the application that holds the details table you want to link to. Click OK.
QuickBase adds the application you chose to the Cross-Application Relationships section of the application’s Settings tab.
Select the role you want users of the related application to have in this application.
It’s worth giving this issue a little thought before you click. When you grant a related application a role, you’re granting that role to that application’s users. So if you grant the other application too broad a role, you might be allowing its users to see confidential information that they shouldn’t see. To tailor the access level, create a new role that specifies exactly what the related application’s users can see in your application, and then assign that role to the related application.
Tip
If you’re just experimenting with creating relationships between tables in different applications, select “No access” here. This protects the data in this application from unauthorized peeking. Once you’ve got the relationship set up, you can change the role.
When you’ve assigned a role, click Save Changes.
QuickBase paves the way for you to create a relationship between tables in these two applications.

To create the relationship, open the application containing the table that will become the details table, and then follow the steps in Creating a Relationship. There’s a small difference in step 3, where you select the tables to link. In the left-hand drop-down list, scroll down to the bottom and choose <Select another table>. QuickBase then asks you to choose the application and table you’re linking to. When you’ve done that, follow the rest of the steps for creating a new relationship.
Note
Cross-application relationships must be created in the application that contains the details table.
When you create a cross-application relationship, each application’s Tables page treats this relationship differently from same-table relationships. Usually, you’d look for relationships on the Relationships tab of the Tables page. For a cross-application relationship, however, the application that holds the details table shows the master table in red to show that it’s an external table—located in a different application. In the master table’s application, the relationship doesn’t appear on the Tables page’s Relationships tab. To see the relationship (and access its properties), you need to go to the application that holds the details table.
After you’ve created a relationship between two tables, you can manage that relationship in different ways—add a new field, delete an unused one, or delete the whole relationship. The next section tells you how.
Adding a Master Record from the Details Table
It’s frustrating to be adding new records to a details table and find that the master table record you want to link to doesn’t exist. For example, in the Manage Multiple Projects application, the Tasks table and the Projects table are related; Projects is the master table and Tasks is the details table (one project has many tasks). Imagine that you’re adding new tasks to the Tasks table when you come across a task that belongs to the brand-new Simkins project, which is so new that no one’s added it to the Projects table yet. When you look for Simkins in the multiple-choice list for the Customer Project field, it’s not there.
But that doesn’t mean you’ve wasted your time entering a task that can’t link to any existing project. Instead, select <Add a new project>, way down at the bottom of the drop-down menu. This opens a box that lets you add a new record to the Projects table. When you’ve added the details of the Simkins project, click Save. QuickBase adds the new record to the Projects table and takes you back to where you where in the Tasks table. Now, though, Simkins appears in the Customer Projects field, so you can finish adding the new task.
Adding a Field to a Relationship
As you work with relationships, you’ll find lots of opportunities to link your tables. After all, the whole point of a relationship is to make data from one table readily available in the other. This makes it easy for people using your application to work with both tables together—whether you’re displaying information from one table as a field in the other, or providing links to make it easy to move back and forth between the tables. When you’ve got a good relationship going, adding a new field increases the number of ways in which tables share their information.
Here’s how to add a new field to an existing relationship:
Open the application where the related tables live. (Or, if you’re adding a field to a cross-application relationship, open the application that holds the details table.) Select Customize→Tables, and then click the Relationships tab.
The Relationships tab of the Tables page opens.
Tip
For tables belonging to the same application, you can choose either the master table or the details table. For cross-application relationships, you have to go to the details table.
Find the relationship you want and click its Edit link.
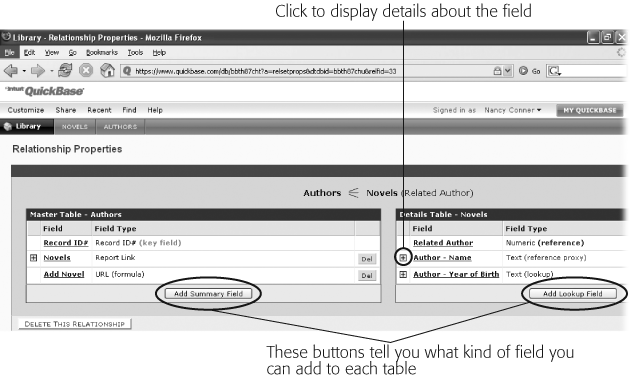
The Relationship Properties page, shown in Figure 10-7, opens. This page shows the master table’s details at left and the details table’s details at right. There are four kinds of fields you can add to a relationship: Report Link, URL (formula), Lookup, and Summary fields. (To learn about these fields in detail, skip over to Working with Advanced Fields.)
Click a button to choose a field type.
A page opens that lets you add a field. This page will vary depending on what kind of field you’re adding.
Select the field you want to add, then click OK.
QuickBase returns you to the Relationship Properties page, where your new field has been added to the list. Click Done when you’re finished tinkering with the fields.
Deleting a Field from a Relationship
If a relationship field doesn’t prove very useful, you can delete it from the relationship. For example, in your Library Catalog application, maybe you don’t really need to see authors’ nationalities in the Novels table. Deleting a field from a relationship doesn’t destroy the original field—just the link to it in the related table.
To delete a field from a relationship, open the application that contains the relationship and then surf your way over to the Relationship Properties page. Choose Customize→Tables, and then click the Relationships tab. Click the Edit link of the relationship you want to modify to get to the Relationship Properties page. As you can see in Figure 10-7, most fields have a Delete button (it’s labeled Del) to their right. Click Del for the field you want to take out of the relationship. QuickBase opens a Usage page, which shows you how your application uses this field, as shown in Figure 10-8. If you’re sure you want to delete the field, click Delete This Field, and then “Yes, delete the field” to confirm. QuickBase deletes the field from the relationship and returns you to the Relationship Properties page.
Note
You can’t delete a key field or a reference field from a relationship, because these are the fields that define the relationship.

Deleting a relationship
In life—as everybody knows—breaking up can be hard to do. Not so in QuickBase. When the time comes to sever the ties between two tables, follow these easy steps (and remember, you’ll always have Paris):
Open the application that contains the related tables. (If you’re deleting a cross-application relationship, open the application that holds the details table). From the menu bar, select Customize→Tables, and then click the Relationships tab.
The Tables page shows you the relationships that exist in the application.
Find the relationship you want to delete and click its Edit button.
The Relationship Properties page (Figure 10-7) opens.
At the bottom left of the section displaying the details of the relationship, click Delete This Relationship.
The Delete Relationship page opens. This page, shown in Figure 10-9, lists the fields that QuickBase deletes when you delete the relationship. (Typically, these are Report Link fields, lookup fields, and Formula URL fields.)
If your tables can live without those fields, click Delete This Relationship.
A confirmation box pops up, giving you one last chance to change your mind.
Click OK.
QuickBase breaks the relationship and deletes the fields it listed back on the Delete Relationship page.

Tip
To clean things up completely, delete the regular, nonreference field that served as the reference field when the relationship still existed. (In the example, that would be the Related Author field.) Otherwise, you might create and delete a relationship multiple times and end up with many leftover reference fields.
Deleting Related Records
When you create a relationship between two tables, any change you make to a field in the master table also shows up in any relevant fields in the details table. In the Library Catalog application, for example, you may discover that a particular author was Welsh, not English. When you correct that author’s nationality in the Authors table, the correction also appears in all related records in the Novels table. This kind of automatic change is the whole point of relating tables.
An exception, however, is when you delete a record from the master table. Deleting a record from this table does not delete related records in the details table. QuickBase errs on the side of caution here; you may not want those details table records deleted. It’s not hard, though, to think of situations where it would be super-convenient to get rid of all “child” records from the details table when you delete a “parent” record from the master table. For example, imagine that a collector paid you a nice bundle of money to buy all the novels in your collection by a particular author. You want to update your Library Catalog application to reflect this change. It would be great if you could simply delete that author from the Authors table and have all related novels disappear. When you delete the author, though, that’s not what happens. The author’s novels remain in the Novels table—for those records, the Author Name and Author Nationality fields are simply blank. If you want to delete those novels, you have to hunt them down and delete them by hand.
There’s gotta be an easier way—and there is. With a little bit of setup work, you can easily find and delete any details records left hanging around after you delete the relevant master record.
The key is to create a report that gathers together all the details-table records that have lost their relevant master-table record. In the Library Catalog example, you’d create a report that shows only those records that have no value in the Author Name field (in other words, the novels whose Author Name field is blank). To do this, open the application you want and select Customize→“Create a new”→Report. QuickBase asks you which table you want to create the report for; choose the details table (in the example, you’d select Novels).
Report Builder opens. You want to create a Table report (QuickBase has already preselected this option for you). In the Filtering section, turn on the “Show only novels that meet certain criteria” radio button. This expands the section to let you define your filtering criteria. You want to find records for which a particular field, taken from the master table, is blank. For the Library Catalog application, your filtering criterion would look like this:
Author Name is [blank]
Note that the last part of the filter is an empty text box, not the actual word blank.
Click Save. QuickBase asks you to name your report; call it something like Records To Delete. Choose the other settings for your report: whether it’s personal or shared, which roles have access to the report, whether you want to add a description. (Read all about your options for creating reports in Creating a Report from Scratch.) When you’re done, click OK to create your report.
Now, when someone deletes a record from the Authors table, the Records To Delete report shows you all records from the Novels table that are missing an author name. In other words, the report shows you all the “child” records from the details table that have no corresponding “parent” record in the master table.
When you open the Records To Delete report, you can delete all its records—that is, all novels with no data in the Author Name field—with just a few clicks:
Open the Records To Delete report. In the gray bar at the top of the table, click Other.
A context menu appears.
From the context menu, choose “Other Operations on Records in this Report”. (The menu option shows the name of whatever you call the records in this table; in the example, it would say Novels instead of Records.)
QuickBase opens the “Other Operations on Records in this Report” window.
Click Delete to delete all the records listed in the report.
Just to make sure, QuickBase tells you how many records you’re about to delete and asks you to confirm that you really want to delete them.
Click Delete RECORDS? (Again, the word RECORDS is replaced by whatever kind of records you’re deleting.)
QuickBase deletes the records from the application.
Click Close Window.
Now, your Records To Delete report is empty, until you delete another parent record.
Creating this type of report—one that finds details-table records whose parent master-table records have been deleted—offers you a couple of benefits:
In a large application, it makes it a snap to find the records you need to delete. This is way easier than scrolling through a huge table, trying to spot them one by one.
It also gives you a chance to scan all the Records To Delete records before you get rid of them en masse. This way, you can make sure that you don’t delete a novel whose Author Name record was inadvertently left blank, for example, and you have a chance to correct the problem in that record.
Tip
To make sure you know when there are details-table records that need deleting, create an automatic notification to email you whenever the Records To Delete report has new records added. Chapter 4 gives step-by-step instructions for subscribing to change notification emails.
Working with Advanced Fields
You know what it’s like when two people embark on a brand-new relationship—they forget all their old, single friends and start hanging out with other couples. QuickBase tables aren’t quite that fickle, but when two tables hook up in a relationship, they suddenly become open to a whole new set of fields. That’s because these specialized fields only work with tables that are in relationships, where they play very helpful supporting roles. QuickBase has advanced fields that let you look up data from one table and display it in another, create a hyperlink between tables, summarize data from one table in another, and more.
Lookup Fields
Lookup fields come into play when you’ve created a relationship between two tables. A lookup field takes information from the master table and displays that info in the details table. In other words, the details table looks up the contents of a field in the master table and displays it. The cool thing about a lookup field is that when someone updates a record in the master table, that record gets updated in the details table, too—with no extra effort. For an example of lookup fields, see Figure 10-10.

To create a lookup field, you first have to create a relationship between two tables, as described at the beginning of this chapter. Without a relationship, the lookup field has nowhere to go to look up its information. When you’ve got two related tables and you want to create a lookup field in the details table, you do so from the Relationship Properties page:
Follow the steps for adding a new field to a relationship as described in Adding a Field to a Relationship. When you get to the Relationship Properties page, go to the Details Table section and click Add Lookup Field.
The Create Lookup Fields page opens (Figure 10-11).
In the drop-down list, find the master table field that you want to display as a lookup field in the details table. Repeat if you want to create more than one lookup field.
When you’re done selecting fields, click OK.
QuickBase creates your new lookup field.
Note
If you create a lookup field and don’t see it when you display a report, you need to adjust the Custom Columns for that report. The box in Looking for Your Lookup Field? tells you how.

Deleting a lookup field is the same as deleting any other field from a relationship. So if your details table starts looking a bit crowded and you want to delete a lookup field, follow the instructions in Deleting a Field from a Relationship. (When you delete a lookup field from a details table, you delete all the data that field holds—but only from the details table. The field still exists unharmed in the master table.)
Snapshot Fields
A snapshot field is like a lookup field—but frozen in time. A lookup field looks up current data in a particular field from the master table and presents that current data in the details table. A snapshot field snaps a picture of some master table data at a particular moment in time, so when someone modifies the field in the master table, the details table’s snapshot field keeps the original, unmodified value. You can do some cool things with snapshot fields: keep track of who was originally assigned a task, for example, if assignments tend to change frequently, or make sure that a customer who ordered a product at $129.99 pays that amount when the price jumps to $159.99 (or drops to $119.99).
To create a snapshot field, you need to follow these guidelines:
You can only create a snapshot field in the details table of two related tables.
You can create a snapshot field for any field type except the following: File Attachment, Formula, Numeric—Rating, Text—Multiple Choice, and Report Link.
The field for which you create a snapshot must also be a lookup field.
You cannot create snapshots of fields designated as required or unique (Editing a field’s properties).
Keeping those rules in mind, here’s how to set up a snapshot field:
Open the application that contains the details table with the lookup field for which you want to create a snapshot field. Open the Tables page (Customize→Tables) and make sure the Fields tab is selected. If necessary, select the details table from the left-hand list of tables. When all that’s set, click the upper-right Create New Fields button.
The Add Fields page opens.
Name your snapshot field and list its field type, which should be the same type as the associated lookup field.
For example, if you want to create a snapshot field that captures the price of a product when a customer placed an order, you can call the field something like Order Price and designate its type as Numeric—Currency. This new field will hold the snapshot of a lookup field (say it’s called Price).
When you’re finished, click Add Fields.
QuickBase creates the field and returns you to the Fields tab of the Tables page.
Note
QuickBase also shows you a confirmation box asking whether you’d like to add the new field to any custom forms. For now, click “Not right now.”
On the Fields tab of the Tables page, click the name of the new field you just created.
The Field Properties page opens.
Scroll down to Advanced Options near the bottom of the page and find the Snapshots drop-down list. From it, choose the name of the lookup field you want to freeze as a snapshot.
The section expands, offering an “Initialize field for existing records” checkbox. Turn on this checkbox, and QuickBase updates all existing records with a snapshot of the master table record’s current value. If you leave the checkbox turned off, the new snapshot field is blank for existing records.
Click Save.
QuickBase takes you back to the Fields tab of the Tables page. There, Info column now identifies the field you just created (and edited) as a snapshot field.
Shared Multiple-Choice Fields
If you manage a number of tables and applications, then you’ve probably run across occasions when you wished you could take a multiple-choice field from this table and transfer it wholesale into that one. For example, suppose your organization uses five different priority levels for its projects’ tasks and issues: Who Cares?, Low, Medium, High, and Red Alert!. Instead of creating a new multiple-choice field with these choices each time you create a new application, it’d sure save time to share that list among all applications that have a Priority field. And if a new boss arrives and tells you to change Who Cares? to Very Low and Red Alert! to Urgent (some people are no fun), you can make the changes once instead of hunting down all Priority fields in all your tables and applications. Shared multiple-choice fields let you do just that—create one multiple-choice field with a specific list of options and share it among different tables, even among different applications.
Note
Use shared-multiple choice fields only when several tables need access to the same list of choices. Shared-multiple choice fields are not for creating a drop-down list of records from another table—for that kind of list, create a relationship between the two tables and use the kind of record you want in the drop-down list as the reference field. Limit shared-multiple choice fields to times when you need the same list of stand-alone (not linked) choices in several different applications, such as a list of sales territories, business units, priority levels, status designations, and so on.
The first step in creating a shared multiple-choice field is to set up the list of choices to be shared (QuickBase calls this the source multiple-choice list):
Open the application that will hold the source list. Select a table to hold your list.
Or you can create a whole new table (Add a new table) just to hold it.
In the table, find or create the field you want to hold your source list.
This field must be either a numeric field or a text field (but not multiple choice). So if you want to create a source list for priority levels, for example, find or create a text field called Priority and add a record for each priority level you want: If you wanted three priority levels—say, Low, Medium, High—you’d add three records. If you wanted five priority levels, you’d add five records, and so on.
When you’ve finished adding records, click Save.
To make sure you’ve added all the options you want, check your work by selecting Reports→List All to see the records you’ve just added to the table.
After you’ve created your source list, you can share it with other applications:
Open the application that holds the source list and then choose Customize→Tables.
The Tables page opens. Make sure the Fields tab is selected.
If you’re in a multi-table application, select the table that holds the source list. Click the name of the field you want to make a shared multiple-choice field (in the example, you’d click Priority).
QuickBase opens the Properties page for that field. Near the bottom of the page, in the Advanced Options section, is the a checkbox labeled “Allow other applications to access this field as the source for a shared multiple choice list.”
Turn on the checkbox to allow shared access to the shared multiple-choice list.
The section expands, as shown in Figure 10-12.
In the “Applications that may access this field” box, click Add Application.
The Select an Application window opens, containing a list of all your QuickBase applications.
Turn on the radio button of an application you want to share your source list. Click OK.
QuickBase adds the application to the “Applications that may access this field” list.
If you want to share the list with other applications, repeat steps 4 and 5 until you’ve selected all the applications you want. When you’re finished, click Save.
QuickBase saves your selections and returns you to the Fields tab of the Tables page.

Note
Later, if you add applications to the list of applications that can share this field, you won’t see a checkbox in the Shared Multiple Choice Access section (because you’ve already turned it on). Instead, this section lists the applications with access to the field. The Add Application button is still there, though—just click it to share the field with another application.
You’re halfway there. You’ve created a source list and selected some applications to share it with. Now you need to tell the applications with which you’re sharing to go ahead and use the shared multiple-choice field. How you do that depends on whether or not the table you’re sharing the field with already has the same field.
Tip
Besides sharing multiple-choice fields, you can nest subfields inside them. You might do this if, for example, you have a multiple-choice list of sales regions; when a user selects a region, a subfield presents a list of sales reps in that region. See Using Form Rules to Create Nested Multiple-Choice Lists for the details on creating nested multiple-choice lists.
Sharing an existing multiple-choice field
Sticking with the Priority field example, say the table you’re sharing with already has a Priority field, but it has a different set of options from your source list. To make an existing field display the same multiple-choice options as your source list, follow these steps:
Open an application with which you want to share the multiple-choice field and then choose Customize→Tables.
The Tables page opens. If necessary, select the Fields tab.
In a multi-table application, click the name of the table you want. Find the name of the field (Priority, for example) and click it.
The Properties page for that field opens.
Tip
When the field you want to make a shared multiple-choice field already exists in an application, here’s a shortcut to its Field Properties page: From the Table bar, click the name of the Table, and then click Add a New Record. When the Add Record form opens, right-click the field and then choose “Edit the field properties for this field” from the context menu.
Scroll down to the Text Options section and turn on the “Multiple-choice, shared” radio button.
The Draw Choices From section, shown in Figure 10-13, appears.
Click Select Source. When the Select an Application window opens, turn on the radio button of the application that holds your source list, and then click OK.
The Select a Field window opens.
Find the name of the shared multiple-choice field you’ve created. (In a multi-table application, you have to pick the name of the table and the field.) Click OK.
QuickBase lists your choice in the Draw Choices From section. What it shows under Field is a hyperlink. Click this link if you want to open that field’s Field Properties page to make sure you’ve chosen the right field.
Click Save.
QuickBase shares your source list of multiple-choice options with this application. Now, when you click Priority (or whatever field you chose to share), QuickBase offers the options you created in your source list.

Creating a new shared multiple-choice field
If you want to add a whole new field to a table, making the new field shared multiple choice, here’s how to do it:
Open the application you want. If you’re in a multi-table application, Click the table’s name in the Table bar, and then choose Add a New Record. If you’re in a single-table application, click the Add a New Record link. (Either way, the command says Add a New Task, Add a New Work Order, Add a New Lead, or whatever kind of record the table holds.)
The Add Record form appears. (Again, the form displays the name of whatever kind of record you’re adding.)
Decide where on the form you’d like the new field to appear. Right-click the field before it and choose “Add a field after this one” from the shortcut menu.
The Add a Field to a Form page opens.
In the “Select a field” drop-down menu, scroll to the bottom and select <Create a New Field>.
The Create a New Field box appears.
In the Create a New Field box, type a name for your field. Select Text—Multiple Choice as the Field Type, and then click Done.
You can call the field whatever you want—it doesn’t have to have the same name as the shared multiple-choice field. QuickBase returns you to the Add Record form, with your new field added.
Find the new field and right-click it. Then select “Edit the field properties for this field.”
The Field Properties page opens.
Go to step 3 of the previous section and continue from there.
You’ve got a brand new field that displays the choices you created in your source list.
Tip
If you don’t want to use the Add Record form to position your new field, you can take this shortcut: In the application you want, choose Customize→Tables, make sure the Fields tab is selected, and then click Create New Fields. From there, jump to step 4 of the above instructions.
One big advantage of creating a shared multiple-choice field: If you have to change its options, you can edit it once, automatically updating all the applications that share that field. To do so, display a report containing the table that holds your source list. Find the record that contains the choice you want to edit, click its Edit button, make your changes, and then click Save. As easy as that, you’ve updated the field across every application that has it.
Summary Fields
When you look at a table as a Summary report or display its data in a Chart report, QuickBase adds up your data to display a total—the total value of orders, the total number of tasks or work orders assigned, the total cost of purchase requisitions, and so on. Often, seeing this big picture is all the information you want. But sometimes you want to focus in on your data in different ways. For example, perhaps you want to total overdue tasks by team member or total sales by salesperson.
In QuickBase, you generate totals using a summary field. This specialized field takes information from the details table and displays it in the master table, usually calculated as a total. For example, a summary field could total the number of billable hours for each member of your maintenance staff.
Creating a summary field is easy:
In the application that holds the related tables, select Customize→Tables, and then click the Relationships tab. Find the relationship that has the data you want to summarize and click its Edit link.
The Relationship Properties page opens.
At the bottom of the Master Table list (at left), click Add Summary Field.
The Add a Summary Field page opens.
Use the radio buttons to tell QuickBase which field you want to summarize, and then click OK.
As shown in Figure 10-14, QuickBase assumes that you want to create a summary field that shows the total number of details records related to each master record. In this example, QuickBase assumes you want to count the number of work orders (details table) linked to each property/unit (master table).
If QuickBase guesses wrong, you can choose a field yourself. When you turn on the “A summary of a specific field” radio button, QuickBase shows you a drop-down menu that lets you choose what you want it to do with the values in the field you select: Total (add ’em up), Average (find the average value of a numeric field), Maximum (find the largest value or latest date, depending on the type of field), Minimum (find the smallest value or earliest date, depending on the type of field) and Standard Deviation (measure the distribution around a mean).
Tip
You can also set matching criteria to filter the data, directing QuickBase to summarize only certain records from the details table. For example, you might want to summarize only those work orders scheduled for the coming week. When you choose a criterion from the Matching Criteria section’s drop-down list, other drop-down menus appear that let you set parameters. You can set several matching criteria; click the “more lines” button to choose other fields for QuickBase to match.
Click OK.
A confirmation box appears, suggesting a name for your new summary field.
Rename the field if you want (you can usually go with QuickBase’s suggestion), and then click OK.
QuickBase creates your new summary field and returns you to the Relationship Properties page.
![A summary field, which appears in a relationship’s master tables (one-to-many relationships)summary fieldstablesmaster (one-to-many relationships)summary fieldsmaster table (here, Projects), adds up values from the details table (Tasks). When you specify the field you want QuickBase to summarize (here, Days Overdue), you have a choice of how QuickBase goes to work on that field: It can add up the records in that field (when you select the Total option [circled]), average them, find the highest or lowest value (or the latest or earliest date, if you’re working with a date field), or calculate the standard deviation.](http://imgdetail.ebookreading.net/design/12/0596529600/0596529600__quickbase-the-missing__0596529600__httpatomoreillycomsourceoreillyimages297693.png)
Report Link Fields
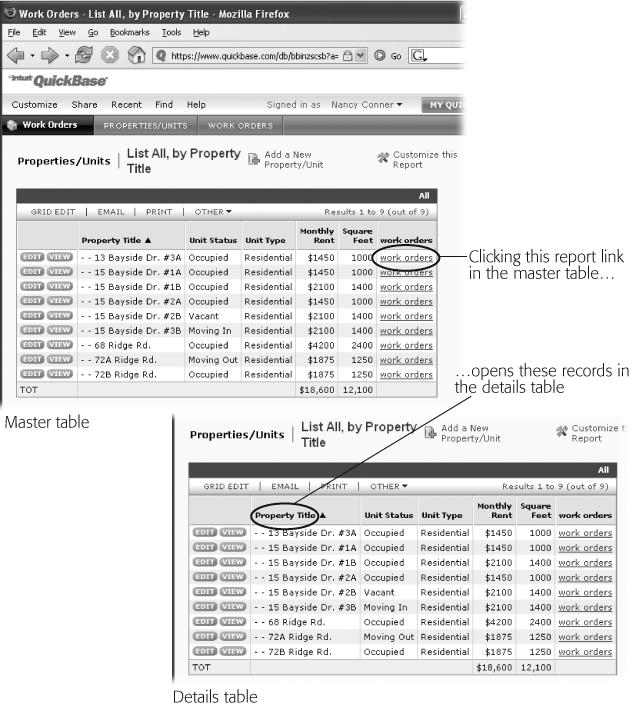
A Report Link field creates a hyperlink between records in one table and records in another, related table. It gives users an easy way to jump between two tables. No need to search for the other table, display it, locate the exact set of records you want, and then find your way back to the first table when you’re done. Just click the Report Link to see the set of related records, and then hit your browser’s Back button to return to the master table. Figure 10-15 gives you an idea of how a Report Link field works.
Create a Report Link field when creating a relationship
When you’re creating a relationship between two tables, QuickBase automatically creates the Report Link fields that it thinks you might need and shows them to you on the Create Relationship—Step 3 of 3 page. (Glance back at Figure 10-4 for a peek at this page.) On this page, QuickBase lists any Report Link fields it’s created in the new relationship and explains what a Report Link field does: “Displays as an embedded report of related records when added to forms.” In plain English, that’s telling you what you just saw in Figure 10-15: a Report Link field shows a link that you can click to zoom over to related records in the details table.
Create a Report Link field between existing tables
To create a Report Link between two tables in an existing relationship, follow these steps:
Add a new field (Add a field) to the table in which you want the Report Link to appear, selecting Report Link as the field type. Then, from that table’s Fields tab (Customize→Tables, select Fields if necessary, and then click the table’s name), click the name of the new field. (It has a fat black arrow pointing to it to help you find it.)
The Field Properties page, shown in Figure 10-16, opens. Because you’ve set the field type as Report Link, the Field Properties page contains a Report Link Options section.
From the Source Field drop-down menu, select your table’s source field—the field that QuickBase uses to match records with the other table.
The source field is a field in the table you’re working in now—that is, the table that will hold the new Report Link.
Next, you’ll select the target field, the field in the other table that holds the records QuickBase displays when a user clicks the Report Link.
Click the Select Target button. When the Select an Application page opens (in a new window), click the radio button of the application you want, and then click OK.
The Select a Field window opens, listing all the fields in the application you chose.
Choose a field, and then click OK.
QuickBase inserts the application and field you chose in the Field Properties page’s Target Field section.
Set your options.
Here are your choices:
Open Target in New Window. It can be helpful to open the target in a new window, keeping the source table open in its window. This lets you refer to the report easily from the form. Report Links typically provide a reference, but when you click a Report Link, you don’t necessarily want to navigate away from the form that you’re currently using (and its data).
Require Exact Match. QuickBase usually requires source and target fields to match perfectly. You can loosen it up a bit by turning off this checkbox. With Require Exact Match turned off, Smith Enterprises and John T. Smith will match, because they’re close but not exact.
Cover Text. If you want the hyperlink to say something different from what QuickBase puts in the box, type it here.
When you’re all finished, click Save.
QuickBase creates your Report Link field.
