
Chapter 11. Automating QuickBase with Formulas, Forms, and Dynamic Rules
You’ve learned the basics of creating and managing QuickBase applications. But with this chapter, you’ll take your applications to the next level. And once you see how much complex applications can do—automate fields with formulas, build custom forms that suck in data from external Web sites, bring your forms to life with QuickBase’s new dynamic rules—you’ll never again be satisfied with a prebuilt application designed by someone else.
Writing Formulas
If the word formula conjures up images of a mad scientist cackling over bubbling potions in a secret laboratory, you’ve been watching too many old horror movies. QuickBase formulas can’t turn Dr. Jekyll into Mr. Hyde, but they can do seemingly magical things to your data by performing powerful calculations. Once you add a formula to a field, QuickBase performs the calculation automatically as your data changes. For example, you might use a formula to figure out the average number of hours each employee worked last month, or to flag the names of people who haven’t turned in a required form. You can write a formula to automatically fill in the name of someone’s manager when that person is chosen in a user field. Formulas can calculate bonuses, fill in the total on invoices, determine sales figures by territory, and much, much more.
Once you get a handle on the different elements that go together in a formula, you can build a formula of your very own to do just about anything you want it to. This section breaks down formulas into their various parts, and then helps you put together your own formulas for use in your QuickBase applications.
The Parts of a Formula
Before you start writing formulas, it helps to understand the different parts that make up a typical formula. Once you understand these building blocks, you can put them together in various ways:
Field reference. A field reference looks up the value inside a field and uses it in your formula. If you’ve created exact forms (Chapter 12) or customized email notifications (Customizing Your QuickBase Emails), you’ve used field references. In a formula, you create a field reference by enclosing the field label in square brackets, like this: [Status] or [Assigned To]. When QuickBase sees a field reference, it displays the contents of the named field or uses them in a calculation (depending on what your formula tells QuickBase to do).
Literal. A literal-minded person is someone who believes exactly what you tell them (they’re the people who call Animal Control when you say, “It’s raining cats and dogs”). In formulas, a literal is similarly precise—it’s a specified value that’s exactly what you say it is. A literal can be numeric or text (enclose text literals in quotation marks). For example, QuickBase responds to the formula “The total is” [subtotal] + 10 by adding the numeric literal (10) to the contents of the subtotal field (say it’s $23.52) and displaying that result along with the text literal, like this: The total is $33.52.
Operators. Operators tell QuickBase how to act on the values it gets from field references and literals. Operators are usually symbols, such as + (add), - (subtract), * (multiply), / (divide), < (less than), > (greater than), and so on, but you can also use these operators: not, and, or. There are two types of operators:
Unary operators. These go to work on a single value. For example, – in front of a number returns the negative value of that number (so –2 returns –2 and ––2 returns 2).
Binary operators. These act on two values, like when you add two numbers together (2 + 4 returns 6) or multiply one number by another (2 * 4 returns 8).
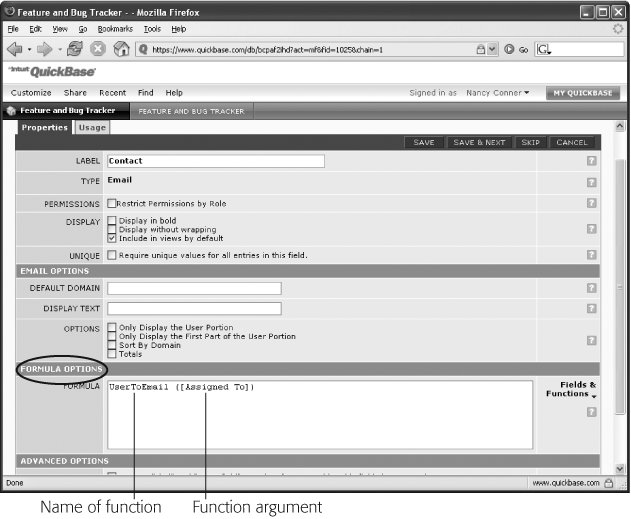
Function calls. If field references and literals are the nouns of your formulas, function calls are the verbs—they make things happen with the values you’ve specified. A function is simply a procedure that returns a value, and a function call is what puts the function to work. A function call has two parts: the name of the function (what you want QuickBase to do) and, in parentheses, the function argument (the values you want the function to work on, as described next). Here’s an example: The Average function returns the average of several values, so the function call Average (3, 18, 165 ) returns 62. Similarly, the Sum function adds up values, so Sum (3, 18, 165 ) returns 186.
Function arguments. Arguments are the values that go inside the parentheses of a function call. You can use field references or literals as arguments. For example, in the function call Sum (15, [price]), the arguments are 15 and [price]: 15 is a literal and [price] is a field reference. This function call adds the number 15 to whatever value is in the Price field, returning the total. The Max argument finds the highest value among several numbers, so Max ([cost], 100) returns either the value in the Cost field or the number 100, whichever is higher. Max (100, 95, 364) returns 364, which is the highest-value argument. Separate arguments with a comma, as shown in the examples.
Tip
For a comprehensive list of functions, start on your My QuickBase page. From its list of applications, click QuickBase Support Center→Formula Functions Reference→All Functions.
Understanding Data Types
Each kind of field has a particular kind of data—a data type—associated with it. Just as you can’t add apples and oranges (orples? appanges?), you can’t put some data types together in a formula. For example, you can’t multiply someone’s annual salary (a numeric data type) by their last name (a text data type). So to make your formulas work, you need to understand a little about data types.
When you write a formula, each field you put in the formula has a data type. So do the field in which you put your formula (see the box Compatibility Check: Are You My (Field) Type?) and the result your formula returns. When you think about formulas and calculations, you probably think about math. But formulas can perform calculations on a variety of information, not just numeric data. There are formulas for text, dates, times, durations, email addresses, and more (the box Compatibility Check: Are You My (Field) Type? has the full rundown). For example, you might write a formula that displays a client’s full name by pulling values from the First Name and Last Name fields. That formula would look like this: [First Name] & " " & [Last Name]. (The double quotes indicate a text literal that inserts a space between the two names.) Or you might want to write a formula that turns on a checkbox to identify employees above a certain salary threshold—$150,000, say. You’d use a Formula—Checkbox field type and write it like this: [Salary] > 150000.
Note
Some formulas act on one kind of data type to produce a new type. For example, in a formula that returns a duration, QuickBase subtracts one date from another to find the length of time between them.
Treat your formula the same way you’d plan a party—make sure the types you invite are all compatible with each other. At a party, incompatible types lead to arguments and a serious drop in the fun factor. In a formula, incompatible types result in an “incorrect type” error message (and it’s no fun when your formula doesn’t work). For example, you wouldn’t try to subtract a date from someone’s first name—those types are incompatible. Knowing which data types can work together will save you a lot of frustration down the road—your formulas will give you the results you’re looking for, and not just major headaches. (And if you meet this unfortunate fate, see “Troubleshooting Formulas” in Troubleshooting Formulas.)
Creating a Formula Field
Once you get a handle on what goes into a formula, you can write formulas to automate calculations on your data. Although the specifics will vary depending on the formula you’re writing, here are the basic steps:
Open the application that holds the table you want. In the menu bar, choose Customize→Tables.
The Tables page opens, with the Fields tab already selected.
If you’re in a multi-table application, click the name of the table you want from the left-hand list of tables. On the Fields tab, click Create New Fields.
The Add Fields page, shown in Figure 11-1, opens.
Give your field a name and select a field type.
You’re creating a formula field, so when you click the “Select a field type” drop-down, scroll to the bottom of the list to select a field type that starts with the word Formula. When you’ve named the field and assigned it a type, click Add Fields.
QuickBase returns you to the Fields tab of the Tables page and displays a confirmation box asking whether you want to add this field to any custom forms.
Unless you’ve already skipped ahead and read the custom forms section, click “Not right now.”
The box disappears.

Now that you’ve created the field that will hold your formula, it’s time to write the formula itself:
From the Fields tab of the application’s Tables page, find the field you just created (QuickBase helps you out by marking the new field with a fat black arrow) and click its name.
The Properties page for that field opens, as shown in Figure 11-2.
Find the Formula Options section and type your formula into the Formula text box. Modify any other settings you want for this field in the other sections of the Properties page. When you’re finished, click Save.
If you’ve messed up your data types, this is when QuickBase lets you know, presenting an error message at the top of the page. (If that happens, see Troubleshooting Formulas for a little troubleshooting.) If it’s all good, QuickBase applies your formula to the field and returns you to the Fields tab of the Tables page.
As you can see, the steps for creating a formula field are easy enough. The trick, of course, is writing a formula that gets QuickBase to do what you want it to. If your formulas are about as cooperative as a two-year-old at bedtime, check out the next few sections to get a handle on the basics of writing formulas, see a few examples, and get some troubleshooting tips.
Tip
If you find yourself squinting at the screen as you type in the Formula text box, here’s a way to avoid straining your eyes trying to read text that’s a couple of sizes too small: Write your formula in a text editor such as Notepad. When your formula’s looking good, copy it, and then paste it into QuickBase’s Formula box.
Formula Writing Basics
If you’re reading this book in English, left to right is a pretty natural flow of information for you. Of course, not all written languages work that way, including Hebrew, Arabic, and Chinese, to name a few. When QuickBase “reads” formulas, it has its own approach, too. It doesn’t start at the left and work its way rightward until it reaches the end. Instead, it looks for the highest-precedence operator—the operator it works with first—and then follows an established order of precedence until it’s evaluated the entire formula. Table 11-1 shows operator precedence in QuickBase.
If you wrote this formula: 5 + 6 * 2, reading from left to right, you’d expect the answer to be 22, because 5 + 6 = 11, and 11 * 2 = 22. But when you look at Table 11-1, you can see that multiplication has a higher precedence than addition. In other words, QuickBase looks for the * operator before it looks for the + operator, doing multiplication first, and then going back through and adding. For your formula of 5 + 6 * 2, QuickBase would do the multiplication first (6 * 2 = 12), and then add (5 + 12 = 17), giving a result of 17.
Humans, however, don’t think like computer programs. You’d find it unbearably tedious to make several passes through your formula, looking for a different level of operator precedence each time. Good thing you don’t have to. You can use parentheses (just like in ninth-grade algebra class) to group certain parts of your formula together. If you wrote the previous formula like this: (5 + 6) * 2, QuickBase still looks for the * operator first, but it multiplies 2 by what’s inside the parentheses, which adds up to 11, giving the answer 22.
So parentheses serve two functions in QuickBase formulas: they group items together and they identify function arguments. You can put sets of parentheses inside other sets of parentheses—that’s called nesting. Just be aware that QuickBase starts from the deepest-nested set of parentheses and works outward from there. And if you type an opening parenthesis, don’t forget to type the closing one, or QuickBase gets confused.
Tip
To make your formulas easier for you to read—for example, to keep track of all those parentheses—you can insert line breaks and extra spaces when you type formulas into the box on the field’s Properties page (which you saw back in Figure 11-2). QuickBase ignores the extra breaks and line spaces, but that white space can make things a lot easier on human eyes.
Example 1: Calculate a Minimum Payment
Your company requires its customers to pay at least $15 per month on their bills; if the balance is less than $15, the customer pays the whole amount. You could go through all the records yourself and compare the current balance against the $15 minimum payment: Customer A owes $134.95, so the invoice requires a minimum payment of $15. Customer B owes just $12.32, so that amount is the minimum payment. But doing those comparisons is not how you want to use your time, so you can write a formula to pass the job over to QuickBase.
You want your formula to tell QuickBase to check the amount in the Balance Due field and compare it to 15, returning whichever amount is smaller. You’re working with numbers, so when you create the new field (call it Minimum Payment), choose Formula—Numeric as the field type. QuickBase now knows that the new field uses a formula, works with numbers, and shows the result as a numeric value.
Next, write your formula. To find the lesser of two values (or the least in a series of values), use the Min function. The formula looks like this:
Min([Balance Due], 15.00)
To fill in the Minimum Payment field, QuickBase looks at the contents of the Balance Due field for each record and compares that amount to 15.00, and then displays whichever is smaller. In other words, it does the same thing you used to do by hand, except now you have time for a second cup of coffee while QuickBase does the work.
Tip
The Min function isn’t restricted to numeric values. It can work with two or more arguments (the values inside the parentheses), as long as the arguments all belong to the same data type. If you use Min with text arguments, for example, it returns the text that comes first alphabetically. If you use it with dates, it returns the earliest date.
Example 2: Keep a Countdown to a Project’s Launch Date
When you want to keep your team aware that the clock is ticking, you can create a field that shows how much time remains between now and the start date of a project or task. To do so, you want to tell QuickBase to calculate a duration and display it as a number—the number of days left. So when you create your formula field (call it something like Days to Launch), assign it the Formula—Numeric field type.
In the Days to Launch field, use the ToDays function, which takes a duration and converts it into a number of days. Here’s the formula:
ToDays([Start Date] - Today())
This formula tells QuickBase to look at the date inside the Start Date field and subtract today’s date from it, returning the difference as the number of days between now and when the project or task will start. Notice that Today has an empty set of parentheses after it. That’s because Today is a function, and a function must always have a pair of parentheses after it, even if they’re empty. The Today function—which simply calls today’s date—doesn’t need any arguments, and so its parentheses are empty. This formula is a nested formula: It has one function (Today) inside another (ToDays). QuickBase starts from the inside and works outward, calculating today’s date before calculating the number of days left before the launch.
If you really want your team aware of how fast that clock is ticking, you can adapt this formula to show how many hours, minutes, and seconds—even milliseconds!—are left before the launch. The function names (as you’ve probably guessed) are ToHours, ToMinutes, ToSeconds, and ToMSeconds.
Example 3: List a Name and Mailing Address in Standard Address Format
If you want to pull information out of a table and display it in the standard format you’d see on an envelope or at the top of a letter, use the List function. This function concatenates (strings together) its arguments, starting with the second argument. The first argument is what tells QuickBase how you want to separate the other arguments from each other. As a simple example, say you want to display client names with the last name appearing first, like this: Fothergill, Algernon.
Here’s the formula that returns that result (assuming, of course, that you have a client named Algernon Fothergill):
List(“,”, [Last Name], [First Name])
Look at the arguments in that function call: The first is a literal—a comma inside quotation marks—which tells QuickBase to insert a comma between items on the list. The second and third arguments are field references, blanks for QuickBase to fill in with the contents of the fields named.
When you use the List function, you’re working with text. (Even if some numbers appear in, say, a mailing address, QuickBase treats them as text.) So when you create your Address Label field, make it a Formula—Text field. Then, write the formula like this:
List(“ ”, [Name], [Address Line 1], List(“, “, [City], [State], [Zip]))
The first argument, /n, means “move to the next line down,” so QuickBase displays each item in this list on its own line. The next two arguments are field references, each displaying its contents on a separate line. The third argument is another function call, this time telling QuickBase to list the contents of the City, State, and Zip fields all on one line, separated by commas. Using this formula displays the data for a particular record like this:
| Algernon Fothergill |
| 1515 Springside Lane |
| Chicago, IL, 60609 |
Using Special Functions in Formulas
Now that you’ve got down the basics of formulas, you can use some special functions to make your data jump through even more hoops.
Tip
A formula field can require unique entries. This is helpful when, for example, you want autonumbered records (in other words, every record contains a different number in that field). To specify that a formula field holds unique entries, click your way to the field’s Properties page (Customize→Tables; on the Fields tab, click the name of the field you want). In the section called Unique, turn on the “Require unique values” checkbox, and then click Save. Be aware that even though the field contains a unique value, you can’t use this formula field as the table’s key field.
The If Function
Lots of times, events can move forward only if something is true: If your lottery numbers came in last night, you can quit your job and book that ’round-the-world cruise. If you forgot to buy a lottery ticket, you can get up with the alarm and join the commuters in seven-thirty-gridlock land. Notice how two very different paths depend on that little word if: If you win the lottery, you’re off on the next luxury liner; if you don’t win the lottery, you’re on your way to work.
If also plays a big role when you’re working with data. Say you want to flag purchase requisitions only if they’re above $100. Or maybe you want to show the total on an invoice if the order status is Complete. Or perhaps you want to calculate a bonus for salespeople if their total sales for the month exceed $250,000. In each case, QuickBase performs a calculation on a record only if that record meets a certain condition.
The If function looks to see whether something is true or false, and then returns one value if true or a different value if false. For example, if you want to flag purchase requisitions over $100, create a Formula—Checkbox field (call it Needs Approval) and give it this formula:
If([Estimated Cost] > 100, true, false)
In this example, QuickBase turns on the Needs Approval checkbox if the amount in the Estimated Cost field exceeds $100.00. If the amount in Estimate Cost is $99.99 or less, QuickBase leaves the checkbox turned off. Note that the field that holds this formula must be a Formula—Checkbox field.
Instead of using a simple checkbox, you could make Needs Approval a Formula—User field and do this:
If([Estimated Cost] > 100, [Requested By], null)
This formula tells QuickBase to return the name of the user who made the request if it’s over $100. If the request is less than that, QuickBase leaves the field blank. (For more on null values, jump to Null Values.)
To have QuickBase total an invoice only if the order is marked Complete, create a Formula—Numeric field called Total and use this formula:
If([Order Complete] = true, [Subtotal] + [Tax], null)
This formula tells QuickBase to check and see whether the Order Complete checkbox is turned on. If it is, QuickBase adds the contents of the Subtotal and Tax fields and displays the result in the Total field. If the Order Complete checkbox is turned off, QuickBase leaves the Total field blank.
To calculate a 2 percent bonus on sales over $250,000, create a field called Bonus, defining it as a Formula—Numeric field. Then use this formula:
If([Total Sales] >= 250000, [Total Sales] * .02, 0)
When QuickBase runs this formula, it calculates 2 percent of any amount that’s $250,000 or more and shows the result in the bonus column. If the amount in the Total Sales field is less than $250K, QuickBase displays a zero in the Bonus column.
The Case() Function
The If function is great in either/or situations, when you want to test whether one field does or does not meet a certain criterion before QuickBase performs a calculation. But sometimes you want to display several possible results, depending on a series of tests. For example, you might want to sort major cities into sales territories. You could string together a whole bunch of If functions, but you don’t have to get that complicated. Instead, you can use the Case function.
To show what sales territory a major city belongs to, you could create a Formula—Text field called Territory and write a formula that looks like this:
Case([City], “Boston”, “Northeast”, “Atlanta”, “Southeast”, “Chicago”, “Midwest”, “Seattle”, “Northwest” )
This formula tells QuickBase to check the contents of the City field: If QuickBase finds Boston, it displays Northeast in the Territory field; if it finds Atlanta, it displays Southeast—and so on.
Your formula might be a little easier to read if you break it up a little, putting the city names and associated territories on separate lines. You can add extra spaces and even Returns to a formula—QuickBase ignores them when it evaluates the formula. So the Territory formula could just as easily look like this:
Case([City], “Boston”, “Northeast”,
“Atlanta”, “Southeast”,
“Chicago”, “Midwest”,
“Seattle”, “Northwest” )
A little easier to follow, no? You can use hit Return to make your formulas more readable, as long as you don’t forget to put in the commas and parentheses that QuickBase needs to understand the formula.
Null Values
Sometimes, a field is empty, blank—this could be because no one’s entered a value for that field, or it could be a formula field that returned no result. A blank field’s value is called null. A null value is not the same as zero. Zero is a number with the numeric value zero; a null field is just plain empty—QuickBase sees it as undefined.
Note
Text fields can never be null. If a text field is empty, QuickBase sees that field as having zero characters. (In geekspeak, that’s known as the empty string value.) Similarly, Boolean (true/false) fields are never null. In a Boolean field, if a value isn’t true, it’s false. If a checkbox isn’t turned on, it’s off. There’s no room for null.
Here’s a quick example to give you an idea of how a null field works. Earlier, you saw this If formula, which tells QuickBase to calculate an invoice total only if the order is marked Complete:
If([Order Complete] = true, [Subtotal] + [Tax], null)
If an order is complete, you know what the total is: the subtotal plus any tax. If an order is incomplete, however, you don’t yet know what the total is, because you don’t know whether the customer will add more items to the order. In that case, you don’t have all the information yet. Since the total is still undefined, a null value makes sense.
There are also functions that make specific use of null values. (To see a complete list, start with the Applications list on your My QuickBase page: click QuickBase Support Center→Formula Functions Reference→All Functions, and then scroll down the page to the Null Handling section.) TheIsNull function works with any data type (except text or Boolean) and returns true if the field referred to in the argument is null; it returns false if there’s any value besides null in the field. You might use IsNull like this:
IsNull([Assigned To])
This formula returns true if the Assigned To field (a user field) is blank (undefined); if the field holds a user, then the formula returns false.
Remember that null is not the same as zero—you can’t multiply by a null value or calculate an average with it. But sometimes you might want to treat null as a zero. For example, maybe at the end of the year you want to figure out the average quarterly bonus that each person on your sales team has earned. If there’s no value in a Bonus field, it means the sales rep didn’t get a bonus. But you still want to include that field in the average calculation—as a zero bonus.
You could use a formula like this:
Average(Nz([Winter Bonus]), Nz([Spring Bonus]), Nz([Summer Bonus]), Nz([Fall Bonus]))
With this formula, if QuickBase finds any null values in your reference fields, it treats them as zeros, including them in the average.
Note
The Properties page for numeric fields, under Advanced Options, has a checkbox labeled “Treat blank as zero in calculations.” When you create a new numeric field, QuickBase turns on this checkbox by default. So you may never actually have to use the Nz function to get QuickBase to look at nulls as zero in numeric fields.
The Fields & Functions Menu
As you saw in the previous sections, writing formulas basically involves combining functions and field references. QuickBase can be awfully picky about the formulas you write. It’s not very good, for example, at guessing what you mean if you make a typo or you call a field Requested when the field’s actual label is Requested By. Fortunately, QuickBase is willing to help you out with getting field names and functions right.
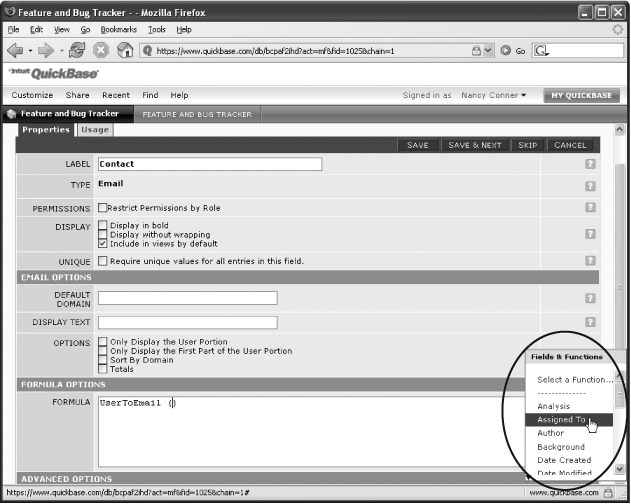
When you’re writing a formula on a field’s Properties page, as soon as you click inside the Formula box, a drop-down menu appears to its right (jump back to Figure 11-2 to see what this looks like). That’s the Fields & Functions menu, which Figure 11-3 shows in all its glory. This menu lists all the fields in your table. When you want to insert a field into your formula, open the Fields & Functions menu, find the field you want, and then click its name. QuickBase slots the field into your formula, complete with brackets.
But that’s not all the Fields & Functions menu does. It can also look up functions for you—taking a lot of the trial-and-error out of getting the syntax right. Finding and inserting a function into your formula takes just a few, quick steps:
On the field’s Properties page (Customize→Tables, and then click the name of the field you want), click inside the Formula box.
QuickBase shows the Fields & Functions drop-down to the right of the box. (You can see it back in Figure 11-2.)
Point your cursor at the words Fields & Functions to see the menu. Choose “Select a Function….”
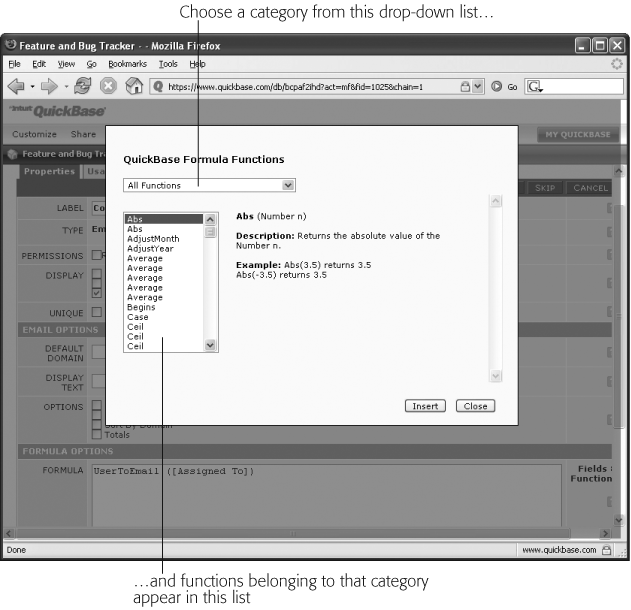
QuickBase opens the QuickBase Formula Functions box (Figure 11-4). This box presents a couple of lists: The top drop-down list lets you select either All Functions or a specialized set of functions (such as Dates Functions or Null Handling Functions). The bottom list shows you functions related to whatever category you choose in the top list.
Make your selections in each drop-down. For example, if you’re writing a formula to create a timestamp, you’d choose Timestamp Functions from the top drop-down and Now from the bottom.
When you choose a function from the bottom list, QuickBase shows the function itself and helpfully gives you both a description of what the function does and an example of how you might use it.
When you’ve selected the function you want, click Insert.
QuickBase inserts the function into the Formula box.
To make sure you get the syntax right, the function includes placeholders for arguments where necessary. This helps you get the required data types right. For example, when you select Begins from the drop-down, QuickBase inserts this: Begins (Text u, Text v) to remind you that this function takes text data types as its argument.
Replace the placeholders with actual values.
In the example, you’d change Begins (Text u, Text v) to something like this: Begins ([Last Name], “a”). This would find all the records where the text in the Last Name field begins with the letter a.
Using Variables in Formulas
When you’re typing out a formula, particularly one that’s long and complex, you probably wish you got paid by the keystroke—or that there were some way to avoid typing the same thing over and over (and over and over) again. Wouldn’t it be nice, for example, if there were a faster, easier way to insert someone’s name into a formula than always typing [First Name] & " " & [Last Name]?
Since most of us don’t get paid by the keystroke, the ability to use variables in QuickBase formulas is a very good thing. A variable is some text that substitutes for a longer segment of code. So it’s best to use a variable for some piece of a formula that repeats several times within that formula. For example, you might want to write a formula that automatically applies a 15 percent discount to customer purchases over $250. The formula calculates the total by multiplying the contents of the Price field by the contents of the Quantity field. So instead of writing a formula that looks like this:
if ([Price] * [Quantity] > 250, [Price] * [Quantity] * 0.85, [Price] * [Quantity])
You can create a variable, perhaps called total, to replace each occurrence of [Price] * [Quantity] in the formula. Doing so will save you some typing and reduce the chance of typos in your formula.
After you’ve defined a variable, you can use it over and over again wherever you need it in your formula. (You can’t, however, use a variable defined for one formula in a different formula—when you want to use a variable in a formula for another field, you have to define it for that field. But isn’t that why they invented Copy and Paste?)
Using variables requires two basic steps:
Define the variable.
Before you can use a variable, you’ve got to tell QuickBase what the variable stands for. You do that at the top of your formula. Here’s how you’d define a variable to insert people’s full names:
var Text fullname = [first name] & " " & [last name];
The first part of the variable, var, indicates that what follows defines the variable. The next part, Text, defines the data type (here, the data type is Text, but in another situation you might use Number or any other data type). Next comes the name you’ve given your variable: in the example, that’s fullname. The equals sign tells QuickBase that what follows is the contents of the variable—in other words, what the variable replaces in the formula. In this example, the variable’s content is [first name] & " " & [last name]. Now you’ve defined the variable, but you’re not quite done. See the semicolon at the end? That’s important. It tells QuickBase that this variable definition is separate from the formula itself—so don’t forget it or QuickBase will get confused.
Type your formula.
Now that you’ve told QuickBase what your variable is and what it stands for, you can create a formula that saves you some typing (and possible mistakes) by using the variable in your formula. To indicate that something in the formula is a variable, stick a dollar sign ($) in front of it.
Suppose you’re creating a formula that will insert customers’ names after their title. It would look something like this:
var Text fullname = [first name] & " " & [last name];
Case([title], “Dr.”, [title] & " " & $fullname,
“Mr.”, [title] & " " & $fullname,
“Mrs.”, [title] & " " & $fullname,
“Ms.”, [title] & " " & $fullname,
“Rev.”, [title] & " " & $fullname,
$fullname)
When QuickBase reads this formula, first it checks out how you’ve defined the variable. Now it knows that every time it comes across $fullname, it’s the same as if you’d typed [first name] & " " & [last name]. This formula then goes on to tell QuickBase to look in the title field; if the title field contains Dr., then QuickBase displays Dr., followed by a space, followed by the contents of the first name field, then another space, and then the contents of the last name field. And so on down the list, whether the title field contains Mr., Mrs., Ms., or Rev. In any case, you’ve just saved your fingers a whole lot of keyboard tapping. Nice.
Note
If the title field is empty or holds something else, QuickBase displays the full name without any title.
Using Formulas to Design Reports
One cool thing you can do with a formula is create a custom column that shows up in one particular report but isn’t really part of the application as a whole. When you have the report open, the column looks and acts just like any other field—but it’s available only in that report. For example, perhaps you don’t have administrative privileges in a particular application, so you can’t add a field, but you want a custom column for your own use. Or perhaps you simply don’t want to clutter up your application and confuse other users with yet another field. Or you may need a formula to create the exact report you want—comparing the contents of two other columns.
Here’s how to use a formula to add a custom column to a report:
Open the report you want to customize and click the upper-right Customize this Report link. (Or, if you’re creating a brand-new report from scratch, open the application and select Customize→Create a new→Report from the menu bar. In a multi-table application, select a table, and then click Create a New Report.)
Report Builder opens. (Chapter 2 tells you all about using Report Builder.)
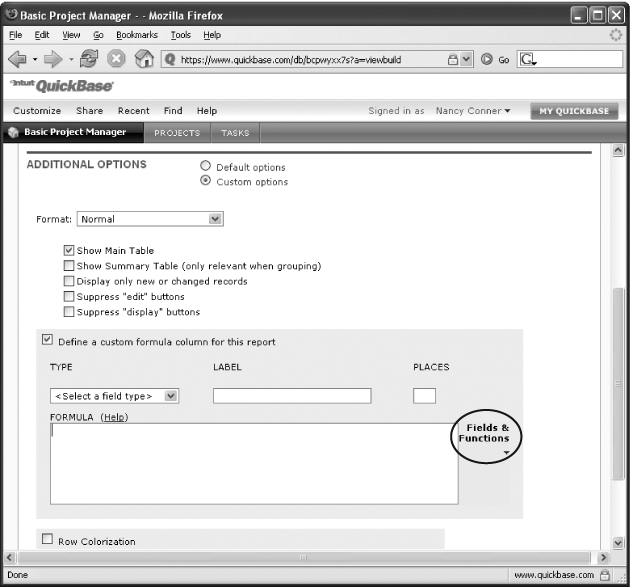
In Report Builder’s Additional Options section (down at the bottom), make sure that “Custom options” is turned on, and then turn on the “Define a custom formula column for this report” checkbox.
The Additional Options section expands, as shown in Figure 11-5.
Choose a field type from the drop-down menu, give your custom column a name in the Label box, and type your formula into the Formula box. (When you click inside the Formula box, the Fields & Functions menu appears to its right—see The Fields & Functions Menu.) To see how the column looks, click Display.
If your custom column fits the bill, click Save. (You can also click Save or Save & Display right in Report Builder.)
QuickBase saves the custom column in this report only.
If you have any experience with formulas, as described in the first part of this chapter, then you know how to create just about any kind of custom formula column. Any kind of formula field you might create for an application can be applied to a column within one particular report. If you want to compare values in two fields, for example, flagging those reps whose sales slid last quarter, you could make your custom column a Checkbox field and write a formula like this:
If(Nz([Q1 Sales]) > Nz([Q2 Sales]), true, false)
QuickBase turns on the checkbox for any sales rep whose second quarter sales are less than their first quarter sales.
Tip
Use the formula field to filter records. In Report Builder’s Filtering section, set a condition like show records where custom column is Yes.
Troubleshooting Formulas
You’ve created a formula field, and everything’s going great. You added a new field, gave it a field type, and typed in the formula on its Properties page. But when you click the Save button, QuickBase returns an error message. Don’t feel bad—this happens to everyone. Testing, retesting, and working out all the bugs are what formula development is all about.
When you write a formula, QuickBase checks for errors in three major areas:
Syntax. Just as your English teacher used to make sure you dotted all your i’s and crossed all your t’s, QuickBase checks your formulas for faulty punctuation or, to use the fancy term, syntax errors. QuickBase looks to see whether you’ve closed all your parentheses and inserted all your commas. If you’ve left out a square bracket or a quotation mark somewhere, QuickBase tells you you’ve made a syntax error.
Validation. You can write a sentence that’s perfectly punctuated, but if it doesn’t make sense, your English teacher would pull out the red pen. Same thing with QuickBase. If your formula’s syntax checks out OK, QuickBase next checks to see if the formula makes sense. Some of the validation issues QuickBase looks for are whether field references refer to actual fields in the table (your field references must match field labels exactly), whether the data types match up, whether those data types work with the operators (The Parts of a Formula) you’ve chosen, and so on. If QuickBase doesn’t understand the formula (even though it made perfect sense to you), you get a validation error.
Evaluation. Evaluation is another word for running a formula. Even if your formula passes its initial tests, QuickBase runs it to make sure it actually works. That way, you won’t run the formula later on and discover that your formula field comes up blank. If you get an evaluation error, it means that even though the formula itself is put together OK, some problem is preventing it from running properly. As with syntax and validation errors, QuickBase reports what it found, so you can figure out the problem.
If QuickBase finds a problem in one of those three main areas, it lets you know by displaying a big yellow error message. Here are some steps you can take to iron things out:
Syntax errors. If there’s a problem with the grammar of your formula, QuickBase tells you there’s a syntax error and shows you where the formula went wrong, underlining the part of the formula it didn’t understand. Look for missing or extra commas, quotation marks, parentheses, and square brackets. Be aware that, unlike your English teacher (whose grammar was so perfect she actually knew the difference between who and whom), QuickBase isn’t always right in its analysis of syntax errors. For example, if QuickBase sees this formula—FirstDayOfPeriod(date, Weeks(2), Date2007,1,1))—it may insist that you’ve included an extra parenthesis at the end. The problem with this formula, however, is not an extra parenthesis: The formula is missing an opening parenthesis between the function Date and its arguments 2007,1,1. The formula should look like this: FirstDayOfPeriod(date, Weeks(2), Date(2007,1,1)). Syntax errors can be tricky to catch, so you might have to try several times before you get all those commas and parentheses right. It’s just par for the course.
Validation errors. The most common kind of error that keeps your formula from flying is when its data types can’t work together. QuickBase calls this an incorrect type error. In this type of error, QuickBase shows you an error message like this: “The types of the arguments supplied do not meet the requirements of the operator,” and then lists the data type or types causing the problem. Take a look at the data types in your formula, and ask yourself the following questions: Are you trying to force incompatible data types to work together? Are you trying to use data types as arguments that can’t produce the data type in your formula field? Are you trying to use the wrong data type with a particular operator or vice versa (for example, are you trying to use the + operator with text, when you should be using & instead)?
Sometimes, though, you need different data types to work together. For instance, you might want to take a duration and display it as the number of days, like the example in Example 2: Keep a Countdown to a Project’s Launch Date. But QuickBase treats duration (a measurement of time) differently from plain-vanilla numbers. Because it’s sometimes useful to make different data types work together, QuickBase offers special functions that let you convert one data type to another, so you can use them in the same formula. These type conversion functions always start with To: ToNumber, ToText, ToDate, and so on. (You can see a whole list of type conversion functions in the QuickBase Support Center. From My QuickBase, select QuickBase Support Center→Formula Functions Reference→All Functions, and then look for the Type Conversion section of the table.)
Other validation errors might spring up because you’ve misspelled a field name or you’re trying to refer to a field that doesn’t exist.
Evaluation errors. QuickBase evaluates (or runs) a formula whenever you display a record that uses the formula or sort a table on a formula field. So evaluation errors can pop up at any time—not just when you first create a new formula field. The major causes of evaluation errors are when someone deletes a field that the formula needs, when your formula relies on another formula field and that field has a problem, or when a field your formula relies on holds weird values (for example, if your formula divides the contents of the Total Hours field by the contents of the Billable Hours field and Billable Hours has some zeros in it, QuickBase runs into a problem because it can’t divide by zero).
Customizing Forms
Computerized or paper, simple or complex, forms are everywhere. They’re the basic mode of interaction between people and information. On a given day, you might fill out a form to apply for admission to a school, to buy a lottery ticket, or to make a restaurant reservation online. Forms are also how QuickBase lets users interact with a single record. Some forms are interactive, others are view-only. When you create a new table (Add a new table), QuickBase automatically creates three forms:
Add. This interactive form consists of blank fields for the user to fill out when creating a new record.
Edit. An Edit form looks just like an Add form, but because it’s for an existing record it already has some fields filled in.
Display. When users click the View button to take a closer look at an existing record, they see this form. You can’t edit a Display form, but you can click its Edit button to open an Edit form.
These built-in forms are plenty to get you started with your QuickBase application, but you don’t have to work with an application too long before you start thinking about ways that you might improve your form. QuickBase makes it easy to modify an existing form by adding new fields (Add a field), deleting fields you don’t need (Delete a field), changing a field’s type (Modify a field), rearranging fields (Reordering fields in the default report), and so on. But why settle? QuickBase lets you tailor data entry to job role, situation, or whatever you want. For example, you can let different roles edit different fields—so employees can change their address and phone number in their HR record but not their salary or benefits. Or you can create a form where, when a maintenance worker changes a work order’s status to Delayed, a required Explanation field automatically appears.
You can create as many custom forms as you need for any application you manage. Custom forms may not eliminate human error from data entry, but they let you minimize it with well-designed forms that guide users through the process of entering or editing data. (For some ideas, see the box in What Custom Forms Can Do.)
Creating a Custom Form
Now that you know what custom forms can do, you’re probably champing at the bit to create one. So here are the steps to follow:
In the application for which you want to create a form, go to the menu bar and select Customize→Create a new→Form. (If you’re in a multi-table application, select a table.) Or, if you prefer to take the scenic route, choose Customize→Tables (if necessary, select the table you want), click the Forms tab, and then click “Create a New Form”.
QuickBase asks you to name the form you’re creating.
Type a name in the text box. For example, the form’s name might show its associated role, like Sales Rep Form or Field Tech Form. If you’re not feeling creative, you can go with the default name, Untitled Form (you can change the name later). Click OK.
QuickBase opens a form editor, with the Elements tab selected. This editor is where you select and configure the fields for your new form.
Select from the offerings on the form editor’s Elements tab, shown in Figure 11-6.
Figure 11-6. When you select and highlight a field in the left pane, you can move it up or down, remove it from your custom form, or insert a different field before it (using the circled buttons at bottom left). The selected field appears in the right pane, where you can tweak the field to make it read-only, required for data entry, and so on (your options in this pane depend on the actual field you’ve selected). To see or edit a field’s properties, click the Properties button (also circled).Tip
Don’t confuse the field’s Properties button with the form’s Properties tab.
Select and configure the different fields that will appear on your custom form. When you select a field in the left-hand pane, configuration options appear in the right-hand pane. Here’s what you can do with a field in a custom form (your actual choices depend on the type of field you select):
Select and reorder fields. When you click a field and highlight it, you can use the buttons below the left pane to move that field up or down the list or to remove it from the form. You can also move fields by using the drop-down lists where field names appear: Click and choose a different field to move up to the current spot.
Use Alternate Label Text.To give the field a different name in this custom form only, turn on this checkbox and type in the new name in the text box that appears.
Read-only. When you turn on this checkbox, users working with this form can only view this field, not delete or modify it (even when they’re using the form to edit a record).
Required. If users must put something in this field before saving the form, turn on this checkbox.
When used for display. This section determines how the form looks when a user clicks the Display button to see a particular record. You have two choices here: display the form as usual (like in the built-in Display form) or embed a report right inside the form. If you want to embed a report, turn on the appropriate radio button and select the report you want from the drop-down menu.
Tip
When you embed a report from another table, that table and the table holding the custom form must have a relationship.
When used for data entry.In this section, you can specify the report on which you want the Record Picker based, which limits the records users can select.
Display when this form is used for. Your choices here are edit, add, view, or any combination of those operations.
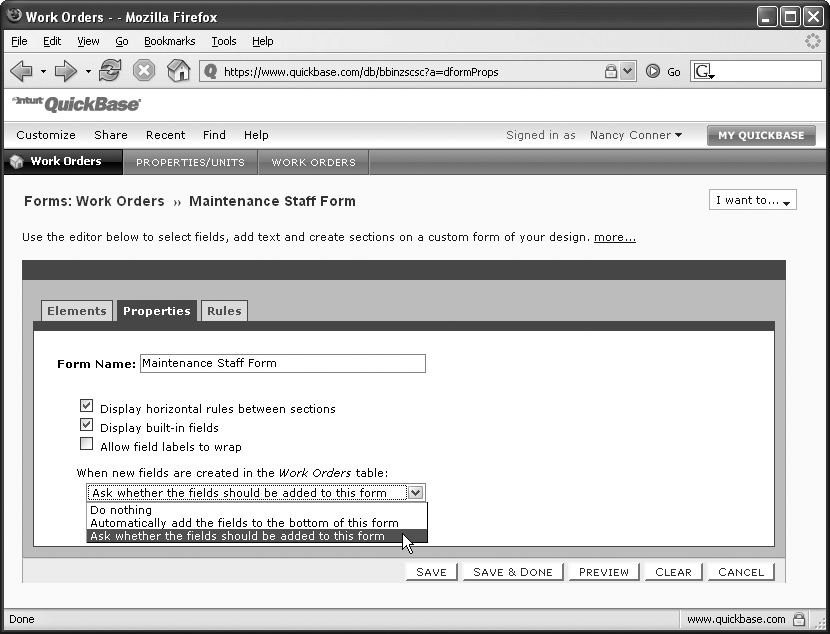
When you’re done working with the form’s elements, click the Properties tab.
This tab lists your custom form’s properties, as shown in Figure 11-7. If you want to change the form’s name, this is where you do it.
Turn on or off the Properties checkboxes as you wish. Use the drop-down to tell QuickBase how the form should act when new fields are added to its table: do nothing, ask whether to add the fields to this form, or automatically add any new fields to the bottom of this form.
If you want to create dynamic rules, click the Rules tab and take a look at Dynamic Forms.
Click Save or (if you’re finished creating custom forms for now) Save & Done.
QuickBase creates your custom form.

Working with Embedded Reports
When you have two related tables, such as Customers and Orders, it can be super helpful to see approrpriate records from the details table when you’re looking at a form in the master table. (In a relationship, the master table and details table have a one-to-many relationship; for example, one customer can have many orders. In that example, Customers is the master table and Orders is the details table.) When you’re looking at the form for a particular customer, it’d be nice to see that customer’s orders at a glance. And that’s just what embedding a report lets you do. When you embed a report inside a form, opening the form shows you related records from the details table.
But it gets even better. Once you’ve embedded a report in a form, you can edit that report’s records without leaving the master form. (A master form is simply a form in the master table.) What that means is that you can make and save changes to the details table without navigating all the way over to that table, then finding your way back to the master form. Quick, convenient, and oh so easy. This section shows you how to get those detail records into a master form, and how to edit them once they’re there.
Embed a report within a form
Note
Not sure which is the master table and which is the details table? Select Customize→Tables, then click the Relationship tab, which shows you all the relationships in which a table is involved. The master table is on the left; the details table is on the right.
Embedded reports are possible only in the context of a relationship between two tables. So first, make sure that the tables you’re working with are related. (If not, it’s a snap to create a relationship.) Next, determine which is the master table and which is the details table. This is important, because you can embed reports inside a master form only. Figure 11-8 shows a report embedded in a form.

Once you know which table is the master table, you can embed a report from the details table in a master form. Just follow these steps:
In the master table, display the form in which you want to embed a report. To do this, open a report that shows the master table’s records, then click the View or V button (which one you see depends on how you’ve set your user preferences) to the left of a record. For example, for the Customers table, you could display List All, choose any record in the table, and click its left-hand View or V button.
QuickBase displays a form for the master table.
In the upper-right part of the form, click the “Customize this Form” link. From the menu that pops up, select “Edit the layout of this form in the Form Builder.”
Form Builder, shown back in Figure 11-6, opens.
In the left-hand list of Form Elements, find the Report Link field. In the master table, the contents of this field display as a link. When someone clicks the link, QuickBase opens a report that shows relevant records from the details table. Usually, the Report Link field is named after the details table, so in the example, it’s named Orders. When you’ve found the Report Link field, click the little blue arrow to its left.
QuickBase shows information related to this field in Form Builder’s right pane, as shown in Figure 11-9.
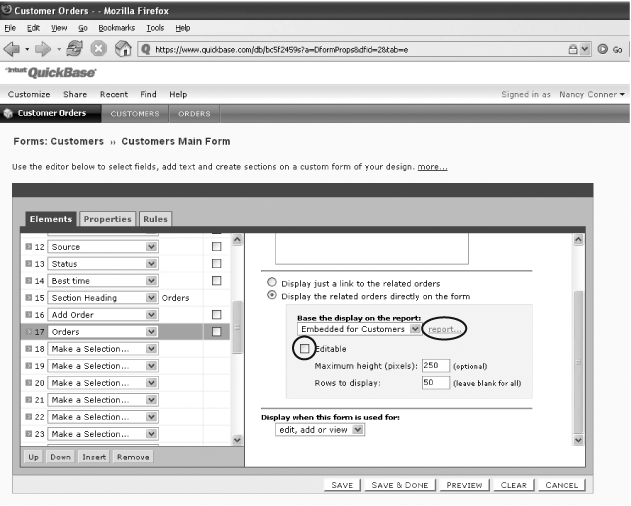
In the right-hand pane, turn on the “Display the related records directly on the form” radio button. (In the example, the records being displayed are orders). Turning on this radio button tells QuickBase that you want to embed a report that shows the related records. If you turn on the other radio button instead (“Display just a link to the related orders”), QuickBase does just that—the form displays a link to the related records, not a report that shows the records themselves.
Figure 11-9. When you turn on the “Display the related records directly on the form” radio button, a new section appears in Form Builder, giving you options for setting up your embedded report. You can choose a report from the drop-down list (although normally you’ll want QuickBase’s default suggestion here). To tweak a report in Report Builder before you embed it, click the “report” link (circled). Turn on the Editable checkbox (also circled) to give users the power to work with records from the details table at the same time they’re working in the master table’s form. You can limit the size of the embedded report and define the kinds of forms (edit, add, view, or a combination of these) that display the report.The section expands to give you some options:
Base the display on the report. Use this dropdown list to select the report you want to embed.
Editable. Turn on this checkbox if you want users to be able to edit the embedded report from this form. That means that the report will appear as a Grid Edit report when the form is in add or edit mode. (For more about editing embedded reports, see the next section.)
Note
You might find that a report has already been embedded in a master table’s forms. For example, many prebuilt applications are set up this way. When you make an existing embedded report editable, make sure you remove any formula—URL fields for adding detail records that might be hanging around. This kind of field, which appears as a button or a hyperlink, lets users add new records to the details table from a master form. Because you’re making the embedded report editable, giving users even more flexibility, you don’t need that formula—URL field any more (and it might be confusing). Read about deleting fields here.
Maximum height (pixels). This setting, which is optional, lets you limit the height of the displayed report. (After all, you don’t want the report to get so big you can’t see what’s on the master table’s form!)
Rows to display. This is another way to keep an embedded report from sprawling. Use it to set the maximum number of rows that appear in your embedded report. Say you set the max to 10 rows, but a particular customer has placed 82 orders. In that case, QuickBase divides the report into several pages, each with a maximum of 10 rows. Users can navigate through the pages to find a particular record. All the records are there; they just don’t display at the same time. (If you don’t want to limit maximum number of rows in this way, simply leave this box blank.)
Make your selections. Then, if you want your embedded report to appear only in a particular mode, take a look at the “Display when this form is used for” drop-down menu. You can have the form show up in the mode of your choice—edit, add, view—or any combination of those. When your choices are all set, you can preview how the form will look by clicking the Preview button.
A new window opens, showing your the form with its embedded report.
When you’re all set, click Save & Done.
QuickBase embeds the report in your form and takes you back to the form you were customizing.
Edit an embedded report
Viewing an embedded report is only half the fun. If you turned on the Editable checkbox when you embedded a report in a form, people who use your application can add or edit records in the details table without leaving the master form, which can be a great timesaver. For example, imagine you’re setting next year’s sales targets for your sales reps—wouldn’t it be convenient to add new opportunities at the same time, then save everything with just one click? Or if you’re defining a new task for a project, you can add related issues for the new task, with no need to navigate between forms.
An editable embedded report looks like a Grid Edit report, as Figure 11-10 shows. And you work with it in just the same way—a lot like editing an Excel spreadsheet. Click a cell in the report to select it (a thick black outline surrounds the cell); double-click to edit the cell’s contents (the outline becomes red).
Note
You must be looking at a form in add or edit mode (not just view) to edit its embedded report.

You can probably think of all kinds of situations where the ability to edit embedded reports will make life easier for your team. But there are a few times where editable reports aren’t so helpful. This is simply due to the nature of Grid Edit reports: They don’t show totals or subtotals. So if you want the embedded report to show averages or totals, you don’t want to turn on the Editable checkbox.
Similarly, Grid Edit reports don’t show running changes to formula fields as users change the data in the fields the formula requires. If users need to be able to see those running changes as they work, an editable embedded report isn’t going to help them much—they’ll have to keep clicking Save to see how the formula fields have changed. And if the details table is a document library that stores attached files, there’s not much point in creating an editable embedded report, because you can’t upload documents in Grid Edit mode. Finally, form rules don’t work in Grid Edit mode, so if you’ve set up such rules for the details table, don’t use editable embedded reports. Bottom line: if you wouldn’t use a Grid Edit report for working with the data in your details table, don’t make embedded reports from that table editable.
Dynamic Forms
Custom forms are great, but adding dynamic rules to your custom form is a lot like putting a cape and a spandex jumpsuit on a mild-mannered average Joe—it elevates your form to superhero status. Dynamic rules let your form change with the situation: If a purchase order’s status changes from Pending to Approved, for example, QuickBase can automatically fill in the Date Approved field with today’s date. If a task’s status changes from Planned to Started, QuickBase can note the start date and adjust the projected completion date. If, on the other hand, a task’s status goes from Planned to At Risk, QuickBase can show and require a Comments text box where the user must type in the risks involved. How cool is that?
You can write dynamic rules for a custom form when you first create a custom form—if you’re doing that, these instructions jump in at step 4 of creating a custom form (Creating a Custom Form). You can also add dynamic rules to an existing form. To do that, first find the form you want on the Tables page (Customize→Tables, select the table if necessary, and then click the Forms tab). Find the form you want and click its Rules button. This takes you straight to the form editor’s Rules tab (Figure 11-11).
Note
If a table has only one form, you won’t see a Rules button on the Tables page’s Forms tab. In that case, the Forms tab has a link that says, “Edit the Rules for the form”. Clicking that link takes you to the form editor’s Rules tab.

On Form Builder’s Rules tab, click the Add New Rule button. When you do, QuickBase automatically starts writing out the rule for you in the Rules box. As you make selections from the following areas, QuickBase revises the sentence in the Rules box to reflect your choices:
Set the condition
A rule’s condition defines its trigger—the circumstances under which you want QuickBase to take some action. There are three parts to the condition, represented by the three drop-down lists under the word When:
A form element. Possible elements include the record itself, the user looking at the record, a field inside the table, or a combination of elements.
An operator. Your choices in the second drop-down list depend on what you chose for the first, but this list holds different operators, such as is, is not, is greater than, is less than, and is equal to. So if you pick The user in the first list, the second drop-down list offers is in the role and is not in the role (you’ll pick the role in the third list). If you choose The record in the first list, the second offers is opened and is saved. If you choose a numeric field, like Subtotal or Billable Hours, you can choose among these operators: is, is not, <, < or =, >, and > or =. (For more info on operators, jump back to Formula Writing Basics.)
Set criterion. QuickBase knows what it’s looking for in a condition and what the operator is, but it needs one more piece of information before the trigger is complete. If you’ve selected, for example, The user and is in the role in the first two drop-downs, you need to tell QuickBase what role you mean. Or if you’ve selected Estimated Cost and > or =, QuickBase needs to know the threshold amount. The third drop-down list completes the condition that makes QuickBase take a specific action. You’ll define that action in the next section.
Much of the time, you’ll have several conditions come together to trigger an action. For example, you may want to specify that the user is in the role of Maintenance Person and the contents of the Assigned To field match the current user before you put a rule into effect—which could indicate Millie the plumber looking at her own assigned work orders. Or you might want any of several different conditions to trigger the same action. In either case, you can choose Multiple Conditions from the leftmost When drop-down list or click the Add Condition button. Either action adds more lines to the When section. You specify whether all the conditions must come together to activate the rule or whether any one of the conditions in the list can cause QuickBase to act.
Specify the action
You’ve set up the trigger, the condition that needs to be in place for the rule to take effect. Now it’s time for a little action. This section tells QuickBase what to do when it encounters the trigger you defined in the When section. The actions you can choose from depend on the choices you’ve already made, but these are typical actions you can set up with a rule:
Change a field’s value.
Show a particular field (the field must be an element in the form for QuickBase to show it).
Hide a field.
Require a field (or remove its required status).
Make a field read only.
Allow the user to edit a field.
Display a message.
You can make more than one action happen in response to a condition or set of conditions. Click the Add Action button to add more lines to the Action section.
As you work on rules, you might want to make some changes, like maybe you realized that you hid a field that’s also required (meaning users can’t save the form because they can’t see the field that they have to assign a value before they can save!). If you want to remove a condition or an action without clearing the whole form and starting over, click the leftmost drop-down menu of the rule or condition you want to get rid of, and then select <remove this condition> or <remove this action>. After you’ve set up all the rules you want to apply to this form, click Save or Save & Done. (You can also click Preview to take a peek at how these rules will affect the form.)
Using Form Rules to Create Nested Multiple-Choice Lists
Nesting helps you keep forms uncluttered and accurate by showing a field only after a user has made a choice from a drop-down list. When you select from a multiple-choice field, a new field appears, showing options related to your selection. You can nest a field inside a field inside a field in this way.
Here’s an example of how nesting works: An application that tracks inventory for a used car dealer might have a multiple-choice field that lists makes of cars: Audi, Chevrolet, Ford, and so on. When someone chooses a make—Toyota, say—another field displays all the relevant models: Avalon, Camry, Corolla, and all the other options. If a user chooses a different make—like Honda—the form displays Honda models instead (Avalon, Civic, Element, and so on). This kind of nesting helps keep the data accurate: people can’t select Ford Camrys or Toyota Civics by mistake. It also keeps the form nice and clean by hiding irrelevant multiple-choice fields: you don’t need to see Chevy or Honda models if you’ve chosen Ford as the make.
Once you understand how to create the rules that govern dynamic forms, creating nested forms is easy. They take a bit of setting up, but the fine-tuning they offer is worth the effort.
Before you start adding fields to your application, take a few minutes to map out your needs. How can you organize the fields and subfields to make the most sense to your users? In the car dealer’s inventory application, for example, you might start off with Make as the main field, then have Models as subfields, and then Editions as a subfield of relevant models. Or you might start off with Vehicle Type (car, truck, SUV, and so on), then list relevant body types (convertible, hatchback, station wagon) as a subfield of Vehicle Type.
Once you’ve decided on a structure for your fields and their subfields, it’s time to get busy nesting them. First, open the application you want to add fields to. From the menu bar, select Customize→Tables. (If you’re in a multi-table application, choose the appropriate table from the left-hand list.) Click the Fields tab (if it’s not already selected), and then click the upper-right Create New Fields button. This opens the Add Fields page. Add as many fields as you’ll need, choosing Text-Multiple Choice as the field type for each. (You can also add fields later, if necessary.)
Tip
Make the names of your subfields specific. In the car dealer example, for instance, the Make field will have several choices: Ford, Chevrolet, Honda, and so on. Each make gets its own specific subfield, so the subfield names should reflect that: call them Ford Model, Chevy Model, Honda Model—you get the idea. This naming system will make your life a whole lot easier when you create the rules that tell QuickBase when to display each subfield.
After you’ve clicked Add Fields to get the new fields into your application, QuickBase takes you through each field, asking for the choices that will appear on that field’s drop-down list. You can provide the choices now, or you can do it later by editing the field.
When you’ve created your fields and subfields, the next step is to tell QuickBase when to display what—that’s how you nest the fields inside each other. To do this, write a series of rules to make the form dynamic, showing a subfield only when someone chooses its corresponding selection from the main list.
To write rules, select Customize→Tables. If necessary, select the table you want. Click the Forms tab, then click “Edit the Rules for the form” to get to the page shown in Figure 11-8. This is where you write your rules, selecting the conditions under which QuickBase displays a particular submenu on the form. Here’s how that might look in the car example:
| When Make is Audi, show Audi Model. |
| When Make is Chevrolet, show Chevy Model. |
| When Make is Ford, show Ford Model. |
And so on, as Figure 11-12 shows.

You can also nest yet another multiple-choice subfield inside a subfield. For example, if someone selects Toyota from the Make drop-down list, then Corolla from the Toyota Model drop-down list, you might want to have a Corolla Edition list appear that offers choices representing the different special editions of that model: CE, DX, LE, or none. To do this, you’d first create this rule:
| When Make is Toyota, show Toyota Model. |
Then follow it with this rule:
| When Toyota Model is Corolla, show Corolla Edition. |
You need to create these as two separate rules, rather than two conditions within one rule, because you’re setting up two separate actions: You’re telling QuickBase, “When someone chooses Toyota in the Make field, then you can display the Toyota Model field—don’t display any Model field at all before you have the Make info. Then, once you know the Model is Corolla, go ahead and display the Corolla Edition field.”
After each rule you write, click Save. When you’ve written rules for all your subfields, click Save & Done. That’s it!
Tip
After you’ve created some nested subfields, you can create different reports that focus on the info you want to see. In the example, you might create a separate report for each make of car, while hiding subfields from List All.
Collecting Data via Web Page Forms
Before there was the Web, gathering information from your customers was about as efficient as sending smoke signals. You either transcribed people’s names, addresses, favorite colors, and so on over the phone, or you somehow convinced them to fill out and mail in a form (and crossed your fingers that what they wrote was legible). Enter the Web page form, that handy online receptacle that’s perfect for capturing reams of neatly organized data. Problem is, you’re a QuickBase maven, which means to score big efficiency points, you probably want to create a Web form that automatically funnels info directly into QuickBase. You’re in luck! And here’s the best part: Once you set up a Web-form-to-QuickBase pipeline, your customers don’t need QuickBase accounts. In fact, they don’t even need to know you use QuickBase—all the magic data collection happens behind the scenes.
Note
For this setup to work, of course, you need a Web site. But those are getting easier than ever to create. Both Google and Yahoo, for example, offer simple page-creation tools; for advice on building a more complex site, check out Creating Web Sites: The Missing Manual.
QuickBase-friendly Web forms are easy to create using QuickBase’s handy Form Creation wizard. You simply tell the wizard which fields you want to appear on your custom form, and QuickBase generates all the necessary HTML code, which you then paste into your site. Even if you’ve never written a lick of HTML before, don’t worry—this section walks you through every step. In no time at all, you’ll know how to create spiffy Web-based forms like the one shown in Figure 11-13.

First Things First: Setting up Your Application
Before creating a Web page form, you first need to tweak a few things in the QuickBase application that you want to act as the receptacle. First, you’ll set up and assign a role that gives anyone on the Internet—whether or not they have a QuickBase account—limited, input-only access to your application. Then you’ll make sure your application’s table’s fields are set up to collect exactly the info you want.
Creating a role
In QuickBase, a role determines the level of access someone has to your application. As an application manager, you can create and assign roles to make sure that people use your application as you intend. When you put a form on your Web site that lets anyone send information to your QuickBase application, you want to be sure of two things:
Anyone can add a record to the appropriate table. This means you can collect data, such as names and addresses for a mailing list, from anyone who visits your Web site.
Not just anyone can see, modify, or delete the information the application holds. Confidential info remains confidential, and there’s no unauthorized messing around with you QuickBase application.
To make sure both these conditions are true, you need to create a role just for Web site visitors. Here’s how:
Open the application you want them to have access to, and then click either Customize→Create a new→Role, or Customize→Application→Roles→Create a new Role.
QuickBase asks you to name the role you’re creating.
Give your new role a name like Customer or Subscriber or Tenant—whatever describes the kind of person who’ll fill out your form—and then click OK.
QuickBase takes you to the Roles page for your new role, shown in Figure 11-14, which is where you specify what people in this role can and cannot do.
On the Permissions tab of the Role page, turn on the Add Records checkbox.
This lets them send you information (but not mess with the data already in your application). Be sure that this is the only permission this role has—no viewing or adding records or otherwise messing around with the application.
Click Save to create the role.

Tip
When you’re working in a multi-table application, the Permissions tab of the Create a New Role page shows a separate set of permissions for each table in that application. Make sure that you grant Add Records permission only for the specific table you want the records added to.
Assigning users to the new role you just created
You’ve created a new role, but so far it’s like a new car with no one to drive it. You need to assign a user to the role so that users can take it out for a spin. In this case, the user will be a group: anyone with Internet access. That way, everyone who visits your Web site and fills out your form can add a record to your application.
To assign users to a role:
Go to the appropriate application and select Share→“Manage users” to get to the Users page.
On the Users page, click the Add Users tab, which takes you to the page shown in Figure 11-15.
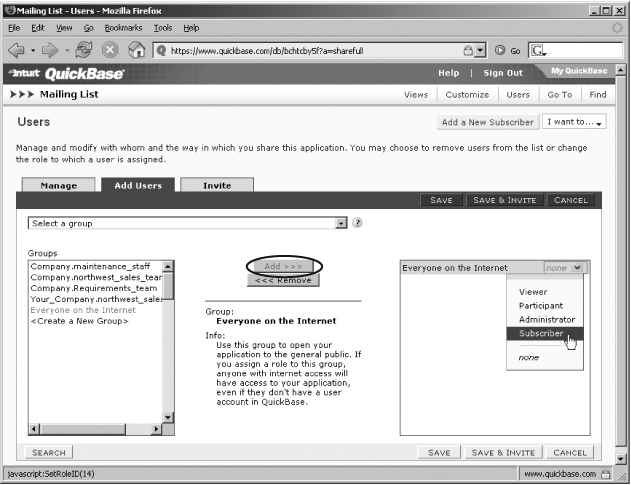
From the drop-down menu just below the Add Users tab, choose “Select a group”.
When you do that, you’ll see any groups you’ve created listed in the left-hand box along with some groups that come with QuickBase, like “Everyone on the Internet”.
Select “Everyone on the Internet” by clicking it, and then click the Add button to add it to the box on the right.
When “Everyone on the Internet” shows up in the right-hand box, a drop-down list appears next to it. This list shows the role assigned to the group; initially it says, “none”. Click the arrow next to “none” and, from the list that appears, select the new role you created (Customer or Subscriber or whatever you named it).
QuickBase asks whether you’re sure you want to grant everyone on the Internet this role. Click OK, and then click Save to assign the role.
Now, anyone who visits your Web site can add records to your application.
Checking your application’s table
If you’re throwing a dinner party, you don’t want your guests to arrive before the table is set. Likewise, you want your QuickBase table all set before everyone on the Internet starts adding records to it. So it’s a good idea to look over your table before creating your Web page form. Ask yourself these questions: Do the fields in the table match the fields in your form? Are there any fields you want to require users to fill out, such as name and email address? Do you need to change the order of the fields? (When you run the Form Creation wizard—as described in the next section—you can choose the fields you want to appear on the Web form, but you can’t reorder them at that point.) And if you’re including a phone number field, you need to handle it a little differently than other fields (see the box in Sorry, Wrong Number).
To add fields or change a field’s properties (Adding and Modifying Fields), go to the Fields tab of the Tables page (Customize→Tables) and make the adjustments you want. For example, if you notice there’s no field where subscribers can enter their email address (a must if you’re collecting names for an email newsletter), you can use the Fields tab of the Tables page to add an email field. Or if you want to make certain fields required (like that email address field), the Fields tab is also the place to go.
The Form Creation Wizard
Now that your application is properly set up, you’re ready to create the form for your Web page. You can muck around with HTML and Web developer tools if that’s how you get your kicks, but the fastest, simplest, most foolproof way to create a Web form is to use QuickBase’s Form Creation wizard. The Form Creation wizard helps create all the HTML you need; all you have to do is copy the code and then add it to your Web page.
To get to the Form Creation wizard, fire up your Web browser (either Internet Explorer or Firefox) and go to: http://tinyurl.com/2hwdqw. In just four easy steps, the wizard generates HTML that lets you put a QuickBase form on your Web site:
Choose a database.
When you start the Form Creation wizard, you see a drop-down list of all your QuickBase applications and tables, alphabetized by application name. Select the application and table you want, and then click Next. The wizard shows you a list of all the fields that are in the table you’ve chosen.
Select the fields you want to display on your Web page.
To select multiple fields, hold down either the Shift key (to select fields listed next to each other) or the Ctrl key (to select fields scattered around the list) as you click your mouse button. Once you’ve selected the right fields, click Next.
A new page opens. Here, the wizard asks you to type the URL of the Web page you want visitors to see after they’ve filled out your form.
Type in the address of the page you want to use as a confirmation page.
This can be a special confirmation page that says “Thanks for filling out our form!” or your site’s home page. (Because the URL needs to start with http://, the wizard has already filled that part in.) After you’ve typed in the URL, click Make My Custom Form.
Faster than the world’s most lightning-fingered HTML expert, the wizard generates the HTML that lets you put your custom QuickBase form on your site. Figure 11-16 shows what the wizard-generated code looks like.
Copy the HTML for your form.
An example below the text box shows you what the form will look like—take a quick glance to make sure it looks okay. If it does, click inside the text box, press Ctrl+A to select all the text in the box, and then press Ctrl+C to copy it to the Clipboard. (If you want to make changes, such as reordering the fields, you’ll need to make those changes in your QuickBase application, and then run the wizard again.)
Now you’ve got all the code you need. Paste the HTML from your Clipboard into your Web page’s HTML editor (Ctrl+V), and then publish the form on your site.

Note
After you’ve copied the Form Creation wizard’s HTML, don’t click the Save button at the bottom of the page. This button isn’t part of the wizard (who’s hung up his magic wand and gone home); it’s part of your new custom form. So if you click Save, you’ll add a blank record to your application. If you want to take the new form for a test drive, you can fill in the fields and click Save, and then check out the new record you’ve just added to your table.
Now, when someone fills out the form and clicks Save, the new record automatically appears in your QuickBase application. (If you have the table open when a new record arrives, then you’ll need to refresh your screen to see the new record.)
Note
The HTML that QuickBase generates corresponds to how your table’s fields are set up right now. If you want to change the form you’ve put on your Web page—make some fields required or change their order, for example—you need to make the changes in your QuickBase application, run the wizard again, and then copy and paste the new HTML into your HTML editor and republish the page.
Customizing Your Form
The Form Creation wizard is good, but it’s not a mind-reader. For example, the wizard automatically gives your custom form a header that matches its name in your QuickBase application, without asking whether you want a different header on your Web site. Fortunately, it’s easy to change the form’s header and even add a little explanatory text. All you need to do is tweak the HTML slightly, which is easy—the steps below show you exactly what to do.
Say you’ve created an application called Mailing List to hold information about your company’s newsletter. Your Web form lets visitors to your site sign up for your newsletter by submitting their names and addresses. When QuickBase creates your Web form, the form’s header matches the name of your table: “Mailing List: Subscribers” (see Figure 11-17). Not too welcoming, is it?

You can change what this header says and even add a line of instructions about how to fill out the form. Here’s how:
Open your HTML editor and paste in the wizard-generated HTML that you’ve saved to your computer’s Clipboard.
The header appears right at the beginning of the HTML, surrounded by header tags. The section you want looks like this:
<h2>Mailing List:
          Subscribers</h2>
Delete the text between the <h2> and </h2> tags and replace it with the text you want, so it looks something like this:
<h2>Subscribe to Our
          Newsletter!</h2>
Now, Web browsers will display your new header.
If you want to add a line of text below the header but above your form, insert the text between the </h2> tag and the <form name> tag that immediately follows it. Use <p> tags, like this:
<p>Fill out this form to
          receive our very next newsletter:</p>
Now, when you publish this HTML on your Web site, it will display your new header and text. Your form will look just like the one in Figure 11-13.
Tip
To see what your form will look like before you publish it on your Web site, paste the HTML into a text editor such as Notepad. When you’ve made any changes you want, save the file in text format by selecting File→Save As. The Save As dialog box appears. Give your file a name that ends with .html, and in the “Save as type” drop-down menu, select Text Document. Save the file and confirm that you want to save it in Text Only format.
Next, in your Web browser, select File→Open (if you’re using Internet Explorer) or File→Open File (if you’re using Firefox). Find the file you just saved and open it. Your browser shows you the file as it will display on a Web page. If you want to make changes, go back to your text editor, make the changes, save the file, and click your browser’s reload button.
The QuickBase API
If the first thing that comes to mind when you hear API is Air Pollution Index or the American Petroleum Institute, you can probably skip this section. But if you know that API stands for application program interface—which offers the building blocks that let a programmer create a program to communicate and work with QuickBase—then read on. The folks at Intuit have made it easy for you to write your own programs to work with QuickBase by creating the QuickBase API.
An API is a set of routines, calling conventions, and tools that let one program use features provided by another. If you’re a developer (or just someone who knows a thing or two about programming), you can use an API to build programs that are consistent with a particular operating environment—in this case, QuickBase. The QuickBase API offers a reliable, stable interface that lets you write programs to access your QuickBase tables.
What Can the QuickBase API Do?
The QuickBase API lets you write programs for these tasks:
Add, modify, or delete records.
Change an application’s permissions.
Add or delete fields.
Change a field’s properties.
Find database IDs by database name.
Copy a database.
Retrieve records one at time.
Find records by executing queries.
Retrieve and modify the schema of an application.
Build your own Web applications on QuickBase, such as a generic data entry form for your own Web site.
Automate back-end processes, like nightly updates of your data.
The QuickBase API works with any environment that supports HTTP POSTs and GETs (methods used to send data from a Web page). That includes, but isn’t limited to Perl, Java, Visual Basic, C, C++, Python, Cold Fusion.
Tip
If you’re not a programming whiz and you think the QuickBase API can do some cool things for your applications, talk to someone in your company’s IT department. By bringing them onboard, you can automate your applications in the ways listed above.
Online API Resources
To get started using the QuickBase API, check out QuickBase’s extensive documentation: From your My QuickBase page, look in your list of Applications and click QuickBase Support Center→KnowledgeBase→QuickBase HTTP API Documentation. This gets you to the page shown in Figure 11-18. In the table’s Files column, click the QuickBaseAPI.htm link. You’re whisked right over to the QuickBase HTTP API Reference, a frequently updated document that tells you everything you could ever want to know about working with the QuickBase API.

Community Forum
When you’ve got a sticky API question, often the best and quickest way to get a good answer is to ask other programmers. QuickBase offers a user-to-user forum where you can search existing posts or submit your own question. (And QuickBase staff often monitor the forum, so you might get your answer directly from the horse’s mouth.)
Even better, the QuickBase Community Forum is a place to discuss all things QuickBase, so if you’ve got any question at all about working with QuickBase, it’s the place to go for fast answers from people who’ve been in the same boat.
To get to QuickBase’s Community Forum, start on your My QuickBase page and, in the Applications list, click QuickBase Community Forum. This opens the Community Forum’s Dashboard, shown in Figure 11-19.
From the Community Forum Dashboard, you can search for a specific topic (click Find) or browse existing topics and their replies, called threads. To post a topic of your own, click the upper-right Add a New Message button. The Add Message page opens; type in your subject line and message (you can even attach a file if you want), and then click Save, just as you’d do when adding any other new record. QuickBase posts your message where other QuickBase users can see it and respond. If you want to see the message you just posted, click Reports→Threads (today) or Reports→List All.
Tip
The QuickBase Community Forum is an application with a bunch of different reports, just like any other QuickBase application. To keep up with what’s going on in the Forum, you can subscribe to one of its reports.

When you see a topic that interests you, click its Display button to read it. Each message has a Reply link; click that link to open an Add Message form that puts your reply under the post you were reading.