
Chapter 3
Reviewing and Correcting Item List Errors
![]() Understanding the Differences Among the Chart of Accounts, Items, Classes, and Customer Types
Understanding the Differences Among the Chart of Accounts, Items, Classes, and Customer Types
![]() Finding Item Errors in QuickBooks
Finding Item Errors in QuickBooks
QuickBooks offers several methods for separating business results into meaningful segments. You have the chart of accounts list for organizing your transactions, the Items list for tracking the profitability of individual services and products you sell, classes for tracking different corporate profit centers, and the ability to view your profitability by user-defined customer types.
The QuickBooks accounting structure is generally easy to set up and define. What becomes problematic for some is how to efficiently use each of the available list types when you want to segment the business reporting activity in QuickBooks.
 Digging Deeper
A well-defined QuickBooks data file most likely includes the use of items, classes, and customer types, in addition to the chart of accounts.
Before reviewing and correcting item list errors, you need to understand the differences between items and the other lists available in QuickBooks.
The chart of accounts list, in particular, the Profit & Loss accounts, should offer just enough detail for you to make financial decisions for your overall business, but not so much detail that you have too much information to analyze.
Keeping your Profit & Loss chart of accounts minimized enables you to easily analyze business finances. For example, a contractor might employ 30 or more different types of specialty trades when building a house, such as site work, concrete, plumbing, and so on. To create a Cost of Goods Sold account for each type of trade would be too much detail when reviewing financial reports for the overall business.
A better approach would be to create summary Cost of Goods Sold accounts that, for the contractor example, might be Cost of Goods Sold—Labor, Cost of Goods Sold—Material, Cost of Goods Sold—Equipment, and so on. Other industries that track many services or products would also benefit from including only summary accounts on the Profit & Loss statement.
Digging Deeper
Are you creating a new data file or using an existing file? Your accountant should review your chart of accounts and make sure that it meets certain accounting guidelines. Taking this extra step can save you lots of extra work at tax reporting time if you find you have not used the appropriate accounts.
Items are what you sell or buy and are used on all customer forms and optionally on purchase forms. Items provide a quick means for data entry. However, a more important role for items is to handle the behind-the-scenes accounting while tracking item-specific costs and revenue detail.
Using the contractor example given previously, you could create an item for Site Work Labor, Concrete Labor, and Plumbing Labor and assign each item to your single Cost of Goods Sold—Labor chart of accounts. Using items enables you to capture cost detail by labor type rather than creating a Chart of Account for each type. Then when you view your Profit & Loss statement, you can easily see what your total Cost of Goods Sold is for all labor types.
A few of the reports that are dependent on the use of items include:
![]() Job Profitability Summary or Detail
Job Profitability Summary or Detail
![]() Job Estimates Versus Actuals Summary or Detail
Job Estimates Versus Actuals Summary or Detail
![]() Item Profitability
Item Profitability
![]() Time by Item
Time by Item
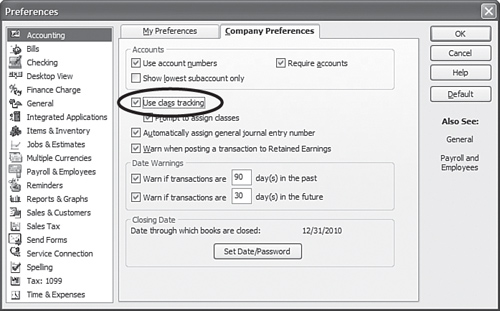
Another method for segmenting your QuickBooks financial information is by using classes. The use of classes is a preference setting and must first be enabled by logging in to the data file as the Admin or External Accountant user:
1. Click Edit, Preferences.
2. Select the Accounting preference on the left.
3. Click the Company Preferences tab.
4. Select the Use Class Tracking option, as shown in Figure 3.1.
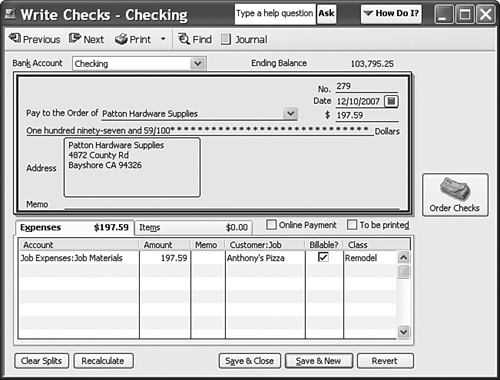
Classes are typically used when a company has multiple revenue-generating business types or multiple profit centers. These class list items are then assigned to each transaction, as in Figure 3.2. Examples of classes might be a construction company that offers either new construction or remodel services, or a restaurant with multiple locations. In both examples, using classes that are assigned to each transaction line for both revenue and costs enables you to report profit and loss by class.
Digging Deeper
When deciding to use classes, it is important that you have only one primary purpose for the class structure. If you try to track more than one “type” of class, the value in the reporting is diminished. For example, your company has both an east coast and west coast division. These represent the proper use of the QuickBooks class feature. However, using classes to also track the source of the business—for example, yellow pages, email marketing, and so on—would diminish the success of class reporting because you would be tracking two unrelated groupings. Instead, you can use classes for one purpose and customer types for another.
You can use customer types to categorize your customers in ways that are meaningful to your business. A retailer might use customer types to track retail versus wholesale; a medical office might track types of services; a service company might track what marketing event brought in the customer. You can filter certain reports by these customer types, giving you critical information for making business management decisions. These customer types can also be useful for marketing purposes when you want to direct a letter to a specific customer type.
To create or assign a customer type:
1. Click the Customer Center icon from the Home page.
2. Select a customer by double-clicking on the name.
3. Click the Additional Info tab and select a type from the drop-down menu or select Add New in Categorizing and Defaults, as shown in Figure 3.3.
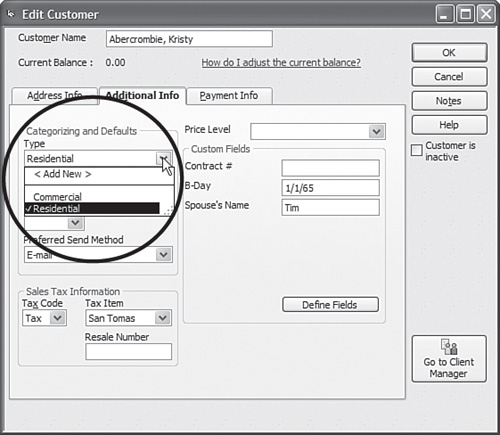
Many of the customer reports can be filtered for customer type, making it another useful list for segmenting your data.
QuickBooks has 11 item types to choose from (not including the Fixed Asset Item, Price Levels, or Billing Rates not discussed in this book, although some of the list items might not be listed in your data file if the related feature is not enabled. You can choose the type to assign to a list item; however, each type has certain unique characteristics. Here are some general guidelines about the proper use for item types:
![]() Service—You usually create this type for services you sell and, optionally, purchase.
Service—You usually create this type for services you sell and, optionally, purchase.
![]() Inventory Part—This type appears only if Inventory and Purchase Orders are active on the Company tab of the Items and Inventory preferences (click Edit, Preferences, select Items and Inventory, and click the Company tab). Inventory is used to track products you make or buy, place in a warehouse location, and later sell to a customer. Inventory is increased with a received purchase order or bill and is decreased on a customer invoice.
Inventory Part—This type appears only if Inventory and Purchase Orders are active on the Company tab of the Items and Inventory preferences (click Edit, Preferences, select Items and Inventory, and click the Company tab). Inventory is used to track products you make or buy, place in a warehouse location, and later sell to a customer. Inventory is increased with a received purchase order or bill and is decreased on a customer invoice.
Digging Deeper
If the item you purchase will never be included on a customer’s invoice or sales receipt, then it should not be created as an Inventory Part, instead create it as a Non-inventory part.
![]() Inventory Assembly—This type is an assembling of multiple inventory components, as in a Bill of Materials. When an inventory assembly is built, the individual items (components of the assembly) are deducted from inventory and the quantity of the finished product is increased. The assembly functionality is only available in QuickBooks Premier or Enterprise.
Inventory Assembly—This type is an assembling of multiple inventory components, as in a Bill of Materials. When an inventory assembly is built, the individual items (components of the assembly) are deducted from inventory and the quantity of the finished product is increased. The assembly functionality is only available in QuickBooks Premier or Enterprise.
![]() Non-inventory Part—This type is used for products you purchase but do not track as inventory. Correct use of this type would include products you purchase that are ordered for a specific customer and directly shipped to the customer, or for materials and supplies you purchase but do not sell to the customer.
Non-inventory Part—This type is used for products you purchase but do not track as inventory. Correct use of this type would include products you purchase that are ordered for a specific customer and directly shipped to the customer, or for materials and supplies you purchase but do not sell to the customer.
![]() Other Charge—This is a multipurpose item type. Freight, handling, and other miscellaneous types of charges are examples of the proper use of the other charge item type. Using this type makes it possible to see your services separate from the other charge types of revenue and expense.
Other Charge—This is a multipurpose item type. Freight, handling, and other miscellaneous types of charges are examples of the proper use of the other charge item type. Using this type makes it possible to see your services separate from the other charge types of revenue and expense.
![]() Subtotal—This type is used to add subtotal line items on sales and purchase forms. This item is especially useful if you want to calculate a specific discount on a group of items on an invoice form.
Subtotal—This type is used to add subtotal line items on sales and purchase forms. This item is especially useful if you want to calculate a specific discount on a group of items on an invoice form.
![]() Group—This type is used to quickly assign a grouping of individual items on sales and purchase forms. Unlike assemblies, groups are not tracked as a separate finished unit. Groups can save you data entry time and enable you to print or not print the details on a customer’s invoice.
Group—This type is used to quickly assign a grouping of individual items on sales and purchase forms. Unlike assemblies, groups are not tracked as a separate finished unit. Groups can save you data entry time and enable you to print or not print the details on a customer’s invoice.
![]() Discount—This type facilitates dollar or percent deductions off what your customers owe on a sales form. This item type cannot be used on purchase forms.
Discount—This type facilitates dollar or percent deductions off what your customers owe on a sales form. This item type cannot be used on purchase forms.
![]() Payment—This item type is not always necessary to set up. You create this item type if you record the payment directly on an invoice as a line item, such as is done with a Daily Sales Summary form (see the QuickBooks Help menu). On typical customer invoices, you should not record payments in this manner because there is no tracking of the customer’s check or credit card number.
Payment—This item type is not always necessary to set up. You create this item type if you record the payment directly on an invoice as a line item, such as is done with a Daily Sales Summary form (see the QuickBooks Help menu). On typical customer invoices, you should not record payments in this manner because there is no tracking of the customer’s check or credit card number.
![]() Sales Tax Item—This type is available only if you enabled sales tax by selecting Yes to charging sales tax on the Company tab of the Sales Tax preferences (click Edit, Preferences and select Sales Tax). In most cases, QuickBooks automatically assigns this item to an invoice. In some states or industries where there are multiple sales tax rates for a given sale, you can also add this item to an invoice as a separate line item.
Sales Tax Item—This type is available only if you enabled sales tax by selecting Yes to charging sales tax on the Company tab of the Sales Tax preferences (click Edit, Preferences and select Sales Tax). In most cases, QuickBooks automatically assigns this item to an invoice. In some states or industries where there are multiple sales tax rates for a given sale, you can also add this item to an invoice as a separate line item.
![]() Sales Tax Group—This type is used to group multiple tax district flat-rate sales tax items that are combined and charged as one sales tax rate.
Sales Tax Group—This type is used to group multiple tax district flat-rate sales tax items that are combined and charged as one sales tax rate.
 Rescue Me!
Carefully determine the correct item type to use when creating items. After they’re created, the following item types cannot be changed to any other item type: Service, Inventory Assembly, Subtotal, Discount, Payment, Sales Tax Item, and Sales Tax Group.
If you find you have set up the wrong item type, correcting it might require making an accounting adjustment. To avoid using the incorrect item on future transactions, mark the item as inactive by clicking Lists, Items. The Item List dialog opens. Select the Item button, choose Edit Item, and place a check mark in the Item is inactive check box. When this box is selected, as Figure 3.4 shows, the item is not included in any drop-down lists on forms, but is included in reports if used during the period being reported.

However, do not make an inventory type inactive if QuickBooks still shows available inventory quantity. This topic is discussed more fully in Chapter 10, “Reviewing and Correcting Inventory Errors.”
Want to quickly fix some of the most common errors in QuickBooks? Reviewing and correcting items in QuickBooks can be the best and easiest way to repair a company’s data file. The most common reason or misstatement on a company’s financials is often traced to incorrectly set up items. Often, it is easy to tell that the items were set up incorrectly. Some indicators of this might be understated revenue, negative costs, or just an overall lack of confidence in the financials. This is because items are “mapped” to the chart of accounts, if an item is improperly assigned to the wrong type of an account, this could create errors in accurate financial reporting.
To help you in those instances where incorrectly set up items might not be so apparent, the following sections offer a few methods for reviewing the item list.
Adding and removing columns you view in the Item List dialog can help you notice any setup errors that exist. To customize the Item List Lookup dialog for items, do the following:
1. Click Lists, Item List and while highlighting any list item, right-click it and click Customize Columns, as shown in Figure 3.5.

2. In the dialog box that appears, add the COGS Account by highlighting it in the Available Columns pane, as you see in Figure 3.6, and clicking Add to include the account in the Chosen Columns pane on the right. Add or remove from the Chosen Columns pane those fields that you want or don’t want to see when viewing the Item List Lookup dialog.
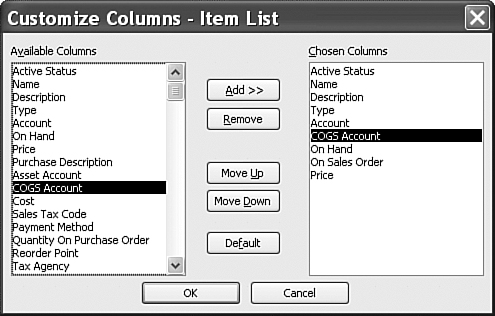
3. Click the Move Up or Move Down buttons in the center of the dialog box to customize the order in which you want to view the columns (see Figure 3.6), and then click OK.
4. Optionally, to widen columns of displayed date on your computer screen, place your mouse on the right or left lines of any group in the grey bar header and drag to make the column wider or smaller.
Now, you can conveniently review the list on the computer screen for those items that do not have a Cost of Goods Sold or expense account assigned, or might have the wrong account assigned. Not having an expense account assigned becomes problematic when the item is both purchased and sold; both types of transactions will report only to the single account selected.
See the “Fixing Item Errors in QuickBooks” section of this chapter for a more detailed discussion of how to properly fix one-sided items.
Another method to review the item list setup is the Item Listing report (click Reports, Lists and select the Item Listing report). Click Modify on the report, and in the dialog box that appears, click the Display tab to select the columns to view. Useful columns include Item, Description, Type, Account, Asset Account (for inventory items only), COGS Account, and Sales Tax Code, as shown in Figure 3.7. Whenever the item is used on a purchase or sales transaction (such as an invoice, a sales receipt, a bill, a check, and so on), these columns show to which accounts QuickBooks records the transaction on the chart of accounts.
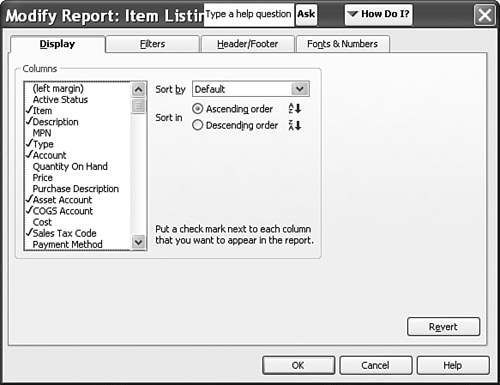
What exactly are you looking for on the list item report as shown in Figure 3.8? One thing you are looking for are items that you use on both purchase and sales forms but that have only the Account column details. Or you might also be looking for items with the incorrect account assigned. If you collect sales tax, be sure the correct sales tax code is selected. For a more detailed discussion of sales tax in QuickBooks, see Chapter 12, “Reviewing and Correcting Sales Tax Errors.”

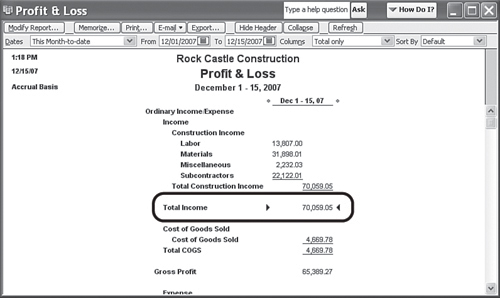
If you suspect errors with your financials, drilling down (double-clicking with your mouse pointer) on the Total Income, Cost of Goods Sold, or Expense detail from a Profit & Loss Standard Report might provide clues to the mistakes. To generate this report, follow these steps:
1. Click Reports, Company & Financial, and select the Profit & Loss Standard report.
2. On the Profit & Loss Standard report, double-click the Total Income column total, as shown in Figure 3.9. A Transaction Detail by Account report appears, showing each line of detail that makes up the amount you viewed on the original Profit & Loss Standard report.
3. On the Transaction Detail by Account report, click Modify Report. In the dialog box that appears, click the Filters tab. In the Choose Filter pane, scroll down to select Transaction Type.
4. In the Transaction Type drop-down menu, select Multiple Transaction Types, as shown in Figure 3.10. The Select Transaction Type dialog appears. Click to place a check mark next to each transaction type that normally would not be reported to an income account, such as a check, bill, credit card, and so on, and then click OK.

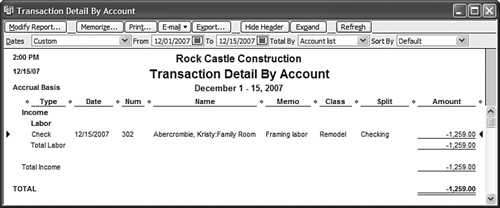
The resulting report now shows all purchase type transactions (or whatever transaction types you selected) that were recorded to income accounts. In the example shown in Figure 3.11, a vendor check transaction type appears in the totals for income. This is because on the vendor check an item was used that had only an income account assigned. After you determine that you have these types of errors in posting, you should review your item list for any one-sided items. This topic is discussed in the next section.
This chapter has shown some effective ways to determine whether your items were incorrectly set up. In this section, you learn the methods of fixing these item setup errors in QuickBooks.
As with any data correction in QuickBooks, you should make a backup of the data before attempting these methods. The preferred backup method is a QuickBooks backup, or a file with the extension of .QBB. You can create a data backup by choosing File, Save Copy or Backup. If the result after fixing items is not what you expected, you can easily restore the backup file.
These methods might affect your financials for prior accounting periods. You should take care when selecting a method that will impact financial periods that have already been used to prepare your tax documents. Discuss these choices with your accountant before making the changes.
This section details how to fix some of the more common item mistakes. New for 2009, with the QuickBooks Premier Accountant 2009 and QuickBooks Enterprise Solutions Accountant 9.0 editions is the Client Data Review feature.
This new feature is used primarily by accounting professionals who want to view the changes to list items customers have made. Changes to accounts assigned, name changes, and making an item inactive are a few of the changes tracked. For more information on this, see Chapter 17, “New for 2009! Detecting and correcting with the Client Data Review Feature.”
A one-sided item is an item that has only one account assigned. See Figure 3.12, which shows the Framing item setup. Notice the only account assigned to this item is Income:Labor. When this item is used on a customer invoice, it increases the Income:Labor amount. However, if the same item is used on a vendor check or bill, the amount of the expense records directly to the Income:Labor income account as a negative number. This would cause both income and cost of goods sold to be understated.
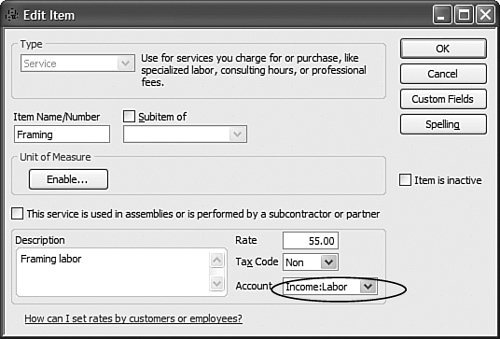
You should never have one-sided items if you plan to use the item on both purchase documents and sales documents.
This section details how to fix some of the more common item mistakes. New for 2009, with the QuickBooks Premier Accountant 2009 and QuickBooks Enterprise Solutions Accountant 9.0 editions is the Client Data Review feature.
This new feature is used primarily by accounting professionals who want to view the changes to list items customers have made. Changes to accounts assigned, name changes, and making an item inactive are a few of the changes tracked.
For more detail information on this see Chapter 17.
You might have several items on your list that can qualify to be one-sided because they are used only on sales forms and never on purchase forms, or always on purchase forms and never on sales forms. What can become problematic is that at some time, a user will mistakenly use the item on the other form.
I recommend you make all items two-sided (see Figure 3.13). You do so by selecting the check box labeled This service is used in assemblies or... (the rest of the label depends on what item type is selected) in the New or Edit Item dialog box. The results are new Purchase Information and Sales Information panes. Now, the “Account” has become an “Income Account” and you have a new Expense Account field to assign your proper expense account. This way, if you use the item on both a vendor bill or check and a customer sales form, your financials show the transaction in the proper account.

Rescue Me!
Before making these suggested changes, have you made a backup of your data? Some of the recommended changes are not reversible.
You might even consider printing reports before and after to compare and to verify that you achieved the desired end result with your change.
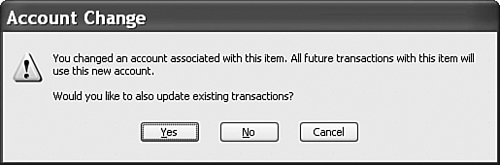
If you are editing an existing item to make it two-sided, QuickBooks now provides an Account Change warning, as shown in Figure 3.14. The decision made at this time is critical to your financials. Saying Yes to updating existing transactions causes all previous transactions to now report to the new account assigned. If you are attempting to fix historical transactions, this can be a timesaving feature because you do not have to change each individual transaction manually.
Click No if you do not want to update prior period transactions. This option might be recommended if you have already prepared your tax data with QuickBooks financial information. The change then takes effect only for future transactions.
Carefully selecting the appropriate choice here determines whether the correction provides the result you were looking for. Beginning with QuickBooks version 2007, users are given a second chance to say No to affect prior period financials (see Figure 3.15). Reference is given in this warning to setting a closing date password. Although setting a closing date password is recommended, doing so does not prevent changes to prior period financials when you are modifying the accounts assigned to an item that has previously been used.
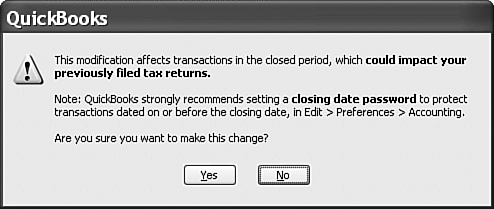
If you disregard the message, QuickBooks posts the expense to the revenue account selected in the Edit Item dialog. The effect of this is to understate revenue (an expense is a negative amount in the revenue account) and to understate your costs (because no cost was recorded to an expense account). Both of these messages distort your financial details, so be sure you don’t disregard this important message.

If you have found errors in your item list, a safe method of fixing them is to make the incorrect items inactive. An inactive item still appears in reports but is not included in any drop-down menus on sales or purchase forms.
To mark an item as inactive:
1. Click Lists, Item List.
2. Select the item you want to make inactive by clicking it once.
3. Click on the Items button and select Edit Item.
4. Place a check mark in the Item is inactive box.
Making an item inactive does not have any impact on the company’s financials. If you want to correct your financials, you need to choose one of two options:
![]() Edit the account assignment on each item. This gives you the option to retroactively fix all previous transactions that used this item. (Use this cautiously because it changes prior period financials.) The effect of changing an account assignment on an item is the same as the one discussed in the section of this chapter titled “Correcting One-Sided Items.”
Edit the account assignment on each item. This gives you the option to retroactively fix all previous transactions that used this item. (Use this cautiously because it changes prior period financials.) The effect of changing an account assignment on an item is the same as the one discussed in the section of this chapter titled “Correcting One-Sided Items.”
![]() Create a General Journal Entry transaction to reassign the numbers from one account to another. This method is typically done by your accountant.
Create a General Journal Entry transaction to reassign the numbers from one account to another. This method is typically done by your accountant.
Make a backup of your data before making these recommended changes and always discuss the method you choose with your accountant.
Need to Make Several Items Inactive?
Open the Item List by choosing Lists, Item List. Click to put a check mark in the Include Inactive box (in the lower center of the dialog). Click once to the left of any list item to make the item inactive, as shown in Figure 3.18.

If the check box is grayed out, you have not yet made any item inactive. After making the first item inactive, you can put a check mark in the box.
Marking most items inactive is okay. The exception is inventory items. Only inventory items with a zero quantity on hand should be made inactive. See Chapter 10 for more details on handling inventory errors.
If you have duplicated items, one easy method for fixing the problem is to merge items of the same type. When merging two items, you first need to decide which item is going to be merged into the other item. The item merged will no longer exist on your item list.
1. Click Lists, Item List.
2. Review the list for duplicate items; note the name of the item you want to remain.
3. Double-click the item you want to merge into another item. The Edit Item dialog appears.
4. Type in the Item Name/Number field the name exactly as you noted it in step 2. You can also use the Windows copy and paste command to avoid typing of lengthy names or long numbers.
5. Click OK to save your change. QuickBooks provides the warning message in Figure 3.19 that you are merging items.

Rescue Me!
You can merge only items of the same type together. Duplicate service item types can be merged together, but a service type item cannot be merged with a non-inventory item type. It is not recommended to merge inventory items together; see Chapter 10 for more detail.
Carefully consider the consequences of merging before you do it (and be sure you have a backup of your QuickBooks file). All the historical transactions merge into the remaining list item.
Creating an item as a subitem of another item is one way to easily filter reports for a group of similar items. Your accounting data is not affected by having or not having items as subitems.
To make an item a subitem of another item:
1. Click Lists, Item List.
2. Double-click the item you want to assign as a subitem. The Edit Item dialog opens.
3. Place a check mark in the Subitem of box, as shown in Figure 3.20.

4. From the drop-down menu, select the item you want to relate this subitem to.
You can create a subitem only within the same item type; for example, service items cannot be subitems of inventory items.
You can also rearrange the list by assigning a subitem to another item by using your mouse pointer on the Item List to move the item up or down and to the right or left. This functionality is the same as the example discussed in the section titled “Removing Duplicated Accounts by Marking an Account Inactive” in Chapter 2.
Digging Deeper
Did you know that if you want your customer to see the discount you are providing them on the invoice, you should not use Price Levels? Instead, create your invoice as usual and then include your discount item type on the invoice. This way your customer will see the benefit of the discount.