
Chapter 10
Reviewing and Correcting Inventory Errors
Inventory can be described as a company’s merchandise, raw materials, and finished and unfinished products that have not yet been sold.
QuickBooks can track the products you purchase, stock, and then later sell to customers. QuickBooks can also track the products that you assemble (component) and use to create a product for sale (finished good).
QuickBooks has a perpetual inventory system, meaning that each time you record a purchase document, inventory is increased, and when you record a sales document, inventory is decreased. (See the “Inventory Processes and Forms and Their Effect on Accounting” section later in this chapter.)
Also, QuickBooks records the cost for inventory using the Average Cost method as apposed to LIFO (Last In First Out) or FIFO (First In First Out). This means that the cost recorded at any time is equal to the number of inventory units divided by the total cost of the units. QuickBooks automates this process for you. As long as you record your documents correctly and date them appropriately, QuickBooks will assign the correct average cost.
Ask yourself these important questions before beginning to create and track inventory items:
![]() Will you be selling what you buy, and do you not know the customer at the time of purchase? An example might be a furniture store that purchases furniture for resale to customers, or a retail store that purchases medical supplies that are sold to customers. These qualify as the proper use of inventory items.
Will you be selling what you buy, and do you not know the customer at the time of purchase? An example might be a furniture store that purchases furniture for resale to customers, or a retail store that purchases medical supplies that are sold to customers. These qualify as the proper use of inventory items.
![]() Are you manufacturing what you sell? In other words, you buy components (raw materials) and later assemble the components into a finished product that is sold to a customer. An example might be a bike store that purchases wheels, steering columns, chains, and so on and then assembles the components into a completed bike for sale to the customer. This qualifies as the proper use of inventory items.
Are you manufacturing what you sell? In other words, you buy components (raw materials) and later assemble the components into a finished product that is sold to a customer. An example might be a bike store that purchases wheels, steering columns, chains, and so on and then assembles the components into a completed bike for sale to the customer. This qualifies as the proper use of inventory items.
![]() Are you purchasing materials that you use, but do not sell? For example, a car repair business might purchase buffing pads and paint supplies. These items are stored in inventory, but are not sold directly to a customer. This example is a more appropriate use of non-inventory items.
Are you purchasing materials that you use, but do not sell? For example, a car repair business might purchase buffing pads and paint supplies. These items are stored in inventory, but are not sold directly to a customer. This example is a more appropriate use of non-inventory items.
![]() Is the dollar value of your inventory not significant? Often, companies carry a small amount of inventory, but the majority of their sales are drop-shipped directly to the customer from the vendor that the product is purchased from. For example, a construction company can order appliances for a new home but does not generally stock them. Instead, they have the appliances shipped directly to the new home from the vendor. This example is a more appropriate use of a non-inventory item.
Is the dollar value of your inventory not significant? Often, companies carry a small amount of inventory, but the majority of their sales are drop-shipped directly to the customer from the vendor that the product is purchased from. For example, a construction company can order appliances for a new home but does not generally stock them. Instead, they have the appliances shipped directly to the new home from the vendor. This example is a more appropriate use of a non-inventory item.
In summary, QuickBooks has the following item types for use in the management of inventory and non-inventory:
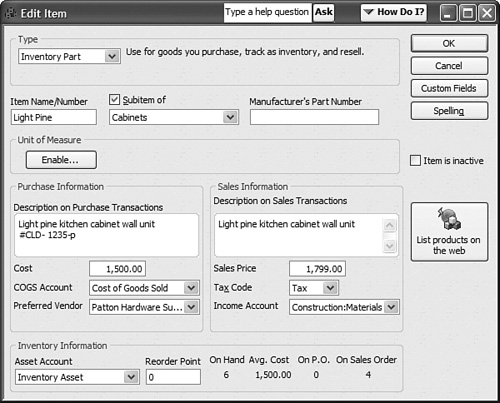
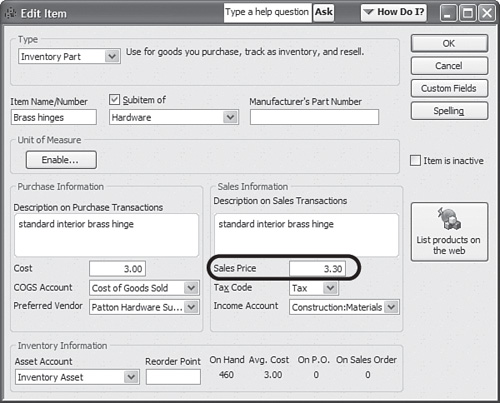
![]() Inventory items (see Figure 10.1)
Inventory items (see Figure 10.1)
![]() Items both purchased and sold
Items both purchased and sold
![]() Items that are stored in stock and later sold
Items that are stored in stock and later sold
![]() Items purchased and used as components of a finished product
Items purchased and used as components of a finished product
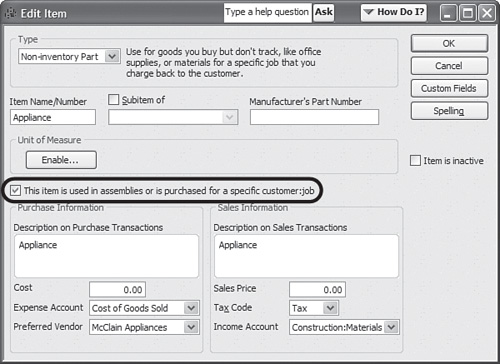
![]() Non-inventory items (see Figure 10.2)
Non-inventory items (see Figure 10.2)
![]() Purchased but not sold
Purchased but not sold
![]() Sold but not purchased
Sold but not purchased
![]() Purchased and resold, but not tracked as stock
Purchased and resold, but not tracked as stock
Inventory items require assigning an expense account (usually a Cost of Goods Sold type), an income account, and an asset account.
Non-inventory items only require one account by default. This is okay if you don’t both purchase and sell the item. It is recommended that when creating a non-inventory item type, you place a check mark in the “This item is used in assemblies or is purchased for a specific customer:job” box, as shown in Figure 10.2. This enables you to assign both an expense and income account in the event you do both purchase and sell the item.
 Digging Deeper
Optionally, you can record a default cost (recommended), default sales price, and default preferred vendor for both types.
Before you begin tracking inventory, you should know the commitment you are making to additional accounting responsibilities. When choosing to track inventory in the normal course of your business, you need to use purchase forms to increase inventory, and sales forms to decrease inventory. You also need to commit to periodic inventory counts because your inventory can often get out of sync with your accounting information.
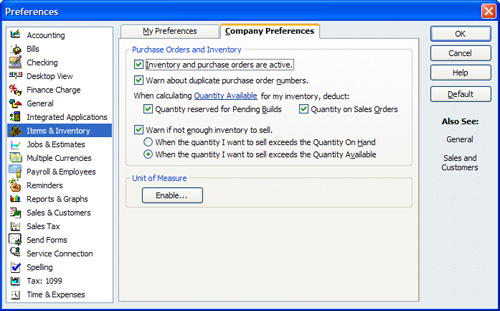
To begin using QuickBooks to track inventory, you must first turn on the feature found in the Items and Inventory preference in QuickBooks. By default, when creating a new company data file, inventory management is not enabled. To turn on the inventory feature, follow these steps:
1. Log in to the data file as the Admin or External Accountant user.
2. Select Edit, Preferences and choose the Items and Inventory preference.
3. Click the Company Preferences tab and place a check mark in Inventory and purchase orders are active.
4. Click OK to save the preference.
These preferences do not affect the accounting for inventory, but rather enable specific features within inventory management (see Figure 10.3).
Your QuickBooks Home page now shows the inventory workflow. To view the Home page (if it does not automatically open), select Edit, Preferences, and choose the Desktop View preference. Click the My Preferences tab and place a check mark in the Show home page when opening a company file box.
One additional preference that can affect your setup of inventory is found in the Time and Expenses, Company Preferences tab (accessed like you did previously for the Item and Inventory preference). When a percentage is entered in the Invoicing options pane for the Default Markup Percentage setting, QuickBooks automatically makes the default Sales Price to be the cost multiplied by the markup on a new item when the cost is first recorded (see Figure 10.4).
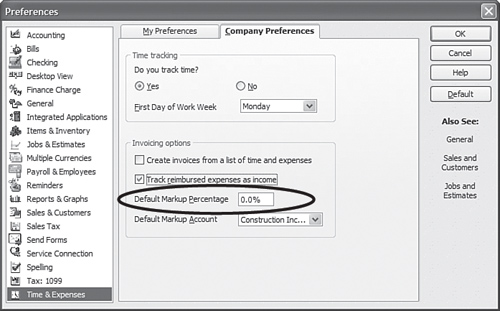
For example, when you create a new inventory list item and enter a cost of $3.00, QuickBooks will default the sales price of $3.30, or $3.00 + 10% markup, as shown in Figure 10.5.
Another feature that was introduced with QuickBooks 2007 is the Unit of Measure. With this feature, you can define the following for inventory items or non-inventory items in QuickBooks:
![]() Single Unit of Measure. Choose this if you buy, stock, and sell each item by the same unit of measure. If you buy by the pound, sell by the pound, and track your inventory by the pound, this option is the best choice.
Single Unit of Measure. Choose this if you buy, stock, and sell each item by the same unit of measure. If you buy by the pound, sell by the pound, and track your inventory by the pound, this option is the best choice.
![]() Multiple Unit of Measure. If you buy in one measurement, for example, you purchase cases (such as a case of canned soda) and sell to the customer in single units (a can of soda), but track inventory in skids (multiple cases of soda), the Multiple Unit of Measure option is the best choice.
Multiple Unit of Measure. If you buy in one measurement, for example, you purchase cases (such as a case of canned soda) and sell to the customer in single units (a can of soda), but track inventory in skids (multiple cases of soda), the Multiple Unit of Measure option is the best choice.
When you select Multiple Unit of Measure and assign it to an inventory or non-inventory item, you can also define your default units of measure for purchase, sales, and shipping forms, as shown in Figure 10.6.

Unit of Measure settings indirectly affect your accounting by defaulting the unit and the associated cost and sales price. Using this feature can improve your buying and selling accuracy on your documents.
Understanding the proper inventory process and the associated forms can help you use the inventory feature properly. If you are new to inventory management, QuickBooks makes getting started with it easy, via the workflow outlined on the Home page, as shown in Figure 10.7.

Use a purchase order if you want to compare the bill that the vendor sends with the original agreed-to quantity and cost. With purchase orders, you can also keep track of what items have been ordered and have not yet been delivered.
You can receive inventory in one of two ways. With one method, you receive inventory with the vendor’s final bill. If you record full receipt of the quantity, QuickBooks will then mark the purchase order as closed. You can also choose to receive inventory without a bill. QuickBooks will create an Item Receipt document that can be viewed in the accounts payable reports and ages with other vendor bills, but cannot yet be paid in the Pay Bills window.
Rest assured that as you create the vendor’s final bill, QuickBooks will recognize if you have outstanding purchase orders or item receipts that you want to associate with the vendor’s bill.
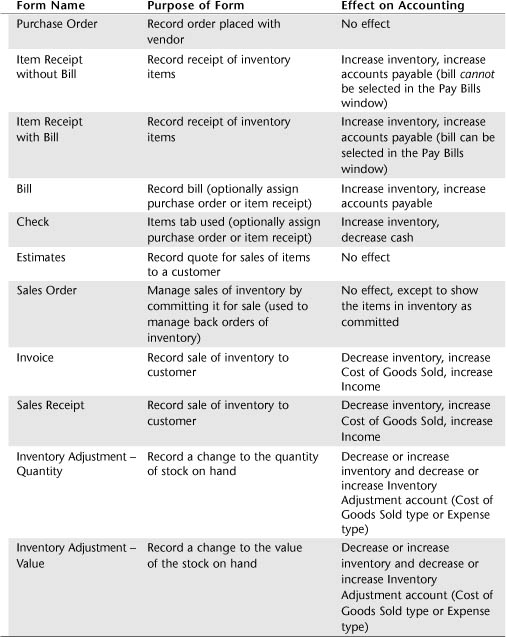
Table 10.1 shows a listing of all forms that you should use when working with Inventory items and their related effects on the company’s accounting.
For companies that do track inventory, I find Inventory balances are one of the last numbers in QuickBooks that truly gets a good look. You review your accounts receivable because you have customers that need to pay you. You keep up with your accounts payable because you have vendors that won’t supply you without first getting paid. Why exactly is it that Inventory “reconciling” is often at the bottom of the list, yet it can have the greatest impact on your company’s financials?
Experience has taught me that most companies simply do not know how in QuickBooks to properly review and audit their inventory balances. This section outlines specific reports and methods you can use in QuickBooks to make sure your Inventory balances are correct.
If you are using Inventory in your QuickBooks data, it is preferred that you view your financial reports in accrual basis. Most companies that have inventory report their tax financials in accrual basis. However, a more important reason is that on accrual basis reporting, QuickBooks will match the cost with the related sale. The exception is when using non-inventory items. These items, when purchased, do not increase an Inventory asset account. Instead, they are recorded directly to the Cost of Goods Sold account, or the Expense account that was assigned when the item was created.
All too often, here is where I find a complacent attitude about inventory management. I agree this is a time-consuming task. However, if effort is put to this task, your overall financials will be more accurate.
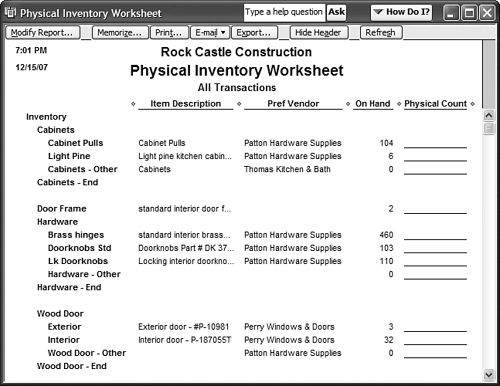
Select Reports, Inventory, and then select the Physical Inventory report to make recording the count easier. The report cannot be modified or filtered, so you should run the report at the same time you plan to do your physical count (see Figure 10.8). If you want to keep a record of the original worksheet, you can export it to Excel or email it as a PDF attachment.
After completing a physical inventory count, you can then confidently create an inventory adjustment so that the accounting records will match your actual physical inventory.
Another equally important task in inventory management is to compare your Inventory Valuation Summary report to your Balance Sheet Inventory Asset balance (accrual basis).
1. Select Reports, Inventory, Inventory Valuation Summary, and select the specific date that you are reconciling your Balance Sheet Inventory balance to.
2. Compare your Balance Sheet Inventory balance to the total Asset Value on the Inventory Valuation Summary report (see Figures 10.9 and 10.10).


What if the two balances do not match? The most common cause for the two reports not to match is entering a transaction that affects the Inventory Asset account, but it does not affect inventory items. The Inventory Summary report only shows the results of transactions that use inventory items. If a General Journal has been used to adjust the Balance Sheet balance, those transactions will not affect the Inventory Valuation Summary report.
 Rescue Me!
When working with inventory adjustments, never use a General Journal form. The specific reason is because a General Journal form does not use Items, and any adjustments using this form affect only the Balance Sheet balance, not the Inventory Valuation Summary report.
Instead, perform the appropriate type of adjustment by selecting Vendors, Inventory Activities, and selecting Adjust Quantity/Value on Hand, as discussed in the “Correcting Inventory Errors” section of this chapter.
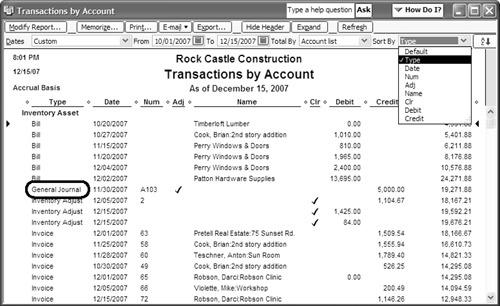
To find General Journal entries that might be causing the out-of-balance amount, double-click the Balance Sheet Inventory balance. QuickBooks creates the Transactions by Account report. To locate the General Journal entries, on the top, right of the report, select Type from the Sort By list, as shown in Figure 10.11. QuickBooks now organizes the data by transaction type. Look for General Journal type transactions.
You should not delete or void these transactions, especially if they were used in accounting periods that have already had tax returns prepared using the current financial information. Continue with the remaining methods in the sections that follow, before making any corrections.
As mentioned earlier in this chapter, QuickBooks uses the Average Cost method for valuing inventory.
As an example, you are selling an item called Widget A.

Sales documents that are dated on or between 12/15/07 and 12/24/07 selling this item will record Cost of Goods sold at $10.00 per unit.
Sales documents that are dated on or after 12/25/07 will record Cost of Goods sold at $9.50 per unit.
Average costing is a perfect fit for a business that sells a product that does not fluctuate significantly in cost from one period to the next. However, this is not always the case, so it becomes important that you verify the relative accuracy of the average cost that QuickBooks has recorded on the Inventory Valuation Summary report.
In Figure 10.9 shown previously, the average cost for the Interior Wood Door is listed as $68.50. Compare this amount to a recent vendor bill. If the amount is significantly different, you will need to research the purchase details for the item.
To easily create an Inventory Valuation Detail report for an item while viewing an Inventory Valuation Summary report, simply double-click the Avg Cost column for the item in question.
In Figure 10.12, the Inventory Valuation Detail is shown for the Interior Wood Door. Reviewing the individual lines in the Average Cost column can help you determine whether an issue exists with the average cost. If the average cost changes dramatically, you might want to review the specific bill or check form used to purchase the product.

Reviewing and correcting the average cost of items is equally important to adjusting the quantity on hand.
As you read previously in this chapter (in the “Inventory Processes and Forms and Their Effect on Accounting” section) concerning the inventory process, one of the optional methods of receiving inventory is without the vendor’s bill.
The effect of receiving inventory without a bill is to increase your inventory asset (debit) and increase your accounts payable (credit). The unique feature of this method is that QuickBooks creates an item receipt form that will not show in the Pay Bills window. QuickBooks recognizes that because you did not receive the bill, it is not likely that you should be paying it without the final bill details.
Often, goods will arrive at your business without a bill. A couple of reasons exist for a vendor to ship the goods to your place of business without a final bill:
![]() Shipping charges need to be added to the bill. Often, the vendor will not know the shipping charges when the goods are initially shipped.
Shipping charges need to be added to the bill. Often, the vendor will not know the shipping charges when the goods are initially shipped.
![]() Vendors do not want to disclose the value of the inventory, so that those who handle the inventory during shipping will not know the value of the goods being shipped.
Vendors do not want to disclose the value of the inventory, so that those who handle the inventory during shipping will not know the value of the goods being shipped.
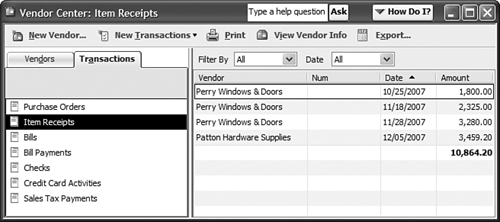
What you might not know is that item receipts age just like an outstanding accounts payable bill. To see whether you have open, outdated item receipts, go to the Vendor Center and click the Transactions tab (see Figure 10.13). Select the Item Receipts transaction type. Filter by All Dates and double-click on the Date column to sort the transactions by date.
You might discover that you have created item receipts and instead of associating a bill with the item receipt, you created checks to the vendors. To see whether this might be the case, select the Checks transaction type. If you do find that this happened, then the user had to have first bypassed the warning shown in Figure 10.14 when creating the check for the vendor.

Digging Deeper
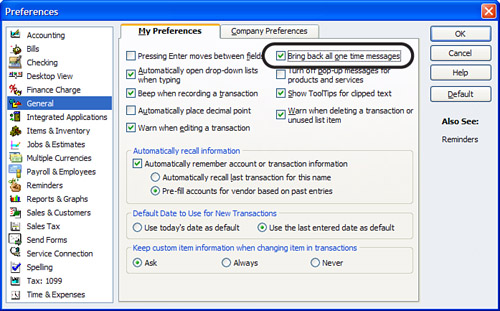
The warning shown in Figure 10.14 also offers the option to not display the warning again. If you think this option was selected and you are no longer being warned, you can turn the warning (as well as others) back on. Select Edit, Preferences, and click the My Preferences tab. Click General, and click the Bring back all one time messages check box, as shown in Figure 10.15.
To associate a check with an item receipt, follow these steps. Make sure that the dates of the transactions being modified are not in an accounting year that has already had a tax return prepared using those prior period balances.
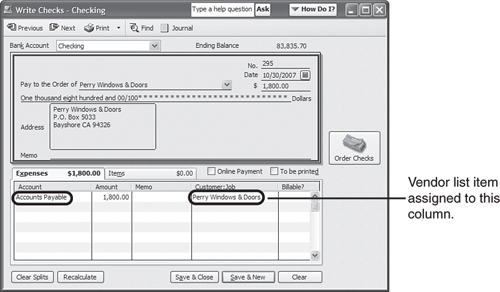
1. After locating the check on the Vendor Center, Transactions tab as described earlier, double-click the check to open up the Write Check form. Modify the Account to Accounts Payable, as shown in Figure 10.16. Next, assign the Vendor name in the Customer:Job column. The effect of this is to decrease (debit) Accounts Payable and decrease (credit) Cash.
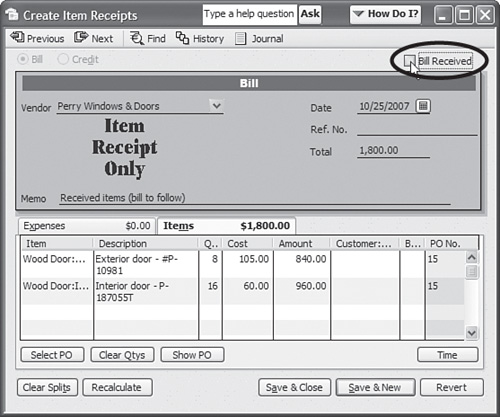
2. Next, from the same Transactions tab of the Vendor Center, select the Item Receipts form that was paid by the Write Check form, click the Bill Received check box. The bill will now be included in the Pay Bills window (see Figure 10.17).
3. Select Vendor, Pay Bills to open the Pay Bills dialog box. Select the bill (now visible because it is no longer an item receipt). After the bill is selected, QuickBooks recognizes that there is a credit available to be assigned in the Set Credits information of the Pay Bills dialog (see Figure 10.18).

4. Click the Set Credits button to assign the modified check transaction from step 3 to the open vendor bill (see Figure 10.19).

At the same time you review your open item receipts, you should also review your accounts payable open invoices that are aged more than 60 days.
To review your accounts payable, select Reports, Vendors & Payables and choose the Unpaid Bills Detail report. If you see open vendor bills you are sure you have paid, it might be because you created a Write Check form to pay your vendor bills instead of using the Bill Payment form (accessed from the Vendors, Pay Bills menu). Having both an open vendor bill and check paying for the same purchase overstates your costs or inventory.
QuickBooks tries to prevent you from doing this by providing a warning message, as shown in Figure 10.20.
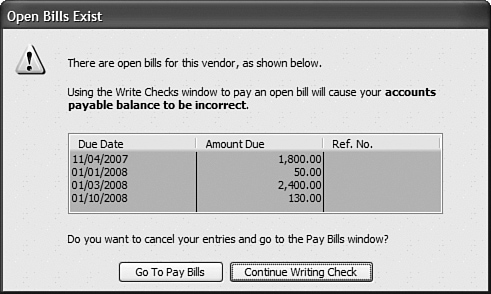
To assign a Write Check form previously issued to a vendor in payment for a currently open vendor bill, follow these steps:
1. Select the Vendor Center from the icon bar. Highlight the vendor in question.
2. In the pane to the right of the vendor’s name, select the Show drop-down menu and select Checks.
3. Optionally, filter for a specific bank account and date range or select All to not filter on these fields.
4. Locate the check in question. Double-click the check to open the Write Checks form. Edit the account column to be the Accounts Payable chart of accounts list item.
5. In the Customer:Job column, enter the Vendor Name from the vendor list. The result is to decrease (debit) your Accounts Payable for this vendor and decrease (credit) cash for the bank account selected on the Write Check form. Click Save & Close.
6. To associate this vendor “credit” with the open bill, click Vendors, Pay Bills. The Pay Bills dialog opens. Find the open vendor bill and place a check mark next to the bill.
7. Click the Set Credit button that is enabled. The Set Credits dialog enables you to assign the “check” credit to the bill. Select Done to assign the credit. More detailed information on Accounts Payable processes can be found in Chapter 11, “Reviewing and Correcting Accounts Payable Errors.”
You have now successfully assigned the Write Check form to the Open Vendor Bill that should have been paid by a Bill Payment check. This correction has now removed the expected overstatement in your costs and removed the bill from being included in your open Accounts Payable balances.
Any company that manages inventory needs to manage inventory errors. Business owners will list any of the following reasons for having to correct his or her accounting inventory errors:
![]() Errors in the physical counted results
Errors in the physical counted results
![]() Damaged goods
Damaged goods
![]() Theft of inventory
Theft of inventory
![]() Open vendor item receipts or bills that are not due to the vendor
Open vendor item receipts or bills that are not due to the vendor
![]() Incorrect valuation given to the inventory at the startup of a data file
Incorrect valuation given to the inventory at the startup of a data file
This section discusses the methods for correcting inventory errors you might find in your QuickBooks data. If you have a good inventory count commitment and manage the resulting information from the QuickBooks Inventory Valuation Summary report, you should see little to no data entry errors and instead probably will be adjusting inventory only for damage or theft.
If you discovered quantity differences between your accounting records and your physical inventory account, you should record an inventory quantity adjustment to correct your accounting records.
Before creating the accounting adjustment, make sure you have created an account in the Chart of Accounts to hold the value of the inventory adjustment. The account type can be either a Cost of Goods Sold type or an Expense type. For the business owner, consult your accountant when making this decision.
To create an inventory quantity adjustment, follow these steps:
1. Select Vendors, Inventory Activities and choose Adjust Quantity/Value on Hand, as shown in Figure 10.21.
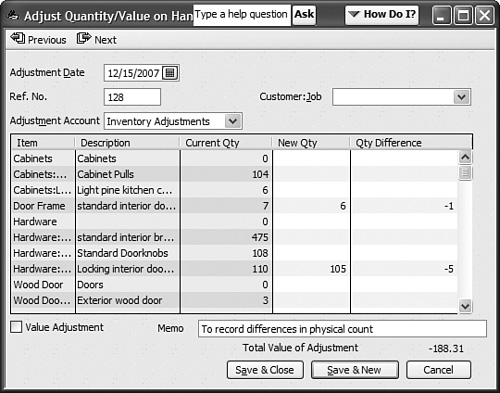
2. Enter an Adjustment Date and optional Ref. No. Optionally, assign a Customer:Job and select your Inventory Adjustment chart of accounts (this can be either a Cost of Goods Sold or Expense type chart of account list item).
3. In the New Qty column, enter your count from the completed physical inventory or optionally enter the change in the Qty Difference column.
4. QuickBooks will provide the Total Value of the Adjustment at the bottom of the dialog for your review as you make the needed changes. Select Save & Close when completed.
The accounting effect of the transaction in Figure 10.21 is to reduce the quantity on hand for each of the items shown, reduce (credits) the Inventory asset balance by $188.31, and increase (debits) the Inventory Adjustments account (either a Cost of Goods Sold type or Expense type).
Timing is important when doing a valuation adjustment. Value adjustments, if appropriate, should be carefully considered for their impact on the company’s resulting financials.
Rescue Me!
This type of adjustment is generally not done as often as quantity adjustments. The purpose of this book is not to explore or offer tax advice, but certain guidelines exist for when an inventory valuation adjustment is appropriate. Ask your tax accountant to provide them for you.
To create an inventory value adjustment, follow these steps:
1. Select Vendors, Inventory Activities and choose the Adjust Quantity/Value on Hand, as shown in Figure 10.22.
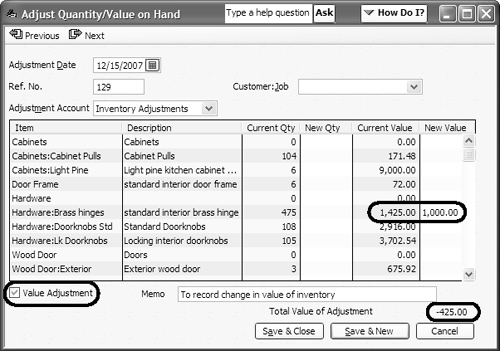
2. Enter an Adjustment Date and optional Ref. No. Optionally, assign a Customer:Job and select your Inventory Adjustment chart of accounts (this can be either a Cost of Goods Sold or Expense type chart of account list item).
3. Place a check mark in the Value Adjustment box in the lower-left of the Adjust Quantity/Value on hand dialog.
4. In the New Value column, enter your current total dollar value for the inventory.
5. QuickBooks will provide the Total Value of the Adjustment at the bottom of the dialog for your review as you make the needed changes. Select Save & Close when completed.
The accounting result of this inventory value adjustment as shown in Figure 10.22 is no net change to inventory quantities, a decrease (credit) to your Inventory Asset account and an increase (debit) to your Inventory Adjustments account (either a Cost of Goods Sold type or Expense type). A new average cost will be computed based on the (Original Asset Value + or - the Value Difference) / Quantity on Hand as recorded on the inventory value adjustment.
The new average cost will be recorded when a sales document uses this item, on or after the date of the inventory adjustment.
Rescure Me!
Did you know how important the date is when assigning the inventory adjustment? If you back date your inventory adjustment, QuickBooks will recalculate your Cost of Goods Sold from that date forward using the new average cost as of the date of the sales form. Care should be taken not to date an inventory adjustment in a prior year where tax returns have already been filed.
Digging Deeper
There are two ways to control dating transactions. To access them, log in as the Admin or new External Accountant user in single-user mode. Click Company, Set Closing Date to open Company Preferences for Accounting (see Figure 10.23). Setting Date Warnings enables a user to be warned when a transaction is either dated so many days in the past or in the future. Set Date/Password is another option to “close” QuickBooks to adding, voiding, or deleting transactions prior to a selected closing date. Setting a closing date and related features is discussed more fully in Chapter 15, “Sharing Data with Your Accountant or Your Client.”

QuickBooks enables selling of inventory, even if you do not have enough quantity available for sale. This situation is referred to as selling negative inventory. What it means is that you can include an inventory item on a customer invoice before you have recorded the receipt or purchase of the item into your inventory.
Although this method can be useful for getting the invoice to the customer, it can create issues with your company’s financials. The following sections detail how QuickBooks handles the costing of the inventory behind the scenes when you sell negative inventory and provides information on how to avoid or minimize the negative effect it can have on your company’s financials.
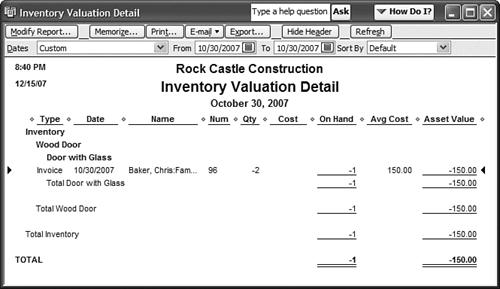
If you review the Inventory Valuation Detail report (click Reports, Inventory, Inventory Valuation Detail) for the item(s) that have negative values, and there are previously recorded average cost amounts, QuickBooks will assign the most recent average cost dated on or before the invoice date that created negative inventory. When the purchase document is later recorded, QuickBooks will adjust Cost of Goods Sold or Expense type for any difference.
Figure 10.24 shows that the average cost on the date of the invoice was $150.00 per unit. QuickBooks records a decrease (credit) to inventory of $300.00 and an increase (debit) to Cost of Goods Sold of $300.00 for the two units sold.
To show how important the date of the purchase document is, the following example shows how to create a bill replenishing inventory dated 11/15/07, or 15 days after the invoice form creating negative inventory, for 3 units at a cost of $200.00 per unit.
The new inventory asset value is calculated as

Actual inventory value is 2 remaining units at $200 each or $400.00 total


Digging Deeper
What is important to note here is that QuickBooks does not retroactively record the additional cost back to the customer’s negative inventory invoice date. In fact, QuickBooks records the adjustment as of the date of the purchase document and will not associate the adjustment with the original customer at all, overstating gross profit on a Profit & Loss by Job report.
The date of the replenishing purchase document becomes increasingly important to manage when you let inventory go negative at the end of a fiscal or tax year in your data.
There might be times when you stock a new item and you add it to a customer invoice before recording any purchase activity for the item. If this happens, you should be sure to at least record a default cost on the Edit Item window.
If you have assigned an inventory item to a customer invoice that you have not yet purchased (that is, the quantity on hand is zero) and if you did define a default cost when you first created the inventory item, QuickBooks will use this default cost as the suggested per-unit cost when the invoice is recorded.
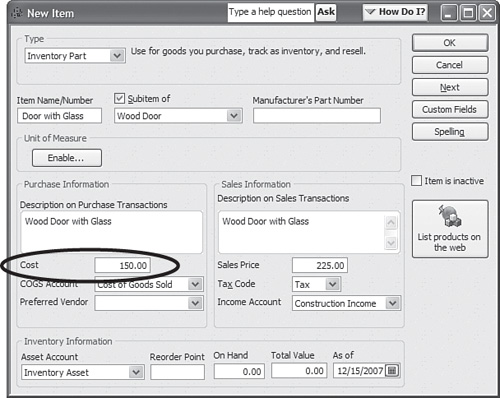
Let’s suppose you stock a new inventory item for a Door with Glass. When creating the item, you record a default cost of $150.00, as shown in Figure 10.26.
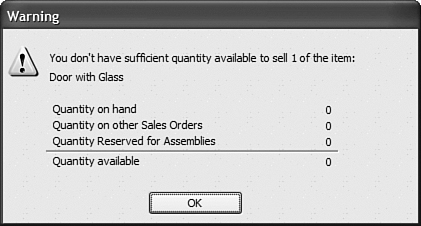
Before any purchase is recorded for this item, it is sold on a customer invoice. When you create an invoice where there is no inventory, QuickBooks provides a warning, as shown in Figure 10.27.
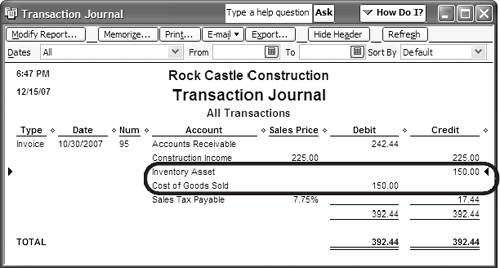
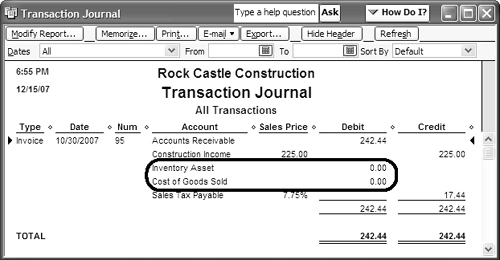
QuickBooks has to estimate the cost of the item and in this example uses the cost assigned to the item in the Edit Item dialog. When you save this invoice, QuickBooks will increase (debit) Accounts Receivable, increase (credit) Income, decrease (credit) Inventory Asset, and increase (debit) Cost of Goods Sold, and in this example, will increase (credit) Sales Tax Payable. The transaction journal report details the accounting automatically recorded by QuickBooks (see Figure 10.28).
This impact to your financials (positive or negative) can be significant if the purchase price is different from the recorded default cost on the Add New or Edit Item dialog.
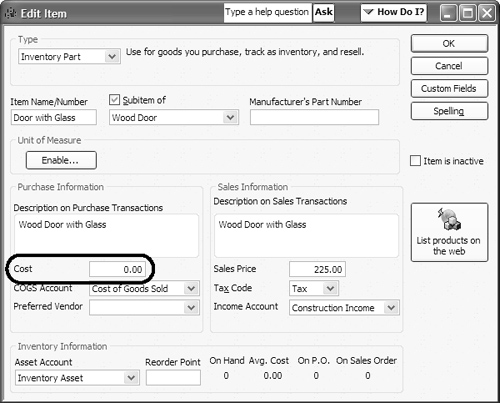
If you have assigned an inventory item to a customer invoice that you have not yet purchased (that is, the quantity on hand is zero) and if you did not define a default cost when you first created the inventory item, QuickBooks will use -0- as the default cost per unit when the invoice is recorded, showing a 100% profit margin for your financials and for that customer!
Now, using the same previous example, only not recording a default cost when setting up the item, as shown in Figure 10.29, QuickBooks will not calculate any cost or inventory reduction with the sale of the inventory (see Figure 10.30).
Imagine the impact this can have on your financials and the profitability reports you might review for your business or clients. Simply heeding the many warnings that QuickBooks provides about the impact of selling negative inventory can prevent this from happening in your or your client’s data file.
What exactly happens when you do record the purchase documents? The date recorded on the purchase document is important in how QuickBooks will handle this transaction.
If we use the example from Figure 10.25 that 1 unit was sold on 10/30/07 and 1 unit was purchased on 11/15/07, QuickBooks records the revenue in the month of October and the cost in the month of November. From month to month, it might not be noticeable, but if the transactions cross years, revenue would be overstated in one year and costs in another. Additionally, the revenue is tracked by the customer assigned to the invoice, but the cost is not tracked by the customer because the cost is recorded on the date of the purchase document.
To limit the negative impact, simply date your replenishing purchase documents before the date of the customer invoice that caused the negative inventory. QuickBooks will recalculate the average cost of all sales documents dated after this “replenishing” purchase document. And of course, it is simply best not to sell negative inventory altogether.
Troubleshooting negative inventory can be an eye opener as to how important proper inventory management is. To help with this task, rely on the Inventory Valuation Detail report, shown previously in Figure 10.12.
You can avoid these issues if the purchase documents or inventory adjustments are dated on or prior to the date of the sales documents creating the negative inventory. Backdating inventory adjustment documents can be a powerful solution for correcting months of misstated financials, so use it where appropriate after discussing it with your accountant.
Have in place inventory management processes that will avoid recording negative inventory. If you do have negative inventory, be sure to correct it at the end of your tax year or your tax return information will potentially be incorrect.
Additionally, you might want to read Chapter 11.
Digging Deeper
Do you want to “commit” inventory to a customer ahead of purchasing the inventory? Consider using the QuickBooks sales order form available with QuickBooks Premier or QuickBooks Enterprise, all editions.
With a sales order, you can set aside the inventory for sale to a customer, provide the customer a sales order for prepayment, and then later create the customer invoice directly from the sales order form.
Sales orders are considered a nonposting document, meaning that when they are created they do not affect inventory, revenue, or costs until the sales order is converted to an invoice.
Using this form often can be the best solution if you must provide a sales document to a customer before he or she receives the merchandise.