
Chapter 26
Modifying and Creating Reports
In this chapter:
• Use the report customization tools
• Memorize customized reports
• Share report templates
QuickBooks offers report customization tools that allow you to work with and view your financial information in the way that makes the most sense for you. Using these tools, you can select and sort almost any piece of information stored in your QuickBooks company file, from the smallest detail to the broadest overview. This chapter covers where to find and how to use these report customization tools.
Customization Starts with a Standard Report
All report customization efforts start with opening one of the standard QuickBooks reports. For this discussion, the Sales By Customer Detail report is opened with the date range set for a full year. Figure 26-1 shows you what it looks like before any customization.

FIGURE 26-1 |
This report has a lot of detail, but sometimes you won’t need all this information; other times, you may need slightly different data. |
Click the Customize Report button to open the Modify Report dialog. This is where you begin the process of customizing the format and content of the report. Each part of the Modify Report dialog is discussed in the following sections.
The Display Tab
The Display tab (see Figure 26-2) is in the foreground when you open the Modify Report dialog, and it’s filled with customization options. Some of these options are also right on the report window itself, such as the Dates and Sort By fields.
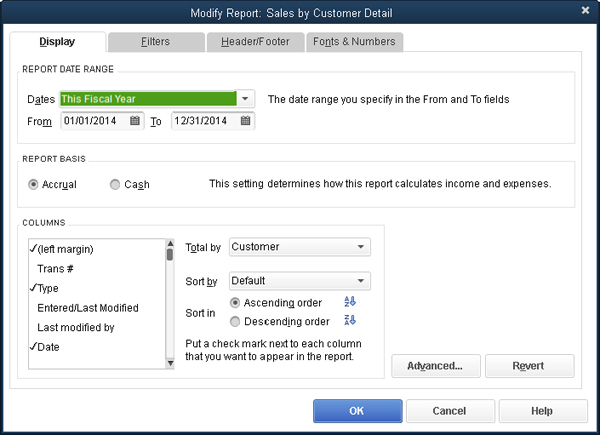
FIGURE 26-2 |
Use the Display tab to determine what type of data appears on the report and how it’s sorted. |
QuickBooks Report Types
Built-in QuickBooks reports come in two flavors: summary and detail. A summary report displays summarized transactions that are grouped together and show a single total for a reporting group. The Display tab in this type of report will show customization options that allow you to compare current and previous periods, calculate percentages of an account total in relation to others listed in a row or a column, and change how the information is totaled and displayed in the report.
Detail reports display the individual transactions that make up the totals for a reporting group. In addition to allowing you to change how the information is totaled and displayed in a report, the Display tab allows you to add or remove columns from the report that make up the report totals.
Selecting the Report Basis
You can select accrual or cash basis for most QuickBooks reports:
• When you run a cash basis report, the report only shows actual cash transactions. This means that, for example, an invoice (revenue) won’t show on a report if a customer has not yet paid you, and a bill (expense) won’t appear on the report if you have not yet paid the vendor for that bill.
• When you run an accrual basis report, the report shows all the transactions you’ve entered. This means that, for example, revenue is reflected in the report when you create an invoice, and expenses are reflected when you enter a bill.
By default, QuickBooks displays financial reports as accrual-based reports because accrual-based reports are more useful for getting an overview of the state of your business. However, if you file taxes on a cash basis, a cash-based report is easier to use for tax preparation.
Selecting Columns
The real power in the Display tab is in the Columns list (which exists only in detail reports, not in summary reports). You can select and deselect columns so the report displays only the information you need.
For example, in this report, you may not care about the contents of the Memo field but you’d like to know whether the invoice is paid. In the Columns list, deselect Memo and select Paid, and then click OK to return to the report where the Memo column is gone and the appropriate data (“Paid” or “Unpaid”) appears in the Paid column.
ProAdvisor Tip: Any custom fields you created appear in the Columns list, which adds even more power to your ability to customize reports in a meaningful way.
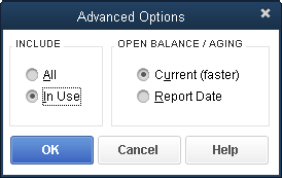
Advanced Options
Some reports have an Advanced button on the Display tab of the Modify Report dialog to open the Advanced Options dialog, which lets you specify the way QuickBooks selects data for the report.
The options you see on the Advanced Options dialog may vary, depending on the report. The following sections describe what you might see.
Include Option
The following options determine which accounts appear in transaction detail reports:
• All All accounts, whether or not the account had postings in the date range selected for the report
• In Use Only those accounts that had postings in the date range selected for the report
Open Balance/Aging Options
The following options specify the way QuickBooks calculates an open balance in an aging report:
• Current (Faster) Displays the open balance as of today, including all payments received through today’s date
• Report Date Displays the open balance as of the ending date of the report, and payments received after the ending date of the report are not included in the calculation
Display Rows Options
These options (typically found in summary reports) specify the rows to include or exclude, as follows:
• Active Only rows in which some financial activity occurred, which includes amounts of $0.00 if that total resulted from financial transactions
• All All rows, regardless of activity or balance
• Non-Zero Only rows in which activity occurred and where the amounts are other than zero
Display Columns Options
These options (also typically found in summary reports) specify whether to include or exclude columns based on whether financial activity occurred in the time frame specified for the report, as follows:
• Active Only Columns in which some financial activity occurred, which includes amounts of $0.00 if that total resulted from financial transactions
• All All columns, regardless of activity or balance
• Non-Zero Only columns in which activity occurred and where the amounts are other than zero
Reporting Calendar Options
These options specify the calendar basis of the report, as follows:
• Fiscal Year Uses the fiscal year as specified in the Company Info window, starting with the first month of the fiscal year. For example, if your fiscal year begins in October, configuring the report’s date range to First Fiscal Quarter displays transactions from October through December.
• Calendar Year Uses the calendar year (starts in January).
• Tax Year Uses a year that starts in the first month of your company’s tax year, as specified in the Company Info window.
ProAdvisor Tip: Some Budget reports (like the Budget Overview) have a Show Only Rows And Columns With Budgets option, which you can use to customize a report so it displays only accounts that are used in your budgets.
The Filters Tab
The Filters tab (see Figure 26-3) gives you a robust set of tools that you can use to customize a report to display the exact information that you want it to. Some examples are covered here, but I encourage you to explore all the options in this tab to get a feel for its capabilities and power.
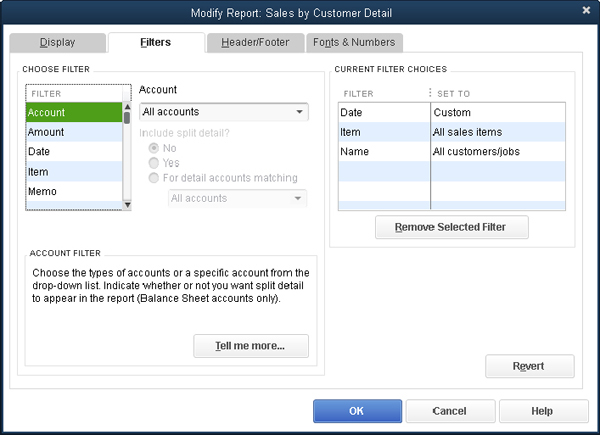
FIGURE 26-3 |
Change what’s reported by filtering the data to meet your own criteria. |
For the sales report used in our previous example, suppose you want to see only those transactions that are higher than a certain amount. Refer to Figure 26-4 for this example.
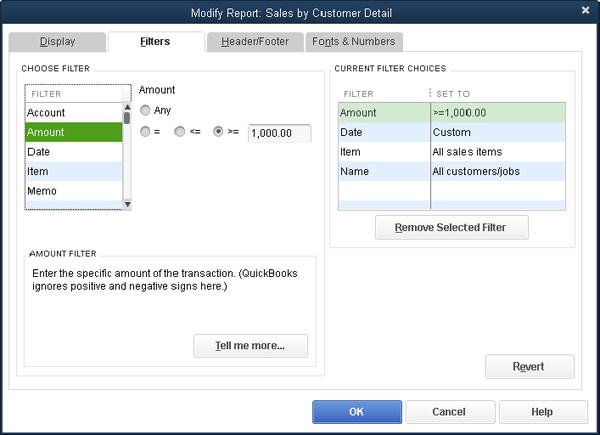
FIGURE 26-4 |
You can create filters to show precisely the information you want to see. |
1. Select Amount in the Filter list. The filter changes to reflect the options available for the Amount item.
2. Select the greater than or equal to (> =) option.
3. Enter the amount on which to filter the transaction—in this example, $1000.00.
4. Press TAB to add the filter to the Current Filter Choices list.
5. Click OK to return to the report, where the contents have changed to match your filter.
If you want to see only certain types of transactions on the report, use the Transaction Type filter to select the type you want to see; for example, in this report on sales and customers, you might want to see only credit memos. At that point, you’ve effectively created a “Credit Memos By Customer Detail” report. This is an example of the kind of report you memorize so you can use it frequently (memorizing customized reports is covered later in this chapter).
If you select multiple filters, make sure they don’t interfere with each other. In this discussion, I mentioned filtering for amounts and also for transaction type. If you were following along and creating the same filters I created, at this point, you’re seeing only credit memos that exceed the amount you entered in the amount filter.
If you want to see all credit memos, select the Amount filter in the Current Filter Choices list and click Remove Selected Filter.
Keep in mind that each filter has its own options. As you add and configure filters and notice the effect on your reports, you’ll learn to use filters effectively.
Customize Report Headers and Footers
You can customize what appears on the header and footer of your report by changing the options on the Header/Footer tab, shown in Figure 26-5. The options you set here have no bearing on the figures in the report; they are simply a descriptive label on the report that appears in either the header or footer. While most of the fields are self-explanatory, the most frequently used settings are described next.
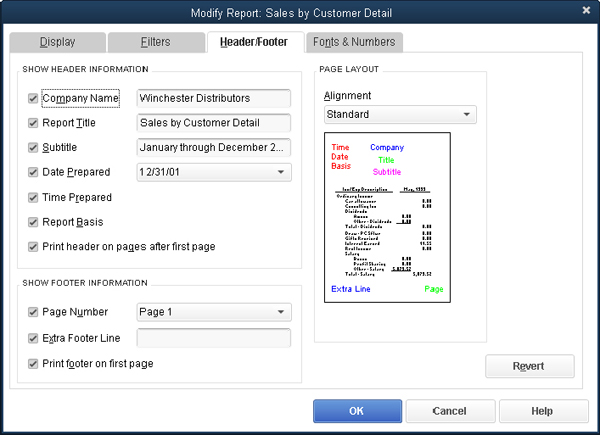
FIGURE 26-5 |
Customize the information that appears on the top and bottom of the report page using the Header/Footer tab. |
In the Show Header Information section:
• To display the date and/or time the report was prepared, select the Date or Time Prepared check box.
• To display the report basis, select the Report Basis check box. Your options are either Cash or Accrual.
• To remove an informational line from the header, clear the check box for that line.
• If you want the header information to appear only on the first page of the report, clear the Print Header On Pages After First Page check box.
In the Show Footer Information section:
• Click the drop-down menu next to Page Number to choose a different numbering style.
• Clear the Page Number check box to remove page numbering altogether.
• Fill in the Extra Footer Line field to add an extra line of information below the page number.
• Clear the Print Footer On First Page check box if you don’t want the footer to appear on the first page.
Customize Report Fonts and Numbers
The Fonts & Numbers tab, shown in Figure 26-6, lets you further customize your report by changing fonts and also giving you control over the way numbers display on the report. Use The Change Font For list to select an element (like a column label or report totals) of the report that you want to change the font size or style for.
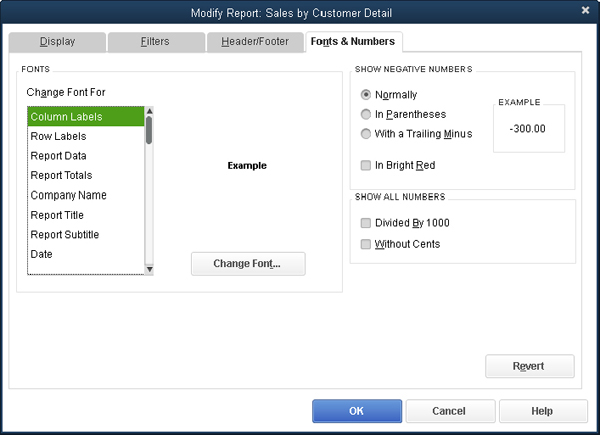
FIGURE 26-6 |
Change the fonts and format of the data in the report. |
On the right side of the Fonts & Numbers tab, you can control the way numbers display and print on your report. Select a method for showing negative numbers. If you wish, you can also select a method for displaying all the numbers on the report.
• Divided By 1000 Reduces the size of the numbers by showing them as multiples of 1,000. This is useful for companies that report seven- and eight-digit numbers.
• Without Cents Eliminates the decimal point and the two digits to the right of the decimal point from every amount. Only the dollars show, not the cents. QuickBooks rounds the cents to the nearest dollar. (Accountants frequently enter numbers in this manner for tax preparation purposes.)
Memorize Customized Reports
After you’ve customized a report to display the information you want in the manner in which you want it, you can avoid the need to go through all this work again by memorizing the report.
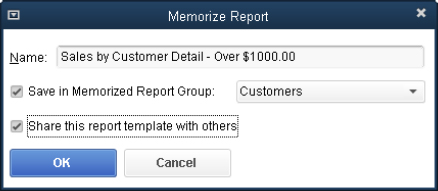
ProAdvisor Tip: Before you memorize a report, change its name in the Header/Footer tab so when you use it in the future you know exactly what you’re looking at.
Click the Memorize button on the report’s button bar to open the Memorize Report window, where you can give this customized report a name. QuickBooks gives you the option to save the report in a report group and to share the report you’ve just customized with others (both of these options are discussed in this chapter).
By default, QuickBooks uses the report name in the Header/Footer tab. If you didn’t change that title, be sure to use a reference to the report type in the memorized name. If you use a name such as My Report, you’ll have no idea what the report displays.
Using a Memorized Report
Open a memorized report by choosing Reports | Memorized Reports from the QuickBooks menu bar and selecting the report from the submenu.
When you open the report, all your customized settings are the way you configured them, but the data changes to reflect up-to-date information. Incidentally, it’s not uncommon for experienced QuickBooks users to open a memorized report, look at the data, and think, “Hmm, this makes me think that I’d like to know more about X than Y when I do my quarterly analysis.” When that happens, use your memorized report as the basis of another customized report, and memorize that one, too.
Using Memorized Report Groups
After you discover the power available in creating and memorizing customized reports, you may find yourself creating special-data reports like crazy. After a while, it can become difficult to select the report you need in the list of memorized reports. To save time and confusion, QuickBooks has a handy feature called Memorized Reports Groups to help. These report groups let you store reports by category, which makes it easier to locate exactly the report you need.
Creating a Memorized Report Group
Memorized report groups are displayed in the Memorized Report List window, as well as on the submenu you see when you select Memorized Reports on the Reports menu. However, to create or manipulate groups, you have to work in the Memorized Report List window.
1. Choose Reports | Memorized Reports | Memorized Report List to open the Memorized Report List window.
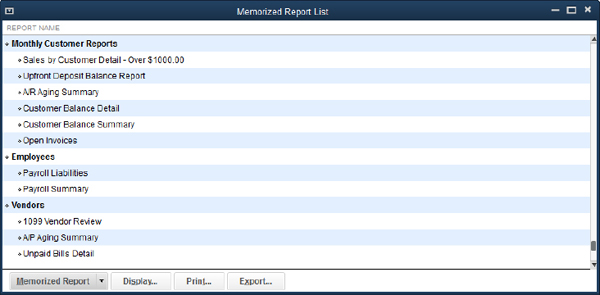
2. Click the Memorized Report button at the bottom of the window to display the window’s menu, and choose New Group. Enter a name for this group in the New Memorized Report Group dialog and click OK. The group you created appears in the window list, and its listing is boldfaced. Continue to add groups to reflect the types of memorized reports you’ve already created or expect to create in the future.
ProAdvisor Tip: Choose a name that fits the category for the group you’re creating. Common names for these groups are Year-End, Monthly, and so on. The more straightforward the name, the easier it is to place reports in the group and find those reports when you need them.
Moving Existing Memorized Reports into Groups
Start by moving your existing memorized reports into the appropriate groups, and then you can save reports you memorize directly in the right group (covered next). You can use either of the following methods to move a report into a group:
• Edit each report to add the name of the group. Select the report’s listing and press CTRL-E. Select the Save In Memorized Report Group option, and then select the appropriate group from the drop-down list.
• Drag each report to a group by indenting the report name under the group name. First, drag each report listing (using the diamond icon to the left of the report name) so it’s under the group listing, and then drag to the right, indenting the report name under the group name.
Note that any report listing indented under a group listing is automatically a member of that group.
ProAdvisor Tip: You can drag listings to groups only if the Report Name column heading bar at the top of the window is the only column heading. If you see a column to the left that has a diamond as the heading, click the diamond to hide that column. (To reverse the process, click the Report Name heading to reveal the diamond.)
Saving a Memorized Report in a Group
After you’ve created groups, you can save memorized reports directly to a group. When you’ve perfected the customizations you need, click Memorize on the report window. In the Memorize Report dialog, enter the report name, select the Save In Memorized Report Group option, and then select the appropriate group from the drop-down list.
Processing Report Groups
One of the cool things about creating groups for your memorized reports is that QuickBooks makes it easy to process all the reports in a group at once. You can print all the reports in one fell swoop or display all the reports (and then export them to Excel for your accountant).
For example, if you’ve created reports that are important at the end of each month or each quarter and placed them in a group named End of Month or End of Quarter, you can display or print all the reports with a single mouse click.
To process a group of reports, double-click the group’s listing in the Memorized Report List window to open the Process Multiple Reports dialog shown in Figure 26-7. You can deselect any report you don’t need at the moment.
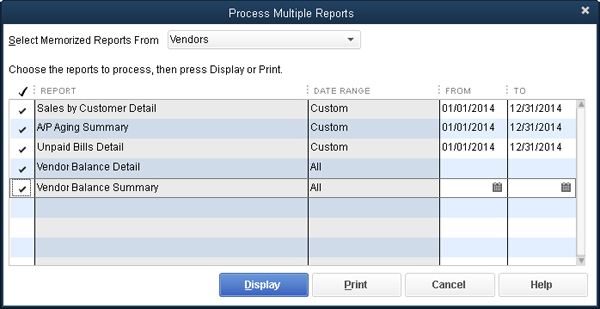
FIGURE 26-7 |
When it’s time to review your businesses performance at month’s end, print everything you need. |
Adding Standard Reports to Memorized Reports Groups
Often, the report you want to include in a group is a standard, built-in report, available on the Reports menu. To add the report to a group, open the standard report and click the Memorize button. In the Memorize Report dialog, put the report into the appropriate group.
Sharing Reports You’ve Customized
It’s nice to share—and when you modify a report, you can share its template (meaning only the customized report structure you’ve created and not your company’s actual financial data) with other QuickBooks users. Simply click the Share Template button at the top of the report window and give your report a title and description. You can decide if you want to share the report with the rest of the QuickBooks world.
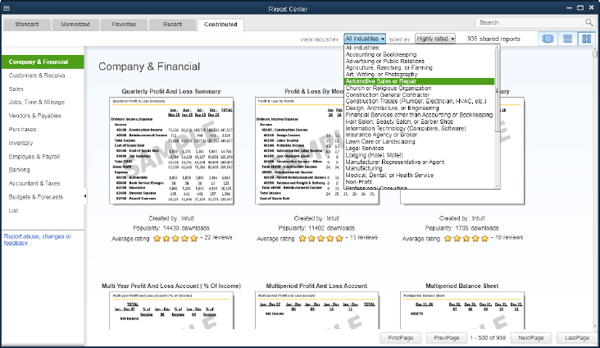
Your shared report will then be listed on the Memorized tab in the Report Center (covered in Chapter 25). What’s more, you can access reports that others have decided to share. In the Report Center, select the Contributed tab. Be sure to check in from time to time to see what reports may have been added by other QuickBooks users in your industry.
Exporting Your Report Data to Excel
This chapter points out the many ways you can work with and customize standard reports inside QuickBooks. But there may be times when you’ll need to perform some additional analysis of your QuickBooks data or even change the appearance of a report in ways that QuickBooks itself doesn’t allow. The ability to easily send the contents of a QuickBooks report to Excel enhances the power of QuickBooks reports and the value of all the important information that you enter into QuickBooks every day.
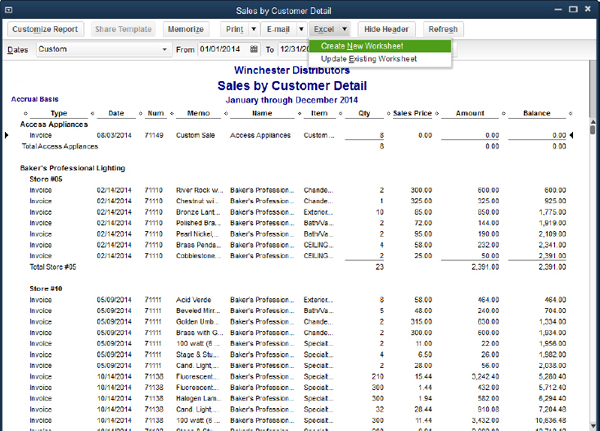
At the top of every report window is an Excel drop-down menu that has two options: Create New Worksheet or Update Existing Worksheet (as shown next). If you choose the first option, QuickBooks can either create a new file (workbook) that contains a new worksheet, or it can create a new worksheet in an existing workbook. If you choose the second option, QuickBooks opens a window that allows you to browse to an existing Excel workbook. QuickBooks can send the report information and update the existing Excel report data accordingly, using much of the existing formats and formulas in the workbook.
..................Content has been hidden....................
You can't read the all page of ebook, please click here login for view all page.