
Appendix A
Installing QuickBooks on a Network
In this appendix:
• License requirements
• Understand the different installation options
• Set up and configure QuickBooks in a multi-user environment
Soon after you launch the QuickBooks installer, you’re asked to make some choices about how the program should be installed on your computer and other computers on your network. Although the choices are presented in a straightforward manner during the installation, it may not be obvious which choice is right for you when more than one user needs simultaneous access to your QuickBooks file.
This appendix will provide you with the background information you need to know, along with some tips to help ensure your multi-user installation goes as smoothly as possible.
License Requirements for a Multi-user Installation
You’ll need to purchase a separate QuickBooks license for each computer that will have simultaneous access to your QuickBooks data file. In addition, all computers must use the same version—in this case, QuickBooks Pro 2014. QuickBooks Pro comes in one-, two-, or three-user license packs, allowing for up to three simultaneous users (with three unique user login names) to access a company file on a network. You can also purchase a two-user and a three-user pack that allows you to have up to five simultaneous users accessing the company file (again, each user is required to have a unique user login name). Setting up users and permissions is covered in Chapter 8.
Multi-user Installation Options
Multi-user installation options are dependent on the type of network configuration you plan to use. Specifically, the options you choose depend on whether you plan on using a dedicated server to host your QuickBooks company file or a peer-to-peer network, where one of the computers on the network runs QuickBooks and also stores the file.
It’s beyond the scope of this appendix to provide instruction on which configuration is best in your situation and the steps required for setup. You’ll want to contact your system administrator for that; if you don’t have one, find a local IT expert.
Installing QuickBooks on a Peer-to-Peer Network
First, ensure that all the computers that need access to the QuickBooks file are on a network running Windows 7, 8 (all editions except Starter and Basic), Vista, or XP. It’s also a good idea to make sure your operating system is up to date with the latest release. Other important tasks to add to your preinstall checklist include these:
• Deciding which computer on your network will hold the QuickBooks company file. It should be the fastest computer on your network, and it will be the first computer that you install QuickBooks on.
• Ensuring that the other QuickBooks computers on the network have full read/write access to the folder in which you plan on storing your QuickBooks data file.
Insert the QuickBooks CD in your CD drive, or, if you downloaded the program, run the Download Manager to launch the Intuit QuickBooks Installer. A Welcome screen confirms the launch. Click Next and follow these steps:
1. Review and accept the terms of the Intuit Software End User License Agreement. Click Next.
2. In the Choose Your Installation Type window, select Custom And Network Options (see Figure A-1). Click Next.
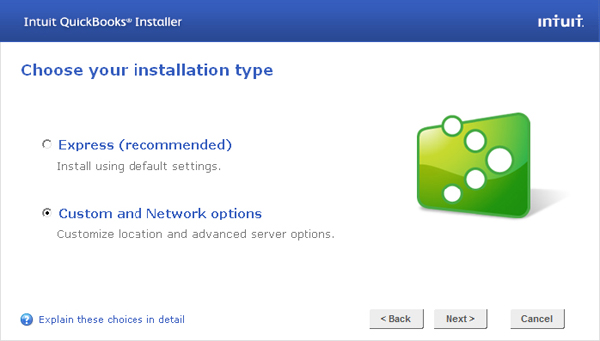
FIGURE A-1 |
Choose the installation type Custom And Network Options. |
3. The Custom And Network Options window opens, giving you three choices. Select the middle option, I’ll Be Using QuickBooks On This Computer, AND I’ll Be Storing Our Company File Here So It Can Be Shared Over Our Network (see Figure A-2). Click Next.

FIGURE A-2 |
This installation option lets you store the file on your computer, run QuickBooks, and give others access to your QuickBooks company file. |
4. Enter your license and product information (found either on your CD or in the e-mail received from Intuit that included your product download link). Click Next.
5. Enter your Intuit ID (which is likely the e-mail address you used when you purchased the software) and click the Validate button. If you don’t know your Intuit user name or password—or you don’t want to enter it at this time—click the “Skip this” link to advance to the next window.
6. If this is your first version of QuickBooks, you can accept the suggested folder that the installer recommends. If you’re upgrading from a previous version of QuickBooks, you’ll have the option of replacing your previous version with QuickBooks 2014 or changing the install location (which keeps the existing version of QuickBooks on your computer). I recommend you select the option Change The Install Location (see the next ProAdvisor Tip). Click Next, and then click the Install button.
For the next several minutes, you’ll see a series of informational windows about various QuickBooks features and additional services. Each of these windows contains a status bar to keep you apprised of the progress of your installation.
When the installation is complete, you’ll receive a congratulations message and the option to open QuickBooks directly, get help getting started, or both. For the discussion that follows, select Open QuickBooks and click Finish.
ProAdvisor Tip: Most installations are trouble-free. But there are times when a setting on your computer that you are not aware of—or perhaps even an emergency situation in your office—interrupts your installation. Whatever the reason, choosing not to overwrite and replace your existing QuickBooks installation lets you continue working in your QuickBooks file until any issues with the installation have been resolved. Later, after you’re up and running with the new version, you can confidently uninstall the previous version using the appropriate utility in Windows Control Panel.
File Hosting and the Database Server Manager
With your QuickBooks company file open, select File | Switch To Multi-User Mode. Click OK. When you turn on multi-user mode on the first computer on which you’ve installed QuickBooks, you automatically designate this computer as the host of your QuickBooks data file.
In addition, behind the scenes, QuickBooks installs a Database Server Manager program. Running this program along with QuickBooks ensures that other QuickBooks users will be able to access the company file even if the QuickBooks program is not open on this computer (the computer itself, however, has to be turned on).
Here’s how to open and run the Database Server Manager:
1. On the Windows Start menu, select All Programs | QuickBooks | QuickBooks Database Server Manager.
2. On the Scan Folders tab, click the Add Folder button to browse to the QuickBooks file you want to make available to other users. The default location that QuickBooks uses to save company files (which will have a .qbw extension) is C:UsersPublicDocumentsIntuitQuickBooksCompany Files.
3. When the folder where your QuickBooks file resides is listed in the Folders That Contain QuickBooks Company Files box, click the Scan button. Your file will be configured to ensure that others on the network can open your QuickBooks file (see Figure A-3).
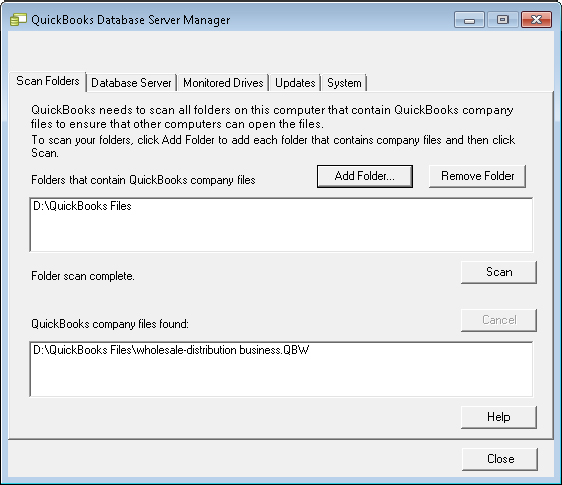
FIGURE A-3 |
Running the Database Server Manager makes your QuickBooks company file available to other users on your network. |
Installing QuickBooks on the Client Computers
With your QuickBooks host computer up and running, you’re ready to install the program on the other networked computers. Follow these steps:
1. Complete Steps 1 and 2 from the previous section.
2. In the Custom And Network Options window, select the first option, I’ll Be Using QuickBooks On This Computer (see Figure A-4). Click Next.
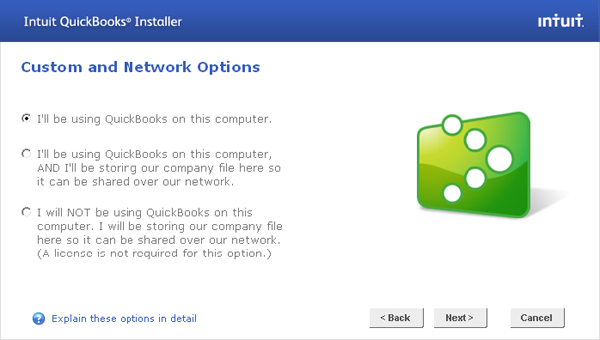
FIGURE A-4 |
When you install QuickBooks on client computers, choose the option I’ll Be Using QuickBooks On This Computer. |
3. Enter your license and product information (found either on your CD or in the e-mail received from Intuit that included your product download link).
4. Enter your Intuit ID (which is likely the e-mail address you used when you purchased the software) and click the Validate button. If you don’t know your Intuit user name or password—or you don’t want to enter it at this time—click the “Skip this” link to advance to the next window.
5. If this is your first version of QuickBooks, you can accept the suggested folder that the installer recommends. If you’re upgrading from a previous version of QuickBooks, you’ll have the option of replacing your previous version with QuickBooks 2014 or changing the install location (which keeps the existing version of QuickBooks on your computer). I recommend you select the option Change The Install Location. (See the earlier ProAdvisor Tip.) Click Next, and then click the Install button.
For the next several minutes, you’ll see a series of informational windows about various QuickBooks features and additional services. Each of these windows contains a status bar to keep you apprised of the progress of your installation.
6. When the installation is complete, you’ll receive a congratulations message and the option to open QuickBooks directly, get help getting started, or both. For the discussion that follows, select Open QuickBooks and click Finish.
7. In the No Company Open window, click the Open Or Restore An Existing Company button.
8. In the Open Or Restore Company window, select the option to Open A Company File. Click Next.
9. Browse to and open your QuickBooks company file located on the QuickBooks host computer.
ProAdvisor Tip: After you click Finish, and before proceeding to the No Company Open window, QuickBooks may ask if you want to use this computer to host multi-user access. Answer No to ensure that the first computer that you installed QuickBooks on remains the host computer. If you answer Yes to this question, this computer will become the host, which means that not only will QuickBooks need to be open on this computer, but a user will need to be logged into the company file before any of the other users on the network can work in the file.
Installing QuickBooks on a Client-Server Network
To use QuickBooks on a network with a dedicated server, you must be running one of the following: Microsoft Windows XP (SP2 or later), Vista (w/UAC on), 7 or 8 (w/UAC on), Windows Server 2003, Windows Server 2008, or Small Business Server 2008. Once you’ve confirmed that your server operating system meets one of these requirements, follow these installation instructions:
1. On the server computer, insert the QuickBooks CD into the CD drive; if you downloaded the program, run the Download Manager to launch the Intuit QuickBooks Installer. A Welcome screen confirms the launch. Click Next.
2. Review and accept the terms of the Intuit Software End User License Agreement. Click Next.
3. In the Choose Installation Type window, select the Custom And Network Options. Click Next.
4. The Custom And Network Options window opens giving you three choices. Select the last option, I Will NOT Be Using QuickBooks On This Computer. I Will Be Storing Our Company File Here So It Can Be Shared Over Our Network (see Figure A-5). Click Next.

FIGURE A-5 |
Choosing the option I Will NOT Be Using QuickBooks On This Computer installs the Database Server Manager only. |
5. QuickBooks suggests an installation location for the Database Server Manager Program. You can change the location if you wish by clicking Change The Install Location. Click Next, and then click the Install button.
6. For the next several minutes, you’ll see a series of informational windows about various QuickBooks features and additional services. Each of these windows contains a status bar to keep you apprised of the progress of your installation. When the installation of the Database Server Manager is complete, you’ll receive a congratulations message and the option to get help getting started. For the discussion that follows, click Finish.
Configure the Database Server Manager
Here’s how to open and configure the Database Server Manager:
1. From the Windows Start menu, select All Programs | QuickBooks | QuickBooks Database Server Manager.
2. On the Scan Folders tab, click the Add Folder button to browse to the QuickBooks file you want to make available to other users.
Installing Both QuickBooks and the Database Server Manager on Your Server
Selecting the I Will Not Be Using QuickBooks On This Computer option (as shown in Figure A-5) installs the QuickBooks Database Server Manager program and not the full version of QuickBooks. Although this is a perfectly acceptable installation option when installing in a client-server environment, it’s also acceptable to install both QuickBooks and the Database Server Manager on the server computer (which is the middle option shown in Figure A-5). This can be a good idea because two very important utilities are built into the full QuickBooks program: the verify and rebuild utilities (they are covered in Chapter 23). These utilities should only be run locally, meaning that the QuickBooks file being verified and rebuilt should reside on the same computer as the full QuickBooks program.
When both QuickBooks and the Database Server Manager are installed, the QuickBooks program will be “silent” and used only occasionally for maintenance purposes. As a result, it will not affect your licensing requirements, but it will give you peace of mind knowing that you can easily perform routine maintenance on your QuickBooks file when you need to.
3. When your folder is listed in the Folders That Contain QuickBooks Company Files box, click the Scan button. Your file will be configured to ensure that others on the network can open your QuickBooks file (refer to Figure A-3).
You’re now ready to install the QuickBooks program on the other client workstations by following the instructions in the earlier section, “Installing QuickBooks on the Client Computers.”
..................Content has been hidden....................
You can't read the all page of ebook, please click here login for view all page.