
Chapter 15
Using Accountant Tools
In This Chapter
![]() Working with sales tax
Working with sales tax
![]() Reviewing tools for accountants
Reviewing tools for accountants
Accountant tools are available to anybody who opens a client QBO company from QBOA.
You can become a user in a QBO company in one of two ways:
- As described in Chapter 12, your client can invite you to be the Accountant user on his account. But each QBO company can have only two Accountant users.
- As described in Chapter 11, the Master Administrator of the QBOA account can set up users. Any user established by the Master Administrator can log in to QBOA, open any client QBO company for which the user has privileges, and use the tools found on the Accountant Tools menu that I describe in this chapter.
In addition to the tools found on the Accountant Tools menu, this chapter covers reporting and paying sales tax — an activity that accountants often perform for their clients, so I start off with that information.
Reporting and Paying Sales Taxes
You or your client can manage and pay sales tax. Open any client QBO company and, in the Navigation bar on the left, click Sales Taxes to display the Sales Tax Center shown in Figure 15-1.
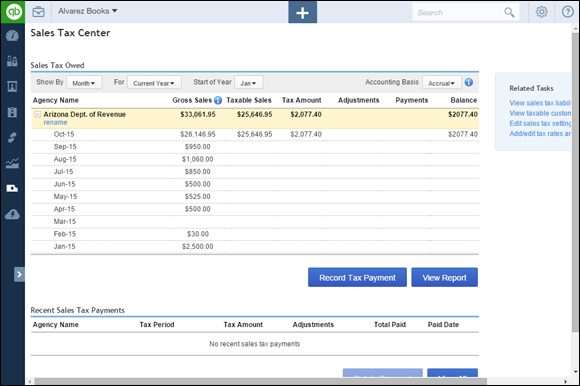
Figure 15-1: Use the Sales Tax Center to manage and pay sales tax.
 If the client QBO company uses QBO payroll (QBOP), you might need to click Taxes before you can click Sales Tax in the Navigation bar.
You can click the View Report button to display the Sales Tax Liability Report, and on the right side of the Sales Tax Center page, you’ll find a link to view a list of taxable customers.
Also on the right side of the page, you’ll find links you can use to edit sales tax settings and add or edit tax rates and agencies.
You can click Record Tax Payment to pay sales tax; when you do, QBO displays the Record Sales Tax Payment dialog box shown in Figure 15-2.

Figure 15-2: Use this dialog box to record a sales tax payment.
QBO calculates the amount due to a sales tax agency, and you can confirm the amount or adjust it. Notice that the payment is made to the sales tax agency. Be aware that QBO doesn’t treat the agency as a vendor. You won’t see the sales tax agency on the Vendor List page, and you can’t use the Check window or the Pay Bills window to pay a sales tax agency. In this way, QBO helps avoid applying sales tax payments incorrectly.
Facilitating Accountant Activities
Accountants often need to reclassify transactions, examine voided and deleted transactions, write off invoices, and perform other activities. QBOA contains tools to make performing these activities easy.
To view and use the tools QBOA makes available to accountants, open any client QBO company. Then, on the QBOA toolbar, click the Accountant Tools button (the one that contains the icon that looks like a suitcase). QBOA displays the Accountant Tools menu, shown in Figure 15-3.
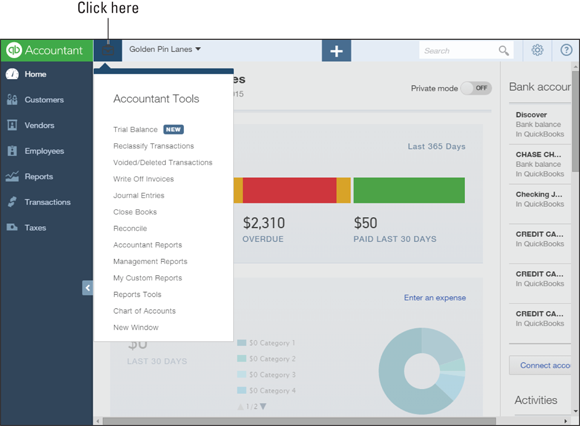
Figure 15-3: The Accountant Tools menu contains commands specifically designed to aid the accountant.
Understanding the Trial Balance page
You use the Trial Balance tool to display the Trial Balance page. The page you see initially presents a working trial balance like the one shown in Figure 15-4.

Figure 15-4: The Working Trial Balance tab of the Trial Balance page.
If you prepare a client's tax return using Intuit Tax Online, Intuit’s cloud-based tax preparation software, you’ll want to make sure that your client’s accounts are mapped properly to lines on tax forms. The Trial Balance feature automatically maps account balances to lines on tax forms you’ll file for corporations using IRS Form 1120 (for corporations) or 1120s, partnerships that use IRS Form 1065, and sole proprietorships using IRS Form 1040. For other business organization types, you can manually assign accounts to tax form lines. You also can manually assign lines on tax forms for accounts the tool doesn’t recognize, and you can change tax line assignments as needed.
Click the Tax Mappings tab on the Trial Balance page to see the page you use to map last year’s client QBO company information directly to tax forms (see Figure 15-5).

Figure 15-5: The Tax Mappings tab of the Trial Balance page.
To assign an account to a tax form line or edit the line to which an account is assigned, click the appropriate link in the Action column. QBOA displays a list box from which you select the appropriate tax form line. Then click Save.
Once you map your client’s accounts, you can use the Working Trial Balance page (refer to Figure 15-4) to make adjusting journal entries that affect both the tax return and the client’s books. When you’re ready, you can click Post to Tax Return to transfer the information to Intuit Tax Online and generate a tax return. You don’t pay anything to use the Trial Balance feature; you pay only when you print or e-file a return from Intuit Tax Online.
Reclassifying transactions
When you choose Reclassify Transactions from the Accountant Tools menu, the Reclassify Transactions page appears (see Figure 15-6). You can use this page to reclassify transactions without worrying about the company’s closing date.

Figure 15-6: Use this page to reclassify transactions.
You use the information in the gray areas of the Accounts section on the left side of the page and the Transactions section on the right side of the page to filter for the date range and type of accounts you want to consider. You then select an account on the left side of the page, and QBOA displays transactions that meet the criteria on the right side of the page. You can reclassify, individually or as a group, transactions that display a green circle.
Follow these steps to reclassify transactions:
- On the left side of the page, set the date range you want to consider, along with the accounting basis.
- From the View list box, select the type of accounts you want to consider — Profit and Loss accounts or Balance Sheet accounts.
Click an account in the list below the View list box to examine that account’s transactions.
The transactions in the account appear on the right side of the page.
Above the list of transactions on the right side of the page, set filters to display the types of transactions that you might consider reclassifying.
You can make changes to transactions that display green circles.
 You can click a transaction to open it in its transaction window and then make changes to it.
- To change several transactions simultaneously, select them by clicking the check box beside them.
- At the bottom of the page, select the For Select Transactions, Change check box.
- From the Account to list, specify a different account.
- Click the Reclassify button.
Examining voided and deleted transactions
You can click Voided/Deleted Transactions on the Accountant Tools menu to display the Audit Log. The default view of the Audit Log (see Figure 15-7), shows information about those transactions that have been voided or deleted. But, you can click the Filter button to set a variety of different filters to view other types of transactions and events.

Figure 15-7: Use the Audit Log to view all kinds of activity in the QBO company.
Writing off invoices
Choosing Write Off Invoices from the Accountant Tools menu displays the Write Off Invoices page, which enables you to view invoices you might want to write off, and then write them off to an account of your choice. At the top of the page, you set filters to display the invoices you want to review. Select the age of the invoices to view those
- Greater than 180 days
- Greater than 120 days
- In the current accounting period
- In a custom date range you set
You also can set a balance limit.
As you can see in Figure 15-8, QBOA displays the date, age, invoice number, customer name, original invoice amount, and the amount still due on the invoice. To write off any invoices, click the check box beside them. Then, at the bottom of the page, select the account you want to use to write off the invoices and click the Preview and Write Off button.

Figure 15-8: Writing off invoices.
QBOA displays the Confirm Write Off dialog box shown in Figure 15-9. If the information in the dialog box is correct, click Write Off. Otherwise, click Cancel.

Figure 15-9: Confirm that you want to write off the selected invoices.
Closing the books
You use the Close Books command on the Accountant Tools menu to display the Advanced page of the QBO company’s Settings dialog box, shown in Figure 15-10. You can click anywhere in the Accounting section to edit the fields in that section, which include the closing date for the books.

Figure 15-10: Setting a closing date.
You can set a closing date and then allow changes prior to the closing date after QBO issues a warning, or you can require a password to enter changes prior to the closing date.
Reviewing reports
Reports in QBOA work the same way as reports in QBO; see Chapter 10 for details.
But, QBOA contains some reports of particular interest to accountants. If you open a client QBO company and then, from the Accountant Tools menu, click Accountant Reports, the Reports page appears. Below the Profit and Loss graphic, the Accountant Reports tab spotlights the reports available to QBOA users. In Figure 15-11, I hid the Profit and Loss graphic (click the arrow in the lower-right corner of the graphic to hide and display it) so that you can see more of the reports on the Accountant Reports tab. But I still couldn’t show all of them; when you’re checking out these reports, be sure to scroll down the page.

Figure 15-11: Accountant-oriented reports available in QBOA.
If you choose Management Reports from the Accountant Tools menu (or if you click the Management Reports link that appears on the Reports page shown in Figure 15-11), QBOA displays two customized management-style reports: Expanded Company Financials and Basic Company Financials. Both reports display a collection of reports, complete with an elegant cover page and a table of contents.
The Expanded Company Financials report contains the P&L, Balance Sheet, Statement of Cash Flows, and the A/R Aging Detail and A/P Aging Detail reports. The Basic Company Financials report contains all reports except the Aging Detail reports. Using the Edit link in the Action column, you can edit either report to add or delete reports and modify the appearance of pages in the report, including determining whether pages such as the table of contents appear in the report. Using the down arrow that appears in the Action column, you can print these reports, send them via email, export the information to PDF files or DOCX files, and make copies of them so that you can make your own set of management reports.
Copying one of these reports before you change it is a great idea; that way, you keep the original report intact but create your own version of it as well.
If you choose My Custom Reports from the Accountant Tools menu, reports you have customized and saved appear. And you can click Reports Tools on the Accountant Tools menu to set default report dates and accounting basis. You also can see account reconciliation status and view and set company closing date information.
A brief look at other accountant tools
The Accountant Tools menu contains a few other tools that make an accountant’s life easier, such as the Reconcile page; from this page, you can opt to reconcile an account you select, or you can review existing reconciliation reports.
Also from the Accountant Tools menu, you can choose Journal Entries to display the Journal Entry window, or Chart of Accounts to display the Chart of Accounts window; I describe working in the Chart of Accounts window in Chapter 13. You also can use the New Window command described in Chapter 14 to quickly open a new window in QBOA.