
Chapter 17
Ten Ways to Use Chrome Effectively
In This Chapter
![]() Setting and using a Home page in Chrome
Setting and using a Home page in Chrome
![]() Understanding Chrome, security, and privacy
Understanding Chrome, security, and privacy
![]() Bookmarking pages you use regularly
Bookmarking pages you use regularly
![]() Taking advantage of Chrome tabs
Taking advantage of Chrome tabs
![]() Setting up users
Setting up users
![]() Controlling the size of text onscreen
Controlling the size of text onscreen
![]() Downloading and working with files
Downloading and working with files
![]() Understanding Chrome and mobility
Understanding Chrome and mobility
Chapter 16 helps you understand and work with the Chrome interface. This chapter introduces some browser tips and tricks that can make using Chrome easier and more effective both in general and specifically with QBO and QBOA.
Setting a Home Page
Many browsers sport an icon that you can click to return to your Home page — the page that appears when you open the browser. When you open Chrome, by default, the New Tab page appears. Although Chrome doesn’t show the Home icon, you can set a Home page and display the icon that you click to display that Home page. Note that Chrome doesn’t open and display the page you set as the Home page; instead, the Home page appears when you click the Home button.
Before you begin the following steps, make sure you know the web address of the page you want to set as your Home page:
Choose Chrome Menu ⇒ Settings.
The Settings tab appears.
In the Appearance section, click the Show Home Button check box.
The Home button appears between the Refresh button and the Omnibox (see Figure 17-1). By default, Chrome opens the New Tab page whenever you click the Home button.
Click Change.
The Home page dialog box appears (see Figure 17-2).
- Select the Open This Page option and type a web address.
- Click OK.

Figure 17-1: Adding the Home button and setting a Home page.
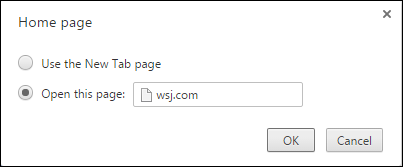
Figure 17-2: Use this dialog box to type the web address of your Home page.
The Home page appears whenever you click the Home icon beside the Omnibox.
 If you open certain sites every time you start Chrome, you can pin each page as a tab. See the section “Duplicating and Pinning Tabs.”
Chrome and Security
Chrome includes several tools that help to keep you safe online. As you are no doubt aware, bad things can happen as you browse the Internet. You can run into phishing schemes, where someone tries to trick you into sharing personal or sensitive information, usually through a fake website. You also can run into websites that have been hacked and contain malware that tries to install itself on your computer, often without your knowledge; malware usually tries to harm you and your computer in some way, including trying to steal information.
Chrome includes technology, enabled by default, that helps protect you from phishing schemes and malware, displaying a warning whenever you visit a potentially dangerous page.
Chrome also uses a technique called sandboxing to open websites. Sandboxing isolates computer processes from anything else happening on the machine. If a sandboxed process crashes or becomes infected with malware, the rest of your computer remains unaffected. Each tab in Chrome opens as a separate process, completely independent of other tabs. If a website contains malware, the sandboxing technique isolates the malware to the browser tab; the malware can’t jump to another Chrome tab or to your computer. You eliminate the malware threat when you close the infected website’s browser tab.
A third method hackers can use to gain access to your computer is by the use of plug-ins. Plug-ins are small add-on programs for browsers. Because they are add-on programs, plug-ins can become out-of-date and hackers can use them to try to introduce malware onto your computer. Adobe Flash Player is one of the most popular browser plug-ins; it is used most often to view video content. Out-of-date versions of Adobe Flash Player are also notorious for introducing malware into computers. Chrome reduces the threat that Adobe Flash Player poses by directly integrating it into Chrome. Because of this integration, updates for Adobe Flash Player are included in Chrome updates.
Chrome also regularly checks for the latest security update without any action on your part. By integrating Adobe Flash Player and regularly checking for security updates, Chrome greatly reduces the danger of malware infection.
To view the default security measures, you can follow the next steps:
Choose Chrome Menu ⇒ Settings.
 Don’t change security settings unless you really know what you’re doing.
- Scroll to the bottom of the page and click Show Advanced Settings.
- In the Privacy section, the Enable Phishing and Malware Protection option warns you if Chrome detects that the site you’re trying to visit might contain phishing or other malware.
- From the HTTPS/SSL section, you can manage your SSL certificates and settings.
Chrome and Privacy
Chrome enables you to control the information you share online. For example, you can change your privacy settings, delete your browsing history, and browse in Incognito mode. To adjust privacy settings, follow these steps:
- Choose Chrome Menu ⇒ Settings.
- Scroll to the bottom of the Settings page and click Show Advanced Settings.
In the Privacy section, click Content Settings.
From the Content Settings dialog box, you can make a variety of changes. Below, I’m going to list the settings you might be most likely to change. If I don’t cover a setting you want to change, you can search for help on that setting at
https://support.google.com/chrome/.
Handling cookies
You can control how Chrome handles cookies. In most cases, websites you visit place cookies on your computer for the purpose of recognizing your specific browser/computer combination if you return to the site. Chrome allows cookies by default, because they are typically harmless, but cookies can allow sites to track your navigation during your visit to those sites.
Third-party cookies are cookies placed on your computer by one website for some other website. To increase privacy, most people block third-party cookies to prevent sharing information with parties not directly associated with the sites they visit.
Chrome and JavaScript
You can control whether Chrome runs JavaScript, which web developers commonly use to make their sites more interactive. If you disable JavaScript, you might find that some sites don’t work properly.
Allowing plug-ins
Plug-ins appear on specific websites and are used by website developers to process web content that browsers can’t inherently handle. For example, Adobe Flash Player processes content that web browsers don’t inherently process. Chrome allows plug-ins to run by default, and, if you disable this feature, various websites might not function as expected.
Working in Incognito mode
If you work in Incognito mode, you can browse the web without recording a history of the websites you have visited and without storing cookies. Using Incognito mode doesn’t make Chrome more secure; it simply enhances your privacy by preventing Chrome from keeping a record of the sites you have visited during that particular browsing session. Even in Incognito mode, you shouldn’t visit websites that you wouldn’t feel safe viewing in a regular Chrome window.
To use Incognito mode, choose Chrome Menu ⇒ New Incognito Window. An incognito window like the one shown in Figure 17-3 appears; notice the Incognito icon in the upper-left corner of the browser window, immediately to the left of the New Tab tab. You use an Incognito window the same way that you use the regular Chrome window; while you work, Chrome doesn’t record a history of the sites you visit nor does Chrome allow sites to store cookies on your computer.

Figure 17-3: An Incognito window.
Deleting browsing history
Like all browsers, if you work in a regular Chrome window (rather than an Incognito window), Chrome keeps track of the websites you have visited during each browsing session. Browsers save your browsing history, among other reasons, to decrease the time you wait to see a web page that you have previously visited. And browser history can help you return to a website you visited previously even though you can’t remember the website’s address.
To view your browsing history, choose Chrome Menu ⇒ History and Recent Tabs ⇒ History. A page similar to the one shown in Figure 17-4 appears; your browsing history is organized by date and time, with the most recent sites you visited appearing first. You can click any entry to redisplay that web page.

Figure 17-4: Use your browsing history to revisit a web page you visited previously.
You also can delete all or only part of your browsing history, typically to maintain your privacy. From the History page, click Clear Browsing Data. The dialog box shown in Figure 17-5 appears; you can choose the type of data you want to delete and the time frame over which to delete that data.

Figure 17-5: Use this dialog box to delete browsing history.
To delete a single browsing history entry, display the History page (shown previously in Figure 17-4) and hover the mouse pointer over the entry you want to delete. Select the check box to the left of the entry, and, if appropriate, select additional entries to delete. Then, click the Remove Selected Items button that becomes clickable at the top of the History page.
Reviewing miscellaneous privacy settings
In addition to the settings previously described in this section, you can control the way Chrome handles the following situations; the following descriptions describe Chrome’s default behavior:
- Chrome asks for permission whenever a website wants to use your location information.
- Chrome asks for permission whenever a site wants to automatically show notifications on your computer desktop.
- Chrome asks for permission whenever sites or apps such as games want to disable your mouse pointer.
- Chrome asks for permission whenever websites request access to your computer’s camera and microphone.
- Chrome asks for permission if a website wants to bypass Chrome’s sandbox technology and directly access your computer.
- Chrome blocks pop-ups from appearing and cluttering your screen.
To use Chrome effectively with QBO and QBOA, you cannot block all pop-ups. By default, Chrome blocks all pop-ups. If you try to use QBO or QBOA while pop-ups are blocked, you’ll see a screen similar to the one shown in Figure 17-6.
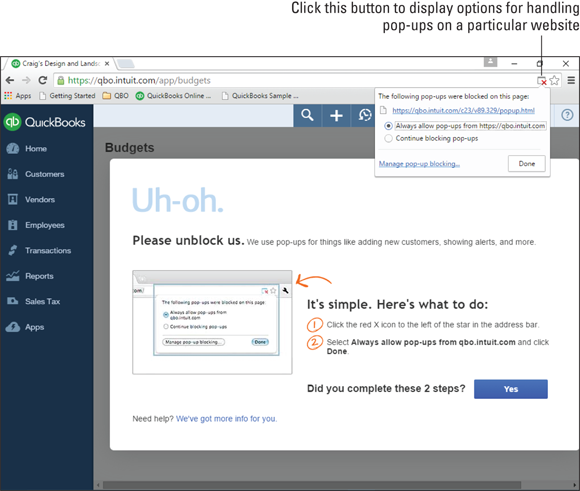
Figure 17-6: When all pop-ups are blocked, you can’t access QBO or QBOA.
Note the pop-up blocker icon at the right edge of the Omnibox. Click it to display the message shown in Figure 17-6, and then select the first option to allow QBO and QBOA pop-ups.
You can turn on pop-ups selectively for any website. Follow these steps:
- Click Chrome Menu ⇒ Settings.
- Click Show Advanced Settings.
- In the Privacy section, click the Content Settings button.
- In the Content Settings dialog box, scroll down to the Pop-ups section and click Manage Exceptions (see Figure 17-7).
- In the Pop-up Exceptions dialog box that appears, type the name of the website for which you want to manage pop-ups.
- From the Behavior list box beside the web address, choose Allow or Block.

Figure 17-7: Use the Manage Exceptions button in the Pop-ups section to identify websites whose pop-ups you want to allow or deny.
Using Google tools to manage privacy
Although Google can collect a lot of information about you, you can control just how much information Google collects using Google’s privacy management tools. Visit www.google.com/goodtoknow/online-safety/security-tools/ from this website, you can, for example, use the Ads Preferences Manager to opt out of targeted ads.
Using Bookmarks in Chrome
Bookmarks enable you to save a web page address so that you can easily return to it. In this section, you learn to
- Create a bookmark.
- Use a bookmark to display its associated web page.
- Display the Bookmarks bar in Chrome to make bookmarks more accessible.
- Organize bookmarks by renaming them, placing them into folders, changing the order in which they appear when you view bookmarks, and deleting bookmarks you no longer need.
Creating a bookmark
Creating a bookmark is easy. First, navigate to the web page you want to bookmark. For example, you might want to bookmark the QBO or QBOA sign-in page. Then click the Bookmark This Page button (the one that looks like a star) at the right edge of the Omnibox, and either press Ctrl+D or choose Chrome Menu ⇒ Bookmarks ⇒ Bookmark This Page. The Bookmark Added! dialog box appears (see Figure 17-8).

Figure 17-8: This dialog box appears when you create a bookmark.
You can change the bookmark’s name (I shortened mine) and the folder in which Chrome stores it; you read more about these organizational techniques later in this section. Click Done, and Chrome saves your bookmark.
Using a bookmark
After you create a bookmark, you can use it to quickly navigate to the bookmark’s website. Choose Chrome Menu ⇒ Bookmarks. All the bookmarks you’ve created appear at the bottom of the Bookmarks menu (see Figure 17-9). Just click the bookmark representing the web page you want to view, and Chrome takes you there.

Figure 17-9: Bookmarks you’ve saved appear at the bottom of the Bookmarks menu.
Displaying the Bookmarks bar
By default, Chrome saves your bookmarks to the Bookmarks bar, which appears just below the Omnibox every time you open the New Tab page. The Bookmarks bar makes using bookmarks faster and easier because bookmarks are always visible — you don’t need to navigate to the Bookmarks menu to view and use them. You can simply click the appropriate bookmark on the Bookmarks bar.
To take full advantage of the Bookmarks bar, you can display it on all Chrome tabs (instead of just the New Tab tab). Press Ctrl+Shift+B or choose Chrome Menu ⇒ Bookmarks ⇒ Show Bookmarks Bar. Chrome displays as many bookmarks as possible on the Bookmarks bar, based on the names you give to your bookmarks: The shorter the name, the more bookmarks Chrome can display. But, you can easily get to the bookmarks you can’t see by clicking the small button containing two right-pointing arrows at the right edge of the Bookmarks bar (see Figure 17-10).

Figure 17-10: Take advantage of the Bookmarks bar.
Importing bookmarks
If you’ve been working in a different browser and want to copy your bookmarks from that browser to Chrome, no problem. Choose Chrome Menu ⇒ Bookmarks ⇒ Import Bookmarks and Settings. The Import Bookmarks and Settings dialog box appears (see Figure 17-11).

Figure 17-11: Use this dialog box to identify what you want to import.
Select or deselect the check boxes beside the items you want to import and, if appropriate, also select the browser from which to import them. Then, click Import, and Chrome imports the information. The imported bookmarks appear in a folder on the Bookmarks bar, and you can use the Bookmark Manager, described in the next section, to reorganize these bookmarks.
Managing bookmarks
If you’re like me, you’ll learn to love bookmarks — perhaps to your detriment. As you accumulate bookmarks, finding them to be able to use them becomes a project. You have a few avenues available to you:
- You can organize your bookmarks by repositioning them on the Bookmarks bar and on the list of bookmarks.
- You can create folders for your bookmarks and place bookmarks in the appropriate folder.
- You can search for a bookmark.
To reposition bookmarks, you can drag them on the Bookmarks bar or on the list of bookmarks (either the list that appears when you click the button at the right edge of the Bookmarks bar, or the list of bookmarks that appears at the bottom of the Bookmarks menu). A black line (vertical if you’re dragging on the Bookmarks bar or horizontal if you’re dragging on either list of bookmarks) helps you locate the new position for the bookmark; simply release the mouse button when the bookmark appears where you want it to appear.
You also can use the Bookmark Manager to reorder bookmarks; in addition, using the Bookmark Manager, you can create folders and organize bookmarks into those folders, delete bookmarks and folders you no longer need, rename bookmarks, and search for bookmarks.
To open the Bookmark Manager, choose Chrome Menu ⇒ Bookmarks ⇒ Bookmark Manager. A tab like the one shown in Figure 17-12 appears.

Figure 17-12: The Bookmark Manager.
The Bookmark Manager window works the same way that the Windows Explorer window works; if you’re familiar with Windows Explorer, you already know many of the techniques you use to organize bookmarks.
The left pane displays existing folders, and the right pane shows the bookmarks in each folder you select in the left pane. You use the Organize button just above the left pane to make organization changes.
To delete any bookmark or folder except the Bookmarks bar folder and the Other Bookmarks folder, click the bookmark or folder and then press the Delete key on your keyboard. Nope, you can’t delete the Bookmarks bar folder or the Other Bookmarks folder.
You can use folders to organize bookmarks; I like to organize my bookmarks by subject. Although you can add new folders to the Other Bookmarks folder at the bottom of the list on the left, I suggest that you confine your organization to the Bookmarks bar folder. You can compare keeping all your bookmarks on the Bookmarks bar to owning only one file cabinet. The cabinet has multiple drawers (folders, in this analogy), but you need to search only one cabinet to find what you need. Finding a particular bookmark will be easier if you use only the Bookmarks bar folder.
To create a new folder on the Bookmarks bar, choose Organize ⇒ Add Folder. Type a name for the new folder, and press Enter.
When you create a new bookmark that you want to place in this folder, select this folder in the Folder list box of the Bookmark Added dialog box (refer back to Figure 17-8).
To add an existing bookmark to a folder, click the bookmark on the right side of the Bookmark Manager window and drag it to the appropriate folder on the left side of the Bookmark Manager window.
To reorder bookmarks or folders, drag the bookmark or folder up or down in the list on either side of the Bookmark Manager window. That is, you can drag folders in the left side of the window and bookmarks or folders in the right side of the window. A horizontal black line appears as you drag and helps you locate the new position for the bookmark or folder; release the mouse button when the bookmark or folder’s black line appears at the correct location in the list.
To rename any folder or bookmark, right-click it and choose Edit from the menu that appears. Then, type a new name and press Enter.
Suppose that, after this wonderful organizing you’ve done, you can’t remember where you put a particular bookmark. No problem. Use the Bookmarks search box (refer to Figure 17-12). Type an address or search term into the Search box and press Enter. Chrome displays any bookmarks that match the address or search term. To cancel the search and redisplay all your bookmarks, click the X that appears in the Search box.
When you finish working in the Bookmark Manager window, click the X that appears in the tab’s name.
Duplicating and Pinning Tabs
Chapter 16 describes how to open multiple tabs as you browse in Chrome and how to reposition tabs within the Chrome window.
At times, you might find it useful to duplicate a QuickBooks company tab you’ve already opened so that you have that tab open twice. To duplicate any tab, right-click the tab and choose Duplicate from the shortcut menu that appears (see Figure 17-13). Chrome automatically opens another tab using the web address of the duplicated tab. You can then work on the tabs independently of each other.
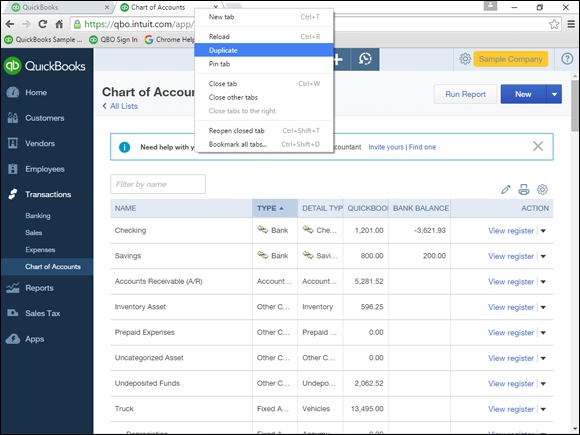
Figure 17-13: Duplicate a browser tab in Chrome.
You might also find it useful to pin a particular Chrome tab; pinned tabs open automatically whenever you start Chrome. To pin a tab, right-click the tab and choose Pin Tab from the shortcut menu that appears (refer to Figure 17-13).
If you decide you no longer want a pinned tab to appear each time you open Chrome, right-click the pinned tab and click Unpin Tab from the menu that appears. Be aware that the Unpin Tab command appears only if you previously pinned the tab.
Using Chrome on Multiple Monitors
Here’s another tab-related trick: If you have more than one monitor, you can pull one tab out of the Chrome window and drag it to your other monitor so that you can work in QBO/QBOA on multiple screens. Again, because tabs in Chrome function independently, the work you do in each window is independent of the other.
To pull a tab, click and drag the tab; a preview of the new window appears. Release the mouse button and the tab appears in a new window onscreen. If you didn’t drag the tab to a different monitor, no problem. Just drag the new window by its title bar to your second monitor. (Yes, if you have three monitors, you can repeat this process.)
Setting Up Chrome Users
In Chapter 16, I explained that you can set up multiple users, each of whom can have different Chrome settings. At that time, I promised that I’d show you how to set up multiple Chrome users — and, here we are.
If you want to log into two different QBO companies from a single QBO account, you can use different Chrome users. To create a user, choose Chrome Menu ⇒ Settings to display the Settings tab. In the People section, click Add Person to display the Add Person dialog box (see Figure 17-14).

Figure 17-14: The Add Person dialog box.
Select an icon for the new user and enter a name for the user. The name will appear in the Current User button, and the icon will appear when you click the Current User button in the upper-right corner of the Chrome window. Optionally, you can create a desktop shortcut for the user so that the user can quickly and easily open his or her own version of Chrome. Then click Add.
Another instance of Chrome opens, and you’ll see two buttons on the Windows taskbar. You can identify the current user by looking at the Current User button in the upper-right corner of the browser, and you can easily switch from one user to another. Let’s assume that you have opened only one instance of Chrome, so only one button appears on the Windows taskbar. To switch users, click Current User ⇒ Switch Person, as shown in Figure 17-15.

Figure 17-15: To initiate switching users, use the Current User button.
Chrome displays a window listing the currently defined users (see Figure 17-16); click one or click the Add Person button to go through the process of creating a new user.

Figure 17-16: Select a different user.
Assuming you select an existing user, Chrome opens a new browser window. If you don’t maximize Chrome, you can easily see the open windows.
To shortcut the process of switching users, you can right-click the Current User button; a list of available users appears and you can click the one you want.
You can use the menu that appears when you click the Current User button to easily change a user’s name or icon. To change a user’s icon, click the Current User button and then click the picture currently displayed (see Figure 17-17). Chrome opens the Edit version of the dialog box you saw earlier in Figure 17-14. Just select a different icon. And you can change the user’s name here, too.

Figure 17-17: Edit a user’s icon, name, or both.
To change only the user’s name, click the Current User button and slide the mouse cursor over the user’s name; a pencil appears (refer to Figure 17-17). Click the pencil, and the text for the user’s name becomes editable. Just type a new name and press Enter.
 You can delete a user from the Chrome Settings tab.
Zooming In and Out
There are times when tired eyes need help; fortunately, you can zoom in and out of Chrome’s windows easily. Press Ctrl++ (plus sign) to make the information in the window larger (known as zooming in) and Ctrl+- (minus sign) to reduce the size of the information in the window (known as zooming out).
Be aware that, while zooming is great for enlarging text, zooming can also alter how web pages appear, even to the point of hiding content that would otherwise be visible. So, if something seems to be missing, try resetting the zoom factor to 100%.
Downloading Files
Chrome can display many different types of documents, media, and other files, such as PDF and MP3 files. But, you might need to save a file to your computer.
Instead of clicking the file’s link — which is always tempting — right-click the link and, from the menu that appears, click Save Link As. Then, in the dialog box that appears, navigate to the folder on your computer where you want to save the file, give the file a name you’ll recognize, and click Save. The file downloads, and you can monitor the download progress in the lower-left corner of the Chrome browser window.
If you click a link to a file, it might download automatically or it might open within the Chrome browser. To prevent a file from opening in Chrome, make sure that you right-click the link.
To view and open any of your downloads, use the Downloads tab (see Figure 17-18). Choose Chrome Menu ⇒ Downloads. From this tab, you can
- Open downloaded files by clicking them.
- Open the Downloads folder by clicking the link on the right side of the screen.
- Search for downloads using the Search box just below the Bookmarks bar.
- Clear the Downloads list using the link at the far right of the window.

Figure 17-18: The Downloads tab.
Chrome on Mobile Devices
You can use the Chrome browser on mobile devices as well as on desktop computers (of course you can!). Chrome works on both iOS and Android, and the Chrome app is typically preinstalled on Android devices because Android and Chrome are both Google products. Chrome on a mobile device functions pretty much the same way that Chrome on a desktop computer functions.