Chapter 6
Start Scratch from Scratch
You can use your Pi to make games and play with real code. This project is about a simple way to get started with coding. It’s called Scratch, and it’s a lot of fun.

Understand Scratch
Scratch is the simplest way ever to make your own software by creating computer code. Usually when you write code, you type words that look a bit — but not much — like English.
With Scratch you don’t have to type anything. You get a big (virtual) box of blocks and a stage where things happen. The stage has characters called sprites, which can move around the stage, bump off the walls and off each other, and do all kinds of other stuff.
Each block does something different. Some blocks move a sprite. Other blocks turn a sprite or make it change color. Some blocks check whether a sprite is touching another sprite or the sides of the stage.
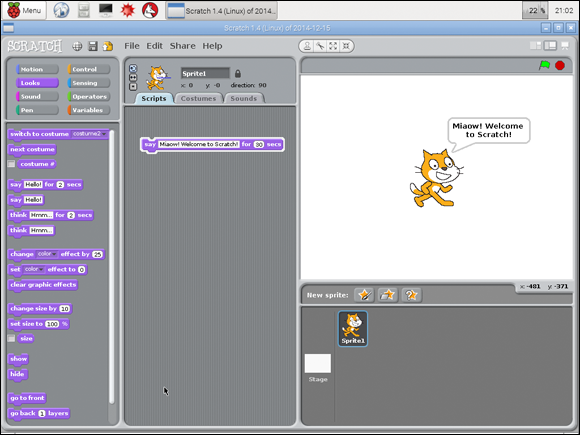
You can make sprites show talk bubbles or think bubbles, get bigger or smaller, or change them in many other ways. Figure 6-1 shows a sprite saying something with a talk bubble.
 Scratch was made for kids, but adults can use it, too. Scratch is a really good way to get started with coding before moving to more complicated computer languages like Python.
 A computer language is a way to tell a computer what you want it to do. There are lots and lots of computer languages. They’re all different, but a lot of languages do the same kind of stuff but use different words for it — a bit like French and English. Scratch is a very simple language that gives you a lot of ready-made words to use, so you don’t have to work hard to learn them and remember them.
Connect Blocks and Making Scripts
To make a game or tell a story, drag the blocks into a list with your mouse. The blocks clip together on the screen, a bit like real plastic blocks.
Lists are called scripts. When you click on a script, Scratch goes through the blocks one by one, and each block does something to the sprites it controls.
The blocks move, change, spin, or check a sprite in the order you set. Special blocks can repeat some or all of a script over and over or a set number of times. You can also make your script remember numbers and sentences and do simple math.
You can have more than one sprite on the stage at a time. You can also set the stage background to make your story or game look more exciting.
You don’t have to use Scratch on your Pi. The scratch website at http://scratch.mit.edu includes a version of Scratch that runs in a web browser. The Pi version is less polished than the web version. But you probably have the Pi all to yourself, so you won’t have to wait to use the family computer to use Scratch.
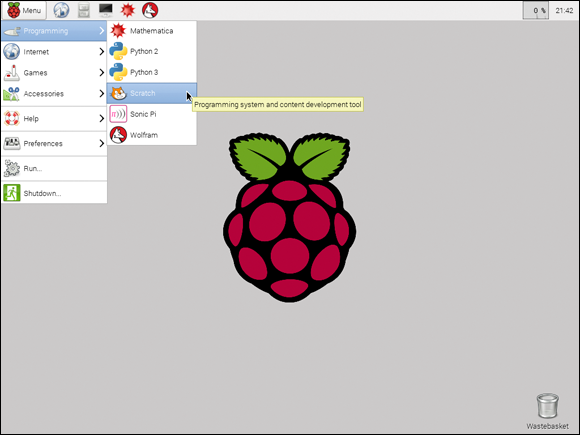
Find and Start Scratch
You can start Scratch only when the Pi’s desktop is open. Here’s what you need to do:
If you’ve just booted your Pi and you’re at the command prompt, type startx and press Enter.
Figure 6-2 shows you where to find Scratch.
- When the desktop appears, click the Menu button at the top left of the screen.
- Move the mouse down to Programming.
When the next menu slides out, move the mouse to Scratch and click on the Scratch item.
After a while, the Scratch window appears.
 You may not see the same options on your Pi, or they may be in different places. Look for the words Programming and Scratch in the menu system to find them.
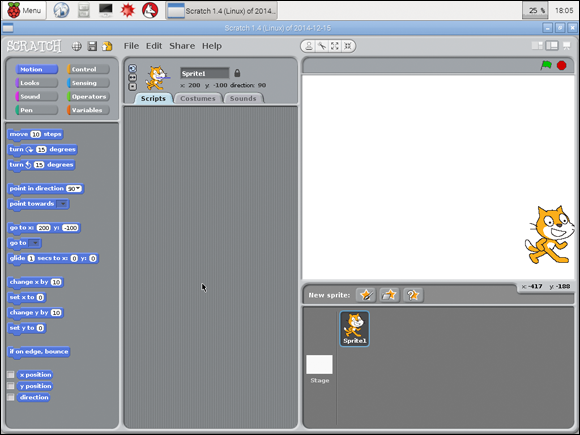
Look around Scratch
The Scratch window looks like it has a lot going on, but it’s not as complicated as it looks.
From left to right, look for four boxes:
- Block box: This box has a list of all the blocks you can use. Blocks come in different colors, and the box shows only one color at a time.
- Scripts/Costumes/Sounds box: This box is where you clip blocks together to make scripts. You can also make new costumes — sprite shapes — and work with sounds by clicking the tags near the top of the box.
- Stage box: The big white area with the cat is the stage. This box is where you play your game or tell your story.
- Sprite box: The area under the stage shows all the sprites in your story or game.
When you start Scratch, it makes a sprite for you. The sprite looks like a cartoon cat. You can change the way the sprite looks by changing its costume. You can make it move by changing its position on the stage.
Understand the Stage
The stage doesn’t understand up, down, left, or right.
Instead, it uses a system with two magic numbers, so you can just tell a sprite to move to the right by some distance. The numbers have special names: x and y. The x number sets the left/right position. The y number sets the up/down position.
x and y are sometimes called coordinates, which is a big, complicated mathy word for “this is how we use two numbers to work out where something is.”
When x and y are both 0, the sprite is dead center of the stage. To move a sprite right, set x to more than 0. To move it left, set x to less than 0.
The size of x tells you how far away the sprite is from the middle of the stage. The sign (minus or nothing) tells you whether it’s left or right of the middle.
So when x is 100, the sprite is in the right half of the stage. When it’s x is –100, it’s in the left half of the stage.
Up and down work the same way. When y is 100, the sprite is in the top half. When y is –100, it’s in the bottom half.
x and y are completely separate. They’re independent, so you can move the sprite left or right without changing how far up/down it is. And you can move it up and down without changing its left/right position.
To move it up and down and left and right, you have to change x and y together.
Table 6-1 has a cheat sheet.
Table 6-1 Moving on the Stage with x and y
How Big Are x and y? |
Where Is the Sprite? |
x doesn’t have a minus sign (100) |
Right half of the stage |
x has a minus sign (–100) |
Left half of the stage |
y doesn’t have a minus sign (75) |
Top half of the stage |
x has a minus sign (–75) |
Bottom half of the stage |
x is zero (0) |
Dead center left/right only |
y is zero (0) |
Dead center up/down only |
x and y are zero (0) |
Dead center left/right and up/down |
Why does Scratch work like this? Wouldn’t it be easier to say left, right, up, and down? It might be, but this x y idea is how it’s done in math and in grown-up game and app programming, so Scratch copies how they work.
Move a Sprite with go to
You can also move a sprite using go to:
- If you can’t see the blue blocks in the block list, click the blue Motion button near the top left of the screen.
Look down the list to find the block called go to x: y:.
When you click it or include it in a script, it sets the x and y numbers that move a sprite. If you haven’t changed anything, the numbers are both 0, so the block looks like this:
go to x:0 y:0You can see the x and y numbers in the block.
Double-click the x: number, and when it turns gray, type 200 and press Enter.
With a new x number, the sprite jumps toward the right of the screen. Cool! See how it works?
Now double-click the y: number, and when it turns gray, type –100.
The sprite moves down. Figure 6-3 shows where it ends up.
Your sprite may not be in the same place. The width and height of the stage depend on the width and height of your screen (monitor), so your stage may not be the same width and height as the stage in the image. You don’t need to worry about where the sprite is, as long as it moves!
Center a sprite
Can you work out how to use a go to block to move a sprite to the middle of the stage? Table 1-1, earlier in the project, offers a clue.
You can probably guess that if you change x and y to 0, the sprite will jump back to the middle.
Now you can play with typing other numbers into the x and y boxes to see what they do. After a while, you should be able to guess what a number does before you try it.
If you look at the block list, you can see other blocks you can use now. Click once on the following to see what they do:
change x by [number]
set x to [number]
change y by [number]
set y to [number]
Glide a sprite
People and things in the real world don’t usually jump instantly from one place to another. To make movement look more realistic, you can use the glide block.
The glide block works like the go to block, but it has an extra number, which sets how long it takes the sprite to glide from one place to another.
Try changing the x and y numbers and the time in seconds in the glide block to see what it does.
Move and turn a sprite
Scratch gives you another way to move sprites. Instead of moving to somewhere on the stage, you can tell a sprite to move in the direction it’s facing. You can also turn it to make it face in a different direction.
Use the move, turn, and point blocks to move like this. They’re at the top of the block list. Try clicking on them and changing the numbers in them to see what they do.
There’s also a point in direction block that makes the sprite turn to face the direction you set. The direction is set in degrees, which are like small turning steps. So 360 degrees turns the sprite all the way around, which is kind of pointless. And 180 degrees turns it halfway around, while 90 degrees turns it a quarter of the way around.
You can click the number box to set your own number, or you can select four directions from a menu. See whether you can work out which numbers mean left, right, up, and down.
Understand turn and rotation
If you turn a sprite, it may not turn on the stage, even though it’s pointing in a new direction. This may be confusing, because although the sprite has turned because you told it to, it still looks like it’s facing that way!
The complicated mathy word for turning something is rotation. Scratch gives you a choice about how the sprite looks when you rotate it.
If you look closely, you can find three tiny buttons to the left of the sprite in the top part of the middle window.
You can click any button to select it. From top to bottom, they work like this:
- can rotate: Click this button to make sure the sprite always turns. It can face up, down, left, right, or any direction in between. Sometimes this means it’s upside down.
- only face left/right: The sprite faces only left or right, even if it’s pointing up or down. It’s never upside down.
- don’t rotate: The sprite always faces the same way. You can still change its direction, but you only ever see one direction on the stage.
Make a Simple Script
You can make a simple script by dragging blocks to the Scripts area in the middle of the screen:
- Drag a move block to the Scripts area.
Drag a turn block to the Scripts area and hold it just under the move block without lifting your finger from the mouse button.
Scratch shows a wide white line, like the one in Figure 6-4.
Let go of the mouse.
When you let go of the mouse button, the bottom block clips to the top block.
You made a script!
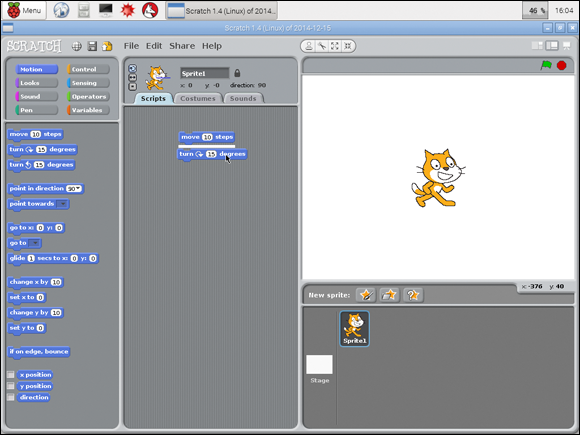
When you click anywhere on the script, Scratch steps through each block in turn. This script makes the sprite move, and then it makes it turn.
This script has only two blocks, but if you made a script with hundreds of blocks, Scratch would start at the top block, do what it says, move to the next block, do what it says, and so on, all the way down the list, in order.
Making a script work is called running a script. Imagine a script wizard running from the top of the script to the bottom and making each block work in turn. Scripts work a lot like that, only you can’t see the wizard because he’s hiding behind the stage.
You can clip blocks to the top of a script as well as the bottom. You can clip a block whenever it has a slot or a tag.
Break up a script
Sometimes you want to break a script. Maybe you want to take off the last few blocks. Or maybe you want to make a gap in the middle so that you can put more blocks in.
To break a script:
Click on a block and drag it.
The script splits, and Scratch shows the white line.
Drag the block far enough, and the white box vanishes.
Now you have two blocks, or maybe two smaller scripts.
Right-click on blocks
Scratch has some cool extra tools. To see them, right-click on a block or a script.
- help: Click help to get a hint about what a block does. The hint appears in a window. Click OK to make the window go away.
- duplicate: Click duplicate to make a copy of a script or block. The copy appears in the Scripts area.
- delete: Click delete to get rid of a script or block from the script area. The block or script disappears. If you do this by accident and change your mind, choose Edit⇒Undelete from the menu at the top of the Scratch window to make the script/block reappear.
Make a reset script for a sprite
Can you work out how to make a reset script for a sprite now? Say that you want to join two blocks to move the sprite to x:0 and y:0 and turn it so that it faces to the right.
Try clipping blocks together and changing the numbers inside them until you’ve made a script that does this. Remember, you can have more than one script in the Scripts area at a time, so you can leave this script lying around, if you want.
Control a Script
Sometimes you want a script to do something over and over. If you broke up the script in the previous section, put it back together. Click on it a few times. The sprite moves and turns each time.
You can make a script do the same thing over and over by clicking it over and over. That works fine for a few repeats, but what if you want to repeat something hundreds of times?
You could use the duplicate right-click tool to make lots and lots of copies of your simple script and clip them together to make one big script.
That works for maybe ten repeats, but it’s a boring way to make a script do something hundreds of times.
Scratch has a better way. Click the Control button at the top of the block library. It has an orange edge. When you click, it you see a new set of blocks.
These are control blocks. They make your scripts smarter.
You can use control blocks do things like
- Repeat some blocks forever.
- Repeat some blocks as many times as you want, then carry on.
- Start a script when you press a key.
- Make a script wait for a while.
- Make a script wait until something happens.
- Repeat a script until something happens.
- Check and test numbers, sprite positions, and other things.
- Stop a script.
- Stop all scripts.
Use control blocks
Control blocks go in three places:
- At the start of a script
- At the end of a script
- Around other blocks
Start control blocks have a round top. You can’t clip a block on top of them. They have to go first because they wait for something to happen. The script can’t start until it happens!
For example, the when [space] key pressed block starts a script when you press the space key. You can pick a different key using the menu in the block.
End control blocks have a flat bottom. You can’t clip a block under them. They have to go at the end of a script because they tell the script to stop.
Around scripts have a space inside them. They look a bit like fat hairclips. To use them, drag them around the script you want to control.
You may have to split the script to pull out the blocks you want to control first and then glue it back together after you added the around block.
You can try out the repeat block. Drag it from the block list to the script area and clip it around the two blocks there already. The bottom end of the clip stretches to fit around the blocks.
Figure 6-5 shows the result. Click the block, and the sprite moves and turns. It repeats ten times unless you change the number by clicking it and typing in a new number.
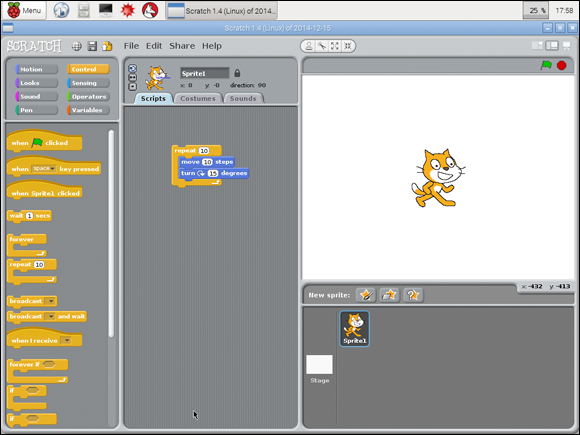
If it doesn’t turn, check which rotation button is lit. For details, see the section “Move and turn a sprite,” earlier in this project.
Stop scripts
Click the number in the repeat block and type 100 and press Enter. Click the script again.
Now the sprite moves and turns over and over. It keeps moving for a long time.
Did you get bored? If you want to stop a script early, you can click the red button above the stage. The green flag next to it lights up when a script is running.
You can also click a script to stop it. While it’s running you can see a white border around it. When you stop it, the border disappears.
Make a Simple Bounce Script
Can you make a script that bounces the sprite off the edges of the screen? There’s an easy way to do this, and a hard way.
The easy way is to use the if on edge, bounce block in the Motion block list. Clip a move block and the if on edge, bounce block together. Put them inside a forever control block.
If you worked out how to make a reset script, click it to move the sprite to the middle of the screen.
Figure 6-6 shows you how to clip the blocks together.
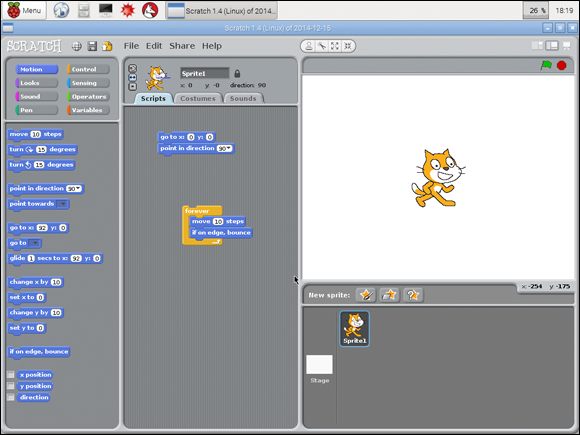
Optionally, you can click the middle only face left-right rotation button to keep the sprite the right way up when it bounces.
Click the script. The sprite should bounce between the two sides of the stage! Click the script again to stop it.
What happens if you turn the sprite first? Click a turn block to turn the sprite. If you don’t have the can rotate button selected, you won’t see any difference. But click the script to run it again.
The sprite bounces up and down and left and right! Click the script to stop it.
Introduce Variables
What does bounce do? What happens when the sprite bounces?
If you think about it, a bounce means it turns to face the other way, so you could use a turn block to make it bounce. You could tell the sprite to face left when it bounces off the right edge of the screen and face right when it bounces off the left edge.
But maybe you want to make the sprite do something else — like jump when you press one key, hide behind another sprite when you press a different key, or bounce before it hits the edge.
To do that, you need to know where it is. And you have to be able to change where it is.
You could make a lot of go to blocks with a different x and y for every place on the stage the sprite might be. But that would be a lot of blocks.
A better way would be to remember and change x and y positions as it needs to. You can do this in Scratch using variable blocks.
A variable is like a box that holds a number. The box has a name, so you can tell it from other boxes. And it has space for a number.
Variables can remember letters, words, and sentences, too.
Use variables
Scratch can do three clever things with variables. The first is make them. Variables have special blocks, and when you make one variable, you get some special blocks to help you use it. You can set the variable to a number or add a number to it.
When you make a variable, it appears on the stage. You don’t always want this, so you can use a hide variable block to make it go away. And you can use a show variable block to make it come back.
The second clever thing is math. You can add, subtract, multiply, and divide variables by some number. You can even add, subtract, multiply, and divide one variable by another!
The final clever thing is best of all. You can use a variable wherever you see a number. For example, you can tell a go to block to use a variable you make. When you click the go to block or when Scratch reaches it in a script, the block moves the sprite to the number stored in the variable.
This gives you way more options than moving a sprite to the same place all the time. You can change the numbers by hand. Or with math. Or by making them follow other numbers, like the position of some other sprite.
Make a variable
To make a variable, click the darker orange Variables button at the bottom right of the block types in the block list area. Three buttons appear. You can click them to
- Make a variable
- Delete a variable
- Make a list
A list is a special kind of a variable that holds other variables. It’s like a big box with lots of smaller boxes inside it. They’re numbered so that you can tell them apart and do things like get the third box and change what’s inside it. You can ignore lists for now.
To make a new variable
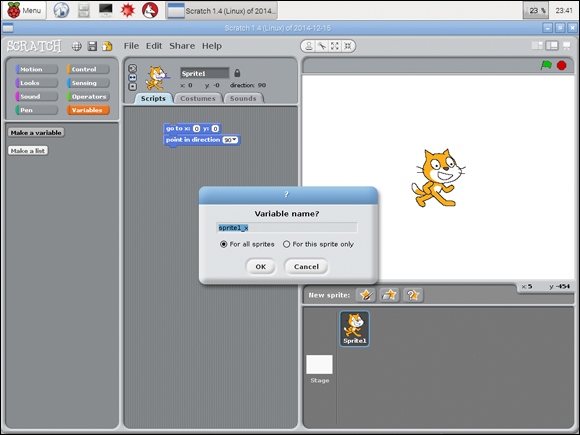
Click the make a variable pattern.
You see a window like the one in Figure 6-7.
- Type sprite1_x into the Variable Name? box.
Leave the For All Sprites option checked and click OK.
Whoa! Stuff happens! Scratch makes some new blocks. And if you look at the stage, you’ll see a box appears, with the name of your variable sprite1_x and a number.
When you make a new variable, the number is always 0 because you haven’t changed it yet. Figure 6-8 shows what you get.
Can you use variables to replace any number? You totally can! You can use a set block to set a variable to the value of another variable. In a change block, you can make the by value a variable. You can make scripts that are really smart, with variables passing values to other variables between sprites all over the stage. There are almost no limits to what you can do.
Understand For All Sprites and This Sprite Only
When you make a variable, you can tell Scratch to make it private for each sprite by clicking the For This Sprite Only option. If it’s private, other sprites can’t read it, change, or even see it.
Sometimes privacy is a good thing. It means you can use the same variable names in different sprites, so you can copy a script and use it with a new sprite without changing anything.
But sometimes you want one sprite to know what’s happening in the scripts for another sprite. That’s when you leave For All Sprites selected as you make the variable. Now you can use the variable in every script for every sprite.
This choice looks like something you can ignore, but it’s a big deal. Programmers spend a lot of time thinking about whether to make variables private or public. If you make everything public, you can make a big mess and never be sure which script is changing which variable. If you have too many private variables you can’t get at the variables you need.
Plug variables into blocks
The big deal about variables is that you can use them to replace numbers. Instead of a fixed number like 10, which never changes, you can use a variable that you control with the power of control blocks and math.
Scratch does some clever tricks to make this work. You can literally drag and drop a variable on top of a number to replace it:
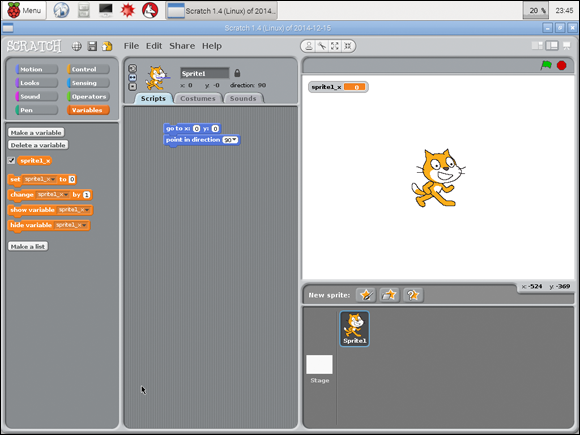
Drag your sprite1_x variable block and drop it into the Scripts area.
Ignore the set, change, show, and hide blocks. You want the block with the variable name and nothing else.- Click the Motion block type at the top left of the block list window and drag a go to block onto the script window.
And for your next trick, drag the variable block and drop it on the white number box.
If you do it right, the variable replaces the 0 that used to be there. Your new block should look like the one in Figure 6-9.
Set and change the variable value
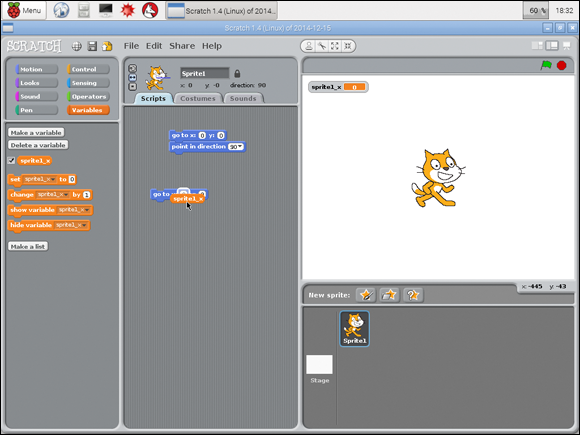
The number inside the variable is called the value. Click the Variables button at the top of the block list and find the set and change blocks.
When you click a set block or use it in a script, it sets the value to the number in the block.
When you click a change block or use it in a script, it adds the number after the value. When you start, that number is 1, so the block adds 1 to a value. But you can click it and change it.
Try it now:
- Click the number in the set block and change it to, say, 10.
- Click the set block and watch what happens.
Click the change block a few times.
Did you see what happened? The sprite1_x value box on the stage changed when you clicked the blocks. Figure 6-10 shows the changes.

The set and change blocks are in the Scripts area so you can see them more clearly. You don’t need to copy them to use them. You can click them and change the numbers inside them in the blocklist. But often if you’re playing with blocks, it’s good to make a copy in the Scripts area so that you can change them and maybe plug them into a script when you’re done.
Understand variables in blocks
Something didn’t happen — the sprite didn’t move. Why not?
The go to block moves the sprite only when you click on it or when Scratch runs it as part of a script. It doesn’t move the sprite when you change a variable inside it.
You might think it would, but it doesn’t — for a good reason.
You want to be able to change a value without lots of stuff happening as a result. Scratch works better if it does only the stuff you tell it to, not if it does stuff because it thinks you might want it.
So if you want a sprite to move, you have to set a variable in go to block and then click the block or run it inside a script. Otherwise, no movement.
Other blocks work the same way. They read the variable value only when you click on them, or Scratch reaches them when it’s running a script.
Show and hide variables
What do you think happens if you click on the show variable and hide variable blocks? Try it now!
Were you surprised? hide variable hides the value box on the stage. show variable makes it appear on the stage.
You can use these blocks to clean up the stage when you have so many variables it looks like a mess. You don’t usually need to look at all the values at once. Sometimes you don’t need to look at the values at all — which is when you need these blocks.