
How to build an IoT Weather Station
What is a software-defined radio
How to connect to 433MHz wireless sensors

Picture of SkyWeather2 Station Deployed Outside
How to gather data to analyze your system performance
How to hook up the SkyWeather2 Weather Station
How to install and configure the SkyWeather2 Python3 software
How to build the 3D printed parts for SkyWeather2
How to connect your weather station to the IoT (WeatherSTEM)
Everybody talks about the weather. In this chapter, we are going to talk about the weather in much more detail than just the temperature.
In the previous chapter, we looked at building simple IoT devices that would measure temperature and share that information with a server and other IoT devices. It was a simple application, but still illustrated a number of important concepts. In this chapter, we are building a much more complex and flexible project based on using the Raspberry Pi as part of the IoT device.
The SkyWeather2 not only gathers 13 different types of weather data; it also monitors and reports its own state, status, and health.
The best part? SkyWeather2 (Figure 3-1) requires no soldering to assemble, test, or build because of the use of Grove connectors. More on Grove connectors later in this chapter.
IoT Characterization of This Project
SkyWeather2 Characterization (CPLPFC)
Aspect | Rating | Comments |
|---|---|---|
Communications | 9 | WiFi connection to the Internet – can do ad hoc mesh-type communication and Bluetooth |
Processor power | 5 | Raspberry Pi 4B w/4GB |
Local storage | 8 | 16GB of SD card |
Power consumption | 2 | ~800mA consumption – not reasonable for small batteries or small solar system |
Functionality | 8 | Full Linux-based system. MySQL, etc. |
Cost | 2 | Expensive for many applications |
Ratings are from 1 to 10, 1 being the least suitable for IoT and 10 being the most suitable for IoT applications. This gives us a CPLPFC rating of 5.7. Great for learning, not so good for deployment for most applications.
No doubt about it, the Raspberry Pi is a very flexible and powerful IoT platform. However, the power consumption, cost, and physical size of the device make it more suitable for prototyping or for stand-alone, highly functional IoT units.
How Does This Device Hook Up to the IoT?
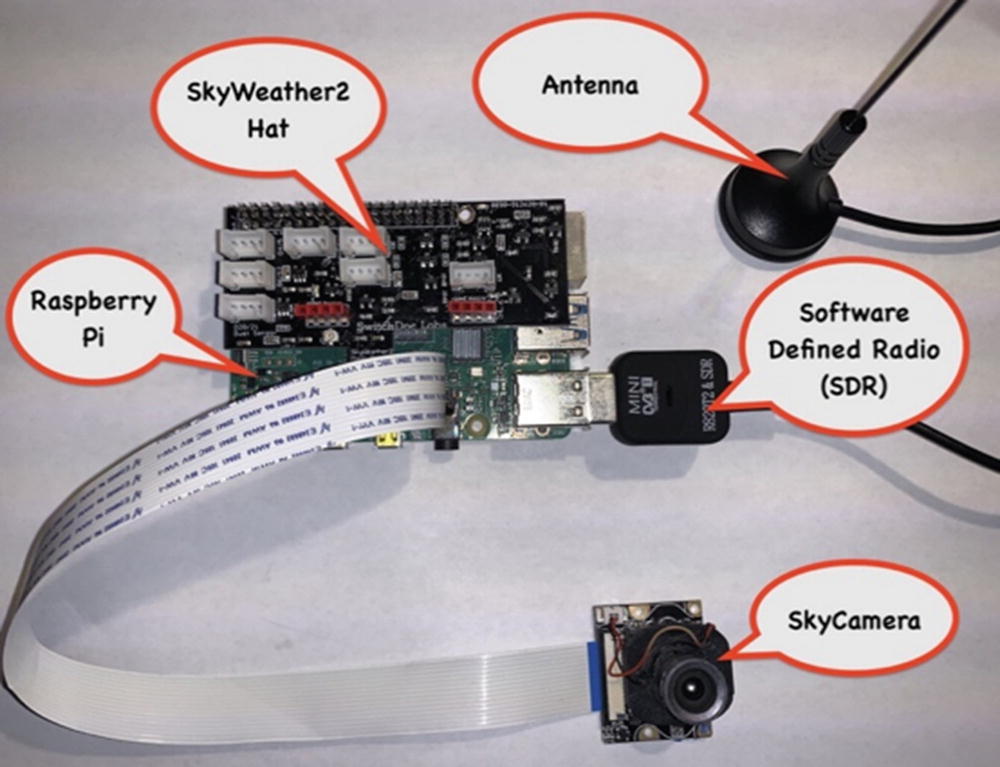
With SkyWeather2, hook up to the Internet using the WiFi connector. We can use the SDR (software-defined radio) to hook up to 422MHz wireless local IoT weather sensors, and we can also use the Pi SkyWeather2 Hat to connect to other wired devices. In this chapter, we will be using the WiFi interface to talk to the outside world.
Data Gathering
The SkyWeather2 uses 13 different sensors to detect weather connections. Because I am using a Raspberry Pi and have good storage mechanisms and disk space, I use a MySQL database to store all the weather data for future analysis and download. We also use the dash_app to build graphs locally and use an iOS app called Blynk to display the information across the Internet. WeatherSTEM is used to show our local weather on the cloud.
What Are Grove Connectors

A Grove Cable
The Grove system consists of a base unit and various modules with standardized Grove connectors.
We use Grove connectors and cable in building SkyWeather2. This means no soldering is needed to build this project.
See a full tutorial on Grove cables and connectors on SwitchDoc Labs:
www.switchdoc.com/2021/01/tutorial-intro-to-grove-connectors-for-arduinoraspberry-pi-projects/
And a great example of projects using Grove connectors:
www.switchdoc.com/2018/12/tutorial-using-an-analog-to-digital-converter-with-your-raspberry-pi-2/
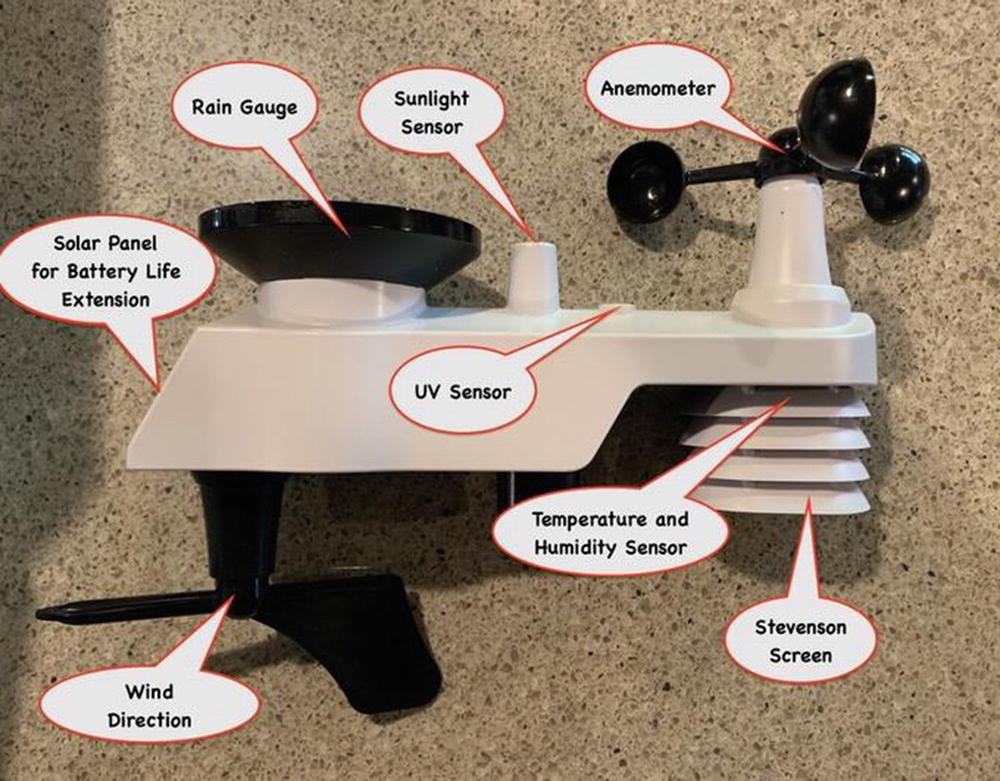
The Project – SkyWeather2
Barometric pressure
Outside temperature
Outside humidity
Altitude
Inside temperature (at up to eight locations!)
Inside humidity (at up to eight locations)
Sunlight
UV index
Wind speed
Wind gusts
Wind direction
Rain
All your weather information on the cloud
SkyCamera
ThunderBoard Lightning Detection
Amazon Alexa integration
WeatherUnderGround installation
This chapter will show you how to build a SkyWeather2 Raspberry Pi Weather Station. This project grew out of a number of other projects, including the massive Project Curacao [www.switchdoc.com/project-curacao-introduction-part-1/], a solar-powered environmental monitoring system deployed on the Caribbean tropical island of Curacao. Project Curacao was written up in an extensive set of articles in The MagPi magazine (starting in Issue 18 and continuing through Issue 22).
Temperature, wind, and humidity data analysis.
Add your own sensors for UV, dust and pollen count, and light color.

SkyWeather2 in Palm Springs with SkyCamera Picture in Background

The SkyWeather2 Architecture
The Architecture of SkyWeather2
This looks really complicated! It is not. There is a step-by-step assembly and testing manual that makes it a “snap” to put together and test.

What Do You Need to Build This Project?
SwitchDoc Labs has organized all the parts for building SkyWeather into a kit and few optional items. Later on in this chapter, I will talk about the 3D printed case for SkyWeather (Figures 3-9 and 3-10) and the weatherization parts needed.
SkyWeather2 kit – shop.switchdoc.com – https://shop.switchdoc.com/products/skyweather2-raspberry-pi-based-weather-station-kit-for-the-cloud
Pre-loaded SD card (not required, but strongly recommended) – shop.switchdoc.com – https://shop.switchdoc.com/products/16gb-sd-card-with-stretch-smart-garden-system-groveweatherpi
Raspberry Pi (you can use many different ones, but we recommend the Raspberry Pi 4B kit to begin) – amazon.com – https://amzn.to/38C2JZO
3 AA batteries
2 AAA batteries
Connecting and Testing the Hardware
SwitchDoc Labs has published excellent step-by-step assembly and testing manuals for SkyWeather 2. The latest versions of these are all available on the SkyWeather2 Product page: https://shop.switchdoc.com/products/skyweather2-raspberry-pi-based-weather-station-kit-for-the-cloud
Step-by-Step Assembly and Testing SkyWeather2 Manual: www.switchdoc.com/wp-content/uploads/2020/12/SkyWeather2AssemblyAndTestManual1.2.pdf
Step-by-Step WeatherRack2 Assembly and Installation Manual: www.switchdoc.com/wp-content/uploads/2020/10/WeatherRack2Installation1.2.pdf
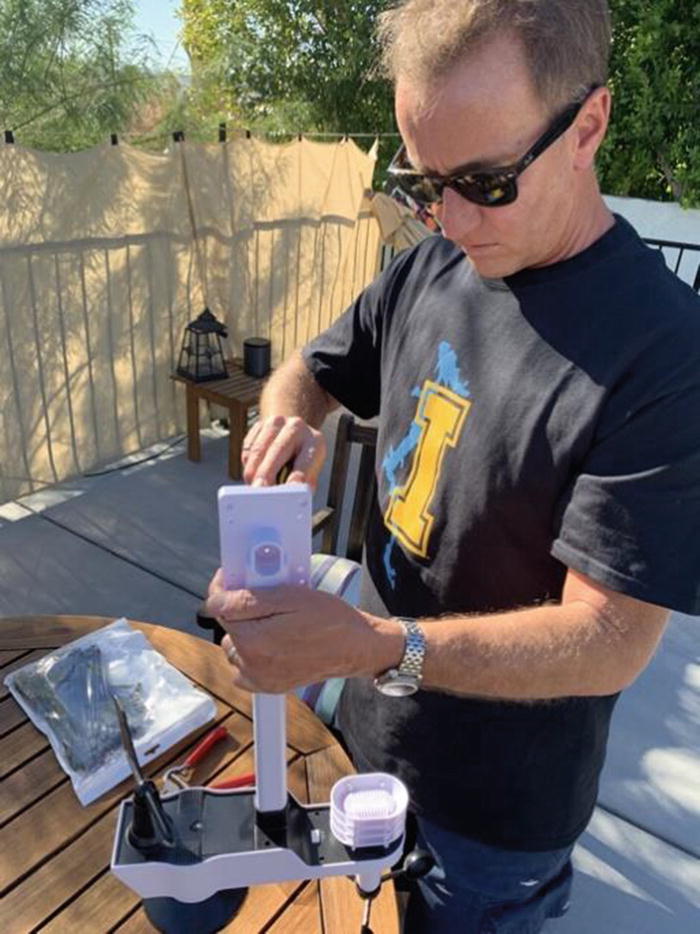
Assembling the SkyWeather2 WeatherRack2
SkyWeather2 Fully Assembled
Weatherization and the 3D Printed Box for SkyWeather2
Because of the unique architecture of SkyWeather2, the main Raspberry Pi system does not require the entire system to be outside. However, many people prefer to mount the unit outside to capture a better sky picture, and if they are using the optional laser AQI (air quality sensor) to capture the outside air quality in their neighborhood.

3D Printed Box Showing Assembly

SkyWeather2 ABS 3D Printed Parts
All the 3D Print STL files and the Fusion360 Design files are on https://github.com/switchdoclabs/SDL_STL_SkyWeather2 for those who want to print or modify the design.
SkyWeather2 WeatherProofing and Test Manual – www.switchdoc.com/wp-content/uploads/2020/12/SkyWeather2WeatherProofingAndTestManual1.1.pdf
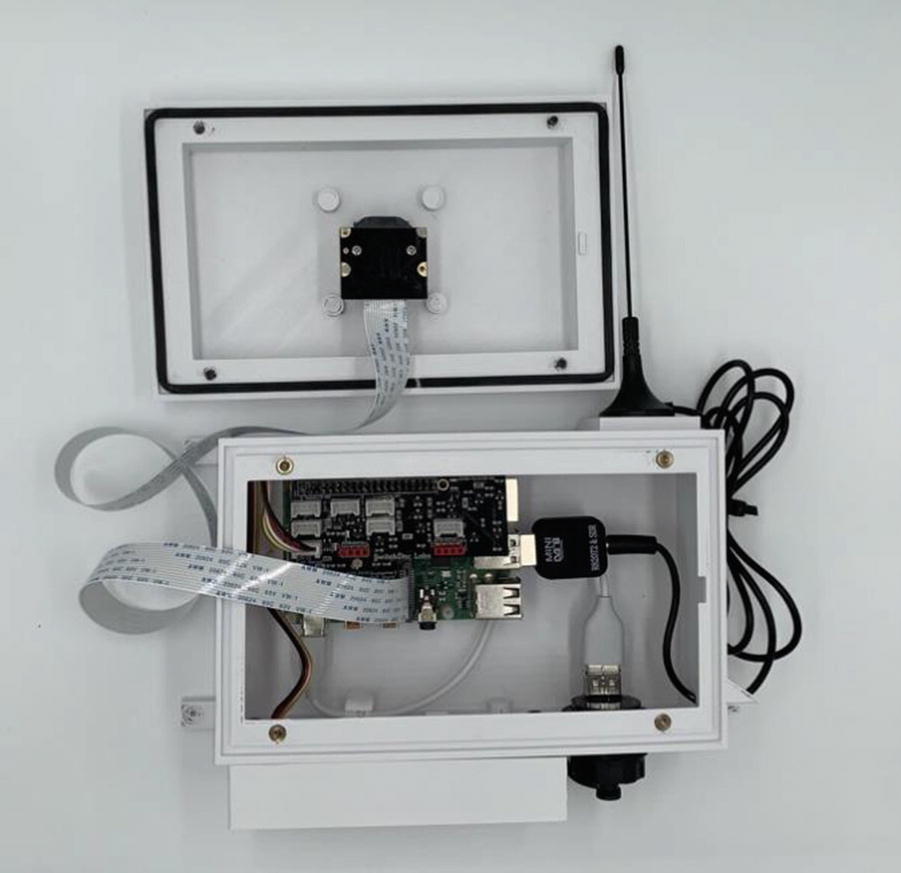
Assembled and Weather Proofed SkyWeather2
The Software
A big part of the SkyWeather2 project is the software. All of the Python software for this project is up on github at the switchdoclabs section [https://github.com/switchdoclabs/WeatherPi]. I also included all of the various libraries for the I2C devices we are using.
Non-normal Requirements for Your Pi
MySQL – There are lots of tutorials on the Internet for installing MySQL. Here is the one we used [raspberrywebserver.com/sql-databases/using-mysql-on-a-raspberry-pi.html]. The structure of the WeatherPi MySQL database in mysqldump format is located on github [https://github.com/switchdoclabs/WeatherPiSQL]. You can use this file to build the MySQL database for the SkyWeather2 project.
The SkyWeather2 Python3 Software
The SkyWeather software is pretty simple. The application was much less complex than the Project Curacao software [www.switchdoc.com/project-curacao-software-system-part-6/]. Basically, the SkyWeather program is a set of tasks scheduled by a Python library called apscheduler.
You can download all the SkyWeather2 Python 3 software on github.com/switchdoclabs/SDL_Pi_SkyWeather2:
https://github.com/switchdoclabs/SDL_Pi_SkyWeather2
The Scheduler Tasks
SkyWeather2 Tasks
Task | Frequency | Description |
|---|---|---|
tick() | 60 seconds | Prints out the current time to the terminal window |
wirelessSensors.readSensors | Starts once and keeps running thread | Reads all the 433MHz wireless sensors from the software-defined radio (SDR) |
wiredSensors.readWiredSensors | 30 seconds | Reads the wired sensors (barometric pressure, etc.) |
state.printState | 60 seconds | If SWDEBUG is true, prints out all the SkyWeather2 state variables |
updateBlynk.blynkStateUpdate | 30 seconds | Updates the Blynk app |
watchdog.patTheDog | 10 seconds | Tells the optional watchdog board that SkyWeather2 is still running |
publishMQTT.publish | Depends on MQTT configuration | Publishes current weather data to the optional MQTT data channel |
rebootPi | Every 5 days | Reboots the Raspberry Pi for reliability |
util.barometricTrend | 15 minutes | Calculates the current barometric pressure trend |
DustSensor.read_AQI | 12 minutes | Reads the option laser dust sensor to calculate local Air Quality Index (AQI) |
pclogging.writeWeatherRecord | 15 minutes | Writes out the current weather data to the MySQL database |
pclogging.writeITWeatherRecord | 15 minutes | Writes out current indoor temperature/humidity sensors to MySQL database. You can have up to eight of this T/H sensors |
The tick() function just prints out the time to the terminal window every 60 seconds. Now that is a simple task!
The Software-Defined Radio
A key part of the SkyWeather2 project is the software-defined radio. A software-defined radio (SDR) is a radio communication system where components that have been traditionally implemented in hardware (e.g., mixers, filters, amplifiers, modulators/demodulators, detectors, etc.) are instead implemented by means of software on a personal computer or embedded system (still with significant hardware support).

Software-Defined Radio Architecture
The SDR we are using with SkyWeather2 is based on the powerful RTL2832U and R820T tuner; it can tune into signals from 24MHz to 1850MHz. SwitchDoc Labs has written drivers for the WeatherSense weather sensors and supplies the drivers to the community open source.
The SkyWeather2 Configuration Software
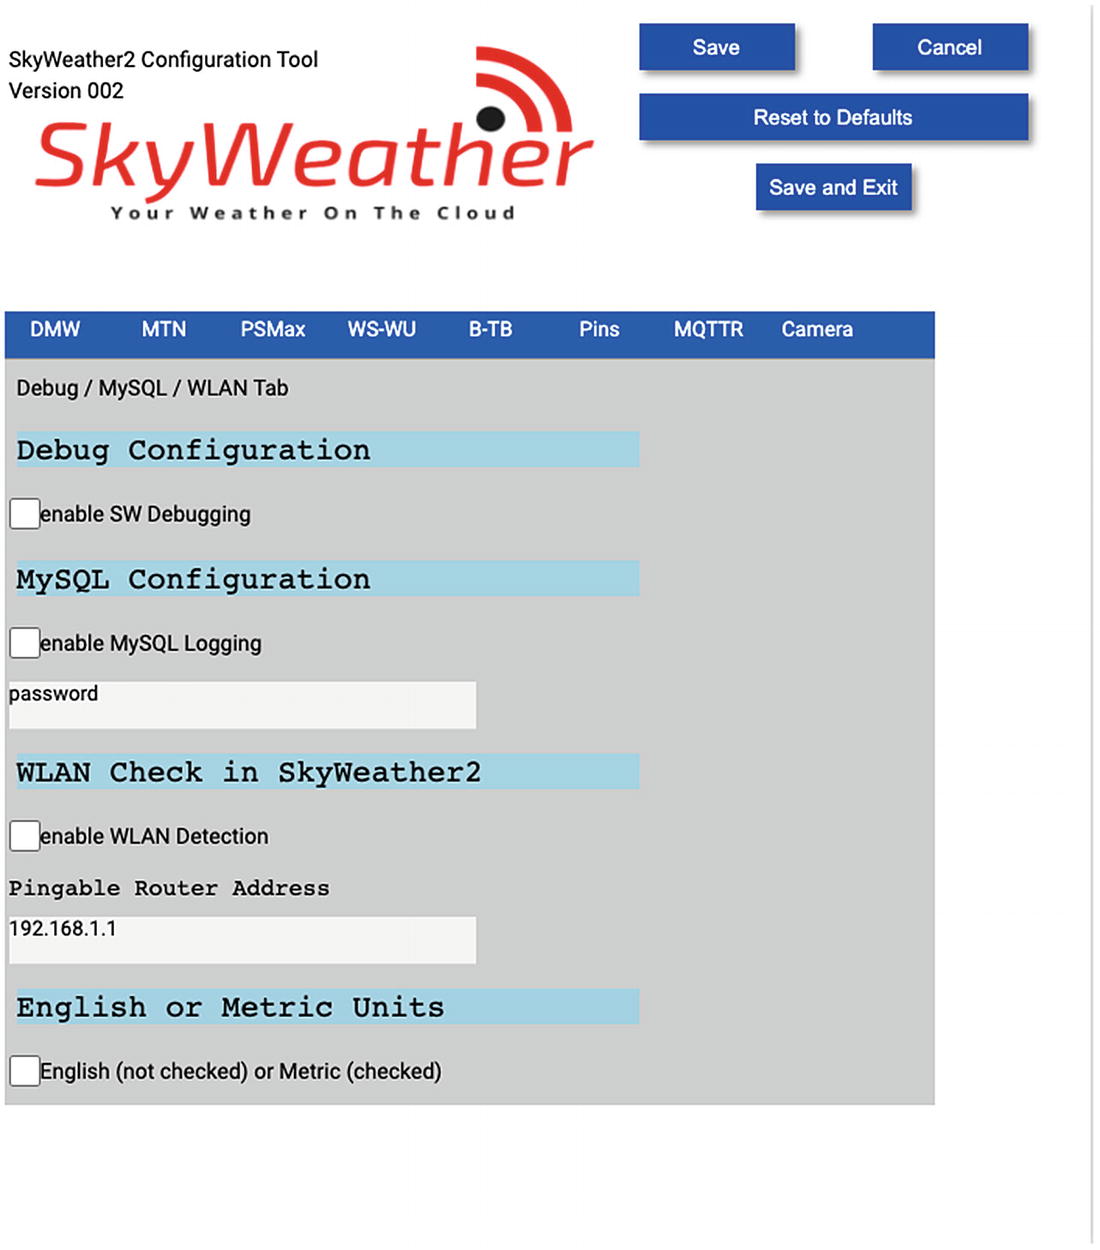
SkyWeather2 Configuration Software
The SkyWeather2 Configuration Manual contains detailed information about the SkyWeather2 Configuration software [www.switchdoc.com/wp-content/uploads/2020/12/SkyWeather2ConfigurationAndOperationsManual1.1.pdf].
The Dash App Local Display
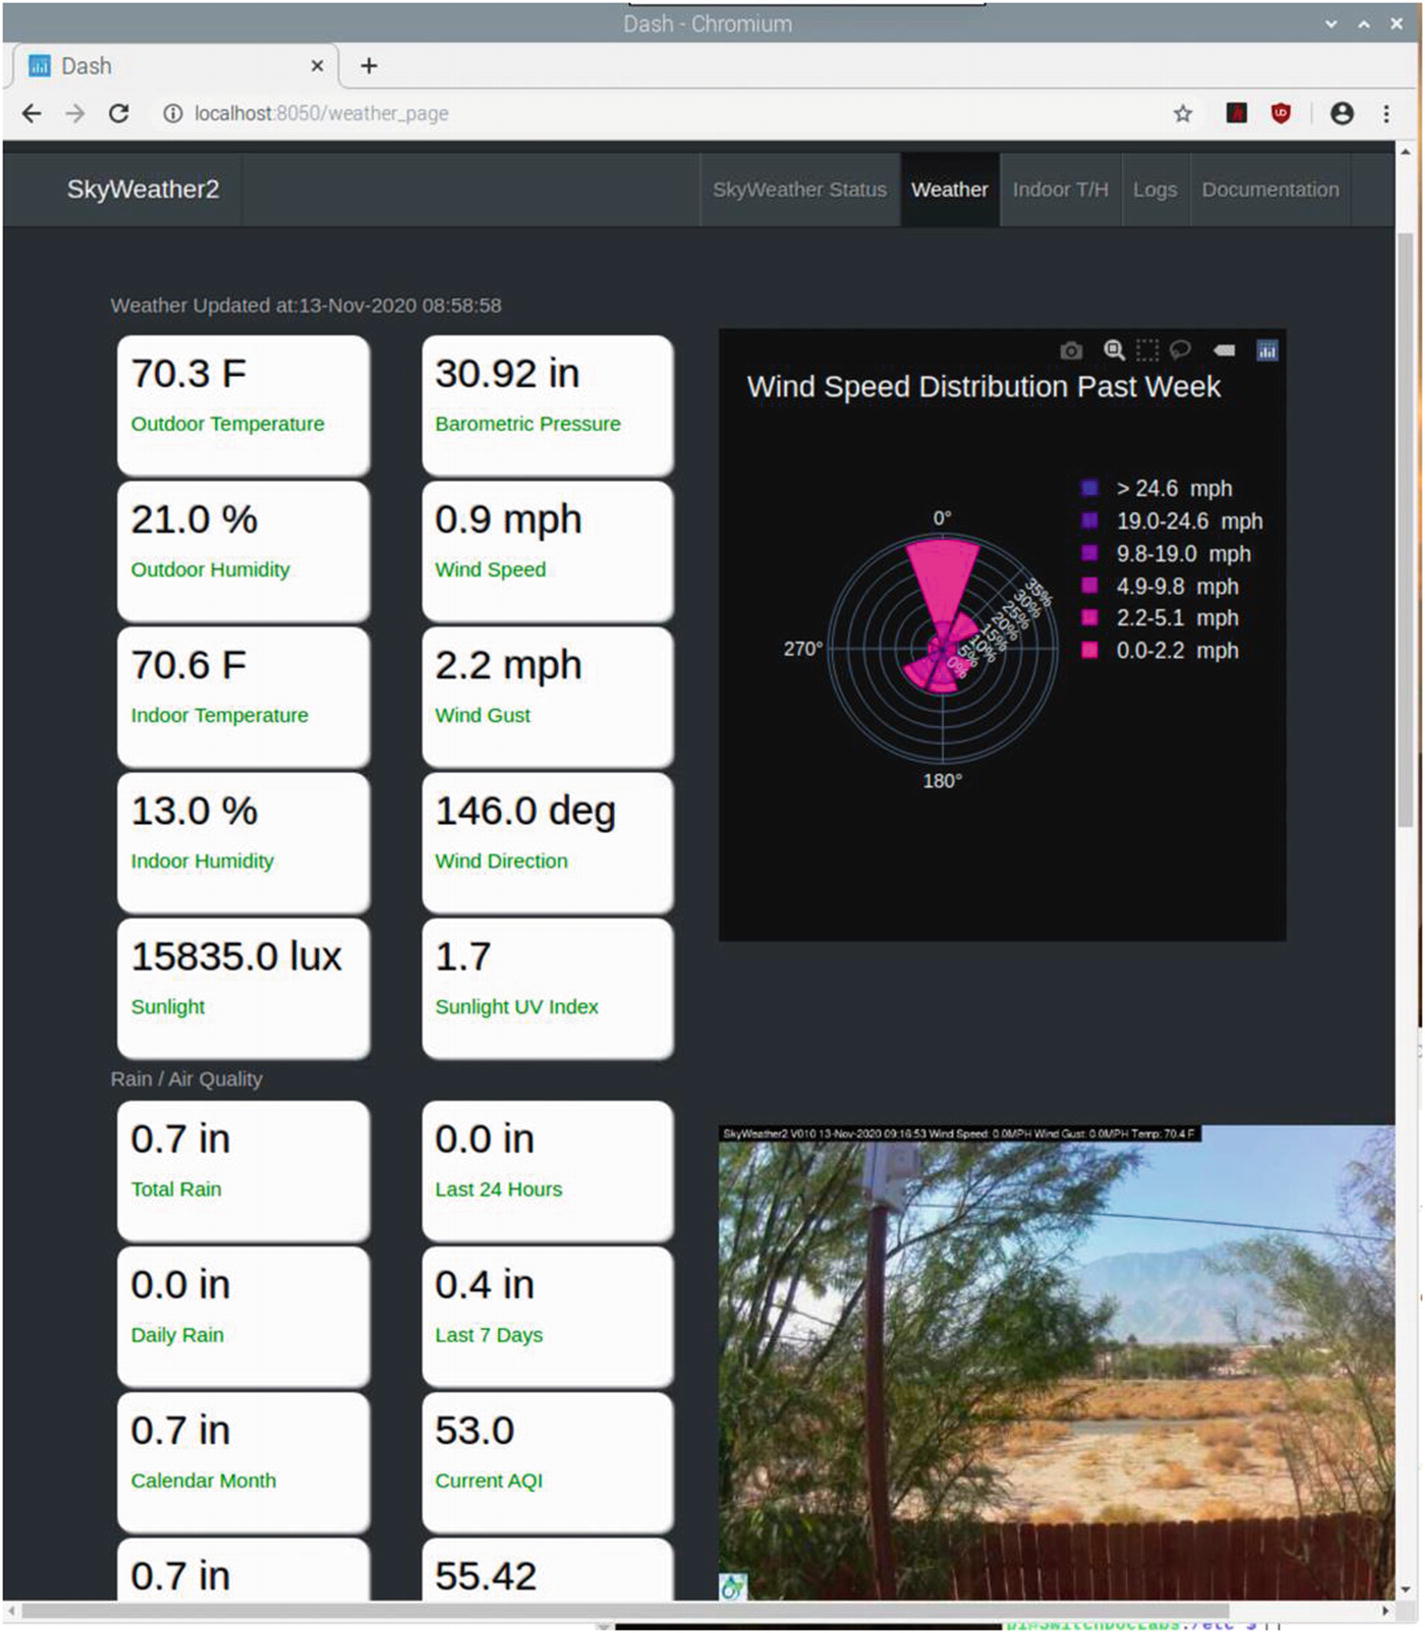
SkyWeather2 Dash App Main Page
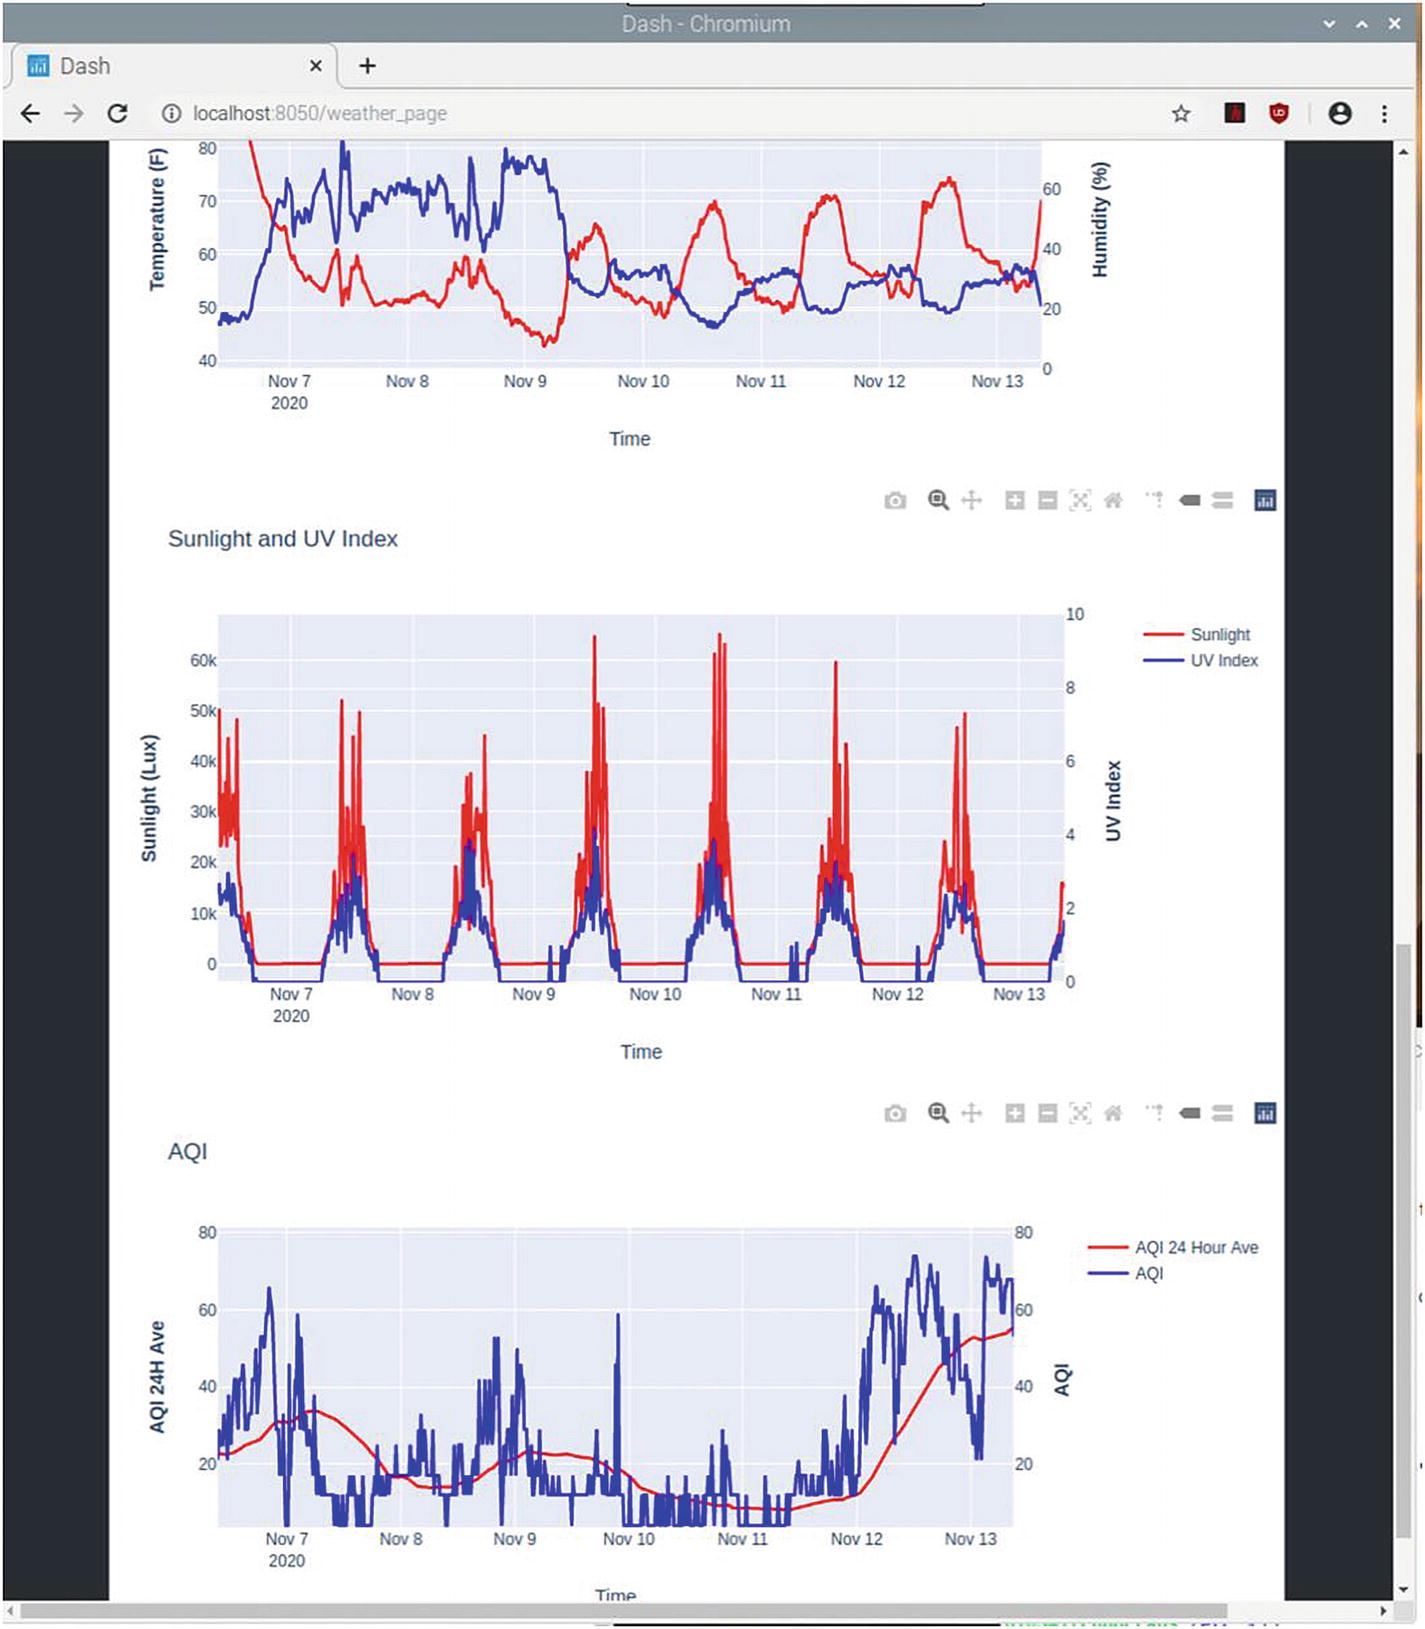
Dash App Historical Weather Graphs
SkyWeather2 and Blynk
Blynk is a digital dashboard for your iOS or Android device that allows you to easily build graphical interfaces by dragging and dropping widgets. Blynk runs on iOS and Android apps to control Arduino, Raspberry Pi, and the like over the Internet.
It’s a digital dashboard where you can build a graphical interface for your project by simply dragging and dropping widgets.

SkyWeather2 Blynk App
SkyWeather2 Blynk Configuration Manual – www.switchdoc.com/wp-content/uploads/2020/12/SkyWeather2WeatherBlynkConfiguration1.2.pdf
Supplying Your Data to the World – WeatherSTEM
There are a number of websites and companies that would love you to send them your weather data. Two of these are WeatherSTEM and WeatherUnderGround. For the purposes of this project, we will send the data to WeatherSTEM.
That's right. Your SkyWeather2 station and sky pictures will be visible to everyone on the Internet, and you will be sharing your local weather with locations all over the globe!
WeatherSTEM is an innovative cloud-based weather education platform for people of all ages and professions. Our innovative curriculum is designed to help you and your students understand the myriad ways weather impacts just about everything in our lives. SkyWeather2 is a great way to become part of the WeatherSTEM community.
One of the things WeatherSTEM produces is a daily time-lapse video of your SkyCamera. Take a look at this example on YouTube:
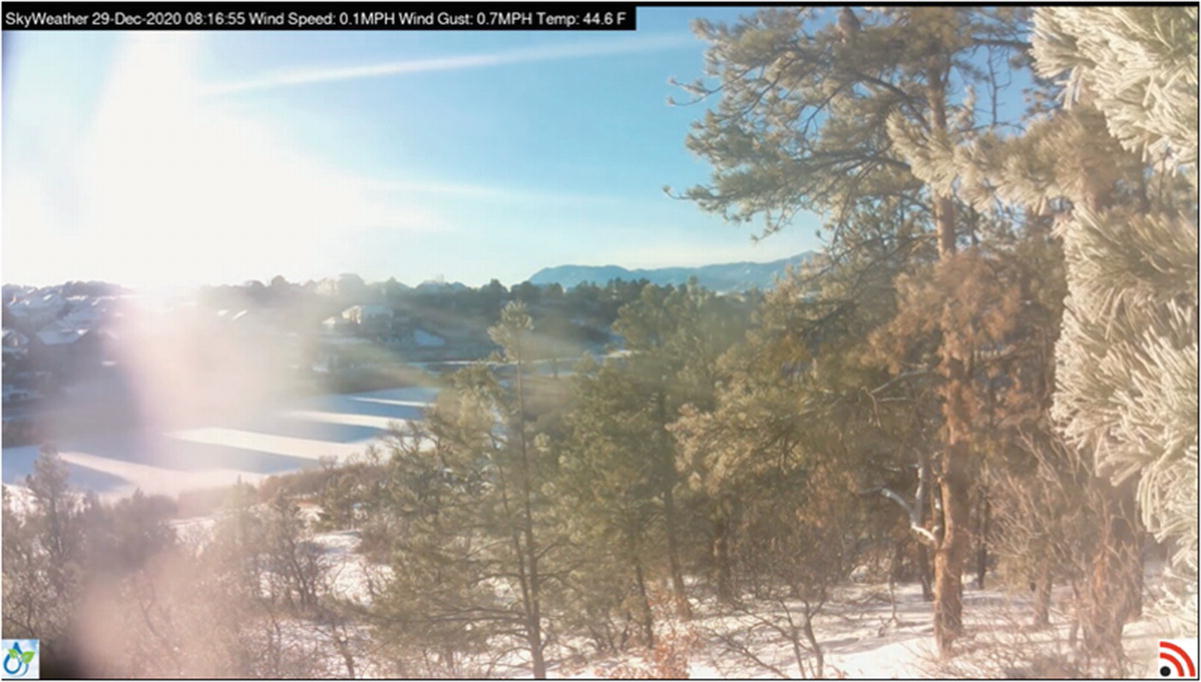
Still from WeatherSTEM Time-Lapse Video
Tweeting Your Weather Data
Tweeting is a great way of reading short messages from people with little to say. With the SkyWeather2, you can join this epic project to be in on the fun. Of course, some people do have interesting things to say, and now you can start tweeting weather information. You may not have a lot of followers, but you can follow your IoT SkyWeather2 from anywhere!
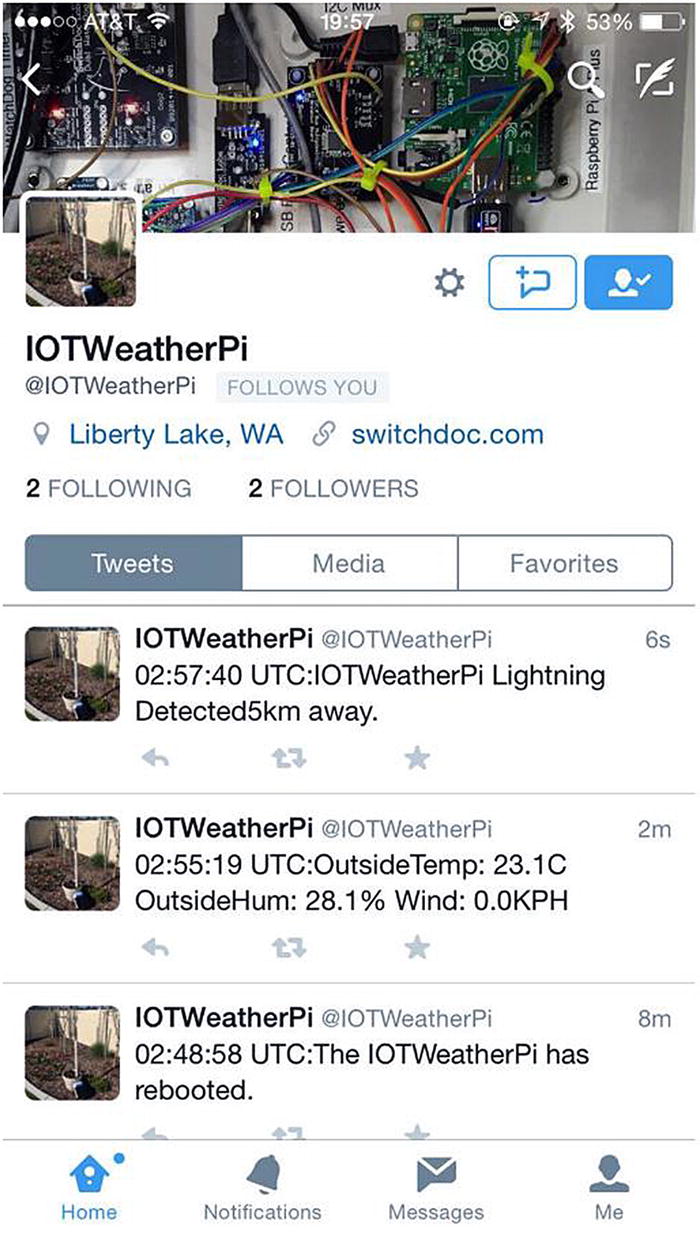
SkyWeather2 Tweeting
A Little History and Science
SkyWeather2, being open source, is very expandable – there are hundreds of Grove modules available!
SwitchDoc Labs has provided extra Grove connectors on the SkyWeather2 Hat for your own projects and sensors.
You can modify the software to do things we haven't even thought of yet!
SkyWeather2 is the last in a long series of weather projects from SwitchDoc Labs. The first weather station was Project Curacao 1, a full solar-powered station for a top ham radio station (PJ2T) down on the island nation of Curacao. This morphed into IOTWeatherPi (featured in the first edition of this book), then GroveWeatherPi, SkyWeather, and now the first wireless sensor-based station, SkyWeather2.
SwitchDoc Labs released the original SkyWeather kit in early 2019. It has been very successful, and there are installations all over the world. SkyWeather2 is a redesigned system using Python3 and the new SwitchDoc Labs Wireless WeatherRack2. It is much simpler to build and configure than the original.
The engineering on this project was great fun for the whole engineering team. Others handled the sensors and our manufacturers, but I was tasked with figuring out how to receive (demodulate) all the incoming 433MHz signals from the WeatherSense sensors. It was a heck of a challenge!
The first thing we did was to learn how to use a software-defined radio (SDR) on the Raspberry Pi. We started analyzing the signals coming into the antenna and figuring out what was going on. We had the digital data formats from our manufacturing partners, but what it looks like coming in over radio waves was quite another challenge. We first decoded the simpler indoor temperature/humidity sensor (making sure we used the proper CRC checksum to guarantee correct reception – 433MHz is noisy and there are lot of other things on the frequency band such as your car key, garage door openers, etc.). We used as a starting step a variety of tools on our Raspberry Pi (RF_Hacker and rtl_433 for two) and started to match the signals coming from the SDR to the digital bits. The coding uses something called Manchester encoding which makes it difficult to read the signal data with just the eye. We wrote software to decode it, and after a lot of effort, we were reading the indoor sensor and the WeatherRack2 correctly from the Raspberry Pi using our software-defined radio.
We had to look at the timing down on the order of about 200 usec. That is 200 millionths of a second! Using a Saleae Logic Analyzer, we figured out what parts were what and then wrote and modified software to get the data out of our sensors using an Arduino (which is a tiny computer compared to the Raspberry Pi!). Whew! One very odd thing we found out this way was that each indoor temperature/humidity message sent each message three times, with no gaps (see picture) and our WeatherRack2 sent each message twice with a gap. Explained why we would pick up multiple transmissions with the Raspberry Pi SDR!
Conclusion

SkyWeather2 Deployed
It is amazing what you can do with hardware such as the Raspberry Pi and off-the-shelf sensors to sense the environment. With a CPLPFC rating of 5.7, SkyWeather2 is probably not a commercially deployable system in the IoT, but it is a great base unit to experiment with and get familiar with hardware and software for the IoT.
Replacing the WiFi with a GSM data connection – This would use the Cellular Data Network for communications.
Making a custom Facebook posting with your weather – This would use the Facebook API to make automated postings, much like Twitter.
Adding a GPS receiver and storing that data – You now have a mobile weather station! When it gets back to WiFi, all the stored data will be available. You could tweet your location and the local conditions on the fly with a GSM connection.
Adding additional air quality sensors, UV sensors, and dust sensors – You have a lot of input/output pins and I2C addressing space that you can fill with more interesting sensors.
The main power expense in SkyWeather2 is the Raspberry Pi. By replacing the Raspberry Pi with a small Arduino (and dramatically reducing the functionality – Arduinos aren’t anywhere near as powerful as the combination of the Raspberry Pi and Linux), you could improve your CPLPFC rating substantially. Want to see how to use an Arduino with the SkyWeather2 WeatherRack2? Check out this article on www.switchdoc.com:
www.switchdoc.com/2020/11/tutorial-arduino-433mhz-weatherrack2/
Next? We move on to using the Raspberry Pi to detect iBeacons and figure out where you are when you carry the RaspberryPi around with you. With BeaconAir, we will modify the lights using Philips Hue lights to light your way.