Chapter 6. Making Your App Maintainable

As soon as there is more than one software developer working on a project, maintaining consistency across your code base will become a serious consideration. The majority of the examples in this cookbook were stripped to the essentials: no PropTypes, no test cases, no type hints. The strategies for ensuring your code is well factored, easily maintained, and correct are varied, and I hope the approaches discussed here save you from dreadful runtime errors, system bugs, and hermetic coding styles.

6.1 Protect Your Components with PropTypes

Many software developers find that their components written for one purpose are being reused elsewhere for different purposes. For example, you might have designed an information card or a special button for a login form and are now repurposing the same component in an account profile screen.

When a component goes from being used in one context to a completely different one, strange things can happen. Bugs can start appearing from unexpected variations in the properties passed down to these components.

Problem

You are trying to establish a contract for your component. For everything to function correctly, your component must throw an error unless it receives the correct props from its parent. Other solutions exist, such as TypeScript or Reason. But design by contract or defensive programming is a well-established programming pattern for reducing bugs. In a language like JavaScript, we need all the help we can get.

Solution

We are going to refactor the Pastry Picker component first developed in Recipe 2.3 into a few smaller components so that we can explore how prop-types can protect us from programmer error.

Begin by adding the prop-types package to your project:

$>npm -i prop-types --save
Note

PropTypes are a React convention and have more to do with React than React Native. However, they still are useful in raising errors during development instead of in front of our users.

I have refactored the <PastryPicker /> component to rely on two smaller components, a <PastryButton /> that enables switching recipes and an <IngredientBar /> for rendering the actual bar chart:

// pastryPicker.js
import React, { Component } from 'react';
import {
  StyleSheet,
  View,
} from 'react-native';

import IngredientBar from './ingredientBar'
import PastryButton from './pastryButton'

const PASTRIES = {
  croissant:    { label: "Croissants",   flour: 0.7, butter: 0.5,
  sugar: 0.2, eggs: 0 },
  cookie:       { label: "Cookies",      flour: 0.5, butter: 0.4,
  sugar: 0.5, eggs: 0.2},
  pancake:      { label: "Pancakes",     flour: 0.7, butter: 0.5,
  sugar: 0.3, eggs: 0.3 },
  doughnut:     { label: "Dougnuts",     flour: 0.5, butter: 0.2,
  sugar: 0.8, eggs: 0.1 },
}

export default class PastryPicker extends Component {
  constructor(props) {
    super(props);
    this.state = {
      selectedPastry: 'croissant'
    }
  }

  setPastry = (selectedPastry) => {
    this.setState({ selectedPastry });
  }

  render() {
    const { flour, butter, sugar, eggs } = PASTRIES[this.state.selectedPastry];
    return <View style={styles.pastryPicker}>
        <View style={styles.buttons}>
          {
            Object.keys(PASTRIES).map( (key) => <PastryButton key={key}
                isActive={this.state.selectedPastry === key}
                onPress={() => { this.setPastry(key) } }
                label={PASTRIES[key].label} /> )
          }
        </View>
      <View style={styles.ingredientContainer}>
        <IngredientBar backgroundColor="#F2D8A6" flex={flour} label="Flour" />
        <IngredientBar backgroundColor="#FFC049" flex={butter} label="Butter" />
        <IngredientBar backgroundColor="#CACACA" flex={sugar} label="Sugar" />
        <IngredientBar backgroundColor="#FFDE59" flex={eggs} label="Eggs" />
      </View>
    </View>
  }
}


const styles = StyleSheet.create({
  pastryPicker: {
    flex: 1,
    flexDirection: 'column',
    margin: 20,
  },
  ingredientContainer: {
    flex: 1,
    flexDirection: 'row',
  },
  ingredientColumn: {
    flexDirection: 'column',
    flex: 1,
    justifyContent: 'flex-end',
  },
  buttons: {
    flexDirection: 'column',
    flexWrap: "wrap",
    paddingRight: 20,
    paddingLeft: 20,
    flex: 0.3,
  },
});

The <PastryButton /> now declares propTypes before export:

import React, { Component } from 'react';
import {
  StyleSheet,
  Text,
  TouchableHighlight,
  View,
} from 'react-native';

import PropTypes from 'prop-types'

class PastryButton extends Component {

  render() {
    const { isActive, onPress, label} = this.props
    return <View style={styles.buttonContainer}>
      <TouchableHighlight onPress={onPress} style={[styles.button, {
        backgroundColor: isActive ? "#CD7734" : "#54250B" } ]}
        underlayColor={"#CD7734"}>
        <Text style={styles.buttonText} >{label}</Text>
      </TouchableHighlight>
    </View>
  }

}

PastryButton.propTypes = {
  isActive: PropTypes.bool,
  label: PropTypes.string.isRequired,
  onPress: PropTypes.func.isRequired,
}

PastryButton.defaultProps = {
  isActive: false
};

export default PastryButton;

const styles = StyleSheet.create({
  button: {
    padding: 10,
    minWidth: 140,
    justifyContent: 'center',
    backgroundColor: "#5A8282",
    borderRadius: 10,
  },
  buttonContainer: {
    margin: 10,
  },
  buttonText: {
    fontSize: 18,
    color: "#FFF",
  },
});

Notice how propTypes can be either optional or required. A default value can also be supplied as part of defaultProps:

// ingredientBar.js
import React, { Component } from 'react';
import {
  Animated,
  StyleSheet,
  Text,
  TouchableHighlight,
  View,
} from 'react-native';

import PropTypes from 'prop-types';

class IngredientBar extends Component {

  render() {
    const { backgroundColor, flex, label } = this.props;
    return <View style={styles.ingredientColumn}>
      <View style={styles.bar} />
      <View style={{ backgroundColor, flex }} />
      <View style={styles.label}><Text>{label}</Text></View>
    </View>
  }

}

IngredientBar.propTypes = {
  backgroundColor: PropTypes.string.isRequired,
  label: PropTypes.string.isRequired,
  flex: PropTypes.number.isRequired,
}

export default IngredientBar;

const styles = StyleSheet.create({
  ingredientColumn: {
    flexDirection: 'column',
    flex: 1,
    justifyContent: 'flex-end',
  },
  bar: {
    alignSelf: 'flex-start',
    flexGrow: 0,
  },
  label: {
    flex: 0.2,
  },
});

With a few extra lines of code, we can sleep well knowing that our <PastryButton /> and <IngredientBar /> will raise warnings unless they receive the props they expect.

Discussion

When React was first unveiled, PropTypes were part of the package: a simple, declarative way of enforcing which arguments needed to be given to a React component. As React evolved in the public, the prop-types package became a separate NPM package and other solutions to the same problem emerged.

See Also

PropTypes can get far more sophisticated when dealing with a deeply nested data structure (like from a GraphQL API). The React.js guide for PropTypes covers many of the examples you may face when implementing your own PropTypes.

6.2 Check Runtime Errors with Flow

The PropTypes package provides a great safety harness for building and delivering React components, but we can do so much better.

Writing a propTypes declaration forces you to think about the boundary of your component: how will it be used? What are acceptable inputs and when should I raise a warning? Unfortunately some of these cases are hard to identify given the dynamic nature of JavaScript’s runtime environment.

Problem

Can we catch more bugs during the compilation step and avoid more unhappy users? Writing PropTypes is a bit of extra work, but we can already see how it might pay off. If we are already invested in trying to improve the type checking and contract between our components and the broader application, are there better tools at our disposal? How can we ensure that every single function, class, and variable is type safe?

Flow provides a simple-to-use development tool. It takes minutes to set up and will improve your overall development experience in no time.

Solution

Before we install Flow, we should understand the specific challenge it tackles: ensuring that input is of the correct type. Flow does this by tracing through your code paths and veryfing that every class, function, and variable assignment is the correct type. Flow is not focused on coding standards or style. You will also notice that by default, Flow will only look at files that begin with // @flow.

When Flow is correctly installed, the following code will trigger an error:

// @flow
// test.js
const butterQuantity = "6 cups"
const doubleButter = butterQuantity * 2

The Flow server returns with:

Error: test.js:4
  4: const doubleButter = butterQuantity * 2
                          ^^^^^^^^^^^^^^ string. The operand of an arithmetic
                          operation must be a number.

Flow won’t stop me from doubling my butterQuantity, but it will stop me from multiplying a string with a number.

Run Flow from the command line by typing yarn run flow before committing code and pushing it to your source code repository. This way, team members will be sure that everything is being run as expected. Flow can save you from embarrassing programming mistakes or spending time in code reviews discussing issues that Flow can catch. You can also set up Flow in a development environment like Nuclide, Sublime Text, or Visual Studio Code.

Tip

Flow’s documentation assumes you are using Yarn for your package management needs. In general I prefer Yarn and have chosen to use it instead of NPM. See Recipe 1.1 for more information about Yarn and NPM.

Setting up Flow

Start by adding Flow and initializing a .flowconfig file in your project folder:

$> yarn add --dev flow-bin
$> yarn run flow init

In order to make a code comparison possible, I decided to refactor the react-native-pastry-picker project to use Flow instead of PropTypes, like in Recipe 6.1. Flow and PropTypes try to protect you from the same family of coding errors. This way you can see how each one addresses the challenge through syntax.

Before adjusting App.js, ingredientBar.js, and pastryButton.js, I had to make some additional project configuration changes. Because react-native-pastry-picker is an NPM package that does not have a locked react-native dependency, Flow will mistakenly raise an error for react-native when running yarn run flow:

Error: ingredientBar.js:9
  9: } from 'react-native';
            ^^^^^^^^^^^^^^ react-native. Required module not found

Error: pastryButton.js:8
  8: } from 'react-native';
            ^^^^^^^^^^^^^^ react-native. Required module not found

Error: pastryPicker.js:6
  6: } from 'react-native';
            ^^^^^^^^^^^^^^ react-native. Required module not found

By adding flow-typed under [libs] in the .flowconfig configuration file, and relaxing the react-native dependency, I can remove these errors:

# .flowconfig
[ignore]

[include]

[libs]
flow-typed

[lints]

[options]

[strict]

Now create a folder called /flow-typed/ and include a new file, /flow-typed/react-native.js:

declare module 'react-native' {
  declare module.exports: any;
}

This declaration will configure Flow to check the /flow-typed folder for any missing modules before throwing an exception.

The ingredientBar.js file can now be updated with Flow type hints. Notice that the type Props declaration provides type checking for the entire component. PropTypes are no longer required:

// @flow
import React, { Component } from 'react';
import {
  Animated,
  StyleSheet,
  Text,
  TouchableHighlight,
  View,
} from 'react-native';


type Props = {
  backgroundColor: string,
  label: string,
  flex: number
}

export default class IngredientBar extends Component<Props>{

  render() {
    const { backgroundColor, flex, label } = this.props;
    return <View style={styles.ingredientColumn}>
      <View style={styles.bar} />
      <View style={{ backgroundColor, flex }} />
      <View style={styles.label}><Text>{label}</Text></View>
    </View>
  }

}

const styles = StyleSheet.create({
  ingredientColumn: {
    flexDirection: 'column',
    flex: 1,
    justifyContent: 'flex-end',
  },
  bar: {
    alignSelf: 'flex-start',
    flexGrow: 0,
  },
  label: {
    flex: 0.2,
  },
});

The <PastryButton /> component supports an optional isActive type, which Flow represents with isActive?: bool. The ? indicates that this is a default attribute. Functions also have a specific signature, which includes the number of arguments, their expected type, and whether they should return a value. For example, onPress: (key: string) => void indicates that the onPress callback will accept one argument (a string) and not return anything (void):

// @flow
import React, { Component } from 'react';
import {
  StyleSheet,
  Text,
  TouchableHighlight,
  View,
} from 'react-native';

type Props = {
  isActive?: bool,
  label: string,
  onPress: (key: string) => void
}

export default class PastryButton extends Component<Props>{

  static defaultProps = {
    isActive: false
  }

  render() {
    const { isActive, onPress, label} = this.props
    return <View style={styles.buttonContainer}>
      <TouchableHighlight onPress={onPress} style={[styles.button, {
        backgroundColor: isActive ? "#CD7734" : "#54250B" } ]}
        underlayColor={"#CD7734"}>
        <Text style={styles.buttonText} >{label}</Text>
      </TouchableHighlight>
    </View>
  }

}

const styles = StyleSheet.create({
  button: {
    padding: 10,
    minWidth: 140,
    justifyContent: 'center',
    backgroundColor: "#5A8282",
    borderRadius: 10,
  },
  buttonContainer: {
    margin: 10,
  },
  buttonText: {
    fontSize: 18,
    color: "#FFF",
  },
});

While <PastryPicker /> does not have any incoming Props, it does maintain the local state for which pastry is selected. Flow provides similar type checking for State. The PastryPicker component accepts State as a second argument in the declaration Component<{}, State>. This State key indicates that the component will be maintaining a this.state variable. Flow can now protect us from inadvertently manipulating other local state variables that were not defined in the type State:

// @flow
import React, { Component } from 'react';
import {
  StyleSheet,
  View,
} from 'react-native';

import IngredientBar from './ingredientBar'
import PastryButton from './pastryButton'

const PASTRIES = {
  croissant:    { label: 'Croissants',   flour: 0.7, butter: 0.5,
  sugar: 0.2, eggs: 0 },
  cookie:       { label: 'Cookies',      flour: 0.5, butter: 0.4,
  sugar: 0.5, eggs: 0.2},
  pancake:      { label: 'Pancakes',     flour: 0.7, butter: 0.5,
  sugar: 0.3, eggs: 0.3 },
  doughnut:     { label: 'Dougnuts',     flour: 0.5, butter: 0.2,
  sugar: 0.8, eggs: 0.1 },
}

type State = {
  selectedPastry: string
}

export default class PastryPicker extends Component<{}, State> {
  state: State

  constructor(props: {}) {
    super(props);
    this.state = {
      selectedPastry: 'croissant'
    }
  }

  setPastry = (selectedPastry: string) => {
    this.setState({ selectedPastry });
  }

  render() {
    const { flour, butter, sugar, eggs } = PASTRIES[this.state.selectedPastry];
    return <View style={styles.pastryPicker}>
        <View style={styles.buttons}>
          {
            Object.keys(PASTRIES).map( (key) => <PastryButton key={key}
                isActive={this.state.selectedPastry === key}
                onPress={() => { this.setPastry(key) } }
                label={PASTRIES[key].label} /> )
          }
        </View>
      <View style={styles.ingredientContainer}>
        <IngredientBar backgroundColor='#F2D8A6' flex={flour} label='Flour' />
        <IngredientBar backgroundColor='#FFC049' flex={butter}
        label='Butter' />
        <IngredientBar backgroundColor='#CACACA' flex={sugar} label='Sugar' />
        <IngredientBar backgroundColor='#FFDE59' flex={eggs} label='Eggs' />
      </View>
    </View>
  }
}


const styles = StyleSheet.create({
  pastryPicker: {
    flex: 1,
    flexDirection: 'column',
    margin: 20,
  },
  ingredientContainer: {
    flex: 1,
    flexDirection: 'row',
  },
  ingredientColumn: {
    flexDirection: 'column',
    flex: 1,
    justifyContent: 'flex-end',
  },
  buttons: {
    flexDirection: 'column',
    flexWrap: 'wrap',
    paddingRight: 20,
    paddingLeft: 20,
    flex: 0.3,
  },
});

Try changing this.setPastry(key) to return anything except a string and Flow will raise an error.

See Also

Flow grew out of the React ecosystem as a powerful approach to type safety. Take a look at the Flow Getting Started guide to learn more about what it can do for your unique project requirements. Some folks prefer using TypeScript, a language that provides a superset of features on top of ES6+, like interfaces, generics, enums, etc. With all these additional code hints, development environments like Visual Studio Code are able to provide autocomplete and deeper type-checking features. If you are starting a large project, read the TypeScript 5 minute guide and determine if it’s right for your team.

6.3 Automate Your Component Tests

Unit tests are one of the first things I look for in an open source library. Did the developers take the time to define how the individual code modules were supposed to function? Unit tests provide clues into how a package is designed and intended to be used downstream. Unit tests are very simple functions that pick apart your project and ensure that the input into a function or class results in the desired output. They can never exhaust every possible case, but they improve quality in the following ways:

  1. Developers have to write a second consumer of their code: the unit test.

  2. Code tends to be better factored and the Single Responsibility Principle emerges automatically.

  3. Unit tests provide a kind of documented intent for how the code should behave. When the documentation fails you, look at the unit tests.

Code quality and maintainability are improved when you combine Flow, ESLint, and a battery of unit tests with Jest. Each tool protects you from a specific kind of development challenge.

Problem

How do we set up component tests in React Native? Unit testing ES6+ in general can be done with a number of libraries (like Mocha), but Jest is the preferred testing framework for React.js. Let’s start writing some component tests with Jest for the react-native-pastry-picker project.

Solution

This configuration enables Flow to coexist with Jest. In the following section, we will finish off the example with ESLint for code linting. By combining these technologies, we will have a comprehensive suite of code-quality tooling. Until now, the react-native-pastry-picker library did not have an explicit dependency on react or react-native. Because Jest will be running this code in a test harness, we now require these additional development dependencies.

I will perform two kinds of unit tests. Snapshot tests, where Jest generates a data structure representation of the React component in a given state. The Enzyme test extension will allow us to inspect the internal state of our subcomponents.

Begin by installing React and React Native (in the case of a package), then Jest and finally Enzyme and the Enzyme adapter:

$> npm install --save-dev react react-native
$> npm install --save-dev jest
$> npm install --save-dev enzyme enzyme-adapter-react-16 react-dom
Warning

As you can imagine, there is a lot of churn around React, React Native, Enzyme, Jest, and Flow. This mix of open source projects has had breaking changes in the past and may in the future. At the time of this writing, the following snippets show a successful set of configuration options. If you find yourself getting stuck, try looking at the GitHub issues for the relevant projects.

The package.json:

{
  "name": "react-native-pastry-picker",
  "version": "1.0.5",
  "description": "Pastry Picker",
  "repository": "https://github.com/jlebensold/react-native-pastry-picker",
  "main": "index.js",
  "scripts": {
    "test": "jest"
  },
  "keywords": [
    "react-native"
  ],
  "author": "Jon Lebensold",
  "license": "MIT",
  "devDependencies": {
    "enzyme": "^3.2.0",
    "enzyme-adapter-react-16": "^1.1.0",
    "flow-bin": "^0.59.0",
    "jest": "^21.2.1",
    "jest-cli": "^21.2.1",
    "react": "^16.0.0",
    "react-dom": "^16.1.1",
    "react-native": "^0.50.3",
    "react-test-renderer": "^16.1.1"
  },
  "dependencies": {},
  "jest": {
    "preset": "react-native"
  }
}

The .flowconfig:

[ignore]

; We fork some components by platform
.*/*[.]android.js

; Ignore templates for 'react-native init'
.*/local-cli/templates/.*

; Ignore the website subdir
<PROJECT_ROOT>/website/.*

; Ignore the Dangerfile
<PROJECT_ROOT>/danger/dangerfile.js

; Ignore "BUCK" generated dirs
<PROJECT_ROOT>/.buckd/

; Ignore unexpected extra "@providesModule"
.*/node_modules/.*/node_modules/fbjs/.*

; Ignore duplicate module providers
; For RN Apps installed via npm, "Libraries" folder is inside
; "node_modules/react-native" but in the source repo it is in the root
.*/Libraries/react-native/React.js

; Ignore polyfills
.*/Libraries/polyfills/.*

.*/node_modules/react-native/Libraries/react-native/
  react-native-implementation.js

[include]

[libs]
node_modules/react-native/Libraries/react-native/react-native-interface.js
flow-typed/

[options]
emoji=true
module.system=haste
munge_underscores=true
suppress_type=$FlowIssue
suppress_type=$FlowFixMe
suppress_type=$FixMe
unsafe.enable_getters_and_setters=true

[version]
^0.59.0

In order for Jest to succesfully parse JSX, I also include a .babelrc configuration file in the project root:

{
  "presets": ["react-native"]
}

In Recipe 6.2, we created a special /flow-typed/react-native.js file for Flow to use in its dependency checking. Jest will need a similar file in order to avoid any irrelevant errors:

// flow-typed/jest.js
declare module 'jest' {
  declare module.exports: any;
}
declare var expect: any;
declare var test: any;

Flow should continue to run as expected with yarn run flow. Now let’s create our first Snapshot test. The convention is to include tests in a __tests__/ folder.

Start with a snapshot of the <PastryPicker /> component:

// __tests__/pastryPicker.test.js
// @flow
import React from 'react';
import renderer from 'react-test-renderer';

import PastryPicker from '../pastryPicker';

test('renders correctly', () => {
  const tree = renderer.create(
    <PastryPicker />
  ).toJSON();
  expect(tree).toMatchSnapshot();
});

Now run yarn run jest:

yarn run jest __tests__/pastryPicker.test.js
yarn run v1.1.0
$ "./react-native-pastry-picker/node_modules/.bin/jest"
"__tests__/pastryPicker.test.js"
 PASS  __tests__/pastryPicker.test.js
  ✓ renders correctly (136ms)1 snapshot written.
Snapshot Summary
 › 1 snapshot written in 1 test suite.

Test Suites: 1 passed, 1 total
Tests:       1 passed, 1 total
Snapshots:   1 added, 1 total
Time:        0.471s, estimated 1s

Jest will write a snapshot of the resulting React component to __tests__/__snapshots__/pastryPicker.test.js.snap. Now any further changes to the component will cause the snapshot comparison and the test will fail. This approach ensures any JSX changes result in the necessary side effects. You can refresh the snapshot by running yarn run test -- -u.

This approach to testing is analagous to integration testing: you are testing the overall structure, but don’t have deep instrumentation for your component.

The <PastryButton /> will render a different version of the backgroundColor property depending on whether the button isActive. The render() method for <PastryButton /> looks like this:

render() {
  const { isActive, onPress, label} = this.props;
  return <View style={styles.buttonContainer}>
    <TouchableHighlight onPress={onPress} style={[styles.button, {
      backgroundColor: isActive ? '#CD7734' : '#54250B' } ]}
      underlayColor='#CD7734'>
      <Text style={styles.buttonText} >{label}</Text>
    </TouchableHighlight>
  </View>
}

Instead of simply comparing the snapshot in its totality, let’s see if we can inspect this one state change with the help of Enzyme:

// @flow
import React from 'react';
import PastryButton from '../pastryButton';
import renderer from 'react-test-renderer';
import Enzyme, { shallow } from 'enzyme';
import Adapter from 'enzyme-adapter-react-16';
Enzyme.configure({adapter: new Adapter()});

test('renders isActive', () => {
  const tree = renderer.create(
    <PastryButton onPress={ (t) => {} } label='Croissant' isActive={true} />
  ).toJSON();
  expect(tree).toMatchSnapshot();
});

test('when isActive = false, then background = #5A8282', () => {
  const button = shallow(
    <PastryButton onPress={ (t) => {} } label='MyLabel' isActive={false} />);
  expect(button.find('TouchableHighlight').props().style[0].backgroundColor)
    .toEqual('#5A8282');
});

The button.find('TouchableHighlight').props().style[0].backgroundColor DOM traversal is similar to browser-based testing with CSS selectors: it can work for testing critical code paths, but it can also be brittle if this is your only means of testing business logic.

Both of these approaches should convince you that it’s best to keep as little business logic or application code in your React components as possible. Let your React component focus on rendering and not much more. In this way, the rest of your application can be tested as though it was just plain old ES6+.

Discussion

The test-driven development programming movement made every career software developer aware of the importance of writing tests. The saying goes that bugs crop up in untested code. Martin Fowler provides some excellent advice about how much to test:

I would say you are doing enough testing if the following is true:

1. You rarely get bugs that escape into production, and

2. You are rarely hesitant to change some code for fear it will cause production bugs.

Can you test too much? Sure you can. You are testing too much if you can remove tests while still having enough. But this is a difficult thing to sense. One sign you are testing too much is if your tests are slowing you down.

Martin Fowler, Test Coverage (17 April 2012)

See Also

Testing is a broad subject and this primer only scratches the surface. From here, you may find it helpful to mock some of the native components or any other asynchronous actions that your application may take. The Jest React Native Tutorial covers a handful of use cases worth considering.

You may also want to dig into Jest’s code coverage reports. Of course, all of these commands could also be run using a continuous integration service like Jenkins, CircleCI, or Codeship every time a developer pushes code to your source code repository. You are on your way to deploying new versions of your app with greater and greater confidence that old bugs won’t reappear in new builds.

6.4 Maintain Coding Standards with ESLint

Consistent code is criticial to ensuring that a software developer can feel at home in any part of the code base. Honey and maple syrup are both capable of sweetening a dish, but mixing them together will probably lead to loss of the unique flavors achieved with either sweetener. The same is true with code: mixing tabs and spaces, camelCase, and snake_case in the same code base leaves the software developer’s palette wanting.

Problem

How do you make sure that your project feels like it was written by one author? A good ESLint rule set will protect every member of the team from each other and yourself.

Solution

Begin by adding ESLint to your project. Airbnb has published an excellent JavaScript style guide. It has gone above and beyond and provided a set of linting tools that can easily be incorporated into any React Native project.

Start by installing ESLint:

$> npm install --save-dev eslint
$> ./node_modules/.bin/eslint --init

You will then be prompted to select how to configure ESLint. For my project, I chose:

  • How would you like to configure ESLint? Use a popular style guide

  • Which style guide do you want to follow? Airbnb

  • Do you use React? (y/N) y

  • What format do you want your config file to be in? JSON

Tip

ESlint works best when you can give it a handful of folders to run against. I recommend putting your React Native project code in a folder like src/. You can then simplify your ESLint script. For the react-native-pastry-picker project, I have moved all the components into src/.

Because my project includes a collection of flow types from Recipe 6.2, some additional configuration is required. Fortunately, the eslint-plugin-flowtype package makes the integration between ESLint and Flow seamless:

npm install babel-eslint --save-dev
npm install eslint-plugin-flowtype --save-dev

babel-eslint is a special ESLint parser that will properly account for the Flow type hints in your project. eslint-plugin-flowtype includes a collection of additional ESLint rules. Layer on additional ESLint rules that account for Flow’s extended type hints by updating the .eslintrc.json file:

{
  "parser": "babel-eslint",
  "extends": "airbnb",
  "plugins": [
    "flowtype"
  ],
  "rules": {
    "flowtype/boolean-style": [
      2,
      "boolean"
    ],
    "flowtype/define-flow-type": 1,
    "flowtype/delimiter-dangle": [
      2,
      "never"
    ],
    "flowtype/generic-spacing": [
      2,
      "never"
    ],
    "flowtype/no-primitive-constructor-types": 2,
    "flowtype/no-types-missing-file-annotation": 2,
    "flowtype/no-weak-types": 2,
    "flowtype/object-type-delimiter": [
      2,
      "comma"
    ],
    "flowtype/require-parameter-type": 2,
    "flowtype/require-return-type": [
      2,
      "always",
      {
        "annotateUndefined": "never"
      }
    ],
    "flowtype/require-valid-file-annotation": 2,
    "flowtype/semi": [
      2,
      "always"
    ],
    "flowtype/space-after-type-colon": [
      2,
      "always"
    ],
    "flowtype/space-before-generic-bracket": [
      2,
      "never"
    ],
    "flowtype/space-before-type-colon": [
      2,
      "never"
    ],
    "flowtype/type-id-match": [
      2,
      "^([A-Z][a-z0-9]+)+Type$"
    ],
    "flowtype/union-intersection-spacing": [
      2,
      "always"
    ],
    "flowtype/use-flow-type": 1,
    "flowtype/valid-syntax": 1
  },
  "settings": {
    "flowtype": {
      "onlyFilesWithFlowAnnotation": false
    }
  }
}

By running node_modules/eslint/bin/eslint.js, you should start to see all the inconsistencies in your source code:

/Users/jon/Projects/react-native-pastry-picker/src/ingredientBar.js
  4:3   err. 'Animated' is defined but ...        no-unused-vars
  7:3   err. 'TouchableHighlight' is de...        no-unused-vars
 12:1   err. Type identifier 'Props' do...        flowtype/type-id-match
 18:16  err. Component should be written...       react/prefer-stateless-function
 19:9   err. Missing return type annotation       flowtype/require-return-type
 21:13  err. JSX not allowed in files with...     react/jsx-filename-extension
 21:26  err. 'styles' was used before it was...   no-use-before-define
 22:20  err. 'styles' was used before it was...   no-use-before-define
 24:20  err. 'styles' was used before it was...   no-use-before-define
 25:13  err. Expected indentation of 4 space...   react/jsx-indent

/Users/jon/Projects/react-native-pastry-picker/src/pastryButton.js
 10:1   err. Type identifier 'Props' does...      flowtype/type-id-match
 21:9   err. Missing return type annotation       flowtype/require-return-type
 23:13  err. JSX not allowed in files with...     react/jsx-filename-extension
 23:26  err. 'styles' was used before it was...   no-use-before-define
 26:17  err. 'styles' was used before it was...   no-use-before-define
 29:22  err. 'styles' was used before it was...   no-use-before-define
 31:13  err. Expected indentation of 4 space...   react/jsx-indent

/Users/jon/Projects/react-native-pastry-picker/src/pastryPicker.js
 26:1   err. Type identifier 'State' does...      flowtype/type-id-match
 31:3   err. state should be placed after...      react/sort-comp
 44:9   err. Missing return type annotation       flowtype/require-return-type
 48:13  err. JSX not allowed in files with...     react/jsx-filename-extension
 48:26  err. 'styles' was used before it was...   no-use-before-define
 49:20  err. 'styles' was used before it was...   no-use-before-define
 51:39  err. Missing "key" parameter type...      flowtype/require-parameter-type
 51:39  err. Missing return type annotation       flowtype/require-return-type
 59:20  err. 'styles' was used before it was...   no-use-before-define
 65:13  err. Expected indentation of 4 space...   react/jsx-indent

✖ 27 problems (27 errors, 0 warnings)
  3 errors, 0 warnings potentially fixable with the `--fix` option.

In just three components, ESLint was able to detect 27 errors! Some of these are style choices that I don’t agree with—for example, I don’t have a problem including JSX in a file ending in .js. Let’s disable that rule in our .eslintrc.json file:

...
"env": {
  "jest": true
},
"rules": {
  "react/jsx-filename-extension": [
    0
  ],
  "import/no-extraneous-dependencies": [
    "error", { "devDependencies": true  }
  ],
...

By setting react/jsx-filename-extension to [ 0 ], ESLint will now ignore this rule. I also want to run eslint on my test suite, which relies on a few global functions. To ignore them, add "jest": true as part of your environment. Because the react-native-pastry-picker is an external package, certain dependencies, like react and react-native, are devDependencies. Relaxing the import/no-extraneous-dependencies rule is required because it will be imported into other React Native applications with their own dependencies on react and react-native.

By rerunning the linter, my error set has dropped to 24 errors.

The following three components, after ESLint and Flow checking, now all follow a consistent style. Note that the implementation has not changed at all—ESLint detected that the <IngredientBar /> component could be refactored into a pure function:

// src/ingredientBar.js
// @flow
import React, { type Element } from 'react';
import {
  StyleSheet,
  Text,
  View,
} from 'react-native';


type PropType = {
  backgroundColor: string,
  label: string,
  flex: number
};

const styles = StyleSheet.create({
  ingredientColumn: {
    flexDirection: 'column',
    flex: 1,
    justifyContent: 'flex-end',
  },
  bar: {
    alignSelf: 'flex-start',
    flexGrow: 0,
  },
  label: {
    flex: 0.2,
  },
});

export default function IngredientBar({ backgroundColor, flex, label }:
PropType):
  Element<View> {
  return (
    <View style={styles.ingredientColumn}>
      <View style={styles.bar} />
      <View style={{ backgroundColor, flex }} />
      <View style={styles.label}><Text>{label}</Text></View>
    </View>
  );
}

The render() method now has a Flow return type:

// src/pastryButton.js
// @flow
import React, { Component, type Element } from 'react';
import {
  StyleSheet,
  Text,
  TouchableHighlight,
  View,
} from 'react-native';

type PropType = {
  isActive?: boolean,
  label: string,
  onPress: (key: string) => void
};

const styles = StyleSheet.create({
  button: {
    padding: 10,
    minWidth: 140,
    justifyContent: 'center',
    backgroundColor: '#5A8282',
    borderRadius: 10,
  },
  buttonContainer: {
    margin: 10,
  },
  buttonText: {
    fontSize: 18,
    color: '#FFF',
  },
});

export default class PastryButton extends Component<PropType> {
  static defaultProps = {
    isActive: false,
  }

  props: PropType

  render(): Element<View> {
    const { isActive, onPress, label } = this.props;
    return (
      <View style={styles.buttonContainer}>
        <TouchableHighlight
          onPress={onPress}
          style={[styles.button, { backgroundColor: isActive ?
          '#CD7734' : '#54250B' }]}
          underlayColor="#CD7734"
        >
          <Text style={styles.buttonText} >{label}</Text>
        </TouchableHighlight>
      </View>);
  }
}

ESLint’s --fix flag reformatted the PASTRIES constant:

// @flow
import React, { Component, type Element } from 'react';
import {
  StyleSheet,
  View,
} from 'react-native';

import IngredientBar from './ingredientBar';
import PastryButton from './pastryButton';

const PASTRIES = {
  croissant: {
    label: 'Croissants', flour: 0.7, butter: 0.5, sugar: 0.2, eggs: 0,
  },
  cookie: {
    label: 'Cookies', flour: 0.5, butter: 0.4, sugar: 0.5, eggs: 0.2,
  },
  pancake: {
    label: 'Pancakes', flour: 0.7, butter: 0.5, sugar: 0.3, eggs: 0.3,
  },
  doughnut: {
    label: 'Dougnuts', flour: 0.5, butter: 0.2, sugar: 0.8, eggs: 0.1,
  },
};

const styles = StyleSheet.create({
  pastryPicker: {
    flex: 1,
    flexDirection: 'column',
    margin: 20,
  },
  ingredientContainer: {
    flex: 1,
    flexDirection: 'row',
  },
  ingredientColumn: {
    flexDirection: 'column',
    flex: 1,
    justifyContent: 'flex-end',
  },
  buttons: {
    flexDirection: 'column',
    flexWrap: 'wrap',
    paddingRight: 20,
    paddingLeft: 20,
    flex: 0.3,
  },
});

type StateType = {
  selectedPastry: string
};

export default class PastryPicker extends Component<{}, StateType> {
  constructor(props: {}) {
    super(props);
    this.state = {
      selectedPastry: 'croissant',
    };
  }

  state: StateType

  setPastry = (selectedPastry: string) => {
    this.setState({ selectedPastry });
  }

  renderButtons(): Array<View> {
    return Object.keys(PASTRIES).map((key: string): Element<View> =>
    (<PastryButton
      key={key}
      isActive={this.state.selectedPastry === key}
      onPress={() => { this.setPastry(key); }}
      label={PASTRIES[key].label}
    />));
  }

  render(): Element<View> {
    const {
      flour, butter, sugar, eggs,
    } = PASTRIES[this.state.selectedPastry];

    return (
      <View style={styles.pastryPicker}>
        <View style={styles.buttons}>
          {this.renderButtons()}
        </View>
        <View style={styles.ingredientContainer}>
          <IngredientBar backgroundColor='#F2D8A6' flex={flour} label='Flour' />
          <IngredientBar backgroundColor='#FFC049' flex={butter}
          label='Butter' />
          <IngredientBar backgroundColor='#CACACA' flex={sugar} label='Sugar' />
          <IngredientBar backgroundColor='#FFDE59' flex={eggs} label='Eggs' />
        </View>
      </View>
    );
  }
}
Note

You can also try to fix some common errors by running ESLint with the --fix flag. Make sure you have committed your source code before it runs so you can verify the changes and make sure that there are no functional differences.

Discussion

With Flow and Jest, you have tools that ensure program correctness, but neither will address style and consistency. ESLint is a powerful tool for ensuring that:

  • Variables that have been declared are used

  • Spacing rules are respected

  • Naming conventions are followed

  • Debugging statements like console.log or debugger are removed

  • Semicolons are added (or not)

  • Variables are not assigned inside of if() statements

Explore all rules ESLint can enforce in its documentation.

See Also

This example only scratches the surface of what ESLint can do to improve the maintainability and code quality of your project. Consider integrating ESLint into your development environment by using the ESLint integrations guide.

6.5 Write Your App with Reason

Reason is a type-safe language built on top of the incredible OCaml compiler. Using BuckleScript, we can transform OCaml code into JavaScript. There is a small, but incredibly productive community of React Native developers writing apps with Reason.

The Reason website also provides excellent guides and documentation to get you started.

Problem

You have JavaScript fatigue, but you want to build apps with React Native. Tired of dealing with versioning challenges, you want to work with a simpler language that can be compiled and analyzed for its correctness before it becomes JavaScript running on the client. Enter Reason.

Solution

In order to see how the same concepts look with a different implementation, let’s rewrite the react-native-pastry-picker as a Reason application. The Reason version of the pastry picker has about 15% less code if you factor in the unit tests and flow types.

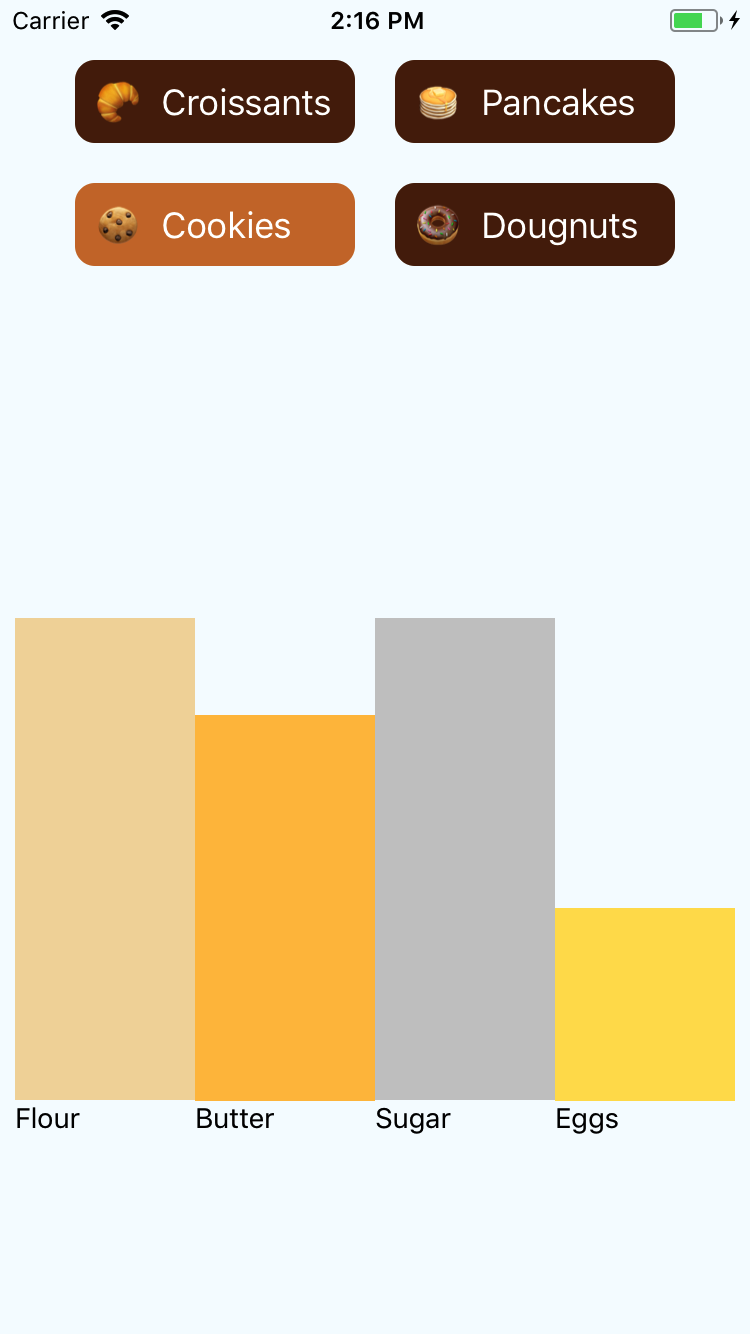
The PastryPicker component in Figure 6-1 maintains the same functionality, but now benefits from the syntax features in Reason.

Start by adding BuckleScript, ReasonReact, and BuckleScript React Native bindings:

$> yarn add bs-platform reason-react bs-react-native

Now add a BuckleScript configuration file (bsconfig.json) to your project root:

{
  "name": "my-reason",
  "sources": [
    {
      "dir": "src",
      "subdirs": true
    },
  ],
  "refmt": 3,
  "reason": {
    "react-jsx": 2
  },
  "package-specs": [
    {
      "module": "commonjs",
      "in-source": true
    }
  ],
  "bs-dependencies": [
    "bs-react-native",
    "reason-react",
  ],
  "generate-merlin": true,
  "bsc-flags": ["-bs-super-errors"],
  "suffix": ".bs.js"
}
The PastryPicker, now in Reason
Figure 6-1. The react-native-pastry-picker application

We are also going to need a process that will watch for changes to our Reason files. The watcher will take these .re files and convert them into .bs.js variants that can be consumed as regular JavaScript by larger React Native applications.

Add bsb -make-world -w to the scripts in your package.json. It might look like this:

"scripts": {
  "start": "node node_modules/react-native/local-cli/cli.js start",
  "test": "jest",
  "watch": "bsb -make-world -w"
},

The bsconfig.json file described tells the BuckleScript compiler to look in the src/ folder for Reason files.

Let’s write a Hello World Reason React Native component in src/hello.re:

open ReactNative;

let component = ReasonReact.statelessComponent("Hello");

let styles =
  StyleSheet.create(
    Style.(
      {
        "text": style([fontSize(18.), color("#00F")])
      }
    )
  );

let make = (~name, _children) => {
  ...component,
    render: (_self) => <Text style=styles##text >(
      ReasonReact.stringToElement({j|Hello, $name |j})
    )</Text>
};

let default = ReasonReact.wrapReasonForJs(
  ~component,
  (jsProps) => make(~name=jsProps##name, [||])
);

Start the BuckleScript watcher:

$> yarn run watch
Note

If you manage your source code using version control like Git, adding an ignore rule for *.bs.js files in your .gitignore file will avoid unnecessary distribution copies of your Reason components.

You should notice that any compile errors will appear in the watch window as you type out the component. When the component is successfully compiled, an src/hello.bs.js file will be generated automatically that will look something like this:

// Generated by BUCKLESCRIPT VERSION 2.0.0, PLEASE EDIT WITH CARE
'use strict';

var TextRe       = require("bs-react-native/src/components/textRe.js");
var StyleRe      = require("bs-react-native/src/styleRe.js");
var ReasonReact  = require("reason-react/src/ReasonReact.js");
var StyleSheetRe = require("bs-react-native/src/styleSheetRe.js");

var component = ReasonReact.statelessComponent("Hello");

var styles = StyleSheetRe.create({
      text: StyleRe.style(/* :: */[
            StyleRe.fontSize(18),
            /* :: */[
              StyleRe.color("#00F"),
              /* [] */0
            ]
          ])
    });

  function make(name, _) {
    var newrecord = component.slice();
    newrecord[/* render */9] = (function () {
    return ReasonReact.element(/* None */0, /* None */0, TextRe.Text[/* make
    */0](/* None */0, /* None */0, /* None */0, /* None */0, /* None */0,
    /* None
    */0, /* None */0, /* None */0, /* None */0, /* Some */[styles.text],
    /* None
    */0, /* None */0, /* None */0, /* None */0, /* None */0, /* None */0,
    /* None
    */0, /* array */["Hello, " + (String(name) + " ")]));
      });
  return newrecord;
}

var $$default = ReasonReact.wrapReasonForJs(component, (function (jsProps) {
        return make(jsProps.name, /* array */[]);
      }));

exports.component = component;
exports.styles    = styles;
exports.make      = make;
exports.$$default = $$default;
exports.default   = $$default;
exports.__esModule= true;
/* component Not a pure module */

Now include the component in your root App.js file as if it were any other .js file:

// App.js
import React, { Component } from 'react';
import {
  StyleSheet,
  View,
} from 'react-native'

import Hello from "./src/hello.bs"

export default class App extends Component<{}> {

  render() {
    return <View style={styles.container}>
      <Hello name="World" />
    </View>
  }
}

const styles = StyleSheet.create({
  container: {
    flex: 1,
    paddingTop: 30,
    backgroundColor: "#FFF",
  }
});

In Figure 6-2, you can see a rendering of a “Hello World” application with React Native and Reason.

Notice the name being passed into the hello.re component.
Figure 6-2. Hello World with Reason and React Native

With all the tooling in place we can now implement <PastryPicker />, <IngredientBar />, and <PastryButton />.

The src/ingredientBar.re file illustrates simple parameter passing as props. Notice how even the stylesheet is type safe! For example, flexDirection() accepts an enum value instead of a string:

open ReactNative;

let component = ReasonReact.statelessComponent("IngredientBar");

let styles =
  StyleSheet.create(
    Style.(
      {
        "ingredientColumn":
          style([
            flexDirection(`column),
            flex(1.),
            justifyContent(`flexEnd)
          ]),
        "bar":
          style([
            alignSelf(`flexStart),
            flexGrow(0.)
          ]),
        "label":
          style([
            flex(0.2)
          ])
      }
    )
  );

let make = (~label, ~barColor, ~flexValue, _children) => {
  ...component,
    render: (_self) =>
      Style.(
        <View style=styles##ingredientColumn >
          <View style=styles##bar />
          <View style=(style([backgroundColor(barColor), flex(flexValue) ])) />
          <View style=styles##label>
            <Text>(ReasonReact.stringToElement(label))</Text>
           </View>
        </View>
      )
};

let default = ReasonReact.wrapReasonForJs(
  ~component,
  (jsProps) => make(~label=jsProps##label,
    ~flexValue=jsProps##flexValue, ~barColor=jsProps##barColor, [||])

The src/pastryButton.re file illustrates how return values from if/else conditions can be performed in the context of rendering a stylesheet:

open ReactNative;

let component = ReasonReact.statelessComponent("PastryButton");

let styles =
  StyleSheet.create(
    Style.(
      {
        "container":
          style([
            margin(10.),
          ]),
        "button":
          style([
            padding(10.),
            minWidth(140.),
            justifyContent(`center),
            backgroundColor("#5A8282"),
            borderRadius(10.)
          ]),
        "text": style([fontSize(18.), color("#FFF")])
      }
    )
  );

let make = (~label, ~isActive, ~onPress, _children) => {
  ...component,
    render: (_self) =>
      Style.(
        <View style=styles##container >
          <TouchableHighlight onPress
            style=(concat([styles##button, style([
                backgroundColor(
                  if (isActive) {
                    "#CD7734"
                  } else {
                    "#54250B"
                  })
              ])])
            )>
            <Text style=styles##text >(ReasonReact.stringToElement(label))</Text>
          </TouchableHighlight>
        </View>
      )
};

let default = ReasonReact.wrapReasonForJs(
  ~component,
  (jsProps) => make(~label=jsProps##label, ~onPress=jsProps##onPress,
                    ~isActive=jsProps##isActive, [||])
);

The most featureful Reason component in this example is the actual src/pastryPicker.re file. I take full advantage of Reason’s type system to build a list of type pastry. Like Recipe 2.5, we perform an action of Click(pastry). This triggers a reducer on the component to perform a local state change:

open ReactNative;

type pastry = {
  label: string,
  flour: float,
  sugar: float,
  butter: float,
  eggs: float,
  isActive: bool
};

type action =
  | Click(pastry);

let pastryList = [
{ label: {j|Croissants|j},  flour: 0.7, butter: 0.5,
                sugar: 0.2, eggs: 0.0, isActive: true },
{ label: {j|Cookies|j},      flour: 0.5, butter: 0.4,
                sugar: 0.5, eggs: 0.2, isActive: false },
{ label: {j|Pancakes|j},  flour: 0.7, butter: 0.5,
                sugar: 0.3, eggs: 0.3, isActive: false },
{ label: {j|Dougnuts|j},  flour: 0.5, butter: 0.2,
                sugar: 0.8, eggs: 0., isActive: false }
];

type state = {
  pastries: list(pastry)
};

let styles =
  StyleSheet.create(
    Style.(
      {
        "pastryPicker":
          style([
            flexDirection(`column),
            flex(1.),
            margin(20.)
          ]),
        "ingredientContainer":
          style([
            flexDirection(`row),
            flex(1.),
          ]),
        "ingredientColumn":
          style([
            flexDirection(`column),
            flex(1.),
            justifyContent(`flexEnd)
          ]),
        "buttons":
          style([
            flexDirection(`column),
            flexWrap(`wrap),
            paddingRight(20.),
            paddingLeft(20.),
            flex(0.3)
          ])
      }
    )
  );

let component = ReasonReact.reducerComponent("pastryPicker");

let make = (_children) => {
  ...component,
  initialState: () => { pastries: pastryList },
  reducer: (action, { pastries }) =>
    switch action {
      | Click(clickedPastry) => ReasonReact.Update({
          pastries:
            pastries
            |> List.map((item) => { ...item,
              isActive: (clickedPastry.label == item.label) })
        });
    },
  render: ({ state, reduce }) => {
    let active = state.pastries
                  |> List.find( (item) => item.isActive);
    <View style=styles##pastryPicker >
      <View style=styles##buttons >
        (
          state.pastries
          |> List.map((item) => <PastryButton isActive=item.isActive
            onPress=(reduce((_event) => Click(item) ))
            key=item.label
            label=item.label />)
          |> Array.of_list
          |> ReasonReact.arrayToElement
        )
      </View>
      <View style=styles##ingredientContainer>
        <IngredientBar barColor="#F2D8A6" flexValue=(active.flour)
        label="Flour" />
        <IngredientBar barColor="#FFC049" flexValue=(active.butter)
        label="Butter" />
        <IngredientBar barColor="#CACACA" flexValue=(active.sugar)
        label="Sugar" />
        <IngredientBar barColor="#FFDE59" flexValue=(active.eggs)
        label="Eggs" />
      </View>
    </View>
  }
};

let default = ReasonReact.wrapReasonForJs(
  ~component,
  (jsProps) => make([||])
);

Now import the PastryPicker with import PastryPicker from "./src/pastryPicker.bs" and update your App.js render() method:

render() {
  return <View style={styles.container}>
    <PastryPicker />
  </View>
}

Reason would definitely be considered bleeding edge, but remember that you are working with the OCaml compiler, a battle-tested library that has been in development for over two decades. There are some trade-offs to using Reason: the documentation and examples are still changing rapidly and there is a limited set of bindings and open source packages to draw on. However, Reason is a simpler programming environment compared to using Flow, Babel, ESLint, etc.

The language itself also has fewer syntactic pecularities when compared to JavaScript. If you are already using functional languages in your development team or are interested in building a small, high-performance application team, Reason is worth considering.

Discussion

Let’s face it: JavaScript provides you with a lot of opportunities to make programming mistakes that will only crop up after your app has been shipped to the various storefronts. While Flow, ESLint, TypeScript, and a battery of unit tests will protect you from a large number of these bugs, why not ditch JavaScript entirely for a language designed around type safety?

Reason is a statically typed, functional programming language. When you write your components with Reason, the supercharged OCaml parser will catch programming errors before you have a chance to switch to your development simulator. Reason’s syntax will be familiar to any modern JavaScript developer. If you have experience with languages like Lisp, Elixir, Haskell, F#, or Elm, you will feel right at home.

Code is written in Reason, then parsed by the OCaml interpreter and transpiled to JavaScript with BuckleScript, a library that produces performant, safe, and human-readable JavaScript. With ReasonReact, you can experience the same productive environment provided by JavaScript. Since this is happening on a native runtime, you still need some special React Native bindings, which are provided by the BuckleScript React Native bindings:

A type system doesn’t magically eliminate bugs; it points out the unhandled conditions and asks you to cover them.

Reason documentation

Reason’s language can also simplify your state management architecture. The uni-directional Flux pattern for state management pattern is built-in.

See Also

As I was writing this book, I found myself supported by the helpful folks in the ReasonML Discord Channel. Language architect Cheng Lou and Jared Forsyth are both worth following as you dip into the Reason community.

..................Content has been hidden....................

You can't read the all page of ebook, please click here login for view all page.
Reset
3.134.79.121