
Chapter 3. Essential File Management Tools

This chapter covers the following subjects:
The following RHCSA exam objectives are covered in this chapter:
Create, delete, copy, and move files and directories
Archive, compress, unpack, and uncompress files using tar, star, gzip, and bzip2
Create hard and soft links
Linux is a file-oriented operating system. That means that many things an administrator has to do on Linux can be traced down to managing files on the Linux operating system. Also, when using hardware devices, files are involved. This chapter introduces you to essential file management skills. You learn how the Linux file system is organized and how you can work with files and directories. You also learn how to manage links and compressed or uncompressed archives.
“Do I Know This Already?” Quiz
The “Do I Know This Already?” quiz allows you to assess whether you should read this entire chapter thoroughly or jump to the “Exam Preparation Tasks” section. If you are in doubt about your answers to these questions or your own assessment of your knowledge of the topics, read the entire chapter. Table 3-1 lists the major headings in this chapter and their corresponding “Do I Know This Already?” quiz questions. You can find the answers in Appendix A, “Answers to the ‘Do I Know This Already?’ Quizzes and ‘Review Questions.’”
Table 3-1 “Do I Know This Already?” Section-to-Question Mapping
Foundation Topics Section |
Questions |
|---|---|
1–4 |
|
5–7 |
|
8 |
|
10 |
1. Under which directory would you expect to find nonessential program files?
a. /boot
b. /bin
c. /sbin
d. /usr
2. Under which directory would you expect to find log files?
a. /proc
b. /run
c. /var
d. /usr
3. Which of the following directories would typically not be mounted on its own dedicated device?
a. /etc
b. /boot
c. /home
d. /usr
4. Which of the following commands would give the most accurate overview of mounted disk devices (without showing much information about mounted system devices as well)?
a. mount
b. mount -a
c. df -hT
d. du -h
5. Which command enables you to show all files in the current directory so that the newest files are listed last?
a. ls -lRt
b. ls -lrt
c. ls -alrt
d. ls -alr
6. Which command enables you to copy hidden files as well as regular files from /home/$USER to the current directory?
a. cp -a /home/$USER .
b. cp -a /home/$USER/* .
c. cp -a /home/$USER/. .
d. cp -a home/$USER. .
7. Which command enables you to rename the file myfile to mynewfile?
a. mv myfile mynewfile
b. rm myfile mynewfile
c. rn myfile mynewfile
d. ren myfile mynewfile
8. Which statement about hard links is not true?
a. Hard links cannot be created to directories.
b. Hard links cannot refer to files on other devices.
c. The inode keeps a hard link counter.
d. If the original hard link is removed, all other hard links become invalid.
9. Which command creates a symbolic link to the directory /home in the directory /tmp?
a. ln /tmp /home
b. ln /home /tmp
c. ln -s /home /tmp
d. ln -s /tmp /home
10. Which tar option enables you to add one single file to a tar archive?
a. -a
b. -A
c. -r
d. -u
Foundation Topics
Working with the File System Hierarchy
To manage a Linux system, you should be familiar with the default directories that exist on almost all Linux systems. This section describes these directories and explains how mounts are used to compose the file system hierarchy.
Defining the File System Hierarchy
The file system on most Linux systems is organized in a similar way. The layout of the Linux file system is defined in the Filesystem Hierarchy Standard (FHS), and this file system hierarchy is described in man 7 hier. Table 3-2 shows an overview of the most significant directories that you’ll encounter on a Red Hat Enterprise Linux (RHEL) system, as specified by the FHS.

Table 3-2 FHS Overview
Directory |
Use |
|---|---|
/ |
The root directory. This is where the file system tree starts. |
/boot |
Contains all files and directories that are needed to boot the Linux kernel. |
/dev |
Contains device files that are used for accessing physical devices. This directory is essential during boot. |
/etc |
Contains configuration files that are used by programs and services on your server. This directory is essential during boot. |
/home |
Used for local user home directories. |
/media, /mnt |
Contain directories that are used for mounting devices in the file system tree. |
/opt |
Used for optional packages that may be installed on your server. |
/proc |
Used by the proc file system. This is a file system structure that gives access to kernel information. |
/root |
The home directory of the root user. |
/run |
Contains process and user-specific information that has been created since the last boot. |
/srv |
May be used for data by services like NFS, FTP, and HTTP. |
/sys |
Used as an interface to different hardware devices that is managed by the Linux kernel and associated processes. |
/tmp |
Contains temporary files that may be deleted without any warning during boot. |
/usr |
Contains subdirectories with program files, libraries for these program files, and documentation about them. |
/var |
Contains files that may change in size dynamically, such as log files, mail boxes, and spool files. |
Understanding Mounts
To understand the organization of the Linux file system, the concept of mounting is important. A Linux file system is presented as one hierarchy, with the root directory (/) as its starting point. This hierarchy may be distributed over different devices and even computer systems that are mounted into the root directory.
In the process of mounting, a device is connected to a specific directory, such that after a successful mount this directory gives access to the device contents.
Mounting devices makes it possible to organize the Linux file system in a flexible way. There are several disadvantages to storing all files in just one file system, which gives several good reasons to work with multiple mounts:
High activity in one area may fill up the entire file system, which will negatively impact services running on the server.
If all files are on the same device, it is difficult to secure access and distinguish between different areas of the file system with different security needs. By mounting a separate file system, mount options can be added to meet specific security needs.
If a one-device file system is completely filled, it may be difficult to make additional storage space available.
To avoid these pitfalls, it is common to organize Linux file systems in different devices (and even shares on other computer systems), such as disk partitions and logical volumes, and mount these devices into the file system hierarchy. By configuring a device as a dedicated mount, it is also possible to use specific mount options that can restrict access to the device. Some directories are commonly mounted on dedicated devices:
/boot: This directory is often mounted on a separate device because it requires essential information your computer needs to boot. Because the root directory (/) is often on a Logical Volume Manager (LVM) logical volume, from which Linux cannot boot by default, the kernel and associated files need to be stored separately on a dedicated /boot device.
/var: This directory is often on a dedicated device because it grows in a dynamic and uncontrolled way (for example, because of the log files that are written to /var/log). By putting it on a dedicated device, you can ensure that it will not fill up all storage on your server.
/home: This directory often is on a dedicated device for security reasons. By putting it on a dedicated device, it can be mounted with specific options, such as noexec and nodev, to enhance the security of the server. When reinstalling the operating system, it is an advantage to have home directories in a separate file system. The home directories can then survive the system reinstall.
/usr: This directory contains operating system files only, to which normal users normally do not need any write access. Putting this directory on a dedicated device allows administrators to configure it as a read-only mount.
Apart from these directories, you may find servers that have other directories that are mounted on dedicated partitions or volumes also. After all, it is up to the discretion of the administrator to decide which directories get their own dedicated devices.
To get an overview of all devices and their mount points, you can use different commands:
The mount command gives an overview of all mounted devices. To get this information, the /proc/mounts file is read, where the kernel keeps information about all current mounts. It shows kernel interfaces also, which may lead to a long list of mounted devices being displayed. Example 3-1 shows sample output of this command.
Example 3-1 Partial mount Command Output
[root@server1 ~]# mount
sysfs on /sys type sysfs (rw,nosuid,nodev,noexec,relatime,seclabel)
proc on /proc type proc (rw,nosuid,nodev,noexec,relatime)
devtmpfs on /dev type devtmpfs (rw,nosuid,seclabel,size=909060k,
  nr_inodes=227265,mode=755)
securityfs on /sys/kernel/security type securityfs (rw,nosuid,nodev,
  noexec,relatime)
tmpfs on /dev/shm type tmpfs (rw,nosuid,nodev,seclabel)
devpts on /dev/pts type devpts (rw,nosuid,noexec,relatime,seclabel,
  gid=5,mode=620,ptmxmode=000)
tmpfs on /run type tmpfs (rw,nosuid,nodev,seclabel,mode=755)
tmpfs on /sys/fs/cgroup type tmpfs (ro,nosuid,nodev,noexec,seclabel,
  mode=755)
...
/dev/nvme0n1p1 on /boot type xfs (rw,relatime,seclabel,attr2,inode64,
  noquota)
sunrpc on /var/lib/nfs/rpc_pipefs type rpc_pipefs (rw,relatime)
tmpfs on /run/user/42 type tmpfs (rw,nosuid,nodev,relatime,seclabel,
  size=184968k,mode=700,uid=42,gid=42)
tmpfs on /run/user/1000 type tmpfs (rw,nosuid,nodev,relatime,seclabel,
  size=184968k,mode=700,uid=1000,gid=1000)
gvfsd-fuse on /run/user/1000/gvfs type fuse.gvfsd-fuse
  (rw,nosuid,nodev,relatime,user_id=1000,group_id=1000)
/dev/sr0 on /run/media/student/RHEL-8-0-BaseOS-x86_64 type iso9660
  (ro,nosuid,nodev,relatime,nojoliet,check=s,map=n,blocksize=2048,
  uid=1000,gid=1000,dmode=500,fmode=400,uhelper=udisks2)
tmpfs on /run/user/0 type tmpfs (rw,nosuid,nodev,relatime,seclabel,
  size=184968k,mode=700))
The df -Th command was designed to show available disk space on mounted devices; it includes most of the system mounts. Because it will look on all mounted file systems, it is a convenient command to get an overview of current system mounts. The -h option summarizes the output of the command in a human-readable way, and the -T option shows which file system type is used on the different mounts.
The findmnt command shows mounts and the relationship that exists between the different mounts. Because the output of the mount command is a bit overwhelming, you may like the output of findmnt. Example 3-2 shows sample output of this command. Notice that because of width limitations of the book page, the output that belongs in the OPTIONS column appears on the left side of the page.
Example 3-2 Sample findmnt Command Output
[root@server1 ~]# findmnt TARGET SOURCE FSTYPE OPTIONS / /dev/mapper/rhel-root | xfs rw,relatime,seclabel,at ⊢/sys sysfs sysfs rw,nosuid,nodev,noexec, |⊢/sys/kernel/security securityfs securit rw,nosuid,nodev,noexec, |⊢/sys/fs/cgroup tmpfs tmpfs ro,nosuid,nodev,noexec, ... ⊢/proc proc proc rw,nosuid,nodev,noexec, |/proc/sys/fs/binfmt_misc systemd-1 autofs rw,relatime,fd=46,pgrp= ⊢/dev devtmpfs devtmpf rw,nosuid,seclabel,size |⊢/dev/shm tmpfs tmpfs rw,nosuid,nodev,seclabe |⊢/dev/pts devpts devpts rw,nosuid,noexec,relati |⊢/dev/mqueue mqueue mqueue rw,relatime,seclabel ⊢/dev/hugepages hugetlbfs hugetlb rw,relatime,seclabel,pa |⊢/run tmpfs tmpfs rw,nosuid,nodev,seclabe |⊢/run/user/0 tmpfs tmpfs rw,nosuid,nodev,relatim |⊢/run/user/42 tmpfs tmpfs rw,nosuid,nodev,relatim |⊢/run/user/1000 tmpfs tmpfs rw,nosuid,nodev,relatim ||
In Exercise 3-1, you use different commands to get an overview of currently mounted devices.
Exercise 3-1 Getting an Overview of Current Mounts
Log in as an ordinary user and type mount. Notice that the output of the command is quite overwhelming. If you read carefully, though, you’ll see a few directories from the Linux directory structure and their corresponding mounts.
Now type df -hT. Notice that a lot fewer devices are shown. An example of the output of this command is shown in Example 3-3.
Example 3-3 df -hT Sample Output
[root@server1 ~]# df -hT

  Filesystem         Type       Size   Used Avail Use%   Mounted on
  /dev/mapper/centos-root xfs    5.9G   3.9G  2.1G  66%  /
  devtmpfs           devtmpfs   908M      0  908M   0%   /dev
  tmpfs              tmpfs      918M   144K  917M   1%   /dev/shm
  tmpfs              tmpfs      918M    21M  897M   3%   /run
  tmpfs              tmpfs      918M      0  918M   0%   /sys/fs/cgroup
  /dev/sda1          xfs        197M   131M   67M   67%  /boot
Now that you have entered the mount and df commands, let’s have a closer look at the output of the df -hT command in Example 3-3.
The output of df is shown in seven columns:
Filesystem: The name of the device file that interacts with the disk device that is used. The real devices in the output start with /dev (which refers to the directory that is used to store device files). You can also see a couple of tmpfs devices. These are kernel devices that are used to create a temporary file system in RAM.
Type: The type of file system that was used.
Size: The size of the mounted device.
Used: The amount of disk space the device has in use.
Avail: The amount of unused disk space.
Use%: The percentage of the device that currently is in use.
Mounted on: The directory the device currently is mounted on.
Note that when using the df command, the sizes are reported in kibibytes. The option -m will display these in mebibytes, and using -h will display a human-readable format in KiB, MiB, GiB, TiB, or PiB.
Managing Files
As an administrator, you need to be able to perform common file management tasks. These tasks include the following:
The following subsections explain how to perform these tasks.
Working with Wildcards
When working with files, using wildcards can make your work a lot easier. A wildcard is a shell feature that helps you refer to multiple files in an easy way. Table 3-3 gives an overview.
Table 3-3 Wildcard Overview
Wildcard |
Use |
|---|---|
* |
Refers to an unlimited number of any characters. ls *, for instance, shows all files in the current directory (except those that have a name starting with a dot). |
? |
Used to refer to one specific character that can be any character. ls c?t would match cat as well as cut. |
[auo] |
Refers to one character that may be selected from the range that is specified between square brackets. ls c[auo]t would match cat, cut, and cot. |
Managing and Working with Directories
To organize files, Linux works with directories (also referred to as folders). You have already read about some default directories as defined by the FHS. When users start creating files and storing them on a server, it makes sense to provide a directory structure as well. As an administrator, you have to be able to walk through the directory structure. Exercise 3-2 gives you practice working with directories.
Exercise 3-2 Working with Directories
Open a shell as a normal user. Type cd. Next, type pwd, which stands for print working directory. You’ll see that you are currently in your home directory; that is, name /home/<username>.
Type touch file1. This command creates an empty file with the name file1 on your server. Because you currently are in your home directory, you can create any file you want to.
Type cd /. This changes the current directory to the root (/) directory. Type touch file2. You’ll see a “permission denied” message. Ordinary users can create files only in directories where they have the permissions needed for this.
Type cd /tmp. This brings you to the /tmp directory, where all users have write permissions. Again, type touch file2. You’ll see that you can create items in the /tmp directory (unless there is already a file2 that is owned by somebody else).
Type cd without any arguments. This command brings you back to your home directory.
Type mkdir files. This creates a directory with the name files in the current directory. The mkdir command uses the name of the directory that needs to be created as a relative pathname; it is relative to the position you are currently in.
Type mkdir /home/$USER/files. In this command, you are using the variable $USER, which is substituted with your current username. The complete argument of mkdir is an absolute filename to the directory files you are trying to create. Because this directory already exists, you’ll get a “file exists” error message.
Type rmdir files to remove the directory files you have just created. The rmdir command enables you to remove directories, but it works only if the directory is empty and does not contain any files.
Working with Absolute and Relative Pathnames
In the previous section, you worked with the commands cd and mkdir. You used these commands to browse through the directory structure. You also worked with a relative filename and an absolute filename.
An absolute filename, or absolute pathname, is a complete path reference to the file or directory you want to work with. This pathname starts with the root directory, followed by all subdirectories up to the actual filename. No matter what your current directory is, absolute filenames will always work. An example of an absolute filename is /home/lisa/file1.
A relative filename is relative to the current directory as shown with the pwd command. It contains only the elements that are required to get from the current directory up to the item you need. Suppose that your current directory is /home (as shown by the pwd command). When you refer to the relative filename lisa/file1, you are referring to the absolute filename /home/lisa/file1.
When working with relative filenames, it is sometimes useful to move up one level in the hierarchy. Imagine you are logged in as root and you want to copy the file /home/lisa/file1 to the directory /home/lara. A few solutions would work:
Use cp /home/lisa/file1 /home/lara. Because in this command you are using absolute pathnames, this command will work at all times.
Make sure your current directory is /home and use cp lisa/file1 lara. Notice that both the source file and the destination file are referred to as relative filenames and for that reason do not start with a /.
If the current directory is set to /home/lisa, you could also use cp file1 ../lara. In this command, the name of the target file uses .., which means go up one level. The .. is followed by /lara, so the total name of the target file would be interpreted as “go up one level” (so you would be in /home), and from there, look for the /lara subdirectory.
Tip
If you are new to working with Linux, understanding relative filename is not always easy. There is an easy workaround, though. Just make sure that you always work with absolute pathnames. It is more typing, but it is easier so you’ll make fewer mistakes.
In Chapter 2, “Using Essential Tools,” you learned how you can use Bash completion via the Tab key to complete commands. Using Bash completion makes it a lot easier to work with long commands. Bash completion works on filenames, too. If you have a long filename, like my-long-file-name, try typing my- and press the Tab key. If in the current directory, just one file has a name starting with my-, the filename will automatically be completed. If there are more files that have a name starting with my-, you have to press the Tab key twice to see a list of all available filenames.
Listing Files and Directories
While working with files and directories, it is useful to show the contents of the current directory. For this purpose, you can use the ls command. If used without arguments, ls shows the contents of the current directory. Some common arguments make working with ls easier. Table 3-4 gives an overview.
Table 3-4 ls Common Command-Line Options
Command |
Use |
|---|---|
ls -l |
Shows a long listing, which includes information about file properties, such as creation date and permissions. |
ls -a |
Shows all files, including hidden files. |
ls -lrt |
This is a very useful command. It shows commands sorted on modification date. You’ll see the most recently modified files last in the list. |
ls -d |
Shows the names of directories, not the contents of all directories that match the wildcards that have been used with the ls command. |
ls -R |
Shows the contents of the current directory, in addition to all of its subdirectories; that is, it Recursively descends all subdirectories. |
Tip
A hidden file on Linux is a file that has a name that starts with a dot. Try the following: touch .hidden. Next, type ls. You will not see the file. Then type ls -a. You’ll see it.
When using ls and ls -l, you’ll see that files are color-coded. The different colors that are used for different file types make it easier to distinguish between different kinds of files. Do not focus too much on them, though, because the colors that are used are the result of a variable setting that might be different in other Linux shells or on other Linux servers.
Copying Files
To organize files on your server, you’ll often copy files. The cp command helps you do so. Copying a single file is not difficult: Just use cp /path/to/file /path/to/destination. To copy the file /etc/hosts to the directory /tmp, for instance, use cp /etc/hosts /tmp. This results in the file hosts being written to /tmp.
Tip
If you copy a file to a directory, but the target directory does not exist, a file will be created with the name of the alleged target directory. In many cases, that’s not the best solution and it would be better to just get an error message instead. You can accomplish this by placing a / after the directory name, so use cp /etc/hosts /tmp/ and not cp /etc/hosts /tmp.
With the cp command, you can also copy an entire subdirectory, with its contents and everything beneath it. To do so, use the option -R, which stands for recursive. (You’ll see the option -R with many other Linux commands also.) For example, to copy the directory /etc and everything in it to the directory /tmp, you would use the command cp -R /etc /sound.
While using the cp command, you need to consider permissions and other properties of the files. Without extra options, you risk these properties not being copied. If you want to make sure that you keep the current permissions, use the -a option, which has cp work in archive mode. This option ensures that permissions and all other file properties will be kept while copying. So, to copy an exact state of your home directory and everything within it to the /tmp directory, use cp -a ~ /tmp.
A special case when working with cp is hidden files. By default, hidden files are not copied over. There are three solutions to copy hidden files as well:
cp /somedir/.* /tmp This copies all files that have a name starting with a dot (the hidden files, that is) to /tmp. It gives an error message for directories whose name starts with a dot in /somedir, because the -R option was not used.
cp -a /somedir/ . This copies the entire directory /somedir, including its contents, to the current directory. So, as a result, a subdirectory somedir will be created in the current directory.
cp -a /somedir/. . This copies all files, regular and hidden, to the current directory (notice the space between the two dots at the end of this command).
Moving Files
To move files, you use the mv command. This command removes the file from its current location and puts it in the new location. You can also use it to rename a file (which, in fact, is nothing else than copying and deleting the original file anyway). Let’s take a look at some examples:
mv myfile /tmp: Moves the file myfile from the current directory to /tmp.
mkdir somefiles; mv somefiles /tmp: First creates a directory with the name somefiles and then moves this directory to /tmp. Notice that this also works if the directory contains files.
mv myfile mynewfile: Renames the file myfile to a new file with the name mynewfile.
Deleting Files
The last common file administration task is file deletion. To delete files and directories, you use the rm command. When used on a single file, the single file is removed. You can also use it on directories that contain files. To do so, include the -r option, which again stands for recursive.
Note
Many commands have an option that creates recursive behavior. On some commands you use the option -R, and on other commands you use the option -r. That is confusing, but it is just the way it is.
On RHEL 8, if you use the rm command as root, it prompts for confirmation. This is because through /root/.bashrc, rm is defined as an alias to rm -i. If you do not like that, you can use the -f option or remove the alias from /root/.bashrc. Make sure that you know what you are doing when using this option, because after using it, there is no way back but the backup tape!
In Exercise 3-3, you work with the common file management utilities.
Note
In this exercise dots are important and used as a part of the commands. To avoid confusion, if normally a dot would be used to indicate the end of a sentence, in this exercise we’ve left it out if it immediately follows a command.
Exercise 3-3 Working with Files
Figure 3-1 provides an overview of the directory structure you are working with in this exercise.

FIGURE 3-1 Sample Directory Structure Overview
Open a shell as an ordinary user.
Type pwd
You should be in the directory /home/$USER.
Type mkdir newfiles oldfiles
Type ls
You’ll see the two directories you have just created.
Type touch newfiles/.hidden and touch newfiles/unhidden
This creates two files in the directory newfiles.
Type cd oldfiles
Type ls -al
This shows two items only: ., which refers to the current directory; and .., which refers to the item above this (the parent directory).
Type ls -al ../newfiles
In this command, you are using a relative pathname to refer to the contents of the /home/$USER/newfiles directory.
Use the command cp -a ../newfiles/ . (notice the space between the / and the . at the end of the command).
Type ls -a
You see that you have created the subdirectory newfiles into the directory oldfiles.
Make sure that you are still in /home/$USER/oldfiles, and type rm -rf newfiles
Now use the command cp -a ../newfiles/* .. (notice the space between the * and ..). Type ls -al to see what has been copied now. You’ll see that the hidden file has not been copied.
To make sure that you copy hidden files as well as regular files, use cp -a ../newfiles/ ..
Verify the command worked this time, using ls -al
You’ll notice that the hidden files as well as the regular files have been successfully copied.
Using Links
Links on Linux are like aliases that are assigned to a file. There are symbolic links, and there are hard links. To understand a link, you need to know a bit about how the Linux file system uses inodes for file system administration.
Understanding Hard Links
Linux stores administrative data about files in inodes. The inode is used to store all administrative data about files. Every file on Linux has an inode, and in the inode, important information about the file is stored:
The data block where the file contents are stored
The creation, access, and modification date
Permissions
File owners
Just one important piece of information is not stored in the inode: the name of the file. Names are stored in the directory, and each filename knows which inode it has to address to access further file information. It is interesting to know that an inode does not know which name it has; it just knows how many names are associated with the inode. These names are referred to as hard links.
When you create a file, you give it a name. Basically, this name is a hard link. On a Linux file system, multiple hard links can be created to a file. This can be useful, because it enables you to access the file from multiple different locations. Some restrictions apply to hard links, though:
Hard links must exist all on the same device (partition, logical volume, etc).
You cannot create hard links to directories.
When the last name (hard link) to a file is removed, access to the file’s data is also removed.
The nice thing about hard links is that no difference exists between the first hard link and the second hard link. They are both just hard links, and if the first hard link that ever existed for a file is removed, that does not impact the other hard links that still exist. The Linux operating system uses links on many locations to make files more accessible.
Understanding Symbolic Links
A symbolic link (also referred to as soft link) does not link directly to the inode but to the name of the file. This makes symbolic links much more flexible, but it also has some disadvantages. The advantage of symbolic links is that they can link to files on other devices, as well as on directories. The major disadvantage is that when the original file is removed, the symbolic link becomes invalid and does not work any longer.
Figure 3-2 gives a schematic overview of how inodes, hard links, and symbolic links relate to one another.
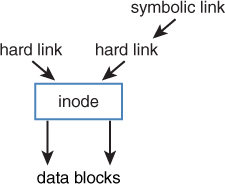
FIGURE 3-2 Links and Inodes Overview
Creating Links
Use the ln command to create links. It uses the same order of parameters as cp and mv; first you mention the source name, followed by the destination name. If you want to create a symbolic link, you use the option -s, and then you specify the source and target file or directory. One important restriction applies, however: to be able to create hard links, you must be the owner of the item that you want to link to. This is a relatively new security restriction that was introduced in RHEL 7.
Table 3-5 shows some examples.
Table 3-5 ln Usage Examples
Command |
Explanation |
|---|---|
ln /etc/hosts . |
Creates a link to the file /etc/hosts in the current directory |
ln -s /etc/hosts . |
Creates a symbolic link to the file /etc/hosts in the current directory |
ln -s /home /tmp |
Creates a symbolic link to the directory /home in the directory /tmp |
The ls command will reveal whether a file is a link:
In the output of the ls -l command, the first character is an l if the file is a symbolic link.
If a file is a symbolic link, the output of ls -l shows the name of the item it links to after the filename.
If a file is a hard link, ls -l shows the hard link counter. In the output in Example 3-4, this is the number 3 that is right before root root for the hosts file.
Example 3-4 Showing Link Properties with ls –l
[root@localhost tmp]# ls -l
total 3
lrwxrwxrwx. 1 root root 5 Jan 19 04:38 home -> /home
-rw-r--r--. 3 root root 158 Jun 7 2013 hosts
Note
In Example 3-4, the command used is ls -l, not ls -l. The ls command by default is an alias, which takes care of using the different colors when showing ls output; the in front of the command causes the alias not to be used.
Removing Links
Removing links can be dangerous. To show you why, let’s consider the following procedure.
Make a directory named test in your home directory: mkdir ~/test.
Copy all files that have a name starting with a, b, c, d, or e from /etc to this directory: cp /etc/[a-e]* ~/test.
Make sure that you are in your home directory, by using cd without arguments.
Type ln -s test link.
Type rm link. This removes the link. (Do not use -r or -f to remove links, even if they are subdirectories.)
Type ls -l. You’ll see that the symbolic link has been removed.
Let’s do it again. Type ln -s test link to create the link again.
Type rm -rf link/ (which is what you would get by using Bash command-line completion).
Type ls. You’ll see that the directory link still exists.
Type ls test/. You’ll see the directory test is now empty.
In Exercise 3-4, you learn how to work with symbolic links and hard links.
Exercise 3-4 Working with Symbolic Links and Hard Links
Open a shell as a regular (nonroot) user.
From your home directory, type ln /etc/passwd .. (Make sure that the command ends with a dot!) This command gives you an “operation not permitted” error because you are not the owner of /etc/passwd.
Type ln -s /etc/passwd .. (Again, make sure that the command ends with a dot!) This works; you do not have to be the owner to create a symbolic link.
Type ln -s /etc/hosts (this time with no dot at the end of the command). You’ll notice this command also works. If the target is not specified, the link is created in the current directory.
Type touch newfile and create a hard link to this file by using ln newfile linkedfile.
Type ls -l and notice the link counter for newfile and linkedfile, which is currently set to 2.
Type ln -s newfile symlinkfile to create a symbolic link to newfile.
Type rm newfile.
Type cat symlinkfile. You will get a “no such file or directory” error message because the original file could not be found.
Type cat linkedfile. This gives no problem.
Type ls -l and look at the way the symlinkfile is displayed. Also look at linkedfile, which now has the link counter set to 1.
Type ln linkedfile newfile.
Type ls -l again. You’ll see that the original situation has been restored.
Working with Archives and Compressed Files
Another important file-related task is managing archives and compressed files. To create an archive of files on a Linux computer, the tar command is often used. This command was originally designed to stream files to a tape without any compression of the files. If you want to compress files as well, a specific compression tool has to be used, or you need to specify an option that compresses the archive while it is created. In this section, you learn how to work with archives and compressed files.
Managing Archives with tar
The Tape ARchiver (tar) utility is used to archive files. Although originally designed to stream files to a backup tape, in its current use tar is used mostly to write files to an archive file. You have to be able to perform four important tasks with tar on the RHCSA exam:
Create an archive
List the contents of an archive
Extract an archive
Compress and uncompress archives
Creating Archives with tar
To create an archive, you use the tar -cf archivename.tar /files-you-want-to-archive command. If you want to see what is happening, use the -v option as well. To put files in an archive, you need at least read permissions to the file and execute permissions on the directory the file resides in. Use tar -cvf /root/homes.tar/home as user root to write the contents of the /home directory and everything below it to the file homes.tar in the directory /root. Notice the options that are used; the order in these options is important.
Originally, tar did not use the dash (-) in front of its options. Modern tar implementations use that dash, as do all other Linux programs, but they still allow the old usage without a dash for backward compatibility. For a complete overview of relevant options used, see Table 3-6.
While managing archives with tar, it is also possible to add a file to an existing archive or to update an archive. To add a file to an archive, you use the -r options. Use, for instance, tar -rvf /root/homes.tar /etc/hosts to add the /etc/hosts file to the archive.
To update a currently existing archive file, you can use the -u option. So, use tar -uvf /root/homes.tar /home to write newer versions of all files in /home to the archive.
Monitoring and Extracting tar Files
Before extracting a file, it is good to know what might be expected. The option -t can be used to find out. Type, for instance, tar -tvf /root/homes.tar to see the contents of the tar archive.
Tip
It is good practice to create archive files with an extension such as .tar or .tgz so that they can be easily recognized, but not everyone does that. If you think that a file is a tar archive, but you are not sure, use the file command. If you type file somefile, for instance, the file command analyzes its contents and shows on the command line what type of file it is.
To extract the contents of an archive, use tar -xvf /archivename. This extracts the archive in the current directory. That means that if you are in /root when typing tar -xvf /root/homes.tar, and the file contains a directory /home, after extracting you’ll have a new directory /root/home that contains the entire contents of the file. This might not be what you wanted to accomplish. There are two solutions to put the extracted contents right where you want to have them:
Before extracting the archive file, cd to the directory where you want to extract the file.
Use the option -C /targetdir to specify the target directory where you want to extract the file to. If you want to put the contents of the file /root/homes.tar in the directory /tmp, for instance, you can use tar -xvf homes.tar -C /tmp.
Note
The RHCSA objectives mention that you need to know how to work with star as well. The star utility was designed to offer support for archiving nondefault file attributes, such as access control lists (see Chapter 7, “Permissions Management”) or SELinux file context (see Chapter 22, “Managing SELinux”). In its current release, tar offers this functionality also, so there is no real need to use star anymore.
Apart from extracting an entire archive file, it is also possible to extract one file out of the archive. To do so, use tar -xvf /archivename.tar file-you-want-to-extract. If your archive etc.tar contains the file /etc/hosts that you want to extract, for instance, use tar -xvf /root/etc.tar etc/hosts.
Using Compression
Many files contain a lot of redundancy. Compression programs allow you to make files take less disk space by taking out that redundancy. If there is no redundancy, you won’t gain much by using compression. In all examples of the tar command that you have seen so far, not a single byte has been compressed. Originally, after creating the archive, it had to be compressed with a separate compression utility, such as gzip or bzip2. After having created home.tar, you can compress it with gzip home.tar. gzip replaces home.tar with its compressed version, home.tar.gz, which takes significantly less space.
As an alternative to using gzip, you can use the bzip2 utility. Originally, bzip2 used a more efficient encryption algorithm, which resulted in smaller file sizes, but currently hardly any difference in file size exists between the result of bzip2 and the result of gzip.
To decompress files that have been compressed with gzip or bzip2, you can use the gunzip and bunzip2 utilities; you work with some examples of this command in Exercise 3-5.
As an alternative to using these utilities from the command line, you can include the -z (gzip) or -j (bzip2) option while creating the archive with tar. This will immediately compress the archive while it is created. There is no need to use these options while extracting. The tar utility will recognize the compressed content and automatically decompress it for you. In Exercise 3-5, you apply the newly acquired tar skills. Table 3-6 gives an overview of the most significant tar options.
Table 3-6 Overview of tar Options
Option |
Use |
|---|---|
c |
Creates an archive. |
v |
Shows verbose output while tar is working. |
t |
Shows the contents of an archive. |
z |
Compresses/decompresses the archive while creating it, by using gzip. |
j |
Compresses/decompresses the archive by using bzip2. |
x |
Extracts an archive. |
u |
Updates an archive; only newer files will be written to the archive. |
C |
Changes the working directory before performing the command. |
r |
Appends files to an archive. |
Exercise 3-5 Using tar
Open a root shell on your server. By logging in, the home directory of user root will become the current directory, so all relative filenames used in this exercise refer to /root/.
Type tar -cvf etc.tar /etc to archive the contents of the /etc directory.
Type file etc.tar and read the information that is provided by the command. This should look like the following:
[root@server1 ~]# file etc.taretc.
tar: POSIX tar archive (GNU)
Type gzip etc.tar.
Type tar tvf etc.tar.gz. Notice that the tar command has no issues reading from a gzip compressed file. Also notice that the archive content consists of all relative filenames.
Type tar xvf etc.tar.gz etc/hosts.
Type ls -R. Notice that a subdirectory etc has been created in the current directory. In this subdirectory, the file hosts has been restored.
Type gunzip etc.tar.gz. This decompresses the compressed file but does not change anything else with regard to the tar command.
Type tar xvf etc.tar -C /tmp etc/passwd. This extracts the password file to the /tmp directory.
Type tar cjvf homes.tar /home. This creates a compressed archive of the home directory to the home directory of user root.
Type rm -f *gz *tar to remove all files resulting from exercises in this chapter from the home directory of /root.
Summary
In this chapter, you learned how to work with essential file management tools. You learned how the Linux directory structure is organized by default, and you learned what file types to expect in which directories. You also learned how to find your way in the directory structure and to work with files.
Exam Preparation Tasks
As mentioned in the section “How to Use This Book” in the Introduction, you have several choices for exam preparation: the end-of-chapter labs; the memory tables in Appendix B; Chapter 26, “Final Preparation”; and the practice exams.
Review All Key Topics
Review the most important topics in the chapter, noted with the Key Topic icon in the outer margin of the page. Table 3-7 lists a reference of these key topics and the page number on which each is found.
Table 3-7 Key Topics for Chapter 3
Key Topic Element |
Description |
Page |
|---|---|---|
FHS overview |
||
Wildcard overview |
||
Paragraph |
Definition of an absolute filename |
|
Paragraph |
Definition of a relative filename |
|
ls common command-line options |
||
Paragraph |
Definition of an inode |
|
ln usage examples |
||
Overview of tar options |
Complete Tables and Lists from Memory
Print a copy of Appendix B, “Memory Tables” (found on the companion website), or at least the section for this chapter, and complete the tables and lists from memory. Appendix C, “Memory Tables Answer Key,” includes completed tables and lists to check your work.
Define Key Terms
Define the following key terms from this chapter and check your answers in the glossary:
File System Hierarchy Standard (FHS)
Review Questions
The questions that follow are meant to help you test your knowledge of concepts and terminology and the breadth of your knowledge. You can find the answers to these questions in Appendix A.
1. Which directory would you go to if you were looking for configuration files?
2. Which command enables you to display a list of current directory contents, with the newest files listed first?
3. Which command enables you to rename the file myfile to yourfile?
4. Which command enables you to wipe an entire directory structure, including all of its contents?
5. How do you create a link to the directory /tmp in your home directory?
6. How would you copy all files that have a name that starts with a, b, or c from the directory /etc to your current directory?
7. Which command enables you to create a link to the directory /etc in your home directory?
8. What is the safe option to remove a symbolic link to a directory?
9. How do you create a compressed archive of the directories /etc and /home and write that archive to /tmp/etchome.tgz?
10. How would you extract the file /etc/passwd from /tmp/etchome.tgz that you have created in the previous step?
End-of-Chapter Lab
In this chapter, you learned how to perform basic file management tasks. Managing files is an essential task for a Linux administrator. This end-of-chapter lab enables you to practice these skills and make sure that you master them before taking the RHCSA exam.
Lab 3.1
1. Log in as user root. In the home directory of root, create one archive file that contains the contents of the /home directory and the /etc directory. Use the name /root/essentials.tar for the archive file.
2. Copy this archive to the /tmp directory. Also create a hard link to this file in the / directory.
3. Rename the file /essentials.tar to /archive.tar.
4. Create a symbolic link in the home directory of the user root that refers to /archive.tar. Use the name link.tar for the symbolic link.
5. Remove the file /archive.tar and see what happened to the symbolic link. Remove the symbolic link also.
6. Compress the /root/essentials.tar file.