
Chapter 15. Managing Advanced Storage

The following topics are covered in this chapter:
The following RHCSA exam objectives are covered in this chapter:
Create and remove physical volumes
Assign physical volumes to volume groups
Create and delete logical volumes
Extend existing logical volumes
Configure disk compression
Manage layered storage
In Chapter 14, “Managing Storage,” you learned how to manage partitions on a hard disk. Creating multiple partitions on a disk is useful because it enables you to keep different data types in separate partitions, but it does not offer the flexibility that the advanced storage solutions are offering. In this chapter, you’ll learn how to work with advanced storage solutions, including Logical Volume Manager (LVM), Stratis, and Virtual Data Optimizer (VDO).
“Do I Know This Already?” Quiz
The “Do I Know This Already?” quiz allows you to assess whether you should read this entire chapter thoroughly or jump to the “Exam Preparation Tasks” section. If you are in doubt about your answers to these questions or your own assessment of your knowledge of the topics, read the entire chapter. Table 15-1 lists the major headings in this chapter and their corresponding “Do I Know This Already?” quiz questions. You can find the answers in Appendix A, “Answers to the ‘Do I Know This Already?’ Quizzes and ‘Review Questions.’”
Table 15-1 “Do I Know This Already?” Section-to-Question Mapping
Foundation Topics Section |
Questions |
|---|---|
1–2 |
|
3–5 |
|
6 |
|
7–8 |
|
9–10 |
1. Which of the following is not a standard component in an LVM setup?
a. Logical volume
b. File system
c. Volume group
d. Physical volume
2. Which of the following is not an LVM feature?
a. Volume resizing
b. Hot replacement of failing disk
c. Copy on write
d. Snapshots
3. Which partition type do you need on a GPT partition to mark it with the LVM partition type?
a. 83
b. 8e
c. 8300
d. 8e00
4. Which of the following commands shows correctly how to create a logical volume that uses 50% of available disk space in the volume group?
a. vgadd -n lvdata -l +50%FREE vgdata
b. lvcreate lvdata -l 50%FREE vgdata
c. lvcreate -n lvdata -l 50%FREE vgdata
d. lvadd -n lvdata -l 50% FREE /dev/vgdata
5. Which command shows an overview of available physical volumes? (Choose two.)
a. pvshow
b. pvdisplay
c. pvs
d. pvlist
6. Which statement about resizing LVM logical volumes is not true?
a. The Ext4 file system can be increased and decreased in size.
b. Use lvextend with the -r option to automatically resize the file system.
c. The XFS file system cannot be resized.
d. To increase the size of a logical volume, you need allocatable space in the volume group.
7. How much storage is used in a Stratis file system for metadata storage?
a. 527 MiB
b. 1 GiB
c. 4 MiB
d. 4 GiB
8. Which of the following lines correctly shows how a Stratis file system should be mounted through /etc/fstab?
a. UUID=abcd /stratis xfs defaults 0 0
b. /dev/stratis/stratis1 /stratis xfs defaults,x-systemd.requires=stratis.service 0 0
c. UUID=abcd /stratis xfs defaults,x-systemd.requires=stratis.service 0 0
d. /dev/stratis/stratis1 /stratis xfs defaults 0 0
9. Which of the following environments could benefit from using VDO? (Choose all that apply.)
a. Virtualization
b. Databases
c. Containers
d. Cloud storage
10. Which option should you use while formatting a VDO device with the XFS file system to ensure that empty blocks are not immediately discarded?
a. -k
b. -K
c. -d
d. -D
Foundation Topics
Understanding LVM
In the early days of Linux servers, storage was handled by creating partitions on disks. Even if this approach does work, there are some disadvantages, the most important of which is that disks are inflexible. That is why the Logical Volume Manager was introduced. Whereas it is not possible to dynamically grow a partition that is running out of disk space, this is possible when working with LVM. LVM offers many other advantages as well, which you learn about in this chapter.
LVM Architecture
In the LVM architecture, several layers can be distinguished. On the lowest layer, the storage devices are used. These can be any storage devices, such as complete disks, partitions, logical units (LUNs) on a storage-area network (SAN), and whatever else is made possible in modern storage topologies. In this chapter you’ll learn how to use partitions as physical volumes, which is recommended practice. By using partitions instead of complete disk devices, it is easy for other tools to recognize that some storage has already been configured on the block device, which makes it less likely that misconfigurations are going to occur.
The storage devices need to be flagged as physical volumes, which makes them usable in an LVM environment and makes them usable by other utilities trying to gain access to the logical volume. A storage device that is a physical volume can be added to the volume group, which is the abstraction of all available storage. The “abstraction” means that the volume group is not something that is fixed, but it can be resized when needed, which makes it possible to add more space on the volume group level when volumes are running out of disk space. The idea is simple: If you are running out of disk space on a logical volume, you take available disk space from the volume group. And if there is no available disk space in the volume group, you just add it by adding a physical volume.
On top of the volume group are the logical volumes. Logical volumes do not act on disks directly but get their disk space from available disk space in the volume group. That means that a logical volume may consist of available storage from multiple physical volumes, which adds an important layer of additional flexibility to the storage configuration.
Note
It is a good idea to avoid logical volumes from spanning multiple physical volumes; if one of the physical volumes breaks, all files on the LVM file system will become inaccessible.
The actual file systems are created on the logical volumes. Because the logical volumes are flexible with regard to size, that makes the file systems flexible as well. If a file system is running out of disk space, it is relatively easy to extend the file system or to reduce it if the file system allows that. Note that in order to resize file systems when logical volumes are resized, the file systems must offer support for that.
Figure 15-1 gives an overview of the LVM architecture.

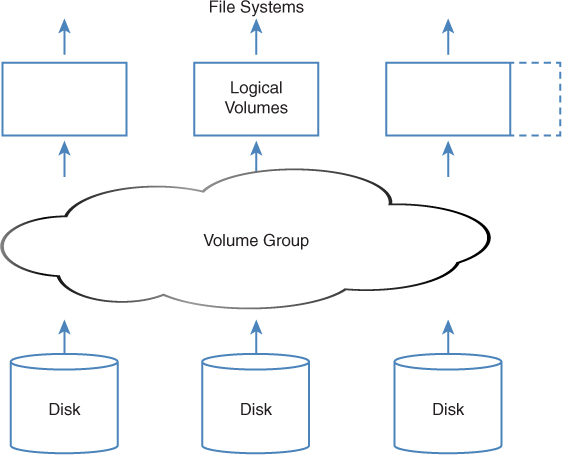
FIGURE 15-1 LVM Architecture Overview
LVM Features
There are several reasons why LVM is great. The most important reason is that LVM offers a flexible solution for managing storage. Volumes are no longer bound to the restrictions of physical hard drives. If additional storage space is needed, the volume group can easily be extended by adding a new physical volume, so that disk space can be added to the logical volumes. It is also possible to reduce the size of a logical volume, but only if the file system that was created on that volume supports the feature of reducing the size of the file system.
Another important reason why administrators like using LVM is the support for snapshots. A snapshot keeps the current state of a logical volume and can be used to revert to a previous situation or to make a backup of the file system on the logical volume if the volume is open. Using snapshots is essential in backup strategies.
LVM snapshots are created by copying the logical volume administrative data (the metadata) that describes the current state of files to a snapshot volume. As long as nothing changes, from the LVM snapshot metadata the original blocks in the original volume are addressed. When blocks are modified, the blocks containing the previous state of the file are copied over to the snapshot volume, which for that reason will grow. Using this method ensures that, by accessing an LVM snapshot volume, the exact state of the files as they were when the snapshot was created can be accessed. Because the snapshot will grow when files on the original volume change, when planning for snapshots, you should make sure that a sufficient amount of disk space is available. Also, snapshots are supposed to be temporary: once a snapshot has served its purpose, it can be removed.
A third important advantage of using LVM logical volumes is the option to replace failing hardware easily. If a hard disk is failing, data can be moved within the volume group (through the pvmove command), the failing disk can then be removed from the volume group, and a new hard disk can be added dynamically, without requiring any downtime for the logical volume itself.
Creating LVM Logical Volumes
Creating LVM logical volumes involves creating the three layers in the LVM architecture. You first have to convert physical devices, such as disks or partitions, into physical volumes (PVs); then you need to create the volume group (VG) and assign PVs to it. As the last step, you need to create the logical volume (LV) itself. In this section, you learn what is involved in creating these three layers.
Different utilities exist for creating LVM logical volumes. This chapter focuses on using the command-line utilities. They are relatively easy to use, and they are available in all environments (whether you are running a graphical interface or not).
Tip
You absolutely do not need to memorize the commands discussed in this chapter for the RHCSA exam. All you really need to remember is pv, vg, and lv. Open a command line, type pv, and press the Tab key twice. This will show all commands that start with pv, which are all commands that are used for managing physical volumes. After you have found the command you need, run this command with the --help option. This shows a usage summary that lists everything you must do to create the element you need. Example 15-1 shows an example of the pvcreate --help command (which is explained in the next subsection).
Example 15-1 Requesting Help for the pvcreate Command
[root@control ~]# pvcreate --help
  pvcreate - Initialize physical volume(s) for use by LVM

  pvcreate PV ...
         [ -f|--force ]
         [ -M|--metadatatype lvm2 ]
         [ -u|--uuid String ]
         [ -Z|--zero y|n ]
         [    --dataalignment Size[k|UNIT] ]
         [    --dataalignmentoffset Size[k|UNIT] ]
         [    --bootloaderareasize Size[m|UNIT] ]
         [    --labelsector Number ]
         [    --pvmetadatacopies 0|1|2 ]
         [    --metadatasize Size[m|UNIT] ]
         [    --metadataignore y|n ]
         [    --norestorefile ]
         [    --setphysicalvolumesize Size[m|UNIT] ]
         [    --reportformat basic|json ]
         [    --restorefile String ]
         [ COMMON_OPTIONS ]

  Common options for lvm:
         [ -d|--debug ]
         [ -h|--help ]
         [ -q|--quiet ]
         [ -v|--verbose ]
         [ -y|--yes ]
         [ -t|--test ]
         [    --commandprofile String ]
         [    --config String ]
         [    --driverloaded y|n ]
         [    --nolocking ]
         [    --lockopt String ]
         [    --longhelp ]
         [    --profile String ]
         [    --version ]

  Use --longhelp to show all options and advanced commands.
Creating the Physical Volumes
Before you can use the LVM tools to create physical volumes, you need to create a partition marked as the LVM partition type. This is basically the same procedure as described in Chapter 14, with the only difference being that before writing changes to disk, you need to change the partition type.
In fdisk and gdisk, you can use t from the menu to change the type. If you are using an MBR disk, the partition type is 8e. If you are using a GUID disk, use the partition type 8e00. If you are using parted to create partitions, you need to use the set n lvm on command from within the parted interface (where n is the number of the partition you want to mark for use with LVM).
After creating the partition and flagging it as an LVM partition type, you need to use pvcreate to mark it as a physical volume. This writes some metadata to the partition, which allows it to be used in a volume group. The entire procedure is summarized in Exercise 15-1, in which you create a physical volume. Also see Example 15-2 for an overview of this procedure.
Exercise 15-1 Creating a Physical Volume
To do this exercise, you need a hard disk that has free (unpartitioned) disk space available. The recommended method to make disk space available is by adding a new hard disk in your virtual machine environment. In this exercise, I use a clean /dev/sdc device to create the partition. You may have to change the device name to match your configuration. If you do not have a dedicated hard disk available to create this configuration, you might want to consider attaching a USB key to your machine.
Open a root shell and type parted /dev/sdc.
Type print. This will show the current partition table layout. There should be none at this point.
Type mklabel msdos to set the MBR-compatible partition type.
Type mkpart to start the procedure to create a partition, and enter primary when asked for the partition type.
Type xfs to specify that the XFS file system should be used. When asked for the Start position of the partition, type 1MiB, and when asked for the end, enter 1GiB.
Type set 1 lvm on to enable the LVM partition type on the partition.
Now that the partition with the correct partition type has been created, type quit to close the parted interface.
Example 15-2 Creating an LVM Partition in parted
[root@server1 ~]# parted /dev/sdc
GNU Parted 3.2
Using /dev/sdc
Welcome to GNU Parted! Type 'help' to view a list of commands.
(parted) print
Error: /dev/sdc: unrecognised disk label
Model: VMware, VMware Virtual S (scsi)
Disk /dev/sdc: 21.5GB
Sector size (logical/physical): 512B/512B
Partition Table: unknown
Disk Flags:
(parted) mklabel msdos
(parted) mkpart
Partition type?  primary/extended? primary
File system type?  [ext2]? xfs
Start? 1MiB
End? 1GiB
(parted) set 1 lvm on
(parted) print
Model: VMware, VMware Virtual S (scsi)
Disk /dev/sdb: 21.5GB
Sector size (logical/physical): 512B/512B
Partition Table: msdos
Disk Flags:

Number  Start   End      Size    Type     File system  Flags
 1      1049kB  1074MB   1073MB  primary  xfs          lvm, lba

(parted) quit
Information: You may need to update /etc/fstab.
Now that the partition has been created, you need to flag it as an LVM physical volume. To do this, type pvcreate /dev/sdc1. You should now get this output: Physical volume “/dev/sdc1” successfully created.
Type pvs to verify that the physical volume has been created successfully. The output may look like Example 15-3. Notice that in this listing another physical volume already exists; that is because RHEL uses LVM by default to organize storage.
Example 15-3 Verifying the Physical Volume
[root@server1 ~]# pvs
  PV          VG   Fmt  Attr PSize    PFree
  /dev/sda2   rhel lvm2 a--   <19.00g        0
  /dev/sdc1        lvm2 ---  1023.00m 1023.00m
As an alternative to the pvs command, which shows a summary of the physical volumes and their attributes, you can also use the pvdisplay command to show more details. Example 15-4 shows an example of the output of this command.
Example 15-4 Example pvdisplay Command Output
[root@server1 ~]# pvdisplay
  --- Physical volume ---
  PV Name                /dev/sda2
  VG Name                rhel
  PV Size                <19.00 GiB / not usable 3.00 MiB
  Allocatable            yes (but full)
  PE Size                4.00 MiB
  Total PE               4863
  Free PE                0
  Allocated PE           4863
  PV UUID                h9seBL-Z0AK-05xH-RNjO-Ui4d-d8Px-VunuQJ

  "/dev/sdb1" is a new physical volume of "1023.00 MiB"
  --- NEW Physical volume ---
  PV Name                /dev/sdc1
  VG Name
  PV Size                1023.00 MiB
  Allocatable            NO
  PE Size                0
  Total PE               0
  Free PE                0
  Allocated PE           0
  PV UUID                vMqYr7-70nM-kNeW-am8J-c9aA-VWUF-vxw0XJ
If you want a very compact overview of the current storage configuration on your server, you might also like the lsblk command. As shown in Example 15-5, this command gives a hierarchical overview of which disks and partitions are used in what LVM volume groups and logical volumes.
Example 15-5 Using lsblk for a Compact Overview of the Current Storage Configuration
[root@server1 ~]# lsblk NAME MAJ:MIN RM SIZE RO TYPE MOUNTPOINT sda 8:0 0 20G 0 disk ⊢sda1 8:1 0 1G 0 part /bootsda2 8:2 0 19G 0 part ⊢rhel-root 253:0 0 17G 0 lvm /
Creating the Volume Groups
Now that the physical volume has been created, you can assign it to a volume group. It is possible to add a physical volume to an existing volume group (which is discussed later in this chapter), but you will now learn how to create a new volume group and add the physical volume to it. This is a simple one-command procedure. Just type vgcreate followed by the name of the volume group you want to create and the name of the physical device you want to add to it. So, if the physical volume name is /dev/sdc1, the complete command is vgcreate vgdata /dev/sdc1. You are completely free in your choice of name for the volume group. I like to start all volume group names with vg, which makes it easy to find the volume groups if there are many, but you are free to choose anything you like.
Between the previous section and the preceding paragraph, you have learned how to create a volume group in a two-step procedure where you first create the physical volume with the pvcreate command and then add the volume group using the vgcreate command. You can do this in a one-step procedure as well (where using a separate pvcreate command will not be necessary). If you are adding a partition to the volume group, however, it must be marked as an LVM partition type already.
The one-step procedure is particularly useful for adding a complete disk device (which does not need to be marked as anything). If you want to add the disk / dev/sdc, for instance, just type vgcreate vgdata /dev/sdc to create a volume group vgdata that contains the /dev/sdc device. When you are doing this to add a device that has not been marked as a physical volume yet, the vgcreate utility will automatically flag it as a physical volume.
When creating volume groups, a physical extent size is used. The physical extent size defines the size of the building blocks used to create logical volumes. A logical volume always has a size that is a multiple of the physical extent size. If you need to create huge logical volumes, it is more efficient to use a big physical extent size. If you do not specify anything, a default extent size of 4.00 MiB is used. The physical extent size is always specified as a multiple of 2 MiB, with a maximum size of 128 MiB. Use the vgcreate -s option to specify the physical extent size you want to use.
Note
When working with LVM, there is the physical extent size to consider. This is the size of the basic building blocks used in the LVM configuration. When working with an ext4 file system, logical extents are used. The extent sizes on LVM are in no way related to the extent sizes that are used on the file systems.
After creating the volume group, you can request details about the volume group using the vgs command for a short summary, or the vgdisplay command to get more information. Example 15-6 shows an example of the output of the vgdisplay command.
Example 15-6 Showing Current Volume Group Properties
[root@server1 ~]# vgdisplay
...
  --- Volume group ---
  VG Name                vgdata
  System ID
  Format                 lvm2
  Metadata Areas         1
  Metadata Sequence No   2
  VG Access              read/write
  VG Status              resizable
  MAX LV                 0
  Cur LV                 1
  Open LV                0
  Max PV                 0
  Cur PV                 1
  Act PV                 1
  VG Size                1020.00 MiB
  PE Size                4.00 MiB
  Total PE               255
  Alloc PE / Size        127 / 508.00 MiB
  Free  PE / Size        128 / 512.00 MiB
  VG UUID                b68TU5-UPQv-xQRB-7Djx-SuZf-agDb-vAujYD
Creating the Logical Volumes and File Systems
Now that the volume group has been created, you can start creating logical volumes from it. This procedure is slightly more complicated than the creation of physical volumes or volume groups because there are more choices to be made. While creating the logical volume, you must specify a volume name and a size.
The volume size can be specified as an absolute value using the -L option. Use, for instance, -L 5G to create an LVM volume with a 5-GiB size. Alternatively, you can use relative sizes with the -l option. For instance, use -l 50%FREE to use half of all available disk space. You’ll further need to specify the name of the volume group that the logical volume is assigned to, and optionally (but highly recommended), you can use -n to specify the name of the logical volume. For instance, use lvcreate -n lvvol1 -L 100M vgdata to create a logical volume with the name lvvol1 and add that to the vgdata volume group. Once the logical volume has been created, you can use the mkfs utility to create a file system on top of it.
Understanding LVM Device Naming
Now that the logical volume has been created, you can start using it. To do this, you need to know the device name. LVM volume device names can be addressed in multiple ways. The simple method is to address the device as /dev/vgname/lvname. So, for example, if you have created a volume with the name lvdata, which gets its available disk space from the vgdata volume group, the device name would be /dev/vgdata/lvdata, which is in fact a symbolic link to the device mapper name (which is explained next).
For naming LVM volumes, another system plays a role: device mapper. The device mapper (abbreviated as dm) is a generic interface that the Linux kernel uses to address storage devices. Device mapper is used by multiple device types, such as LVM volumes, but also by software RAID and advanced network devices such as multipath devices.
Device mapper devices are generated on detection and use meaningless names like /dev/dm-0 and /dev/dm-1. To make these devices easier to access, device mapper creates symbolic links in the /dev/mapper directory that point to these meaningless device names. The symbolic links follow the naming structure /dev/mapper/vgname-lvname.
So, the device /dev/vgdata/lvdata would also be known as /dev/mapper/vgdata-lvdata. When working with LVM logical volumes, you can use either of these device names. Example 15-7 shows an overview of the different LVM device names as provided by the device mapper. In Exercise 15-2, you learn how to create a volume group and logical volumes.
Example 15-7 LVM Device Name Overview
[root@server1 ~]# ls -l /dev/vgdata/lvdata
lrwxrwxrwx. 1 root root 7 May 19 06:46 /dev/vgdata/lvdata -> ../dm-2
[root@server1 ~]# ls -l /dev/mapper/
total 0
crw-------. 1 root root 10, 236 May 19 06:33 control
lrwxrwxrwx. 1 root root       7 May 19 06:33 rhel-root -> ../dm-0
lrwxrwxrwx. 1 root root       7 May 19 06:33 rhel-swap -> ../dm-1
lrwxrwxrwx. 1 root root       7 May 19 06:46 vgdata-lvdata -> ../dm-2
Exercise 15-2 Creating the Volume Group and Logical Volumes
In Exercise 15-1, you created a physical volume. In this exercise, you continue working on that physical volume and assign it to a volume group. Then you add a logical volume from that volume group. You can work on this exercise only after successful completion of Exercise 15-1.
Open a root shell. Type pvs to verify the availability of physical volumes on your machine. You should see the /dev/sdc1 physical volume that was created previously.
Type vgcreate vgdata /dev/sdc1. This will create the volume group with the physical volume assigned to it.
Type vgs to verify that the volume group was created successfully. Also type pvs. Notice that this command now shows the name of the physical volumes, with the names of the volume groups they are assigned to.
Type lvcreate -n lvdata -l 50%FREE vgdata. This creates an LVM logical volume with the name lvdata, which will use 50% of available disk space in the vgdata volume group.
Type lvs to verify that the volume was added successfully.
At this point, you are ready to create a file system on top of the logical volume. Type mkfs.ext4 /dev/vgdata/lvdata to create the file system.
Type mkdir /files to create a folder on which the volume can be mounted.
Add the following line to the bottom of /etc/fstab:
/dev/vgdata/lvdata /files ext4 defaults 0 0
Type mount -a to verify that the mount works and mount the file system.
Table 15-2 summarizes the relevant commands for creating logical volumes.
Table 15-2 LVM Management Essential Commands
Command |
Explanation |
|---|---|
pvcreate |
Creates physical volumes |
pvs |
Shows a summary of available physical volumes |
pvdisplay |
Shows a list of physical volumes and their properties |
pvremove |
Removes the physical volume signature from a block device |
vgcreate |
Creates volume groups |
vgs |
Shows a summary of available volume groups |
vgdisplay |
Shows a detailed list of volume groups and their properties |
vgremove |
Removes a volume group |
lvcreate |
Creates logical volumes |
lvs |
Shows a summary of all available logical volumes |
lvdisplay |
Shows a detailed list of available logical volumes and their properties |
lvremove |
Removes a logical volume |
Resizing LVM Logical Volumes
One of the major benefits of using LVM is that LVM volumes are easy to resize, which is very useful if your file system is running out of available disk space. If the XFS file system is used, a volume can be increased, but not decreased, in size. Other file systems such as Ext4 support decreasing of the file system size also. Decreasing an Ext4 file system can be done offline only, which means that you need to unmount it before you can resize it. In this section, you learn how to increase the size of an LVM logical volume. To increase the size of a logical volume, you need to have disk space available in the volume group, so we address that first.
Resizing Volume Groups
The most important feature of LVM flexibility lies in the fact that it is so easy to resize the volume groups and the logical volumes that are using disk space from the volume groups. The vgextend command is used to add storage to a volume group, and the vgreduce command is used to take physical volumes out of a volume group (which can lead to some additional complications). For the RHCSA exam, you need to know how to extend the available storage in volume groups. This procedure is relatively easy:
Make sure that a physical volume or device is available to be added to the volume group.
Use vgextend to extend the volume group. The new disk space will show immediately in the volume group.
After extending a volume group, you can use the vgs command to verify that a physical volume has been added to the volume group. In Example 15-8, you can see that the vgdata VG contains two physical volumes, as indicated in the #PV column.
Example 15-8 Verifying VG Resize Operations with vgs
[root@server1 ~]# vgs
  VG       #PV  #LV  #SN   Attr     VSize      VFree
  centos     1    2    0   wz--n-   <19.00g     0
  vgdata     2    1    0   wz--n-   1020.00m   512.00m
Resizing Logical Volumes and File Systems
Like volume groups can be extended with the vgextend command, logical volumes can be extended with the lvextend command. This command has a very useful option -r to take care of extending the file systems on the logical volume at the same time; it is recommended to use this option and not the alternative approach that extends separately the logical volumes and the file systems on top of the logical volumes. Most file system resizing operations can be done online if the file system is getting bigger, without the need to unmount the file system.
To grow the logical volume size, use lvextend or lvresize, followed by the -r option to resize the file system used on it. Then specify the size you want the resized volume to be. The easiest and most intuitive way to do that is by using -L followed by a + sign and the amount of disk space you want to add, as in lvresize -L +1G -r /dev/vgdata/lvdata. An alternative way to resize the logical volume is by using the -l option. This option is followed either by the number of extents that are added to the logical volume or by the absolute or relative percentage of extents in the volume group that will be used. You can, for example, use the following commands to resize the logical volume:
lvresize -r -l 75%VG /dev/vgdata/lvdata This resizes the logical volume so that it will take 75% of the total disk space in the volume group.
lvresize -r -l +75%VG /dev/vgdata/lvdata This tries to add 75% of the total size of the volume group to the logical volume. (Notice the difference with the previous command.)
lvresize -r -l +75%FREE /dev/vgdata/lvdata This adds 75% of all free disk space to the logical volume.
lvresize -r -l 75%FREE /dev/vgdata/lvdata This resizes the logical volume to a total size that equals 75% of the amount of free disk space. (Notice the difference with the previous command.)
A logical extent is the logical building block used when creating logical volumes, and it maps to a physical extent, the size of which can be specified when creating a volume group. All resize operations need to match complete logical extents. You will sometimes notice that the resize size is rounded up or down to the logical extent size. You can also specify the number of logical extents that need to be added or removed directly by using the -l option with the lvresize command.
As you can see, resizing a logical volume has many options, and you need to take care to use the right options because it is easy to make a mistake! In Exercise 15-3, you learn how to resize logical volumes and the file systems used on top of them.
Note
The size of an XFS file system cannot be decreased; it can only be increased. If you need a file system that can be shrunk in size, use Ext4, not XFS.
Exercise 15-3 Resizing Logical Volumes
In Exercises 15-1 and 15-2, you created a physical volume, volume group, and logical volume. In this exercise, you extend the size of the logical volume and the file system used on top of it.
Type pvs and vgs to show the current physical volume and volume group configuration.
Use parted to add another partition with a size of 1 GiB. Do not forget to flag this partition with the LVM partition type using set lvm on. I’ll assume this new partition is /dev/sdb2 for the rest of this exercise. Replace this name with the name used on your configuration if it is different.
Type vgextend vgdata /dev/sdb2 to extend vgdata with the total size of the /dev/sdb2 device.
Type vgs to verify that the available volume group size has increased.
Type lvs to verify the current size of the logical volume lvdata.
Type df -h to verify the current size of the file system on lvdata.
Type lvextend -r -l +50%FREE /dev/vgdata/lvdata to extend lvdata with 50% of all available disk space in the volume group.
Type lvs and df -h again to verify that the added disk space has become available.
Type lvreduce -r -L -50M /dev/vgdata/lvdata. This shrinks the lvdata volume with 50 MB. Notice that while doing this the volume is temporarily unmounted, which happens automatically. Also note that this step works only if you’re using an Ext4 file system. (XFS cannot be shrunk.)
Configuring Stratis
In RHEL 8, Red Hat has added two advanced storage types: Stratis and VDO. Stratis is a so-called volume-managing file system, and it introduces advanced storage features that were not available in previous versions of RHEL:
Thin provisioning: This feature enables a Stratis file to present itself to users as much bigger than it really is. This is useful in many environments, such as virtual desktops, where each user may see 20 GiB of available storage in total although a much lower amount is actually provisioned to each user.
Snapshots: A Stratis snapshot allows users to take a “picture” of the current state of a file system. This snapshot makes it easy to revert to the previous state of a file system, rolling back any changes that have been made.
Cache tier: Cache tier is a Ceph storage feature that ensures that data can be stored physically closer to the Ceph client, which makes data access faster.
Programmatic API: The programmatic API ensures that storage can easily be configured and modified through API access. This is particularly interesting in cloud environments, where setting up storage directly from cloud-native applications is extremely useful.
Monitoring and repair: Whereas old file systems need tools like fsck to verify the integrity of the file system, Stratis has built-in features to monitor the health of the file system and repair it if necessary.
Understanding Stratis Architecture
The lowest layer in the Stratis architecture is the pool. From a functional perspective, the Stratis pool is comparable to an LVM volume group. A pool represents all the available storage and consists of one or more storage devices, which in a Stratis environment are referred to as blockdev. These block devices may not be thin provisioned at the underlying hardware level. Stratis creates a /dev/stratis/poolname directory for each pool.
From the Stratis pool, XFS file systems are created. Note that Stratis only works with XFS, and the XFS file system it uses is integrated with the Stratis volume. When creating a file system, no size is specified, and each file system can grow up to the size of all the available storage space in the pool. Stratis file systems are always thin provisioned. The thin volume automatically grows as more data is added to the file system.
Creating Stratis Storage
Creating Stratis volumes is a multistep process. This section provides a high-level overview, and then Exercise 15-4 in the following section guides you through the procedure. You start by creating a pool. Once the pool has been added, you can create file systems from it. Before you begin, make sure that the block devices you’re going to use in Stratis have a minimal size of 1 GiB. Each Stratis file system occupies a minimum of 527 MiB of disk space, even if no data has been copied to the file system.
Install the Stratis software using yum by installing the stratis-cli and stratisd packages.
Start and enable the user-space daemon, using systemctl enable --now stratisd.
Once the daemon is running, use the stratis pool create command to create the pool that you want to work with. For instance, use stratis pool create mypool /dev/sdd to create a pool that is based on the block device /dev/sdd. You can add additional block devices later, using stratis pool add-data poolname blockdevname, as in stratis pool add-data mypool /dev/sde.
Once you have created the pool, add a file system using stratis fs create poolname fsname.
To verify that all was created successfully, use the stratis fs list command.
After creating the file system, you can mount it. To mount a Stratis file system through /etc/fstab, you must use the UUID; using the device name is not supported. Also, when mounting the Stratis volume through /etc/fstab, include the mount option s-systemd.requires=stratisd.service to ensure that the Systemd waits to activate this device until the stratisd service is loaded.
Managing Stratis
After creating the Stratis file system, you can perform several different management tasks. To start with, you can dynamically extend the pool, using stratis pool add-data. Also, you need to monitor Stratis volumes using Stratis-specific tools, as the traditional Linux tools cannot handle the thin-provisioned volumes. The following commands are available:
stratis blockdev: Shows information about all block devices that are used for Stratis.
stratis pool: Gives information about Stratis pools. Note in particular the Physical Used parameter, which should not come too close to the Physical Size parameter.
stratis filesystem: Enables you to monitor individual file systems.
Another Stratis feature that you’ll have to manage is the snapshot. A snapshot contains the state of the file system at the moment the snapshot was created. After creation, the snapshot can be modified. It’s also good to know that the snapshot and its origin are not linked, which allows the snapshot to live longer than the file system it was created from. This is fundamentally different from, for instance, LVM snapshots, which cannot stay alive if the volume they are linked to is removed.
In Exercise 15-4, you set up an environment with Stratis volumes.
Exercise 15-4 Managing Stratis Volumes
You need one dedicated disk with a size of 5 GiB to perform the steps in this exercise. In this exercise, the disk name /dev/sdd is used as an example. Replace this name with the disk device name that is presented on your hardware.
Type yum install stratisd stratis-cli to install all the required packages.
Type systemctl enable --now stratisd to enable the Stratis daemon.
Type stratis pool create mypool /dev/sdd to add the entire disk /dev/sdd to the storage pool.
Type stratis pool list to verify successful creation of the pool.
Type stratis fs create mypool stratis1 to create the first Stratis file system. Note that you don’t have to specify a file system size.
Type stratis fs list to verify the creation of the file system.
Type mkdir /stratis1 to create a mount point for the Stratis file system.
Type blkid to find the Stratis volume UUID.
Add the following line to /etc/fstab to enable the volume to be mounted automatically. Make sure to use the UUID name that is used on your system.
UUID=xxx /stratis1.  xfs.  defaults,x-systemd.requires=stratisd.
  service   0 0
Type mount -a to mount the Stratis volume. Use the mount command to verify this worked successfully.
Type cp /etc/[a-f]* /stratis1 to copy some files to the Stratis volume.
Type stratis filesystem snapshot mypool stratis1 stratis1-snap to create a snapshot of the volume you just created. Note that this command may take up to a minute to complete.
Type stratis filesystem list to get statistics about current file system usage.
Type rm -f /stratis1/a* to remove all files that have a name starting with a.
Type mount /dev/stratis/mypool/stratis1-snap /mnt and verify that the files whose names start with a are still available in the /mnt directory.
Reboot your server. After reboot, verify that the Stratis volume is still automatically mounted.
Configuring VDO
In the previous section you learned about Stratis. In this section you’ll learn about Virtual Data Optimizer (VDO), a solution that was developed to offer data deduplication features.
Understanding VDO
Virtual Data Optimizer (VDO) is another advanced storage solution offered in RHEL 8. VDO was developed to reduce disk space usage on block devices by applying deduplication features. VDO creates volumes, implementing deduplication on top of any type of existing block device. On top of the VDO device, you would either create a file system, or you would use it as a physical volume in an LVM setup.
The main purpose of VDO is data deduplication. It deduplicates data by using three common technologies:
Zero-block elimination filters out data blocks that contain only zeros.
Deduplication reduces redundant data blocks.
Compression occurs when the kvdo kernel module compresses data blocks.
VDO is particularly useful in specific environments. The typical use cases are host platforms for containers and virtual machines, where the deduplication engine ensures much more efficient disk storage use. Commonly, a logical size of up to ten times the physical size can be used for working in this type of environment.
Another typical environment where VDO does well is in cloud block storage. If, for instance, VDO is used as the underlying storage layer for Ceph storage, a logical size of up to three times the physical size can be used.
Setting Up VDO
To configure VDO, you first need to make sure that the underlying block devices have a minimal size of 4 GiB. Next, you need to install the vdo and kmod-vdo packages. These ensure that the required kernel modules are available.
Next, create the device by using the vdo create command. While creating the device, you can use the --vdiLogicalSize= option to specify the logical size of the volume. For instance, use vdo create --name=vdo1 --device=/dev/sde --vdoLogicalSize=1T to create a volume with a logical size of 1 TiB.
After creating the device, you can put an XFS file system on top of it, using mkfs.xfs -K /dev/mapper/vdo1. The -K option with mkfs.xfs prevents unused blocks in the file system from being discarded immediately, which makes the command significantly faster.
Once the file system has been created, you can add a line to /etc/fstab to automatically mount it. Make sure to include the mount options x-systemd.requires=vdo.service,discard, which triggers the vdo systemd service to be loaded. To verify that all is working well, you can now use the command vdostats --human-readable.
Tip
Memorizing the options to use to make a VDO mount persistent may be challenging. Fortunately, in /usr/share/doc/vdo/examples/systemd there is an example Systemd mount file, shown in Example 15-9. Just modify the settings of the mount file to your requirements, and copy it to /etc/systemd/system/yourmountpoint.mount. Don’t forget to enable it, and it will automatically be mounted at the next reboot.
Example 15-9 Sample Systemd Mount Unit File for VDO
[Unit]
Description = Mount filesystem that lives on VDO
name = VDO.mount
Requires = vdo.service systemd-remount-fs.service
After = multi-user.target
Conflicts = umount.target

[Mount]
What = /dev/mapper/my_vdo
Where = /VDO
Type = xfs
Options = discard

[Install]
WantedBy = multi-user.target
[root@localhost systemd]# pwd
/usr/share/doc/vdo/examples/systemd
Exercise 15-5 guides you through the steps to create a thin-provisioned VDO volume.
Exercise 15-5 Managing VDO Storage
To do this exercise, you need to have access to a block device with a size of at least 5 GiB. This exercise uses /dev/sde as an example block device name. Make sure to replace this name with the actual device name that is used in your configuration.
Type lsblk to verify the availability of the /dev/sde block device.
Type yum install -y vdo kmod-kvdo to install the required packages.
Type vdo create --name=vdo1 --device=/dev/sde --vdoLogicalSize=1T to create the VDO device with a logical size of 1 TiB.
Use mkfs.xfs -K /dev/mapper/vdo1 to put an XFS file system on top of the device.
Type mkdir /vdo1 to create a mount point where the VDO device can be automatically mounted.
Copy the example Systemd mount file for VDO to /etc/systemd/system, using cp /usr/share/doc/vdo/examples/systemd/VDO.mount.example /etc/systemd/system/vdo1.mount.
Edit the file to include the following lines:
what = /dev/mapper/vdo1
where = /vdo1
Type systemctl enable --now vdo1.mount to mount the new block device.
Type vdostats --human-readable to monitor current statistics about the VDO device.
Type df -h to verify the logical size of 1 GiB.
Reboot your server to ensure that after reboot the VDO device is correctly mounted.
Summary
In this chapter, you learned how to work with advanced storage on RHEL 8. First, you read how LVM is used to bring flexibility to storage. By using LVM, you get the advantages of volumes that can be resized easily and multi-device logical volumes. Next, you were introduced to Stratis, the volume-managing file system. Stratis brings next-generation storage features to RHEL 8, and by default creates thin-provisioned file systems. Last, you learned how to use VDO, the Virtual Data Optimizer, to implement data deduplication in specific scenarios.
Exam Preparation Tasks
As mentioned in the section “How to Use This Book” in the Introduction, you have several choices for exam preparation: the end-of-chapter labs; the memory tables in Appendix B; Chapter 26, “Final Preparation”; and the practice exams.
Review All Key Topics
Review the most important topics in the chapter, noted with the Key Topic icon in the outer margin of the page. Table 15-3 lists a reference of these key topics and the page number on which each is found.
Table 15-3 Key Topics for Chapter 15
Key Topic Element |
Description |
Page |
|---|---|---|
LVM architecture overview |
||
LVM management essential commands |
||
List |
LVM lvresize commands |
Complete Tables and Lists from Memory
Print a copy of Appendix B, “Memory Tables” (found on the companion website), or at least the section for this chapter, and complete the tables and lists from memory. Appendix C, “Memory Tables Answer Key,” includes completed tables and lists to check your work.
Define Key Terms
Define the following key terms from this chapter and check your answers in the glossary:
Review Questions
The questions that follow are meant to help you test your knowledge of concepts and terminology and the breadth of your knowledge. You can find the answers to these questions in Appendix A.
1. Which partition type is used on a GUID partition that needs to be used in LVM?
2. Which command enables you to create a volume group with the name vgroup that contains the physical device /dev/sdb3 and uses a physical extent size of 4 MiB?
3. Which command shows a short summary of the physical volumes on your system as well as the volume group to which these belong?
4. What do you need to do to add an entire hard disk /dev/sdd to the volume group vgroup?
5. Which command enables you to create a logical volume lvvol1 with a size of 6 MiB?
6. Which command enables you to add 100 MB to the logical volume lvvol1, assuming that the disk space is available in the volume group?
7. When working with Stratis, what line would you add to /etc/fstab to mount the Stratis volume?
8. Which command do you use to create a Stratis pool that is based on the block device /dev/sdd?
9. Which command do you use to create a VDO device with a virtual size of 1 TiB?
10. Which option do you need with mkfs.xfs to successfully create an XFS file system on top of a VDO thin-provisioned volume?
End-of-Chapter Labs
To complete the following end-of-chapter labs, you need a dedicated disk device. Either use a USB thumb drive or add a new virtual disk to your virtual environment before starting.
Lab 15.1
1. Create a 500-MB logical volume named lvgroup. Format it with the XFS file system and mount it persistently on /groups. Reboot your server to verify that the mount works.
2. After rebooting, add another 250 MB to the lvgroup volume that you just created. Verify that the file system resizes as well while resizing the volume.
3. Verify that the volume extension was successful.
Lab 15.2
1. Create a Stratis pool with a size of 5 GiB. In this pool, create two Stratis file systems and ensure that they are automatically mounted.
2. Add an additional block device to the Stratis pool and verify that the size of the pool was successfully extended.
Lab 15.3
1. Create a VDO volume with a virtual size of 1 TiB.
2. Ensure the VDO volume is automatically mounted by using the example Systemd unit file.
3. Reboot your server to verify that everything still works.