
Chapter 7: Pachyderm Operations
In Chapter 6, Creating Your First Pipeline, we created our first pipeline, as well as learning how to create Pachyderm repositories, put data into a repository, create and run a pipeline, and view the results of the pipeline. We now know how to create a standard Pachyderm pipeline specification and include our scripts in it so that they can run against data in our input repository.
In this chapter, we will review all the different ways to put data inside of Pachyderm and export it to outside systems. We will learn how to update the code that runs inside of your pipeline and what the process of updating the pipeline specification is. We will learn how to build a Docker container and test it locally before uploading it to a registry.
We will also look into the most common troubleshooting steps that you should perform when a pipeline fails.
This chapter will cover the following topics:
- Reviewing the standard Pachyderm workflow
- Executing data operations
- Executing pipeline operations
- Running maintenance operations
Technical requirements
You should have already installed the following components.
For a local macOS installation, you need the following:
- macOS Mojave, Catalina, Big Sur, or later
- Docker Desktop for Mac 10.14
- minikube v1.9.0 or later
- pachctl 2.0.x or later
- Pachyderm 2.0.x or later
For a local Windows installation, you need the following:
- Windows Pro 64-bit v10 or later
- Windows Subsystem for Linux (WSL) 2 or later
- Microsoft PowerShell v6.2.1 or later
- Hyper-V
- minikube v1.9.0 or later
- kubectl v1.18 or later
- pachctl 2.0.x or later
- Pachyderm 2.0.x or later
For an Amazon Elastic Kubernetes Service (Amazon EKS) installation, you need the following:
- kubectl v.18 or later
- eksctl
- aws-iam-authenticator
- pachctl 2.0.x or later
- Pachyderm 2.0.x or later
For a Microsoft Azure Kubernetes Service (AKS) cloud installation, you need the following:
- kubectl v.18 or later
- Azure CLI
- pachctl 2.0.x or later
- Pachyderm 2.0.x or later
- jq 1.5 or later
For a Google Kubernetes Engine (GKE) cloud installation, you need the following:
- Google Cloud SDK v124.0.0. or later
- kubectl v.18 or later
- pachctl 2.0.x or later
- Pachyderm 2.0.x or later
In addition to this, you need to have the following:
- A Docker Hub account to be able to upload images
Downloading the source files
All the source files for this chapter are located in this repository: https://github.com/PacktPublishing/Reproducible-Data-Science-with-Pachyderm/tree/main/Chapter07-Pachyderm-Operations.
Reviewing the standard Pachyderm workflow
As you probably noticed when you were creating a pipeline, there is a certain workflow that you will need to follow when working with Pachyderm. Depending on your automation tools, your team processes, and the software that you use, it might differ, but in general, it boils down to the following common steps:
- Add your data to Pachyderm.
- Create a pipeline or pipelines.
- Add more data.
- Modify the parameters.
- Modify your pipeline or pipelines.
- Output the result to an output repository.
- Repeat Steps 3–6 as many times as needed or continuously.
- Serve your model or package your library and make it available for use.
The following diagram demonstrates this process:
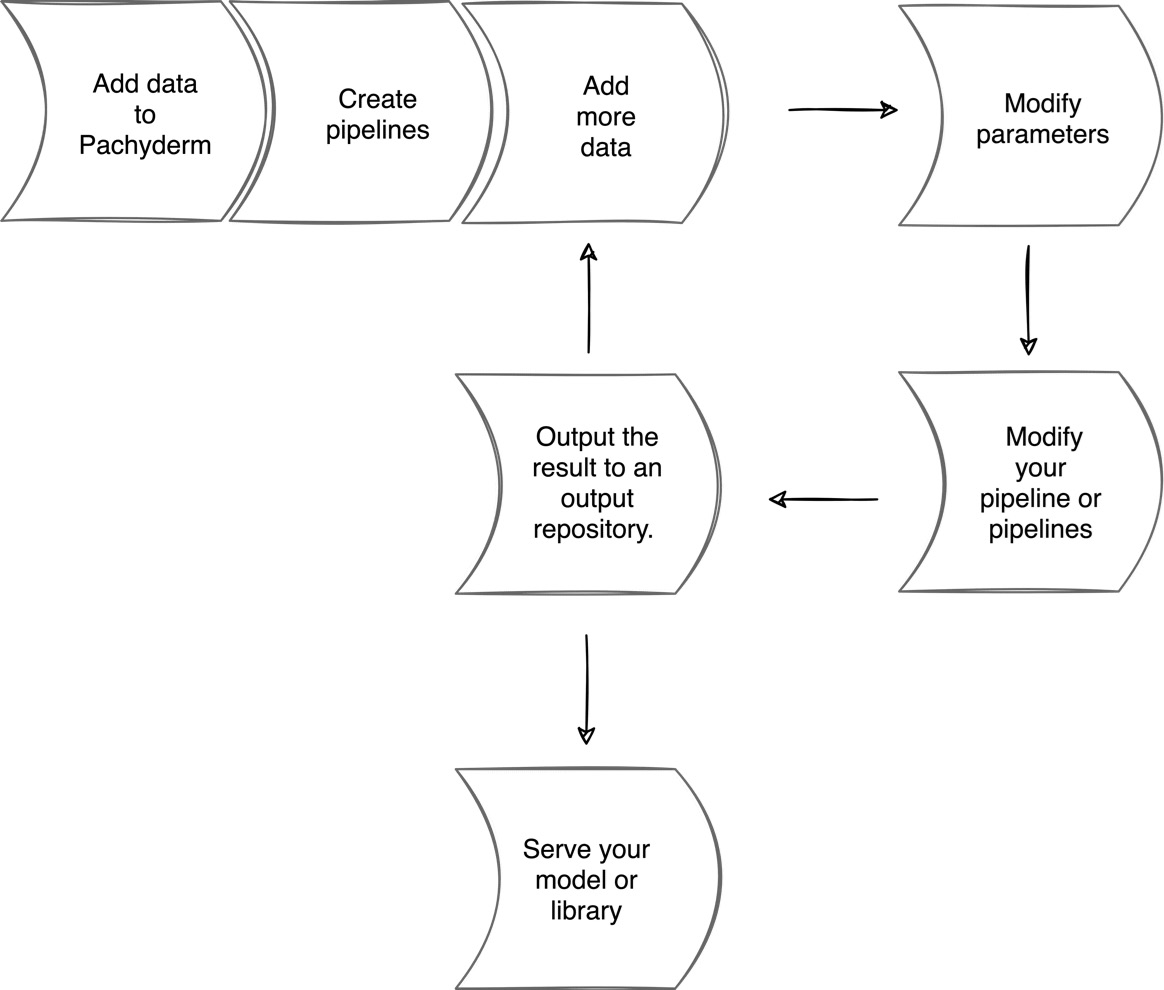
Figure 7.1 – Pachyderm workflow
Depending on whether you keep your code in a Docker image, in the pipeline itself, or you use a build pipeline with your Python code, you need to rebuild your Docker image every time you make changes to the code. There is a lightweight workflow for Python pipelines only that uses a base Docker image and a special build pipeline. You can read about this approach in the Pachyderm official documentation at https://docs.pachyderm.com. For any other language, you likely will need to build Docker images regularly.
Now that we know what the typical workflow is, let's dive into data operations and learn about all the ways you can upload your data to Pachyderm.
Executing data operations
As you have probably already noticed, to get started working with Pachyderm, you need to put data into it. Then, data is transformed through a number of transformation steps. After that, you can export your data and models to an outside source in a form of libraries, binaries, packages, tables, dashboards, or any other format for further use. In this section, we will review the ways to upload and download data to and from Pachyderm and all the native Pachyderm modifications that can be applied during this process.
Let's begin with uploading data to Pachyderm.
Uploading data to Pachyderm
You can divide data sources that ingest data into Pachyderm into the following categories:
- From a local filesystem
- From a URL
- A remote object or block storage
- A streaming or messaging platform
In this section, you will likely mostly use your local filesystem to upload data to Pachyderm repositories. This can be done with a simple Pachyderm command:
- To upload data from a local filesystem, you use the following:
pachctl put file -f <filename> repo@branch
The repository must exist.
- Similarly, to upload the data stored in a remote location, you can use the same command by specifying the correct URL:
pachctl put file -f https://mylink repo@branch
- The same applies to the files stored in an object store. For example, if you are using an object store on Google Cloud Platform, you use the following:
pachctl put file -f gs://my-bucket repo@branch
The preceding commands put the files in the root of the repo, but you could also put them in any subdirectory by specifying the path to them, like this:
pachctl put file -f gs://my-bucket repo@branch:/path
- To upload a whole directory, use the -r flag:
pachctl put file -f directory -r repo@branch:/
Run pachctl put file --help to view more examples.
- If you want to automatically upload data from a messaging queue to Pachyderm, you need to create a special type of pipeline called a spout. The main thing a spout does is that it connects a data stream from a messaging platform to Pachyderm and puts it into a specified Pachyderm repository. You could also specify some code to categorize data into folders according to the preferred pattern. Here is an example of a spout pipeline:
---
pipeline:
name: my-spout
spout: {}
transform:
cmd:
- python
- myspout.py
image: registry/image:1.0
env:
HOST: my-messaging-queue
TOPIC: mytopic
PORT: '5672'
Now that we know how we can put data into Pachyderm, let's take a look at data provenance and data lineage in Pachyderm.
About data lineage
If your system relies on data, you need to ensure that the data you use in your decision-making process is accurate and credible. Failure to provide a traceable data footprint may result in negative consequences for your organization. As more and more data-based systems are used in all aspects of our lives, wrong decisions based on erroneous data can have devastating impacts on people's lives.
That's why being able to go back in time and trace the data to its origins is a crucial part of any data management system. The ability to track the changes that happened to the data through the multiple transformation steps back to its origin is called data lineage or data provenance.
Typically, data lineage is visualized in the form of a Direct Acyclic Graph (DAG). Here is an example of the DAG representation in the Pachyderm UI:

Figure 7.2 – Pachyderm DAG
Each container represents either an input or output repository or a pipeline. The preceding example is very simple. In a workflow with more steps, the DAG might look more complex.
Why is data lineage so important? Here are a few important points to consider:
- With topics such as privacy and equality being widely discussed on all levels, providing an audit trail for governance is becoming a necessity.
- With data science being widely productized, implementing a system that offers the ability to roll back and correct errors in data and algorithms is crucial.
- Trustworthiness of the data is another aspect that can be verified through data lineage.
In Chapter 1, The Problem of Reproducibility, we discussed many examples where the lack of a proper data management system can have a devastating impact on people's lives, as well as harming your businesses.
Now that we have discussed the importance of data lineage, let's take a look at how you can explore data lineage in Pachyderm.
Exploring data lineage
Data provenance or data lineage is the most important feature of Pachyderm that ensures that your changes are preserved and can be traced to the beginning of the pipeline's existence.
To demonstrate this functionality, we will use the same pipeline we used in Chapter 6, Creating Your First Pipeline. If you have not downloaded the files yet, go to https://github.com/PacktPublishing/Reproducible-Data-Science-with-Pachyderm/tree/main/Chapter06-Creating-Your-First-Pipeline and download them from there:
- Create the Pachyderm photos repository, put the brown_vase.png file in it, and create the contour and histogram pipelines by running the following commands:
pachctl create repo photos
pachctl put file -f brown_vase.png photos@master
pachctl create pipeline -f contour.yaml
pachctl create pipeline -f histogram.yaml
You should see the following output:
brown_vase.png 25.82KB / 25.82 KB [================] 0s 0.00 b/s
- The following command shows how you can view the lineage of your data and pipelines. First, we need to get a commit number for the desired data change:
pachctl list commit contour@master
The output should look similar to this:
REPO BRANCH COMMIT FINISHED SIZE ORIGIN DESCRIPTION
contour master 3d42... 22 seconds ago 23.78KiB AUTO
In this example, we only have one output commit with the 3d42e6385854478fbd2c9212c3afdab2 hash.
- Then, we can run the inspect commit command to get the provenance information:
pachctl inspect commit contour@3d42e6385854478fbd2c9212c3afdab2
The preceding command returns the following output:
{
"commit": {
"branch": {
"repo": {
"name": "contour",
"type": "user"
},
"name": "master"
},
"id": "3d42e6385854478fbd2c9212c3afdab2"
},
"origin": {
"kind": "AUTO"
},
"child_commits": [
{
"branch": {
"repo": {
"name": "contour",
"type": "user"
},
"name": "master"
},
"id": "dfff764bd1dd41b9bf3613af86d6e45c"
}
],
"started": "2021-08-18T17:03:32.180913500Z",
"finishing": "2021-08-18T17:03:39.172264700Z",
"finished": "2021-08-18T17:03:39.225964100Z",
"direct_provenance": [
{
"repo": {
"name": "contour",
"type": "spec"
},
"name": "master"
},
{
"repo": {
"name": "photos",
"type": "user"
},
"name": "master"
}
],
"size_bytes_upper_bound": "24353",
"details": {
"size_bytes": "24353"
}
}
This output shows you that the commit is created in the photos repository. It has the AUTO type because it was generated when the data was uploaded to the photos repository. You can also see that it has created a child commit, dfff764bd1dd41b9bf3613af86d6e45c, for which you can run the same command. The child commit will have the ALIAS type since it is connected to the original commit in the photos repository. Over time, as new data arrives, this list will grow.
- The preceding command tells us what the predecessors of the commit in the contour repository were. We can also use the wait commit command with a commit ID to track commits as they land in the output repository. For example, if we want to watch the changes that the 3e16201310374944b48ed73f83be2be7 commit lands in downstream pipelines, we can run the following command:
pachctl wait commitset photos@438428d0c3a145aa905c86c9fb1789ea
Provenance is a powerful feature of Pachyderm. It is especially useful when you need to find an audit trail to find out what made your pipeline biased.
Now that we have learned how to explore data provenance in Pachyderm, let's look into how to mount your Pachyderm repository to a local filesystem.
Mounting a Pachyderm repository to a local filesystem
You can mount your Pachyderm system to your local computer by using the Filesystem in Userspace (FUSE) interface to access your Pachyderm repositories as you typically would access local files. FUSE is supported on all major platforms, such as Microsoft Windows, Linux, and macOS. By default, you can mount your Pachyderm repositories with read-only access but write access can also be enabled. You need to understand that modifying the files in these mounts leads to broken provenance and should not generally be used. Use this functionality to do the following:
- View the results of your pipeline runs.
- Give third-party applications access to Pachyderm output repositories for further processing.
To mount a Pachyderm repository to your local computer filesystem, complete the following steps:
- Install FUSE on your machine. If you are on macOS, run the following:
brew install osxfuse
If you are on Linux, run the following:
sudo apt-get install -y fuse
On Windows, run the following:
choco install winfsp
- Use the pachctl mount command to mount a Pachyderm repository. For example, to mount a contour repository, run the following:
pachctl mount ~/Documents/contour --repos contour@master
This command will run continuously in your terminal until you interrupt it with Ctrl + C.
- To access your files, go to your file browser. For example, if you are on macOS, use Finder. You should see the ~/Documents/contour folder mounted like this:

Figure 7.3 – Mounted Pachyderm repository
From here, you can view the files as needed.
- To mount a repository with write access, run the same command with the --write flag:
pachctl mount ~/Documents/contour --repos contour@master --write
Use this functionality with caution as modifying files in output repositories breaks the provenance.
- To mount multiple repositories, specify the list of the repositories each with a --repos flag:
pachctl mount ~/Documents/pachyderm-repos --repos contour@master --repos data@master --repos histogram@master --repos photos@master
The following screenshot shows how the data, contour, histogram, and photos repositories are mounted on your machine:

Figure 7.4 – Mounted Pachyderm repositories
In this section, we learned how to perform the most common Pachyderm data operations, including uploading data to Pachyderm, exploring provenance, and mounting Pachyderm repositories to your local machine, as well as splitting data while uploading it to Pachyderm. Next, we'll look into the most common pipeline operations that you will have to perform while working with Pachyderm.
Executing pipeline operations
Apart from creating and deleting pipelines, you likely will need to update your pipelines with new code changes. If changes are made to the pipeline specification itself, such as increasing the number of Pachyderm workers, input repository, glob pattern, or similar, you only need to do it in the YAML or JSON file and update the version of your pipeline spec. However, if the changes are in your code and your code is in your Docker image, you need to rebuild the Docker image. Let's go through each of these use cases.
Updating your pipeline specification
The pipeline specification enables you to control various Pachyderm parameters, such as controlling from which repository your pipeline consumes data, how many workers are started, and how many resources are available to your pipeline. You can also specify your code in the pipeline itself through the stdin field. Such a pipeline can use a basic Docker image that you won't have to ever update. If this is your case and you need to make changes in your pipeline spec or the code in the stdin field, here is what you need to do:
- Make the needed changes in the YAML or JSON file that has your pipeline specification. For example, if you want to change a glob pattern in your contour.yaml pipeline from glob: "/" to glob: "/*", you just make these changes directly in the YAML file and save it.
- Then, you need to update the version of the already running pipeline by specifying this YAML file:
pachctl update pipeline -f contour.yaml
- Verify that the pipeline version is updated:
pachctl list pipeline
If the previous version of your pipeline was 1, it should change to 2:
NAME VERSION INPUT CREATED STATE / LAST JOB DESCRIPTION
contour 2 photos:/* 6 seconds ago running / success A pipeline that identifies contours on an image.
The new pipeline will not process the data that has already been processed unless you explicitly specify it by using the --reprocess flag.
- To run the updated pipeline against the already processed data, use the following:
pachctl update pipeline -f contour.yaml --reprocess
- In the output, you should see that the version was updated again:
NAME VERSION INPUT CREATED STATE / LAST JOB DESCRIPTION
contour 3 photos:/* 15 seconds ago running / success A pipeline that identifies contours on an image.
- By default, if you run pachctl list pipeline, Pachyderm shows information about the latest pipeline only. If you run this command with the --history flag, you can see all previous versions as well:
pachctl list pipeline contour --history 3
Here is what the output should look like:
NAME VERSION INPUT CREATED STATE / LAST JOB DESCRIPTION
contour 3 photos:/ 25 seconds ago running / success A pipeline that identifies contours on an image.
contour 3 photos:/ 25 seconds ago running / success A pipeline that identifies contours on an image.
contour 3 photos:/ 25 seconds ago running / success A pipeline that identifies contours on an image.
You can see that the version 3 pipeline ran three times.
- Now, let's check that the third version of the pipeline output a commit in the contour repository:
pachctl list commit contour@master
This command should return similar output:
REPO BRANCH COMMIT FINISHED SIZE ORIGIN PROGRESS DESCRIPTION
contour master 38eb403e62844f45939c6307bb0177c7 46 seconds ago 23.78KiB AUTO
Now that we know how to update a pipeline without changes to the code, let's see the workflow when your code is in a Docker image, and you need to update that code.
Updating your code
If your code is specified in a file that is embedded in a Docker image, you need to rebuild this Docker image every time you make changes to it, upload it to the Docker registry with a new version, update the version of the image inside of your pipeline specification, and then run the pachctl update pipeline command.
Let's modify the contour.py file in the contour pipeline that we created in Chapter 6, Creating Your First Pipeline. You need to have an account in a Docker registry to complete this section. If you do not have an account, you can create a free account on Docker Hub. All images referenced in this book are stored in Docker Hub and we will use Docker Hub as an example. If you are using any other Docker image registry, follow that registry's documentation to log in and upload images.
We will also need the Dockerfile for this pipeline to build new images:
- If you have not done so yet, download the Dockerfile from https://github.com/PacktPublishing/Reproducible-Data-Science-with-Pachyderm/tree/main/Chapter06-Creating-Your-First-Pipeline.
- Configure your Docker Hub account by signing up at https://hub.docker.com/.
- When logged in to Docker Hub, click Create Repository.
- Name your repository and write a short description. For this example, we will be using a public registry, but Pachyderm supports private registries as well:
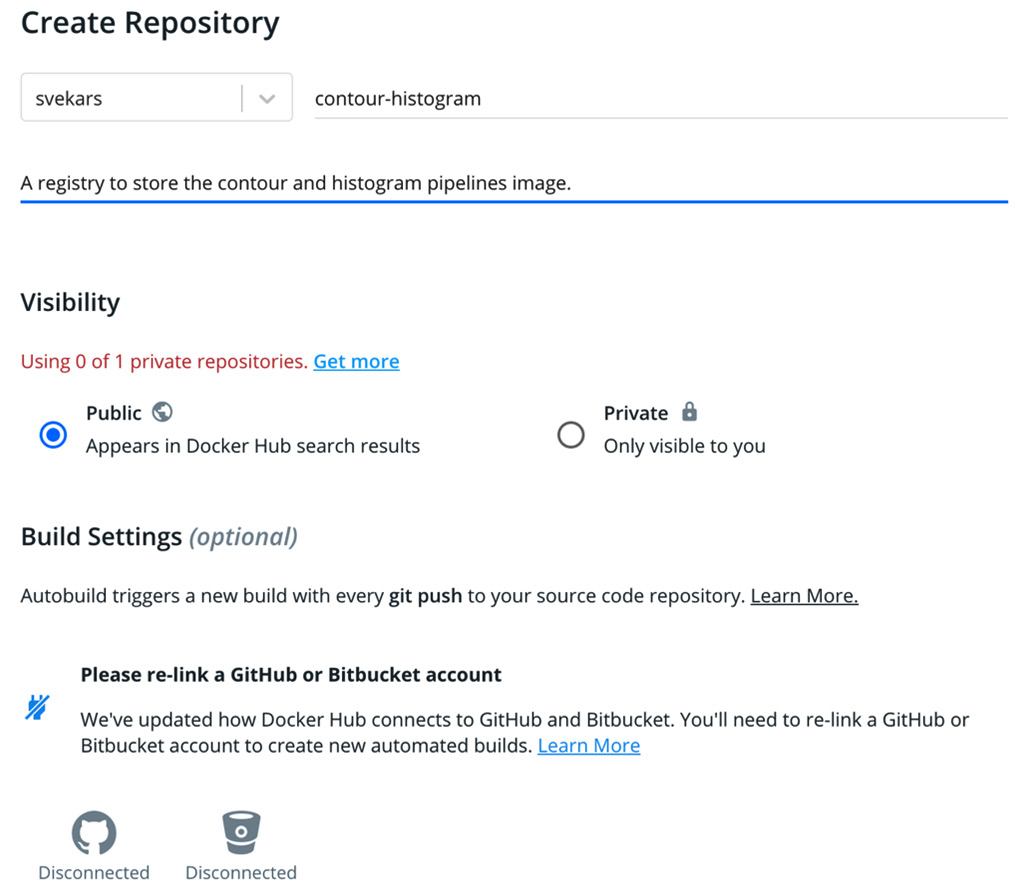
Figure 7.5 – Creating a Docker Hub registry
- Click Create.
- Go to the terminal on your machine and run the following:
docker login
- Provide your Docker Hub credentials to log in to Docker Hub. You should see the following output:
Login Succeeded
- Open the contour.py file for editing.
- Let's make a very small change in our code—on line 18, change linewidth to 1. Here is how it should look:
ax.plot(contour[:, 1], contour[:, 0], linewidth=1)
- Save your changes and exit.
- For these changes to take effect in our Pachyderm pipeline, we need to build a new Docker image. You need to have the Dockerfile in the current directory for the next command to work. Run the following command:
docker build . -t <your-registry>/contour-histogram:1.1
Replace <your-registry> with the name of your Docker Hub repository that you have created by following the preceding steps. You should see output similar to the following text:
Sending build context to Docker daemon 2.325GB
Step 1/10 : FROM ubuntu:18.04
---> 3339fde08fc3
…
Step 9/10 : ADD contour.py /contour.py
---> 4fb17a5f1f0b
Step 10/10 : ADD histogram.py /histogram.py
---> e64f4cb9ecb1
Successfully built e64f4cb9ecb1
The first time you build a Docker image, it might take some time. Note that in Step 9 in the preceding output, Docker adds your updated contour.py script.
- The next step is to upload your image to your Docker registry. You could also first mount your Docker image locally and test it before uploading. To mount your Docker image locally, run the following:
docker save <your-registry>/contour-history:1.1 | (
eval $(minikube docker-env)
docker load
)
This command takes some time to run, but it is very handy when you need to test something without constantly pushing new images to Docker Hub. We recommend that you mount your image locally, run your pipeline, and when ready, upload it to Docker Hub.
Or, if uploading directly to Docker Hub, run the following:
docker push <your-registry>/contour-history:1.1
- After you load your image, you need to update your pipeline specification with the new version of your pipeline. Assign a new version number every time you build a new image so that you keep track of your changes. To update the image version in the pipeline specification, open the contour.yaml file and change the following online number 9:
9 image: <your-registry>/contour-histogram:1.1
- Now, you can run your updated pipeline with the new code. Let's run the update command with the --reprocess flag to see how our changes have affected the result:
pachctl update pipeline -f contour.yaml --reprocess
In the following screenshot, you can see the comparison between the two versions. We have the first version on the left with a visibly thicker contour than the new version on the right:

Figure 7.6 – Comparing the results of the pipeline version
We have learned how to update Pachyderm pipelines. This method works for any language or framework. Pachyderm also provides built-in Docker build and Docker push commands that you could use. However, we suggest that you follow the process described previously as it seems to be more familiar to the majority of engineers, as well as more transparent.
Running maintenance operations
Like with every system or tool, Pachyderm might require periodic maintenance, upgrades, and troubleshooting. In the following sections, we will discuss the most important aspects of pipeline maintenance.
Troubleshooting your pipeline
In this section, you will learn how to troubleshoot your pipeline.
Your pipelines might fail for the following reasons:
- Error in your code: This type of error occurs when something in your code is incorrect, such as a resource is not available or an incorrect value is specified. Fixing this type of error involves troubleshooting your code. You could try to do it locally before testing it inside Pachyderm.
- Pipeline specification error: This type of error occurs when something is incorrect in the pipeline specification; for example, a pipeline cannot pull the Docker image. This often happens when a wrong image version is specified or there is a network issue.
- Resource-related error: This type of error occurs when your cluster runs out of memory or has a similar resource constraint issue.
Pachyderm provides built-in functionality for pipeline troubleshooting through the pachctl logs command and you could also use Kubernetes-native tools to troubleshoot your pipelines. Since each Pachyderm pipeline is a Kubernetes Pod, you can use Kubernetes logging and debugging tools to troubleshoot them.
To detect and troubleshoot Pachyderm pipeline errors, complete the following steps:
- When a pipeline fails, you should see it in the pipeline status:
pachctl list pipeline
Here is an example output of a failed pipeline:
NAME VERSION INPUT CREATED STATE / LAST JOB DESCRIPTION
contour 1 photos:/ 28 seconds ago crashing / starting A pipeline that identifies contours on an image.
- To troubleshoot this pipeline, we need to view the logs for the pipeline or the job. To view the logs for the pipeline, run the following:
pachctl logs --pipeline=contour
The following is an example response:
container "user" in pod "pipeline-contour-v1-fmkxj" is waiting to start: image can't be pulled
In the preceding example, the failure is pretty clear—the pipeline failed to pull the Docker image. This could be due to the wrong image version specified in the pipeline spec or a network issue. Verifying that the pipeline spec is correct will likely solve the problem.
- The following text is an example of another common code error in the pipeline:
Traceback (most recent call last):
File "/pos-tag.py", line 13, in <module>
with open('/pfs/out/pos-tag/pos-table.txt', 'w') as f:
FileNotFoundError: [Errno 2] No such file or directory: '/pfs/out/contour/pos-table.txt'
In the preceding example, the pipeline was not able to find a specified file. This is likely because the path to the file was specified incorrectly in the pos-tag.py file.
- In some cases, you won't be able to see the job logs because the pipeline crashed before kicking off a job. However, in most cases, you should be able to view the logs for a job. To view the job logs, first get the hash of the job:
pachctl list job
Here is an example output:
ID SUBJOBS PROGRESS CREATED MODIFIED
5865a26e1795481d96ecf867075c4f35 1 2 minutes ago 2 minutes ago
When you have a pipeline error, such as in the preceding output, the progress bar is yellow instead of green. This indicator gives you a clue that something is wrong in your code.
- Use the job hash to view more information about the failure in the job logs:
pachctl logs --job=contour@5865a26e1795481d96ecf867075c4f35
The output should give you more information about the failure.
- Finally, you can use kubectl to analyze possible errors in your pipeline. Get the name of your pipeline Pod by running the following:
kubectl get pod
You should see a similar response to the following:
NAME READY STATUS RESTARTS AGE
etcd-0 1/1 Running 0 6h10m
pachd-85d69d846-drgrk 1/1 Running 0 6h10m
pg-bouncer-84df8bdc58-7kzzg 1/1 Running 0 6h10m
pipeline-contour-v1-7dgwl 1/2 ImagePullBackOff 0 6m54s
postgres-0 1/1 Running 0 6h10m
You need to get logs for the pipeline Pod.
- Get the Pod logs by running the following:
kubectl describe pod pipeline-contour-v1-7dgw
Important note
The Events part of the Pod logs typically provides information about any issues. Read more about Kubernetes debugging and troubleshooting in the Kubernetes documentation at https://kubernetes.io/docs/tasks/debug-application-cluster/.
This is an example output that you will see:
...
Events:
...
Normal BackOff 3m7s (x20 over 8m6s) kubelet, minikube Back-off pulling image "svekars/contour-histogram:1.2"
In this section, we have discussed basic troubleshooting operations. The best strategy is to get as many logs as possible, categorize the problem, and then troubleshoot accordingly. If the problem is in the user code, you likely will want to test your code locally before running it in Pachyderm. One limitation that has been recently introduced in Pachyderm is the limit of the number of pipelines that you can run in the free tier. You won't be able to run more than 16 pipelines and 8 workers unless you upgrade to a paid version.
Next, we'll look into how to upgrade your cluster from one version to another.
Upgrading your Pachyderm cluster
Pachyderm releases minor version upgrades on a regular basis. Upgrading between minor versions and patches, such as from version 1.13.0 to 1.13.1 or 1.12.4. to 1.13.0, is pretty straightforward, but moving between major versions, such as 1.13.0 to 2.0, might be a bit more disruptive. Let's review the process for each of these use cases. Upgrades to major versions do not happen often. Typically, Pachyderm releases a major version once every few years. Those types of upgrades involve breaking changes and likely will have specific instructions. Refer to the Pachyderm documentation for steps to perform a major upgrade.
Upgrading between patches and minor versions
When you are upgrading your Pachyderm cluster, you need to make sure you back up your data and pipelines, upgrade the version of pachctl, and then redeploy your cluster. If you are upgrading locally in a minikube environment, you might not need to use your backup, but create one for safety reasons. If you are redeploying into the same namespace, all your data should still be available. If you are using a cloud environment, then you'll need to redeploy in a new namespace.
To upgrade from one patch or a minor version to another, complete the following steps:
- Stop all pipelines that are currently running in your cluster:
pachctl stop pipeline <pipeline>
- Let's stop the contour pipeline:
pachctl stop pipeline contour
- Verify that the pipeline is suspended:
pachctl list pipeline
You should see the following output:
NAME VERSION INPUT CREATED STATE / LAST JOB DESCRIPTION
contour 1 photos:/* 3 hours ago paused / success A pipeline that identifies contours on an image.
If you have any other pipelines running, stop them as well.
- You need to make sure that all external data loading operations are suspended as well, if you have any automated services uploading data to Pachyderm.
- Just in case, save your pachd, etcd, and console service manifests to separate YAML files:
kubectl get svc/pachd -o yaml > pachd_backup.yaml
kubectl get svc/etcd -o yaml > etcd_backup.yaml
kubectl get svc/dash -o yaml > dash_backup.yaml
If your upgrade goes wrong, you should be able to restore from these manifests manually.
- Back up your cluster:
pachctl extract --no-auth --no-enterprise > my-pachyderm-backup
In the preceding example, we have specified the --no-auth and --no-enterprise flags. If you are using an enterprise version of Pachyderm or have enabled authentication, run this command without these flags.
- Verify that the values.yaml file has updated values. Specifically, verify that the following autogenerated values are correct:
global:
postgresql.postgresqlPassword
pachd:
clusterDeploymentID
rootToken
enterpriseSecret
oauthClientSecret
- Upgrade your pachctl version, as in the following example:
brew upgrade pachyderm/tap/[email protected]
Use the package manager in your system to upgrade.
You should see the upgraded version in the output. In this case, it is 2.0.0:
pachctl 2.0.0
- Use the helm upgrade command to redeploy your cluster:
helm upgrade pachd -f <pachyderm_deployment>_my_values.yaml pachyderm/pachyderm
- Run kubectl get pod until you see the Pachyderm Pods running like this:
NAME READY STATUS RESTARTS AGE
console-5db94c4565-pzjft 1/1 Running 0 1m
etcd-0 1/1 Running 0 1m
pachd-84984bf656-g4w8s 1/1 Running 0 1m
pg-bouncer-7f47f5c567-zwg8d 1/1 Running 0 1m
postgres-0 1/1 Running 0 1m
- Check that pachd is running:
pachctl version
This command should return an output similar to this:
COMPONENT VERSION
pachctl 2.0.0
pachd 2.0.0
- If you are in a cloud environment, use the following command to restore your configuration from the backup that you have created:
pachctl restore < my-pachyderm-backup
- Check that your pipelines and repositories are in place:
pachctl list pipeline && pachctl list repo
The system response should look similar to this:
NAME CREATED SIZE (MASTER) DESCRIPTION
contour 49 seconds ago 23.78KiB Output repo for ...
photos 49 seconds ago 25.21KiB
NAME VERSION INPUT CREATED STATE / LAST JOB DESCRIPTION
contour 1 photos:/* 6 minutes ago paused / success A pipeline that identifies contours on an image.
We have successfully restored our repositories and pipelines in our newly deployed cluster.
Cleaning up
After you are done experimenting, you might want to clean up your cluster so that you start your next experiment with a fresh install. To clean up the environment, run the following commands:
- Delete all pipelines and repositories:
pachctl delete pipeline –all && pachctl delete repo --all
- Verify that no repositories and pipelines exist in your cluster:
pachctl list repo && pachctl list pipeline
You should see the following output:
NAME CREATED SIZE (MASTER) DESCRIPTION
NAME VERSION INPUT CREATED STATE / LAST JOB DESCRIPTION
You have successfully cleaned up your cluster.
Summary
In this chapter, we have learned about some of the most important Pachyderm operations that you will need to perform during the lifetime of your Pachyderm cluster. We learned about the various ways to load data into Pachyderm, including how to do it with a messaging system. We learned how to update your pipelines, build Docker images, and mount them locally or upload them to a Docker image registry. Finally, we learned about some basic troubleshooting techniques and upgrading between patches and minor versions.
In the next chapter, we will implement an end-to-end machine learning workflow and learn more about deploying more complex multi-step Pachyderm pipelines.
Further reading
- Docker Hub Quickstart: https://docs.docker.com/docker-hub/
- Kubernetes monitoring, logging, and debugging: https://kubernetes.io/docs/tasks/debug-application-cluster/
- Pachyderm build pipelines: https://docs.pachyderm.com/latest/how-tos/developer-workflow/build-pipelines/
- Dua, D. and Graff, C. (2019). UCI Machine Learning Repository (http://archive.ics.uci.edu/ml). Irvine, CA: University of California, School of Information and Computer Science.