
Chapter 14: Building a Full Stack Application
In this chapter, we are going to learn how to build a simple WebAssembly application and use Rocket to serve the WebAssembly application. We are going to make WebAssembly load the user information from one of the endpoints that we created earlier. After learning the information in this chapter, you will be able to write and build a WebAssembly application using Rust. You will learn how to serve WebAssembly using the Rocket web framework.
In this chapter, we are going to cover these main topics:
- Introducing WebAssembly
- Setting up a Cargo workspace
- Setting a WebAssembly build target
- Writing a WebAssembly application using Yew
- Serving a WebAssembly application using Rocket
Technical requirements
The technical requirements for this chapter are very simple: the Rust compiler, the Cargo command line, and a web browser.
You can find the code for this chapter at https://github.com/PacktPublishing/Rust-Web-Development-with-Rocket/tree/main/Chapter14.
Introducing WebAssembly
In the past, almost all applications in the web browser were made using the JavaScript language. There were also attempts to use different languages in the web browser, such as Java Applet, Adobe Flash, and Silverlight. But, all those different attempts were not web standards, and, therefore, the adoption of those attempts was not as universal as JavaScript.
However, there is a way to use other programming languages in the web browser: by using WebAssembly. WebAssembly is both a binary executable format and its corresponding text format for a stack-based virtual machine. Web browsers that support WebAssembly can execute the binary executable format. Any programming language that can be compiled into WebAssembly can be executed by web browsers.
In 2015, WebAssembly was announced and was first released in March 2017. All major web browser vendors finished the release of browsers with minimum support for WebAssembly in September 2017, and then World Wide Web Consortium recommended WebAssembly on December 5th, 2019.
Compiled languages such as C++ or Rust can be compiled into a .wasm file, and a virtual machine in the browser can then run the WebAssembly file. To run interpreted languages, first, the language runtime can be compiled into a .wasm file, and then, the runtime can run the runtime scripts.

Figure 14.1 ‒ Interpreted languages and compiled languages in WebAssembly
The Rust programming language supports WebAssembly, and as we have already learned about Rust and created a backend application using Rust and Rocket, we can take this opportunity to learn a little about frontend application development using Rust. The old web standards and web technologies, such as HTML, CSS, and JavaScript, are technologies that changed the course of human history. Learning about new web standards, such as WebAssembly, is a good opportunity to be a part of future development.
Let's implement a page in our application where we will render an empty template. The template will load WebAssembly binary from the server. WebAssembly will call the user API endpoint that we created earlier. It will then render users using a custom component.
For the implementation, we are going to use Yew (https://yew.rs), which is a frontend Rust framework.
Setting up a Cargo workspace
Since we are going to create a new application, it would be nice if we could make the code for the our_application Rocket application work alongside this new application. Cargo has a feature called Cargo workspaces. A Cargo workspace is a set of different Cargo packages in a single directory.
Let's set up a Cargo workspace to have multiple applications in a single directory using the following steps:
- Create a directory, for example, 01Wasm.
- Move the our_application directory inside the 01Wasm directory and create a new Cargo.toml file inside the 01Wasm directory.
- Edit the Cargo.toml file as follows:
[workspace]
members = [
"our_application",
]
- Create a new Rust application inside 01Wasm using this command:
cargo new our_application_wasm
- After that, add the new application as a member of the workspace in 01Wasm/Cargo.toml, as follows:
members = [
"our_application",
"our_application_wasm",
]
- Try building both applications using this command:
cargo build
- To build or run one of the applications, append --bin with the binary package name, or --lib with the library package name. To run the application, consider the location of the directories required for running the Rocket application. For example, if there's no logs directory, the application might fail to run. Also, if there's no static directory, the application might not be able to find the assets file.
- Try building one of the applications by running this command in the terminal:
cargo build --bin our_application
Now that we have set up the Cargo workspace, we can learn how to build the application for a different target specifically for WebAssembly.
Setting a WebAssembly build target
The Rust compiler can be set to compile to a different architecture. The architectures are also called targets. Targets can be identified by using target triple, a string that consists of three identifiers to be sent to the compiler. Examples of targets are x86_64-unknown-linux_gnu and x86_64-apple-darwin.
Targets can be categorized into three tiers, tier 1, tier 2, and tier 3:
- Tier 1 means that the target is guaranteed to work properly.
- Tier 2 means that the target is guaranteed to build but, sometimes, the automated test to build the binary for the targets may not pass. The host tools and full standard library for this tier are also supported.
- Tier 3 means that the Rust code base supports some features of the targets. The build for those targets may or may not exist, and the tooling might not be complete.
Remember that WebAssembly is a binary format for a virtual machine. The Rust compiler has targets for the virtual machine specifications, such as asmjs-unknown-emscripten, wasm32-unknown-emscripten, or wasm32-unknown-unknown. The community mostly supports the tooling around wasm32-unknown-unknown.
To see the available target list for the Rust compiler, run the following command in the terminal:
rustup target list
To add WebAssembly target support for the Rust compiler, run the following command in the terminal:
rustup target add wasm32-unknown-unknown
After adding the target, try building our_application_wasm by running this command:
cargo build --target wasm32-unknown-unknown --bin our_application_wasm
We will use wasm32-unknown-unknown to build the WebAssembly application in the next section.
Writing a WebAssembly application using Yew
In the application, we are going to use Yew (https://yew.rs). On the website, it says that Yew is a modern Rust framework for creating multithreaded frontend web apps.
Cargo can compile the WebAssembly binary, but the WebAssembly binary itself is not usable without other steps. We have to load the WebAssembly binary in the web browser's virtual machine engine. There are proposals such as using a <script type="module"></script> tag, but unfortunately, those proposals are not standard yet. We have to tell JavaScript to load the module using the WebAssembly Web API. To make the development easier, we can use wasm-pack from the Rust WebAssembly working group at https://rustwasm.github.io/. Yew uses an application named trunk (https://trunkrs.dev) that wraps wasm-pack and provides other conveniences. Install trunk by using this command:
cargo install --locked trunk
Now that the preparation for compiling WebAssembly has been completed, we can write the code for the WebAssembly application. Follow these steps to create the application:
- Create an HTML file named index.html inside the our_application_wasm directory. We will use this HTML file to mimic the template on our_application, with small differences. We want to add an ID for an HTML tag to be the main tag for the WebAssembly application. Let's name this ID main_container. Append the following lines to our_application_wasm/index.html:
<!DOCTYPE html>
<html lang="en">
<head>
</head>
<body>
<header>
<a href="/" class="button">Home</a>
</header>
<div class="container" id="main_container"></div>
</body>
</html>
- Add yew as a dependency to our_application_wasm. We also want to access the browser DOM, so we need another dependency. Gloo (https://gloo-rs.web.app/) provides bindings to the Web API, and we want to use gloo_utils as a dependency for our WebAssembly application to access the DOM. Add the following dependencies to our_application_wasm/Cargo.toml:
gloo-utils = "0.1.3"
yew = "0.19"
getrandom = { version = "0.2", features = ["js"] }
- Add the required use declarations in our_application_wasm/src/main.rs:
use gloo_utils::document;
use yew::prelude::*;
- Create a minimal component that creates an empty HTML inside our_application_wasm/src/main.rs:
#[function_component(App)]
fn app() -> Html {
html! {
<>{"Hello WebAssembly!"}</>
}
}
- Use gloo_utils in the main() function in our_application_wasm/src/main.rs to select the div tag with the main_container ID. Append the following lines in the main() function:
let document = document();
let main_container = document.query_selector("#main_container").unwrap().unwrap();
- Initialize a Yew application by appending this line to the main() function:
yew::start_app_in_element::<App>(main_container);
- We can use trunk to create a small web server and build everything needed to build the WebAssembly and related JavaScript to load the WebAssembly and serve the HTML. Run this command in the terminal inside the our_application_wasm directory:
trunk serve
There should be an output like the following in the terminal:
Apr 27 20:35:44.122 INFO fetching cargo artifacts
Apr 27 20:35:44.747 INFO processing WASM
Apr 27 20:35:44.782 INFO using system installed binary app="wasm-bindgen" version="0.2.80"
Apr 27 20:35:44.782 INFO calling wasm-bindgen
Apr 27 20:35:45.065 INFO copying generated wasm-bindgen artifacts
Apr 27 20:35:45.072 INFO applying new distribution
Apr 27 20:35:45.074 INFO ✅ success
Apr 27 20:35:45.074 INFO ? serving static assets at -> /
Apr 27 20:35:45.075 INFO ? server listening at 0.0.0.0:8080
Apr 27 20:53:10.796 INFO ? starting build
Apr 27 20:53:10.797 INFO spawning asset pipelines
Apr 27 20:53:11.430 INFO building our_application_wasm
- Try opening a web browser to http://127.0.0.1:8080; you'll see that it loads and runs the Yew WebAssembly application:
Figure 14.2 ‒ Hello WebAssembly!
- We are going to get users' information using an API endpoint that returns the JSON that we created earlier in our_application from http://127.0.0.1:8000/api/users. To convert the JSON into Rust types, let's define similar types to those in our_application. The types should derive SerDes' deserialize. In our_application_wasm/Cargo.toml, add the dependencies for the WebAssembly code:
chrono = {version = "0.4", features = ["serde"]}
serde = {version = "1.0.130", features = ["derive"]}
uuid = {version = "0.8.2", features = ["v4", "serde"]}
- Then, in our_application_wasm/src/main.rs, add the required use declarations:
use chrono::{offset::Utc, DateTime};
use serde::Deserialize;
use std::fmt::{self, Display, Formatter};
use uuid::Uuid;
- Finally, add the types to deserialize the JSON:
#[derive(Deserialize, Clone, PartialEq)]
enum UserStatus {
Inactive = 0,
Active = 1,
}
impl fmt::Display for UserStatus {
fn fmt(&self, f: &mut fmt::Formatter<'_>) ->
fmt::Result {
match *self {
UserStatus::Inactive => write!(f,
"Inactive"),
UserStatus::Active => write!(f, "Active"),
}
}
}
#[derive(Copy, Clone, Deserialize, PartialEq)]
struct OurDateTime(DateTime<Utc>);
impl fmt::Display for OurDateTime {
fn fmt(&self, f: &mut fmt::Formatter<'_>) ->
fmt::Result {
write!(f, "{}", self.0)
}
}
#[derive(Deserialize, Clone, PartialEq)]
struct User {
uuid: Uuid,
username: String,
email: String,
description: Option<String>,
status: UserStatus,
created_at: OurDateTime,
updated_at: OurDateTime,
}
#[derive(Clone, Copy, Deserialize, PartialEq)]
struct Pagination {
next: OurDateTime,
limit: usize,
}
#[derive(Deserialize, Default, Properties, PartialEq)]
struct UsersWrapper {
users: Vec<User>,
#[serde(skip_serializing_if = "Option::is_none")]
#[serde(default)]
pagination: Option<Pagination>,
}
Note
One thing that we can do to improve redefining the types is to create a library that defines types that can be used by both applications.
- If we look at the User struct, we can see that the description field is an Option. Create a convenience function to return an empty String if the value is None, and return the String content of Some if the value is Some. Add the following function to our_application_wasm/src/main.rs:
struct DisplayOption<T>(pub Option<T>);
impl<T: Display> Display for DisplayOption<T> {
fn fmt(&self, f: &mut Formatter) -> fmt::Result {
match self.0 {
Some(ref v) => write!(f, "{}", v),
None => write!(f, ""),
}
}
}
- It's now time to implement a component that will render User. We will name the component UsersList. Add the following function to our_application_wasm/src/main.rs:
#[function_component(UsersList)]
fn users_list(UsersWrapper { users, .. }: &UsersWrapper) -> Html {
users.iter()
.enumerate().map(|user| html! {
<div class="container">
<div><mark class="tag">{ format!("{}",
user.0) }</mark></div>
<div class="row">
<div class="col-sm-3"><mark>{ "UUID:"
}</mark></div>
<div class="col-sm-9"> { format!("{}",
user.1.uuid) }</div>
</div>
<div class="row">
<div class="col-sm-3"><mark>{
"Username:" }</mark></div>
<div class="col-sm-9">{ format!("{}",
user.1.username) }</div>
</div>
<div class="row">
<div class="col-sm-3"><mark>{ "Email:"
}</mark></div>
<div class="col-sm-9"> { format!("{}",
user.1.email) }</div>
</div>
<div class="row">
<div class="col-sm-3"><mark>{
"Description:" }</mark></div>
<div class="col-sm-9"> { format!("{}",
DisplayOption(user.1.description.
as_ref())) }</div>
</div>
<div class="row">
<div class="col-sm-3"><mark>{
"Status:" }</mark></div>
<div class="col-sm-9"> { format!("{}",
user.1.status) }</div>
</div>
<div class="row">
<div class="col-sm-3"><mark>{ "Created
At:" }</mark></div>
<div class="col-sm-9"> { format!("{}",
user.1.created_at) }</div>
</div>
<div class="row">
<div class="col-sm-3"><mark>{ "Updated
At:" }</mark></div>
<div class="col-sm-9"> { format!("{}",
user.1.updated_at) }</div>
</div>
<a href={format!("/users/{}",
user.1.uuid)} class="button">{ "See user"
}</a>
</div>
}).collect()
}
Notice that the html! macro content looks like the content of our_application/src/views/users/_user.html.tera.
- We want to load the User data from the API endpoint. We can do this by using two libraries, reqwasm (which provides HTTP request functionality), and wasm-bindgen-futures (which converts Rust futures into JavaScript promise and vice versa). Add the following dependencies to our_application_wasm/Cargo.toml:
reqwasm = "0.2"
wasm-bindgen-futures = "0.4"
- In our_application_wasm/src/main.rs, add a const for our API endpoint. Add the following line:
const USERS_URL: &str = "http://127.0.0.1:8000/api/users";
- Implement the routine to fetch the User data. Add the required use declaration:
use reqwasm::http::Request;
Then, append the following lines inside the app() function in our_application_wasm/src/main.rs:
fn app() -> Html {
let users_wrapper = use_state(|| UsersWrapper::
default());
{
let users_wrapper = users_wrapper.clone();
use_effect_with_deps(
move |_| {
let users_wrapper =
users_wrapper.clone();
wasm_bindgen_futures::spawn_
local(async move {
let fetched_users_wrapper:
UsersWrapper = Request::get(
USERS_URL)
.send()
.await
.unwrap()
.json()
.await
.unwrap();
users_wrapper.set(fetched_
users_wrapper);
});
|| ()
},
(),
);
}
}
- Below the {} block under the users_wrapper fetching, set the value for next and limit. Append the following lines:
let users_wrapper = use_state(|| UsersWrapper::default());
{
...
}
let (next, limit): (Option<OurDateTime>, Option<usize>) = if users_wrapper.pagination.is_some()
{
let pagination = users_wrapper.
pagination.as_ref().unwrap();
(Some(pagination.next), Some(pagination.limit))
} else {
(None, None)
};
- Change the HTML from Hello WebAssembly! to show the proper User information. We want to use the UsersList component that we created earlier. Change the html! macro content into the following:
html! {
<>
<UsersList users = {users_wrapper.
users.clone()}/>
if next.is_some() {
<a href={ format!("/users?
pagination.next={}&pagination.limit={}",
DisplayOption(next), DisplayOption(limit))
} class="button">
{ "Next" }
</a>
}
</>
}
- Build the our_application_wasm WebAssembly and JavaScript by running this command in the terminal:
trunk build
The command should generate three files in the dist directory: index.html, a WebAssembly file with random name, and a JavaScript file with random name. The example of random WebAssembly and JavaScript file are index-9eb0724334955a2a_bg.wasm and index-9eb0724334955a2a.js in the dist directory.
At this point, we have successfully written and built a WebAssembly application. In the next section, we are going to learn how to serve a WebAssembly application using Rocket.
Serving a WebAssembly application using Rocket
In this section, we are going to serve the WebAssembly web application using the following steps:
- To run the WebAssembly file in our_application, we have to modify our_application a little bit. First, copy the WebAssembly and the JavaScript from our_application_wasm/dist to the our_application/static directory.
- Edit the template to be able to selectively use WebAssembly in our_application/src/views/template.html.tera as follows:
<head>
...
{% block wasm %}{% endblock wasm %}
<meta...>
</head>
<body>
...
{% block wasmscript %}{% endblock wasmscript %}
</body>
- Add a new template file named our_application/src/views/users/wasm.html.tera. Edit the file in order to make sure the HTML file loads the necessary WebAssembly and JavaScript file, and run the WebAssembly on the right DOM. Add the following lines:
{% extends "template" %}
{% block wasm %}
<link rel="preload" href="/assets/index-9eb0724334955a2a_bg.wasm" as="fetch" type="application/wasm" crossorigin="">
<link rel="modulepreload" href="/assets/index-9eb0724334955a2a.js">
{% endblock wasm %}
{% block body %}
<div id="main_container"></div>
{% endblock body %}
{% block wasmscript %}
<script type="module">import init from '/assets/index-9eb0724334955a2a.js';init('/assets/index-9eb0724334955a2a_bg.wasm');</script>
{% endblock wasmscript %}
- Add a new route handling function to load just the generated HTML. Add the following function in our_application/src/routes/user.rs:
#[get("/users/wasm", format = "text/html")]
pub async fn wasm() -> HtmlResponse {
let context = context! {};
Ok(Template::render("users/wasm", context))
}
- Finally, don't forget to load the route. Add the new route in our_application/src/lib.rs:
user::delete_user_entry_point,
user::wasm,
post::get_post,
- Run the our_application web server by running cargo run in the our_application directory, and then open http://127.0.0.1:8000/users/wasm in the web browser. If we inspect the web browser developer tools, we can see that the web browser runs the JavaScript and WebAssembly, as shown in the following screenshot:
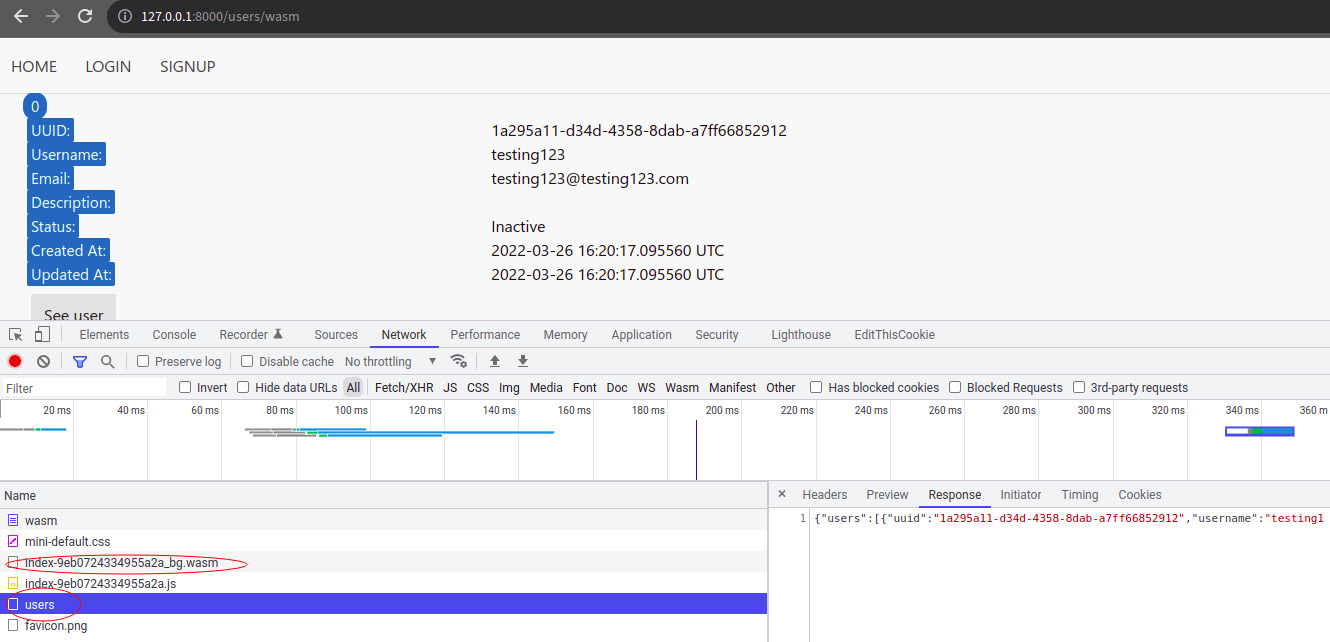
Figure 14.3 ‒ Web browser loading and running our_application_wasm
WebAssembly should run properly by modifying the tag with the main_container tag, then loading the JSON from http://127.0.0.1:8000/api/users and rendering the HTML in the web browser properly.
Summary
Web technology has evolved to allow web browsers to run a universal binary format for a virtual machine. Web browsers can now run a binary generated by the Rust compiler.
In this chapter, we have looked at an overview of WebAssembly, and how to prepare the Rust compiler to compile to WebAssembly. We also learned how to set up a Cargo workspace to have more than one application in a single directory.
We then learned how to write a simple frontend application that loads the User data from the our_application API endpoint that we created earlier using Yew and other Rust libraries.
Finally, we finished with how to serve the generated WebAssembly and JavaScript in the our_application web server.
The next chapter is the final chapter, and we're going to see how we can expand the Rocket application and find alternatives to it.