
Let’s dive deeper into the domain of identity and access management. As you know, cloud technology has enabled enterprise business applications and business transactions to be more ubiquitous and accessible by anyone, anywhere, with just a web browser and an Internet connection. This level of convenience comes with a multitude of security considerations for designing and managing cloud-based solutions. The potential threats vary from hacked user accounts and data breaches to malicious attacks that can bring down the entire system. If a breach occurs in a cloud-based system, the recoverability of the system is not the only concern. The risk of damaged reputation and loss of customer trust can be far more devastating than just recovery for business. An identity and access management breach often requires a complete overhaul of the system because most identity and access management breaches are deep-rooted. Identity and access management also becomes complicated over time because of the ever-growing size of the user base and the diverse user needs. Identity and access management is the most critical security aspect of every system and designed for the full life of the system, which can last as long as a decade.
Identity and access management streamlines and automates the critical aspects of managing users, system identities, and access rights to one or many systems in the enterprise. The different elements of protection offered by identity and access management (IAM) solutions are a vital starting point in building a robust information security framework for your company.
When we ask people to describe identity and access management, we hear phrases like “SSO,” “SAML,” “OAuth,” “username/password,” “user provisioning,” and so on. Identity management is not just one of these terms; it is all of them. Identity and access Management is a lifecycle of security measures that span across the life of a user’s use of a system.
The nine stages of an identity and access management lifecycle
An overview of key concepts including provisioning, access, authentication, authorization, session management, single sign-on (SSO), logouts and redirects, deprovisioning, and user account management
The options available in Salesforce for designing identity and access management for each stage of the identity and access management lifecycle
Stages of an Identity and Access Management Lifecycle
To introduce the fundamental concepts of identity and access management, I (James) would like to start by sharing a story of my travel experience.
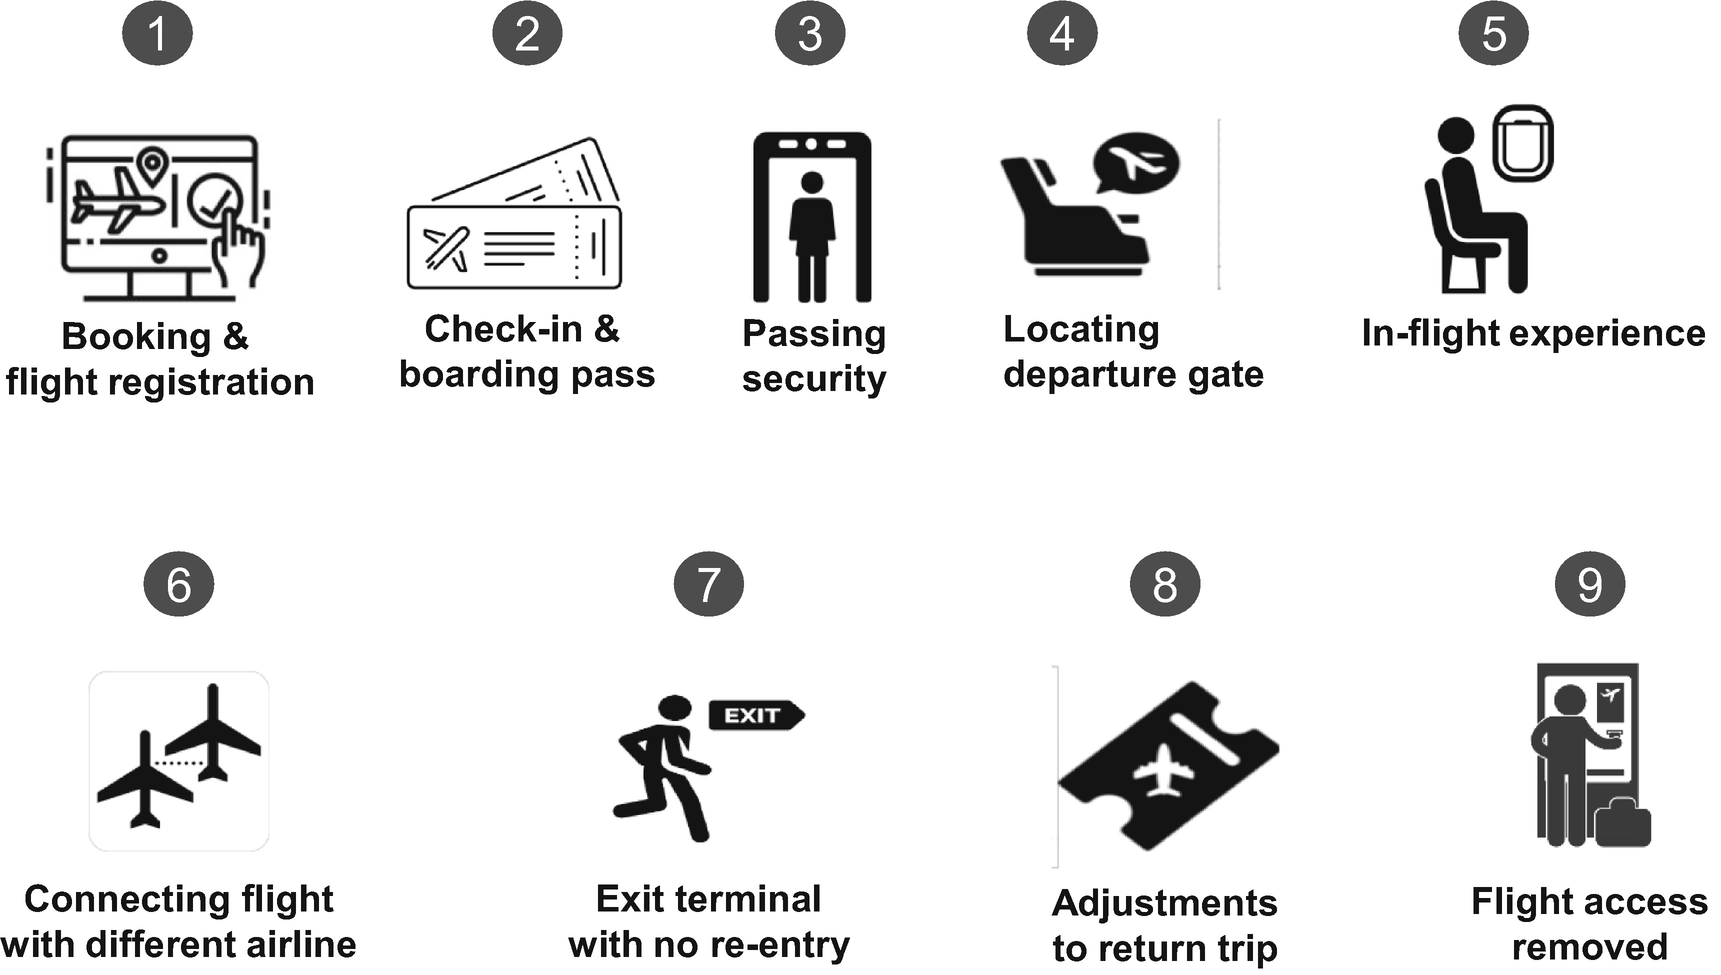
Experience on Flight from Washington, DC, to Barcelona, Spain
- 1.
Booking and Flight Registration: I found a multi-carrier flight deal on Expedia. I registered as a new user and then completed my booking by entering personal details from my passport. I received a confirmation number from the airline, which also included a link to complete check-in before the date of my flight.
- 2.
Check-In and Boarding Pass: On the day of my flight, I arrived at the airport and checked in at a United Airlines kiosk to get my boarding pass. The boarding pass had all of my booking details. Additionally, the pass included other information such as my TSA pre-check, 1 the terminal, and the gate from which my flight was departing. It also had my seat assignment and my boarding group details.
- 3.
Passing Security: When I arrived at the designated terminal, I noticed that I had the option to either pass through the TSA security that was shorter and fast-moving or the general security, which was longer and slower. I chose the TSA security line. When I reached the security officer, she asked for photo identification and a valid boarding pass. She acknowledged my identity based on the information already stored in the TSA database and allowed me to enter the terminal.
- 4.
Locating Departure Gate: After passing security, I checked my boarding pass to find the assigned gate for my flight. When I arrived at the gate printed on my boarding pass, the gate official announced that the gate assignment had changed, and I had a newly assigned gate. They also assured me I would not need to pass through security again to move to my new loading gate since all gates and terminals for the airport are accessible from inside the security checkpoint seamlessly.
- 5.
In-Flight Experience: I arrived at the new gate of departure and boarded the flight. Once the flight boarded, the flight agent shut the plane doors before the plane could leave the terminal. Based on the seat assignment on my boarding pass, the flight attendants already knew my meal preferences. They offered in-flight experience specific to my favorites and in the context of my seat class.
- 6.
Connecting Flights with Different Airlines: My flight landed at the first stopover, which was at Heathrow Airport in London. I switched airlines from United to British Airways in a separate terminal for my next flight. When I arrived at the British Airways gate, I was required no additional security check.
- 7.
Exit Terminal with No Reentry Allowed: I landed at BCN airport in Barcelona, Spain, and as I exited the customs, I saw the sign “No reentry allowed.” I acknowledged that I had everything I needed from the terminal facilities, and I exited the terminal.
- 8.
Made Changes to My Return Trip: I was enjoying Barcelona, and hence I decided to stay longer than I planned. To change my return flight, I went online on Expedia and made changes to my return date and chose new flights. Expedia confirmed my changes and the date and time of my return flight. They also provided me with new boarding passes.
- 9.
Access to My Past Flights Removed: After returning from my trip, when I tried to log in to view my past flights online, I could not access my recent flight information. The website displayed a message stating that I did not have access to my past trips, and if I needed any additional information, I should call their customer service for further help.
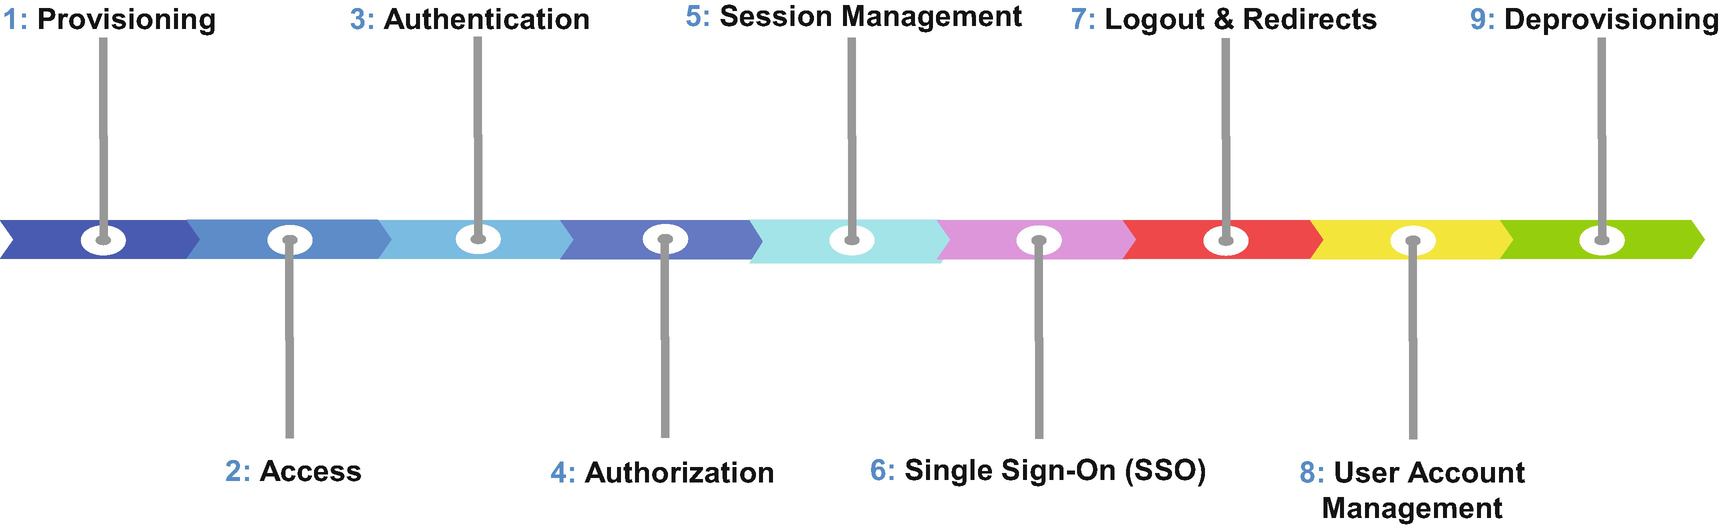
Lifecycle of Identity and Access Management (IAM)
- 1.
Provisioning : The process of setting up a user in Salesforce, including collecting and storing personal and system registration details about the user or an external system. In my flight experience story, the provisioning is similar to the experience of booking my flight on Expedia, where I self-registered my user account and provided personal details to register myself also with the airline’s database that operates the trip interests.
- 2.
Access : The setup defines a user’s access or systems privilege to specific resources in Salesforce such as objects, records, fields, and UI pages. An admin must define and set up access before a user is authenticated or authorized into Salesforce. Salesforce strictly enforces the assignment of a user profile and a license type to each user, which is the minimum access configuration needed for every user. We can provide additional access in Salesforce via permission sets, role hierarchy, group memberships, queues, teams, and a large variety of configurable sharing rules. Access can be changed before, during, and after the user authorization. In the flight example, my boarding pass had all the details, such as the terminal, gate, and seat details of the flight.
- 3.
Authentication : Refers to the process of verifying the identity of the user or a remote system requesting access to Salesforce. The authentication process verifies a set of identification credentials stored within Salesforce or an external identity store to confirm that the user or remote system is authentic. This process is similar to my experience at the airport security gate, where the TSA security officer asked me to identify myself by requesting a photo identification and a valid boarding pass. I used the TSA pre line, which is like using a high-assurance authentication method in Salesforce. I passed through security without requiring additional security steps such as removing my laptop out of my bag or removing my shoes, belt, and watch when passing through security. The security officer also verified that I was in the correct airport and at the right terminal for my flight.
- 4.
Authorization : The validation of the user’s access rights/privileges to resources in Salesforce, such as objects, records, fields, and UI pages, at the time of access. When conducting authorization, Salesforce checks, at minimum, the license type, user profile, permission sets (if any), and role hierarchy (if any) assigned to the user. The flight and terminal details in my boarding pass allowed the security officials to validate that I was requesting entry into the correct terminal at the right date and time, as listed on my boarding pass.
- 5.
Session Management : The duration of a seamless user or system experience during their active use of Salesforce. After authentication and authorization into Salesforce, a user may navigate across multiple screens, access various data, and conduct a variety of transactions, without requiring Salesforce to reauthenticate and reauthorize the user after every single user activity. Session management is similar to getting access to service for the duration of that flight described in the flight example. Sessions for each user are uniquely managed based on a session token, which contains specific details about the user’s sessions. In the flight experience, a session token is like the unique seat number assigned to my flight. My seat number on the flight was used by the flight attendant to identify my meal preferences and for tracking my overall flight experience.
- 6.
Single Sign-On (SSO) : The method of centralizing user authentication processes via the use of a single identity-providing system known as the “identity provider” (IPD). The IDP enables the users to authenticate with multiple systems by logging in once. In my flight example, I arrived at Terminal 3 of Heathrow Airport in London via United Airlines, and my next connecting flight departing Heathrow Airport was with British Airways from Terminal 3, Gate D17. I walked over to the designated gate of my next flight, without requiring to go through security again. Even though I was flying with a different airline for my next flight, I was able to bypass all security requirements at the airport and seamlessly board my next flight with British Airways. Here, the booking service acted as the identity provider and registered my details with both airlines, airports, and terminals to ensure that my transition from one flight to another was part of a seamless, unified experience.
- 7.
Logouts and Redirects : The termination of a user’s current active session securely as per the user’s intent to end their current session or due to the deprovisioning of the user while in an active session of Salesforce. The termination of the user’s active session navigates the user to an external alternative site. The post-logout navigation of the user can be customized to redirect the user to a custom web address or be set to default Salesforce redirect experience. In my flight example, I arrived in Barcelona and picked up my bags. I noticed a sign at the exit that said “No reentry after this point.” As I exited the secure part of the airport, I entered the public access area of the airport, without a need for a boarding pass or ticket.
- 8.
User Account Management : The process of supporting user access to a secure environment. User management may require login recovery and password resets, freezing a user’s account temporarily, or deactivating a user. Often, login recovery refers to unlocking a user account for failed authentication or authorization attempts. It may also require changing user-assigned login hours and IP restrictions. In my flight experience, this is like the flight changes I made to my return flight, which changed my access and authorization from the initially scheduled flight.
- 9.
Deprovisioning : The deactivation of user access in the Salesforce instance. In Salesforce, users cannot be deleted or removed. They can only be deactivated. Deactivating a user disables the user’s access to the Salesforce instance. It also releases the Salesforce license previously assigned for use by other users or new users added to the Salesforce environment. In my flight example, the airline removed access to my previous trips. The access to the data was deprovisioned.
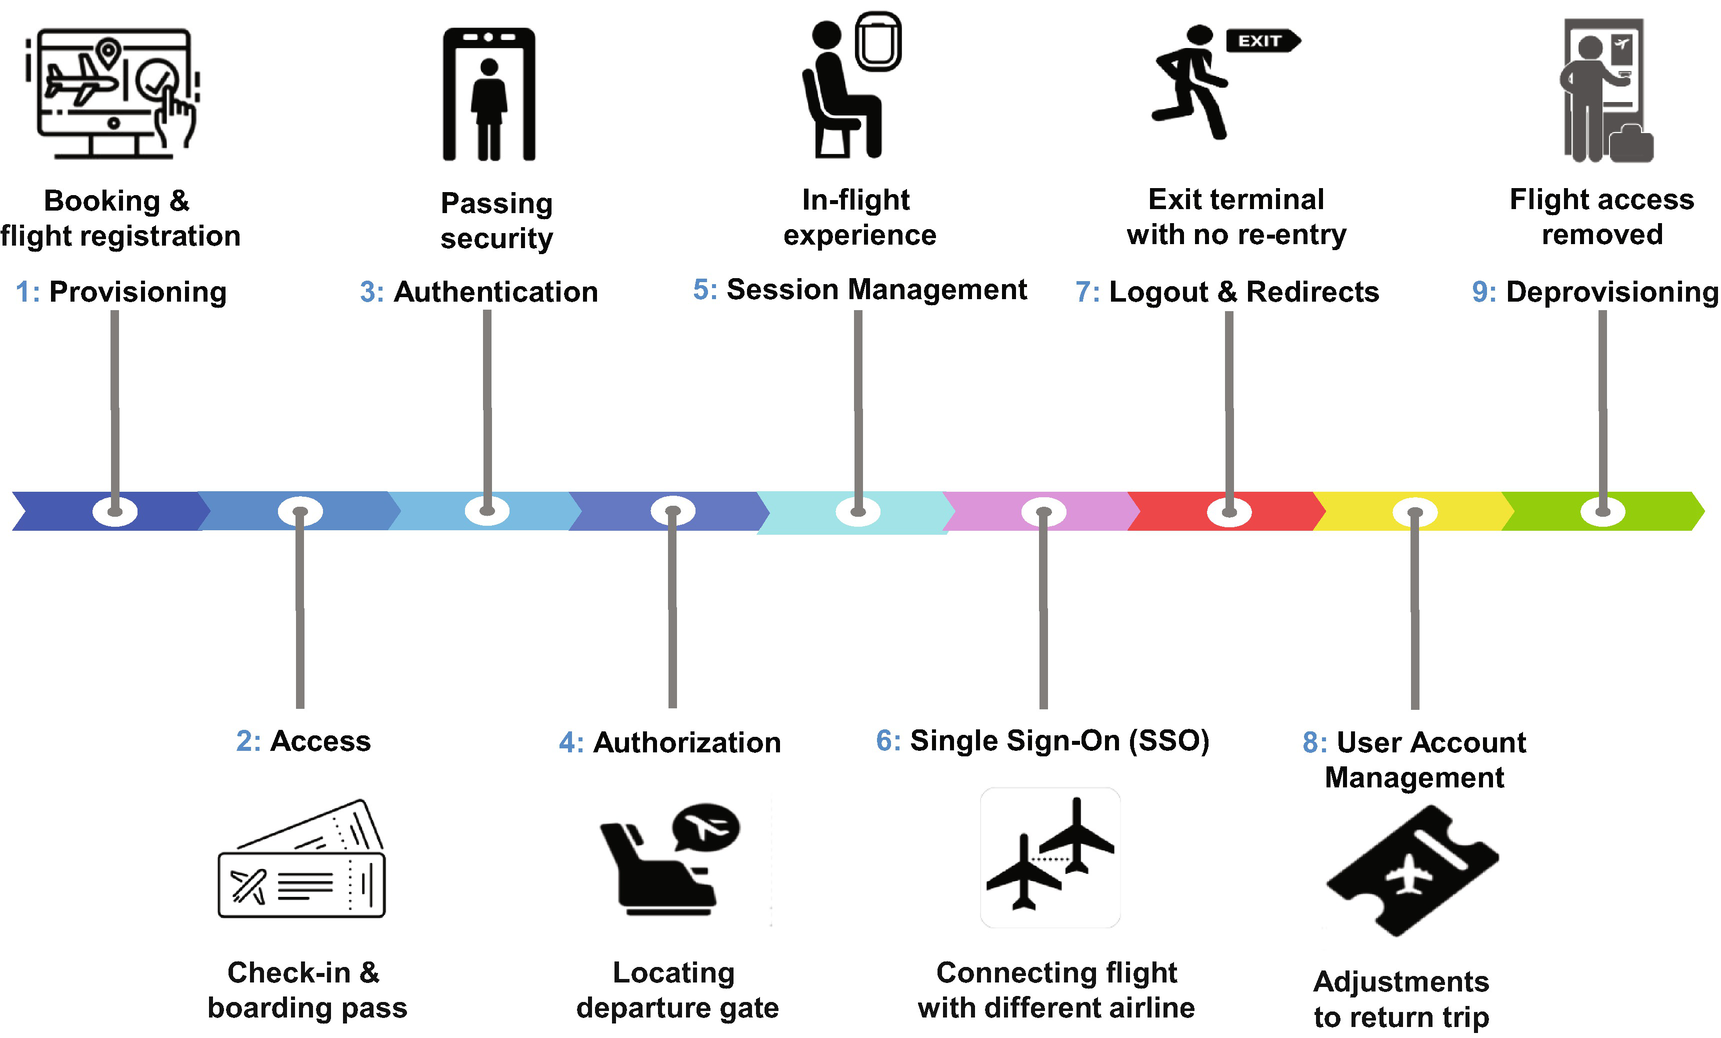
Mapping the Identity and Access Management Stages to the Flight Experience
Now that we have covered the nine stages of identity and access management at a high level, let’s dig deeper into each one. Let’s understand the considerations that an architect should have when architecting an ideal identity and access management solution in Salesforce.
Architecting Identity and Access Management in Salesforce
Identity is a loaded term in the technology industry. To some it means verification of users; to others it is just a security parameter. But identity and access management is not a singular concept; it is a lifecycle that covers every aspect of access to a system for the entirety of the system’s life. At the basic level, identity and access management ensures that the user or remote system accessing the system is authentic, has access only to system resources they are entitled to, and respects all security parameters set within the system.
Provisioning
Provisioning refers to the process used to set up users in Salesforce for access. An architect must plan and include an ideal approach for user provisioning since user provisioning can quickly become an expensive administrative overhead for most companies. Also, when many users need provisioning or in a company with an ever-growing population of Salesforce users, the ideal setup for user provisioning makes all the difference.
Provisioning Methods in Salesforce
User Provisioning Method | How Does It Work? |
|---|---|
Internal Users | |
Manual provisioning | The administrator is creating users manually. |
API provisioning | Users are provisioned individually from an external system or application through integration via the SOAP API2 or REST API on the user object. |
Programmatic provisioning | Users provisioned programmatically using Apex code. |
JIT provisioning with SAML | Users provisioned using the just-in-time (JIT) provisioning method, along with a SAML assertion to create users immediately when they first attempt to log into Salesforce. Advanced user account creation is not required. This method is dependent on the implementation of single sign-on. |
Mass user provisioning | Users can be created in bulk either using Bulk API from another system or application or via CSV file uploaded using Salesforce Data Loader. |
Identity Connect with AD | This method uses the Salesforce Identity Connect feature, which integrates Microsoft Active Directory (AD) with Salesforce. In this method, the user information is maintained in Microsoft Active Directory (AD), and any changes to users are reflected in Salesforce. |
External Users (via Salesforce Community Cloud) | |
Manual setup | Users set up as contacts can be provisioned access to Community Cloud by internal users or Community Plus super users or Partner super users. |
Self-registration | Users can self-register when first visiting the site. |
Social sign-on provisioning | Users can sign in using social site credentials, such as LinkedIn, Facebook, Twitter, Google. These services implement the OpenID Connect or OAuth 2.0 framework. |
Access
Access refers to the itemized list of all things that a provisioned user can do in Salesforce as per the capacity of their security rights. The “capacity” of access refers to the fine-grained detail of whether they get read-only access, read-write access, read-write-transfer access, or modify all access to a specific object, record, or field in Salesforce. Access determines the user’s access to objects, records, and fields.
- 1.
Salesforce user license
- 2.
User profile
- 3.
Role hierarchy
- 4.
Permission sets
- 5.
Sharing rules
- 6.
Queue membership
- 7.
Group membership
- 8.
Team membership
- 9.
Territory hierarchy
- 10.
Implicit sharing
- 11.
Apex sharing
- 12.
Manual sharing
- 13.
Account-based data sharing rules
- 14.
External account hierarchy
- 15.
Sharing sets
- 16.
Share group
Visibility and sharing is the label given to “access” in the Salesforce ecosystem . We discussed visibility and sharing in greater depth in Chapter 5.
Authentication
Domain Access: Checking for the Salesforce instance(s) to which the user has access and verifying if the Salesforce instance being requested by the user is one that the user can access.
IP Restrictions: Checking for any user IP range restrictions. Salesforce denies access if the user is accessing from an IP range outside the IP range set for the user or the IP is not part of a whitelisted IP address for the organization.
Login Hours: Checking for any login hour restrictions that have been set by the administrator, applicable to the user. If the user is accessing Salesforce outside of the login hours set up for the user, then the user’s access to Salesforce is denied.
Two-Factor Authentication (2FA): Checking if the user is required to authenticate themselves via an additional, alternate form of authentication. As an example, a Salesforce-generated dynamic code is sent to the user’s mobile device, or a one-time password (OTP) is sent to the user’s email or mobile device.
If the requirements of the authentication step are not satisfied by the user, then the user authentication fails, and the user is not provided access into Salesforce.
- 1.
Username/Password Framework
This is the most common and most straightforward framework, where users enter their unique user ID and a self-created secret password on the Salesforce login page. This method of authentication is considered the least secure form of authentication compared to other frameworks because the user’s credentials can be easily compromised and the breach can remain unnoticed until significant damage occurs in the user’s account. An approach to secure this method of authentication is to enable multifactor authentication along with this method of authentication as it mandates the user to verify themselves using an alternate source such as a user’s mobile device or email address, which can only be accessed by the real user.
- 2.
The Security Assertion Markup Language (SAML) 2.0 Framework
Security Assertion Markup Language (SAML) is an XML-based framework for exchanging user authentication information between two or more systems that have established a trust relationship with each other. In SAML, the system that provides the user’s identity is known as the “identity provider,” and the system that leverages the authentication function of the identity provider to offer the user access to its services and resources is known as the “service provider.” In SAML, the service provider delegates its user authentication function entirely to the identity provider. The SAML identity provider conducts the user’s authentication and returns the results of the user’s authentication attempt in an XML-based message called a SAML assertion to the service provider. The SAML assertion contains details about who the user is and how the identity provider authenticated the user.
In most cases, an identity provider can be an identity broker such as Microsoft Active Directory (AD) or Okta, and the service provider is Salesforce. But in other cases, when user details are only stored and managed in Salesforce, the real source of the user’s identity, Salesforce, can act as the identity provider for other systems that serve as the service provider.
- 3.
OpenID Connect Framework for Authentication
The OpenID Connect framework enables Salesforce to leverage the user’s authentication stored in an external system referred to as the “OpenID authentication provider” in this context. The OpenID Connect framework combines user authentication with OAuth-based authorization (more on OAuth-based authorization later in this chapter). The OpenID framework assumes that Salesforce can rely on the authentication method established in the OpenID authentication provider such as a user’s Amazon, Twitter, Google, PayPal, or Janrain account or the user’s identity stored in Microsoft Active Directory Federation Services (ADFS). A registration handler needs to be set up in Salesforce to match the user info requested from the OpenID provider.
Methods to Authenticate Users into Salesforce
# | Authentication Method | How Does It Work? | Framework Used |
|---|---|---|---|
Internal Users | |||
1 | Salesforce username/password | Users are authenticated using their unique username and password entered on the standard or custom login page of Salesforce. | Username/password |
2 | Multi-org Salesforce authentication | SSO can be set up between multiple instances of Salesforce existing in the company via simple out-of-the-box configuration. | SAML 2.0 |
3 | Federated authentication | In this method, Salesforce receives a SAML assertion via an HTTP POST request from an identity management system or an external system with identity management capabilities. The SAML assertion contains a unique identifier and a validity duration and is digitally signed by the external system. | SAML 2.0 |
4 | Delegated authentication | An internal web service authenticates users based on information stored and provided by an external system. The external system provides a Salesforce username, password, and source IP to Salesforce to authenticate the user into Salesforce. | Web service |
External Users (via Salesforce Community Cloud) | |||
5 | Salesforce username/password | Users are authenticated using their unique username and password entered on the standard or custom Salesforce Community Cloud login page. | Username/password |
6 | Social sign-on access | Users can sign in using social site credentials. Supported sites include LinkedIn, Facebook, Twitter, Google, Janrain, Salesforce, and any service that implements the OpenID Connect protocol or OAuth 2.0 protocol. | OpenID Connect |
7 | Customer Identity and Access Management (CIAM) | Authentication provided by an external tool such as Okta acting as a CIAM directory that hosts all customer identity information and authenticates access into Salesforce using SAML SSO for external users . | SAML 2.0 |
Authorization
Authorization refers to verifying access rights/privileges to resources in Salesforce. When conducting authorization, Salesforce checks the license type, user profile, permission sets, and role hierarchy (if any) assigned to the user based on which the user’s access to the requested resources in Salesforce will be determined. Many people believe that access and authorization are synonymous. They are not.
Access is an itemized list of everything that a user can do in Salesforce, whereas authorization is validating the defined access at the time of entry into Salesforce. Access differs from authorization in the same way as placing a food order for pickup at a restaurant differs from the act of picking up the food from the restaurant when it is ready. What you pick up is what you ordered, but they are not the same thing. Access is the definition of what a user can do, whereas authorization is the execution of what the user can do in Salesforce. Just as you cannot pick up anything from the restaurant unless you first place an order, user authorization cannot work unless you first define the user’s access in Salesforce. A user’s access needs to be defined and completed before a user is authorized into Salesforce. Luckily, Salesforce does not allow a new user to be set up or saved successfully without at least assigning a user profile and a Salesforce license. Every user must have at least a user profile and a Salesforce license assigned to them; requiring these two access configuration items at the time of user creation ensures that no user is created without at least some basic access rights being defined.
Going along with the analogy of the food order, if you arrive at the restaurant and you want to order more or make a few changes to the current order, with the understanding that the restaurant is still okay with making changes, you can make real-time modifications to the order while you are at the restaurant. It would be a terrible experience if the restaurant asked you to leave the restaurant immediately, call them again to modify the order, and come back to the restaurant only after the changes have been made. Similarly, If the user is already authorized in Salesforce and the user’s access is modified, the user’s experience will be instantly and seamlessly altered by the system to match the user’s new access configuration.
It is essential to cover another aspect of authorization, which relates to authorizing an external system to gain access to Salesforce on behalf of a specific user. Let’s take a scenario such as when a user of an external ERP system conducts a transaction in the ERP system. The ERP transaction then needs to update a field in Salesforce on behalf of the same user, as long as the user has the permissions to update the field. In such cases, the external system’s authorization into Salesforce on behalf of a specific user needs to follow a system authorization framework.
OpenID Connect framework
OAuth 2.0 framework
OpenID Connect Framework for Authorization
As discussed earlier, the OpenID Connect framework combines the functions of user authentication through delegated authentication via an OpenID authentication provider (also known as identity provider) with the authorization functions leveraging the OAuth 2.0 framework. Hence, the OpenID Connect framework addresses both the authentication and authorization for the user or system accessing Salesforce.
The OpenID framework assumes that Salesforce can rely on the authentication method established between the user and the OpenID authentication provider, such as the user’s Google account or Amazon account or Twitter account. Since Salesforce relies on the OpenID authentication provider for authentication, Salesforce in this context is referred to as the relying party.
To support the authentication method using the OpenID framework, Salesforce (relying party) receives an ID token and a UserInfo endpoint from the “identity provider” to convey the authenticity of the user. There needs to be a registration handler set up in Salesforce (the relying party) to match the UserInfo received from the “identity provider” with the personal details of the user stored in Salesforce, such as the user’s email address or phone number.
Once the authentication process is completed between Salesforce (relying party) and the identity provider, Salesforce follows any of the OAuth 2.0 flows mentioned in the next section.
OAuth 2.0
The OAuth 2.0 authorization framework allows a system to gain access into Salesforce on behalf of a specific user, without sharing the user’s identity or login credentials with the external applications. When an external system accesses Salesforce on behalf of a particular user, Salesforce grants access based on the scope of that user’s access in Salesforce.
To do so, the external system requesting access to Salesforce needs first to establish a trust relationship between itself and Salesforce. It is important to note that the process of authorizing an external system to access Salesforce on behalf of an authenticated user is a complex multi-sequence process requiring extensive back-and-forth API-based exchanges between Salesforce and the external system requesting authorization. This multi-sequence process of authorizing an external system into Salesforce is known as an “OAuth flow.”
It is important to note that OAuth does not conduct user authentication for the user since it cannot see a user’s identity or user credentials at all. It only manages the authorization functions needed on behalf of the user. It relies entirely on Salesforce confirming authentication on its own or via an OpenID authentication provider by using the OpenID Connect framework.
Authorization Flows
# | OAuth 2.0 Authorization Flow | Description | When to Use |
|---|---|---|---|
1 | Web Server Flow | This flow is used when a server-side application is a trusted service and can protect the client secret. The User-Agent is redirected to an authorization server that was previously configured with the client secret. The flow relies on the trusted connection where the access token does not go through a browser. | Machine-to-machine authorization where the apps are hosted on a secure server, such as Single-page apps Native mobile apps This is the most common flow. |
2 | User-Agent Flow | This flow does not use an authorization code; rather, the resource owner submits credentials directly to the client, and the access token is the client. The flow does not use a redirect, nor does it exchange credentials directly. | Established trust between the resource owner and the client application, such as Desktop or mobile integration app |
3 | JWT Bearer Flow | This flow allows an authorized server to access a given systems’ data without logging in each time. It uses a certificate to sign the JSON Web Token (JWT) request and doesn’t require explicit user interaction. This flow is stateless; no tokens are used. | Created for server-to-server API integration, such as In-house applications LDAP solutions |
4 | Device Flow | Often devices have a limited ability to accept input or display information and can support user direct input. This flow redirects the User-Agent to a specific URL to request and confirm access . | Primarily used with IoT devices such as Smart TVs Appliances Bluetooth devices Command-line apps |
5 | Asset Token Flow | An asset token similar to an open-standard JWT token is used in this flow. Once authorized, an OAuth access token and an actor token are exchanged for an asset token. | Primarily used to combine issuing and registering asset tokens for efficient token exchange and automatic linking of devices to Salesforce (https://help.salesforce.com/articleView?id=sso_delauthentication.htm&type=5asset) data, such as scanners, RFID, and so on. |
6 | Username and Password Flow | This flow requires the user to authorize a client. It is supported for connected apps, and both the username and password are passed to the application. This flow should be avoided, as its credentials are not secure. The resource owner and the client must have a high degree of trust. If you do have to use this flow, then utilize the named credentials feature to store and service your username/password through the API. | Primarily used when a client legacy application does not support another option such as Custom application created by client Internal application without ability to store access token or credentials |
7 | OAuth 2.0 Refresh Token Flow | This flow supports other flows such as the Web Server and User-Agent flows to renew their access tokens. Once the client is authorized for access, it uses a refresh token to get a new access token. This flow reduces the need to repeat the full authorization flow continually . | Renews the session with a new session ID for Web Server and User-Agent flows, without requiring reauthorization. |
8 | Canvas App User Flow – Signed Request | This flow supports a feature in Salesforce called Canvas, which is used to integrate third-party applications with Salesforce. The signed request is the default. | It is used to provide access to an app using admin access or user self-authority. |
9 | Canvas App User Flow – OAuth 2.0 | This flow is the default authorization method for Canvas apps. The signed request authorization flow is dependent on the Canvas app’s Permitted Users field whether it is set to “Admin approved users are pre-authorized” or “All users may self-authorize.” | It uses either Web Server OAuth Authentication Flow or User-Agent OAuth Authentication Flow. |
10 | SAML Assertion Flow | This flow is used to access a web service API using a SAML assertion. In this flow, an app can use an existing SAML authentication. This flow can be used without the need for a connected app. | This flow extends an existing Web SSO connection to authenticate a requested API. |
11 | SAML Bearer Assertion Flow | An app can reuse an existing authorization. A signed SAML 2.0 assertion can be used to renew with a digital signature applied to the SAML assertion . | Renews the assertion with a new session ID for SAML Assertion Flow. |
12 | SAML Single Sign-On for Canvas Apps Flow | Whether you use a signed request or OAuth authorization, you can use SAML-based single sign-on (SSO) to provide your authentication flow. | Leverages Salesforce as an ID provider or SP. SAML SSO can provide automatic authentication into your Canvas app via SAML. |
13 | Social Sign-On with Social Agent Authorization | This flow facilitates Salesforce identity to use standard OpenID public authentication, such as Facebook, LinkedIn, Twitter, Google. These provider connections are created in Salesforce and used to allow access to known and unknown users. | Social sign-on can also be used to create and update users by presenting the user identity information to Salesforce. |
Authorization Scopes
Authorization Flows using OAuth 2.0
# | Scope Type | Description |
|---|---|---|
1 | api | Provides access to the current user’s account via API. |
2 | chatter_api | Provides access to only Chatter REST API. |
3 | custom_permissions | Provides access to custom permissions associated with a connected app. |
4 | full | Provides full access to all data accessible by the logged-in user. |
5 | id | Provides access to identity, such as profile, email, address, or phone. |
6 | openid | Provides access to OpenID identifier. |
7 | refresh_token | Provides refresh token to be returned. |
8 | visualforce | Provides access to Visualforce pages. |
9 | web | Provides use of access_token on the Web. |
10 | Custom Scope | Custom Scope as defined by an admin or developer. |
Session Management
A user’s interaction with Salesforce for a duration of time is a session. After authentication and upon being authorized with the allowed scope of access, a user session is established. A session contains the details about the user, session type, and duration of the session among other session details,3 all of which are stored in the user’s browser as session cookies. Hence, a session is similar to the in-flight experience in my travel experience. Everything needed for the duration of my flight was stored and provided as part of my in-flight experience. The session secures and limits the user’s exposure and prevents unauthorized and unintended use of the system by any user other than the user authenticated and authorized to use the system during a specific time. Salesforce uses TLS (Transport Layer Security) and requires secure connections (HTTPS) for all communication by default.
Each session in Salesforce maintains a “session state” that contains information about the user and the authentication level used by the user to authenticate themselves into Salesforce. There are two types of security level for authentication that impact session security. They are standard-assurance and high-assurance authentication levels. High-assurance authentication requires users to authenticate into Salesforce using a two-factor authentication.
Two-Factor Authentication
This form of authentication requires a two-step verification process which requires not only a username and password but also an additional confidential set of information that only the real user possesses. Two-factor authentication can also be set up to be required when a user meets specific criteria, such as attempting to view reports or accessing a connected app. When a user accesses Salesforce from outside a trusted IP range or uses a browser or app that Salesforce does not recognize, the user is challenged to verify their identity.
- 1.
Push notification or location-based notification automated with the Salesforce Authenticator mobile app connected to the user’s account
- 2.
U2F security key registered on the user account
- 3.
Code generated by a mobile authenticator app such as the Google Authenticator app
- 4.
Code sent via SMS to mobile phone
- 5.
Code sent via email to the user’s email address
After the verification is successful, the user does not have to verify identity again from that browser or app because the browser or the app retains the session ID that authenticates the entire session for the user for the duration of that session.
Manually clears browser cookies and instructs the browser to delete cookies
Browses in private or incognito mode and then opens new browsers or browser tabs to access the same pages
Removes “Don’t ask again” on the identity verification page and times out as per the configured session timeout
An administrator can restrict access to certain types of resources in Salesforce based on the level of authentication used by the user to authenticate into Salesforce. The administrator can define access policies requiring a high-assurance authentication to access specific sensitive data or sensitive operations in Salesforce. If a user authenticated into Salesforce using a standard assurance, they would be blocked from accessing the sensitive data or sensitive operations that require a high-assurance authentication. In such cases, the users will have to log out and log back in using a high-assurance authentication such as the use of two-factor authentication. The users that have already authenticated using a high-assurance authentication are provided seamless access to all data, including sensitive data and sensitive operations without any reauthentication and authorization requirements. Although no other user can access a user’s active session other than the user itself, an administrator of Salesforce can view the type of session that the user is engaged in.
Session Types in Salesforce
# | Session Type | Description |
|---|---|---|
1 | API | Created when accessing an org through the API. |
2 | APIOnlyUser | Created to enable a password reset in the user interface for API-only users. |
3 | Aura | Created for access to Lightning Experience functionality. |
4 | ChatterNetworks | Created when using Chatter Networks or Chatter Communities. |
5 | ChatterNetworksAPIOnly | Created when using the Chatter Networks or Chatter Communities API. |
6 | ChatterNetworksAPIOnlyOAuth | Created when approving OAuth access by a Chatter Communities user. |
7 | Content | Created when serving user-uploaded content. |
8 | DataDownloadOnly | A session that can only be used to download data. |
9 | LightningContainerComponent | Created for use with Lightning container components. |
10 | LivePreview | Created to use the live preview functionality in Experience Builder. |
11 | Node | Created for NodeJS access. |
12 | OAuthApprovalUI | A session that allows access only to the OAuth approval page. |
13 | OAuth2 | Created using OAuth flows. For example, if you use OAuth authentication for a connected app, this type of session is created. |
14 | SamlOAuthApprovalUi | Created when approving OAuth access during a SAML flow. |
15 | SiteStudio | Created when using the Experience Builder user interface. |
16 | SitePreview | Initiated when an internal Canvas app is invoked. |
17 | STREAMING_API | Created for use by Streaming API. |
18 | SubstituteUser | Created when one user logs in as another user. For example, if an administrator logs in as another user, a SubstituteUser session is created. |
19 | UI | Created for access to the Salesforce Classic UI. Represents the core session for a login to the user interface. |
20 | UnspecifiedType | Created by an unknown source. |
21 | UserSite | Initiated when a Canvas application is invoked. |
22 | Visualforce | Created to access Visualforce pages. |
23 | WDC_API | A session using Work.com API. |
Single Sign-On (SSO) Methods Available in Salesforce
# | SSO Methods | How Does It Work? | Framework Used |
|---|---|---|---|
Internal Users | |||
1 | SSO with multiple orgs | SSO can be set up between multiple instances of Salesforce existing in the company via simple out-of-the-box configuration. | SAML 2.0 |
2 | SSO with Microsoft Active Directory (AD) | Salesforce is integrated with Microsoft Active Directory (AD) using Identity Connect or Microsoft Active Directory Federation Services (ADFS). | OpenID Connect |
3 | Federated authentication | In this method, Salesforce receives a SAML assertion via an HTTP POST request from an identity management system or an external system with identity management capabilities. The SAML assertion contains a unique identifier and a validity duration and is digitally signed by the external system. | SAML 2.0 |
External Users (via Salesforce Community Cloud) | |||
4 | Social sign-on access | Users can sign in using social site credentials. Supported sites include LinkedIn, Facebook, Twitter, Google, Janrain, Salesforce, and any service that implements the OpenID Connect protocol or OAuth 2.0 protocol. | OpenID Connect |
When users have authenticated into Salesforce via single sign-on, they can have multiple sessions active at the same time.
The length of time a user is allowed to remain active before reauthentication is known as a session duration. An administrator can set up a session timeout duration that automatically ends a user’s session due to inactivity for the admin’s chosen session timeout duration. The default session timeout in Salesforce is two hours of inactivity. When the session timeout is reached, the user is prompted with a message on the screen that asks the user if they want to log out or continue working. If the user does not respond to this message, then they are automatically logged out in a few minutes from the message being displayed.
A common misconception with many Salesforce users is that they believe that closing the web browser window or tab, which has the active session of Salesforce, will automatically log them out. This is not true. An active Salesforce session remains active even when all web browser windows or tabs are closed. It remains active until either a session timeout is reached due to user inactivity or until the user logs out, whichever is earlier.
Single Sign-On
Single sign-on is the approach by which a single user credential, maintained and stored in a single centralized identity management system, is used to authenticate and authorize the user’s access into multiple systems.
Single sign-on works using the Security Assertion Markup Language (SAML) 2.0 framework to allow the identity management system, referred to in this context as the “identity provider,” to remotely authenticate users requesting services existing in another system, referred to in this context as the “service provider.” When authenticating in this manner, the user is seamlessly given access to multiple service providers without being required to individually log into any of “service providers.”
- 1.
Identity provider (IDP)–initiated SAML SSO flow
- 2.
Service provider (SP)–initiated SAML SSO flow
It is important to note that both the SAML-based SSO flows are needed for an SSO approach to work, and it’s not a matter of choosing one over the other since the two flows cover the two possible scenarios by which a user is authenticated and authorized into the system using SSO.
Identity Provider (IDP)–Initiated SAML SSO Flow
In identity provider (IDP)–initiated SAML SSO flow , the user begins their user experience by first logging into the identity provider and then requesting access to the service provider after successfully authenticating itself with the identity provider.

Identity Provider (IDP)–Initiated SAML SSO Flow
Service Provider (SP)–Initiated SAML SSO Flow
In service provider (SP)–initiated SAML SSO flow , the user begins their user experience by directly attempting to access the service provider. In this case, the service provider routes the user to the identity provider to complete authenticating themselves with the identity provider. The identity provider redirects the user back to the requested Salesforce page that the user was trying to access in the first place by completing a sequence of authorization steps to gain access into the service provider. The service provider–initiated flow is an extension of the identity provider–initiated flow, and hence the latter is a prerequisite for the former.

Service Provider (SP)–Initiated SAML SSO Flow
There are four methods of setting up SSO in Salesforce, that is, three methods to set up SSO for internal users and one method to set up SSO for external users who log in via Salesforce Community Cloud, as shown in Table 7-6.
Logouts and Redirects
- 1.
User-Initiated Logout
In this type of logout, the user has initiated the logout by clicking a logout function in Salesforce, or the identity provider initiated it in the case of single sign-on.
- 2.
System-Initiated Logout
System-initiated logout can occur when the system automatically logs the user out of an active session or when a session timeout is being reached due to user inactivity and no user response is received on the session timeout screen message prompting the user to continue working or log out.
Single Logout (SLO)
Salesforce also offers a “Single Logout” feature, which can be seen as an antonym feature to single sign-on for login. When SLO is enabled, logging out of a single session of Salesforce automatically logs users out from all other sessions of Salesforce and any connected apps that were used in any of the sessions. To use SLO, the identity provider, service provider, and relying parties must be all configured to use single sign-on (SSO).
- 1.
When Salesforce is the service provider (SP) in a SAML 2.0–based single sign-on (SSO) setup.
In this scenario, Salesforce is set up as the service provider connected to an external SAML-based identity provider. The identity provider uses SAML to log users into Salesforce; and when they log out of the identity provider or the Salesforce session, the users are logged out of both, Salesforce and the identity provider.
- 2.
When Salesforce is the identity provider (IDP) in a SAML 2.0–based single sign-on (SSO) setup.
In this scenario, Salesforce is set up as the identity provider connected to an external SAML-based service provider. Salesforce uses SAML to log users into the service provider through a connected app. When users log out of the service provider or the Salesforce session, the users are logged out of both, Salesforce and the service provider.
- 3.
When Salesforce is the relying party in an OpenID Connect setup.
In this scenario, the users authenticate themselves using an OpenID authentication provider such as Google or Amazon to log into Salesforce as the relying party. In this case, when the users log out of the Salesforce session or the OpenID authentication provider session, they are automatically logged out of both, Salesforce and the OpenID authentication provider.
- 4.
When Salesforce is the OpenID authentication provider in an OpenID Connect setup.
In this scenario, the users authenticate themselves using Salesforce as the OpenID authentication provider to log into a Salesforce-connected app that acts as the relying party. In this case, when the users log out of the Salesforce session or the connected app that acts as the relying party, they are automatically logged out of both, Salesforce and the relying party.
Logout is considered a part of the user’s active user experience in Salesforce, and the user experience is not concluded until the user is gracefully redirected out of Salesforce to a web page, outside the authenticated area of Salesforce. By default, Salesforce redirects the users back to the login page of Salesforce. However, administrators can choose to redirect the users to a different location, such as the company’s website, by specifying a redirect URL in Setup ➤ Session Settings ➤ Logout Page Settings ➤ Logout URL.
User Account Management
User account management refers to the process of supporting ongoing changes required to a user’s scope of access in the Salesforce instance. It also includes designing for self-recovering user accounts via guided forgotten username/password flows on the login page. There may be user lockout policies based on the number of failed login attempts, requiring an administrator to unlock the user’s account after cautious review of the user’s login activities.
User account management is a key aspect of every Salesforce administrator’s role, and there are several online resources and books available on the topic of Salesforce administration, so we will refrain from covering Salesforce administration related to user account management in this book.
Deprovisioning
User deprovisioning in Salesforce refers to the process of deactivating a user’s access to the Salesforce instance. In Salesforce, users cannot be deleted or removed completely; they can only be deactivated. Deactivating a user disables the user’s access to the Salesforce instance and releases the Salesforce license previously assigned for use by other users or new users added to the Salesforce environment. If a user is deactivated while the user is in an active session in Salesforce, then an immediate system-initiated logout is executed by Salesforce, and the user’s session ends instantly. In this scenario, the user realizes the session termination when they attempt to take any actions in their active session or when they attempt to navigate to another page in Salesforce. Any data not committed by the user is automatically removed as a result of the session being terminated.
Chapter Summary
The nine stages of an identity and access management lifecycle: provisioning, access, authentication, authorization, session management, single sign-on (SSO), logouts and redirects, user account management, and deprovisioning.
Provisioning refers to the process of setting up a user in Salesforce, which includes collecting and storing personal and system registration details about the user or an external system. There are nine methods of provisioning within Salesforce as of this writing.
Access refers to the process of defining a user’s access or system’s privilege to specific resources within Salesforce such as objects, records, fields, and UI pages.
A user’s access needs to be defined and set up prior to a user being authenticated or authorized into Salesforce. Access can be changed before, during, and after the user has been authorized in Salesforce.
Access configuration in Salesforce is often referred to as “visibility and sharing” in the Salesforce ecosystem.
Authentication refers to verifying the identity of the user or an external system, by requesting them to provide a set of identifying credentials as part of their request for access to the correct instance of Salesforce and then validating those credentials against the credentials stored in Salesforce as part of user provisioning.
Authentication into Salesforce can be managed using one of three industry standard frameworks, which are the username/password framework, SAML 2.0 framework, and OpenID Connect framework. There are seven methods of authentication into Salesforce using any of the three authentication frameworks as of this writing.
Authorization refers to validating the user’s access rights/privileges to resources in Salesforce such as objects, records, fields, and UI pages. We also discussed that access is different from authorization, as access refers to the setup of user privileges, whereas authorization is the execution of the defined user privileges at the time of user’s entry into Salesforce.
Authorization into Salesforce can be managed using one of two industry standard frameworks, which are the OpenID Connect framework and OAuth 2.0 framework. There are 13 authorization flows for configuring authorizations using the OAuth 2.0 framework as of this writing.
Every authorization request utilizes one or more authorization scopes to determine the scope of access being granted to the user or an external system on behalf of a user. There are nine authorization scope types in Salesforce, as of this writing.
Session management refers to the duration of a seamless user or system experience during their active use of Salesforce. After authentication and authorization into Salesforce, a user may navigate across multiple screens, access various data, and conduct a variety of transactions, without requiring Salesforce to reauthenticate and reauthorize the user after every single user activity. There are 23 different session types that can be established within Salesforce as of this writing.
Single sign-on (SSO) refers to the method of centralizing user authentication processes via the use of a single identity-providing system known as the “identity provider” that enables users to authenticate with multiple systems in your company by logging in only once.
Single sign-on for Salesforce can be managed using one of two industry standard frameworks, which are the OpenID Connect framework and SAML 2.0 framework.
There are two key authentication flows using single sign-on; they are identity provider (IDP)–initiated SAML SSO flow and service provider (SP) –initiated SAML SSO flow.
Using either the OpenID Connect framework or the SAML 2.0 framework for SSO, there are four different methods to set up SSO in Salesforce, as of this writing.
Logouts and redirects refer to the process of terminating the user’s current active session securely as per the user’s intent to end their current session or due to the user being deprovisioned while the user is in an active session of Salesforce. The termination of the user’s active session navigates the user to an alternative site outside the user’s authorized access to Salesforce, which is known as a “redirect.” There are two main types of logout; they are user-initiated logout and system-initiated logout.
Salesforce provides a feature known as “Single Logout” (SLO) which can be enabled if SSO is enabled for the Salesforce org. This feature logs a user out of all active Salesforce sessions when the user logs out of any single active session of Salesforce.
User account management refers to the process of supporting ongoing changes required to a user’s access, supporting login recovery and password resets, or freezing a user’s account temporarily or deactivating a user completely. Login recovery often refers to unlocking locked user accounts for failed authentication or authorization attempts.
Deprovisioning refers to the process of deactivating a user’s access to the Salesforce instance. In Salesforce, users cannot be deleted or removed completely. They can only be deactivated.