
Before you begin to create custom fields, it is worth spending some time to first plan and choose the most appropriate type of field to create. You can create many different custom field types in Salesforce CRM, including text, number, currency, as well as relationship types that enable lookup, master-detail, and hierarchical relationships.
Adding custom fields can be carried out by navigating to the field's area of the appropriate object:
- For standard objects, navigate to Your Name | Setup | App Setup | Customize. Now, select the appropriate object from the Customize menu, click on Fields, and then click on New in the Custom Fields & Relationships section of the object page.
- For custom task and event fields, navigate to Your Name | Setup | App Setup | Customize | Activities | Activity Custom Fields. Now, click on the New button.
- For custom objects, navigate to Your Name | Setup | App Setup | Create | Objects. Now, select one of the custom objects in the list. Next, click on New in the Custom Fields & Relationships section of the page.
Note
Field dependencies and field history tracking
From these pages, you can set field dependencies and field history tracking for the objects. Field history tracking captures information for the date, time, nature of the change, and who made the change. A dependent field is a picklist field for which the valid values depend on the value of another field. Field dependencies and field history tracking is not available for task and event fields, as described later in this chapter.
Whenever history tracking is set, a separate history data object is created for the object. This history data comprises the record ID and the history-tracked field names whose value has been changed. Here, both the old and the new record values are recorded.
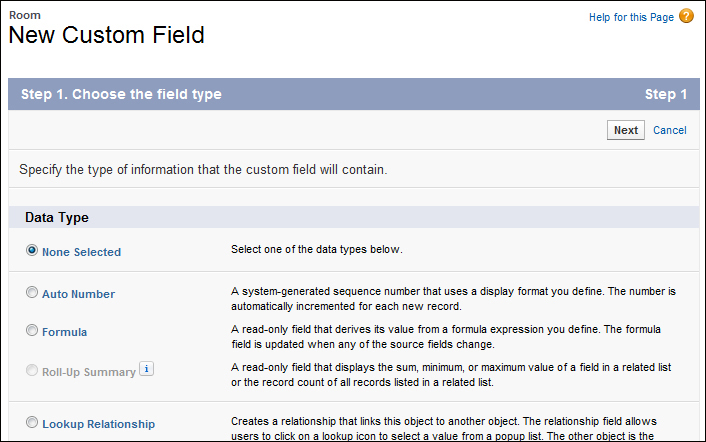
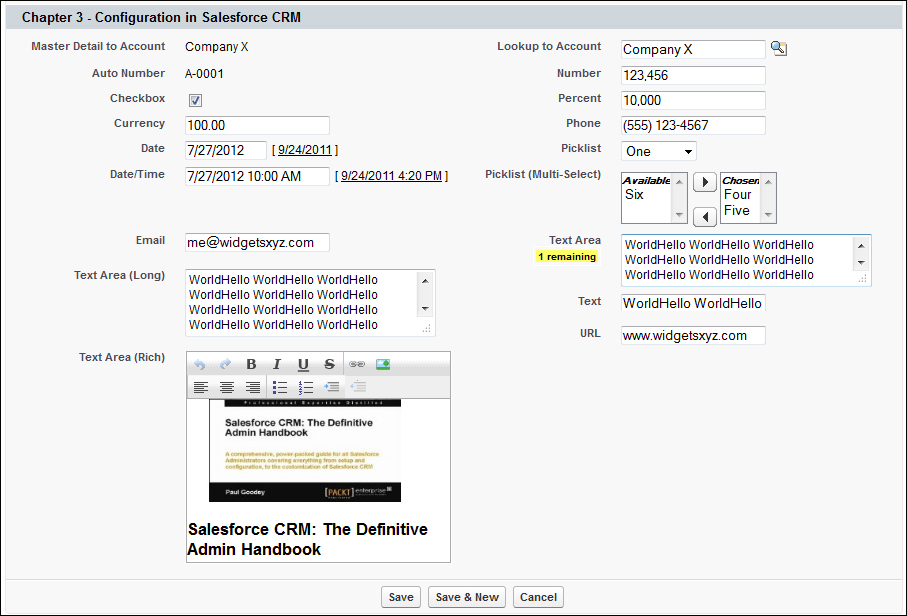
Choose a data type for the field to be created. The following screenshot shows the first page (step 1) where a full list of data types (which are described in detail later) are available to choose from:
Note
Field types not listed in custom field types may appear if your organization installed a package from AppExchange that uses those custom field types.
Some data types are only available for certain configurations. For example, the Master-Detail Relationship option is available only for custom objects when the custom object does not already have a master-detail relationship. The Roll-Up Summary option is only available for objects defined as Master in master-detail relation and is used to record an aggregate of the child records, using functions such as SUM, MAX, MIN (these are described in detail later).
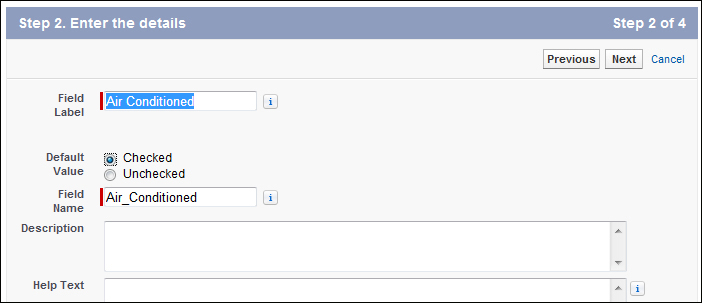
Click on Next and enter a Field Label. Field Name is a mandatory field and must be unique within the Salesforce CRM application. There are also some restrictions on what can be entered. Here, you can only enter alphanumeric characters and underscores. In addition, the text must start with a letter; it cannot include spaces, it cannot contain two consecutive underscores, and the final character must not be an underscore.

Tip
Make both the custom field name and label unique in your application
Ensure that the custom field name and label are unique and not the same as any existing standard or custom field for that object. Creating identical values may result in unexpected behavior when you reference that name in a merge field. If a standard field and custom field have matching names or labels, the merge field displays the value of the custom field. If two custom fields have matching names or labels, the merge field may not display the value of the field you expect. For example, if you create a field label called Phone, the field name automatically populates as Phone__c. If you also have a standard field with the label Phone, the merge field may not be able to distinguish between the standard and custom field names. Make the custom field name and label unique by adding a suffix to each, such as Phone_Custom and Phone_Custom__c, respectively.
For relationship fields, choose the object that you want to associate with it:

Enter any field attributes. In this example, a new checkbox field is set as Checked by default:
Object relationship fields allow you to create a lookup filter that can be used to further control the associated returned records and lookup dialog results for the field. These are available for Lookup, Master-detail, and Hierarchical relationship fields. Here, you can select multiple fields and selection criteria to restrict the results. This is presented in an additional step of the field-creation process and is available at the bottom section Lookup Filter available from the Step 3. Enter the label and name for lookup field setup page.
Click on Next to continue and specify the field's access settings for each profile:
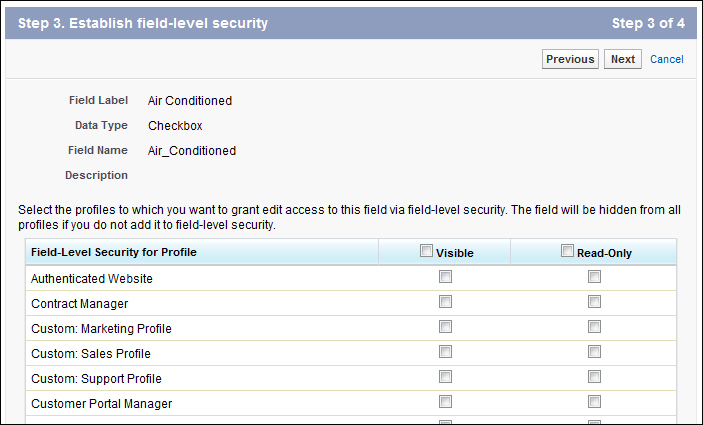
To set the field-level security, enable the following settings:
|
The Visible checkbox |
The Read-Only checkbox |
Result |
|---|---|---|
|
Checked |
Not Checked |
Users can view and edit the field |
|
Checked |
Checked |
Users can view but not edit the field |
Click on Next and choose the page layouts that you would want to add the new field to:
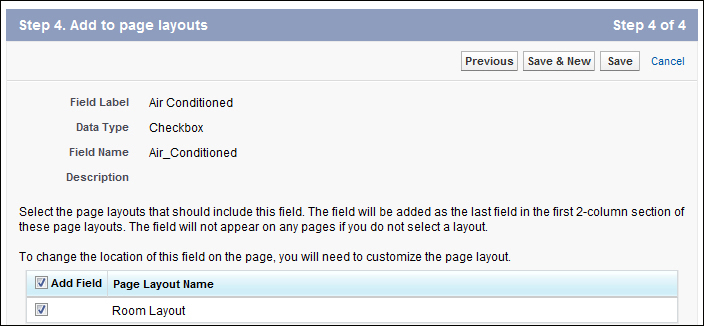
The new field is automatically positioned on the page layout as the final field in the first two-column section. However, there is an exception for Text Area (Long) and Text Area (Rich) fields. These fields, due to their double width, are placed as the final field on the first one-column section on the page layout.
Click on Save to finish, or on Save & New to create more custom fields.
For relationship fields, choose whether to create a related list that displays information about the associated records. You can choose to put the related list on any page layout for that object.
To change the label of the custom-related list as it will appear on the page layouts of the associated object, edit the Related List Label field. This is covered later in this chapter in the sections on page layouts and related lists.
To add the new related list to page layouts that users have already customized, check the Append-related list to users' existing personal customizations.
When creating a custom field, the first step is to select the appropriate type for the field. There are many different field types available in Salesforce that allow the storage of records of various data types, such as numbers, dates, and percentages. The following sections describe the data types that are available.
An Auto Number field produces a unique number that is automatically incremented for each saved record. As such, this is a read-only field where the maximum length is 30 characters, of which 20 are reserved for further prefix or suffix text that you can specify.
Salesforce provides a Currency field to specifically capture a monetary value. Here, the Salesforce CRM application applies currency-related codes, which are applied when working with that field record.
A Date field provides a way for your users to either pick a date from a pop-up calendar or to manually key the date. Your users can also enter the current date by clicking on the date link positioned to the right of the field.
A Date/Time field provides a way for your users to either pick a date from a pop-up calendar or to manually key the date and the time of day. Your users can also enter the current date and time by clicking on the date and time link positioned to the right of the field. Here, the time of day includes the A.M.-P.M. notation.
An Email field provides us with the capability to store an individual's e-mail address. The Salesforce CRM application provides a very robust method of verifying the correct format of e-mail addresses before they are allowed to be saved. If this field is specified for contacts or leads, users can choose the address when clicking on Send an Email.
A Formula field enables a method to automatically calculate a value that is obtained from other fields or values stored within Salesforce CRM. These referenced fields are known as merge fields. Formula fields are very powerful and flexible mechanisms. However, a formula field cannot be set to reference itself within a formula irrespective of whether the reference is made directly or indirectly. Further information concerning formulas is covered later in this chapter under the Building Formulas section. Salesforce uses the, round-half up, tie-breaking rule for numbers in formula fields. For example, 12.345 becomes 12.35 and −12.345 becomes −12.34.
The geolocation custom field allows you to identify locations by their latitude and longitude, and calculate the distance between locations.
You can then use the geolocation field with the DISTANCE and GEOLOCATION formula functions to calculate distance between locations. For example, you can calculate the distance between two geolocation fields (such as between the warehouse and an account-shipping address), or between a geolocation field and any fixed latitude-longitude coordinate.
Note
The geolocation field is currently in beta release and so has the following limitations:
- History tracking is not available on geolocation fields
- Geolocation fields cannot be used on custom settings
- Geolocation fields cannot be included in reports, dashboards, validation rules, Visual workflow, workflow, or approvals
- Geolocation fields cannot be searched
- Geolocation fields cannot be accessed within the Schema Builder
- DISTANCE and GEOLOCATION formula functions are available only when creating formula fields or using them in Visual Workflow
The lookup relationship field creates a relationship between two records so you can associate them with each other. For example, opportunities have a lookup relationship with cases that enable you to associate a specific case with an opportunity.
A lookup relationship creates a field that allows users to click on a lookup icon and select another record from a pop-up window. On the associated record, you can display a related list to show all of the records that are linked to it, and you can create lookup relationship fields that link to the following: users, and custom or standard objects. See the Building Relationship Fields section for further options, discussed later in this chapter.
This field creates a parent-child type relationship between records, where the master record controls certain behaviors, such as security and record deletion, of the detail record.
Master-detail relationship fields can only be created on custom objects that relate to a standard object and not the other way round. If the master record is deleted then all detail records are also deleted. You can create up to two master-detail relationship fields per custom object. See the Building Relationship Fields section for further options, discussed later in this chapter.
Note
As a best practice, salesforce.com recommends that you do not exceed 10,000 child records for a master-detail relationship.
This field type forms a hierarchical lookup relationship between relevant objects. For the user hierarchical relationship, users can use a lookup field to associate one user with another. For example, you can create a custom hierarchical relationship field to store each user's direct manager. See the Building Relationship Fields section for further options, discussed later in this chapter.
The Number field (data type) can be used to enter any number, with or without a decimal place (the number of decimal places can be specified), and saved as a real number with any leading zeros removed.
With Percent fields in Salesforce CRM, a percentage sign is automatically appended to the entered number.
The Phone field allows the users in your organization to enter any telephone number. While saving the record, the Salesforce CRM application will attempt to format it into a known phone format.
When your users enter phone numbers in Phone fields, Salesforce keeps the phone number format that has been entered. However, if the Locale field is set to English (United States) or English (Canada), 10-digit phone numbers and 11-digit numbers that start with 1 are automatically formatted as (800) 555-1234 when you save the record. If you do not want this formatting for a 10- or 11-digit number, you can enter a + before the number, for example, +44 117 123 4567.
Note
If you are using Salesforce CRM Call Center, custom phone fields are displayed with the button, allowing click-to-dial functionality. Consequently, salesforce.com recommends that you do not use a custom phone field for fax numbers.
The Picklist field allows users to choose a value from a set of predefined text values. The maximum length of the text values is 255 characters.
The Picklist (Multi-select) field allows users to choose more than one picklist value from a set of predefined text values. The maximum length of the text values is 255 characters. When saving and viewing, the data is stored as text along with semi-colons, which are used to separate the individual picklist values.
A Roll-up Summary field (or RUS) is used to automatically display the summarized values of the related records. This can be a record count of related records or a calculation of the sum, minimum, or maximum value of the related records.
Note
The records must be directly related to the selected record and on the detail side of a custom master-detail relationship with the object that contains the roll-up summary field. For example, a custom account field called Total Number of Branches displays the number of branches the custom object records in the branch-related list for Accounts.
The Text field allows users to enter any combination of alphanumeric characters. The maximum length of the text value is 255 characters.
The Text (Encrypted) field allows users to enter any combination of alphanumeric characters. The text is then stored in an encrypted form (this data type can be availed by sending a request to Salesforce support).
Encrypted fields are encrypted with 128-bit master keys and use the Advanced Encryption Standard (AES) algorithm.
The Text Area field allows users to enter alphanumeric characters on separate lines. The maximum length of the text value is 255 characters and a warning is displayed when the number is about to be reached (as shown before).
The Text Area (Long) field provides for the storage of up to 32,000 characters that display on separate lines, similar to a Text Area field. However, you can specify a lower maximum length of this field type, between 256 and 32,000 characters.
This data type is not available for activities or products, on opportunities. Only the first 254 characters in a rich-text area or a long-text area are displayed in a report.
Using the Text Area (Rich) data type, your users are provided with a text field with an embedded toolbar. This toolbar allows simple formatting of the text and provides for the adding of images and URL web links.
Also, the toolbar allows your users to undo, redo, bold, italicize, underline, strike-out, add a hyperlink, upload or link to an image, and add a numbered or non-numbered list.
The maximum field size is 32,000 characters, which is inclusive of all the formatting and HTML tags and only the first 254 characters in a rich text area or a long text area will be displayed in a report.
Dependent picklists are picklists (including multi-select picklists) in which the values available in the picklist depend on the value of another field, which is called the controlling field.
Controlling fields that are picklists are fields with at least one and fewer than 300 values. These are used to help with efficient, accurate data entry and help to achieve consistent data.
- To define a dependent picklist, navigate to the field's area of the appropriate object.
- For standard objects, this is carried out by navigating to Your Name | Setup | (App Setup) | Customize | (select the appropriate standard object) | Fields. Click on Field Dependencies.
- For custom objects, navigate to Your Name | Setup | (App Setup) | Create | Objects | (select the appropriate custom object). Click on Field Dependencies.
Now click on New, choose a controlling field and dependent field, and then click on Continue.
Use the field-dependency matrix to specify the dependent picklist values that are available when a user selects each controlling field value, as shown in the following screenshot:
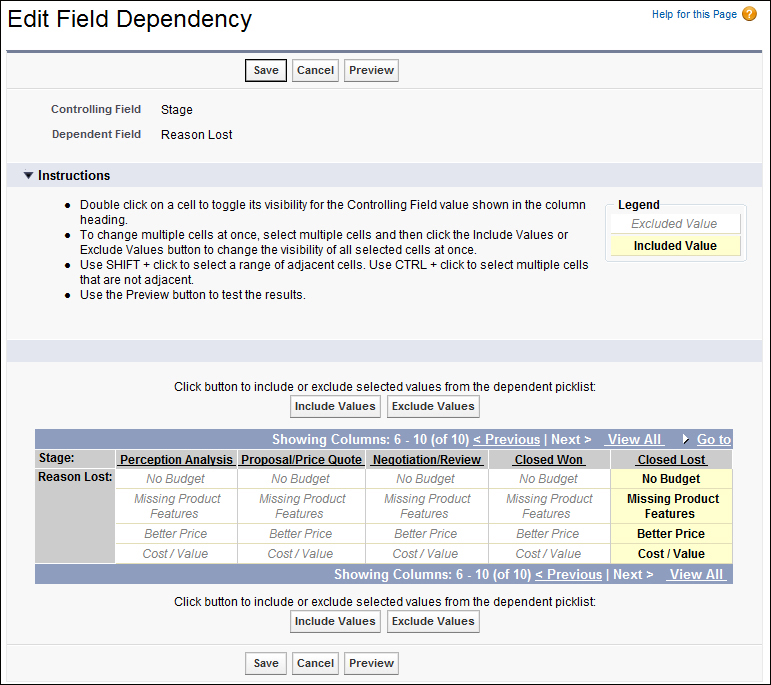
Finally, click on Save.
Note
Please note the following points:
- Checkbox fields can be controlling fields but not dependent fields
- You can set default values for controlling fields but not for dependent picklists
- Multi-select picklists can be dependent picklists but not controlling fields
- Standard picklist fields can be controlling fields but not dependent fields
- Custom picklist fields can be either controlling or dependent fields
- The maximum number of values allowed in a controlling field is 300
When building lookup and master-detail relationship fields, there are various options and settings that you can set, which will enforce data integrity. These options and settings are covered in the next section.
When you create a lookup field on an object, you can choose whether the lookup field is required or optional. If it is set as optional, you can choose one of the following three actions to occur if the lookup record is deleted:
- Clear the value of this field
- Don't allow deletion of the lookup record that's part of a lookup relationship
- Delete this record also
This is the default option and is a good choice when the field does not have to contain a value from the associated lookup record.
This option prevents the lookup record from being deleted and is a good choice to restrict deletions if you have dependencies, such as workflow rules, based on the lookup relationship.
This option works similar to the master-detail relationship and deletes the record whenever the lookup record is deleted. However, such a deletion on a lookup relationship is known as a cascade-delete and bypasses security and sharing settings. As a result, users can delete records when the lookup record is deleted even if they do not have access to the related records.
This option is a good choice when the lookup field and its associated record are highly coupled and you need to delete related data whenever the lookup data is removed.
Lookup filters are used to restrict the values and lookup dialog results for Lookup, Master-detail, and Hierarchical relationship fields.
You can specify the restrictions by configuring filter criteria that compare fields and values based on:
- The current record
- The related object (via the Lookup, Master-detail, or Hierarchical field)
- The current user's record, permissions, and role
- The records directly associated to the related object
As an example, you can:
- Restrict the Contact Name field on an Account record to allow only those contacts that have a custom status of active, filtering out inactive contacts
- Restrict the Contact Name field on a case record to allow only those contacts that are associated with the Account record specified in the Account Name field on the Case record
- Restrict the Account Name field on an Opportunity record to allow only those users who have an International profile to create or edit Opportunity records, for accounts outside the United States
You can optionally click on Insert Suggested Criteria to choose from a list of lookup filter criteria that the Salesforce CRM system suggests based on the defined relationships between the objects in your organization.
You can make lookup filters either required or optional.
For fields with required lookup filters, only values that match the lookup filter criteria appear in the lookup dialog. Non-valid values manually entered into the field also prevent the record from saving Salesforce CRM displays an error message, which you can set.
For fields with optional lookup filters, only values that match the lookup filter criteria appear in the lookup dialog initially. However, users can click on the Show all results link in the lookup dialog to remove the filter and view all search result values for the lookup field. Optional lookup filters also allow users to save values that do not match the lookup filter criteria.
Custom formula fields require additional settings as specified by the Salesforce CRM application, which are carried out using the following actions and steps:
- Create the Formula field.
- Choose the data type for the field, based on the output of the calculation.
- Enter the number of decimal places for currency, number, or percent data types.
Note
The setting for the number of decimal places is ignored for currency fields in multi-currency organizations. Instead, the decimal places for your currency setting apply. Salesforce uses the, round-half up, tie-breaking rule for numbers in formula fields. For example, 12.345 becomes 12.35 and −12.345 becomes −12.34.
- Click on Next to display the formula creation screen.
To create a basic formula that passes specific Salesforce data, select the Simple Formula tab, choose the field type in the Select Field Type drop-down list, and choose one of the fields listed in the Insert Field drop-down list.
To insert an operator, choose the appropriate operator icon from the Insert Operator drop-down list. Here, you can select from the following operators: + Add, - Subtract, * Multiply, / Divide, ^ Exponentiation, (Open Parenthesis,) Close Parenthesis, & Concatenate, = Equal, <> Not Equal, < Less Than, > Greater Than, <= Less Than or Equal, >= Greater Than or Equal, && And, and || Or.
The basic formula feature is quite restricted and you will likely seek to create more complicated formulas which can be performed by selecting the Advanced Formula tab.
Within this tab, click on Insert Field, choose a field, and then click on Insert.
You can now include merge fields along with advanced operators as well as functions, which are prebuilt Salesforce CRM formulas that you can invoke and pass your input values to.
- Click on Check Syntax to check your formula for errors.
- Enter a description of the formula in the Description box.
- If your formula references any number, currencies, or percent fields, choose an option for handling blank fields. To give any blank fields a zero value, choose Treat blank fields as zeros. To leave these fields blank, choose Treat blank fields as blanks.
- Click on Next.
- Set the field-level security to determine whether the field should be visible for specific profiles or not, and click on Next.
- Choose the page layouts that should display the field. The field is added as the last field in the first two-column section on the page layout. For user custom fields, the field is automatically added to the bottom of the user detail page.
- Click on Save to finish, or on Save & New to create more custom fields.
Some best practices and methods to improve the creation and maintenance of formula fields are as follows:
- Formatting with carriage returns and spacing
- Commenting
Consider the following formula:
Sales Tax (Percent) =
IF(TEXT(Account.Market__c) = "US", IF(TEXT(Account.State__c) = "California", 0.0925, IF(TEXT(Account.State__c) = "Nevada", 0.081, IF(TEXT(Account.State__c) = "Utah", 0.0835, 0) )) , 0)
To improve the readability of formula fields, you can add spacing and carriage returns. The preceding formula can be made far easier to understand, simply by adding spaces and carriage returns, as follows:
Sales Tax (Percent) =
  IF( TEXT(Account.Market__c) = "US",
    IF(TEXT(Account.State__c) = "California", 0.0925,
    IF(TEXT(Account.State__c) = "Nevada", 0.081,
    IF(TEXT(Account.State__c) = "Utah", 0.0835, 0) ))
, 0)Salesforce CRM allows you to put comments in your formulas. These are sections of text that are not run as part of the formula and are typically used to make notes about the formula code, especially if it is particularly complicated. Comments must start with a forward slash followed by an asterisk (/*), and finish with an asterisk followed by a forward slash (*/).
Comments are useful for explaining specific parts of a formula to other system administrators viewing the formula definition. Look at the following code block as an example:
Sales Tax (Percent) =
/* value only set for US opportunities */
  IF( TEXT(Account.Market__c) = "US",
/* Check for the US State of the Account record and set accordingly */
    IF(TEXT(Account.State__c) = "California", 0.0925,
    IF(TEXT(Account.State__c) = "Nevada", 0.081,
    IF(TEXT(Account.State__c) = "Utah", 0.0835, 0) ))
  )
  , 0)
Carefully using comments to prevent parts of the formula from being activated allows you to test and verify the syntax as you construct and iron out bugs in the formula. However, if you try to comment out the entire formula as syntax, an error is shown. Also, you will experience a syntax error if you try to place comments within other comments because this is not supported in the Salesforce CRM application:
/* /* comment */ */
There is a text character and byte size limit of 3,900 characters, and a limit of 5,000 characters for the compiled characters for formulas.
When this limit is reached, you will be unable to save the formula field and will be presented with the following error:
Compiled formula is too big to execute (7,085 characters). Maximum size is 5,000 characters.
It is common to encounter these limits when building complicated formula field calculations and particularly so when building formulas that reference other formula fields. While there is no way to increase this limit, there are some methods to help avoid and workaround these limitations, listed as follows:
For formulas that use multiple branch conditions to derive the values, as in the preceding example formula, check if the market is US and the state is California, Nevada, or Utah. You can replace the nested IF statements and instead use the CASE statement.
Nested IF statements often result in larger compiled sizes where the IF function is used multiple times, as in our example:
    IF(TEXT(Account.State__c) = "California", 0.0925,
    IF(TEXT(Account.State__c) = "Nevada", 0.081,
    IF(TEXT(Account.State__c) = "Utah", 0.0835, 0) ))
Using the CASE statement can provide better logic and often results in a smaller compiled size for the formula:
IF( TEXT(Account.Market__c) = "US",
  CASE(Account.State__c,
    "California", 0.0925,
    "Nevada", 0.0685,
    "Utah", 0.0475, 0) ,
0)The compiled size of formula fields increases as you increase the number of fields that are referenced. This is compounded when you are referencing fields that are themselves formula fields. A way to reduce the overall size is to use algebra to avoid the need to reference fields, wherever possible. The following example shows how the Item_Price__c and Support_Price__c fields are used multiple times:
Total Price =
(Item_Price__c + (Item_Price__c * Sales_Tax__c)) +
(Support_Price__c + (Support_Price__c * Sales_Tax__c))
To reduce the compiled size, use simple algebra to avoid multiple uses of the Item_Price__c and Support_Price__c fields, as in the following example:
Total Price =
(Item_Price__c * (1 + Sales_Tax__c)) +
(Support_Price__c * (1 + Sales_Tax__c))
There may be situations where the logic that is required for a formula is simply too complex for the current size limitations in formula fields. The proven methods to overcome this are to implement a solution using either of the following:
- Workflow field updates
- Apex trigger updates
There are two ways in which workflow field updates can help to provide the formula logic workaround. Firstly, larger and more complex formulas can be saved using the formula-building function within the workflow mechanism. Secondly, large formula logic can be decomposed into smaller functions of resulting data. For example, you could create simple formulas that get the data fed from fields that have been updated by multiple workflow field updates.
Workflows are covered in detail later in this book. However, the general approach for implementing a workflow field update to provide a solution to the formula field limit is to:
- Create a non-formula field on the object, such as a currency or number field, in place of the desired formula field. Administrators often identify this field with a suffix to indicate it is a workflow field—for example, Total Price (workflow). This field is then set as read-only on page layouts as the field can be considered a system field (as it should not be available for manual updating).
- Create a workflow rule that will always fire.
- Create a field update with an appropriate formula to update the workflow field—Total Price (workflow) in our preceding example.
Any subsequent formulas can reference the populated field. The disadvantages to this workaround are that creating many workflows can add to the complexity of the application and may eventually introduce performance issues. Also, whenever an object has multiple complex workflows assigned, the order in which the workflows are evaluated cannot always be guaranteed, which if not properly maintained can lead to subtle data discrepancies.