
Visualforce is the framework in Salesforce CRM, which allows you to further customize your organization's user interface beyond the standard functionality that we have previously covered.
As described previously, using Visualforce, you can combine data from multiple objects, create mashups with data from external web services, and even override some of the logic and the behavior found within standard Salesforce CRM application functions. Visualforce consists of the following three elements:
- Visualforce pages: These are used to define the user interface
- Visualforce components: These can be thought of as a library of standard or custom-built sections of Visualforce code
- Visualforce page controllers: These are used to control the behavior of Visualforce pages, and can either be controlled by standard logic or you can create custom logic to change or extend the standard Salesforce CRM behavior
The Visualforce framework allows for the creation of Visualforce pages. These pages are a little like documents that are stored in Salesforce, and are comprised of instructions that specify how the page is to appear and function. Similar in nature to HTML, Visualforce pages comprise of a tag-based markup language, with each Visualforce tag type corresponding to a particular user interface component.
For the more technical readers, Visualforce performs similar functions as, say, Java Server Pages or Active Server Pages, and is used to manage the retrieval of the data from the Salesforce platform and the rendering of results via the Internet browser user interface.
Now that you are aware of the basic building blocks provided by Visualforce, we will describe the creation of Visualforce pages. This section looks at how the creation and modification of pages can be done, and shows the following two ways of doing so:
- Using the Visualforce pages setup page
- Using development mode
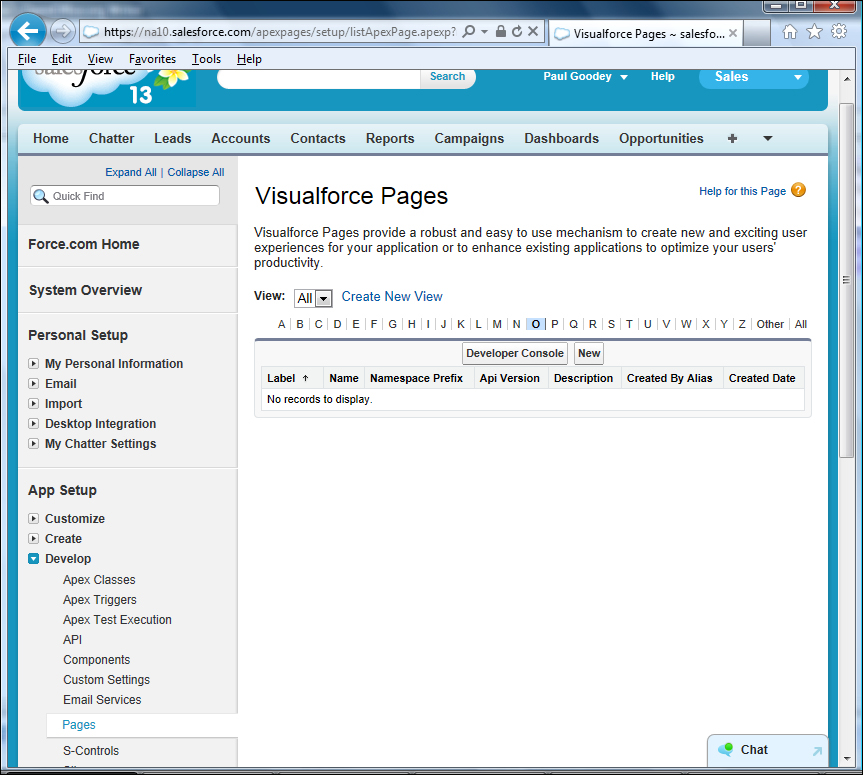
To navigate to the setup page for creating Visualforce pages, go to Your Name | Setup | (App Setup) | Develop | Pages. Now click on the New button to create a new Visualforce page. Select an existing entry to view the page, or click on Edit to modify it:
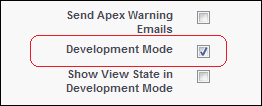
We can also use something called Visualforce development mode to initially create and edit Visualforce pages. This can be a better choice because it provides several useful features that make it easier to build Visualforce pages.
To start using the development mode, it needs to be activated on your user record by navigating to Your Name | Setup | My Personal Information | Personal Information. Now click on the Edit button, select the Development Mode checkbox, and then finally click on Save:
Tip
Automatic creation of new Visualforce pages
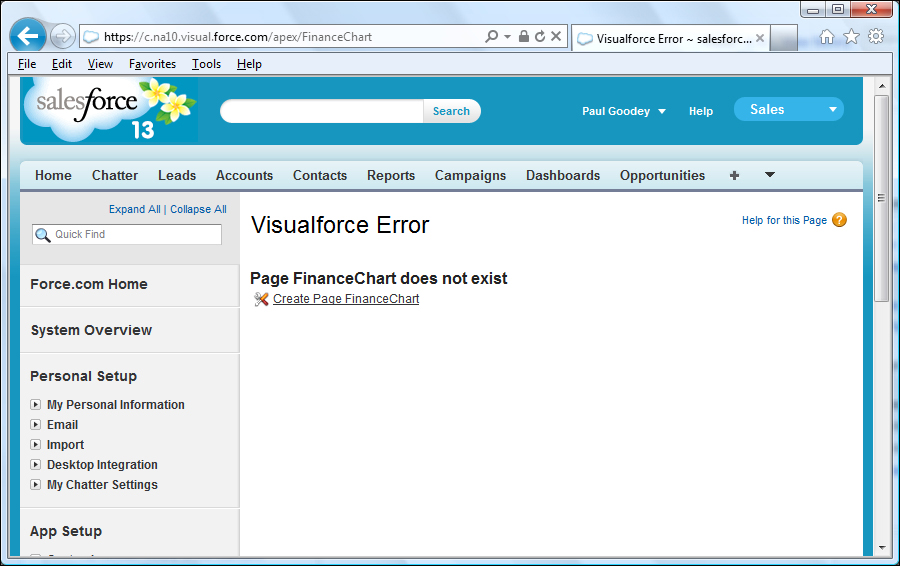
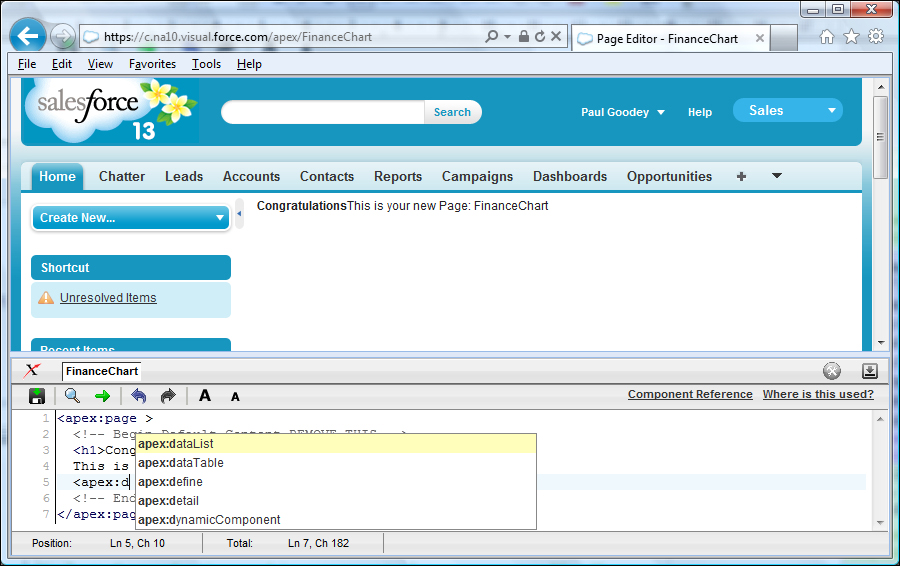
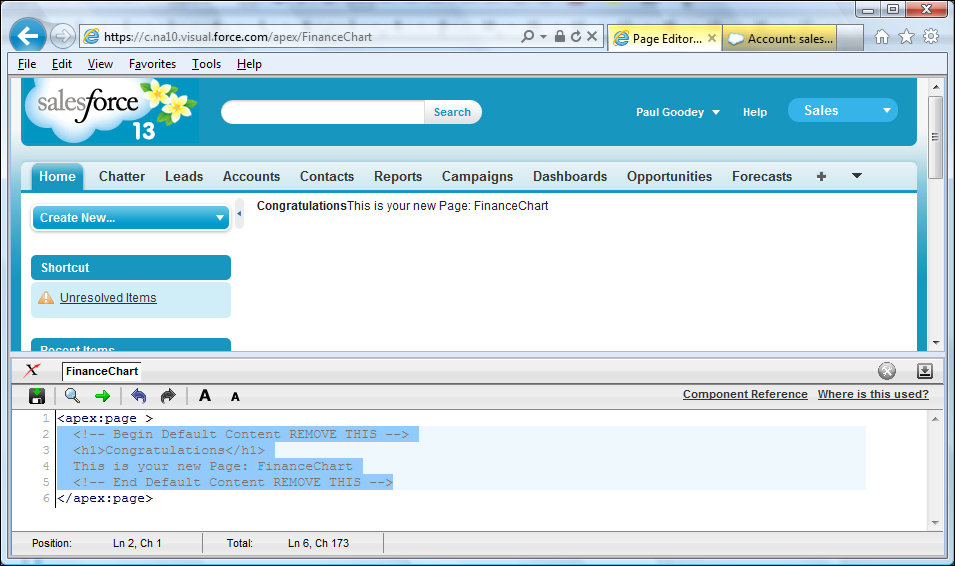
When in Visualforce development mode, you can create a new page simply by entering a unique URL into the browser's address bar; for example, the URL https://na10.salesforce.com/apex/FinanceChart will enable a new page called FinanceChart to be created.
You need to be careful that you are entering the correct URL text, as it is the part /apex/FinanceChart in the preceding example that prompts Salesforce CRM to check and create the new page if it does not currently exist. It is also important that the start of the URL is entered correctly. The https://na10.salesforce.com part refers to the Salesforce instance for your Salesforce CRM application.
When entered correctly, the following screen will be presented:
This, as you can appreciate, can save a lot of time when creating a lot of pages, as you do not need to keep navigating to the setup sidebar section, and it saves a number of mouse clicks. The resulting edit page, when you click on the link Create Page FinanceChart, is the same edit page as when accessed through the setup route as shown in the following screenshot:
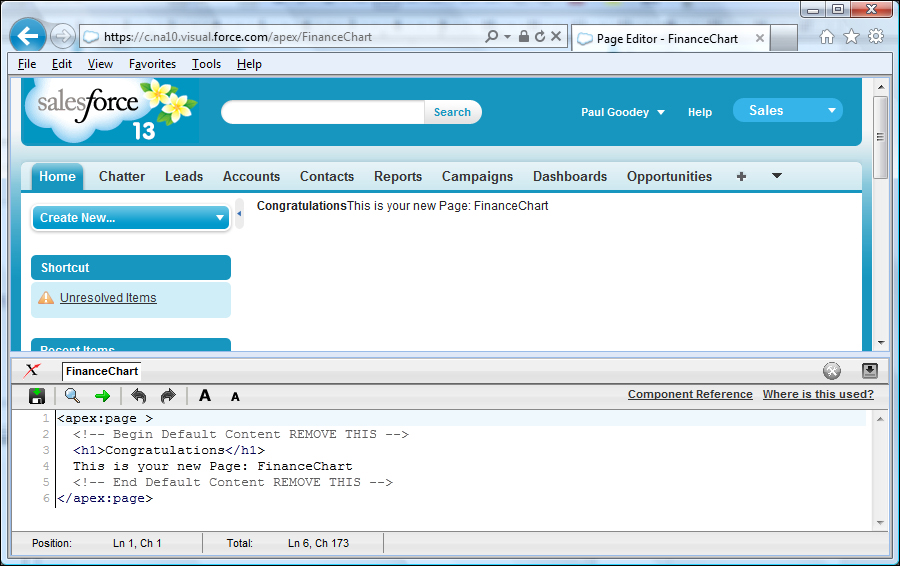
When development mode is enabled, a development section is automatically presented below the Visualforce page that you are creating or editing which displays an editor section. To show or hide the development section, click on the following icon:
The editor allows you to write Visualforce component tags directly within the browser window, and also offers the following features:
As shown, the seven menu functions are provided for:
- Saving the page
- Searching for text
- Navigating to a specified line in the code
- Undoing changes
- Redoing changes
- Increasing the font size of the text
- Decreasing the font size of the text
Clicking on the Component Reference link will navigate to the online documentation, which provides descriptions as well as example code for all the Visualforce components, as shown in the following screenshot:

In addition, the page editor also provides highlighting and an autocomplete feature that automatically displays available component markup tags, as shown in the following screenshot:
The greatest benefit of having development mode enabled when building Visualforce pages using the Salesforce CRM platform is that as you add component tags and build up the code in the page, you can click on the save icon and view the resulting changes immediately.
We have seen in the previous section that Salesforce provides a set of standard, pre-built components, such as <apex:actionFunction> and <apex:actionStatus>, which can be added to Visualforce pages to construct pages of functionality. In addition, you can build your own custom components to augment this library of components.
Similar to the way functions work in a programming language, a custom Visualforce component allows you to construct common code and then re-use that code in one or more Visualforce pages.
Custom components allow you to define attributes that can be passed in to each component. The value of an attribute can then change the way the markup is displayed on the final page and the controller-based logic that executes for that instance of the component.
Visualforce custom components consist of Visualforce markup tags using the standard <apex:component> tag, and so rather than repeating the Visualforce markup required for every page that you need the common code on, you can define a custom component that has certain attributes and then uses those attributes to display the functionality on the page. Once defined, every Visualforce page in your organization can leverage the custom component in the same way as a page can leverage standard components such as <apex:dataTable> or <apex:actionStatus>.
In order to construct our example mashup, we will navigate to the Yahoo! Finance chart code website http://finance.yahoo.com/badges/, where we can copy and paste the required financial stock chart code.
The URL http://finance.yahoo.com/badges/wizard/config?style=cq provides a simple setup wizard that will allow us to obtain the code that will form part of the code that will be entered on our Visualforce page:
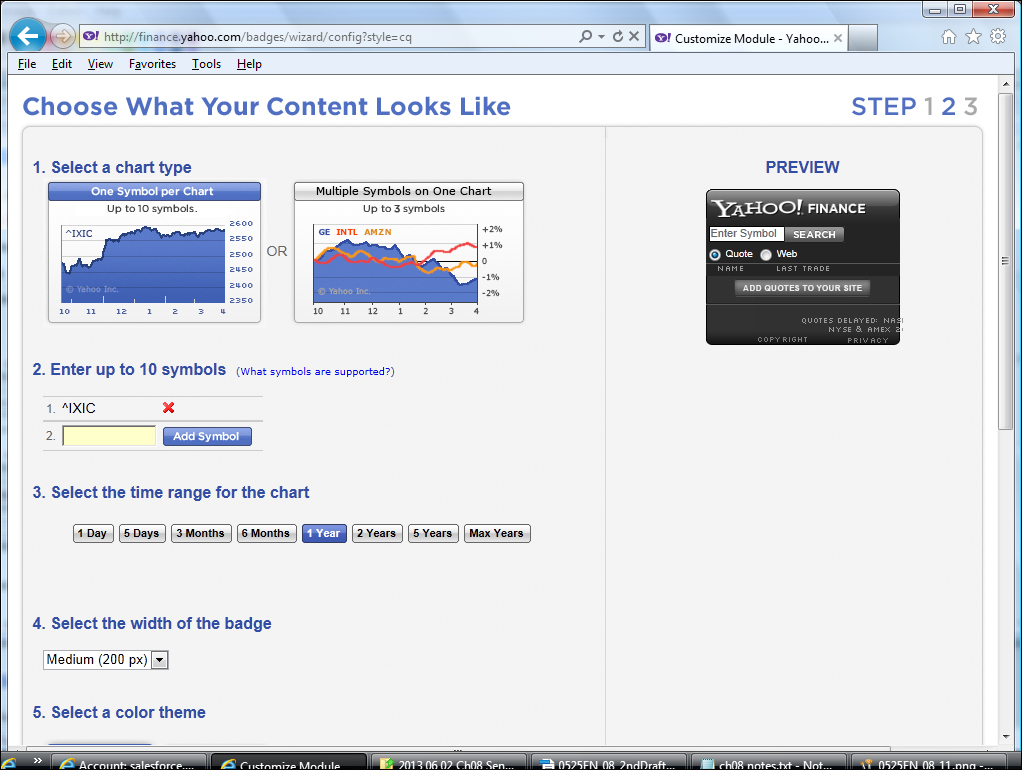
Now apply these settings as shown in the following steps:
- Select the One Symbol per Chart type (the chart on the left).
- Enter
CRMin the Symbol textbox (and remove the default ˆIXIC). - Leave the time range to the default 1 Year.
- Select the width of the badge to be X large.
- Select the color theme to be white (the chart on the right).
- Agree to the Terms of Service by checking the I agree to the Terms of Service above box.
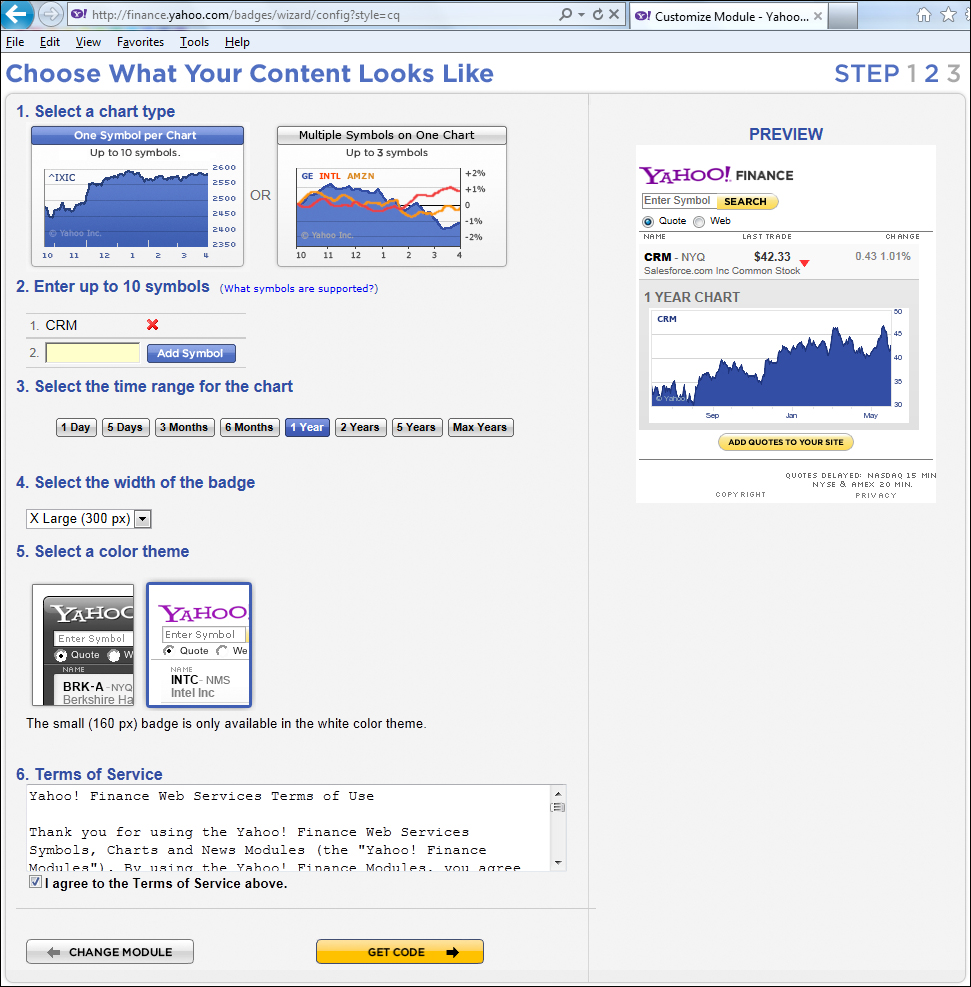
Now click on the GET CODE button to display the following:
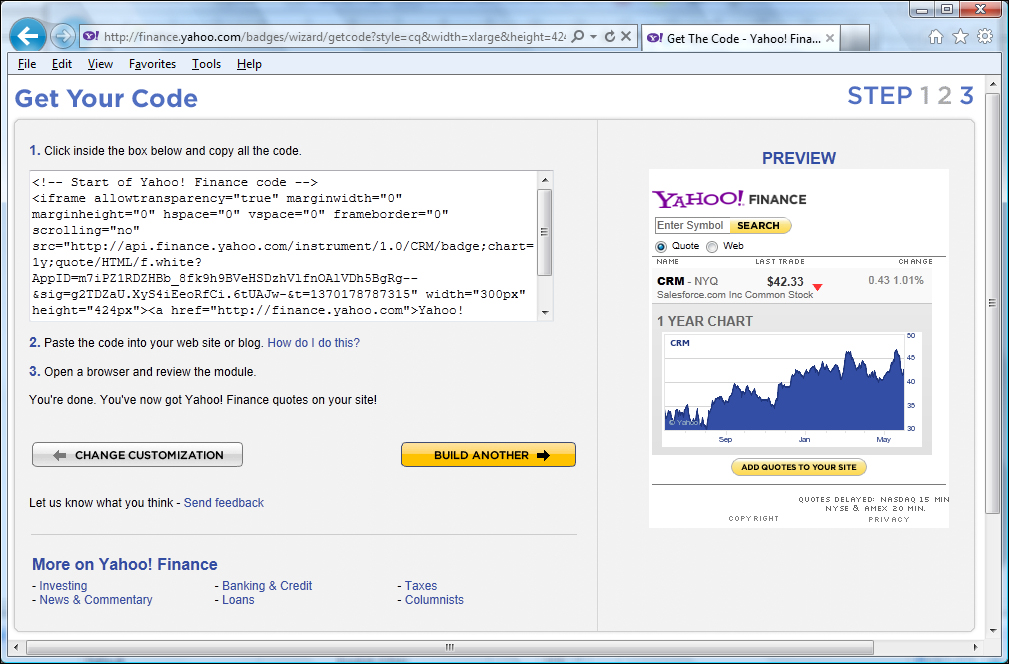
Now we can use the generated code by clicking in the textbox labelled 1. Click inside the box below and copying all the code. We can then start to copy and paste the Finance Chart functionality into our Visualforce page by following these steps:
- Delete the default new Visualforce markup content.
- Change the Visualforce Controller to specify an Account Standard Controller.
- Add Salesforce-specific merge fields.
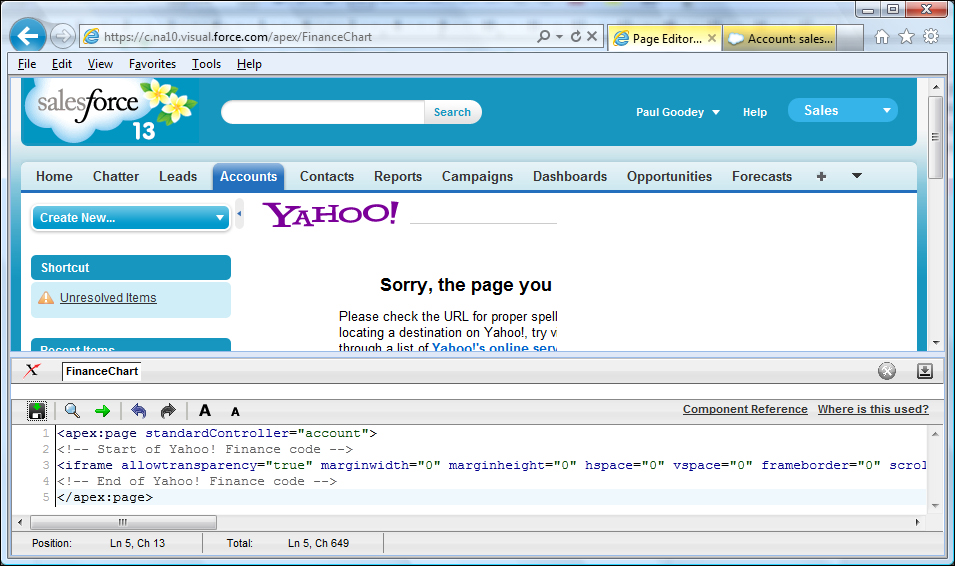
Delete the existing Visualforce page text (lines 2 to 5 in the following screenshot) and leave just the starting and ending tags, <apex:page> and </apex:page>, as shown:
We also need to change the Visualforce page controller so that we can read the value of the fields stored on the Account record. Controllers will be looked at in more detail later in this chapter, but for the moment, we will change the opening tag <apex:page> and add the attribute standardController, which allows the call to the Account record, as shown using the code <apex:page standardController="account">:

However, it is not simply a case of copying and pasting as it is; we need to make a few changes to complete the mashup and display the account details. The Visualforce feature that allows us to link the account is what is known as merge fields. Here, the syntax for adding a merge field to access the data field in Salesforce CRM is the Visualforce code {!object.Field}, where the expression in between {! and } is evaluated.
For the Account Ticker symbol, which is what we will be passing to the Finance Chart widget, we need to set the code {!Account.TickerSymbol}.
This is done in the following block of code where we highlight the section that is changed:
- Before:
src="http://api.finance.yahoo.com/instrument/1.0/CRM/badge;chart=1y;quote/HTML/f.white? <a href="http://finance.yahoo.com/q?s=CRM/">Quote for CRM/</a> - After:
src="http://api.finance.yahoo.com/instrument/1.0/{!Account.TickerSymbol}/badge;chart=1y;quote/HTML/f.white?
<a href="http://finance.yahoo.com/q?s={!Account.TickerSymbol}/">Quote for {!Account.TickerSymbol}/</a>
The following shows the complete code that should appear on the Visualforce page. Note that you will need to use the codes that were generated for the AppID and sig parameters when you clicked on the GET CODE button as shown earlier:
<apex:page standardController="account">
<!-- Start of Yahoo! Finance code -->
<iframe allowtransparency="true" marginwidth="0" marginheight="0" hspace="0" vspace="0" frameborder="0" scrolling="no" src="http://api.finance.yahoo.com/instrument/1.0/{!Account.TickerSymbol}/badge;chart=1y;quote/HTML/f.white?AppID=[Your AppID Code Here]&sig=[Your sig Code Here]&t=1370174151909" width="300px" height="424px"><a href="http://finance.yahoo.com">Yahoo! Finance</a><br/><a href="http://finance.yahoo.com/q?s={!Account.TickerSymbol}/">Quote for {!Account.TickerSymbol}/</a></iframe>
<!-- End of Yahoo! Finance code -->
</apex:page>
The final code will appear within the Visualforce page as in the following screenshot.
When saving the Visualforce page, the page is rendered immediately, however, at this point, there is no valid ticker symbol to be passed to the Yahoo! Finance Chart widget (this will be rendered properly after we have added the Visualforce page to the Account Page Layout), therefore an error will initially be presented as shown in the following screenshot:
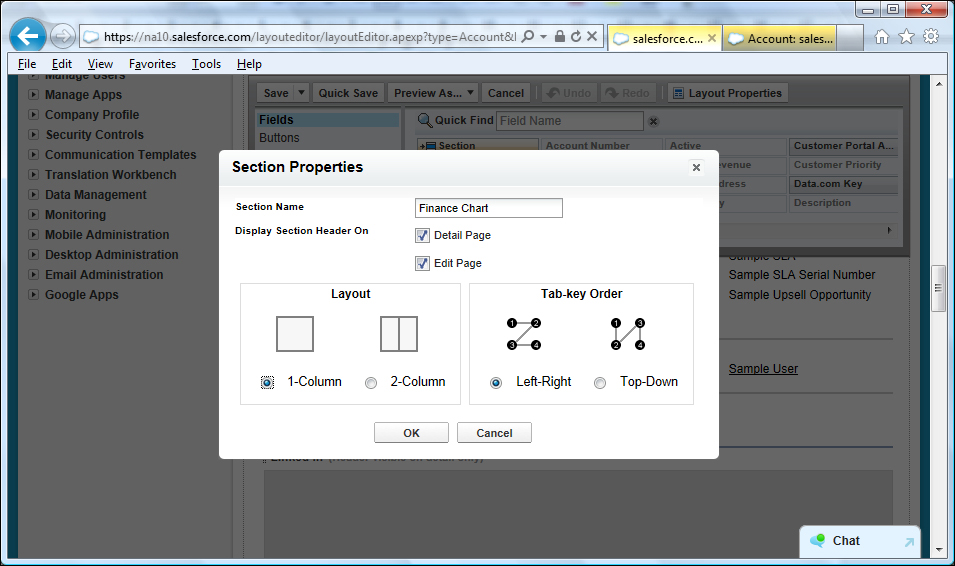
Now that we have completed and saved the Visualforce page, we can add the Finance Chart page to the Account page layout. To add Visualforce pages to Accounts, navigate to Your Name | Setup | (App Setup) | Customize | Accounts | Page Layouts. Now select the appropriate page layout. Here we are going to add it to the page layout called Account Layout by carrying out the steps discussed in the following section.
The new section has been given the title Finance Chart and has been set to 1-Column width and positioned by dragging-and-dropping below the Account System and Description Information section:
Now drag-and-drop the Finance Chart Visualforce page to the Finance Chart section on the page layout:
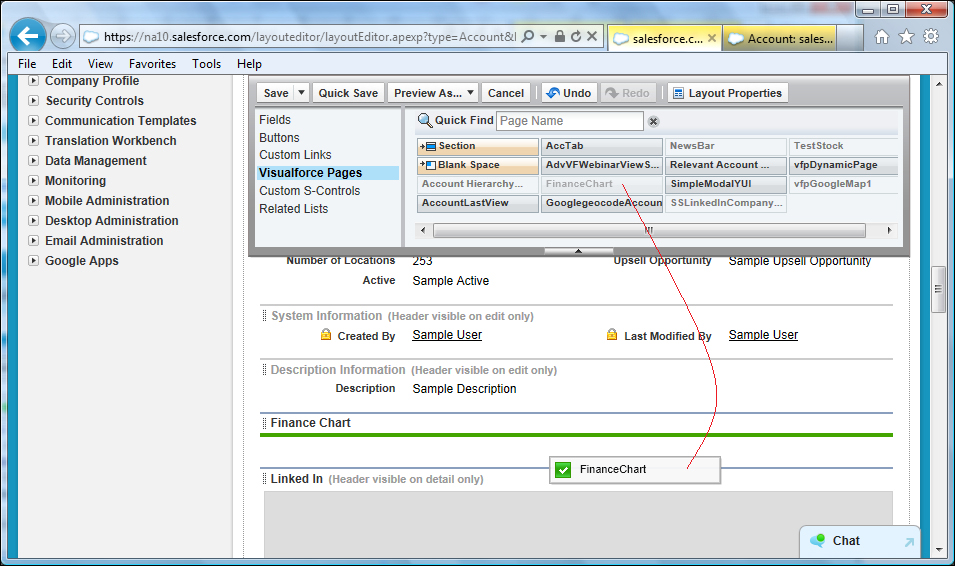
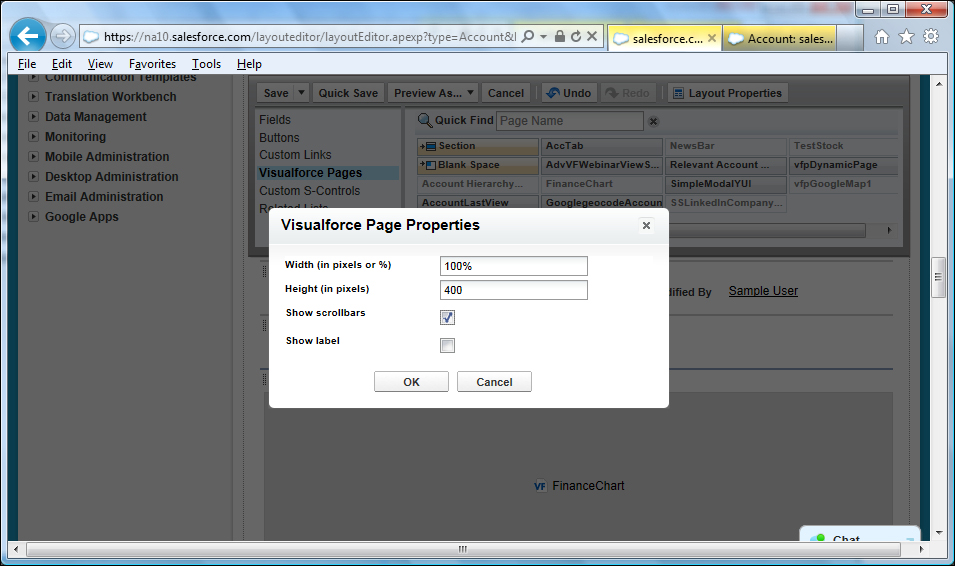
Finally, double-click on the Visualforce page and set the width at 100% and the height at 400 (pixels), and optionally check the Show scrollbars checkbox as shown in the following screenshot:
Now click on Save; we are ready to test by navigating to an account page.
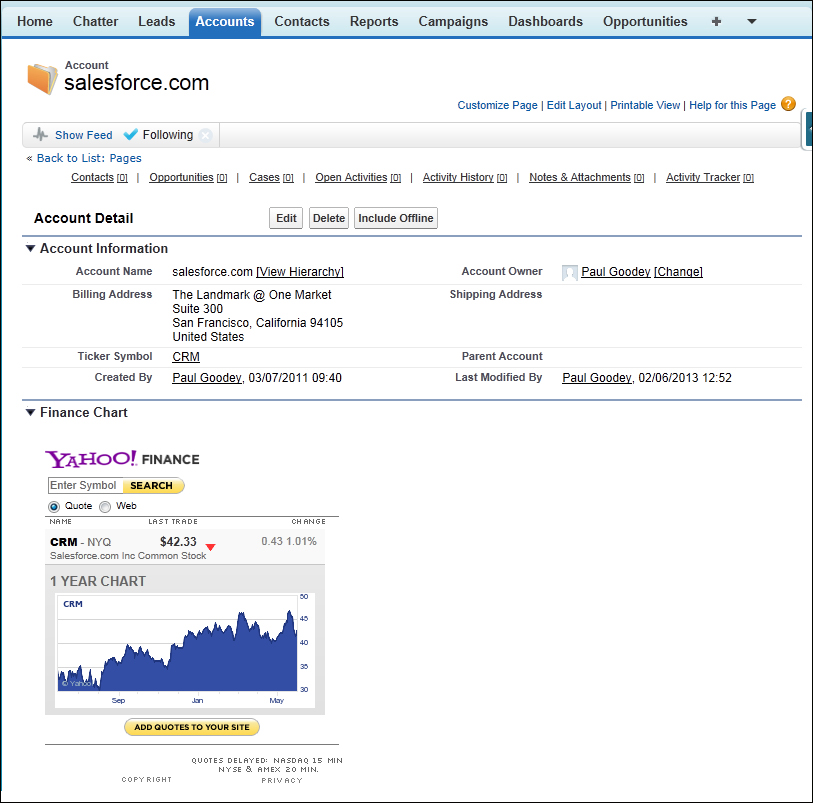
Navigate to the Account tab and select an existing account to verify that the mashup is working as expected.
Here we have an existing account for salesforce.com with the Ticker Symbol CRM, which presents the following when the account detail page is loaded:
Tip
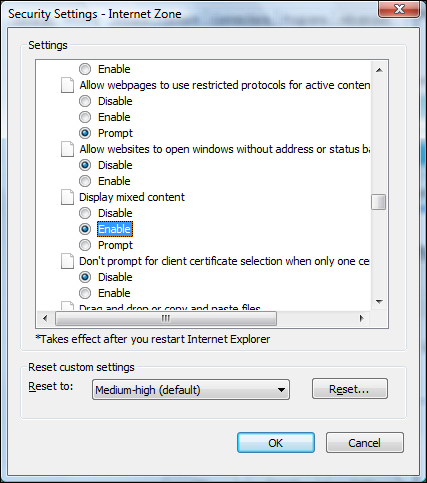
How do I suppress browser security warnings in Internet Explorer?
By default, Internet Explorer displays the following security warning message when a page contains a mixture of secure (HTTPS) and nonsecure (HTTP) content: This page contains both secure and nonsecure items. Do you want to display the nonsecure items? When you create a mashup with a nonsecure URL, users may see this warning message depending on their browser security settings. To suppress this warning in Internet Explorer, follow these steps: from the Internet Explorer tools menu, select Internet Options, click on the Security tab, and click on the Custom Level button, and finally, in the miscellaneous section, set Display mixed content to Enable, as shown in the following screenshot:
As described earlier in this chapter, there are three types of controllers that can be used to control the functionality behind a Visualforce page.
A standard controller provides access to standard Salesforce CRM behavior, and as shown in our example client-side mashup, can be specified using the following tag and attribute as the first line in the Visualforce page:
<apex:page standardController="Account">
Standard controllers are available for all objects, such as Account, Contact, Opportunity, and so on, as well as custom objects, and provide access to standard Salesforce CRM data operations and behavior for actions such as save, edit, and delete.
Custom controllers are used for fully customized behavior, and are implemented using the Visualforce tag and attribute as follows:
<apex:page controller="CustomAccount">
The Apex code language in Salesforce CRM is based on Java, which is one of the most popular programming languages for Internet and web-based applications, and is executed on the Salesforce platform servers.
Although based on Java, the Apex code and the Salesforce CRM platform is not a general-purpose computing platform that can be used to run any type of program that developers may choose to run. Instead, Apex is kept intentionally controlled and limited and is, therefore, designed with the needs of the business and platform in mind.
Apex is used in Salesforce CRM to develop the code within Custom controllers and Controller extensions, as well as Apex triggers, which we will look at shortly.
Apex is specifically designed for building business applications to manage data and services, and the language provides a highly productive approach to creating applications and business logic. Developers can focus on the functionality required to solve the business problem and domain, and need not be concerned with building the infrastructures such as database connection, error handling, and so on, which is managed by the platform.
It should be noted that since the Salesforce CRM platform is a multi-tenant platform, there are certain limits as to what and how much processing can be performed within certain operations. Such limits are known as Governor Limits, and there are some restrictions and requirements, for example, Apex code must be developed in a developer or sandbox organization and must have test methods to verify each line of code, and only then is it allowed to be deployed to production.
Apex triggers are blocks of Apex code that are executed before and/or after any record action, such as create, read, update, or delete, in the Salesforce CRM application.
Triggers are very powerful and can include complex code to control your process. They are used for complex business logic automation and where such functionality is too complicated to be implemented using validation rules or workflow rules, such as field updates. The development of Apex triggers usually requires the resource of a software developer, as they have certain restrictions and implications for the overall system.
When using multiple triggers, and alongside any existing workflow field updates, there needs to be a thorough understanding of any dependencies to avoid any ripple effect when records are created or updated. As trigger code can make changes to the record being updated within its own operation, any likely recursion effect needs to be understood and avoided.