
Historical salting formula charts
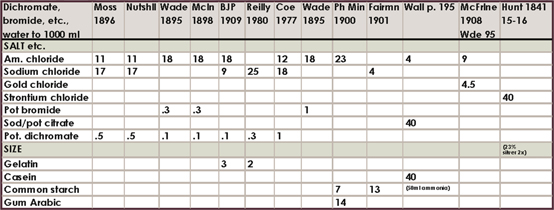
The amount of different formulas in the literature and the range of amounts is somewhat confusing to say the least, so I am only including this compilation of about 160 formulas for historical, or other, interest. I have highlighted my favorites. If you feel inclined to experiment, the directions for mixing each of these salting solutions will be exactly like the directions already outlined in this chapter.
Where a number is in red italics, it is to be in substitution of the other salt or citrate given. For example, if the formula calls for 23 g ammonium chloride and 46 g barium chloride marked in red, use either ammonium or barium salts. The range of silver accompanying these formulas was all over the board in the literature, compounded with tray sensitizing and double-coating, but most often it was the “60 grains to the ounce” or 13.7%. 15% silver nitrate is therefore adequate for all formulas.
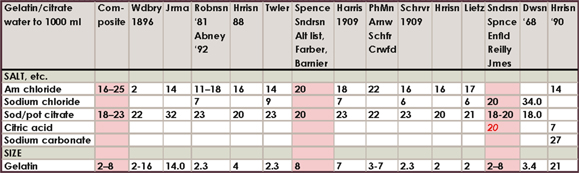
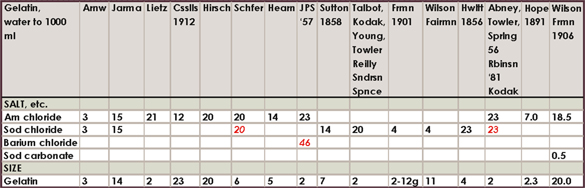
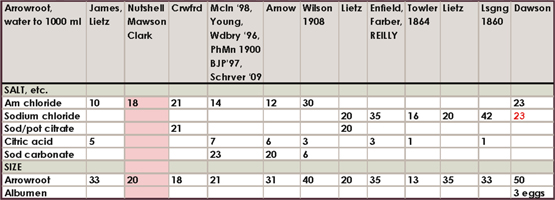

Table A.5. Partial albumen formulas
| Albumen, water to 1000 ml | Kodak | Waterbury 1890 | Mnckhvn 1863 |
| SALT | |||
| Ammonium chloride | 23 | ||
| Sodium chloride | 23 | 40 | |
| SIZE | |||
| Gelatin | 2 | ||
| Albumen | 500ml | 62ml | 500ml |
Table A.6. Agar agar formulas
| Agar agar, water to 1000 ml | PhMin 1900 Arnw 1982 | BJP 1897 Norath |
| SALT | ||
| Sodium chloride | 20 (+20 citric acid!) | 20 |
| SIZE | ||
| agar agar | 10 | 20 |
Table A.7. Icelandic moss formula
| Icelandic moss, water to 1000 ml | Hardwich 1857 |
| SALT | |
| Ammonium chloride | 18 |
| Sodium chloride | 18 |
| SIZE | |
| Gelatin | 2 |
| Iceland moss | 7 |
The guerrilla fix
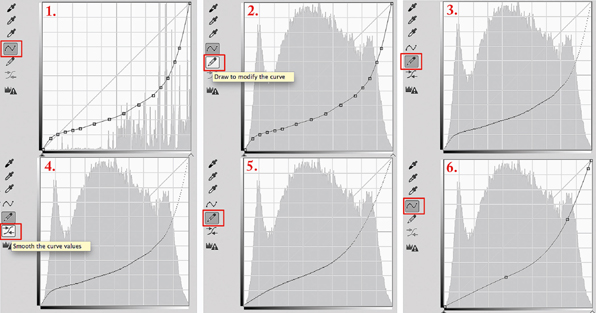
Since each person’s setup, light source, and personal techniques vary from mine (hence the best practice to use custom, not generic, curves), it is possible that these generic curves produce images that are slightly low in contrast or that there is some posterization in the tones of the image. If this is the case, there is a “guerrilla” fix (Figure A.10) available in the Curves Panel. I call it a “guerrilla fix” because it probably should be used only in a pinch. This fix will move the adjustment curve towards the diagonal line in the curves panel in increments. However, it will do so to both the shadows and the highlights globally, and so if either is perfect already, it is best to select points on the curve individually in either area by clicking on the points and using the up/down and left/right arrows on the keyboard to move them closer to the diagonal.
The Pencil icon will temporarily hide curve points and the Smooth icon will smooth the curve closer and closer to the diagonal line with each click. Contrast will rise globally across the negative. Sometimes a little drama with more contrast is effective.
1. Screen Shot 1 shows the original curve that needs a contrast tweak with the curve icon active.
2. Click on the pencil icon shown in Screen Shot 2; when clicked and made active as it is in Screen Shot 3, it will remove all points and show the “naked” curve.
3. Just below the pencil icon is the “smooth” icon as in Screen Shot 4. Click on this button to activate it.
4. Once activated, click from 1–7 times on this button to move the curve “bowl” towards the diagonal line. With each click towards that line, contrast increases. Be judicious; small point movements make big changes. Note in Screen Shot 5 that the adjustment is global, meaning it will affect the highlights as well as the shadows.
5. After the desired amount of smoothing clicks, click back on the curve icon and the points will appear again, though there will be fewer of them as shown in Screen Shot 6.
Determining exposure with a step wedge

The most accurate mathematical method to determine exposure is with a Stouffer film step wedge (see Sources for supplies). The step wedge is used to find maximum “black” or the amount of time it takes to get salted paper as dark as it needs to be and no darker (overexposure). The Stouffer step wedge is calibrated in ⅓ stop increments. Each increment corresponds to a mathematical number of 0.794 which is used to add time (by dividing the exposure time) or subtract time (by multiplying the exposure time) depending on how many maximum black steps are showing on the print. This is found by first overexposing the step wedge to make sure two or more steps on the Stouffers merge together with no differentiation. Once that is done the rest can be calculated mathematically. The math is very easy, but if math drives you crazy, here it is already done for you.
1. For salted paper use an initial overexposure time of 60 minutes.
2. Note the step that is the first darkest step, usually Step 2–10, for instance.
3. Find that step in Table A.1 and note your final exposure time. Once this exposure time is found it never changes on that paper with that salt-size.
The math: for every step moving back towards Step 1, multiply by .794. For instance, if Steps 1–4 are all maximum black, Step 4 needs to move 3 steps back to Step 1. The initial 60-minute exposure time is multiplied by .794 for each step of movement. Then the film density is subtracted since you won’t be using film again (multiply by .89) and then Pictorico OHP density is added by dividing the total by .707.
60-minute baseline exposure time (BPT) |
|
|---|---|
If Step 1 is max black: |
75 |
If Step 2 is max black: |
60 |
If Step 3 is max black: |
48 |
If Step 4 is max black: |
38 |
If Step 5 is max black: |
30 |
If Step 6 is max black: |
24 |
If Step 7 is max black: |
19 |
If Step 8 is max black: |
15 |
If Step 9 is max black: |
12 |
If Step 10 is max black: |
8.5 |
Numerical factors for fractional stop exposure time sequences |
|||
|---|---|---|---|
Increment |
Description |
Value |
Inverse |
Half stops |
sq. root of 2 |
1.414 |
.707 |
One third stops |
cube root of 2 |
1.260 |
.794 |
One fourth stops |
fourth root of 2 |
1.189 |
.841 |
One-sixth stops |
sixth root of 2 |
1.122 |
.891 |
Tables A.10 and A.11. The table above is the actual math behind the numbers, courtesy of Rufus Cone, Montana State University. The table to the left has all the math done for you already, so the only number to remember is the final exposure time listed by the step that is the first maximum black.
Weights and measures
Historic salt formulas are very confusing because of four measurement systems in use in the 1800s: troy, avoirdupois, apothecary, and the French decimal system. One source said that all English photographic formulas used apothecaries’ solid and lf uid measures. This would mean: 60 grains = 1 dram; 8 drams = 1 ounce; 480 grains = 1 ounce; and 60 grains = 3.88 grams.1 In another source I found: 60 minims or drops = 1 liquid dram as well as 60 grains = 1 solid dram, and with 8 drams in both solid and liquid measures equalling 1 ounce, it is becoming a little more tidy. I’ve been able to ascertain that 1 ml = 16.896 minims/drops, and 28.41 ml = 1 fluid ounce. But then there’s mention of a 12-ounce pound and a 16- and a 20-ounce pint and I am back to being confused.2
Mike Ware helped me through some of this morass. He told me that any time you see a formula as “XX grains per ounce” multiply the “XX” by 0.228 and you can immediately derive the w/v percentage formula. He bases this on the following facts: a British ounce is 28.413 cc; There are 15.4 grains to the gram; to get from “grains per fluid ounce” to “weight per volume in grams per 100 cc” the mathematical formula would be 100 x XX x 0.0648 / 28.413 = 0.228XX. Thus a “60 grains to the ounce” silver nitrate is 60 x .228 or 13.7%. Whew!
Solid measurements
1 gram = 15.4323 grains
1 grain = 0.0648 gram
1 ounce = 28.4 grams
1 pound = 454 grams
1 gram = 0.0353 ounces
1000 grams = 2.2 pounds
Liquid measurements
The most important measurement conversion to know is that 1 teaspoon = 5 ml. The next is that British volume is 28.413 ml to the ounce; US volume is 29.574 ml to the ounce. Throughout the book formulas will be given in milliliters (ml) and occasionally teaspoons. See unitconversion.org.
1 teaspoon = |
⅓ tablespoon |
5 ml |
|
75–100 drops |
|
3 teaspoons = |
1 tablespoon |
½ ounce |
|
15 ml |
|
2 tablespoons = |
1 ounce |
30 ml |
|
8 ounces = |
48 teaspoons |
16 tablespoons |
|
1 cup |
|
237 ml |
|
2 cups = |
1 pint |
473 ml |
|
2 pints = |
32 ounces |
1 quart |
|
1 (scant) liter/946 ml |
|
4 quarts = |
128 ounces |
1 gallon |
|
3785 ml |
Ounces to milliliters: × 29.57
Milliliters to ounces: × 0.0338
Liter × 2.10 = pints
Liter × 1.06 = quarts
Liter × 0.26 = gallons
1 liter = 33.81 ounces or 1.057 quarts
1 cc water = 1 g = 1 ml — all interchangeable
Endnotes
1. Johnson, George Lindsay. “Weights and Measures and Ten Per Cent. Solutions” in Photographic News, March 23 1888, pp. 180–181.
2. The Universal Text-Book of Photography. Leeds: Harvey, Reynolds, & Fowler, 1863, p. 75 and Hearn, Charles W. The Practical Printer, A Complete Manual of Photographic Printing, Containing Full Details Concerning All the Styles and Processes of Plain and Albumen Paper Printing and of Printing on Porcelain, 2nd ed. Philadelphia: Edward L. Wilson, 1878, p. 161.
Sources for supplies
Chemistry, scientific, and photographic supplies
My top five in alphabetical order are:
Artcraft Chemicals
800.682.1730
B&H Photo
877.848.1244
Bostick and Sullivan
877.817.4320
Freestyle Photographic Supplies
800.292.6137
Photographer’s Formulary
800.922.5255
Then also:
Step wedges
Stouffer Industries
574.252.5772
UVBL lightboxes and bulbs
Jon Edwards UVBL lightboxes:
Freestyle markets a wonderful lightbox:
For replacement UVBL bulbs:
Art, paper, and framing supplies
For Pictorico: Diamond-jet.com
Watercolors: DanielSmith.com
Photo books
Petra Keller’s source for 24,000 photography titles:
Search engine for used books worldwide:
PhotoEye bookstore in New Mexico:
Routledge photography books:
https://www.routledge.com/photography
Websites
Larry Schaaf’s Fox Talbot blog:
www.AlternativePhotography.com
The alt process listserv: www.Altphotolist.org
Alt supplies and workshops in Australia:
Chicago Albumen Works:
http://www.albumenworks.com/traditional_printing/