
Hour 13. Advanced Storyboards Using Navigation and Tab Bar Controllers
What You’ll Learn in This Hour:
![]() The purpose of navigation and tab bar controllers
The purpose of navigation and tab bar controllers
![]() How to create navigation controller-based scenes with the storyboard
How to create navigation controller-based scenes with the storyboard
![]() How to build tab bar applications using the iOS tab bar template
How to build tab bar applications using the iOS tab bar template
![]() A way to share data between scenes using the navigation and tab bar controllers
A way to share data between scenes using the navigation and tab bar controllers
Over the past few hours, you’ve become familiar with creating multiscene applications using modal scene segues and popovers. These are useful and common user interface (UI) features, but many iOS applications take a more “structured” approach to scene layout. Two of the most popular application layout methods involve the use of navigation controllers and tab bar controllers. Navigation controllers enable a user to drill down from one screen to another, exposing more detail as they go. You’ll see this everywhere in iOS—from the settings app to bookmarks in Safari. The second approach, implementing a tab bar controller, is used for developing apps with multiple functional features, where each tab presents a different scene where the user can interact with a new set of controls.
In this hour, you learn about these two controllers and how they can provide a whole new world of interface options for your applications.
Advanced View Controllers
It is rare when an iOS (or any OS) update comes out that makes development simpler. Each release brings new features and new levels of complexity. Because of recent changes to Xcode and iOS, however, two common types of iOS view controllers have become much easier to integrate with your projects: navigation and tab bar controllers.
Previously relying on quite a bit of coding prowess, these advanced view controllers required multiple chapters just to cover basic implementation, and far more code than could be reasonably covered in a 24 Hours book. Now, it’s literally a matter of drag and drop.
Before we get started with looking at these new features, let’s take a moment to review where we are in the book, and, specifically, what we’ve learned over the past few hours.
Multiscene Development
You’ve reached the second half of this book. Nicely done! You should now have a good sense of how to populate a scene and process a user’s input.
We also started (in the past two hours) building apps with multiple scenes. This includes creating new view controller subclasses to handle each scene, adding segues, and, if necessary, writing code to manually trigger a segue. The key to being successful in creating multiscene applications is being able to easily exchange information between the different scenes so you can build a cohesive user experience. The more scenes you have, the more planning you need upfront to make sure that everything works the way you want it to.
In the preceding hour’s lesson, you created a delegate attribute on one custom view controller subclass and used it to refer to the initial view controller object. Another approach is to create a brand-new class that does nothing but manage the information that needs to be shared across scenes. The two types of view controllers that we use in this hour include a “parent” view controller that manages multiple scenes that are presented to the user. This parent controller provides an excellent opportunity for creating variable properties to facilitate exchanging information between scenes—since it is present regardless of which scene is visible. We put this to the test in our sample projects a bit later.
Caution: Segues Where You Don’t Want Them
If you need to directly reference one scene’s view controller from another, you always can use an outlet to connect them. Just Control-drag from one view controller into the other view controller’s .swift file and add a variable property to reference it.
That said, if you attempt to add an outlet and then connect the view controller, Xcode prompts you to create a segue instead. Remember that if you want to create a connection and Xcode starts prompting you to make a segue, you can use the Connections Inspector to precisely target an outlet; no segue will get in the way.
This hour is mostly visual—giving your typing fingers a break before kicking back in in the next hour. The Xcode storyboard feature makes what we’re about to do possible in a 24 Hours book and enables you to concentrate on coding application logic instead of worrying about getting the right scenes to display when you need them.
Exploring Navigation Controllers
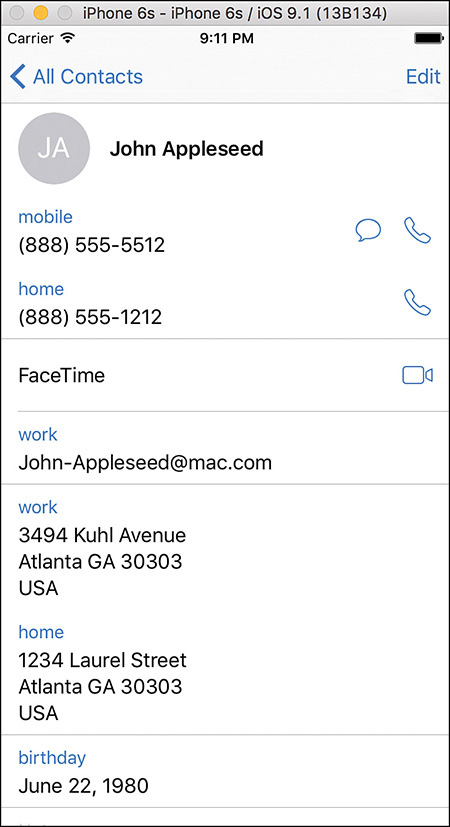
The navigation controller (UINavigationController) class presents a series of scenes that represent hierarchical information. In other words, one scene presents a high-level view of a topic, a second scene drills down further, a third scene even further, and so on. For example, the iPhone version of the Contacts application presents a list of contact groups. Touching a group opens a list of contacts within that group. Touching an individual contact displays details on that person, as shown in Figure 13.1. At any point in time, a user can back out of a level of detail and return to the previous level or jump all the way to the starting point (called the root).
Managing this transition between scenes is the navigation controller. It creates a “stack” of view controllers. The root view controller is at the bottom. As a user navigates deeper into the scenes, each successive view controller is pushed on the stack, with the current scene’s view controller at the very top. To return to a previous level, the navigation controller pops the topmost controller off the stack and returns to the one below it.
Tip
The terminology of push and pop is used to describe navigation controllers throughout the iOS documentation. Be sure that you understand this concept before using it in your application.
Navigation Bars, Items, and Bar Button Items
In addition to managing the stack of view controllers, the navigation controller manages a navigation bar (UINavigationBar). Appearing similar to the toolbar you used in the preceding hour, a navigation bar is populated from an instance of a navigation item (UINavigationItem) that is added to each scene that falls under the navigation controller.
By default, the navigation item for a scene contains a title for that scene and a Back button. The Back button is added as a bar button item (UIBarButtonItem) within the navigation item (yes, just like the bar buttons you used in the last hour). You can even drag additional bar button items into the navigation item to add your own custom buttons to the navigation bar that is displayed for that scene.
I fully expect that if you’ve made it through that description you’re getting a bit worried about having to manually handle all those different objects (and that’s why doing this in code is not trivial!). Don’t fear: Interface Builder makes it painless, and once you see how each scene is constructed, you’ll have no problem working with all of these objects in your apps.
Using Navigation Controllers in Storyboard
Adding a navigation controller to a storyboard is very similar to adding a view controller, something you’ve done several times over the past two hours. It looks a bit different, but the process is the same. Let’s assume you’re starting with a Single View Application template.
First, you want to establish the code files for one or more view controller subclasses to handle the user’s interactions within a given navigation controller scene. This is the same as any other scene. If you don’t recall how to add new subclasses to your project, review Hours 11 and 12 to see how the modal scenes tutorials work.
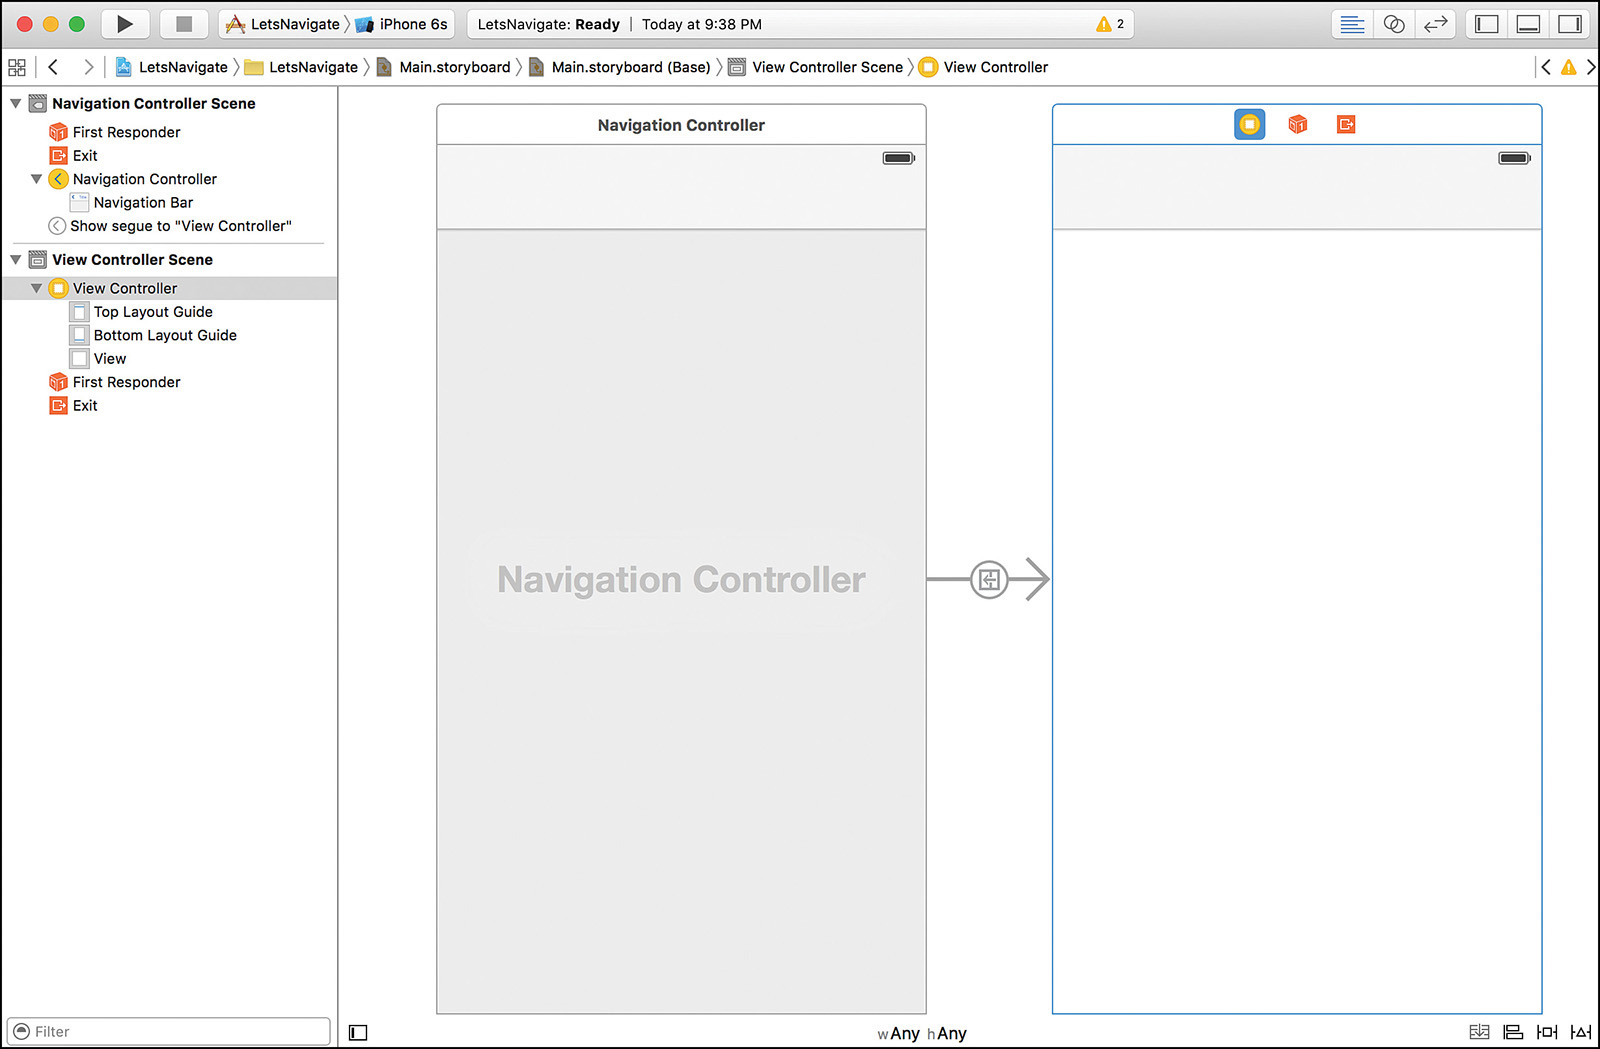
Open your storyboard file in the IB editor. If you want your entire application to fall under the navigation controller, select the view controller in the default view and delete it. (You want to remove the corresponding ViewController.swift file, as well.) This removes the default scene. Next, you drag an instance of the navigation controller object from the Object Library into the document outline or the editor. This adds what appears to be two scenes to your project, as shown in Figure 13.2.
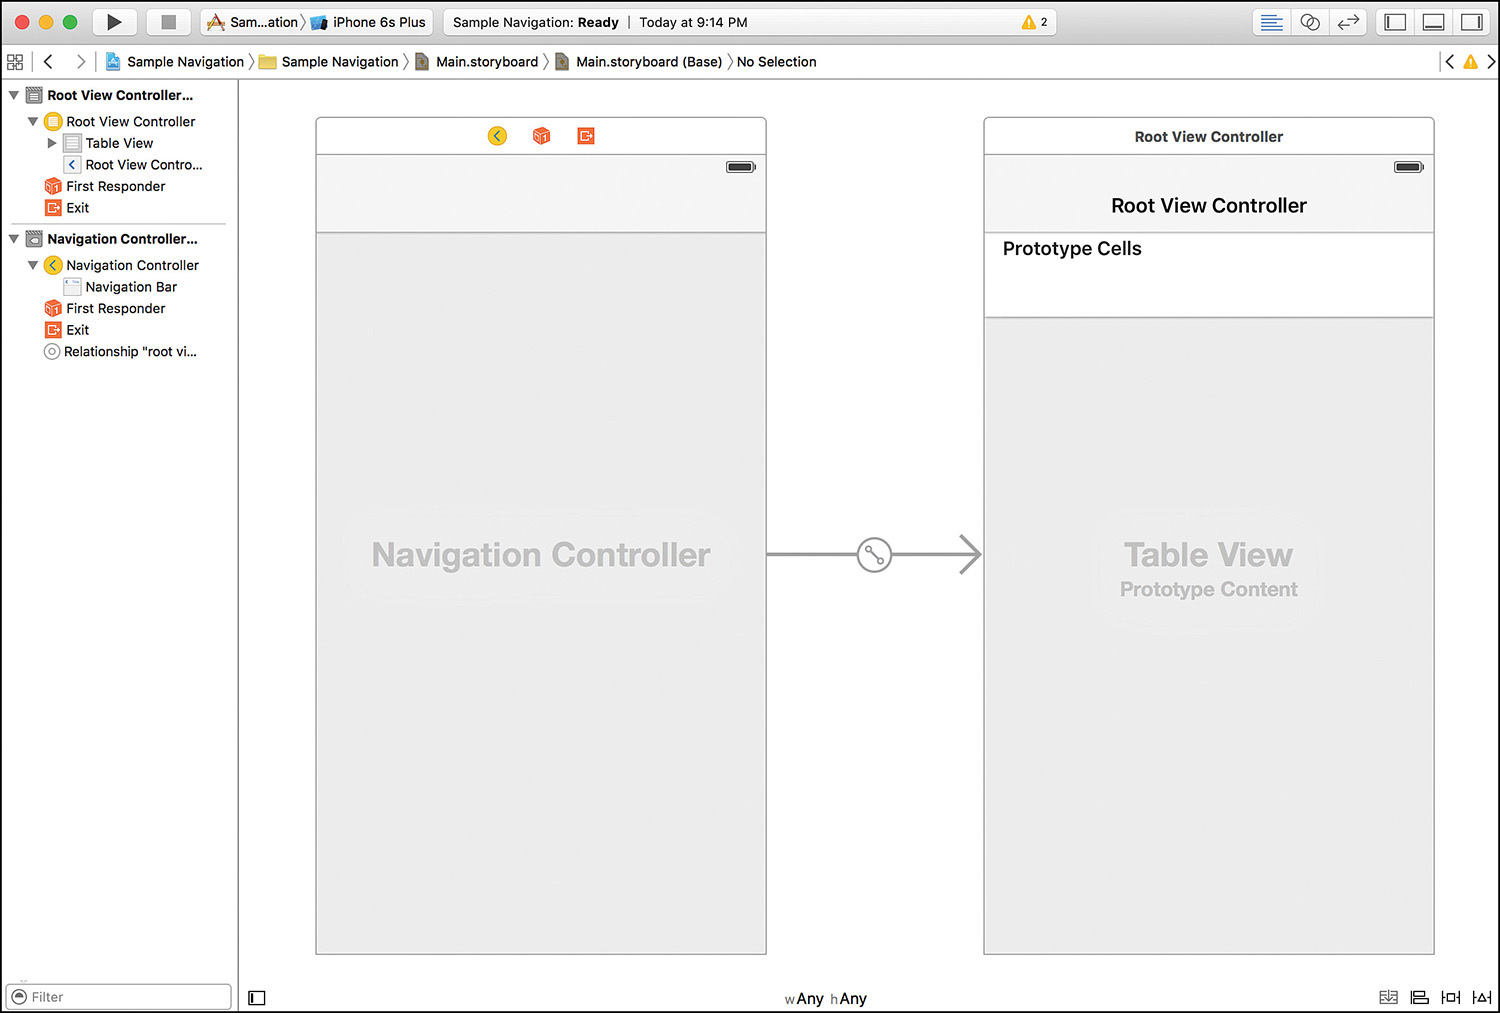
The scene labeled Navigation Controller Scene represents the navigation controller. It is just a placeholder for the object that is going to control all the scenes that fall underneath it. Although you won’t want to change much about the controller, you can use the Attributes Inspector to customize its appearance slightly (choosing a color scheme/tint, if desired).
The navigation controller is connected via a “relationship” to a scene titled with Root View Controller. By default, IB sets a table view controller as the root view controller. This can be removed, and the relationship to any custom view controller you’d like, created. We’ll be doing that in one of today’s tutorials.
The scenes under a navigation controller are exactly like any other scene; they just happen to have the navigation bar at the top and can use a segue to transition to further scenes. Development within the content area of the scenes is the same as developing in any other view.
Tip
I use the Single View Application template because it gives me an application with an associated storyboard file, and it gives me an initial view that I could, if needed, display before seguing into another view controller. If I don’t want the initial scene, I delete it, and I delete the default ViewController.swift files. In my opinion, this is the fastest way to get a clean project and a consistent starting point.
Setting the Navigation Bar Item Attributes
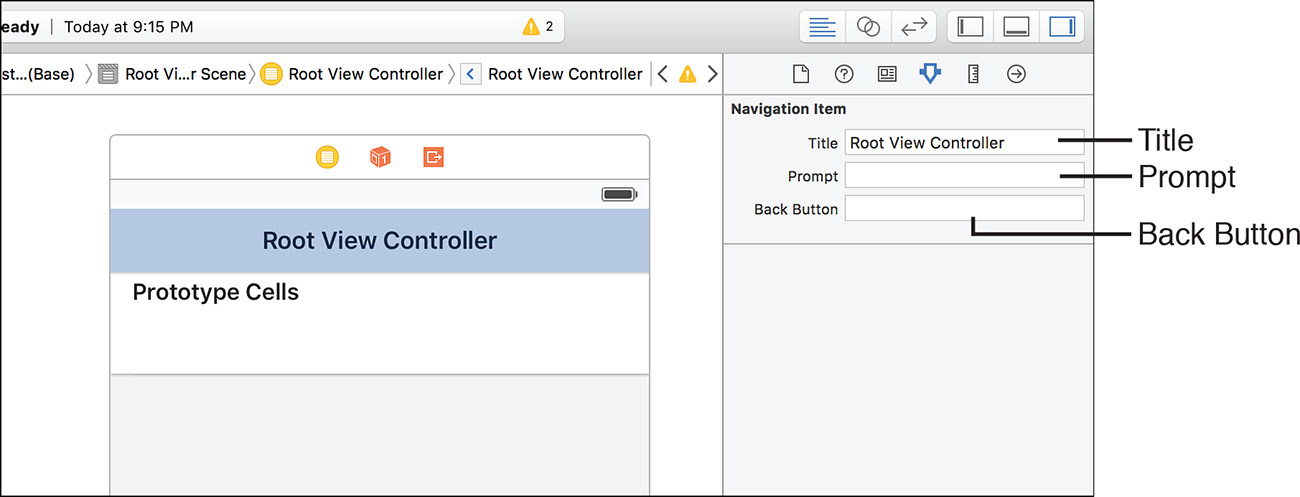
To change the title in the navigation bar, just double-click and start editing, or select the navigation item in the scene and open the Attributes Inspector (Option-Command-4), as shown in Figure 13.3.
You can change three attributes:
![]() Title: The title string that is shown at the top of the view
Title: The title string that is shown at the top of the view
![]() Prompt: A line of text that provides instruction to the user (if needed) and is shown above the title
Prompt: A line of text that provides instruction to the user (if needed) and is shown above the title
![]() Back Button: The text that appears in the Back button of the next scene
Back Button: The text that appears in the Back button of the next scene
Now wait a minute. You can edit the text of the button that appears in a scene you don’t even have yet? Yes. By default, when you transition from one navigation controller scene to another, the “title” of the previous scene shows up as the title of the Back button in the next scene. Sometimes, however, the title may be long, or not necessarily appropriate. In these cases, you can set the Back button attribute to whatever string you want, and if the user drills down to the next scene, that text will be displayed in the button that takes you back to the scene.
The Back button text does one additional thing. Because iOS can no longer use its default behavior to create a Back button, it creates a new custom bar button item within the navigation item that contains the title you wanted. You can customize this bar button item even more, changing its color and appearance using the Attributes Inspector.
So far, there is only a single scene under the navigation controller, so the Back button would never be displayed. Let’s see how you can chain together multiple scenes to create the “drill-down” hierarchy that navigation controllers are known for.
Note
Remember, you can drag additional bar button items into a scene’s navigation item to add toolbar-like controls to the scene.
Adding Additional Navigation Scenes with Show Segues
To add an additional scene to the navigation hierarchy, we follow the same process as adding a new modally presented scene to an application. Begin by creating a new scene that you want to be managed by the navigation view controller. Next, just Control-drag from the object that you want to trigger the segue to the new scene’s view controller. When prompted, choose the Show segue. You’ll see a new segue line added to the originating scene, as well as a change to the scene you just connected. The new scene shows the navigation bar, but will require that you add your own navigation item to customize the title and back button. (This is a change from earlier versions of Xcode that added the navigation item for you.)
What’s important to realize here is that you can keep doing this. You can add additional segues and even branch from multiple segues to follow different paths, as shown in Figure 13.4. Xcode keeps track of everything for you.
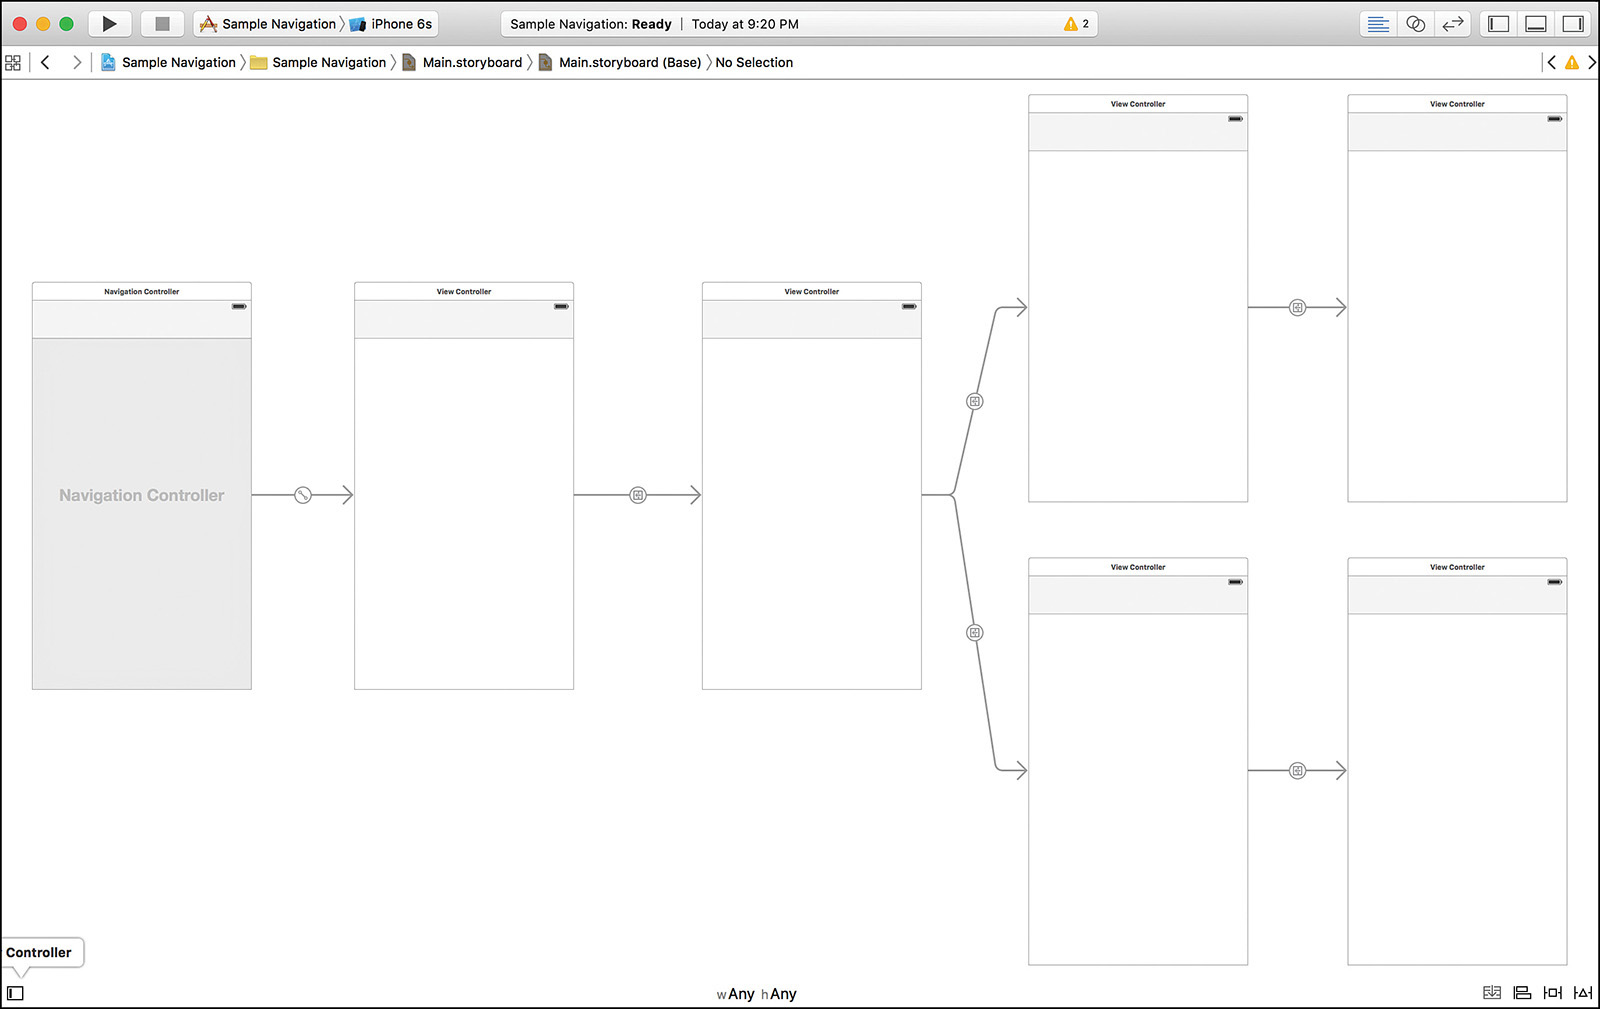
Keep in mind that these are just views, like any other, so you are welcome to add modal segues or popovers in your storyboard as well. One advantage that this hour’s controllers have over other segues is that transitioning to and from views is handled automatically. You don’t need to add any code to use the Back button or the swipe gesture within a navigation controller hierarchy, nor (as you learn shortly) any code to switch between scenes in a tab bar controller application.
Sharing Data Between Navigation Scenes
As I hinted early on, the navigation controller and tab bar controller classes, because they manage a series of views, give us a perfect place to share data. We can access these classes using the parentViewController variable property from any of the scenes we create—just like you used presentingViewController from a modal scene to access the view controller of the scene that presented it.
We can (and will) create a subclass of UINavigationController that does nothing but include variable properties we want to share between scenes, assign that as the identity class of the navigation controller that is managing all of our scenes, and then access those variables via parentViewController in any of the other views.
Understanding Tab Bar Controllers
The second type of view controller that we work with in this hour is the tab bar controller (UITabBarController). Tab bar controllers, like navigation controllers, are prominently featured in a wide range of iOS applications. As the name implies, a tab bar controller presents a series of “tabs” at the bottom of the screen, represented as icons and text. By touching these, you can switch between scenes. Each scene represents a different function in the application or a unique way of viewing the application’s information.
The Health application on the iPhone, for example, presents different ways of viewing your health information by using a tab bar controller, as shown in Figure 13.5.
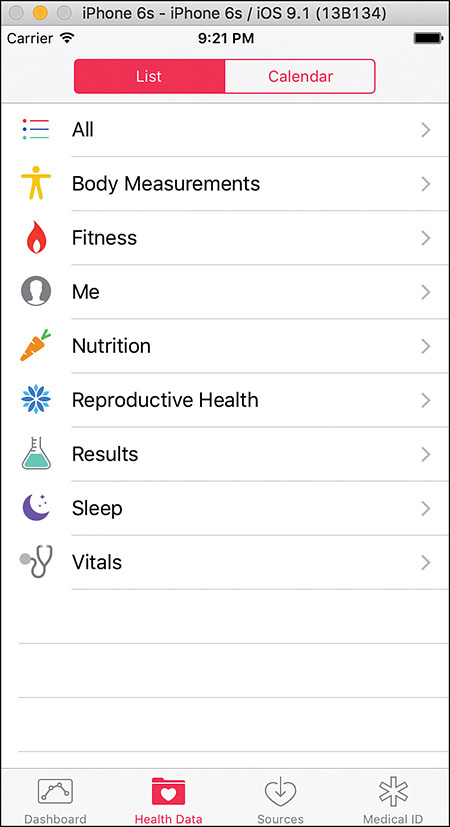
Like a navigation controller, the tab bar controller handles everything for you. When you touch a button to transition between scenes, it just works. You don’t need to worry about programmatically handling tab bar events or manually switching between view controllers. The similarity doesn’t end there.
Tab Bars and Tab Bar Items
The implementation of a tab bar within the storyboard is also very similar to a navigation controller. It contains a UITabBar that resembles a toolbar, but in appearance only. Any scene that is presented with the tab bar controller inherits this navigation bar within its scene.
The scenes presented by a tab bar controller must contain a tab bar item (UITabBarItem) that has a title, an image, and, if desired, a badge (a little red circle with value in it).
If you’re wondering why a tab might need a badge, imagine that you have a long-running calculation in one of the tab scenes in your application. If the user switches off of the tab, the calculation continues. You can have the scene’s view controller update the badge in the tab, even when the user is viewing another tab’s scene.
This gives an immediate visual indication that there is something to look at without the user needing to switch back and forth.
Using Tab Bar Controllers in Storyboard
Adding a tab bar controller to the storyboard is just as easy as adding a navigation controller. Let’s walk through the steps of how to add the controller, configure the tab bar buttons, and add additional tab scenes to the storyboard.
Caution: We Don’t Need No Stinkin’ (Tabbed) Templates
Before you start building tab-based applications, I want to point out that Apple includes an iOS application template called the Tabbed Application. This template creates an application with two sample tabs already added and two view controller subclasses set up and associated with each tab. It also makes absolutely no sense (to me) to use.
This template may get you up and running a few seconds faster than adding a tab bar controller to a storyboard, but for production projects, it has a fatal flaw: Apple has associated two view controllers with the two default tabs in the application and named them FirstViewController and SecondViewController. There’s nothing wrong with this for learning exercises, but in a real application, you want to name these in a way that reflects their actual use (MovieListViewController, TheaterListViewController, and so on). You could certainly rename all of their references in Xcode, but by the time you did that, it would have been faster to just add and associate your own tab bar controller and view controller subclasses.
To add a tab bar controller to an application, I recommend again starting with a Single View Application template. If you don’t want the initial scene to segue into the tab bar controller, you just delete the initial scene by removing its view controller and then delete the corresponding ViewController.swift file. Once your storyboard is in the state you want, drag an instance of the tab bar controller object from the Object Library into the document outline or the editor. This adds a controller and two sample tab bar scenes to the view, as shown in Figure 13.6.
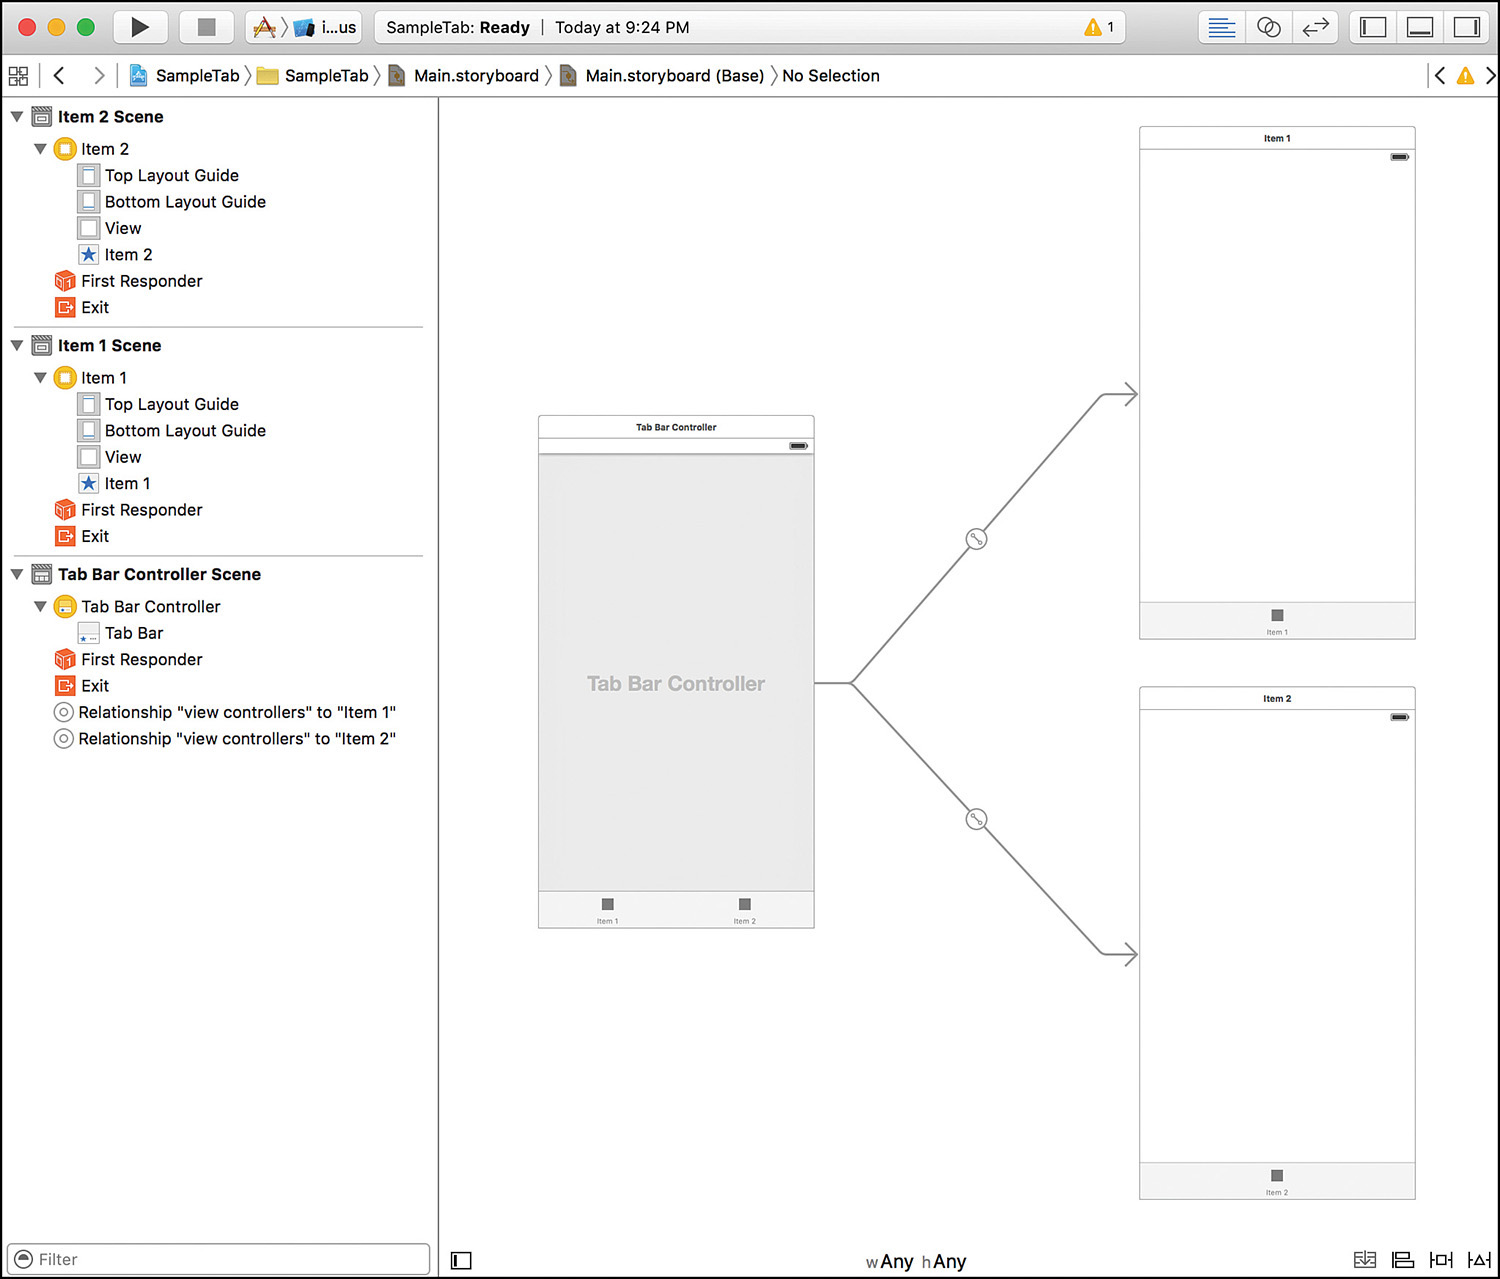
The tab bar controller scene represents the UITabBarController object that coordinates all the scene transitions. Within it is a tab bar object that can be customized slightly with IB, changing the color.
From the tab bar controller are two “relationship” connections to the two scenes that the tab bar will display. The scenes can be differentiated by the name of the tab bar button that is added to them (Item 1 and Item 2, by default).
Tip
Even though all the tab bar item buttons are shown in the tab bar controller scene, they are actually part of the each individual scene. To change the tab bar buttons, you must edit the tab bar item added to a scene. The controller scene is left alone.
Setting the Tab Bar Item Attributes
To edit the tab bar item (UITabBarItem) that is displayed for any scene, open that scene’s view controller and select the tab bar item within the document outline area, and then open the Attributes Inspector (Option-Command-4), as shown in Figure 13.7.
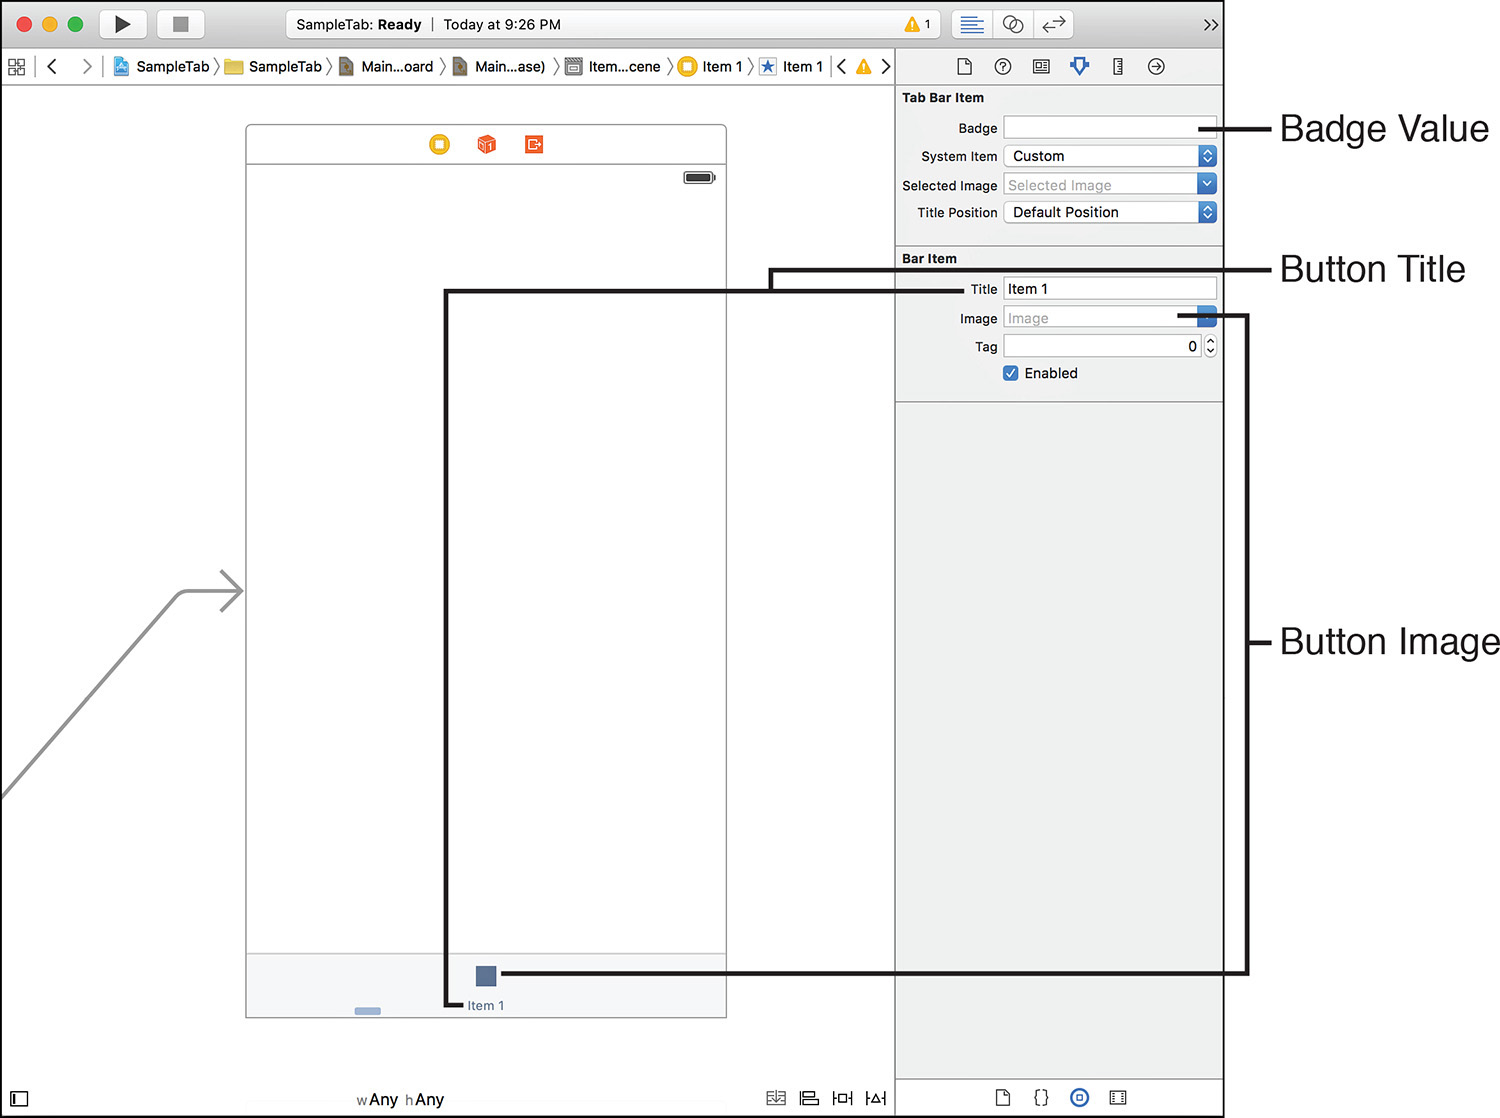
Using the Tab Bar Item section, you can set a value to be displayed in the tab bar item badge. Typically, you want to set this via tab bar item’s badgeValue variable property (a String) in code. You can also use the Identifier pop-up menu to choose from over a dozen predefined tab bar icons and labels. If you choose to use a predefined icon/label, you cannot customize it further, because Apple wants these to remain constant throughout iOS.
To set your own image and title, use the Bar Item settings. The Title field sets the label for the tab bar item, and the Image drop-down associates an image resource from your project for the item.
Tip
Tab bar images are “approximately” 30×30 points (60×60 pixels for 2× Retina displays, 90×90 pixels for the iPhone 6+ 3× display) or smaller and are automatically styled by iOS to appear in a monochromatic color scheme (regardless of what colors you choose). Simple line drawings with a transparent background turn out the best when creating your tab bar interface art.
That’s everything you need to configure a scene for a tab bar controller. But what if you want to add additional scenes to the tab bar? We tackle that now, and, as you’ll see, it’s even easier than adding a scene to a navigation controller.
Adding Additional Tab Bar Scenes
Unlike other segues that we’ve used, a tab bar has a clearly defined item (the tab bar item) that triggers a change in scene. The scene transition isn’t even called a segue; it is a relationship between the tab bar controller and a scene. To create a new scene, tab bar item, and the relationship between the controller and scene, start by adding a new view controller to the storyboard.
Drag a new view controller instance into the document outline or editor. Next, Control-drag from the tab bar controller to the new scene’s view controller in document outline. When prompted, choose Relationship Segue, View Controllers, as shown in Figure 13.8.
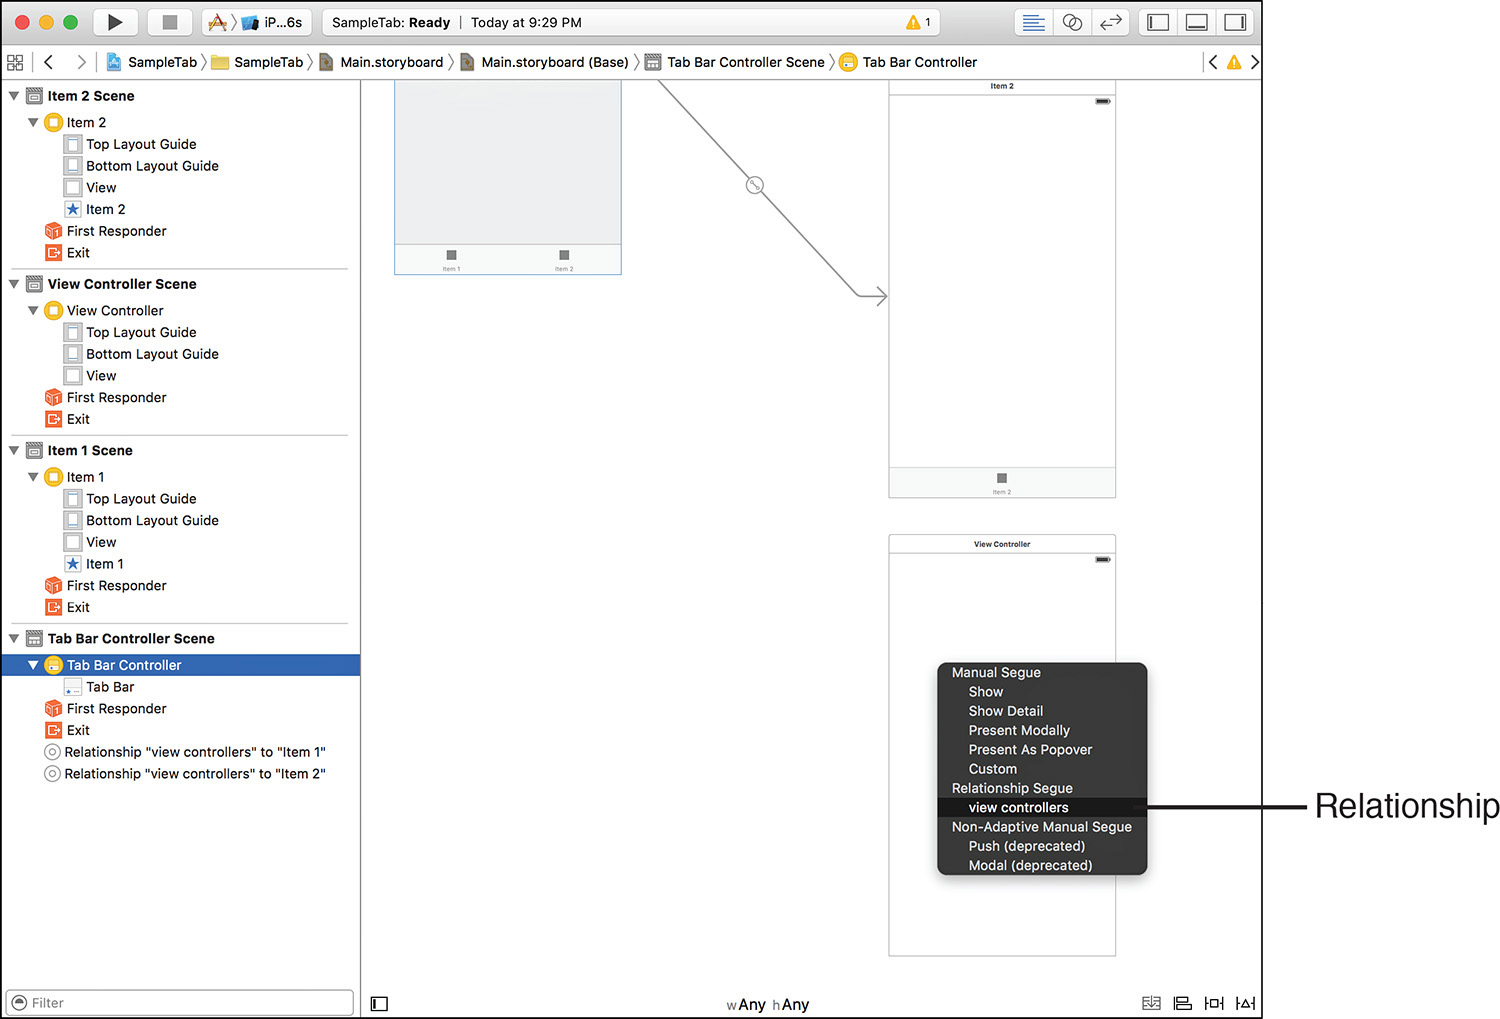
Creating the relationship does everything we need; it automatically adds a tab bar item to the new scene, ready to be configured. We can keep doing this to create as many tabs and scenes as we need in the tab bar.
Note
Let me repeat something I said earlier: The scenes that you’re adding to the tab bar controller are the same as any other scene. You associate a view controller subclass using the Identity Inspector and then interact with the scene the same as you would any other.
To set the tab bar item’s badgeValue, for example, you can just create an outlet in your view controller to reference the tab bar item. It’s exactly the same as if you had added a button or a label to a view and wanted to modify it programmatically.
Sharing Data Between Tab Bar Scenes
Like the navigation controller, a tab bar controller presents us with an easy opportunity to share information. Create a tab bar controller (UITabBarController) subclass that is assigned as the identity of the tab bar controller. Add variable properties to the subclass that represent the data we want to share, and then access those variables through the parentViewController variable property in each scene.
Now that you’ve seen how to add these new view controllers to your project, let’s actually create a few examples that demonstrate these principles in action. As promised, these will be light on the typing, so don’t expect a masterpiece. The beauty is that once you know see how easy it is to use these controllers, the possibilities for your applications will open up tremendously.
Using a Navigation Controller
In the first project, we create an application that presents a series of three scenes through a navigation controller. Within each scene, we show a “next” button that increments a counter and then transitions to the next scene. The counter will be stored as a variable property in a custom subclass of the navigation controller. This will provide both an example of building a navigation-based UI and of using the navigation controller to manage a variable property that all the scenes can access.
Figure 13.9 shows what we want to accomplish.

Implementation Overview
The implementation follows the process described earlier. We start with a Single View Application template, remove the initial scene and view controller, and then add a navigation controller and two custom classes: one a subclass of a navigation controller that will enable each scene in the application to share information, the other a subclass of a view controller that will handle user interactions in the scenes.
We remove the default table view controller that is used with the navigation controller and add three scenes, designating one as the root view scene for the controller. A “next” button is included in each scene’s view with an action method to increment a counter—as well as a segue from that button to the next scene.
Doesn’t each scene need its own view controller subclass? Yes and no. In most applications, you create a view controller for each scene. In this application, we’re doing the same thing in each scene so that a single view controller can be used, saving us time and code.
Setting Up the Project
Create a new single-view project called LetsNavigate. Before doing anything else, clean up the project so that we only have the things that we need. Start by selecting the ViewController.swift file and pressing the Delete key. When prompted, choose to delete the files (move to trash), not just the references.
Note: Simple Names, Happy You
In case you’re wondering, yes, we could name this project “Let’s Navigate,” with an apostrophe and space. Why don’t we? To avoid problems down the road. Adding special characters can make source control operations difficult, lead to inconsistencies in your class naming conventions, and generally result in future unpleasantness. The name of your project doesn’t have to match the application name that you submit to Apple, so I recommend keeping your project names as simple as you can.
Next, click the Main.storyboard file and then select the View Controller line in the document outline area (Editor, Show Document Outline) and again press Delete. The scene will disappear. We now have the perfect starting point for our app.
Adding the Navigation Controller and Generic View Controller Classes
We need two additional classes added to the project. The first, a subclass of UINavigationController, manages our push count variable property and will be named CountingNavigationController. The second, a subclass of UIViewController, is named GenericViewController and handles incrementing the push count as well as displaying the count in each scene.
To add these two additional classes, follow these steps:
1. Click the + button at the bottom-left corner of the project navigator and choose File.
2. Choose the iOS Source category and Cocoa Touch class, and then click Next.
3. Name the new class CountingNavigationController, set the subclass to UINavigationController (you will have to type in the class name), make sure that iPhone (or iPad) is selected, and set the language to Swift.
4. Click Next.
5. On the last setup screen, make sure that Xcode has chosen the code folder for your project (navigate to it, if not), choose your main project code group from the Group pop-up menu, and then click Create.
Repeat this process to create a new UIViewController subclass named GenericViewController. Make sure that you choose the right subclass for each of the new classes; otherwise, you’ll have difficulty later on.
Adding and Configuring the Navigation Controller
Open Main.storyboard in the IB editor. Display the Object Library (Control-Option-Command-3) and drag a navigation controller into an empty area of the IB editor (or into the document outline area). Your project will now show a navigation controller scene and a root view controller scene. For now, concentrate on the navigation controller scene.
We want to associate this controller with our CountingNavigationController class, so select the navigation controller line in the document outline, and then open the Identity Inspector (Option-Command-3). From the class drop-down menu in the Custom Class section, choose CountingNavigationController.
Next, we need to make sure that Xcode knows this is the initial view controller to display when the application starts. Make sure that the navigation controller is still selected in the document outline, and then open the Attributes Inspector (Option-Command-4), and check the Is Initial View Controller check box within the View Controller section.
Finally, use the Size drop-down within the Simulated Metrics section to set a simulated size, as we’ve done previously. This isn’t required, of course, but it gives us a consistent interface to target for the lesson.
Now let’s add the additional scenes we need and associate them with the generic view controller class we created.
Adding Additional Scenes and Associating the View Controller
With the storyboard still open, start by selecting the Root View Controller item (within the Root View Controller scene) and pressing Delete. This gets rid of the default root view controller for the navigation controller. We want to associate our own (more flexible) GenericViewController class as the root view controller. To do this, drag a new view controller (UIViewController) from the Object Library into the IB editor. A new scene is created, and your document should resemble Figure 13.10. This will become your new root view.

Control-drag from the navigation controller to the new view controller. When finished dragging, release your mouse button. You are prompted for the type of connection to make. Choose Relationship Segue, Root View Controller. Your storyboard should now look like Figure 13.11.
You’re ready to add the other two scenes to the storyboard. Drag two more instances of the view controller object from the Object Library into the editor or the document outline. In a few minutes, these will be connected to the root view controller scene to form a series of scenes that are managed by the navigation controller.
After adding the additional scenes, we want to do two things to each of them (including the root view controller scene). First, we need to set the identity of each scene’s view controller. Next, it’s a good idea to set a label for each view controller so that the scene has a friendlier name.
Start by selecting the view controller connected to the Counting Navigation Controller (the root view controller) and opening the Identity Inspector (Option-Command-3). Within the Custom Class section, use the Class drop-down menu to pick the GenericViewController. Still within the Identity Inspector, set the Label field (within the Document section) to First. Move to one of the new scenes you added, select its view controller line, set its class to GenericViewController, and the label to Second. Repeat the process for the last scene as well, setting its custom class and a label of Third. When finished, your document outline should look like Figure 13.12.
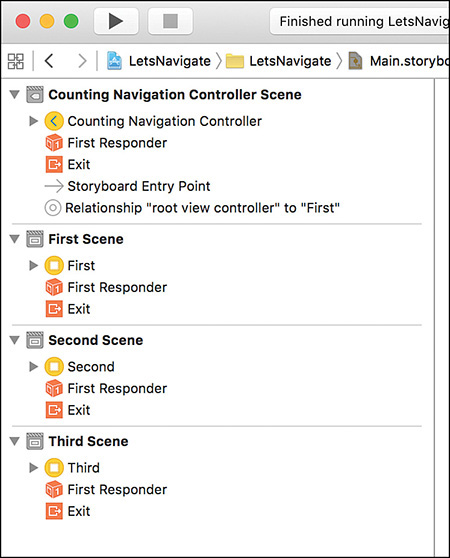
FIGURE 13.12 Your final document outline includes a navigation controller and three scenes (order is not important).
Planning the Variables and Connections
I’m intentionally trying to keep these projects light, so there isn’t a great deal of information that needs to be stored or actions that will have to be defined. The CountingNavigationController will have a single variable property (pushCount) that contains the number of times we’ve pushed a new scene into view using the navigation controller.
The GenericViewController class will also have a single variable property called countLabel that references a label in the UI displaying the current count of pushes. It will also have a private action method named incrementCount that increases the pushCount in the CountingNavigationController by one.
Note
The outlet and action in the GenericViewController class will be defined once, but, to be used in each scene, must be connected to the label and button individually in each scene.
Creating the Show Segues
Hey, isn’t this the time when we work on the UI? In the past two hours, we created our UI, and then we added the segue. What am I doing by switching things around? Good question. With applications that have only two scenes, it’s easy to work on them separately and keep track of what is what. As soon as you start adding additional scenes, it becomes very helpful to lay them out in the storyboard, with segues, so that you can see how it all fits together before you create the interface. In addition, with the navigation controller and tab bar controllers, creating the connection actually adds objects to our scenes that we might want to configure when working on the interface. So, in my opinion, it just makes sense to create the segues first.
To build a segue for the navigation controller, we need something to trigger it. Within the storyboard editor, add a button (UIButton) labeled Next to the first and second scenes, but not the third. Why not the third? Because it is the last scene that can be displayed; there’s nothing after it to segue to.
Next, Control-drag from the button in the first scene to the second scene’s view controller line in the document outline, or target the scene directly in the editor. When prompted for the segue type, choose Show, as shown in Figure 13.13. A new segue line (Show Segue to Second) will be added to the first scene in the document outline, and the second scene will inherit the navigation controller’s navigation bar.

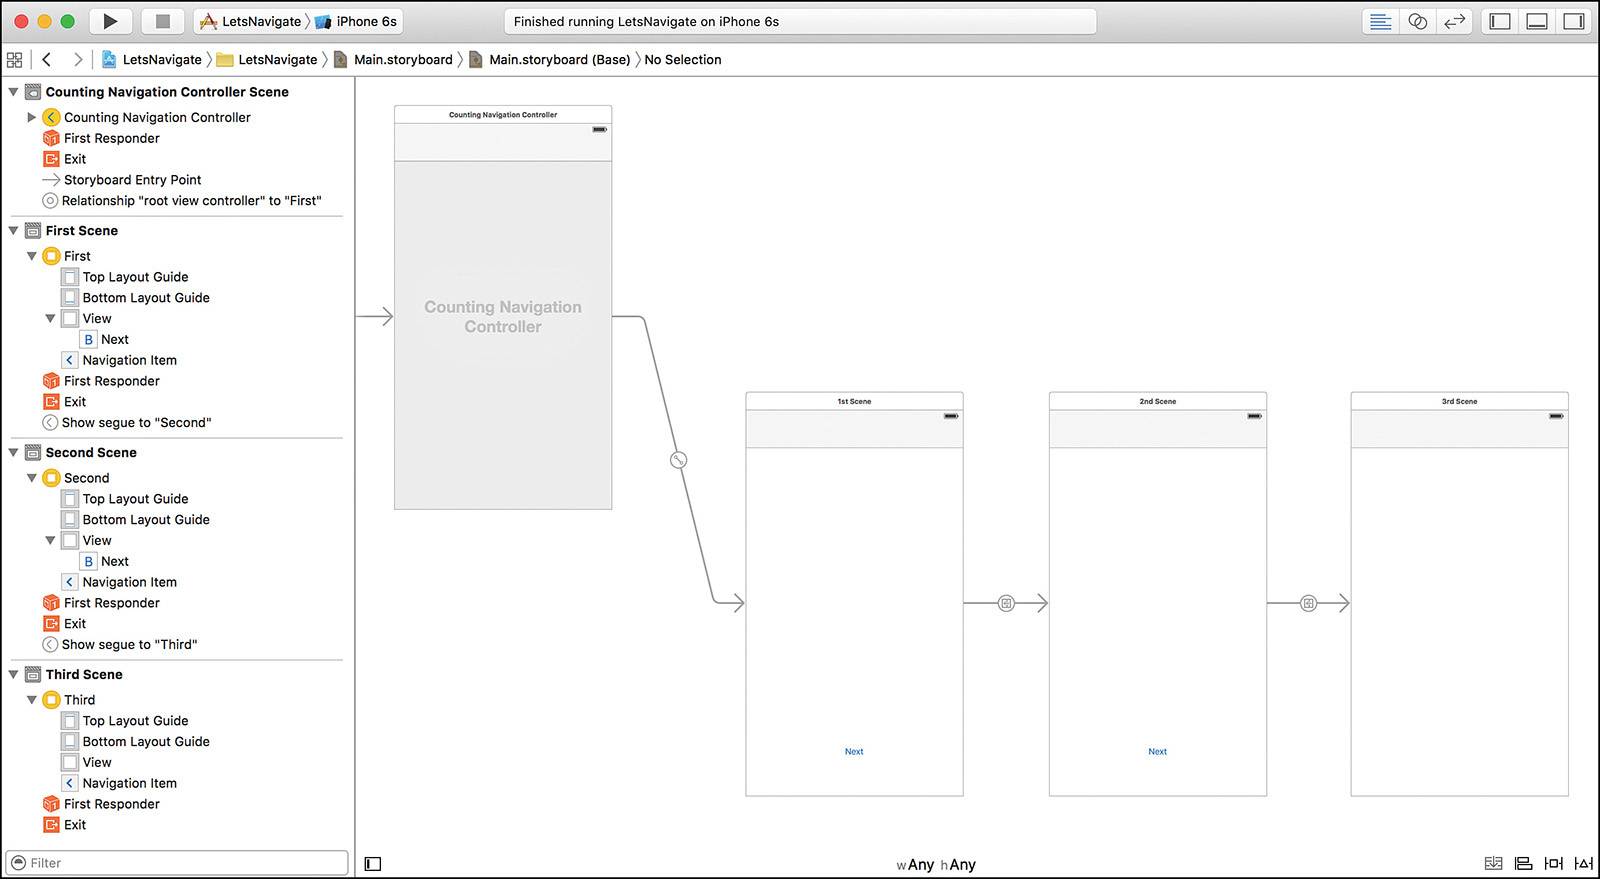
Repeat this process, creating a show segue from the second scene’s button to the third scene. Your IB editor should now contain a fully realized navigation controller sequence. Click and drag each scene in the view to arrange it in a way that makes sense to you. Figure 13.14 shows my interconnected views.
Designing the Interface
By adding the scenes and buttons, you’ve really just built most of the interface. The final steps will be adding a navigation item to each scene, customizing the title of the navigation item, and adding an output label to display the push count.
Begin by going through each of the scenes (first, second, and third) and dragging a navigation item into the scene (just drop it anywhere on the view, it doesn’t matter). Next, select the navigation item within document outline. Use the Attributes Inspector (Option-Command-4) and the Title field to set each view’s title. Title the first view (the root view controller) 1st Scene, the second 2nd Scene, and the third... wait for it... 3rd Scene.
Tip
You can also customize the title of the navigation item by double-clicking in the center of the blank area at the top of each scene. Unfortunately, sometimes it is difficult to hit the right spot, and thus the approach of accessing the Title field through the document outline.
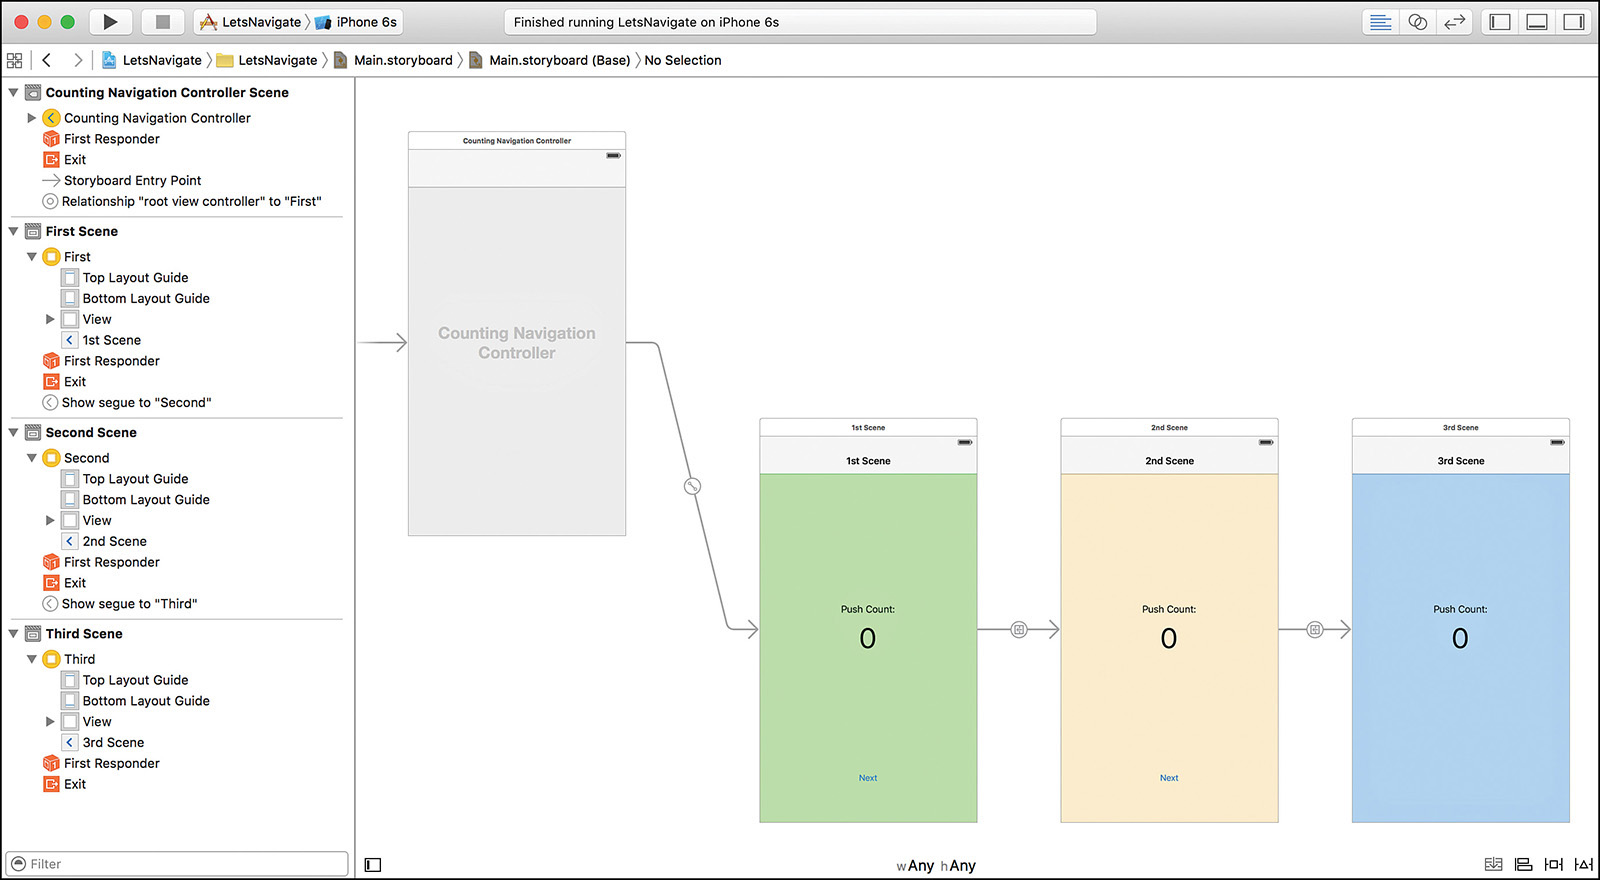
In each scene, add a label (UILabel) near the top that reads Push Count: and a second label (the output label) with the default text of 0 (and a large, center-aligned font, if you like) to the center of each view.
For my design, I’m setting slightly different backgrounds for each of the three scenes. This can help users identify when they have moved to a different part of the application, but it has no functional bearing on the project. Figure 13.15 shows my final interface design.
Creating and Connecting the Outlets and Actions
Only one outlet and one action need to be defined in this project, but they need to be connected several times. The outlet (a connection to the label displaying the push count, countLabel) will be connected to each of the three scenes. The action (incrementCount) will need to be connected to the button only in the first and second scenes.
Position your display in the IB editor so that the first scene is visible (or just use the document outline), and click its push count label, and then switch to the assistant editor mode. The GenericViewController.swift file should be visible, because we’re defining variable properties and methods.
Adding the Outlet
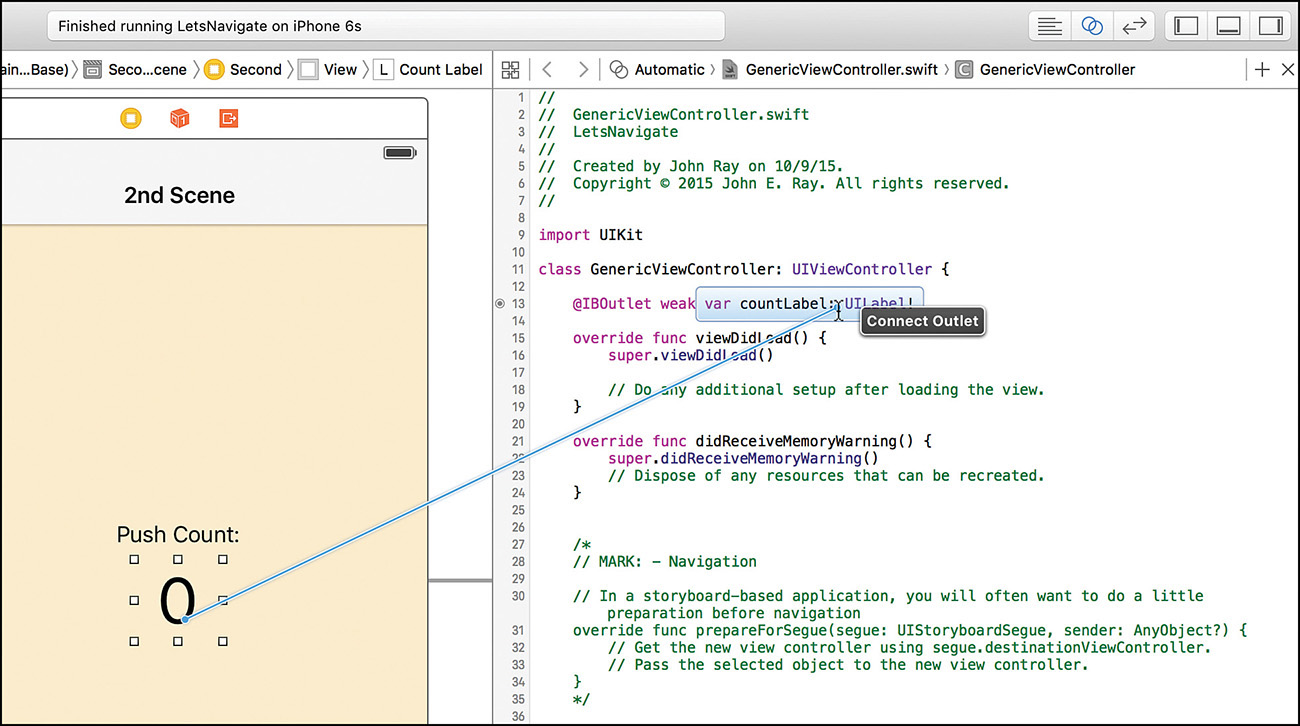
Control-drag from the label in the center of the first scene to just below the class line in GenericViewController.swift. When prompted, create a new outlet named countLabel.
That created the outlet and the connection from the first scene; now you need to connect it to the other two scenes. Control-drag from the second scene’s push count label and target the countLabel variable property you just created. The entire line will highlight, as shown in Figure 13.16, showing you are making a connection to an existing outlet. (You can drag from the circle beside the countLabel definition in GenericViewController.swift to the label within the scene—essentially the reverse of what you just did—and accomplish the same thing.)
Repeat this for the third scene, connecting its push count label to the same variable property.
Adding the Action
Adding and connecting the action works in much the same way. Start by Control-dragging from the first scene’s button to just below the variable property definition in GenericViewController.swift. When prompted, create a new action named incrementCount.
Switch to the second scene and Control-drag from its button to the existing incrementCount action. You’ve just made all the connections we need.
Implementing the Application Logic
Most of our work is now behind us. To finish the tutorial, we first need to set up the pushCount variable property in the CountingNavigationController class so that it can keep track of the number of times we’ve pushed a new scene in the application.
Adding the Push Count Variable Property
Open the CountingNavigationController.swift file and add a variable property definition for an integer named pushCount below the class line:
var pushCount: Int = 0
That’s all we need to do to implement the custom CountingNavigationController class. Because it is a subclass of a UINavigationController, it already performs all the navigation controller tasks we need, and now it stores a pushCount value.
We’re all set to finish our implementation, which is just a matter of adding logic to GenericViewController that increments the counter and makes sure that it is displayed on the screen when a new scene is pushed into view.
Incrementing and Displaying the Counter
To increment the counter in GenericViewController.swift, we use the parentViewController variable property to access the pushCount variable property. The parentViewController, as you’ve learned, is automatically set to the navigation controller object within any scene managed by the navigation controller.
We need to cast the parentViewController to our custom class of CountingNavigationController, but the full implementation is just a single line. Implement incrementCount, as shown in Listing 13.1.
LISTING 13.1 Implementing the incrementCount Method
@IBAction func incrementCount(sender: AnyObject) {
(parentViewController as! CountingNavigationController).pushCount++
}
The final step is to update the display to show the current count. Because pushing the button increments the push count and pushes a new scene into view, the incrementCount action isn’t necessarily the best place for this logic to fall. In fact, it won’t always be accurate, because the count could be updated in another view, and then the Back button used to “pop” back to the original view, which would now be showing an invalid count.
To get around this, we just add the display logic to the viewWillAppear:animated method (a standard view controller method that we’ll need to add). This method is called right before a view is displayed onscreen (regardless of whether it is through a segue or by a user touching the Back button), so it is a perfect place to update the label. Add the code in Listing 13.2 to the GenericViewController.swift file.
LISTING 13.2 Updating the Display in viewWillAppear:animated
1: override func viewWillAppear(animated: Bool) {
2: super.viewWillAppear(animated)
3: let displayCount=(parentViewController as! CountingNavigationController).pushCount
4: countLabel.text=String(displayCount)
5: }
Line 3 declares a new constant, displayCount, and sets it to the pushCount variable property of the parent view controller. Line 4 uses the String() function to convert this value (an integer) to a string, and sets the countLabel’s text variable property to the string.
Building the Application
Run the application and test the navigation controller. Use the button to push new scenes on to the navigation controller stack, and then pop them back off with the Back button or the back swipe gesture functionality that we get for free. You can even use the swipe gesture to “peek” at the view underneath a given view. The push count stays in sync through all the different scenes because we now have a central class (CountingViewController) managing our shared variable property for us.
Using a Tab Bar Controller
In our second mini-project of the hour, we create an application with a tab bar controller that manages three individual scenes. As in the preceding project, each scene has a button to increment a counter, but these counters are unique for each scene (and visible in each scene’s view). We even set the tab bar item’s badge to that scene’s counter. Again, we demonstrate the use of this custom controller and how scenes can share information through the controller class.
Figure 13.17 shows the result we want.

Implementation Overview
We start with a cleaned-out Single View Application template. In this application, we add a tab bar controller and two custom classes: one a subclass of a tab bar controller to manage the application’s variable properties, and the other a subclass of a view controller to manage the display of the other three views.
Each scene will again have a single button that calls a method to increment that scene’s counter. Because the project calls for a unique counter for each scene, each button invokes a slightly different action method. This enables us to share all the code that is in common between the views (updating the badge and the count label) but have a slightly different increment action to target the right counter for that scene.
That’s it; no segues needed this time around.
Setting Up the Project
Make a new single-view project called LetsTab. Clean out the project by removing the ViewController class file and the initial scene, just as you did in the previous tutorial. Your starting point should be a project with no view controller and an empty storyboard file.
Adding the Tab Bar Item Images
Each scene that is managed by the tab bar controller needs an icon to represent it in the tab bar UI element. The Images folder inside this hour’s project folder contains PNG files (One.png, Two.png, Three.png) that can be used for this example.
Click the Assets.xcassets asset catalog in the project navigator so that it displays in the editor. Drag the Images folder from the OS X Finder into the column on the left within the catalog. This action creates a new folder in the catalog and makes the images available to your project.
Adding the Tab Bar Controller and Generic View Controller Classes
This project requires two custom classes. The first is a subclass of the UITabBarController that will hold three variable properties—counters for each of the scenes in the project. This custom controller class will be named CountingTabBarController. The second, a subclass of UI-ViewController, will be named GenericViewController and include a private action to increment a scene-specific count of each button press that occurs.
To create these two custom classes, follow these steps:
1. Click the + button at the bottom-left corner of the project navigator and choose File.
2. Choose the iOS Source category and Cocoa Touch class, and then click Next.
3. Name the new class CountingTabBarController and configure the subclass to UITabBarController.
4. Set the language to Swift, and then click Next.
5. Be sure to create the class files inside your main project code group, or drag the files there later.
Repeat these steps, creating a new UIViewController subclass named GenericViewController. We did almost exactly this for the previous example, so if you’re experiencing déjà vu, it’s okay.
Adding the Tab Bar Controller
Open the project’s storyboard, and drag a tab bar controller into an empty area of the IB editor (or into the document outline area). Your project will now show a tab bar controller scene with two scenes.
Associate the tab bar controller with the custom CountingTabBarController by selecting the Tab Bar Controller line in the document outline, and then open the Identity Inspector (Option-Command-3). Within the Custom Class section, use the class drop-down menu to choose CountingTabBarController.
Like the last project, we must make sure Xcode knows this is the view controller to display when the application starts. With the tab bar controller still selected in the document outline, open the Attributes Inspector (Option-Command-4) and check the Is Initial View Controller check box. Finally, use the Size drop-down within the Simulated Metrics section to set a simulated size of your choosing.
Adding Additional Scenes and Associating the View Controller
The tab bar controller, by default, includes two scenes in your project. Why two? Because a tab bar controller only makes sense with more than one scene, so Apple chose to include two to start. This project, however, calls for three scenes to be managed by the tab bar controller, so drag an additional instance of the view controller object from the Object Library into the editor or the document outline.
After adding the additional scene, use the Identity Inspector to set each scene’s custom class to be the GenericViewController and establish a label for easy identification.
Select the Item 1 scene that corresponds to the first tab in the tab bar. Using the Identity Inspector (Option-Command-3), set the Class drop-down menu to GenericViewController and the Label field to First. Move to the second scene and repeat, but set the label to Second. Finally, select the view controller line in the new scene you created. Set its class to GenericViewController and the label to Third. Note that the third scene isn’t yet connected to the tab bar controller; this is perfectly fine.
Planning the Variables and Connections
In this project, we need to track three different counts. The CountingTabBarController will have variable properties for each scene’s counter: firstCount, secondCount, and thirdCount.
The GenericViewController class will have two variable properties. The first, outputLabel, references a UILabel that contains the current values of the counters for all three scenes. The second variable property, barItem, connects to each scene’s tab bar item so that we can update its badge value.
Because there are three separate counters, the GenericViewController class requires three action methods: incrementCountFirst, incrementCountSecond, and incrementCountThird. A button in each scene invokes the method specific to that scene. Two additional methods (updateCounts and updateBadge) will also be added so that we can easily update the current count and badge value without having to rewrite the same code in each increment method.
Creating the Tab Bar Relationships
As with the navigation controller, it makes sense to connect the tab bar scenes to the tab bar controller before spending much time on the user interface. The act of making the connection will actually add the tab bar item object to each scene, which is something we need if we want to manipulate the item’s badge value.
Control-drag from the Counting Tab Bar Controller line in the document outline to the view controller of the scene you added (labeled Third). When prompted for the segue type, choose Relationship Segue, View Controllers, as shown in Figure 13.18. A new segue line (Relationship from "view controllers" to Item) will be added to the counting tab bar controller scene. In addition, the tab bar will become visible in the third scene, and a tab bar item will appear in the third scene’s view.

Because all the other scenes are already connected to the tab bar controller, we’re done here. Now we can move on to creating the interface.
Designing the Interface
Visually, each scene in this project is identical, with the exception of the tab bar item and a label showing the scene’s name.
Begin by adding a label (reading Scene One) to the first scene near the top of the view. Add a second label, to be used for output, to the center of the view. The output will span multiple lines, so use the Attributes Inspector (Option-Command-4) to set the number of lines for the label to 5. You can also center the text and adjust its size as desired.
Next, add a button labeled Count to the bottom center of the view. This will increment the counter for the view.
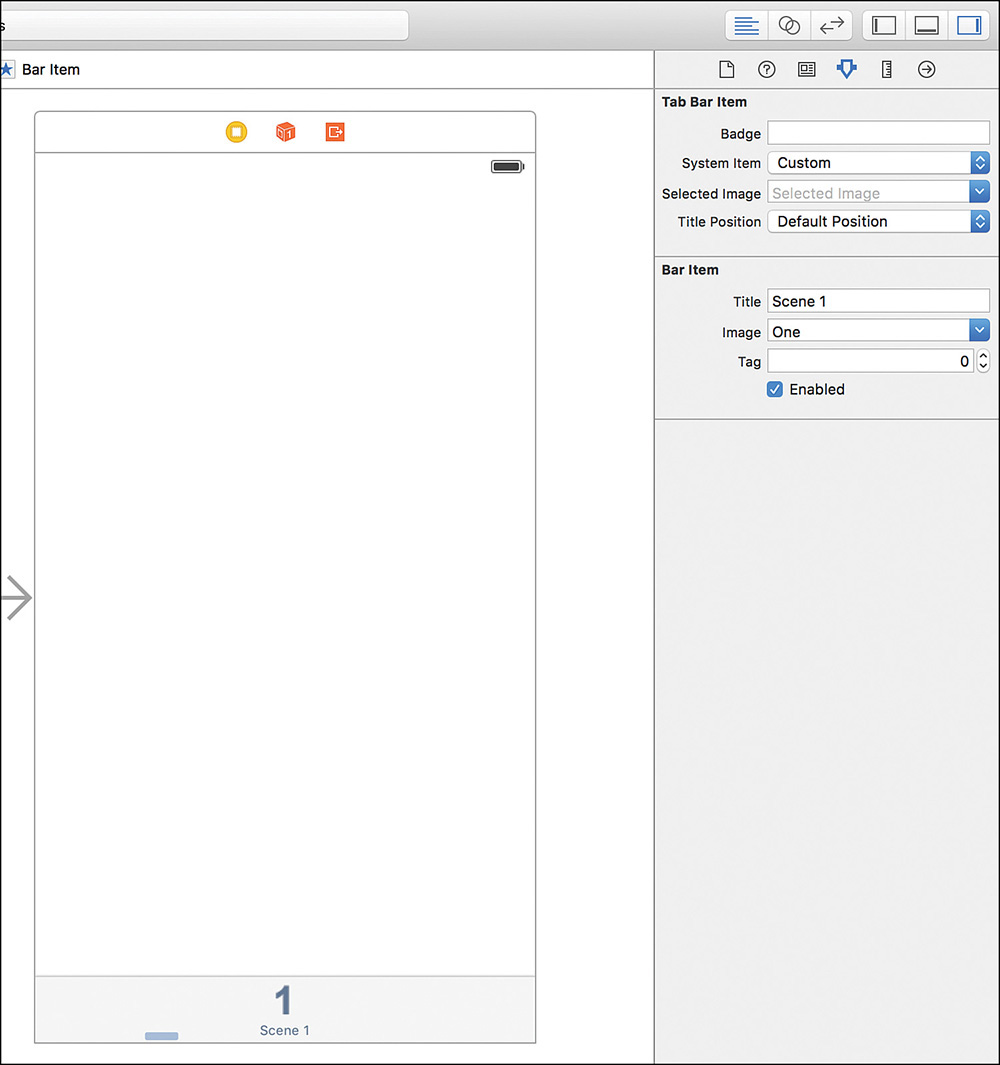
Now update the tab bar item to set its icon and label. Click the tab bar item at the bottom of the view, and open the Attributes Inspector. Use the Bar Item settings to set the title to Scene 1 and the image to One, as shown in Figure 13.19.
Repeat these design steps for the other two scenes. The second scene should be labeled Scene 2 and use the Two image file, and the third Scene 3 with Three.
As with the previous project, I’m setting a different background color for each of my views. This is purely optional, but can be used as a visual indicator that the user has moved to a different area of the application.
Figure 13.20 shows my completed tab bar application design.

Creating and Connecting the Outlets and Actions
Two outlets and three actions need to be defined in this project. The outlets will be connected identically in each scene, but the actions will be unique for each. Let’s review these connections now, starting with the outputs:
![]() outputLabel (UILabel): Used for displaying the results of each scene’s counter, this label must be connected in each scene.
outputLabel (UILabel): Used for displaying the results of each scene’s counter, this label must be connected in each scene.
![]() barItem (UITabBarItem): References the tab bar item that was automatically added to each view by the tab bar controller. This connection must be made in each scene.
barItem (UITabBarItem): References the tab bar item that was automatically added to each view by the tab bar controller. This connection must be made in each scene.
And the actions:
![]() incrementCountFirst: Connected to the Count button in the first scene, this action method updates the first scene’s counter.
incrementCountFirst: Connected to the Count button in the first scene, this action method updates the first scene’s counter.
![]() incrementCountSecond: Connected to the Count button in the second scene, this action method updates the second scene’s counter.
incrementCountSecond: Connected to the Count button in the second scene, this action method updates the second scene’s counter.
![]() incrementCountThird: Connected to the Count button in the third scene, this action method updates the third scene’s counter.
incrementCountThird: Connected to the Count button in the third scene, this action method updates the third scene’s counter.
Make sure that the first scene is visible in IB (or just use the document outline), and then switch to the assistant editor mode.
Adding the Outlets
Control-drag from the label in the center of the first scene to just below the class line in GenericViewController.swift. When prompted, create a new private outlet named outputLabel.
Next, Control-drag from the tab bar item in the first scene to below the outputLabel variable property. Add another new outlet named barItem.
After creating the outlets for the first scene, connect them to the other two scenes. Control-drag from the second scene’s output label and target the outputLabel in GenericViewController.swift. Do the same for the second scene’s tab bar item, targeting barItem.
Repeat this for the third scene, connecting its label and tab bar item to the defined outlets.
Adding the Actions
The private actions are unique for each scene because each scene has a unique counter that needs to be updated. Start in the first scene and Control-drag from the Count button to below the variable property definitions in GenericViewController.swift. When prompted, create a new action named incrementCountFirst.
Move to the second scene and Control-drag from its button to a line below the incrementCountFirst action. Name this new action incrementCountSecond. Repeat this for the third scene, connecting to a new action named incrementCountThird.
Implementing the Application Logic
Only a little bit of development, and we have a fully functional tab bar application. It won’t be particularly useful, but making useful content is your job! Switch back to the standard editor now.
We start by establishing the three variable properties to track the Count button presses in each of three scenes. These are going to be added in the CountingTabBarController class and will be named firstCount, secondCount, and thirdCount.
Adding the Push Count Variable Property
Open the CountingTabBarController.swift file and add three integer variable property definitions below the class line:
var firstCount: Int = 0
var secondCount: Int = 0
var thirdCount: Int = 0
To complete the implementation, we’ll create two methods to update the display within the scenes and then add the actions to increment the counters and call the update methods.
Implementing the Counter Display
Even though the counter differs between scenes, the logic to update the display of all three counter values is entirely the same and is simply an expanded version of the code we used in the previous tutorial. We implement this logic in a new method named updateCounts.
Edit the GenericViewController.swift file and add the updateCounts method, as shown in Listing 13.3.
LISTING 13.3 Updating the Display Using the Counter Values
1: func updateCounts() {
2: let first=(parentViewController as!
3: CountingTabBarController).firstCount
4: let second=(parentViewController as!
5: CountingTabBarController).secondCount
6: let third=(parentViewController as!
7: CountingTabBarController).thirdCount
8: self.outputLabel.text =
9: "First: (first)
Second: (second)
Third: (third)"
10: }
Lines 2–7 set three constants (first, second, third) to the three variable properties in the parent view controller. Lines 8-9 set the outputLabel to a nicely formatted string using Swift’s string interpolation along with the first, second, and third constants.
Incrementing the Tab Bar Item Badge
To increment a scene’s tab bar item badge, we read the current value from the badge (badgeValue), convert it to an integer, add 1, convert the new value to a string, and then set the badgeValue to the string. Why is all of that conversion necessary? Because the badgeValue is a string, not an integer, so we need to make sure we have a properly formatted string to change it.
Because we have added a uniform barItem variable property accessible from all the scenes, we only need a single method in the GenericViewController class to handle incrementing the badge value. We’ll call this method updateBadge.
Add the code in Listing 13.4 to GenericViewController.swift.
LISTING 13.4 Updating the Tab Bar Item’s Badge
1: func updateBadge() {
2: var badgeCount: Int
3: if (barItem.badgeValue != nil) {
4: badgeCount = Int(barItem.badgeValue!)!
5: badgeCount++
6: barItem.badgeValue=String(badgeCount)
7: } else {
8: barItem.badgeValue="1"
9: }
10: }
Line 2 declares a new integer variable, badgeCount, that will ultimately hold the number that will be displayed in the tab bar item’s badge.
Line 3 checks to see if the barItem’s badgeValue is nil (entirely empty). If it is, that means that updateBadge hasn’t be called before, and the badge should be set to 1 (line 8).
If the badgeValue is anything other than nil, lines 4–6 are executed. Line 4 sets the badgeCount to Int(barItem.badgeValue!)!. Kinda weird looking, don’t you think? Ignore the !’s, and it’s a bit easier to understand: We get the badgeValue of barItem, and then use Int() to return it as an integer. The !’s are necessary because badgeValue is an optional variable property and Int()’s return value is optional—meaning that if it can’t create an integer, it returns nil.
In Line 5, badgeCount is incremented by 1.
Finally, line 6 sets the barItem.badgeValue to the badgeCount (converted to a string).
Triggering the Counter Updates
The very last step of this project is to implement the incrementCountFirst, incrementCountSecond, and incrementCountThird methods. If that sounds like a lot, don’t worry. Because the code to update the display and the badge is in a separate method, each of these methods is a total of three lines of code, and all of that code, with the exception of a single variable property, is the same in all three.
This method must update the appropriate counter in the CountingTabBarController class and then call the updateCounts and updateBadge methods to update the interface appropriately. Listing 13.5 shows an implementation for the incrementCountFirst method.
LISTING 13.5 Adding a Method in GenericViewController.swift to Update Each Scene’s Counter
@IBAction func incrementCountFirst(sender: AnyObject) {
(parentViewController as! CountingTabBarController).firstCount++
updateBadge()
updateCounts()
}
Add similar code for each of the other methods: incrementCountSecond and incrementCountThird. The only difference will be the variable property you increment. Instead of firstCount, you use secondCount and thirdCount.
Building the Application
Run the application and switch between the different scenes. Use each scene’s Count button to increment its unique counter. Thanks to the decision to store values in the centrally shared class, CountingTabBarController, all three counts can be accessed and displayed by any scene.
The tab bar items should also show and increment their badges when the Count button is used, providing yet another form of visual feedback that you can give to the user.
You should now be comfortable creating projects based around the tab bar and navigation controllers—a dramatic improvement over just a single scene, don’t you think? The next hour’s lesson finishes up our look at custom view controllers by introducing another interesting UI element and an entirely new application template. Get your fingers ready for more typing!
Further Exploration
By now, you should have a good idea of how to implement multiple views and switch between them either manually or via segue. There was quite a bit of information covered in this past hour, so I recommend reviewing the topics that we covered and spending some time in the Apple documentation reviewing the classes, the variable properties, and their methods. Inspecting the UI elements in IB will give you additional insight into how they can be integrated into your apps.
The navigation controller (UINavigationController) is often combined with other types of views, such as the table view, to enable the viewing of structured information in a logical manner. You learn a bit more about this in the next hour, but a read of the UINavigationController class reference is highly recommended. Unlike many class references, the navigation controller documentation fully describes how navigation controllers can and should be used. You’ll want to learn about the UINavigationController view hierarchy, as well as the UINavigationControllerDelegate protocol, which can help you respond to advanced user events within a navigation controller.
The tab bar controller (UITabBarController) also offers additional features beyond what we were able to cover here. If there are too many buttons to be displayed in a single tab bar, for example, the tab bar controller provides its own “more” view in the form of a navigation controller. This enables you to expand the user’s options beyond the buttons immediately visible onscreen. The UITabBarControllerDelegate protocol and the UITabBarDelegate can even implement optional methods to enable the user to customize the tab bar within the application. You can see this level of functionality within Apple’s Music application.
Summary
This hour’s lesson introduced two new view controller classes to your iOS toolkit. The first, the navigation controller, displays a sequence of scenes that are displayed one after the other (and are often used to drill down into detailed information about something). Navigation controllers also provide an automatic way to back out of a scene and return to the previous scene. The process of moving to a new scene is called pushing, and returning to the previous scene is called popping.
The second view controller, the tab bar controller, is used to create applications with a single unifying bar at the bottom that can be used to switch between different scenes. Each scene, according to Apple’s guidelines, should perform a unique function. Unlike the navigation controller, all the scenes managed by a tab bar controller are “random access,” meaning that users can switch between whatever tabs they like; there is no preset order.
Both of these controllers present an opportunity for sharing information between the different scenes that they manage by implementing variable properties and methods on a custom subclass of the controller.
Finally, and possibly the best thing you learned in this hour’s lesson, both of these controllers can be implemented almost entirely visually with the Xcode storyboard tools. This is a significant change from earlier releases where the code required to implement these features made them difficult to discuss.
Q&A
Q. What if I want to share information between objects that don’t have a central controller class?
A. The fact that the tab bar controller and navigation controller have a nice place to implement shared variable properties is great, but not necessary. You can always create a custom class in your application and reference it in other classes that need to exchange data.
Q. Can I mix and match scenes and segues?
A. Yes and no. Navigation controllers are required for pushing and popping views, and you can’t create a working tab bar application without a tab bar controller. You can, however, implement a navigation controller that is used in conjunction with a tab bar controller, display a segue that transitions to a navigation controller-managed series of scenes, and so forth.
Q. Are tab bar and toolbar objects interchangeable?
A. Absolutely not. A tab bar is for switching between different functional areas of an application. A toolbar is for activating a feature within a single functional area of an app.
a. Display
b. Shove
c. Push
d. Show
2. Adding additional scenes to a tab bar control involves establishing a new what?
a. Relationship
b. Push
c. Modal dialog
d. Link
3. A tab bar icon has what dimensions?
a. 30×30 points
b. 30×30 pixels
c. 60×60 points
d. 90×90 points
4. To set the badge displayed on a tab bar item, you’ll access which variable property?
a. badge
b. badgeText
c. badgeValue
d. badgeCircle
5. To reference the tab bar view controller or the navigation view controller from one of the child controllers, what variable property do you use?
a. parent
b. parentViewController
c. superViewController
d. viewControllerTop
6. The recommended approach for starting a tab bar application uses which template?
a. Tab Bar Application
b. Single View Application
c. Master Detail Application
d. Empty Application
7. What is used to set the badge value of a tab bar item?
a. Integer
b. Float
c. String
d. Any object
8. When you connect additional scenes to a navigation controller, what will they inherit?
a. Navigation title
b. Navigation bar
c. Navigation icon
d. Navigation button
9. How many additional classes were used to manage the content of the scenes (not including the controller) in this hour’s exercises?
a. 1
b. 2
c. 3
d. None
10. Although Xcode automatically adds some new objects to your navigation scenes, you must add which of the following?
a. UINavigationButton
b. UINavigationBar
c. UINavigationItem
d. UINavigationList
Answers
1. D. The Show segue is used to push a new scene onto a navigation controller.
2. A. New scenes are added to a tab bar controller by establishing relationships between new view controllers and the tab bar controller.
3. A. Tab bar icons should be roughly 30×30 points.
4. C. You’ll update the badgeValue variable property to change the badge displayed on a tab bar item.
5. B. Use the parentViewController variable property to grab the navigation or tab bar controller from any of the child controllers.
6. B. I always recommend using the Single View Controller as the starting point for tab bar applications, despite a separate tab bar template being available.
7. C. A String is used to set a tab bar item’s badge value.
8. B. New scenes added to a navigation controller will automatically inherit the navigation bar.
9. A. A single generic view controller class was used to handle all the additional scenes in both projects.
10. C. The UINavigationItem is no longer added automatically to scenes connected to a navigation controller.
Activities
1. Create a simple calculator application using the tab bar controller. Use one view, for example, for calculating the area of common shapes (circles, squares, and so on) and another for calculating volumes of their 3D equivalents (spheres, cubes, and so on). Use the central tab bar controller class to automatically populate dimensions that are entered in one view so that they can be reused in another.
2. Update the navigation controller example so that the navigation branches depending on a user’s selection.