
LESSON 11. Participating in LinkedIn Groups
In this lesson, you learn how to participate on LinkedIn groups, manage your groups, and create your own group.
Understanding LinkedIn Groups
LinkedIn groups offer a way for like-minded individuals to share and discuss relevant topics related to the focus of the group. With LinkedIn groups, you can network and share ideas with industry peers, discover job leads and recruit quality talent, promote your career or business, and learn about a wide range of professional topics.
Remember, to maximize the publicity potential of LinkedIn groups, focus on visibility and sharing your expertise rather than overt sales or advertising.
LinkedIn groups take many forms. There are groups for alumni, associations, nonprofits, professional interests, corporations, general networking, conference attendees, and personal interests. Your group activity appears on the Group Updates section on your home page, providing additional visibility for your group actions and your groups.
LinkedIn imposes a limit of 50 group memberships per account holder. If you reach 50 groups and want to join another, you need to leave a group of which you’re currently a member. Because of this limit, it’s important to consider carefully which groups will provide you with the most value and help you meet your goals.
Note: LinkedIn Open Groups
In general, you must request to join a LinkedIn group to participate in it. However, LinkedIn is currently introducing open groups as another group option. The discussions on an open group are visible to all LinkedIn users and don’t require you to join the group. Other benefits of open groups include search engine indexing and sharing on Facebook and Twitter. All existing groups will remain members-only unless the group owner chooses to change the group’s status.
Joining a Group
One of the best ways to find a group to join is to search LinkedIn’s Groups Directory. To search the directory for potential groups to join, follow these steps:
- On the global navigation bar, select Groups Directory from the Groups drop-down menu. The Featured Groups page opens, shown in Figure 11.1.
Figure 11.1. Join a featured group or search for one that meets your criteria.
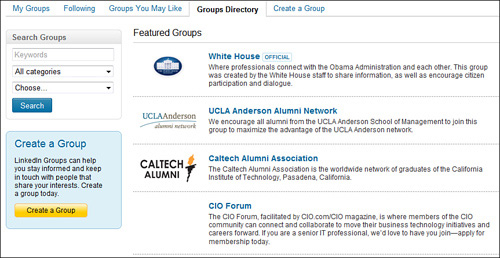
- In the Search Groups box, enter keywords related to the group you want to find. For example, you could enter the name of a company, school, professional association, skill, or hobby.
- If you want to narrow your search results by category, click All Categories and select a category from the drop-down list. Options include groups for professional association members, alumni, corporate employees, conference attendees, nonprofits, and general networking.
- If you want to narrow your search by language, select a language from the Choose drop-down list.
- Click the Search button to open the Search Results page, which displays a preview of each group that matches your search criteria. The preview boxes include a group description, the group owner’s name, and the number of members. Click the group title to view more details, including a list of people in your network who already belong to this group.
- Click the Join Group button on the Search Results page to open the Join Group page, as shown in Figure 11.2.
Figure 11.2. Select your group contact preferences on the Join Group page.
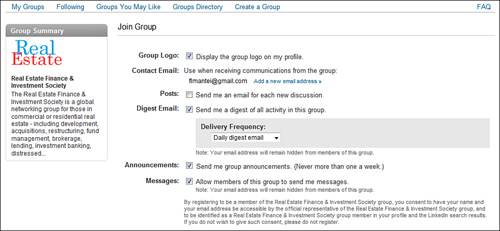
- If you want the group logo to appear in the Groups section on your profile, select the Group Logo check box. Placing this logo on your profile identifies you to fellow members.
- Specify the Contact Email for sending group announcements and updates.
- If you want to receive an email for each new discussion, select the Posts check box. Be aware that this could result in a lot of email if your group is an active one.
- If you want to receive summary email updates of group activity, select the Digest Email check box. You can choose to have updates delivered on a daily basis or a weekly basis.
- To receive group announcements no more than once per week, select the Announcements check box.
- To allow other members of your group to send you messages on LinkedIn, select the Messages check box. (They won’t see your personal email address.)
- Click the Join Group button to join the group.
The My Groups page opens, which lists your current and pending groups. Group managers approve join requests manually unless the group was set up for automatic approval. Your status for a new group on the My Groups page is listed as pending approval. This status remains until the group manager approves you. If you want to follow up with the group owner about a join request, click the Send Message to the Group Manager link. If want to cancel your request to join the group, click the Withdraw Request link.
Participating in Group Discussions
Participating in discussions is one of the greatest values of joining a group. With LinkedIn group discussions, you can view discussion threads for relevant professional information, add a comment to a current discussion, start your own discussion, or share news and links with group members.
Caution: Focus on Quality, Professional Discussions
As with everything else on LinkedIn, focus on intelligent, meaningful comments that add value to a discussion. Don’t post a sales pitch or irrelevant comment just to lead people to your profile.
To view discussions for a group you belong to, click the Groups link on the global navigation menu to open the My Groups page. From there, click the title of the group you want to view. Near the top of the Discussion tab, the discussions carousel (see Figure 11.3) rotates new discussion content every few seconds. This is a great way to preview what’s new with your group.
Figure 11.3. Preview a rotating carousel of new discussion content.
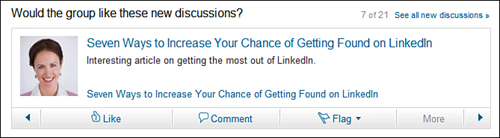
Below each carousel item, you’ll find buttons that enable you to like the discussion (similar to Facebook’s Like feature), add a comment, or flag the post as promotional, job-related, or inappropriate. To view a discussion item in more detail, click its headline.
The most popular discussions display below the carousel. Again, click a discussion item’s headline to view the entire discussion, like it, add comments, follow it, flag it, or reply privately to the author.
Liking a Discussion
If you find a discussion item particularly useful and interesting, you can show your support by clicking the Like button below it in the discussion carousel or on its detail page (see Figure 11.4). Liking a discussion alerts other group members as well as your followers that you found the discussion worthwhile. If you change your mind or click this button by mistake, you can unlike the discussion.
Figure 11.4. Click the Like button to point out quality discussions to your fellow group members.
![]()
Adding Comments to a Discussion
To add a comment to a discussion, follow these steps:
- Click the Comment button below any discussion item in the carousel. Alternatively, click the discussion headline to open it fully and comment on that page.
- Enter your own comment in the Add a Comment text box, shown in Figure 11.5.
Figure 11.5. Contributing your own thoughts to a discussion.

- If you want to receive email notification of any new comments in this discussion, select the Send Me an Email for Each New Comment check box.
- Click the Add Comment button to post your comment.
Tip: Reply Privately If You Don’t Want to Post a Comment
To reply privately to the original poster or anyone who posted a comment, select Reply Privately from the More drop-down menu.
After you post a comment, LinkedIn gives you 15 minutes to revise it. Click the Edit Comment link below your comment to make any changes. Click the Delete link to remove your comment from the discussion at any time.
Following Group Discussions and Members
If you want to know when someone adds a new comment to a discussion item you find particularly relevant, you can follow the discussion. To do so, click the discussion item’s headline and click the Follow link below the discussion text on the detail page. LinkedIn sends you an email anytime someone adds a comment. By default, you follow any discussion that you start or comment on unless you specify that you don’t want to receive email notification.
If you decide you no longer want to follow a discussion, click the Unfollow link below it. You can also manage your group-following activity by clicking a group’s Following tab to open the My Followed Discussions page.
To follow a group member, click the Follow link below that person’s photo. You can unfollow people by clicking the Stop Following link below their name or by going to the My Followed Discussions page.
Starting a Discussion
On the Discussions tab, you can start your own discussion or share relevant news and links with other group members.
To start your own discussion, follow these steps:
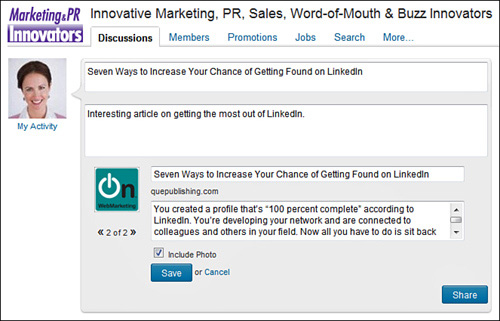
- Enter up to 200 characters in the text box at the top of the Discussions tab (to the right of your photo), shown in Figure 11.6. This text serves as your discussion headline, so consider carefully what you want to enter.
Figure 11.6. Start a discussion or share some news.
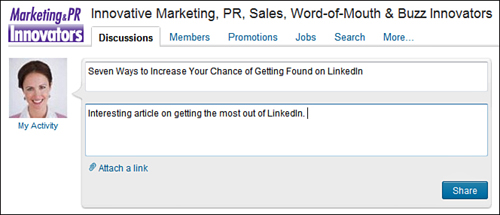
- The section expands to include a second text box where you can add more details (up to 4,000 characters).
- If you want to refer to an external URL, click the Attach a Link link. If not, skip to step 9.
- Enter the URL you want to include in the Add News box, such as http://www.quepublishing.com. For example, you could attach a link to an article you just read in a major newspaper, or you could submit a great post from your favorite blog.
Caution: Don’t Overdo Self-Promotion
Submitting your own articles, blog posts, or media coverage is acceptable, but don’t overdo this feature as a promotional tool. Submit only the most informative, meaningful content that offers value to the members of your group. If your post is promotional, click the Promotions tab to post a promotion to your group.
- Click the Attach button. LinkedIn searches for this URL and displays a title, description, and photo from this content it finds on this page (see Figure 11.7).
Figure 11.7. Attach links to relevant external sites, such as a website, blog, or news site.
- Optionally, click the Edit link to make changes to this default content.
- Enter any changes to the title or description in the text boxes.
- The Include Photo check box is selected by default, but you can remove this check mark if you don’t want to include a photo. To change from the default photo, click the arrows below the photo to view alternative selections. LinkedIn searches for any photos on the page you’re sharing and offers them as options.
- Click the Share button to post your discussion item for your fellow group members to see.
Using a Group’s Jobs Discussion Board
If you’re recruiting for a position that would interest the members of a specific LinkedIn group, you can post your job on the group’s Jobs Discussion Board, located on the Jobs tab. This is also a great place for job seekers to find targeted jobs.
Tip: Consider LinkedIn’s Other Job Search and Recruiting Tools
For more ways to search for and post jobs on LinkedIn, click the Jobs link on the top navigation menu. Refer to Lesson 9, “Finding a Job,” and Web Lesson 1, “Recruiting Job Candidates,” for more information.
To view job postings for a group you belong to, click the Groups link on the global navigation bar. On the My Groups page, select Go To, Jobs in the preview box of your target group. The group opens with the Jobs tab selected.
The Jobs tab displays a preview of the jobs with the most recent activity. Each preview box includes the name and photo of the person who posted the job, when it was posted, and links to follow the discussion or add comments.
Although Recent Activity is the default view, you can also click any of the links on the left side of the page for additional views.
To view the actual job posting, click the job headline. The links below the job description text enable you to like the job posting, comment on it, follow it, flag it, or reply privately to the poster. These functions are very similar to responding to a discussion item, covered in the “Participating in Group Discussions” section earlier in this lesson.
To post a job, follow these steps:
- Select the Jobs tab and click the Post a Job link. The Post a Job page opens, shown in Figure 11.8.
Figure 11.8. Post a job targeted to members of a specific LinkedIn group.
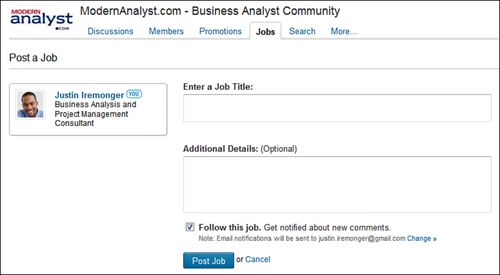
- Enter a job title that clearly defines the nature of the job.
- Enter additional details about your job. If you don’t want potential candidates to contact you through LinkedIn, be sure to provide alternative contact information.
- If you want to receive email notification of any new comments related to the job you post, select the Follow This Job check box.
- Click the Post Job button to post your job to the Jobs tab.
Managing Your Groups
LinkedIn offers you lots of flexibility in how you participate in, manage, and view the groups you join. You can also search for and share specific group information, and leave a group any time you want.
Viewing Your Groups
You can view a list of the groups you belong to by clicking the Groups link on the global navigation bar. The My Groups page opens, shown in Figure 11.9.
Figure 11.9. View information about all your groups in one place.
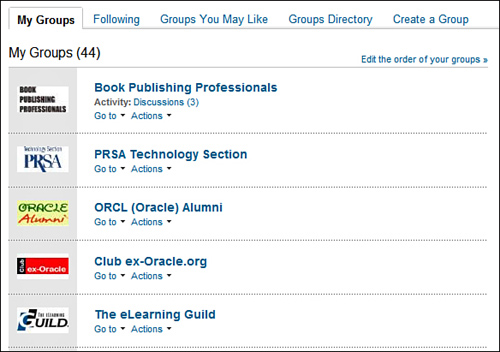
This page lists all your groups with the following links appearing below each group’s name:
• Go To: Click the Go To link and select one of the following options from the drop-down list: Discussions, Subgroups, Jobs, Updates, Members, or Settings.
• Actions: Click the Actions link and select one of the following actions: Forward, Start a Discussion, or Leave Group.
If your request to join a group is still pending, you’ll see a notification in that group’s preview box. The links to specific tasks aren’t available until you’re approved for a group. If you are not yet approved, your options include emailing the group manager or withdrawing your request.
If you’re the group manager, a Manage link is also available.
Tip: View Your Group Information on Your Profile
You can also view a list of the groups you belong to on your profile.
Changing the Display Order of Your Groups
For easy access to your groups, LinkedIn displays the first three groups in your My Groups list on the Groups menu you access from the global navigation bar (see Figure 11.10).
Figure 11.10. Access your favorite groups directly from your home page.
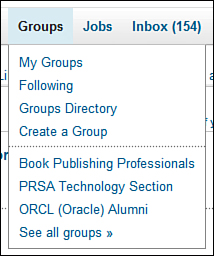
If you’re a frequent participant in group activity, it’s a good idea to display your favorite groups on this navigation menu. You can also increase the number of displayed groups from 3 to as many as 10.
To change the display order of your groups, follow these steps:
- On the global navigation bar, click the Groups link.
- On the My Groups page, click the Edit the Order of Your Groups link. The Groups Order and Display page opens, shown in Figure 11.11.
Figure 11.11. Choosing the order in which your groups appear.
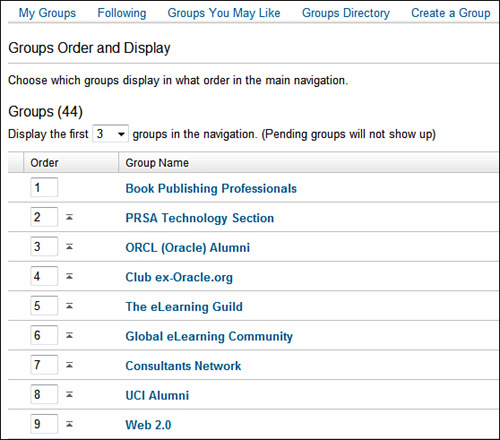
- Select the number of group links to display on the Groups drop-down menu on the global navigation bar. Options range from 1 to 10.
- Use the Order field to move each of your groups up or down until you reach your desired display order.
Note: Change Your Settings for Each of Your Groups
You can specify different settings for each of your groups. Click the Member Settings link to make changes to a particular group. See “Managing Group Settings” later in this lesson for more information.
- Click the Save Changes button to save your changes, which appear on the navigation menu.
Viewing Group Updates
To view the latest group updates, pause your mouse over the More tab on any group page and then select Updates from the drop-down list. The Updates page lists activity for the current and previous day, such as who joined the group, who started a discussion, who posted comments, and so forth. The default view is All Updates. Click the People I’m Following tab to display updates only from those group members you follow.
Viewing Group Members
To view a list of group members, click the Members tab on any group page. This page tells you how many members a group has and displays previews of each group member, starting with you. From there, LinkedIn lists your 1st degree connections, your 2nd degree connections, and, finally, all other members.
Depending on members’ settings and connection to you, their preview could include a photo, a profile link, a professional headline, their number of connections, and links to connect and send a message.
To search a group’s member list for members matching specific criteria, enter keywords in the Search Members box and click the Search button. You can also search groups from the quick search box on the top navigation menu. Refer to Lesson 7, “Searching on LinkedIn,” for more information on searching for people.
Managing Group Settings
To revise your settings for a group, pause your mouse over the More tab on any group page and then select My Settings from the drop-down list. The Settings page opens, which gives you the option to modify the visibility and contact options for a specific group.
The Settings page is identical to the Join a Group page. Refer to “Joining a Group,” earlier in this lesson, for more information on the settings you can modify on this page.
Forwarding Information About Groups
If you’re a member of a particular group that you think your connections would also enjoy, let them know about it by clicking the Forward This Group link on the Discussions tab of any group.
LinkedIn takes you to your Inbox where you can send a group link to as many as 50 of your connections. For best results, let your connections know why you recommend this group or why it’s appropriate for them.
See Lesson 6, “Communicating with Other LinkedIn Members,” for more information about the Inbox and sending messages.
Leaving a Group
If you decide that a group no longer meets your needs or you have to pare down your current group membership to make room for new groups, you can easily leave a group.
To do so, select Action, Leave Group on the My Groups page. LinkedIn displays a pop-up box asking you to confirm that you want to leave the group. Click the Yes, Leave Group button to remove the group from your My Groups page.
Creating and Managing Your Own Group
Creating your own group is a good way to develop a community for a topic, profession, or interest. Before you create a group, consider the following:
• Is there already a similar group on LinkedIn Groups? If so, how will your group differ? What value will you add?
• Is your proposed group an advertisement in disguise? Although many LinkedIn members do benefit from their participation with LinkedIn groups, you need to create a group whose focus is providing value and community to its members. If you don’t, your group most likely won’t succeed.
• Do you have the time to maintain and support your group? If you don’t respond quickly to join requests and keep the activity going with your group, it won’t flourish.
Creating Your Own Group
To create a new LinkedIn group, follow these steps:
- On the global navigation bar, click the Groups link.
- On the My Groups page, click the Create a Group link. The Create a Group page opens, shown in Figure 11.12.
Figure 11.12. Creating your own group.
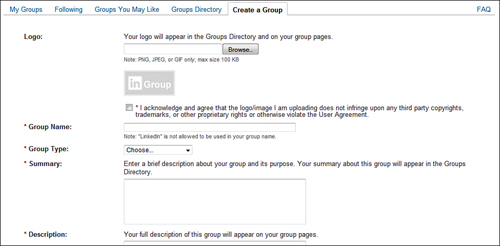
- Click the Browse button in the Logo section to select and upload a logo for your group. Supported formats include PNG, JPEG, and GIF files no larger than 100KB.
- Enter a group name. If your group also exists outside of LinkedIn, you can increase visibility by including the actual group name rather than just an acronym. For example, enter International Association of Business Communicators (IABC) instead of only IABC.
- Select a group type. Options include alumni, corporate, conference, networking, nonprofit, professional, or other groups. The Other group type is most appropriate for special interest or hobby groups that don’t fit into any other category.
- Enter a summary of your group. In this text box, indicate your group’s focus, goals, and any membership benefits your group might provide for LinkedIn members. This summary appears in the Groups Directory.
- In the Description text box, enter more details to display on your group pages.
- If your group has an external website, enter the URL in the Website field.
- Enter the Group Owner Email. LinkedIn sends all messages about your group to this email address.
- If you want to approve group membership requests, select the Request to Join option button. This option is selected by default. LinkedIn sends a message whenever someone requests to join your group, and you must approve the request manually. This requires extra effort on your part, but it ensures that only qualified people join your group. If your group members work for the same organization, you can pre-approve members with a specific email domain by entering it in the text box below.
- If you want LinkedIn to approve new group members automatically, without your approval, select the Open Access option button.
- Select the Display This Group in the Groups Directory check box or the Allow Group Members to Display the Logo on Their Profiles check box if you want to enable these options. These are great promotional tools for your group. Unless you have a specific need for privacy, it’s a good idea to make your group visible.
- Select a language for your group. English is the default language for groups, but LinkedIn offers numerous language choices.
- If your group is for members who are located in a specific geographic location, select the Location check box. The Country and Postal Code fields appear so that you can specify the exact location of your group.
- If you agree to the Terms of Service, select the Agreement check box. The Terms of Service cover your rights to provide LinkedIn with the email addresses of group members and LinkedIn’s rights to use the logo you upload.
- Click the Create Group button to create your group.
LinkedIn reviews your request to create a new group and approves the group if it meets LinkedIn’s guidelines.
Managing Your Own Group
After LinkedIn approves your group, you can start inviting and accepting members.
As a reminder, click the Groups link on the global navigation bar to open the My Groups page where you can access all your LinkedIn groups. To manage your group, select the Manage tab on your group’s page.
On the Manage tab, you can
• Approve or reject requests to join your group.
• Send invitations to LinkedIn members asking them to join your group.
• Upload a pre-approved list of email addresses for your group in the CSV format. This option is useful if your group also exists outside of LinkedIn, and you know the members you want to pre-approve.
Tip: Create Your CSV File in Microsoft Excel
Enter your list of pre-approved members in an Excel file with columns for first name, last name, and email. Save your spreadsheet as a CSV file. CSV stands for comma separated values, a common text file format.
Summary
In this lesson, you learned how to join and participate in LinkedIn groups, create your own groups, and manage your own groups.