Hour 3. Managing Database Objects
What You’ll Learn in This Hour:
• An introduction to database objects
• An introduction to the schema
• An introduction to the table
• A discussion of the nature and attributes of tables
• Examples for the creation and manipulation of tables
• A discussion of table storage options
• Concepts on referential integrity and data consistency
In this hour, you learn about database objects: what they are, how they act, how they are stored, and how they relate to one another. Database objects are the logical units that compose the building blocks of the database. The majority of the instruction during this hour revolves around the table, but keep in mind that there are other database objects, many of which are discussed in later hours of study.
What Are Database Objects?
A database object is any defined object in a database that is used to store or reference data. Some examples of database objects include tables, views, clusters, sequences, indexes, and synonyms. The table is this hour’s focus because it is the primary and simplest form of data storage in a relational database.
What Is a Schema?
A schema is a collection of database objects normally associated with one particular database username. This username is called the schema owner, or the owner of the related group of objects. You may have one or multiple schemas in a database. The user is only associated with the schema of the same name, and often the terms are used interchangeably. Basically, any user who creates an object has just created it in her own schema unless she specifically instructs it to be created in another one. So, based on a user’s privileges within the database, the user has control over objects that are created, manipulated, and deleted. A schema can consist of a single table and has no limits to the number of objects that it may contain, unless restricted by a specific database implementation.
Say you have been issued a database username and password by the database administrator. Your username is USER1. Suppose you log on to the database and then create a table called EMPLOYEE_TBL. According to the database, your table’s actual name is USER1.EMPLOYEE_TBL. The schema name for that table is USER1, which is also the owner of that table. You have just created the first table of a schema.
The good thing about schemas is that when you access a table that you own (in your own schema), you do not have to refer to the schema name. For instance, you could refer to your table as either one of the following:
EMPLOYEE_TBL
USER1.EMPLOYEE_TBL
The first option is preferred because it requires fewer keystrokes. If another user were to query one of your tables, the user would have to specify the schema as follows:
USER1.EMPLOYEE_TBL
In Hour 20, “Creating and Using Views and Synonyms,” you learn about the distribution of permissions so that other users can access your tables. You also learn about synonyms, which enable you to give a table another name so you do not have to specify the schema name when accessing a table. Figure 3.1 illustrates two schemas in a relational database.
Figure 3.1. Schemas in a database.
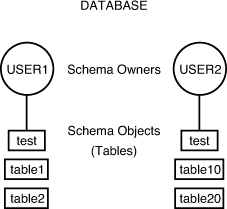
There are, in Figure 3.1, two user accounts in the database that own tables: USER1 and USER2. Each user account has its own schema. Some examples for how the two users can access their own tables and tables owned by the other user follow:
USER1 accesses own TABLE1: TABLE1
USER1 accesses own TEST: TEST
USER1 accesses USER2's TABLE10: USER2.TABLE10
USER1 accesses USER2's TEST: USER2.TEST
In this example, both users have a table called TEST. Tables can have the same names in a database as long as they belong to different schemas. If you look at it this way, table names are always unique in a database because the schema owner is actually part of the table name. For instance, USER1.TEST is a different table than USER2.TEST. If you do not specify a schema with the table name when accessing tables in a database, the database server looks for a table that you own by default. That is, if USER1 tries to access TEST, the database server looks for a USER1-owned table named TEST before it looks for other objects owned by USER1, such as synonyms to tables in another schema. Hour 21, “Working with the System Catalog,” helps you fully understand how synonyms work.
You must be careful to understand the distinction between objects in your own schema and those objects in another schema. If you do not provide a schema when performing operations that alter the table, such as a DROP command, the database assumes that you mean a table in your own schema. This could possibly lead to your unintentionally dropping the wrong object. So you must always pay careful attention as to which user you are currently logged into the database with.
Watch Out!: Object Naming Rules Differ Between Systems
Every database server has rules concerning how you can name objects and elements of objects, such as field names. You must check your particular implementation for the exact naming conventions or rules.
Tables: The Primary Storage for Data
The table is the primary storage object for data in a relational database. In its simplest form, a table consists of row(s) and column(s), both of which hold the data. A table takes up physical space in a database and can be permanent or temporary.
Columns
A field, also called a column in a relational database, is part of a table that is assigned a specific data type. The data type determines what kind of data the column is allowed to hold. This enables the designer of the table to help maintain the integrity of the data.
Every database table must consist of at least one column. Columns are those elements within a table that hold specific types of data, such as a person’s name or address. For example, a valid column in a customer table might be the customer’s name. Figure 3.2 illustrates a column in a table.
Figure 3.2. An example of a column.
Generally, a column name must be one continuous string and can be limited to the number of characters used according to each implementation of SQL. It is typical to use underscores with names to provide separation between characters. For example, a column for the customer’s name can be named CUSTOMER_NAME instead of CUSTOMERNAME. This is normally done to increase the readability of database objects. There are other naming conventions that you can utilize, such as Camel Case, to fit your specific preferences. As such, it is important for a database development team to agree upon a standard naming convention and stick to it so that order is maintained within the development process.
The most common form of data stored within a column is string data. This data can be stored as either uppercase or lowercase for character-defined fields. The case that you use for data is simply a matter of preference, which should be based on how the data will be used. In many cases, data is stored in uppercase for simplicity and consistency. However, if data is stored in different case types throughout the database (uppercase, lowercase, and mixed case), functions can be applied to convert the data to either uppercase or lowercase if needed. These functions are covered in Hour 11, “Restructuring the Appearance of Data.”
Columns also can be specified as NULL or NOT NULL, meaning that if a column is NOT NULL, something must be entered. If a column is specified as NULL, nothing has to be entered. NULL is different from an empty set, such as an empty string, and holds a special place in database design. As such, you can relate a NULL value to a lack of any data in the field.
Rows
A row is a record of data in a database table. For example, a row of data in a customer table might consist of a particular customer’s identification number, name, address, phone number, and fax number. A row is composed of fields that contain data from one record in a table. A table can contain as little as one row of data and up to as many as millions of rows of data or records. Figure 3.3 illustrates a row within a table.
Figure 3.3. Example of a table row.
The CREATE TABLE Statement
The CREATE TABLE statement in SQL is used to create a table. Although the very act of creating a table is quite simple, much time and effort should be put into planning table structures before the actual execution of the CREATE TABLE statement. Carefully planning your table structure before implementation saves you from having to reconfigure things after they are in production.
By the Way: Types We Use in This Hour
In this hour’s examples, we use the popular data types CHAR (constant-length character), VARCHAR (variable-length character), NUMBER (numeric values, decimal, and nondecimal), and DATE (date and time values).
Some elementary questions need to be answered when creating a table:
• What type of data will be entered into the table?
• What will be the table’s name?
• What column(s) will compose the primary key?
• What names shall be given to the columns (fields)?
• What data type will be assigned to each column?
• What will be the allocated length for each column?
• Which columns in a table can be left as a null value?
By the Way: Existing Systems Often Have Existing Naming Rules
Be sure to check your implementation for rules when naming objects and other database elements. Often database administrators adopt a naming convention that explains how to name the objects within the database so you can easily discern how they are used.
After these questions are answered, the actual CREATE TABLE statement is simple.
The basic syntax to create a table is as follows:
CREATE TABLE table_name
( field1 data_type [ not null ],
field2 data_type [ not null ],
field3 data_type [ not null ],
field4 data_type [ not null ],
field5 data_type [ not null ] );
Note that a semicolon is the last character in the previous statement. Also, brackets indicate portions that are optional. Most SQL implementations have some character that terminates a statement or submits a statement to the database server. Oracle, Microsoft SQL Server, and MySQL use the semicolon. Although Transact-SQL, Microsoft SQL Server’s ANSI SQL version, has no such requirement, it is considered best practice to use it. This book uses the semicolon.
Create a table called EMPLOYEE_TBL in the following example using the syntax for MySQL:
CREATE TABLE EMPLOYEE_TBL
(EMP_ID CHAR(9) NOT NULL,
EMP_NAME VARCHAR (40) NOT NULL,
EMP_ST_ADDR VARCHAR (20) NOT NULL,
EMP_CITY VARCHAR (15) NOT NULL,
EMP_ST CHAR(2) NOT NULL,
EMP_ZIP INTEGER(5) NOT NULL,
EMP_PHONE INTEGER(10) NULL,
EMP_PAGER INTEGER(10) NULL);
The following code would be the compatible code for both Microsoft SQL Server and Oracle:
CREATE TABLE EMPLOYEE_TBL
(EMP_ID CHAR(9) NOT NULL,
EMP_NAME VARCHAR (40) NOT NULL,
EMP_ST_ADDR VARCHAR (20) NOT NULL,
EMP_CITY VARCHAR (15) NOT NULL,
EMP_ST CHAR(2) NOT NULL,
EMP_ZIP INTEGER NOT NULL,
EMP_PHONE INTEGER NULL,
EMP_PAGER INTEGER NULL);
Eight different columns make up this table. Notice the use of the underscore character to break the column names up into what appears to be separate words (EMPLOYEE ID is stored as EMP_ID). This is a technique that is used to make table or column name more readable. Each column has been assigned a specific data type and length, and by using the NULL/NOT NULL constraint, you have specified which columns require values for every row of data in the table. The EMP_PHONE is defined as NULL, meaning that NULL values are allowed in this column because there might be individuals without a telephone number. The information concerning each column is separated by a comma, with parentheses surrounding all columns (a left parenthesis before the first column and a right parenthesis following the information on the last column).
Watch Out!: Limitations on Data Types Vary
Check your particular implementation for name length limits and characters that are allowed; they could differ from implementation to implementation.
Each record, or row of data, in this table consists of the following:
EMP_ID, EMP_NAME, EMP_ST_ADDR, EMP_CITY, EMP_ST, EMP_ZIP, EMP_PHONE, EMP_PAGER
In this table, each field is a column. The column EMP_ID could consist of one employee’s identification number or many employees’ identification numbers, depending on the requirements of a database query or transaction.
Naming Conventions
When selecting names for objects, specifically tables and columns, make sure the name reflects the data that is to be stored. For example, the name for a table pertaining to employee information could be named EMPLOYEE_TBL. Names for columns should follow the same logic. When storing an employee’s phone number, an obvious name for that column would be PHONE_NUMBER.
The ALTER TABLE Command
You can modify a table after the table has been created by using the ALTER TABLE command. You can add column(s), drop column(s), change column definitions, add and drop constraints, and, in some implementations, modify table STORAGE values. The standard syntax for the ALTER TABLE command follows:
alter table table_name [modify] [column column_name][datatype | null not null]
[restrict|cascade]
[drop] [constraint constraint_name]
[add] [column] column definition
Modifying Elements of a Table
The attributes of a column refer to the rules and behavior of data in a column. You can modify the attributes of a column with the ALTER TABLE command. The word attributes here refers to the following:
• The data type of a column
• The length, precision, or scale of a column
• Whether the column can contain NULL values
The following example uses the ALTER TABLE command on EMPLOYEE_TBL to modify the attributes of the column EMP_ID:
ALTER TABLE EMPLOYEE_TBL MODIFY
EMP_ID VARCHAR(10);
Table altered.
The column was already defined as data type VARCHAR (a varying-length character), but you increased the maximum length from 9 to 10.
Adding Mandatory Columns to a Table
One of the basic rules for adding columns to an existing table is that the column you are adding cannot be defined as NOT NULL if data currently exists in the table. NOT NULL means that a column must contain some value for every row of data in the table. So, if you are adding a column defined as NOT NULL, you are contradicting the NOT NULL constraint right off the bat if the preexisting rows of data in the table do not have values for the new column.
There is, however, a way to add a mandatory column to a table:
- Add the column and define it as
NULL. (The column does not have to contain a value.) - Insert a value into the new column for every row of data in the table.
- Alter the table to change the column’s attribute to
NOT NULL.
Adding Auto-Incrementing Columns to a Table
Sometimes it is necessary to create a column that auto-increments itself to give a unique sequence number for a particular row. You could do this for many reasons, such as not having a natural key for the data, or wanting to use a unique sequence number to sort the data. Creating an auto-incrementing column is generally quite easy. In MySQL, the implementation provides the SERIAL method to produce a truly unique value for the table. Following is an example:
CREATE TABLE TEST_INCREMENT(
ID SERIAL,
TEST_NAME VARCHAR(20));
By the Way: Using NULL for Table Creation
NULL is a default attribute for a column; therefore, it does not have to be entered in the CREATE TABLE statement. NOT NULL must always be specified.
In Microsoft SQL Server, we are provided with an IDENTITY column type. The following is an example for the SQL Server implementation:
CREATE TABLE TEST_INCREMENT(
ID INT IDENTITY(1,1) NOT NULL,
TEST_NAME VARCHAR(20));
Oracle does not provide a direct method for an auto-incrementing column. However, there is one method using an object called a SEQUENCE and a TRIGGER that simulates the effect in Oracle. This technique is discussed when we talk about TRIGGERs in Hour 22, “Advanced SQL Topics.”
Now we can insert values into the newly created table without specifying a value for our auto-incrementing column:
INSERT INTO TEST_INCREMENT(TEST_NAME)
VALUES ('FRED'),('JOE'),('MIKE'),('TED'),
SELECT * FROM TEST_INCREMENT;
| ID | TEST_NAME |
| 1 | FRED |
| 2 | JOE |
| 3 | MIKE |
| 4 | TED |
Modifying Columns
You need to consider many things when modifying existing columns of a table. Following are some common rules for modifying columns:
• The length of a column can be increased to the maximum length of the given data type.
• The length of a column can be decreased only if the largest value for that column in the table is less than or equal to the new length of the column.
• The number of digits for a number data type can always be increased.
• The number of digits for a number data type can be decreased only if the value with the most number of digits for that column is less than or equal to the new number of digits specified for the column.
• The number of decimal places for a number data type can either be increased or decreased.
• The data type of a column can normally be changed.
Some implementations might actually restrict you from using certain ALTER TABLE options. For example, you might not be allowed to drop columns from a table. To do this, you have to drop the table itself and then rebuild the table with the desired columns. You could run into problems by dropping a column in one table that is dependent on a column in another table or dropping a column that is referenced by a column in another table. Be sure to refer to your specific implementation documentation.
By the Way: Creating Tables for Exercises
You will create the tables that you see in these examples at the end of this hour in the “Exercises” section. In Hour 5, “Manipulating Data,” you will populate the tables you create in this hour with data.
Creating a Table from an Existing Table
Watch Out!: Altering or Dropping Tables Can Be Dangerous
Take heed when altering and dropping tables. If you make logical or typing mistakes when issuing these statements, you can lose important data.
You can create a copy of an existing table using a combination of the CREATE TABLE statement and the SELECT statement. The new table has the same column definitions. You can select any or all columns. New columns that you create via functions or a combination of columns automatically assume the size necessary to hold the data. The basic syntax for creating a table from another table is as follows:
create table new_table_name as
select [ *|column1, column2 ]
from table_name
[ where ]
Notice some new keywords in the syntax, particularly the SELECT keyword. SELECT is a database query and is discussed in more detail in Chapter 7, “Introduction to the Database Query.” However, it is important to know that you can create a table based on the results from a query.
Both MySQL and Oracle support the CREATE TABLE AS SELECT method of creating a table based on another table. Microsoft SQL Server, however, uses a different statement. For that database implementation, you use a SELECT ... INTO statement. This statement is used like this:
select [ *|column1, columnn2]
into new_table_name
from table_name
[ where ]
Here you’ll examine some examples of using this method.
First, do a simple query to view the data in the PRODUCTS_TBL table:
select * from products_tbl;
PROD_ID PROD_DESC COST
-----------------------------------------------
11235 WITCH COSTUME 29.99
222 PLASTIC PUMPKIN 18 INCH 7.75
13 FALSE PARAFFIN TEETH 1.1
90 LIGHTED LANTERNS 14.5
15 ASSORTED COSTUMES 10
9 CANDY CORN 1.35
6 PUMPKIN CANDY 1.45
87 PLASTIC SPIDERS 1.05
119 ASSORTED MASKS 4.95
Next, create a table called PRODUCTS_TMP based on the previous query:
create table products_tmp as
select * from products_tbl;
Table created.
In SQL Server, the same statement would be written as such:
select *
into products_tmp
from products_tbl;
Table created.
Now if you run a query on the PRODUCTS_TMP table, your results appear the same as if you had selected data from the original table.
select *
from products_tmp;
PROD_ID PROD_DESC COST
----------------------------------------------
11235 WITCH COSTUME 29.99
222 PLASTIC PUMPKIN 18 INCH 7.75
13 FALSE PARAFFIN TEETH 1.1
90 LIGHTED LANTERNS 14.5
15 ASSORTED COSTUMES 10
9 CANDY CORN 1.35
6 PUMPKIN CANDY 1.45
87 PLASTIC SPIDERS 1.05
119 ASSORTED MASKS 4.95
Did You Know?: What the * Means
SELECT * selects data from all fields in the given table. The * represents a complete row of data, or record, in the table.
Did You Know?: Default STORAGE Attributes for Tables
When creating a table from an existing table, the new table takes on the same STORAGE attributes as the original table.
Dropping Tables
Dropping a table is actually one of the easiest things to do. When the RESTRICT option is used and the table is referenced by a view or constraint, the DROP statement returns an error. When the CASCADE option is used, the drop succeeds and all referencing views and constraints are dropped. The syntax to drop a table follows:
drop table table_name [ restrict | cascade ]
SQL Server does not allow for the use of the CASCADE option. So for that particular implementation, you must ensure that you drop all objects that reference the table you are removing to ensure that you are not leaving an invalid object in your system.
In the following example, you drop the table that you just created:
drop table products_tmp;
Table dropped.
Watch Out!: Be Specific When Dropping a Table
Whenever you’re dropping a table, be sure to specify the schema name or owner of the table before submitting your command. You could drop the incorrect table. If you have access to multiple user accounts, ensure that you are connected to the database through the correct user account before dropping tables.
Integrity Constraints
Integrity constraints ensure accuracy and consistency of data in a relational database. Data integrity is handled in a relational database through the concept of referential integrity. Many types of integrity constraints play a role in referential integrity (RI).
Primary Key Constraints
Primary key is the term that identifies one or more columns in a table that make a row of data unique. Although the primary key typically consists of one column in a table, more than one column can comprise the primary key. For example, either the employee’s Social Security number or an assigned employee identification number is the logical primary key for an employee table. The objective is for every record to have a unique primary key or value for the employee’s identification number. Because there is probably no need to have more than one record for each employee in an employee table, the employee identification number makes a logical primary key. The primary key is assigned at table creation.
The following example identifies the EMP_ID column as the PRIMARY KEY for the EMPLOYEES table:
CREATE TABLE EMPLOYEE_TBL
(EMP_ID CHAR(9) NOT NULL PRIMARY KEY,
EMP_NAME VARCHAR (40) NOT NULL,
EMP_ST_ADDR VARCHAR (20) NOT NULL,
EMP_CITY VARCHAR (15) NOT NULL,
EMP_ST CHAR(2) NOT NULL,
EMP_ZIP INTEGER(5) NOT NULL,
EMP_PHONE INTEGER(10) NULL,
EMP_PAGER INTEGER(10) NULL);
This method of defining a primary key is accomplished during table creation. The primary key in this case is an implied constraint. You can also specify a primary key explicitly as a constraint when setting up a table, as follows:
CREATE TABLE EMPLOYEE_TBL
(EMP_ID CHAR(9) NOT NULL,
EMP_NAME VARCHAR (40) NOT NULL,
EMP_ST_ADDR VARCHAR (20) NOT NULL,
EMP_CITY VARCHAR (15) NOT NULL,
EMP_ST CHAR(2) NOT NULL,
EMP_ZIP INTEGER(5) NOT NULL,
EMP_PHONE INTEGER(10) NULL,
EMP_PAGER INTEGER(10) NULL,
PRIMARY KEY (EMP_ID));
The primary key constraint in this example is defined after the column comma list in the CREATE TABLE statement.
You can define a primary key that consists of more than one column by either of the following methods, which demonstrate creating a primary key in an Oracle table:
CREATE TABLE PRODUCT_TST
(PROD_ID VARCHAR2(10) NOT NULL,
VEND_ID VARCHAR2(10) NOT NULL,
PRODUCT VARCHAR2(30) NOT NULL,
COST NUMBER(8,2) NOT NULL,
PRIMARY KEY (PROD_ID, VEND_ID));
ALTER TABLE PRODUCTS_TST
ADD CONSTRAINT PRODUCTS_PK PRIMARY KEY (PROD_ID, VEND_ID);
Unique Constraints
A unique column constraint in a table is similar to a primary key in that the value in that column for every row of data in the table must have a unique value. Although a primary key constraint is placed on one column, you can place a unique constraint on another column even though it is not actually for use as the primary key.
CREATE TABLE EMPLOYEE_TBL
(EMP_ID CHAR(9) NOT NULL PRIMARY KEY,
EMP_NAME VARCHAR (40) NOT NULL,
EMP_ST_ADDR VARCHAR (20) NOT NULL,
EMP_CITY VARCHAR (15) NOT NULL,
EMP_ST CHAR(2) NOT NULL,
EMP_ZIP INTEGER(5) NOT NULL,
EMP_PHONE INTEGER(10) NULL UNIQUE,
EMP_PAGER INTEGER(10) NULL);
The primary key in this example is EMP_ID, meaning that the employee identification number is the column ensuring that every record in the table is unique. The primary key is a column that is normally referenced in queries, particularly to join tables. The column EMP_PHONE has been designated as a UNIQUE value, meaning that no two employees can have the same telephone number. There is not a lot of difference between the two, except that the primary key provides an order to data in a table and, in the same respect, joins related tables.
Foreign Key Constraints
A foreign key is a column in a child table that references a primary key in the parent table. A foreign key constraint is the main mechanism that enforces referential integrity between tables in a relational database. A column defined as a foreign key references a column defined as a primary key in another table.
Study the creation of the foreign key in the following example:
CREATE TABLE EMPLOYEE_PAY_TST
(EMP_ID CHAR(9) NOT NULL,
POSITION VARCHAR2(15) NOT NULL,
DATE_HIRE DATE NULL,
PAY_RATE NUMBER(4,2) NOT NULL,
DATE_LAST_RAISE DATE NULL,
CONSTRAINT EMP_ID_FK FOREIGN KEY (EMP_ID) REFERENCES EMPLOYEE_TBL (EMP_ID));
The EMP_ID column in this example has been designated as the foreign key for the EMPLOYEE_PAY_TBL table. This foreign key, as you can see, references the EMP_ID column in the EMPLOYEE_TBL table. This foreign key ensures that for every EMP_ID in the EMPLOYEE_PAY_TBL, there is a corresponding EMP_ID in the EMPLOYEE_TBL. This is called a parent/child relationship. The parent table is the EMPLOYEE_TBL table, and the child table is the EMPLOYEE_PAY_TBL table. Study Figure 3.4 for a better understanding of the parent table/child table relationship.
Figure 3.4. The parent/child table relationship.
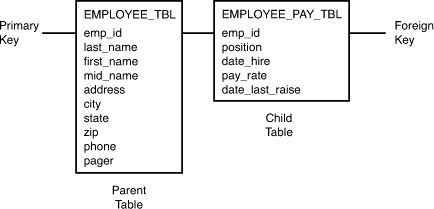
In this figure, the EMP_ID column in the child table references the EMP_ID column in the parent table. For a value to be inserted for EMP_ID in the child table, a value for EMP_ID in the parent table must exist. Likewise, for a value to be removed for EMP_ID in the parent table, all corresponding first values for EMP_ID must be removed from the child table. This is how referential integrity works.
You can add a foreign key to a table using the ALTER TABLE command, as shown in the following example:
alter table employee_pay_tbl
add constraint id_fk foreign key (emp_id)
references employee_tbl (emp_id);
By the Way: ALTER TABLE Variations
The options available with the ALTER TABLE command differ among implementations of SQL, particularly when dealing with constraints. In addition, the actual use and definitions of constraints vary, but the concept of referential integrity should be the same with all relational databases.
NOT NULL Constraints
Previous examples use the keywords NULL and NOT NULL listed on the same line as each column and after the data type. NOT NULL is a constraint that you can place on a table’s column. This constraint disallows the entrance of NULL values into a column; in other words, data is required in a NOT NULL column for each row of data in the table. NULL is generally the default for a column if NOT NULL is not specified, allowing NULL values in a column.
Check Constraints
You can utilize check (CHK) constraints to check the validity of data entered into particular table columns. Check constraints provide back-end database edits, although edits are commonly found in the front-end application as well. General edits restrict values that can be entered into columns or objects, whether within the database or on a front-end application. The check constraint is a way of providing another protective layer for the data.
The following example illustrates the use of a check constraint in Oracle:
CREATE TABLE EMPLOYEE_CHECK_TST
(EMP_ID CHAR(9) NOT NULL,
EMP_NAME VARCHAR2(40) NOT NULL,
EMP_ST_ADDR VARCHAR2(20) NOT NULL,
EMP_CITY VARCHAR2(15) NOT NULL,
EMP_ST CHAR(2) NOT NULL,
EMP_ZIP NUMBER(5) NOT NULL,
EMP_PHONE NUMBER(10) NULL,
EMP_PAGER NUMBER(10) NULL,
PRIMARY KEY (EMP_ID),
CONSTRAINT CHK_EMP_ZIP CHECK ( EMP_ZIP = '46234'));
The check constraint in this table has been placed on the EMP_ZIP column, ensuring that all employees entered into this table have a ZIP Code of '46234'. Perhaps that is a little restricting. Nevertheless, you can see how it works.
If you wanted to use a check constraint to verify that the ZIP Code is within a list of values, your constraint definition could look like the following:
CONSTRAINT CHK_EMP_ZIP CHECK ( EMP_ZIP in ('46234','46227','46745') );
If there is a minimum pay rate that can be designated for an employee, you could have a constraint that looks like the following:
CREATE TABLE EMPLOYEE_PAY_TBL
(EMP_ID CHAR(9) NOT NULL,
POSITION VARCHAR2(15) NOT NULL,
DATE_HIRE DATE NULL,
PAY_RATE NUMBER(4,2) NOT NULL,
DATE_LAST_RAISE DATE NULL,
CONSTRAINT EMP_ID_FK FOREIGN KEY (EMP_ID) REFERENCES EMPLOYEE_TBL (EMP_ID),
CONSTRAINT CHK_PAY CHECK ( PAY_RATE > 12.50 ) );
In this example, any employee entered into this table must be paid more than $12.50 an hour. You can use just about any condition in a check constraint, as you can with an SQL query. You learn more about these conditions in Hours 5 and 7.
Dropping Constraints
Using the ALTER TABLE command with the DROP CONSTRAINT option, you can drop any constraint that you have defined. For example, to drop the primary key constraint in the EMPLOYEES table, you can use the following command:
ALTER TABLE EMPLOYEES DROP CONSTRAINT EMPLOYEES_PK;
Table altered.
Some implementations provide shortcuts for dropping certain constraints. For example, to drop the primary key constraint for a table in MySQL, you can use the following command:
ALTER TABLE EMPLOYEES DROP PRIMARY KEY;
Table altered.
Did You Know?: Other Ways of Dealing with Constraints
Instead of permanently dropping a constraint from the database, some implementations allow you to temporarily disable constraints and then enable them later.
Summary
You have learned a little about database objects in general, but you have specifically learned about the table. The table is the simplest form of data storage in a relational database. Tables contain groups of logical information, such as employee, customer, or product information. A table is composed of various columns, with each column having attributes; those attributes mainly consist of data types and constraints, such as NOT NULL values, primary keys, foreign keys, and unique values.
You learned the CREATE TABLE command and options, such as storage parameters, that might be available with this command. You also learned how to modify the structure of existing tables using the ALTER TABLE command. Although the process of managing database tables might not be the most basic process in SQL, if you first learn the structure and nature of tables, you will more easily grasp the concept of accessing the tables, whether through data manipulation operations or database queries. In later hours, you learn about the management of other objects in SQL, such as indexes on tables and views.
Q&A
Q. When I name a table that I am creating, is it necessary to use a suffix such as _TBL?
A. Absolutely not. You do not have to use anything. For example, a table to hold employee information could be named something similar to the following, or anything else that would refer to what type of data is to be stored in that particular table:
EMPLOYEE
EMP_TBL
EMPLOYEE_TBL
EMPLOYEE_TABLE
WORKER
Q. Why is it so important to use the schema name when dropping a table?
A. Here’s a true story about a new DBA who dropped a table. A programmer had created a table under his schema with the same name as a production table. That particular programmer left the company. His database account was being deleted from the database, but the DROP USER statement returned an error because he owned outstanding objects. After some investigation, it was determined that his table was not needed, so a DROP TABLE statement was issued.
It worked like a charm, but the problem was that the DBA was logged in as the production schema when the DROP TABLE statement was issued. The DBA should have specified a schema name, or owner, for the table to be dropped. Yes, the wrong table in the wrong schema was dropped. It took approximately eight hours to restore the production database.
Workshop
The following workshop is composed of a series of quiz questions and practical exercises. The quiz questions are designed to test your overall understanding of the current material. The practical exercises are intended to afford you the opportunity to apply the concepts discussed during the current hour, as well as build upon the knowledge acquired in previous hours of study. Please take time to complete the quiz questions and exercises before continuing. Refer to Appendix C, “Answers to Quizzes and Exercises,” for answers.
Quiz
1. Does the following CREATE TABLE statement work? If not, what needs to be done to correct the problem(s)? Are there limitations as to what database implementation it works in (MySQL, Oracle, SQL Server)?
Create table EMPLOYEE_TABLE as:
( ssn number(9) not null,
last_name varchar2(20) not null,
first_name varchar2(20) not null,
middle_name varchar2(20) not null,
st address varchar2(30) not null,
city char(20) not null,
state char(2) not null,
zip number(4) not null,
date hired date);
2. Can you drop a column from a table?
3. What statement would you issue to create a primary key constraint on the preceding EMPLOYEE_TABLE?
4. What statement would you issue on the preceding EMPLOYEE_TABLE to allow the MIDDLE_NAME column to accept NULL values?
5. What statement would you use to restrict the people added into the preceding EMPLOYEE_TABLE to only reside in the state of New York ('NY')?
6. What statement would you use to add an auto-incrementing column called EMPID to the preceding EMPLOYEE_TABLE using both the MySQL and SQL Server syntax?
Exercises
In the following exercise, you will be creating all the tables in the database to set up the environment for later. Additionally, you will be executing several commands that will allow you to investigate the table structure in an existing database. For thoroughness we have provided instructions for each of the three implementations (MySQL, Microsoft SQL Server, and Oracle) because each is slightly different in its approach.
• MySQL
Bring up a command prompt and use the following syntax to log onto your local MySQL instance, replacing username with your username and password with your password. Ensure that you do not leave a space between –p and your password.
Mysql -h localhost –u username -ppassword
At the mysql> command prompt, enter the following command to tell MySQL that you want to use the database you created previously:
use learnsql;
Now go to Appendix D, “CREATE TABLE Statements for Book Examples,” to get the DDL for the tables used in this book. At the mysql> prompt, enter each CREATE TABLE statement. Be sure to include a semicolon at the end of each CREATE TABLE statement. The tables that you create are used throughout the book.
At the mysql> prompt, enter the following command to get a list of your tables:
show tables;
At the mysql> prompt, use the DESCRIBE command (desc for short) to list the columns and their attributes for each one of the tables you created. For example:
describe employee_tbl;
describe employee_pay_tbl;
If you have errors or typos, simply re-create the appropriate table(s). If the table was successfully created but has typos (perhaps you did not properly define a column or forgot a column), drop the table, and issue the CREATE TABLE command again. The syntax of the DROP TABLE command is as follows:
drop table orders_tbl;
• Microsoft SQL Server
Bring up a command prompt and use the following syntax to log onto your local SQL Server instance, replacing username with your username and password with your password. Ensure that you do not leave a space between –p and your password.
SQLCMD -S localhost –U username -Ppassword
At the 1> command prompt, enter the following command to tell SQL Server that you want to use the database you created previously. Remember that with SQLCMD you must use the keyword GO to tell the command tool that you want the previous lines to execute.
1>use learnsql;
2>GO
Now go to Appendix D to get the DDL for the tables used in this book. At the 1> prompt, enter each CREATE TABLE statement. Be sure to include a semicolon at the end of each CREATE TABLE statement and follow up with the keyword GO to have your statement execute. The tables that you create are used throughout the book.
At the 1> prompt, enter the following command to get a list of your tables. Follow this command with the keyword GO:
Select name from sys.tables;
At the 1> prompt, use the sp_help stored procedure to list the columns and their attributes for each one of the tables you created. For example:
Sp_help_ employee_tbl;
Sp_help employee_pay_tbl;
If you have errors or typos, simply re-create the appropriate table(s). If the table was successfully created but has typos (perhaps you did not properly define a column or forgot a column), drop the table and issue the CREATE TABLE command again. The syntax of the DROP TABLE command is as follows:
drop table orders_tbl;
• Oracle
Bring up a command prompt, and use the following syntax to log onto your local Oracle instance. You are prompted to enter your username and password.
sqlplus
Now go to Appendix D to get the DDL for the tables used in this book. At the SQL> prompt, enter each CREATE TABLE statement. Be sure to include a semicolon at the end of each CREATE TABLE statement. The tables that you create are used throughout the book.
At the SQL> prompt, enter the following command to get a list of your tables:
Select * from cat;
At the SQL> prompt, use the DESCRIBE command (desc for short) to list the columns and their attributes for each one of the tables you created. For example:
describe employee_tbl;
describe employee_pay_tbl;
If you have errors or typos, simply re-create the appropriate table(s). If the table was successfully created but has typos (perhaps you did not properly define a column or forgot a column), drop the table, and issue the CREATE TABLE command again. The syntax of the DROP TABLE command is as follows:
drop table orders_tbl;