Hour 19. Timeline
What You’ll Learn in This Hour:
► An introduction to Timeline system
► How to add and sequence clips
► More complex Timeline use cases
In this hour, you’ll take a look at a very powerful sequencing tool in Unity: the Timeline. You’ll begin by looking at the structure and concept of a timeline and a director. From there you’ll explore the concept of clips and how they can be sequenced on a timeline. Finally, you’ll finish this hour by looking at more ways you can use the Timeline to bring sophistication and complexity to your projects.
Timeline Basics
At its heart, the Timeline is a sequencing tool. This means it can be used to cause things to happen at specific times in relation to each other. What those things are is really up to you. In a way, a timeline is very similar to an Animator controller (see Hour 18, “Animators,” for a refresher). An Animator controller is used to sequence and control which animations are played on an object. The limitation, though, is that an Animator controller can only control itself or child objects. It can’t be used, for example, to create a cinematic where two guards talk to each other while a thief sneaks behind them in the shadows. This is exactly the type of work that the Timeline was intended to do. You can use it to sequence many different objects doing many different things at many different times.
Anatomy of a Timeline
The core element of a sequenced item is called a clip. While this would indicate that the Timeline is used for animations, the truth is that a clip can be anything from an audio clip, to a control track, to a custom data event, or even enabling and disabling game objects. You can even program your own clips and make them do whatever you want.
You place clips on one or more tracks (see Figure 19.1). The tracks determine what types of clips can be placed on them and what objects they control. In order to animate two characters in sequence, for example, you need two animation tracks (one for each character), with one or more animations on each.

FIGURE 19.1
The anatomy of a timeline.
Both the clips and the tracks rest on a timeline asset (pictured in Figure 19.1). This asset can be reusable between scenes or can even have multiple instances in a single scene. The timeline keeps track of the objects it controls through bindings. These bindings can be set up through code, but usually you just drag the objects you want to control onto the timeline.
Finally, the Timeline system uses a Playable Director component to control the timeline. This component is added to a game object in a scene and determines when the timeline plays, when it stops, and what happens when it finishes.
Creating a Timeline
As mentioned earlier in this hour, a timeline asset is the piece that all the other parts fit into. Thus, the first step in working with the Timeline is to create a timeline asset. To do this, right-click in the Project view and select Create > Timeline (see Figure 19.2).
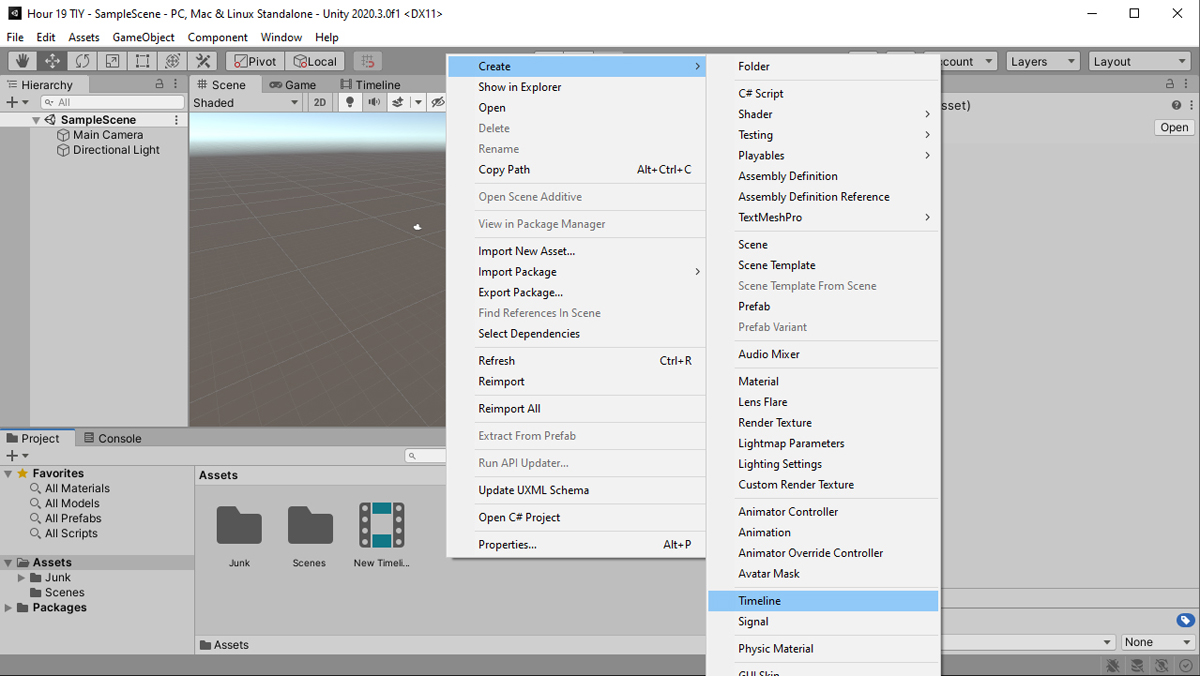
FIGURE 19.2
Creating a timeline.
Once a timeline is created, it needs to be controlled by a Playable Director component, which is added to a game object in the scene. In order to add a Playable Director component to a game object, you can simply select it and then click Add Component > Playables > Playable Director. Then you need to set the timeline asset as the Playable property of the Playable Director component. An easier way to complete both of these steps at once is to drag the timeline asset from the Project view onto the game object in the Hierarchy view that you want to control the timeline (see Figure 19.3).

FIGURE 19.3
Adding a Playable Director component to a game object.
Working with Timelines
Creating a timeline is a simple enough process, but a timeline doesn’t really achieve anything on its own. To use a timeline, you need to create tracks and clips that control and sequence objects in your scene. All this work is done through the Timeline window, which is very similar to the Animation window explored in Hour 17, “Animations.”
The Timeline Window
In order to see and work with a timeline, you need to open the Timeline window. You can do this by clicking Window > Timeline or simply double-clicking a timeline asset in the Project view. This window features controls for previewing and playback, mode controls, and a large area for working with tracks and clips (see Figure 19.4).

FIGURE 19.4
The Timeline window.
There would be little point to examining the Timeline window now, as it is rather empty. Instead, let’s move on, and you can learn more about the Timeline window as it becomes applicable.
Timeline Tracks
The tracks on a timeline determine what things can be done, what object does those things, and what things the object does. In essence, a timeline track does a lot of work for you. To add a track to a timeline, click the Add button in the Timeline window (refer to Figure 19.4). Table 19.1 lists the built-in track types and describes what they do.
TABLE 19.1 Timeline Track Types

Try it Yourself
Adding Tracks
In this exercise you’ll add tracks to the timeline asset you created earlier in this hour. Be sure to save this scene because you will continue using it later in this hour. Follow these steps:
1. Open the scene you created in the Try It Yourself “Creating a Timeline Asset.” Add a cube to the scene and position it at (0, 0, 0).
2. Open the Timeline window (by selecting Window > Timeline). Select the Director game object in the scene. You should see your timeline appear in the Timeline window (though it doesn’t have any tracks yet).
3. Lock the Timeline window by clicking the lock icon in the upper-right corner (refer to Figure 19.4).
4. Add an animation track by clicking the Add button and selecting Animation Track.
5. Bind the Cube game object to this animation track by dragging the Cube object from the Hierarchy view onto the Track Binding property in the Timeline window (see Figure 19.5).

FIGURE 19.5
Binding a track.
6. When prompted, click Create Animator on Cube.
7. Add an audio track by clicking the Add button and selecting Audio Track. The audio track doesn’t need to be bound to a game object in order to function.
Timeline Clips
Once you have tracks on your timeline, you need to add clips. The way clips behave varies slightly depending on the type of track you have, but the general functionality of all clips is the same. To add a clip to a track, simply right-click a track and select Add From <type of clip>. So, for example, if you were adding a clip to an audio track, the menu would say Add from Audio Clip (see Figure 19.6). A menu pops up, allowing you to pick the clip to add to the track. Alternatively, you can add a clip to a track by dragging a relevant asset from the Project view onto the track in the Timeline window.

FIGURE 19.6
Adding the clip called Beep High to an audio track.
Once there is a clip on the track, you can move it around to control when it plays. You can also resize the clip to change how long it plays. You can even use a clip’s duration to crop or loop an animation over a period of time. Note that the exact behavior of a clip’s duration depends on the track type.
Besides dragging clips around on a track to adjust their play settings, you can also select a clip and then modify the settings in the Inspector view. This gives you a finer level of control and tuning when working with clips (though it isn’t as fast as simply clicking and dragging).
Try it Yourself
Sequencing Clips
It’s finally time to actually get some stuff happening in your timeline! You will be adding clips to the timeline tracks you created in the Try It Yourself “Adding Tracks.” Be sure to save this scene again because you will continue using it later in this hour. Follow these steps:
1. Open the scene you created in the Try It Yourself “Adding Tracks.” Locate the book assets for Hour 19 and import two folders: Animations and Audio.
2. In the Timeline window, right-click the animation track bound to the Cube game object and select Add from Animation Clip.
3. In the Select AnimationClip dialog that pops up, choose the newly imported Red animation clip.
4. Repeat step 3, adding clips for Orange, Yellow, Green, Blue, Indigo, and Violet (see Figure 19.7).
5. Right-click the audio track and select Add from Audio Clip. Select the Beep High audio clip.
6. Duplicate the Beep High clip on the audio track six times by selecting the clip and pressing Ctrl+D on a PC or Command+D on a Mac.
7. Move the audio clips so that the timing lines up with the changing of the cube’s color.

FIGURE 19.7
The final timeline setup.
8. Preview the timeline by moving the scrubber or clicking the Play button in the Timeline window. Save your scene and then play it. Notice the cube’s color changing sequenced with the audio clips.
FIGURE 19.8
Recording within the Timeline window.
Going Beyond Simple Control
You have only just begun to scratch the surface of what you can do with the Timeline system. Obviously, this system is very good for cinematics, but it can also be used to create many types of rich behaviors. A few examples are controlling guard movements, making a crowd look more lifelike, or deploying a complex set of screen effects when a character takes damage.
Blending Clips on a Track
So far in this hour, you’ve looked at working with clips as individual items on a track. That doesn’t necessarily have to be the case, though. You can actually use a timeline to blend two different clips to get a new, combined result. Doing so simply requires that you drag one clip onto another one. Figure 19.9 shows the result of blending the Red and Orange clips from the Try It Yourself “Sequencing Clips.”

FIGURE 19.9
Blending clips in the Timeline window.
Blending works for more than just animation clips. You can also blend audio tracks and many of the custom tracks being created by the Unity community. Being able to blend clips allows for unprecedented levels of control and smooth action “tweening” between key frames.
Try it Yourself
Blending Clips
The following steps show you how to blend the clips you added in the Try It Yourself “Sequencing Clips” to create a smooth color transition across the rainbow. Be sure to save this scene again because you will continue using it later in this hour. Follow these steps:
1. Open the scene you created in the Try It Yourself “Sequencing Clips.” Ensure that the Timeline window is open and that the Director game object is selected.
2. In the Timeline window, drag the Orange clip so that it halfway covers the Red clip. In the Inspector view, the Orange clip should start on frame 30 and end on frame 90.
3. Continue blending the color clips leftward until the timeline consists of an almost continuous blend (see Figure 19.10).

FIGURE 19.10
Blending all color clips.
4. Shift the audio clips so that each one matches up with the beginning of a color animation. These sound cues will help identify each color as it is applied.
Scripting with the Timeline
For the most part, the code required to build custom playable tracks and clips is fairly complex and beyond the scope of this text. Something simple you can do, however, is to tell a timeline when to run instead of letting it run automatically when the scene first begins. This enables you to trigger cinematics or in-game events.
In order to write code that works with the Timeline system, you need to tell Unity to use the Playables library:
using UnityEngine.Playables;
Then you can create a variable of type PlayableDirector and use it to control the timeline. The two primary methods to use are Play() and Stop():
PlayableDirector director = GetComponent<PlayableDirector>();

director.Play(); // Start a timeline
director.Stop(); // Stop a timeline
Another thing you can do is tell a director what playable to play at runtime. One potential use case for this is to have a collection of timelines that get chosen randomly or to determine what timeline to play depending on the results of gameplay:
public PlayableAsset newTimeline;

void SomeMethod()
{
     director.Play(newTimeline);
}
Using these simple method calls, you can provide most of the functionality you need from the Timeline system at runtime.
Summary
You started this hour by exploring the Timeline system in Unity. You examined how to create timeline assets and fill them with tracks and clips. From there, you learned to mix and blend clips, and you finished the hour with some scripting to control timelines.
Q&A
Q. What is the difference between a timeline and a playable?
A. A timeline is a playable. It just happens to be a playable that plays playables (which also contain playables). Get it?
Q. How many timelines can be playing in a scene?
A. You can have—and play—as many timelines as you want in a scene. Be aware, though, that if two timelines are trying to control the same object, one of them will take priority over the other.
Workshop
Take some time to work through the questions here to ensure that you have a firm grasp of the material.
Quiz
1. What component plays a timeline in a scene?
2. How many track types are built into Unity?
3. What is the term for telling a timeline track which game object it controls?
4. How do you blend two clips?
Answers
1. Playable Director component
2. Six (seven if you count the group track)
3. This is called binding the object to the track.
4. Simply drag one clip onto the other on a track.
Exercise
This exercise is a bit of an open-ended invitation to play with the Timeline system. Besides practicing more with the Timeline, you are encouraged to check out some of Unity’s video training on the topic (see https://unity3d.com/learn/tutorials/s/animation). Here are some things to try in this hour:
► Create a dynamic UI using animations.
► Create a guard patrolling pattern.
► Set up a series of complex camera animations.
► Use an activation track to cause several lights to behave like strobes or a marquee.