Chapter 8: Kinesis Integrations
In the previous chapters, we covered the four Kinesis services: Kinesis Data Streams (KDS), Kinesis Firehose, Kinesis Data Analytics (KDA), and Kinesis Video Streams (KVS). When we looked at their core concepts, usage patterns, and examples, each service was shown in isolation or in combination with other Kinesis services. In this chapter, we will explore how the Kinesis family of services integrates with other AWS services to create applications or end-to-end solutions.
We will cover a wide variety of services, including Amazon Connect, Amazon Aurora, Amazon DynamoDB, Amazon Athena, AWS Glue, and third-party services such as Splunk. This chapter will serve as a good primer on these services, if you are unfamiliar with them. We will start by covering the basics of the services, and then focus on using them in conjunction with Kinesis. This book was written in the middle of the COVID-19 pandemic, and if there is one thing that's clear, it is that technology has made it possible for us to stay connected. Without the use of Amazon Chime, Slack, or GitHub, we would not have been able to complete this book.
We believe that the Amazon Kinesis family of services represents a connecting tissue for other AWS (and non-AWS) services. When used appropriately, the cloud allows us to quickly create new solutions and applications. In this chapter, we will integrate Kinesis with a wide variety of services and create a serverless data lake.
In this chapter, we're going to cover the following main topics:
- Amazon services that can produce data to send to Kinesis
- Amazon services that consume data from Kinesis
- Amazon services that transform Kinesis data
- Third-party integrations with Kinesis
Technical requirements
In this chapter, we will touch upon multiple services and technologies. The core technical requirements are listed in this section. There are numerous Git repositories that you will use for the integrations; we will call those out in their pertinent sections.
AWS account setup
You will need to get an AWS account to run the examples included in this chapter. If you do not have an account already, you can go to https://aws.amazon.com/getting-started/ to create an account. AWS accounts offer a Free Tier (https://aws.amazon.com/free).
The AWS Free Tier allows you to use many AWS services for free within specified usage limits. Some of the service examples in this chapter are outside the AWS Free Tier and incur some service usage charges.
AWS CLI
You will need the AWS Command-Line Interface (CLI) to execute the commands for multiple AWS services that will be used throughout this chapter. We recommend that you use AWS CLI v2 as it offers more interactive features.
For Windows, you can download and run the Windows installer here: https://awscli.amazonaws.com/AWSCLIV2.msi.
For MacOS, you can download and run the MacOS PKG installer here: https://awscli.amazonaws.com/AWSCLIV2.pkg.
Kinesis Data Generator
To create streaming data, we will use Kinesis Data Generator (KDG). If you haven't set up KDG already, please navigate to https://awslabs.github.io/amazon-kinesis-data-generator/web/producer.html and complete the setup portion.
Code examples
The code examples in this chapter are listed throughout multiple GitHub repositories; you will need a Git client to access them (https://git-scm.com/).
Amazon services that can produce data to send to Kinesis
In this section, we will cover services that produce data and then utilize Kinesis to deliver that data to its intended location(s). We will learn how to use Kinesis with those services to get faster insight from data. As is the case with any new technology, integration may present some challenges. It's impossible to cover all the possible integration scenarios, so we will focus on some examples where Kinesis integrates with Amazon Connect, DynamoDB, Aurora, and Spark Streaming.
Amazon Connect
One of Amazon's leadership principles is customer obsession (https://www.amazon.jobs/en/principles). Any company that wants to have satisfied long-term customers, in addition to having great products, requires excellent customer service. Most businesses need some sort of customer contact center, where a customer can call and talk to a customer service agent, to address customer questions or problems.
Amazon Connect is a service that allows us to run a serverless contact center. Using Amazon Connect, we can set up our customer service center in a matter of hours, and our agents can be virtually located anywhere in the world.
More importantly, AWS has designed Amazon Connect so that it can integrate with other platforms and services. If you are thinking, "that's where the Kinesis comes in," you are correct. If we want to track Connect Agent Events, we can send those to the desired destination using Kinesis Data Streams.The following diagram shows a reference architecture for Amazon Connect data streaming, with the consumers of that data being AWS services or third-party software solutions:

Figure 8.1 – Amazon Connect data streaming flow
One good example of an integration with AWS services would be sending AWS Connect agent events to AWS Redshift or a data lake to perform analysis on how well our agents are doing. AWS Connect generates agent events such as the following (this is a partial list):
- CONNECTED: The agent has accepted the contact.
- MISSED: The contact was missed by the agent.
As agent events are generated, we can have AWS Connect send those to Kinesis and then deposit them into the data lake. This will allow us to analyze how many missed calls there are, so that we can have additional agents made available and monitor the depth of our customer waiting queue. Similarly, instead of sending records to the data lake, we could send them to third-party systems such as Salesforce or Verint Workforce Management and Optimization.
At the time of writing this book, Amazon Connect doesn't offer support for CloudFormation, so to set up data streaming, we must use the AWS Console or AWS Cloud Development Kit (CDK).
Amazon Connect with CDK
To use CDK with Amazon Connect, we need to create a CDK custom resource and then utilize the APIs that are exposed via the Connect service. When we use custom resources with CDK, we need to use the Node.js API as a guide.
Let's explore how to set up data streaming with AWS Connect. If you don't have an AWS Connect Instance configured and running, you will need to do that first. Please follow the following guide to complete the Connect instance configuration: https://docs.aws.amazon.com/connect/latest/adminguide/amazon-connect-instances.html.
Once you have a Connect instance up and running, navigate to Amazon Connect in the AWS console. You will see your instances on that page. The instance name is a link you can use to get into the configuration; click on it. Click on the Data streaming link and then select Enable data streaming.
At this point, you can set up either a Kinesis Data Stream or Firehose Stream for Contact Trace Records. Agent Events can only flow through the Kinesis Stream. We can either select existing streams or create new ones. An example setup for data streaming for Amazon Connect is shown in the following screenshot:

Figure 8.2 – Streaming data from Amazon Connect
In this section, we learned how to export Contact Trace Records (CTRs) and agent events from Amazon Connect and then send them to Amazon Kinesis. If you have use cases that require Amazon Connect, then here is a real-world example of how PwC used Kinesis to create unified customer solutions with SalesForce: https://aws.amazon.com/blogs/apn/intelligent-case-management-using-amazon-connect-and-amazon-kinesis-data-streams/.
Amazon Aurora database activity
Amazon Aurora is an AWS Database-as-a-Service (DbaaS) that's offered through a MySQL or PostgreSQL engine. Being a managed service means that we can use the database without doing standard Database Administrator (DBA) tasks such as setting up actual hardware, establishing related networking and infrastructure, and installing database software. Aurora's most considerable appeal is that it is highly available out-of-the-box, because it replicates data to six storage nodes across multiple availability zones (built into the base price). As Aurora is a managed service, our visibility into the internals of the database's operations is limited, and that's where Activity Streams come in.
Aurora database activity streams allow us to extract those behind the scenes operations into the Kinesis data stream. Once our Aurora activity is in the Kinesis data stream, we can use it to trigger specific actions and observe usage and database activity. Let's see how we can set this up and get Aurora's activity into Kinesis.
We created the kinesisbook database using the Aurora PostgreSQL database with the db.r5.large instance. If you aren't familiar with Aurora and need further assistance with creating the database, please follow the following AWS guide: https://docs.aws.amazon.com/AmazonRDS/latest/AuroraUserGuide/Aurora.CreateInstance.html.
Creating a database will incur a cost
If you create a database, please be aware that your AWS account will be charged for using that database.
We made the database publicly available (don't do this with your production database unless there is an exact requirement). The following screenshot shows our Aurora PostgreSQL database:

Figure 8.3 – Aurora PostgreSQL database example
Before we start streaming Aurora's activity into Kinesis, we need to create an AWS Key Management System (KMS) key. Aurora's activity will be encrypted using the key that we provide. We can initiate sending database activity using the AWS console or CLI.
There are two modes of database activity streaming that are supported: synchronous and asynchronous. In synchronous mode, the database session blocks until it can write an event to the event stream. If there is an error, the database session continues the process and then creates a second event once the stream has recovered. With synchronous mode, we get the activity stream's accuracy, but that may impact database performance.
In asynchronous mode, the database writes first and returns control. The activity stream event is written separately and then sent. If an error occurs while writing the event to the stream, RDS sends the error itself and not the event. Asynchronous mode is better for database performance, but we may lose some accuracy regarding the activity stream.
To start Aurora streaming from the console, we must select our database cluster, then click on the Actions button and select Start activity stream. Another way we can do this is by using the CLI, as shown in the following screenshot:

Figure 8.4 – Starting RDS data streaming
Once Aurora streaming is active, we can connect to our database and generate some activity so that data is generated and sent to the Kinesis stream. An example of generating database activity would be creating or altering tables. Once there is some activity in our Aurora database, we can use the CLI to fetch records that Aurora has sent to Kinesis. In the following screenshot, we can see how to retrieve the Kinesis record that was inserted by the Aurora DB seen in Using the GetRecords API section in Chapter 5, Kinesis Firehose:

Figure 8.5 – Example of database activity being retrieved from Kinesis
The Kinesis record we retrieved is base64 encoded. Using an online base64 decoding tool (https://www.base64decode.org/), we can decode the Kinesis data record. The resulting output of base64 decoding will look similar to the following:
{
"type":"DatabaseActivityMonitoringRecords",
"version":"1.1",
"databaseActivityEvents":"AYADe<ABBREVIATED>/Q=",
"key":"AQIDAHhIKW8loWteYVqlyNhV8cpwWkF6X0PLmiWBsD51+
GYtrAFyxdnoY8TMt7oD8S7n8cl+AAAAfjB8BgkqhkiG9w0BBwagbzBtAgEAMGg
GCSqGSIb3DQEHATAeBglghkgBZQMEAS4wEQQMV2vbuf4HMEouImBtAgEQgDur4d
+efHMtSdcP9czoNUIGCp566cfOuyJkX7kjznliB665iNBXPj9cLsa
7NPH815ev1oIriyVdda4SMg=="}
The databaseActivityEvents field is encrypted with the KMS key that we specified, and to use it further, we would need to decrypt it. We aren't going to cover the details of decrypting the record here. You can find a full-fledged example in the following GitHub repository: https://github.com/iann0036/aurora-activity-streams-sechub.
In this section, we learned how to set up Aurora data streaming and how to fetch generated records from the Kinesis data stream.
DynamoDB activity
In the preceding section, we talked about integrating Kinesis with Aurora. We did this to obtain changes from the Aurora database and then process them as a stream of events using Kinesis. Another top-rated database service is DynamoDB, a fully managed NoSQL database.
DynamoDB is a key-value data store that can automatically scale as our workload grows or shrinks. DynamoDB provides a change data capture feature through DynamoDB Streams, which provides us with a time-ordered sequence of row modifications (in DynamoDB, a row is also referred to as an item). Please note that during re:Invent2020, AWS introduced the ability to stream data from DynamoDB directly into Kinesis. Full details can be found here: https://docs.aws.amazon.com/amazondynamodb/latest/developerguide/kds.html.
Now, we will explore how DynamoDB streams data into Kinesis. We will start by storing the SmartCity bike station address in DynamoDB, as shown in the following code:
{
"stationId": "100",
"address": {
"street": "1 Wall Street",
"postalCode": "10003",
"city": "New York",
"countryCode": "USA"
},
"active": "YES"
}
We will then create a DynamoDB Stream stream to notify us if any new stations are being added or removed. Whenever we add, modify, or delete (set "active" to NO) in the DynamoDB table, we will receive a record in our DynamoDB Stream with rows (items) that were modified.
Unlike with Aurora, we can set up a DynamoDB stream so that it includes the "before" and "after" information for the modified rows. Another difference between Aurora and DynamoDB streams is that DynamoDB streams are at the table level, and in Aurora, they are database-wide.
You may be wondering why we are discussing DynamoDB streams; shouldn't they just work like Aurora streams? The fact is that DynamoDB uses its own streaming technology, and although it is similar to Kinesis data streams, DynamoDB streams are not the same as Kinesis streams.
Like Kinesis but not Kinesis
"Although these DynamoDB Streams actions are similar to their counterparts in Kinesis Data Streams, they are not 100 percent identical." AWS documentation: https://docs.aws.amazon.com/amazondynamodb/latest/developerguide/Streams.KCLAdapter.html.
If you want to try out DynamoDB streaming, here are the steps:
- Navigate to the AWS console and then go to DynamoDB.
- Create a table called bike-stations.
- Once the table has been created, make sure that a stream has been enabled for the table.
- Using JSON from this section as a template, create a few rows (items).
- Once you have created a few items, modify some of them by updating items. The activity will trigger DynamoDB to write that data to the DynamoDB stream. To read from the DynamoDB stream, you can use the following code, provided by AWS: https://docs.aws.amazon.com/amazondynamodb/latest/developerguide/Streams.KCLAdapter.Walkthrough.CompleteProgram.html.
This section taught us how to set up DynamoDB Streams and then use Amazon Kinesis Adapter to consume data from the stream.
Processing Kinesis data with Apache Spark
In simple terms, Spark is an improved version of Hadoop MapReduce. The most significant difference is that Spark uses an in-memory engine, so it outperforms MapReduce in several use cases. The key concept with Spark is its immutable Resilient Distributed Dataset (RDD), which allows Spark to balance its workload across multiple compute nodes (executors) to achieve parallel processing (improved map and reduce functionality).
We can create RDDs out of many sources, such as databases and files such as those stored in S3 or from our Kinesis data stream. Spark also has SQL support, which allows us to perform functions similar to those in Kinesis Data Analytics, such as joining or aggregating data.
We can deploy Spark on EC2, Amazon EMR, or use AWS Glue services to run Spark applications. Spark provides support for multiple programming languages, such as Java, Scala, and Python. It also supports streaming data, so in this section, we are going to learn how to integrate Kinesis and Spark. An example architecture is shown in the following diagram:

Figure 8.6 – Kinesis as a producer for Apache Spark
To create streaming data, as depicted in preceding diagram under (1), we will use KDG. If you haven't set up KDG already, please navigate to https://awslabs.github.io/amazon-kinesis-data-generator/web/producer.html and complete the setup portion.
KDG Setup
KDG requires you to set up Cognito to create authorized users so that it can put data into the Kinesis data stream in your AWS account.
Once we have configured KDG, we need to create a KDS. We will create a simple stream with one shard named sparky-stream. We can create a stream from the AWS console or using the AWS CLI, as shown here:
aws kinesis create-stream
--stream-name sparky-stream
--shard-count 1
To set up our Spark consumer application (3), we will leverage an existing example that does a word count; we can get the word count code from this repository: https://spark.apache.org/docs/2.3.0/streaming-kinesis-integration.html. Once you've navigated to this link, go straight to the Running the Example section to set up a Spark consumer application. For this example, we downloaded Spark 2.4.7.
Spark Random Data Generator
Spark can also produce random data and put it into the Kinesis stream. We will not be using it in this example as we have already set up KDG.
Since the Spark application is doing a word count, we will instruct KDG to send Lorem Ipsum lines. Navigate to the KDG console. You will find a link to your personalized KDG console in the CloudFormation output section of the KDG stack.
In KDG, under Region, select your region. For the data stream, select sparky-stream, and then configure Template 1 so that it matches the template shown in the following screenshot. Click the Send Data button to start sending data to sparky-stream:

Figure 8.7 – KDG template setup details
Now that KDG is generating data and sending it to sparky-stream, we need to consume it. To run the Spark consumer application, navigate to the location where you downloaded Spark and execute the example application. Change the parameters so that they match your environment and configuration, as depicted in following code block:
bin/run-example --packages org.apache.spark:spark-streaming-kinesis-asl_2.11:2.3.0 streaming.KinesisWordCountASL SparkKinesisTest sparky-stream https://kinesis.us-east-1.amazonaws.com
After our Spark word count application starts, you should see the Spark application outputting word counts, as shown in the following screenshot:

Figure 8.8 – Spark word count application with Kinesis data
In this section, we learned how to configure Spark as a data consumer for the Kinesis data stream. The example that we walked through was simple, but Spark also comes with a collection of algorithms that can help us process graph constructs and do basic machine learning.
Amazon services that consume data from Kinesis
We have spent a lot of time on streaming data, but the question remains: how do we aggregate all that data at scale? This is where data lakes come into the picture. The term data lake doesn't describe any single technology or AWS service; it is a pattern that's used to store and analyze massive volumes of mixed data. Using a data lake, we can keep all of our data, be it unstructured, semi-structured, or structured, in a single place for later use.
In this section, we will build a serverless data lake with multiple service integrations. The integration examples in this chapter will follow the persona of the SmartCity AWS technical vendor known as SwipeBike. SwipeBike is responsible for doing the integrations for modernizing SmartCity's bike-sharing capabilities.
Serverless data lake
Why a serverless data lake? It's pretty simple. As the SmartCity technical vendor SwipeBike, we have finite resources, and we prefer to focus on what matters to our business (improving our bike service through analytics). Managing servers takes us away from our core focus and diverts precious resources to server maintenance, which doesn't distinguish our SwipeBike from any other bike-sharing service.
Obtaining telemetry and analytics so that we know that our bikes may need a service before they break down, or that any station is running low on bikes, improves our customer's experience and, in turn, pays for our salaries. So, it's a simple choice; instead of managing servers, we will build a fully serverless data lake.
To build our SwipeBike serverless data lake, we will use the following services:
- Kinesis Firehose will stream source data and deposit it into a data lake.
- Amazon S3 will be the data storage repository for our data lake.
- AWS Glue will be used for extractions, transformation, and data processing.
- Amazon Athena will perform searches (SQL queries).
Let's take a look at our overall architecture for the serverless data lake:

Figure 8.9 – Serverless data lake architecture for SwipeBike
Let's step through the serverless lake architecture and see what's going on here:
- In this chapter, in the Processing Kinesis data with Apache Spark section, we used the KDG tool to send data to Kinesis. It's an easy way to produce some random data and send it over to Firehose, so we will use KDG again and simulate the data producer.
- We will use S3 for serverless data lake data storage. S3 is affordable storage for petabytes, and along with it, we get a high availability of 99.99% and a durability of 99.999999999%.
- We will learn how to use AWS Glue, which is a serverless Extract Transform Load (ETL) service that allows us to discover, arrange, and integrate data for analytics. We will use Glue crawlers to create metadata that describes the structure of the data in S3 buckets:
a) Glue crawler will inspect our raw data and create metadata in a Glue Data Catalog. A Data Catalog is a Hive compatible data store.
- With Glue, we will also handle data transformations such as relationalizing data and converting it into more optimized formats such as Parquet.
- The output of our Glue data transformations will be stored in S3 in a curated directory. This directory will contain an optimized data format and structure for improved query performance at a lower cost.
- As with step 3, we will use Glue crawlers to extract the metadata from the files stored in the curated directory of the S3 bucket:
a) Glue crawler will inspect curated data and create metadata in the Glue data catalog.
- To create our reports and gain insight from our data, we will use Athena by creating SQL queries:
a) Athena will look up the Glue data catalog to obtain information about the locations of files in S3, their format, and their structure.
b) Using the information provided by the Glue data catalog (7a), Athena will execute the query.
Creating serverless data storage using S3
Let's start building our serverless data lake.
First, we will create an S3 bucket that will be used as the storage layer. S3 is a Simple Storage Service (Amazon S3) that focuses on simplicity and robustness. We are using S3 because it is a versatile yet cheap storage option that is protected by 99.999999999% (11 9s) of durability. S3's durability ensures the data is protected in the case of outages or failures.
With S3, there are no servers to manage, and we can scale up storage without having to purchase any additional hardware. We will start by creating an S3 bucket with the <yourname>-dl-bucket naming convention. Navigate to your command tool and execute S3's create-bucket API, as shown in the following code:
aws s3api create-bucket --bucket tarik-dl-bucket --region us-east-1
If you are using an AWS region other than us-east-1, you will need to add create-bucket configuration, as shown in following code snippet:
aws s3api create-bucket --bucket tarik-dl-bucket2 --region us-west-2 --create-bucket-configuration LocationConstraint=us-west-2
After you execute create-bucket, you will get confirmation that the bucket was created. If you receive an error, it's likely because someone else has created a bucket with the same name. S3 bucket names are global, so there can't be two buckets with the same name. Try adding digits to your name until you get a unique name.
As a next step, we will create a Firehose delivery stream that the KDG data producer will use. Firehose will deliver the data into the S3 bucket's rawdata directory. We covered Firehose destination delivery in depth in Chapter 5, Kinesis Firehose, so we will skip those details here and jump right into creating a Firehose stream and configuring destination delivery to the S3 bucket RAW directory.
Landing data into S3 using Firehose
Before we can use Firehose to write data to the S3 bucket, we need to create an IAM role with permissions that give Firehose privilege to write, read, and list files in the <yourname>-dl-bucket S3 bucket.
Open up the AWS Console, navigate to IAM, and click Create Role. When you're prompted to select a trusted entity, select AWS Service and then choose Kinesis from the available services list. You will be prompted to Select your use case. Choose Kinesis Firehose and click the Next: Permissions button. Click the Create policy button, which will open up a new window or tab in your browser, then click the JSON tab and copy and paste the policy from the chapter8/FHSwipeBikeDataLakepolicy.json GitHub repository (https://github.com/PacktPublishing/Streaming-Data-Solutions-with-Amazon-Kinesis/tree/main/chapter8/FHSwipeBikeDataLakePolicy.json).
Creating your IAM policy
Make sure you use the appropriate bucket name and replace AWS-REGION and AWS-ACCOUNT-NUMBER with your values.
Click Next: Tags; you can leave tags blank for now and click the Next: Review button. Call your policy FHSwipeBikeDataLakePolicy, and then click the Create policy button. Go back to the browser window where you had started creating a role and select FHSwipeBikeDataLakePolicy (you may need to hit the refresh button for the newly created policy to show up). Click the Next: Tags button, then the Next: Review button, call the role FHSwipeBikeDLRole, and then click the Create Role button.
We are now ready to create our Firehose delivery stream. You will need to provide a cli-input-json file, which you can download from the Git repository. Download the fhCreateFile.json file, modify the parameters accordingly, and save the file locally. Open up your command-line tool and execute the following code:
aws firehose create-delivery-stream --delivery-stream-name dl-delivery-stream --cli-input-json file://fhCreateFile.json
If everything worked correctly, you should receive a Firehose delivery stream ARN in the following format: arn:aws:firehose:[REGION]:[AWS-ACCT-NUM]:deliverystream/dl-delivery-stream.
AWS CLI trick
If you are like us and can't remember all the CLI options and parameters, https://awsclibuilder.com/home/services/firehose can help you.
For the next step, we are going to set up KDG. If you haven't already set up KDG, please navigate to https://awslabs.github.io/amazon-kinesis-data-generator/web/producer.html and complete the setup portion.
Using KDG to produce random data
Let's begin!
First, navigate to KDG; a link will be available in the CloudFormation console. Select an appropriate Region, then select dl-delivery-stream from the delivery stream dropdown. Scroll down to the template section and enter the template. You can download the template from GitHub under the chapter8 folder, kdgTemplate.json. Click the Send Data button to initiate data generation for KDG. After a minute or two or roughly around 10,000 records, click the Stop Sending Data to Kinesis button.
At this point, we should have data in our S3 bucket under the rawdata directory. Open the AWS console and navigate to <yourname>-dl-bucket/rawdata. You should have data files that have been produced by the KDG under the rawdata directory that are structured like so: {rides}/{YEAR}/{MONTH NUMBER}/{DAY NUMBER}/{HOUR NUMBER}.
While we are still in the S3 console, let's upload the bikeStations.csv file (available in the chapter8 GitHub repository folder). This file contains detailed station information, such as the address of the bike station and its longitude and latitude. We will use this file's information in our Athena SQL queries to join it with information about our bike rentals (KDG-produced data) to produce more rich information for our customers.
Create a new stations directory in your S3 bucket; that is, <yourname>-dl-bucket/rawdata. Once the directory has been created, upload the bikeStations.csv file into the stations directory. Your S3 bucket hierarchy should, at this point, look like this:
<yourname>-dl-bucket
rawdata
rides
stations
We are now ready to inspect our raw data using Glue so that we can catalog it for usage by Athena. Using Glue crawlers, we will go through our bucket's rawdata directory and create corresponding metadata in the Glue data catalog.
AWS Lake Formation
You may need to turn off Lake Formation in Lake Formation Console, under the Settings section. You may need to manage the IAM permissions yourself beyond the scope of this chapter: https://docs.aws.amazon.com/lake-formation/latest/dg/change-settings.html.
Using Glue for ETL
Glue crawlers are like forensic inspectors that will look at the data structures in our rides and stations directories, and then create information about the data structure of those files as if it's a database table. Glue crawlers will enable us to query the data using Athena and deal with changes and additions to schema changes in our raw files. Let's set up a Glue crawler.
In the AWS console, navigate to Glue, click on the Crawlers link, and click the Add crawler button. Enter the following values when prompted:
- In the Crawler name field, enter rawdata-crawler, then click Next.
- Leave the defaults as Data Stores and Crawl all folders and click Next.
- Select S3 as the data store, select <yourname>-dl-bucket/rawdata as the include path, and then click Next.
- Select No for Add another data store and click Next.
- Select Create an IAM role and give it a name; ours is AWSGlueServiceRole-GlueSwipeBikeRaw. Click Next.
- For Frequency, select Run on Demand and click Next.
- Click Add Database; for the database name, enter swipebike, click Create, and then click Next.
- Finally, click the Finish button.
Once rawdata-crawler has been created, click the checkbox next to it and click the Run crawler button. It will take about 1 to 2 minutes for the crawler to finish.
Let's see what the crawler created. In the Glue console, click on the Databases link on the left-hand side menu. Then, click on the swipebike database. If the database isn't showing, try hitting the refresh icon in the Glue console. Click on the swipebike database and then click on Tables in the swipebike link; you should see two tables, as shown in the following screenshot:

Figure 8.10 – Glue data catalog for Swipebike
The Glue crawler created an inventory of data in our datastore (S3 bucket). The crawler examined the schema of the data files in our S3 bucket and, using a classifier, inferred the structure of that data; that is, metadata. The crawler then wrote the metadata into the Glue data catalog (the swipebike database and its corresponding tables).
We can now try and query the swipebike database using Athena. Navigate to the Athena console and select swipebike from the database dropdown.
Athena setup
If you are opening up Athena for the first time, you will have to go through the initial setup to configure the S3 bucket so that Athena can output query results: https://docs.aws.amazon.com/athena/latest/ug/getting-started.html.
Query data with Athena
We will begin by opening the New query tab in Athena and entering the query shown in the following screenshot (you can copy the query from chapter8/sql/stationIncome.sql):

Figure 8.11 – An Athena query to summarize income by station using raw data
Once the query completes, you should be able to see the result. Our query took 1.5 seconds, and it scanned 5.17 MB of data. This isn't bad so far; we can query rawdata and get results, so why bother with curating data any further? There are several reasons, but the primary ones are as follows:
- We want to expose data to business users so that they can get results swiftly without having a granular understanding of the underlying raw data and its relationships. Queries that use rawdata could get gnarly!
- If you expand the rides table in Athena, you will notice that the bikedetail field is defined as struct<>. It's not easily consumed, so we want to transform it into a more functional structure. We are going to use Glue jobs to do this.
- Security: We may not want everyone to swim all over our data lake, so exposing a subset of data is preferred.
- Cost: For the query to find data that matches our search, it has to traverse (scan) the data storage in S3. We scanned 5.17 MBs, but imagine if we had a data lake fully loaded with petabytes of data. This approach can get expensive if we are scanning massive amounts of data (kind of like a cartesian product query in a relational database).
Optimizing a serverless data lake
To curate our data further, we will use Glue jobs. Glue jobs come pre-packaged with several ETL routines, which we can use with minimal configuration. We are going to do two things to produce a curated dataset:
- Create a station-income dataset that only contains data users need in Parquet optimized format. Parquet format and removing unused columns should lead to scanning less data; hence, it should be less expensive.
- Relationalize the bikedetail field so that values from struct<> become their own dataset (table) and are easier to query.
Glue – Relationalize
Athena can relationalize data using CROSS JOIN UNNEST, but at some point, that operation will become costly, and relationalizing as part of your ETL pipeline is better: https://docs.aws.amazon.com/glue/latest/dg/aws-glue-programming-python-samples-legislators.html.
Curating data in the data lake using Glue jobs
Navigate to the S3 console and create a new directory called curated in the <yourname>-dl-bucket S3 bucket.
Before we create a Glue job, we will need to modify the IAM role we created for the crawlers (AWSGlueServiceRole-GlueSwipeBikeRaw) so that it also has the privilege to write to and delete from S3.
Navigate to IAM, find the relevant role under the Policies tab, and click to edit the policy with the same name as the AWSGlueServiceRole-GlueSwipeBikeRaw role. We need to add a curated bucket to the resources list, as shown in the following code:
{
"Version": "2012-10-17",
"Statement": [
{
"Effect": "Allow",
"Action": [
"s3:GetObject",
"s3:PutObject",
"s3:Delete*"
],
"Resource": [
"arn:aws:s3:::tarik-dl-bucket/rawdata*",
"arn:aws:s3:::tarik-dl-bucket/curated*"
]
}
]
}
Navigate back to the Glue console and click the Jobs link on the left-hand side. We will create a Glue job script as a template, and then we will edit that script to achieve the two goals we set out. Click the Add Job button and call it SwipeBikeCurateETL. Select the IAM role from the list of dropdown roles (AWSGlueServiceRole-GlueSwipeBikeRaw). We are using the same IAM role that we created while we were setting up the rawdata-crawler Glue crawler. Leave the other settings as their defaults and click the Next button.
Select the rides table as the data source and click the Next button. For transform type, leave the default as Change schema and click the Next button. Select Create tables in your data target, select S3 as the data store, format it as Parquet, set the target path to s3://<yourname>-dl-bucket/curated, and click the Next button. Leave the defaults for Output Schema Definition as-is and click the Save job and edit script button.
From GitHub, download the chapter8/glue/curationScript.py Glue script. Replace the {YOUR-S3-BUCKET} occurrences with your actual bucket name. This is the same bucket name we have been using thus far. Save the Glue script and run the job. Depending on how much data you created using KDG, the job may take a minute or two to run. Let's walk through some of the pertinent code in the Glue job script.
On line 25, we call Glue's built-in relationalize transformation:
25 relationalized = Relationalize.apply(
frame = ds_rides,
staging_path = args["TempDir"],
name = "rides",
transformation_ctx = "relationalized")
We then proceed to write the relationalized data to the S3 bucket on line 28. Glue will produce two distinct structures: "rides" and "bikeDetail.bikeAttributes". If you look into your S3 bucket under the curated directory, you should see these two directories. We will learn how to use these later in this section, when we create Athena queries:
28 relationalize_datasink =
glueContext.write_dynamic_frame.from_options(
frame = relationalized,
connection_type = "s3",
connection_options = {
"path": "s3://{S3-PATH}/curated/rides-relat.."},
format = "json",
transformation_ctx = "relationalize_datasink"
)
We then proceed to create a summarized version of the income by each station. We loaded the station data into ds_station_min on line 31. Then, on line 34, we dropped the columns that we didn't need in the summarized dataset:
34 ds_station_min =
ds_stations.drop_fields(
['latitude','longitude']
).rename_field(
'stationid', 'station-st-id'
)
On line 37, we did something similar with the ds_rides_min DataFrame. We then joined the two DataFrames on line 43:
43 ds_joined = Join.apply(
ds_station_min, ds_rides_min,
'station-st-id', 'ride-st-id'
)
Then, on line 47, we exported the income by station data into the s3://{YOUR-S3-BUCKET}/curated/stationincome S3 bucket.
Before we can start using data stored under the curated directory, we need to crawl it. Navigate to the Glue console and create a new crawler, as we did for rawdata.
We named our crawler CuratedSwipeBike and set it up to crawl data under the curated directory. The crawler's path is s3://{your-bucket-name}/curated. You can use the same IAM role we have been using thus far: AWSGlueServiceRole-GlueSwipeBikeRaw. You can create a new database for a curated crawler or use the existing database and prefix the table names with c_. We used the existing swipebike database, and we used the c_ prefix for curated tables.
Once you have finished creating the crawler, run it. Once the crawler finishes inspecting the data in the curated directory, you should have three newly created tables in the Glue data catalog (the swipebike database). Let's navigate to the Athena console and see if we have achieved the two desired goals by curating the data.
We will start by examining the station income summary table (ours is named c_stationincome). In Athena, create and run the query, as depicted in the following screenshot (you can get the SQL code from https://github.com/PacktPublishing/Streaming-Data-Solutions-with-Amazon-Kinesis/tree/main/chapter8/sql/stationIncomeCurated.sql):

Figure 8.12 – An Athena query to summarize income by the station using curated data
With the curated dataset, the query time dropped to 0.56 seconds, and the amount of data that was scanned was only 44.15 KB. When we ran the query that relied on rawdata, it took 1.5 seconds for the query to finish, and 5.17 MB of data was scanned. Goal one achieved! It's faster, cheaper, and the query is simpler to create as we are going only after one table.
Now, let's see what happened with the data that was relationalized. With rawdata, we had a single table, rides, that contained a nested structure for bike details. Now that our Glue job has rationalized the data, we have two tables; in our case, they are c_rides and c_rides_bikedetail_bikeattributes.
As we examine c_rides_bikedetail_bikeattributes, we can see that Glue has kept referential integrity between the two tables. A newly created column named id corresponds to the bikedetail.bikeattributes column in the c_rides table. This looks a lot like a relational database at this point.
Let's put this to the test and see if it was done correctly. Open up any raw files under rawdata/rides in S3 (hint: you can use S3 Select to peek into files) and pick one of the records. We selected the following record:

Figure 8.13 – Raw record to validate the relationalize function
Let's create an Athena query that will join the two relationalized tables and search for the same record and see if referential integrity is still intact. Navigate to Athena and create a query, as shown in the following screenshot (since the data was randomly generated, we had to narrow down the record using few attributes). You can find the query at https://github.com/PacktPublishing/Streaming-Data-Solutions-with-Amazon-Kinesis/tree/main/chapter8/sql/relationilizedQuery.sql:

Figure 8.14 – Athena query using relationalized data
Glue didn't disappoint when it came to referential integrity. We joined the two tables using c_rides.bikedetail.bikeattribute and c_rides_bikedetail_bikeattributes.id. We validated the values from rawdata files that match the relationalized data (split files).
In this section, we learned how to use many services to build a serverless data lake. We used Kinesis Firehose to ingest the data into S3 buckets. From there, we created a data pipeline that ingests raw data. We learned how to use Glue to index the data with crawlers and then transformed and curated the data, which allows our business users to consume it in a performant and frugal manner. Lastly, we used Athena to query the data and gain insights.
In the next section, we are going to learn how to use other AWS services, along with Kinesis, to transform and enhance data.
Amazon services that transform Kinesis data
In this section, we are going to learn about how to use EventBridge to add additional capabilities that aren't present in Kinesis. We will use EventBridge to help us add rule-based routing to our SwipeBike solution.
Routing events with EventBridge
One of the coolest things about AWS services is that they are building blocks. We like to think of AWS services as a set of microservices that enable us to build rapidly, or prototype, working applications. The downside is that with such a large number of services at our disposal, there is an overlap between those services, and often, analysis-paralysis can set in when we have to select a service to use.
Two-way door
The most significant advantage of the cloud is that it doesn't punish us for making a mistake when selecting a service; it's pretty forgiving. Two-way door decisions imply that if we pick the wrong door, we can quickly walk back and go through another door available to us. On the other hand, one-way door decisions are hard to reverse as we can't go back, so a considerable amount of time has to be allocated to deciding when to select the door. An example of a one-way door would be buying brand new servers; there's not much we can do after that. As you adopt the cloud, we encourage you to treat service selection as a two-way door. You are better off picking a service quickly and experiment with your use case, instead of endlessly discussing which service is better!
If you are familiar with Enterprise Service Bus (ESB) concepts, skip to the next paragraph. Wikipedia describes ESB as follows: "An enterprise service bus (ESB) implements a communication system between mutually interacting software applications in a service-oriented architecture (SOA)."
We can think of the postal office (mail service) being an ESB. Each of us can send or receive a postcard, so we are both message producers and message consumers. As consumers or producers, we don't need to know anything about the internals of mail sorting and routing. All we need to do is use a postal API, which lets us basically specify a receiving address and deposit our letter (message) in the mailbox. From that point on, the postal service takes over and routes and delivers our letter to the recipient. If we want to obtain confirmation that the recipient received our message, that's also possible. We would provide our address and when our letter is delivered, the postal service will send us back delivery confirmation.
Let's see how we can implement some of the ESB principles using Kinesis and EventBridge. Before we get into the solution, let's learn what EventBridge is.
EventBridge is a serverless event bus that allows us to connect applications/services, yet keep them decoupled from each other (two-way door, anybody?). Using EventBridge, we can set up routing rules so that events can be sent to the appropriate service/application to be processed. Why would we want to use Kinesis at all with EventBridge when Kinesis itself can send events? Because Kinesis can't route events.
For example, in our SmartCity bike fleet example, we were ingesting data from each station (our producer simulates 40 bike stations). What if we wanted to send data to those stations? Let's assume the bike docking station is malfunctioning and we need to send it an unlock code. If we just drop it into the Kinesis stream, then each station would have to filter its events and discard events intended for other stations; this sounds like a lot of work!
In short, when we use EventBridge with Kinesis, we can route messages/events based on a rule or set of rules. Our architecture looks as follows:

Figure 8.15 – Rule-based architecture with EventBridge and Kinesis
So, let's see how we can do this. Navigate to the AWS console and create two Kinesis data streams, station100stream and station200stream. These two streams will receive events from EventBridge for their corresponding stations.
The event that we will send to EventBridge has the following structure:
[
{
"Source": "com.smartbike.maintenance",
"Detail": "{"stationId":"200"}",
"Resources": [
"unlock-key-34534"
],
"DetailType": "unlockDockingStation",
"EventBusName": "bike-ride-unlock"
}
]
Navigate to the EventBridge console. Under Events, click on Event busses, then click the Create event bus button. When prompted for the name, enter bike-ride-unlock, leave Resource-based policy empty, and click the Create button. Your console should display a newly created event bus, as shown in the following screenshot:

Figure 8.16 – Custom EventBridge event bus
To route maintenance events to the appropriate bike station Kinesis data stream, we will set up two event rules: station 100 and station 200. Navigate to Rules and click the Create rule button. Name your event station100Rule. Under Event matching pattern, select Custom Pattern. Under Event pattern, enter the pattern shown in the following code:
{
"source": [ "com.smartbike.maintenance" ],
"detail-type": [ "unlockDockingStation" ],
"detail": { "stationId": [ "100" ] }
}
Under Select event bus, click on Custom or Partner event bus, and from the dropdown, select the bike-ride-unlock event bus. Under Select targets in the first dropdown, select your first Kinesis stream; that is, station100stream. EventBridge will need IAM privileges to put records into Kinesis and will create the specific role; please leave the defaults as-is. Click the Create button.
Repeat rule creation for station200Rule and select station200stream as the corresponding stream. Make sure that your station200Rule for stationId has a value of 200 and not 100.
Once we have created both rules, we should see both rules as Enabled, as shown in the following screenshot:

Figure 8.17 – EventBridge event bus rules summary
Let's see if our rules work correctly. Using the AWS CLI, we will send a few events to the bike-ride-unlock event bus and then fetch the records from two Kinesis data streams.
We will start by creating two files. You can find the sample content under chapter8/eventbridge/sampleEvent.json:
- For the event100.json file, we will set stationId to 100.
- For the event200.json file, will set stationId to 200.
The AWS CLI isn't where we set the bus name
If you haven't named your bus event bike-ride-unlock, then you will have to change the value of EventBusName in both files.
Open your command prompt and navigate to the directory where you saved the two JSON files. Then, execute put-event (the following code is for Mac or Unix) for both files. This will put two events into the bike-ride-unlock EventBridge bus.EventBridge will respond with an EventId for each successful entry as we execute the commands. We are inputting single events, so we should get zero for FailedEntryCount and a single EventID:
aws events put-events --entries file://{filename}.json
Once we have input the events into EventBridge, they should be routed to the appropriate Kinesis data stream. The following screenshot shows an example of fetching records from station100stream:

Figure 8.18 – Rule-based routing in action
Once you have gathered data from the Kinesis stream, shown under (4) in the previous screenshot, you can go to the online base64 decoder (https://www.base64decode.org/) and make sure your data in each of the streams has been routed correctly. You can find the appropriate Kinesis CLI commands here: https://docs.aws.amazon.com/streams/latest/dev/fundamental-stream.html#get-records.
In this section, we implemented simple routing using Amazon EventBridge and Kinesis. The key takeaway is that AWS services are like LEGO and that we were able to create this solution in approximately 30 minutes. Experiment and fail often!
Third-party integrations with Kinesis
In this section, we are going to learn how to integrate Kinesis with third-party software provider Splunk. Although we are using Splunk to show how we can work around some of the integration intricacies, this approach is applicable to other third-party integrations.
Firehose delivery is possible for generic HTTP endpoints. This enables us to use Firehose, a fully managed service, to send data to HTTP endpoints, and it opens doors for other integration points, including our own applications.
Splunk
If you are not familiar with Splunk, you should still read this section as we will cover some of the nuances of Lambda processing that are applicable, regardless of whether the delivery endpoint is for Splunk or not. We covered Firehose and Splunk integration in depth in Chapter 5, Kinesis Firehose, in the Amazon Kinesis Data Firehose Destinations/Splunk destination section.
Splunk's website defines the software as follows: "Splunk makes it simple to collect, analyze, and act upon the untapped value of the big data generated by your technology infrastructure, security systems, and business applications – giving you the insights to drive operational performance and business results."
A simplified version would be stating that Splunk is how we make sense of data in logs. While building our SmartCity cloud infrastructure, we have primarily focused on Kinesis services and how to extract the data around our bicycle fleet. But we haven't paid any attention to our overall cloud infrastructure, which includes things such as the following:
- How we analyze if someone is trying to get into our VPC and how to block those IP addresses (flow logs)
- The performance of our EC2 instances or AWS Lambdas (CloudWatch logs)
In this section, we will discuss how to ingest CloudWatch Logs into Kinesis Firehose and deliver those logs to Splunk. Our overall architecture is depicted in the following diagram:

Figure 8.19 – Log delivery with Kinesis Firehose
We use CloudWatch subscriptions (1) to send CloudWatch Logs events to the Firehose delivery stream (2). To optimize throughput, CloudWatch will encode the logs to base64 and compressed them into GZIP format. Splunk HEC (4) can't accept compressed format, so we will use AWS Lambda (3) to decompress the logs before sending them to Splunk HEC.
AWS Lambda quota
Lambda's request invocation has a limit of 6 MB for synchronous and 256 KB asynchronous. This defines how much data can be passed back by AWS Lambda: https://docts.amazonaws.cn/en_us/lambda/latest/dg/lambda-invocation.html.
What will inevitably happen is that the amount of compressed data in the Firehose buffer, when uncompressed by Lambda, will exceed the 6 MB quota allowed for invocation. Commonly, GZIP compression is at a 1:9 ratio (1 MB compressed results in 9 MB uncompressed data). At this point, an exception will be thrown by Lambda. Lambda's request invocation quota is not something that we can call AWS to extend for us, so we need an alternative solution. Let's see how we can do that.
AWS offers a Serverless Application Template called kinesis-firehose-cloudwatch-logs-processor that we can use to work around this issue. We are only going to examine the pertinent code blocks of the solution. You can find the source code for the full solution here: https://github.com/tmakota/amazon-kinesis-firehose-cloudwatch-logs-processor/blob/master/index.js.
Open the GitHub link to the code, and let's step through it. The serverless function will be invoked by Firehose and sent a batch of compressed data. In Chapter 5, Kinesis Firehose, we discussed how Firehose sends data, so we are assuming you have familiarized yourself with it. The following diagram describes what happens when Kinesis sends compressed data to AWS Lambda, how that data is chunked, and how it is sent back to Kinesis to avoid the 6 MB quota imposed by AWS Lambda:
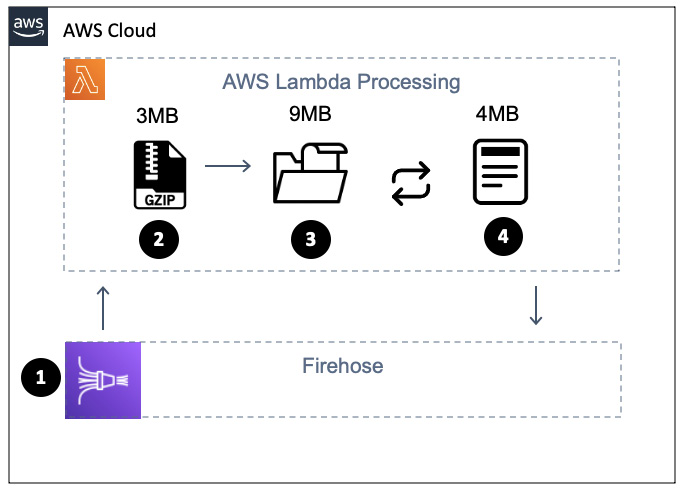
Figure 8.20 – Handling more than 6 MB of data with Lambda
Invocation of the serverless function by Firehose (2) starts on line 104 with exports.handler = (event, context, callback). On line 107, the batch of data that Firehose sent will be decompressed (3) with decompressed = zlib.gunzipSync(buffer). If the amount of compressed data being sent by Firehose was, let's say, 3 MB and the compression ratio is 1:3, then the resulting decompressed data would be 9 MB, which is well above Lambda's request quota of 6 MB.
Lines 140 through 148 take decompressed data and compose recordsToReingest, which is roughly 4 MBs in size (4). Line 153 will invoke the function to send uncompressed data back to Firehose using putRecords(streamName, recordsToReingest, firehose, resolve, reject, 0, 20). You can set up the maxAttampts parameter, which is hardcoded as 20, to be a parameter to the Lambda function.
In turn, the putRecords function will send the decompressed data to Firehose by invoking client.putRecordBatch() on line 70. Lines 91 through 100 will handle any retries needed while incrementing maxAttempts; this is the code on line 94; that is, putRecords(streamName, failed, client, resolve, reject, attemptsMade + 1, maxAttempts).
In this section, we learned about ingesting large amounts of compressed data, how to decompress that data using AWS Lambda, and how to work around the AWS Lambda 6 MB request limit using data chunking.
Summary
In this chapter, we learned about the different ways that Kinesis services can work with other AWS services and non-AWS services. We built a few integrations ourselves, which exemplified how easy it is to compose solutions using various services that work with Kinesis.
In addition to what we showed you in this chapter, there are several different ways that Kinesis services can be used. With additional features being added by AWS on an almost daily basis, the only limitation is our creativity. We discussed a two-way door approach for you to adopt as you advance through your AWS cloud journey. AWS services are like LEGO blocks that we can quickly put together, and if we make a mistake, we can quickly take them apart to try again. Embrace two-way doors over analysis paralysis.
We are looking forward to you creating new solutions and letting us know about the unique ways you solved your business problems using Kinesis and AWS Cloud.
Further reading
We covered many different services in this chapter and explained how to integrate them with Kinesis. Covering these topics in-depth would require another book. Please take a look at the following links for further references:
- How to Stream Data from Amazon DynamoDB to Amazon Aurora using AWS Lambda and Amazon Kinesis Firehose:
- Top 10 performance tuning tips for Amazon Athena:
https://aws.amazon.com/blogs/big-data/top-10-performance-tuning-tips-for-amazon-athena/
- Build a data lake foundation with AWS Glue and Amazon S3:
https://aws.amazon.com/blogs/big-data/build-a-data-lake-foundation-with-aws-glue-and-amazon-s3/