
Proxy overview
In some cases, the proxy uses a path to map the upstream web service. For example, consider the URL https://www.example.com/myService. In this case, the proxy answers to the hostname www.example.com, but myService is used as a “junction” to the location of the upstream web resource. Alternately, a web server could use a hostname to map an upstream service. For example, https://myservice.example.com.
You may hear your peers use the term “reverse” proxy. As proxies, by definition, go in both directions, you may have trouble figuring out what’s reverse about it. You’re not alone. Maybe people used the term “proxy” to describe the type that is used to intercept web browser traffic within an organization. If they considered this the “normal” direction for a proxy, i.e., outbound web requests, then proxying inbound traffic is reverse.
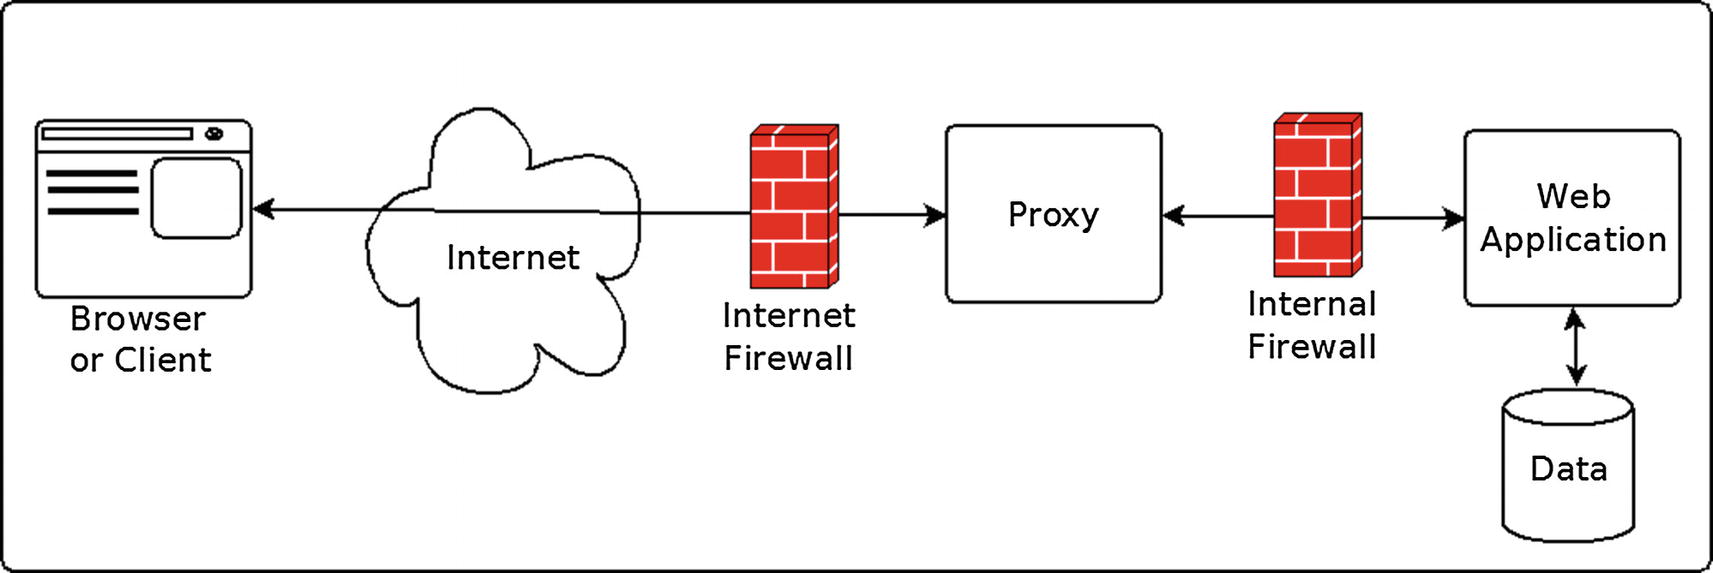
Many web application frameworks include a web server component. For example, J2EE applications are deployed inside a servlet container (i.e., a web server). Python Flask builds in a web server implementation. Many system administrators feel uncomfortable exposing these web servers directly to the Internet. Although fairly secure—most vulnerabilities are identified and patched quickly by the community—correctly configuring any web server requires familiarity with the platform. Thus, in a heterogeneous environment, with developers using many web frameworks and tools, it’s hard for system administrators to know them all. It’s a good practice to minimize the number of Internet-facing web server implementations, so administrators have a smaller surface area to protect from the riskiest network segment.
Configuration of Internet-facing web services is not a trivial task. Many web servers utilize security plugins that prevent attacks. As a result, although a platform like Apache Tomcat (a J2EE servlet container) isn’t insecure, there are fewer tools available to protect it. Minimizing the systems on which administrators have to manage TLS may also be a goal. Generating and storing private keys and updating X.509 certificates (which expire every few months) requires more effort than many developers appreciate. Although if your organization has a “secure communication” policy, which assumes no network is safe, you will have to use SSL on both the proxy and the application.
Another reason to use a proxy is because the web server is “dumber”. If TLS is breached (and TLS implementations have been targeted in the past, such as by Heartbleed), it may have access to sensitive files, databases, and services. File system resources may include private keys. The impact of a breach can be worse on the application server than on the web proxy. The proxy may have lot of data going through it, so a breached proxy is bad too, but if you have to pick your poison, many security experts will choose the proxy.
From a pure network standpoint, most large organizations want to put Internet-facing proxies on a different network segment, i.e., the “DMZ”. An Internet-facing firewall protects the DMZ, and a second firewall protects the private network. This strategy prevents Internet-connected servers from directly communicating with internal databases, or other services that require additional security.
While security was the initial driver, proxies created new opportunities to do some other handy stuff. The following is a discussion of those features.
Load Balancing
Overview of load balancing
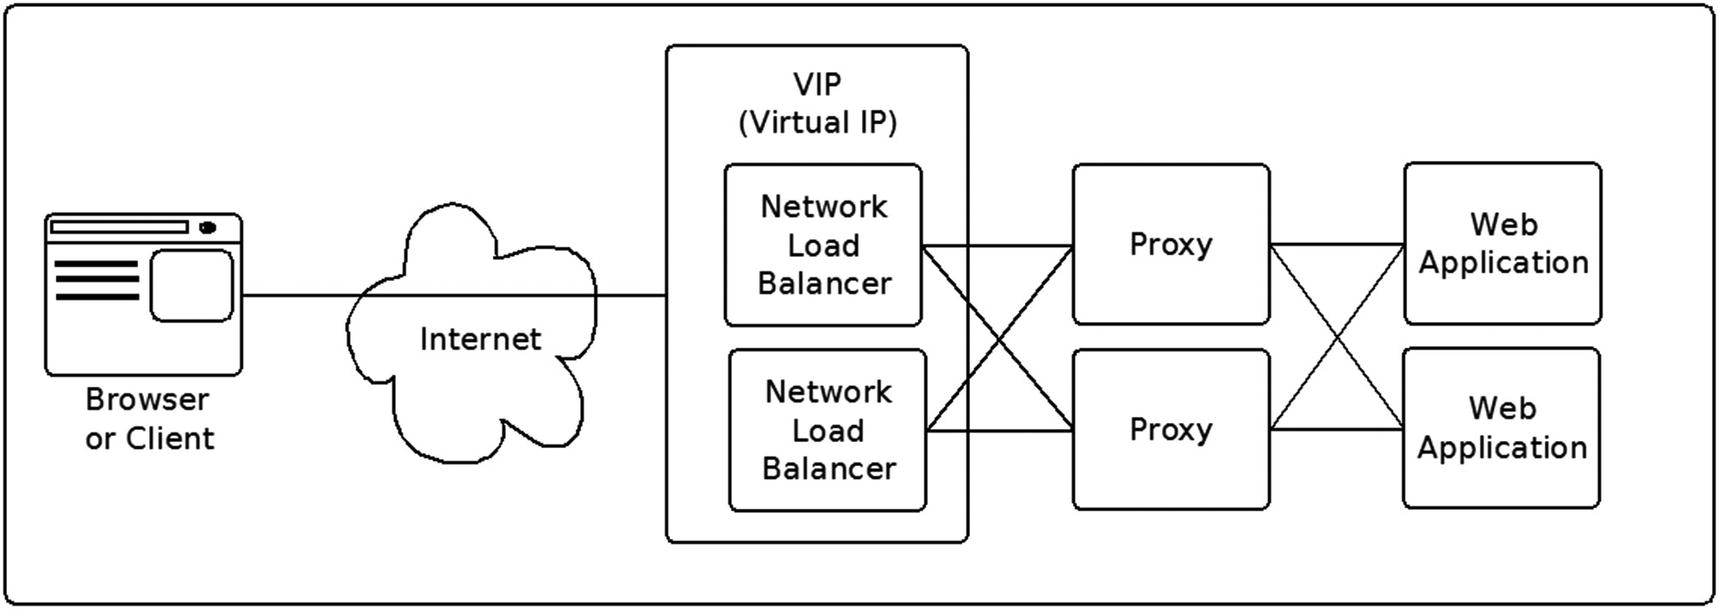
When a browser or client makes an HTTP request, the host portion of the request resolves to one IP address. We don’t want the proxy itself to be a single point of failure. The network load balancer infrastructure normally handles this requirement and routes the request to an available proxy. At this point, the proxy has to route the request to the “upstream” web server. It would be silly to fail if another server could handle the request.
The proxy infrastructure also provides a path to upgrading the upstream applications without incurring downtime. For example, you can take an upstream server out of the available pool, upgrade it, and then add it back.
Network load balancers and proxies normally can handle timeouts automatically. The sophistication of health checks vary. At the simplest level, you can look at the TCP/IP connection—can you connect to the host and port? Of course, a service might listen on a port and still be non-responsive (i.e., hang). Some proxies and load balancers implement “active health checks” to a predetermined URL. “Passive health checks” monitor every request and response. The health checks operate as circuit breakers by switching traffic from an unhealthy service instance to a healthy one. The proxy must use active health checks to restore the circuit breaker automatically, since there is no regular traffic to monitor. Alternately, an administrator can manually reset the circuit breaker.
Access Control and Security
As a funnel for incoming web requests, the proxy is a very good place to enforce security policies. In fact, several early commercial web access management products used the proxy for this purpose, e.g., IBM WebSEAL and Novell Access Manager (subsequently NetIQ and then Micro Focus).
The proxy makes an excellent policy enforcement point (PEP) in a P*P architecture (PEP, PDP, PAP, etc.). You don’t want the proxy doing too much policy evaluation because the main goal is speed. The proxy might be checking to make sure a valid token exists, or looking at a token to make sure it has the appropriate level of access. For example, an OAuth-based proxy might check the token expiration or check to make sure the token has the correct scopes. But of course a proxy can use any access control architecture, not just OAuth.
The proxy is a good place to run intrusion detection software. If it gets breached, you want to know quickly. The proxy’s logs should also be monitored, in addition to the upstream web server logs. If an attack happens, the logs will contain vital information, such as the network source of the web request.
There is also a security benefit to masking the upstream servers. In security, you always want to expose as little information as possible to potential attackers. By proxying, you hide potentially useful information such as the web server type and network information.
Rate Limiting
An organization may have a mix of web performance requirements. For example, an organization’s web services may handle requests from internal departments, partners, customers, or even anonymous Internet clients. Each of these client classes may have different expectations, or even service level agreements. To appropriately deliver web content, it may be necessary for an organization to prioritize certain requests. Proxy implementations can either block requests beyond a threshold amount or delay them. Rate limiting can also help prevent data scraping—although attackers may still attempt to scrape data while living within the rate limit.
Rate limiting can also be an important security feature. Hackers may launch a denial of service attack (DoS) by overloading your web services. By specifying maximum traffic limits, the proxy can prevent overloading the upstream web services. However, the proxy by itself might not be enough to protect you from a DoS attack, which can swamp the proxy itself, so you may need to implement hardware and network strategies as well.
Organizations that charge for web services may use rate limiting for monetization. It’s not uncommon for companies that sell APIs to offer a certain number of calls for a given time period. For example, two requests a minute are free.
Proxies use different algorithms to implement rate limiting. There is a tradeoff between performance and precision. A discussion of rate-limiting algorithms is beyond the scope of this book, as there is a large existing body of work on this topic. The algorithms are more complex when multiple proxies are deployed in a clustered solution. In this case, communication is needed between the proxies, normally via a high-speed in-memory network cache, like Redis or memcached. This shared state between the systems will obviously incur some overhead and hence add latency to the traffic. As with any database application, the algorithm needs to mitigate the risk of race conditions and blocking. The different algorithms define various mechanisms to minimize latency, usually at the cost of real-time accuracy.
Caching and Compression
The goal of caching and compression is to gain speed, to minimize network traffic, and to reduce load on upstream servers. It is superfluous for the upstream server to generate the same response twice. Caching is a win-win: it’s more efficient for the organization hosting the web service, and it results in a faster response for the web client. Caching only makes sense for the HTTP GET method. The POST, PUT, and DELETE methods are write requests and can’t be cached.
The client can use the Cache-Control HTTP header to control how the proxy handles caching. The following is not a full discussion of how to use this header, but it should give you an idea of some of the options.
Cache implementations vary—read the documentation for your proxy.
Telemetry
Human evolution favored those of us who were able to detect changes in our visual environment. Was that flash of stripes a tiger? In information technology, we can put our visual acuity to work by looking at graphs and other reports. Due to the complexity of our infrastructures, it is hard to even diagnose problems if you can’t literally see them.
Pretty pictures are not possible without data. Telemetry is the process of recording and transmitting the readings of an instrument—in this case our proxy. Web servers create logs with lots of data. These logs must be processed to produce graphs. Newer proxies send the data needed for analytics at runtime and enable integration with visualization tools like Grafana.
Beyond passively capturing data , the proxy can play an active role by inserting tracking identifiers into the request and response. Tools can use these tracking identifiers to report on transactions through their lifecycle, such as using an open source tool like OpenTracing. It’s helpful if system administrators can see execution times and latencies of an entire request cycle, and even configure monitoring tools to send alerts if thresholds are exceeded.
Monetization
The API proxy is like the gate at a large concert—someone has to take the tickets before you get to see the rock band! API monetization can integrate with accounting or e-commerce platforms to transform web traffic into currency!
Amazon, the e-commerce juggernaut of the world, does a really good job at this. Amazon Web Service (AWS) enables developers to monetize APIs built with the AWS API Gateway using Amazon bill calculation and collection mechanisms. API usage plans allow developers to set rate limits and quotas, and to create multiple usage plans with different limits (e.g., Silver, Gold, or Platinum) and offer them as different API products on the Amazon Web Service (AWS) Marketplace.
Tiered—Access is differentiated by either features, response time, rate limits, volume, or data depth. Additional costs may be incurred for overages, or discounts may be applied for volume.
Flat fees—APIs are billed uniformly based on usage.
Freemium—Try-buy-fly. APIs are free for a certain length of time or for a certain quantity of calls .
Points or credits may be used in lieu of fiat currency. For example, maybe you get 2,500 credits for free, but if you pay $50 per month, you get 5,000 credits. The advantage of this strategy is that it reduces some of the financial friction in the technical infrastructure, especially when customers are global and may want to pay in various fiat or crypto currencies.
In some cases, you could build the billing into the code of the APIs themselves. The intersection of monetization and APIs definitely occurs where billing is a factor in access control.
API vs Web Proxy
A front-channel HTTP request is sent from a person’s browser to a web server (or user agent). A back-channel request is sent from a software agent—it can even be a machine-to-machine operation that doesn’t involve a person. Therefore, front-channel requests require a web proxy, while back-channel requests use an API proxy .
From the perspective of a proxy, this is a subtle difference. You may even wonder why it matters.
Web proxies need to think about the user experience. A web proxy will need to brand messages to a person. If everything goes well, the web proxy is invisible to the person using a browser. However, if there is an error, for example a non-existent page is requested, the response will vary based on who is making it. A response to a user agent will need to format pages appropriately with the right CSS, JavaScript, and images, while error responses to a software agent are informational only. Web proxies need to be smarter about the variety of browsers, perhaps sending a different response based on the type of browser or logging the information.
Web applications use cookies to track sessions. Session validation is an important feature for a Web proxy. It’s easier for a software agent to use the path to request parameters or HTTP headers to communicate information to a web service. And software agents are normally stateless—each request is self-contained and, from the proxy perspective, doesn’t depend on previous requests. The software agent equivalent of a session is a token, typically sent in the Authorization header.
Protocols like OpenID Connect, which involve multiple steps—they get the code, use the code to get an access token, and then use the access token to get user_info—are more complex to implement in a proxy and require more advanced handling of state across a series of requests. Also if a web proxy is responsible for authenticating a person, it will need to convey the resulting authentication information to the upstream application. For example, the proxy may set the person’s username in the HTTP_REMOTE_USER header variable. Other HTTP headers may convey other user claims (e.g., HTTP_EMAIL and HTTP_NAME). Alternately, the web proxy may just send the identity assertion (e.g., HTTP_ID_TOKEN and HTTP_USER_INFO).
The security policies may differ for a web proxy. While a user agent primarily specifies the GET and POST methods, software agents may use all available methods, like PUT and DELETE, and even extension methods like PATCH. Web proxies may want to block these methods .
Open Source Web Proxies
The open source web proxies are as follows.
Apache httpd
The ProxyPass and ProxyPassReverse directives
The Rewrite directive
The upstream API is mapped to a folder or hostname using the Apache Directory or VirtualHost configuration directives.
Apache ProxyPass Example
AuthType shibboleth—This signals to Apache to use the Shibboleth filter for authentication.
Location—This directive limits the scope of the enclosed directives by URL, which is different than Directory, where you control access rights to a directory (and its subdirectories) in the file system. In this example, we are using base URL /.
Require shib-attr memberOf Manager—This directive requires that certain attributes must contain the specified values in the request. In this case, the memberOf attribute must be Manager in order to pass the authentication.
ProxyPass—This directive allows remote servers to be mapped into the space of the local server. The local server does not act as a proxy in the conventional sense, but appears to be a mirror of the remote server.
ProxyPassReverse—This directive lets Apache Httpd adjust the URL in the Location, Content-Location, and URI headers on the HTTP redirect responses.
In the discussed configuration, the client attempting to access https://proxy.example.com/target is first required to be authenticated by Shibboleth, and then Apache makes a reverse proxy request to http://target.example.com/ to get the final content displayed on the browser .
mod_auth_openidc
This Apache module functions as an OpenID Connect relying party, authenticating users against an OpenID Connect provider, after which it receives user identity information either via the id_token or the UserInfo JWT.
Sample Configuration to Use Gluu as an OpenID Connect Provider
OIDCProviderMetadataURL—The URL for the OP configuration metadata, i.e., the location of the .well-known/openid-configuration file.
OIDCClientID—The client identifier (client_id) issued by the OP.
OIDCClientSecret—The secret corresponding to the client_id.
OIDCRedirectURI—This path will be used by mod_auth_openidc to receive the callback from the OP with the response. It should not map to content on the website.
OIDCResponseType—The response type expected from the authorization endpoint. Use code for code flow and code id_token for hybrid flow.
OIDCScope—The scopes requested from the OP.
Nginx
Sample Nginx Proxy Configuration
The worker_connections directive under the events context defines how many clients can be served simultaneously by Nginx. The default is 1024.
The server directives under the http context are where we define the behaviors of the Nginx web server and see how to handle different requests.
- As you can see in the first server directive, requests are automatically redirected from http calls to https. This is done by listening on port 80 and returning a 301 redirect to the port 443 equivalent of the web server.
Inside the following server directive block, we defined our SSL/TLS capabilities with the following declarations: ssl on, ssl_certificate, and ssl_certificate_key.
Next is the location directive, which defines what should happen to client requests. For example, a client request to https://proxy.example.com/items will proxy on the backend to https://backend.example.com/items . This will also route traffic to all “children” of this directory, unless another hardcoded location is defined. For instance, /items/shoes/ will be handled by this directive unless you have a location /items/shoes/ {} directive, which will override this one.
Sample upstream Context
- To expand on our previous configuration, the upstream directives were added to the http context. Here, we define the server pools, backend_items and backend_users. These blocks contain each server in that proxy pool. By default, Nginx handles the server pools in a round-robin fashion: each server is requested in order until it rolls back to the first server and the process begins again.
Note that each server added must begin with server followed by the path to the server. Optional ports can be defined as well. In our example, 443 is used.
To control failover, Nginx provides max_fails and fail_timeout. The former sets the maximum amount of connection failures a server can have before it’s considered unavailable. The latter defines how long Nginx should wait for a connection and also how long the server should be considered unavailable.
- Now moving to the location blocks, the proxy_pass directive for /items and /users points to the upstream pools defined previously, as opposed to any single URL. Anytime a user or agent tries to access https://proxy.example.com/users , Nginx will route that request to one of the servers defined in the backend_users pool ( https://backend03.example.com/users for example).
The proxy_next_upstream directive will forcefully route traffic to the next server in the upstream block if any of the following conditions are met. So if the server that Nginx is trying to route a request to presents an error, has a timeout, returns an invalid_header, or returns any of the HTTP response codes 403, 404, 500, 502, 503, or 504, Nginx will then switch to the next server in the pool.
These are only some of the tools available with Nginx. Let’s examine a more complex example and extend the functionality to limit access to people authenticated using OpenID Connect. This example uses the lua-resty-openidc module , written by Hans Zandbelt (who also wrote the Apache module mod_auth_openidc plugin). The instructions for installation can be found at https://github.com/zmartzone/lua-resty-openidc . At this point you should have two servers: one is the OpenID Connect provider, which is idp.example.com in our example. The other server hosts the Nginx web server (tested with version 1.11.2.5) with the lua-resty-openidc dependency properly configured. This second server will be called rp.example.com.
The lua-resty-openidc Nginx library uses the OpenID Connect Authorization Code Flow. The Nginx OpenResty server in this example is the OpenID Connect RP. After navigating to the Nginx OpenResty server, the user will be redirected to the OP. After authentication and authorization, the RP will gather user information from the OP and send the user to the proxied content.
First, let’s register the OpenResty client with the OpenID Provider, in this case the Gluu Server. Navigate to your Gluu Server, and on the left panel, click OpenID Connect, and then Clients. Click the Add Client button. Choose a descriptive name for your client, like lua-resty-openidc for convenience (this is only for human readability). Jump down to the bottom, where you will choose Add Login Redirect URI, Add Scope, Add Response Type, and Add Grant Type. For our example, our Redirect Login URI will be https://rp.example.com/welcome to match the hostname of the OpenResty server we will configure shortly.
Now, click Add Scope and Search to display all scope options. Check email, openid, and profile. Next, click Add Response Type and check Code. Click Add Grant Type and check authorization_code. For our simple example, this is enough, and we can click the Add button at the bottom of the page. Once we’ve done this, we can gather our inum of the client we just created from the OpenID Connect -> Clients dashboard next to the Display Name. OpenResty’s Nginx configuration will use this inum as the client_id and the secret we created before will be our client_secret. That’s all we need to configure the Gluu Server as the OP.
OpenResty Nginx Configuration
There are a couple of things to be aware of with this configuration. lua_package_path must point to the proper location of lua-resty-openidc.lua and its dependencies. If you installed the packages with the OpenResty Package Manager, this can be left as shown in Listing 6-4. The ssl_certificate and ssl_certificate_key options should point to the web certificates for this web server. Creating self-signed certificates isn’t difficult and is the reason we have the ssl_verify option set to no. Replace the $INUM and $SECRET terms with client_id and client_secret we created earlier in the Gluu Server.
That’s it. Now you can start OpenResty from OpenResty’s bin directory. After that, navigate to https://rp.example.com and you should be redirected to the IDP where you can log in. After giving consent, you’ll be redirected to the default OpenResty landing page in the /usr/local/openresty/nginx/html/index.html directory.
Looking through the examples and issues in the lua-resty-openidc GitHub repo will give you a better understanding of the robust nature of what you can achieve with these tools.
Kong

Kong
There are two versions of the product. One is the Enterprise Edition, which includes additional tools for documentation and analytics, as well as additional features on the gateway itself. There is also the Community Edition of Kong, which is the bare gateway.
Very fast, sub-millisecond latency on the core gateway
Small footprint, suitable for sidecar patterns
Extensible through custom plugins
Open source, no black box
Extensive and active community
Over 60 plugins available
Kong Technical Component Overview
Kong as a gateway is built on top of the well-known Nginx web server. It is written in Lua (with the OpenResty framework) and as such is easy to extend. For its configuration, it uses a database. You can choose either Postgres or Cassandra. Many Kong nodes can be connected to the same database, and they will then form a Kong cluster. A Kong cluster scales horizontally; all you need to do is add Kong nodes. The Kong configuration is dynamic, which means that any changes made to the configuration will automatically propagate over the entire Kong cluster and take effect within seconds, without having to deploy and push configurations.
Kong is available in packages for more than 12 platforms, from Docker images to source code.
Kong Functional Component Overview
Route—A route is a set of matching rules. Whenever a request is received, its characteristics will be matched against the configured route entities, and the best match is assigned as the route for this request. Matching can be done on the requested hostname (host-header), the requested path, and/or the requested HTTP method. Every route is always connected to one service (services can have multiple routes).
Service—A service is the representation of the backend service, where the request will be routed. This means that a service contains all properties for an upstream connection, including host, port, path, connection timeouts, connection retries, and other information to control Kong’s proxy behavior. A service can contain many routes.
Consumer—Software that is calling the API. In OAuth, this is mapped to a client. In more primitive API access control implementations, you might use HTTP Basic Authentication, or some other type of shared secret (e.g., an API key or a signed JWT).
Plugin—Plugins add functionality to Kong. Plugins can be attached to any combination of service, route, or consumer. A plugin will be executed when a request is received for any of the items it is attached to. When plugins are not attached to anything, they are global and will be executed on every request. Many standard plugins are included for functions like authentication, security, traffic control, serverless, analytics/monitoring, transformations, and logging. There are also many community-contributed plugins. It is possible to write your own plugins if you’re up for learning about Lua and publishing some Lua rocks!
Getting Started with Kong
To get started with Kong, you can use the Docker distribution to quickly create a setup that is fully functional without too much hassle. We’ll take the following steps here: (1) Set up Kong and database, (2) Create an API in Kong, and (3) Enable authentication on that API, using plugins.
To get started with Docker, execute the following shell commands.
Installing Dockerized Kong
The command will start a new container running PostgreSQL version 9.5. The container goes by the name kong-database and exposes a single port 5432 to connect to the database. kong is both the username and password.
Initializing the Kong Database
This will start an ephemeral container with Kong running its migrations up command. When completed, it will simply exit. The command will pull the latest version of Kong (as per kong:latest).
The previously created PostgreSQL container kong-database is made available as hostname kong-database. The two environment variables, KONG_DATABASE and KONG_PG_HOST, are passed to Kong to tell it to use PostgreSQL as the database and connect to it as kong-database.
We do not need to pass the port nor any credentials, as Kong defaults to port 5432 and kong for both the username and password (all according to the previously created PostgreSQL container). Obviously, they can be altered and passed along using other settings from Kong’s configuration file.
Starting Kong
This will now actually start Kong and run the container as a daemon (the -d option). From the previous command, there are a few new options passed along. First of all, exposing the Kong ports for the proxy (8000 for http and 8443 for https traffic) and for the Kong administrator interface (8001 for http and 8444 for https). Second, the log files are set to stdout and stderr as per Docker best practices.
Finally, there is the KONG_ADMIN_LISTEN option that tells Kong to listen on all interfaces for the administrator interface. The default here is to only listen on localhost, but since it runs inside a container, that would make it unreachable from outside the container, and hence prevent us from configuring anything.
Step 4: Check your installation.
Testing Kong
The output (despite being an error) clearly shows that Kong is running but cannot find a matching route for the simple test request.
Step 5: Create a service and route.
The route catches any request destined for host myapi.com, then the service will forward it to mockbin.org (a test service to create and debug test requests)
Step 6: Test the activated API.
This inserts a host header that matches the route we created earlier. This makes Kong forward the request as expected, and we get a result with a body containing all details of the request we send.
Step 7: Add client authentication using HTTP basic.
If you now test the API again (Step 6), you’ll get a 401 unauthorized response. The API is now protected and can only be accessed by providing proper credentials.
Step 8: Add a consumer and credentials.
Step 9: Examine the response.
When examining the response from Step 8, there are a number of artifacts inserted by Kong into the request and the response.
The Proxy-Latency header shows the latency it took Kong to process the request/response (in milliseconds, so 0 means less than a millisecond). The Upstream-Latency is the time it took the upstream to respond.
The backend does not have to do its own authentication; it can just grab the details it needs from the headers of the request.
Step 10: Consider some warnings.
All requests are plain HTTP—all APIs should be HTTPS.
The example backend is reachable by bypassing Kong. Your network firewalls should only allow access through Kong.
The apikey header is forwarded to the backend—configure Kong to remove it.
Kong’s admin API is accessible .
Istio
Traffic management—The ability to route requests based on flexible rules is a compelling advantage of Istio. For example, let’s say you want to route 10% of your traffic to version 1.1 of your API, while routing 90% to version 1.0. You can implement these kinds of rules in Istio quickly, which is quite difficult in other API gateway platforms.
Telemetry Istio—It’s built on a new web server, Envoy (see https://envoyproxy.io ), which provides quite a bit of telemetry out of the box. This enables you to use a tool life Grafana to provide a visual representation of what’s happing in your proxy deployment.
Mutual TLS—You can configure mutual TLS on a per service basis. You can also configure role-based access control (RBAC) for each service.
Istio facilitates accurate monitoring of the health and activity of your micro-services. It also makes it possible to apply policy across dozens or hundreds of micro-services all at once. This is where powerful tooling helps give you control and an accurate picture of your service ecosystem.
For more information on Istio, see the website at https://istio.io . Because it’s so new, there wasn’t enough time to provide a detailed overview here. But given its potential, it seemed remiss not to mention it. Check it out!
Conclusion
Proxying is a powerful technology that keeps getting better. New tools are getting faster, more flexible, more reliable, and easier to manage. Controlling access to web content via the proxy is an essential part of any IAM strategy. In Chapter 8, we’ll introduce one more proxy: the Gluu Gateway. This is an open source distribution that uses Kong community edition, but adds some extra IAM management components.