
7
Restoring Vintage Photos
Most scanners have full auto modes where the scanner software deals with all of the adjustments of the image. Sometimes this mode will let you customize your resolution and then you can opt for dust removal or color restoration.
Restoration: Photos that Need Some Work
Old photos and negatives are affected by mold, mildew, pests, and other elements that degrade the photo. One of the biggest problems is that the film emulsion gets sticky on some types of photos, causing the photos to stick together. You’ll want to clean up your photos—removing scratches, tears, and bends. Figure 7.1 shows a photo that was restored—the image on the left is the before shot and the image on the right shows the photo after restoration.
Here are the steps and tips you’ll need to smooth out a rough-looking photo:
Note
Resolution is important, very important, because the more pixels an image contains, the better the quality and detail. If at all possible use the TIFF scan to edit a photo. If you don’t have that scan, use the JPEG and save it at the highest resolution (see Chapter 13 for more information about this process).
1. Crop. You can crop out any major damage to the edges of the photo so long as you don’t go too far into the main part of the picture. If a photo is torn, tape it together from the back and then proceed with removing the mark where the two parts join.
2. Tweak in ACR. Play with the sliders in Adobe Camera Raw (ACR). You might think that this software is only for RAW photos, but that’s not the case. You can set the preferences so that your TIFF or JPEG photos open in the program. Use the sliders to adjust the color temperature (warm and cold colors), fill light (be careful here; old photos don’t take to this well), and brightness (better than playing with exposure because it’s less likely to clip your colors).
Clipping is when areas of your photo turn to one color tone. You don’t want this to happen because it takes away the image detail when the image is blown up.
Note
When you’re tweaking tough spots like people’s faces, blow up the resolution to 200 or 300 percent and work from there.
3. Tweak in Photoshop or Elements. Use the tools in Photoshop or Elements (or whatever image-processing program you have) to help correct tears, scratches, and bends. The content healing tool does wonders for long scratches in photos. Just select it, choose a brush size, and click and drag it along the scratch. If part of the emulsion of the print is gone, leaving a big smudge in the frame, attempt to use the Clone Stamp and Healing Brush tools. (See Adobe Photoshop CS6 Classroom in a Book by the Adobe Creative Team, for more detailed information about using Photoshop.)
Figure 7.1 The image above is the original and the image on the right shows the result of restoration.
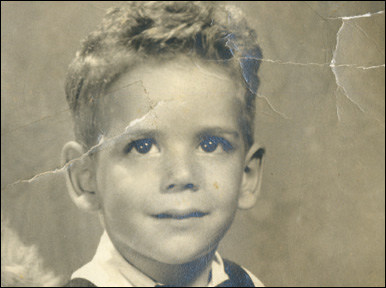
©Matthew Bamberg
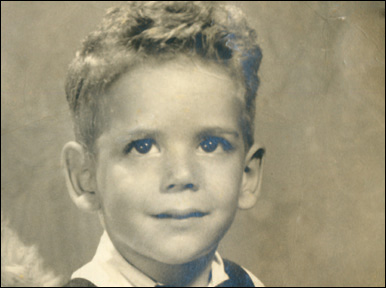
©Matthew Bamberg