Chapter 3. Building a serverless application
- Writing, testing, and deploying Lambda functions
- Creating a basic event-driven system for transcoding videos
- Using AWS services such as Simple Storage Service, Simple Notification Service, and the Elastic Transcoder
To give you a thorough understanding of serverless architectures, you’re going to build a serverless application. Specifically, you’ll build a video-sharing website, a YouTube mini clone, which we’ll call 24-Hour Video. This application will have a website with user registration and authentication capabilities. Your users will be able to watch and upload videos. Any videos uploaded to the system will be transcoded to different resolutions and bitrates so that people on different connections and devices will be able to watch them. You’ll use a number of AWS services to build your application, including AWS Lambda, S3, Elastic Transcoder, SNS, and non-AWS services such as Auth0 and Firebase. In this chapter, we’ll focus on building your serverless pipeline for transcoding uploaded videos.
3.1. 24-Hour Video
Before we jump in to the nitty-gritty of the chapter, let’s step ahead and look at what you’re going to accomplish by the time you get to the final chapter. Figure 3.1 shows a 10,000-foot view of the major components you’re going to develop. These include a transcoding pipeline, a website, and a custom API. At the end, you’ll also have a full-fledged system with a database and a user system.
Figure 3.1. These are the major components you’ll create as you work through the book.

The website you’re going to build will look like figure 3.2. Videos uploaded by your users will be shown on the main page. Your users will be able to click any video and play it.
Figure 3.2. The website you’ll build for 24-Hour Video

The overall purpose of building 24-Hour Video throughout the book is threefold:
- To demonstrate how easy it is to create a serverless back end using AWS Lambda and other services. Each chapter will add new functionality to 24-Hour Video.
- To implement and explore different serverless architectures and patterns. We’ll also show you useful tips and tricks.
- To allow you to try exercises found at the end of every chapter. Several exercises will assume that you’ve built 24-Hour Video and ask you to implement additional features or make changes. These exercises are great to test whether you understand new concepts. They’re fun, too!
Before you begin, however, you need to set up your machine, install the necessary tooling, and configure a few services in AWS. Details for that process are in appendix B, “Installation and setup.” Go through appendix B first, and then come back here to begin your adventure!
3.1.1. General requirements
You’re going to build an important part of your system in this chapter: an event-driven pipeline that will take uploaded videos and encode them to different formats and bitrates. 24-Hour Video will be an event-driven, push-based system where the workflow to encode videos will be triggered automatically by an upload to an S3 bucket. Figure 3.3 shows the two main components you’re going to work on.
Figure 3.3. The serverless transcoding pipeline will be your first challenge.

A quick note about AWS costs: most of AWS services have a free tier. By following the 24-Hour Video example, you should stay within the free tier of most services. Elastic Transcoder, however, is likely to be the one that costs a little. Its free tier includes 20 minutes of SD output and 10 minutes of HD (720p or above) output per month (a minute refers to the length of the source video, not transcoder execution time). As usual, costs are dependent on the region where Elastic Transcoder is used. In the eastern part of the United States, for example, the price for 1 minute of HD output per month is $.03. This makes a 10-minute source file cost 30 cents to encode. Elastic Transcoder pricing for other regions can be found at https://aws.amazon.com/elastictranscoder/pricing/.
The S3 free tier allows users to store 5 GB of data with standard storage, issue 20,000 GET requests and 2,000 PUT requests, and transfer 15 GB of data out each month. Lambda provides a free tier with 1M free requests and 400,000 GB-seconds of compute time. You should be well within the free tiers of those services with your basic system.
The following are the high-level requirements for 24-Hour Video:
- The transcoding process will convert uploaded source videos to three different resolutions and bitrates: generic 720p, generic 1080p, and a web/YouTube/Facebook–friendly 720p with a lower bitrate.
- There will be two S3 buckets. Source files will go into the upload bucket. Newly transcoded files will be saved to the transcoded videos S3 bucket.
- The permissions of each transcoded file will be modified to make them publicly viewable and downloadable.
- After each successful transcoding, you’ll be sent an email notification with information about the file. This will be done using SNS.
- A small JSON file with video metadata will be created and placed alongside each transcoded video. This metadata will contain basic information about the file, such as its size, number of streams, and duration.
To make things simpler to manage, you’ll set up a build and deployment system using the Node Package Manager (npm). You’ll want to do it as early as possible to have an automated process for testing, packaging Lambda functions, and deploying them to AWS. You will, however, temporarily set aside other developmental and operational aspects such as versioning or deployment and come back to them later.
3.1.2. Amazon Web Services
To create your serverless back end, you’ll use several services provided by AWS. These include S3 for storage of files, Elastic Transcoder for video conversion, SNS for notifications, and Lambda for running custom code and orchestrating key parts of the system. Refer to appendix A for a short overview of these services. For the most part, you’ll use the following AWS services:
- Lambda will handle parts of the system that require coordination or can’t be done directly by other services. You’ll create three Lambda functions:
- The first Lambda function will create and submit Elastic Transcoder jobs. It will trigger automatically whenever a file is uploaded to the upload bucket.
- The second function will run whenever a new, transcoded video appears in the transcoded videos bucket. This function will change the file’s permissions so that it becomes publicly accessible. This will allow your users to view and download the new file.
- The third function will also run in response to the creation of a new, transcoded file. It will analyze the video, create a metadata file, and save it in S3.
- Elastic Transcoder will encode videos to different resolutions and bitrates. Default encoding presets will alleviate the need to create custom profiles for the transcoder.
- SNS will issue notifications when a transcoded file is placed in the transcoded videos bucket. This notification will be used to send an email with information about the file and invoke the last two Lambda functions.
Figure 3.4 shows a detailed flow of the proposed approach. Note that the only point where a user needs to interact with the system is at the initial upload stage. This figure and the architecture may look complex, but we’ll break the system into manageable chunks and tackle them one by one.
Figure 3.4. This back end is built with S3, SNS, Elastic Transcoder, and Lambda. This figure may seem complex initially, but we’ll break it down, and you’ll build a scalable serverless system in no time at all.

3.1.3. Creating your first Lambda function
Now that you’ve taken care of the setup and configuration details in appendix B, it’s time to write the first Lambda function. In the same directory as package.json, which you created during installation, create a new file named index.js and open it in your favorite text editor. This file will contain the first function. The important thing to know is that you must define a function handler, which will be invoked by the Lambda runtime. The handler takes three parameters—event, context, and callback—and is defined as follows:
exports.handler = function(event, context, callback){}
Your Lambda function will be invoked from S3 as soon as a new file is placed in a bucket. Information about the uploaded video will be passed to the Lambda function via the event object. It will include the bucket name and the key of the file being uploaded. This function will then prepare a job for the Elastic Transcoder; it will specify the input file and all possible outputs. Finally, it will submit the job and write a message to an Amazon CloudWatch Log stream. Figure 3.5 visualizes this part of the process.
Figure 3.5. The first Lambda function will react to an event in S3 and create an Elastic Transcoder job.

Listing 3.1 shows this function’s implementation; copy it into index.js. Don’t forget to set PipelineId to the corresponding Elastic Transcoder pipeline you created earlier. You can find the Pipeline ID (figure 3.6) in the Elastic Transcoder console by clicking the magnifier button next to the pipeline you created in appendix B.
Figure 3.6. You need to set the correct pipeline ID in the first Lambda function to create and execute jobs.

Source code at your fingertips
Our GitHub repository at https://github.com/sbarski/serverless-architectures-aws has all the code snippets and listings you need for this book. So you don’t have to manually type anything out—unless you really want to.
Listing 3.1. Transcode video Lambda


3.1.4. Naming your Lambda
You can name the file containing your Lambda function something other than index.js. If you do that, you’ll have to modify the handler value in Lambda’s configuration panel in AWS to reflect the new name of the file. For example, if you decide to name your file TranscodeVideo.js rather than index.js, you’ll have to modify the handler to be TranscodeVideo.handler in the AWS console (figure 3.7).
Figure 3.7. The Lambda runtime needs to know the handler function to execute your code.

3.1.5. Testing locally
Having copied the function from listing 3.1 into index.js, you can think about how to test it locally on your machine. A way to do that is to simulate events and have the function react to them. This means you have to invoke the function and pass three parameters representing the context, event, and callback objects. The function will execute as if it was running in Lambda, and you’ll see a result without having to deploy it.
You can run Lambda functions locally using an npm module called run-local-lambda. To install this module, execute the following command from a terminal window (make sure you’re in the function’s directory): npm install run-local-lambda save-dev.
Note
This module allows you to invoke your Lambda function but it doesn’t emulate Lambda’s environment. It doesn’t respect memory size or the CPU, ephemeral local disk storage, or the operating system of real Lambda in AWS.
Modify package.json, as in the next listing, to change the test script. The test script will invoke the function and pass the contents of event.json, a file you’re about to create, as the event object. For more information about this npm module, including additional parameters and examples, see https://www.npmjs.com/package/run-local-lambda.
Listing 3.2. Test script

The test script requires an event.json file to function. This file must contain the specification of the event object that run-local-lambda will pass in to the Lambda function. In the same directory as index.js, create a subdirectory called tests and then create a file called event.json in it. Copy the next listing into event.json and save it.
Listing 3.3. Simulating the event object


To execute the test, run npm test from a terminal window in the directory of the function. If it works, you should see the values of key, sourceKey, and outputKey print to the terminal.
Having run the test script, you might see an error message with an AccessDenied-Exception. That’s normal, because your user lambda-upload doesn’t have permissions to create new Elastic Transcoder jobs. Once uploaded to AWS, your function will run correctly because it will assume the identity and access management (IAM) role defined in appendix B. One of the exercises at the end of this chapter will be to add a policy to the IAM user (lambda-upload) to create Elastic Transcoder jobs from your local system.
3.1.6. Deploying to AWS
You’re now ready to deploy the function to AWS. To do that, you need to modify package .json to create predeploy and deploy scripts. The predeploy script creates a zip file of the function. The deploy script then deploys the zip file to AWS. Note that if you’re a Windows user, you won’t have the zip file, which is needed by the predeploy script, installed by default. Please refer to appendix B and the sidebar “Zip and Windows” for further information. Update package.json to include deploy and predeploy scripts, as shown in the following listing.
Listing 3.4. Predeploy and deploy scripts

For deployment to work, the --function-name parameter must match the name or the ARN of the function. If you wish to use the ARN, follow these steps:
- In the AWS console click Lambda.
- Click transcode-video and copy the ARN of the function (figure 3.8).
Figure 3.8. You need to copy the ARN of your Lambda function to package.json for the deployment to work.

- Open package.json and change the ARN value in the deploy script to the value copied from the AWS console.
Having updated the ARN value in the deploy script, execute npm run deploy from the terminal. This will zip up the function and deploy it to AWS. If the deployment was successful, you’ll see the current function configuration, including timeout and memory size, printed to the terminal (chapter 6 goes into more detail on function configuration options and what all of this represents).
3.1.7. Connecting S3 to Lambda
The last step before you can test the function in AWS is to connect S3 to Lambda. You need to configure S3 to raise an event and invoke a Lambda function whenever a new file is added to the upload bucket (figure 3.9).
Figure 3.9. S3 will trigger Lambda when you add a new file to the bucket.

To configure S3, follow these steps:
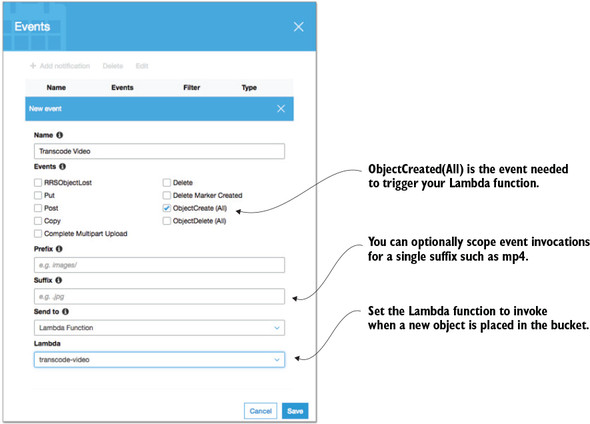
- Open the upload bucket (serverless-video-upload) in the AWS console, select Properties, click Events, and click Add Notification.
- Give your event a name, such as Video Upload, and then under Events select ObjectCreate (All).
- Select Lambda Function from the Send To drop-down. Finally, from the Lambda drop-down select your transcode-video function and click Save (figure 3.10).
Figure 3.10. You need to configure S3 to invoke the right Lambda function when you add a new object to the bucket.
If this is your first time connecting S3 to Lambda, you may see a permissions error. If that happens, you’ll need to use Lambda’s console to set up the event instead:
- In the AWS console click Lambda.
- Select the transcode-video function.
- Select the Triggers tab.
- Select Add trigger.
- Click on the box in the popup and select S3.
- Select the upload bucket and set event type as Object Created (All).
- Select Submit to finish.
3.1.8. Testing in AWS
To test the function in AWS, upload a video to the upload bucket. Follow these steps:
- Click into the video upload bucket, and then select Upload (figure 3.11).
Figure 3.11. It’s better to upload a small file initially because it makes the upload and transcoding a lot quicker.

- You’ll see an upload dialog appear on your screen. Click Add Files, select a file from your computer, and click the Upload button. All other settings can be left as they are.
After a time, you should see three new videos in the transcoded videos bucket. These files should appear in a folder rather than in the root of the bucket (figure 3.12).
Figure 3.12. Elastic Transcoder will generate three new files and place them in a folder in the transcoded videos S3 bucket.

3.1.9. Looking at logs
Having performed a test in the previous section, you should see three new files in the transcoded videos bucket. But things may not always go as smoothly. In case of problems, such as new files not appearing, you can check two logs for errors. The first is a Lambda log in CloudWatch. To see the log, do the following:
- Choose Lambda in the AWS console and then click the function name.
- Choose the Monitoring tab and then click View Logs in CloudWatch (figure 3.13).
Figure 3.13. Logs and metrics are accessible from the Monitoring tab of each function in the Lambda console.

The latest log stream should be at the top, but if it’s not, you can sort log streams by date by clicking the Last Event Time column header. If you click into a log stream, you’ll see log entries with more detail. Often, if you make an error, these logs will reveal what happened. See chapter 4 for more information about CloudWatch and logging.
If Lambda logs reveal nothing out of the ordinary, take a look at the Elastic Transcoder logs:
- Click Elastic Transcoder in the AWS console, then click Jobs, and select your pipeline.
- Click Search to see a recent list of jobs (figure 3.14). The Status column shows whether the job was (successfully) completed or if there was an error. Click the job to see more
information about it.
Figure 3.14. The Elastic Transcoder job list can reveal if a job has failed. Failures can occur for a variety of reasons, including the source file being deleted before the job started or a file with the same name already present in the target bucket.

3.2. Configuring Simple Notification Service
The next part of the job is to connect Simple Notification Service to your transcoded videos bucket. After Elastic Transcoder saves a new file to this bucket, you need to send an email and invoke two other Lambda functions to make the new file publicly accessible and to create a JSON file with metadata.
You’ll create an SNS topic and three subscriptions. One subscription will be used for email and the other two will trigger Lambda functions (you’re implementing the fan-out pattern described in chapter 2). The transcoded videos bucket will automatically create event notifications as soon as new video appears and push a notification to an SNS topic to kick-start this bit of the workflow. Figure 3.15 displays this part of the system with the SNS topic in the middle and three subscribers consuming new notifications.
Figure 3.15. To create multiple notifications, you need to use SNS. You can add multiple subscribers and perform operations in parallel.

3.2.1. Connecting SNS to S3
Create a new SNS topic by clicking SNS in the AWS console and then selecting Create Topic. Give your topic a name such as transcoded-video-notifications.
You need to connect S3 to SNS so that when a new object is added to the transcoded videos bucket, an event is pushed to SNS. To achieve this, the SNS security policy must be modified to allow communication with S3:
- In the SNS console, click Topics and then click the ARN of your topic (transcoded-video-notifications). The Topic Details view will appear.
- Click the Other Topic Actions drop-down, select Edit Topic Policy, and then click the Advanced View tab.
- Scroll to the bottom of the policy until you see the Condition declaration. Replace it with a new condition, as shown in listing 3.5. Click Update Policy to save.
Figure 3.16 shows what the updated policy looks like. Make sure to modify the SourceArn to reflect the name of your bucket. It should be in the following form: arn:aws:s3:*:*:<your bucket name>.
Listing 3.5. SNS condition

Figure 3.16. The resource policy for the SNS topic needs to be updated to work with S3. See chapter 4 for more information on security, policies, and permissions.

- In the AWS console click S3 and open the transcoded videos bucket.
- Click Properties and choose Events.
- Click the Add Notification button.
- Set a name for the event, such as “Transcoded Video.”
- Enable the ObjectCreate (All) check box.
- From the Send To drop-down, select SNS Topic.
- From the SNS drop-down, select the SNS topic you created (transcoded-video-notification).
- You can optionally set a suffix such as mp4. If you do that, new event notifications will be created only for files that have an mp4 extension. If you decide to tackle section 3.4, you’ll definitely have to come back and set the suffix to mp4 (figure 3.17).
Figure 3.17. S3 can post events to SNS, which can fan out these notifications to multiple subscribers.

- Click Save.
If you get an error message such as, “Permissions on the destination topic do not allow S3 to publish notifications from this bucket” when trying to save, double-check that you copied listing 3.5 correctly. If you get stuck, have a look at http://amzn.to/1pgkl4X for more helpful information.
3.2.2. Getting email from SNS
One of your requirements is to get an email about each transcoded file. You have an SNS topic that receives events from an S3 bucket whenever a new transcoded file is saved in it. You need to create a new email subscription for the topic so that you can begin receiving emails. In the SNS console, follow these steps:
- Click Topics and then click the name of your SNS topic (transcoded-video-notifications). The check box to the topic should be selected.
- Click Actions, and select Subscribe to Topic. You should see a Create Subscription dialog appear.
- In the dialog select Email as the protocol and enter your email address as the endpoint.
- Click Create Subscription to save and exit the dialog.
SNS will immediately send a confirmation email, which you must activate to receive further notifications. Going forward, you’ll receive an email whenever a file is added to the bucket.
3.2.3. Testing SNS
To test if SNS is working, upload a video file to the upload bucket. You can also rename an existing file in the bucket to trigger the workflow. You should receive an email for each transcoded file.
3.3. Setting video permissions
The second Lambda function you create will make your newly transcoded files publicly accessible. Figure 3.18 shows this part of the workflow. In chapter 8, we’ll look at securing access to files using signed URLs, but for now your transcoded videos will be available for everyone to play and download.
Figure 3.18. This part of the workflow modifies the access control list of the newly transcoded video file to make it publicly accessible.

3.3.1. Creating the second function
First, create the second Lambda function in AWS the way you created the first one. This time, though, name your function set-permissions. You can follow the instructions in appendix B again. Then, on your system, create a copy of the directory containing the first Lambda function. You’ll use this copy as a basis for the second function. Open package.json and change all references of transcode-video to set-permissions. Also, change the ARN in the deploy script to reflect the ARN of the new function created in AWS.
In the second Lambda function, you’ll need to perform two tasks:
- Extract the bucket and key of the new video from the event object.
- Set the access control list (ACL) attribute of the video to public-read to make it publicly accessible.
The next listing shows a reference implementation for the second function. Copy it to index.js, replacing anything that’s already there.
Listing 3.6. Changing the ACL of an S3 object

3.3.2. Configuring and securing
Having copied over the second Lambda function to index.js, perform a deployment using npm run deploy. Finally, you need to connect Lambda to SNS:
- In the AWS console click SNS, select Topics, and then click the ARN of your topic (transcoded-video-notifications).
- Click the Create Subscription button and select AWS Lambda.
- From the Endpoint drop-down, select the set-permissions Lambda function, and click Create Subscription.
There’s still one more security issue: the role under which the Lambda function executes has permissions only to download or upload new objects to the bucket. But this role doesn’t have permission to change the object ACL. You can fix this by creating a new inline policy for the role (lambda-s3-execution-role) you’ve been using:
- In the AWS console click IAM, select Roles, and click lambda-s3-execution-role.
- Expand Inline Policies, click the Click Here link, and select Policy Generator.
- In the AWS Service drop-down, select Amazon S3 and then select PutObjectAcl in Actions.
- In the ARN textbox, type arn:aws:s3:::<your-bucket-name>/*, where <your-bucket-name> is the name of your bucket for transcoded videos.
- Click Add Statement, then click Next Step, and click Apply Policy to save.
Security and Roles
In a production environment, you should create separate roles for your Lambda functions, especially if they’ll use different resources and require different permissions.
3.3.3. Testing the second function
Having configured role permissions, you can test the second Lambda function by uploading or renaming a video in the upload bucket. To see if the function has worked, find any newly created file in the transcoded videos bucket, select it, and click Permissions. You should see the second Grantee setting configured for Everyone with the Open/Download check box selected (figure 3.19). You can now copy the URL that’s given just above on that same page and share it with others.
Figure 3.19. Check if the Lambda function successfully updated the object ACL by looking at its permissions in the S3 console.

If something goes wrong with the Lambda function, look at CloudWatch logs for the function. They might reveal clues as to what happened.
3.4. Generating metadata
The third Lambda function needs to create a JSON file with metadata about the video. It should also save the metadata file next to the video. This Lambda function will be invoked via SNS just like the one before it. The problem in this function is how to analyze the video and get the required metadata.
FFmpeg is a command-line utility that records and converts video and audio. It has several components, including the excellent FFprobe, which can be used to extract media information. You’re going to use FFprobe to extract metadata and then save it to a file. This section is slightly more advanced than other sections, but it’s also optional. You’ll learn a lot by working through it, but you can skip it without affecting what you do in other chapters.
3.4.1. Creating the third function and FFprobe
There are two ways to acquire FFprobe. The first way is to spin up a copy of EC2 with Amazon Linux, grab the FFmpeg source code, and build FFprobe. If you do that, you’ll need to create a static build of the utility. The second way is to find a static build of FFmpeg for Linux (for example, https://www.johnvansickle.com/ffmpeg/) from a reputable source or a distribution. If you decide to compile your own binaries, per the article “Running Arbitrary Executables in AWS Lambda” (http://amzn.to/29yhvpD), ensure that they’re either statically linked or built for the matching version of Amazon Linux. The current version of Amazon Linux in use within AWS Lambda can always be found on the Supported Versions page (http://amzn.to/29w0c6W) of the Lambda docs.
Having acquired a static copy of FFprobe, create the third Lambda function in the AWS console, and name it extract-metadata. Set the role for this function to lambda-s3-execution-role, timeout to 2 minutes, and memory to 256 MB. You can reduce memory allocation and timeout at a later stage when everything works. On your system, copy the second function and associated files into a new directory to create the third function. Open package.json and change all occurrences of the old function name (set-permissions) to the new one (extract-metadata). Make sure to update the ARN in package.json, as well as to reflect the ARN of the new function.
In the function directory, create a new subdirectory called bin. Copy your statically built version of FFprobe into it. You’ll be pushing Lambda to the max with this function, so make sure to include only FFprobe and not the other components. The maximum deployment package size for Lambda is 50 MB, so including too many unnecessary files may cause your deployment to fail.
The third Lambda function works by copying the video from S3 to a /tmp directory on its local filesystem. It then executes FFprobe and collects the required information. Finally, it creates a JSON file with the required data and saves it in the bucket next to the file (figure 3.20). Lambda has a maximum disk capacity of 512 MB, so this function won’t work if your videos are larger.
Figure 3.20. The third Lambda function will retrieve an object from S3, run FFprobe, and save metadata back to the bucket.

Listing 3.7 shows an implementation of the third Lambda function. Replace the contents of index.js with the code in the listing. Once you’ve finished, deploy the third function to AWS.
Any script or program you wish to execute in Lambda must have the right (executable) file permissions. Unfortunately, you can’t change file permissions directly in Lambda, so it must be done on your computer before the function is deployed. If you use Linux or Mac, it’s easy. Run chmod +x bin/ffprobe from a terminal command line (you must be in the Lambda function’s directory). You can then deploy the function, and FFprobe will work. If you’re on Windows, it’s trickier because it doesn’t come with the chmod command. One way you can solve this problem is by spinning up an Amazon Linux machine in AWS, copying FFprobe over, changing permissions, and then copying the file back.
Listing 3.7. Extracting metadata


You may notice that the function in listing 3.7 has many callbacks. Having numerous callbacks in a function that essentially carries out sequential operations makes it harder to read and understand. Chapter 6 introduces a pattern called async waterfall that makes composition of asynchronous operations easier to manage.
3.5. Finishing touches
The third Lambda function needs to subscribe to the SNS topic. Create a new subscription for it just as you did for the second Lambda function:
- In the AWS console click SNS, select Topics, and then click the ARN of your topic (transcoded-video-notifications).
- Click the Create Subscription button and select AWS Lambda.
- In the Endpoint drop-down, select the extract-metadata Lambda function and click Create Subscription.
Deploy the third function to AWS, and you’re now ready to run the whole process end to end. Upload a video to the upload bucket; you should see JSON files created and placed next to the video files in the transcoded videos bucket (figure 3.21).
Figure 3.21. The full workflow should now be operational. If something doesn’t work, check CloudWatch logs for clues about what went wrong.

You might also see a few errors in CloudWatch if you didn’t set an mp4 suffix in the S3 event configuration back in section 3.2.1. If you didn’t set the suffix, your workflow will trigger automatically whenever any new object is saved to the transcoded videos bucket. When a JSON file is saved, the workflow runs again, except the extract-metadata function doesn’t know how to deal with a JSON file, which causes an error.
To fix this problem, S3 needs to create notifications only for objects that end with mp4 so that other types of files including JSON don’t trigger the workflow:
- Open the transcoded videos bucket in S3, click Properties, click Events, and edit the event notification.
- In the Suffix textbox, type mp4, and save.
Of course, if you did this back in section 3.2.1, you don’t need to do it again.
3.6. Exercises
At the moment, 24-Hour Video is functional, but it has a number of limitations that have been left for you to solve as an exercise. See you if you can implement a solution for the following problems:
- A file with more than one period in its name (for example, Lecture 1.1 – Programming Paradigms.mp4) will produce transcoded files with truncated names. Implement a fix so that filenames with multiple periods work.
- Currently, any file uploaded to the upload bucket will trigger the workflow. The Elastic Transcoder, however, will fail if it’s given invalid input (for example, a file that’s not a video). Modify the first Lambda function to check the extension of the uploaded file and submit only avi, mp4, or mov files to Elastic Transcoder. Any invalid files should be deleted from the bucket.
- The functions that you’ve written are somewhat unsafe. They don’t always gracefully handle errors or invalid input. Go through each function and modify it to do additional error checking and handling where you see fit.
- The JSON metadata file is not publicly accessible. Modify the third Lambda function to make the file publicly viewable, similar to the videos in the bucket.
- The current system creates three similar transcoded videos. The main difference between them is the resolution and bitrate. To make the system more varied, add support for HLS and webm formats.
- The files in the upload bucket will remain there until you delete them. Come up with a way to clean up the bucket automatically after 24 hours. You might want to have a look at the Lifecycle options in S3 for ideas.
- Running a Lambda function to create a metadata file for each transcoded file is unnecessary if you care only about information that’s constant, such as the length of the video. Modify the system to create a metadata file off the original upload, and then save it next to the transcoded files in the transcoded videos bucket.
- Videos uploaded to the upload bucket must have unique filenames for the system to work properly. The Elastic Transcoder won’t create new files if another file with the same name already exists in the transcoded videos bucket. Modify the first Lambda function to create transcoded videos with unique filenames.
- The test that you’ve built for the first Lambda function won’t work because the IAM user (lambda-upload) doesn’t have permissions to create Elastic Transcoder jobs. In chapter 6 we’ll look at more robust ways of testing Lambda functions, but for now, add the right permissions to the IAM user so that you can create new jobs by running the test locally.
3.7. Summary
In this chapter, we covered the basics of creating a serverless back end, including the following:
- IAM users and roles
- Storage and event notifications in S3
- Configuration and usage of the Elastic Transcoder
- Implementation of custom Lambda functions
- Testing and deployments using npm
- SNS and multiple subscriber workflows
In the next chapter, we’ll look at AWS security, logging, alerting, and billing in more detail. This information is important to know to create secure serverless architecture, to know where to look for answers when things go wrong, and to avoid unexpected and unwelcome surprises on the monthly bill.