
Appendix E. Models and mapping
- API Gateway models and mapping
Chapter 7 gives you a thorough look at the API Gateway. In that chapter you get to create a resource and a GET method, connect it to a Lambda function, and use Lambda proxy integration. Lambda proxy integration makes it straightforward to invoke a Lambda function via the API Gateway and to return a response. Most of the logic takes place in the function, with the Gateway proxying the request to the function and the response to the client.
The API Gateway doesn’t force you to use Lambda proxy integration, however. You can decide how to transform requests and responses within the Gateway and have more control over what goes out of the Gateway. This appendix gives you information about how to implement models and mappings and teaches you other tips and tricks not covered in chapter 7.
E.1. Get video list
If you implemented the get-video-list function in chapter 7, this is an alternative way of showing how to do the same thing without proxy integration. To get started, we’ll assume that you’ve created the /videos resource and a GET method. You can begin following this appendix instead of section 7.2.3. There’s one important point to mention here, though: if you enabled Lambda proxy integration when creating the GET method, you must now turn it off. To do this, click the GET method under the /videos resource, and then click Integration Request. Make sure to unselect Use HTTP Proxy Integration if it’s selected.
E.1.1. GET method
We’re going to take things step by step, because there are more elements to configure in the API Gateway than if you were using proxy integration. Right now, click the GET method under /videos to see the Method Execution view.
Method Request
The first step is to update the settings in your method request. Choose Method Request from the Method Execution view to access its configuration. You can do a number of things here:
- Set authorization settings, including the custom authorizer as you did in chapter 5.
- Add support for a URL query string parameter.
- Add support for a custom HTTP request header.
- Add support for a request model. This is used for non-GET method types, so you can ignore it for now.
Your get-video-list function doesn’t take any parameters at the moment, but let’s imagine that it can take an optional encoding. It needs to return a list of videos specific for that encoding (for example, just 720p videos if encoding is set to 720p). If encoding is not specified, then the function will return all videos just as it does now. Let’s also say that the encoding is supplied via the URL. Here’s how you’d set it up:
- Expand URL Query String Parameters.
- Choose Add Query String.
- Type encoding and click the round checkmark button to save.
- Don’t enable caching yet because you need to think through your cache--invalidation strategy first. Enabling this Caching
check box will create a specific cache key when caching is enabled for the stage (figure E.1).
Figure E.1. The Method Request page defines the interface and settings that the caller of the API must respect and provide.

Integration Request
Integration Request is the next page you need to step through. You’ve already configured the Lambda function to invoke. All that’s left to do is configure the body mapping template. This mapping template tells the API Gateway how to transform the request, including elements such as headers and query strings, into a format the consuming service can understand. Our example has a URL query string called encoding. You might want to map it to a property called encoding on the event object that your Lambda function can access:
- Access Integration Request from the Method Execution window.
- Expand Body Mapping Templates.
- Choose Add Mapping Template.
- Type application/json into the Content-Type text box and click the checkmark button to save.
- Click Yes, Secure This Integration if a dialog presents asking to change pass-through behavior.
- On the right side, you should see an edit box in which you can specify the mapping. To map encoding to be available via the event object, copy the contents of listing E.1 to the text box and choose Save. The “Payload mapping” sidebar and AWS documentation (https://docs.aws.amazon.com/apigateway/latest/developerguide/api-gateway-mapping-template-reference.html) describe mapping in greater detail.
Listing E.1. Mapping URL query string

The API Gateway API Request and Response Payload-Mapping Template Reference (https://docs.aws.amazon.com/apigateway/latest/developerguide/api-gateway-mapping-template-reference.html) is full of interesting tidbits. Not only can you extract values from the request (including those from the path, query string, or header), but you can also do quite a bit more; for example:
- $input.body returns the raw payload as a string.
- $input.json(value) evaluates a JSONPath expression and returns the result as a JSON string.
- $input.params() returns a map of all request parameters.
You also have access to the $context variable, which has a lot of useful information about the API call. You have information about the identity of the caller (if it’s provided), the HTTP method, and the gateway deployment stage from which the API call is originating.
Finally, you have access to the $util variable, which contains a few useful utility functions:
- $util.escapeJavaScript() escapes characters in a string (using Java-Script string rules).
- $util.parseJson() takes a stringified JSON representation and produces a JSON object.
- $util.urlEncode() and $util.urlDecode() convert a string to and from application/x-www-form-urlencoded format.
- $util.base64Encode() and $util.base64Decode() encode and decode base64-encoded data.
API Gateway offers a shortcut so you don’t need to specify values individually. This might be useful if you have numerous parameters and don’t want to maintain a complex mapping.
In the drop-down box next to Generate Template, select Method Request Passthrough. The API Gateway will set a template for you that maps “all parameters including path, querystring, header, stage variables, and context...” (https://docs.aws.amazon.com/apigateway/latest/developerguide/api-gateway-mapping-template-reference.html; see figure E.2).
Figure E.2. The easy way is to map everything. It will add extra parameters that you may not necessarily need to the event object. You might notice that this is similar to what you get when using Lambda proxy integration.

In most cases, however, you should craft your own mapping and not pass everything through to the endpoint. We did it in this example to show you the syntax, methods, and parameters that you can apply.
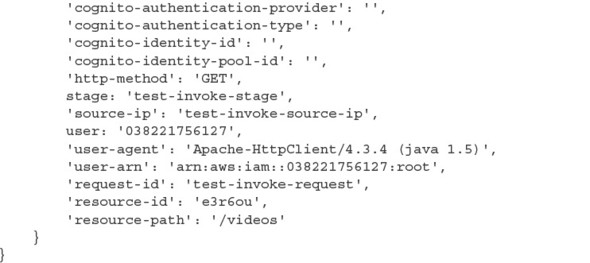
If you use Method Request Passthrough to get all parameters passed to the integration point, you can review what it looks like by logging the event object using CloudWatch. The following listing shows some of the properties you can access.
Listing E.2. Method Request Passthrough

Intermission–let’s do a test
You’ve now configured Integration Request and Method Request. That’s enough for you to do a test, so take a breather and check if you’re on the right track.
In the Method Execution page, choose Test on the left side. You’ll be taken to a page from which you can execute a test against your GET method. If you’ve defined the encoding query string, you’ll see a text box in which you can enter a value to test it. For the moment, it does nothing, so you can leave it alone. Instead, click the Test button at the bottom of the page. You’ll see a response body on the right side (figure E.3).
Figure E.3. The test page is an excellent tool for testing whether your API has been correctly configured.

Integration Response
It’s now time to look at the response that will be sent back to the client. As you begin using the API Gateway more and more, you might come across a scenario where the client expects data in a different format than what the API Gateway receives from its integration point. If you have complete control over the client, then it may be okay. You can modify the client and make it handle the response. But what if you don’t have control over the client? Luckily, the API Gateway has the ability to transform one schema to another. You already saw glimpses of this when you configured the Integration Request. But what you did was pretty ad hoc. To build a more-solid system, you can define a model (or a schema) and build a robust mapping template to transform data from one format to another.
If you look at the current response from the API Gateway (figure E.3), you’ll see an object with two properties (baseUrl and bucket) and an array of URLs. Each URL has five properties (Key, LastModified, Etag, Size, and StorageClass). Let’s come up with a different schema that reduces the amount of data you need to send back to the client and makes things a little more obvious. Here’s what you want to do:
- Rename baseUrl to domain.
- Rename URLs as files.
- Rename Key to filename.
- Remove LastModified (you already have an ETag) and StorageClass.
First, you need to create a model in the API Gateway:
- Choose Models on the right side under 24-Hour Video.
- Click the Create button.
- Enter a model name such as GetVideoList.
- Set Content Type to application/json, and enter a description if you wish (figure E.4).
Figure E.4. Models, which use JSON Schema, define the output format for your data.

API Gateway uses JSON Schema (http://json-schema.org/) to define the expected format. If your schema conforms to JSON Schema v4 (http://json-schema.org/latest/json-schema-core.html), everything should work. You can always check if your schema is correct by running it through the online JSON Schema Validator (http://www.jsonschemavalidator.net/). For now, copy the schema from the next listing to the Model Schema editor and click Create Model.
Listing E.3. GetVideoList JSON Schema


After creating the schema, follow these steps to modify Integration Response:
- Choose Resources under 24-Hour Video.
- Choose GET under /videos.
- Choose Integration Response.
- Expand the response type (it should be the one with the Method response status of 200) and then expand Body Mapping Templates.
- Choose application/json and then from the Generate Template drop-down select GetVideoList. The text box below the drop-down
should autopopulate with a bit of code. Update this code to make it work with your model (refer to listing E.4 and see figure E.5).
Figure E.5. Templates can be applied to an Integration Response and to an Integration Request.

- Click Save when you’ve finished.
One thing to be aware of: API Gateway supports JSONPath notation and Velocity Template Language (VTL), so your mapping templates can have loops and logic. See https://velocity.apache.org/engine/devel/vtl-reference.html for more information about VTL and what you can do with it, and see http://goessner.net/articles/JsonPath/ for more information about JSONPath.
Listing E.4. Body Mapping Template

Now that the mapping template has been implemented, you can retest your GET method to see if you get a different response from it. Go back to the main Method Execution window and click Test. Click the Test button and look at the response body. It should look similar to figure E.6.
Figure E.6. The response from the API should be different when the new model is implemented.

E.1.2. Handling errors
So far we’ve only considered the happy path for your GET method. We’ve assumed that the GET method will always succeed and return a response with an HTTP status code of 200 and a response body with a list of your videos. But what if this isn’t always the case? What if your Lambda function throws an error or encounters an unexpected result? It would be useful to return a different HTTP status code and a different body so that your client could handle it appropriately.
Let’s see how you can handle happy and unhappy cases by extending your get-video-list Lambda function further. Remember that encoding parameter you included in the previous section? You’re now going to use it. Consider the following requirements:
- If encoding is valid but you don’t have any videos for that encoding, the GET method will return a 404 (Not Found) HTTP status code.
- If encoding isn’t provided, then you’ll continue to do what you’ve done before and return all videos with a 200 (OK) HTTP status code.
- If there is any other kind of error, you’ll return a 500 (Internal Server Error) HTTP status code and the error message.
You’re also going to configure the API Gateway to return the appropriate HTTP code and a response body based on what the Lambda function returns via its callback. You’ll configure Method Response and Integration Response to make it happen. This is how it will work:
- In the API Gateway, Method Response will be configured to handle new HTTP status codes, such as 200, 404, and 500.
- Integration Response will extract the response from Lambda and decide which HTTP status code to set.
Updating the Lambda function
You’re going to update the Lambda function to return an appropriate response when things go bad. When things go right, you’ll use your callback to return the list of files as per normal. That will generate a 200 HTTP status response code. When things go bad, however, you’ll generate and return an object with three properties: status code, message, and the encoding parameter. In the API Gateway, you’ll write a regex to match on the status code and assign the right HTTP status to the response. You’ll also extract the message and the encoding parameter and add it to the response. To do this, you’ll create a new mapping template. It will override the existing mapping template that you use for the happy case.
The regex in the API Gateway works only if you return an error via a callback. You have to use callback(result) if you want your error conditions to work. If you use callback(null, result), the API Gateway will ignore your regex and always choose the default response and template (which is 200 unless you change it).
Open index.js of the get-video-list function in your favorite text editor and replace the implementation with the following code.
Listing E.5. get-video-list function


Having implemented the function, deploy it to AWS by running npm run deploy from the command line.
Configuring the method response
You’re going to configure method response first. Choose Method Response in the Method Execution page and add two new responses:
- 404
- 500
Your page should look like figure E.7.
Figure E.7. Don’t rely on a single (200) HTTP status code. Add as many status codes as your system needs.

Configuring the integration response
Now you can configure the integration response. In the Method Execution page, choose Integration Response. Here you need to add three responses. You’ll write a simple regex to inspect the output from the Lambda function. Then, based on the result, you’ll set the right method response status. To do this, follow these steps:
- Choose Add Integration Response.
- Type .*"code":404.* in the Lambda Error Regex column.
- Select 400 from the drop-down below and choose Save.
- Choose Add Integration Response again.
- Type .*"code":500.* in the Lambda Error Regex column.
- This time select 500 from the drop-down and choose Save.
You should now see a view similar to figure E.8.
Figure E.8. Setting a new integration response requires only a regex and a method response status. You can customize header mapping and body mapping templates for each response.

You’ve created the regex to match on the output from the Lambda function. Take .*"code":404.*, for example: the string "code":404 looks for an occurrence of that specific text in the response from the Lambda function. The characters .* allow any other text to precede and follow "code":404. If you don’t include .*, your regex will expect only "code":404 in the response.
Expand each of the new response types you’ve created and repeat the following for each response:
- Expand Body Mapping Templates.
- Choose Add Mapping Template.
- Type application/json and click the checkmark button to save.
- Copy the mapping template from the next listing to the template edit box.
- Click Save.
Listing E.6. Mapping template for the error conditions

You now have a way to control exactly what the API Gateway returns when there’s an error. Note that you can modify response header mappings for each response code. You can access them above Body Mapping Templates.
Testing status codes
You can test whether the new status codes work straight from the API Gateway. Click back to Method Execution and click Test. Type 2160p in the Encoding Query String text box and click Test. After the test runs, look on the right side of the page. You should see Status set to 404 and a response body based on the mapping template you set up in listing E.6.
E.1.3. Deploying API Gateway
Having configured your GET method, you need to deploy it:
- In the API Gateway, choose Resources under the 24-hour-video API.
- Choose Actions.
- Choose Deploy API.
- You should see a dialog video with a Deployment Stage label and a drop-down.
- From the drop-down select Dev:
If you can’t choose Dev from the drop-down, it means that you didn’t create a stage back in chapter 5. That’s not hard to fix. Simply choose [New Stage] and type in dev as the stage name (figure E.9).
Figure E.9. API Deployment via the console is a quick operation.

- Click Deploy.
You’ve now learned how to use models and mapping templates to exercise greater control over the API Gateway. Jump back to chapter 7 and carry on from section 7.2.5.