Deploying to Amazon S3
When starting a new project, you are often faced with many unknown risks. Problems that you’re not even aware of can be sitting out there, waiting to suck away hours of your time. Being able to identify and avoid those risks can save you frustration, headache, and pain.
One of the risks you can avoid easily is that of deployment. We don’t want to wait until we’re “finished” before we deploy. Our assumptions about how things work might be wrong. As we build on top of these incorrect assumptions, the risks and potential pain grow. Web apps often suffer from these problems because we develop them on a desktop but deploy them on a server. The two environments can be totally different, and until you understand all the differences, you’re potentially building on sand.
By deploying now, we’ll know that our deploy process is configured correctly. We’ll be able to check that the production environment is actually accessible, and that we don’t have any permission problems waiting to bite us. Most importantly, we’ll have gotten these necessary tasks out of the way and proven that we can take the application all the way to done. Until your application is in the hands of your users, from their perspective, you haven’t really done anything…no matter how much code you’ve written.
Rather than trying to run our own web server like Apache or Nginx, we’re going to deploy our app to Amazon’s Simple Storage Service (S3). One of its many uses is as a static website host. While not as fully featured as other hosting options, it’s inexpensive to use (typically costing just a few pennies a month) and scales well. Since we’re trying to avoid the time and cost of setting up server infrastructure, S3 meets our needs perfectly.
Setting Up the AWS Command-Line Interface
As we move through this tutorial, we’ll need to interact with Amazon Web Services to create and configure the services we need for our application. One great way to do this is by using the AWS command-line interface, sometimes called simply AWS CLI. We’ll first use this tool to create our S3 bucket, and we’ll get a lot more use out of it later in this book as we build our application.
If you don’t have this tool installed and configured with administrator access already, you’ll need to do that now. Amazon recommends that you install awscli using pip, a Python package manager. If you don’t have pip installed, you can install it using easy_install, a Python package manager. You’ll need Python 2.7 or later. Depending on what you already have installed, run some (or all) of the following commands:
| | $ sudo easy_install pip |
| | $ sudo pip install awscli |
On Debian/Ubuntu systems, you can install pip using apt instead of easy_install, like so:
| | $ sudo apt-get install python-pip |
To use this tool, you’ll need to configure it. To do that, you’ll need to create a user that has administrative access to your AWS account.
Creating an AWS User with Access Keys
The Amazon Web Service that grants you access to all the other Amazon Web Services is called Identity and Access Management, or simply IAM. You can use this service to create individual users who have access to the services under your account. Obviously, this can be useful when working with a team, but it can also make sense to create different users by role or task. Segmenting access like this can limit the exposure of compromised keys, prevent test data from making its way into a production database, or prevent one application from accidentally interfering with another.
While you may want to create many users for your applications, the first user we’re going to create is an administrative user. This user will have access to all the services in your account, so you’ll have to use it carefully. To create this user, follow these steps:
-
Open the Amazon Web Services console,[19] creating an account if necessary.
-
Click the Identity & Access Management service under Security & Identity.
-
In the left sidebar, click Users.
-
Click Create New Users to create a user. We’ll use this user account to deploy our app.
-
Pick a name for your user (for example, learnjs) and fill in the first row.
-
Ensure that the “Generate an access key for each user” check box is checked, and click Create.
-
Download the credentials when prompted.
The credentials are made up of two keys: an access key and a secret key. Both of these keys will be in the CSV file you download, or you can view them directly on the Amazon website. Amazon only gives you one chance to do this, so get them now. Otherwise, you’ll have to re-create the keys.
|
|
You’ll never need to provide a password for this user. |
Once you get these keys, you can finish setting up AWS CLI. Run the aws configure command with the admin profile, and enter the keys when prompted. When it asks you for a default region, enter us-east-1.
| | $ aws configure --profile admin |
| | AWS Access Key ID [None]: JFAKEKEYSRRETDMAAKIA |
| | AWS Secret Access Key [None]: 2Jdw+ThI5iSafAKeKeY4ExamPLEsHAONXn32Af/sm |
| | Default region name [None]: us-east-1 |
| | Default output format [None]: |
If you’re familiar with AWS, you might have existing services already configured for a region other than us-east-1. While you can certainly enter other regions when configuring the admin profile, be aware that not all services work in all regions. Additionally, the sspa script may not handle URLs and other resources names correctly in other regions.
If you choose to use a region other than us-east-1, you’ll need to verify that the service you’re using is available in that region. You might also need to make modifications to the sspa script to accommodate your region name.
Now that you’ve configured AWS CLI, you should have a new file in your home directory at ~/.aws/credentials. The contents of the file should look like this (with different key values, of course):
| | [admin] |
| | aws_access_key_id = JFAKEKEYSRRETDMAAKIA |
| | aws_secret_access_key = 2Jdw+ThI5iSafAKeKeY4ExamPLEsHAONXn32Af/sm |
Now that you’ve created a user and saved the credentials, you’ll need to grant this user permission to perform actions by creating an access policy. Go back to the user list in the AWS console; you should see your newly created user there. Click the user to get to the user summary page; it should look something like the screenshot.
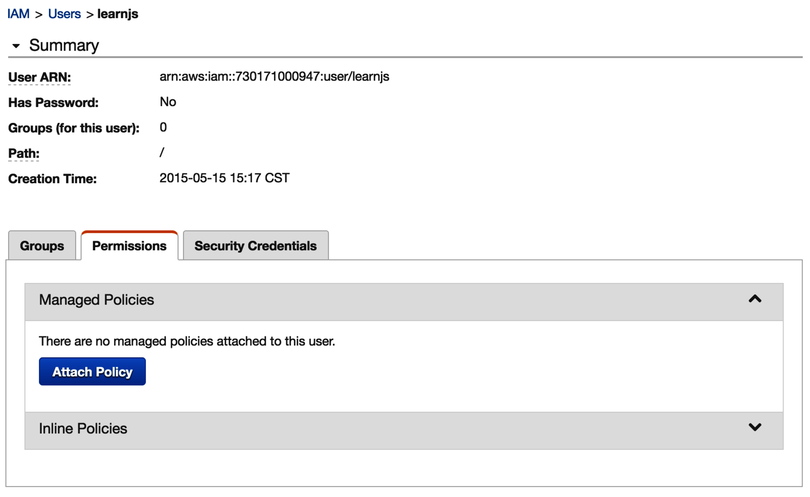
© 2015, Amazon Web Services, Inc. or its affiliates. All rights reserved.
Now you need to create a policy that specifies which services this user can access. Find the Permissions section of the user summary page and click the link to attach a new managed policy. You’ll then be presented with a list of policies like the following.
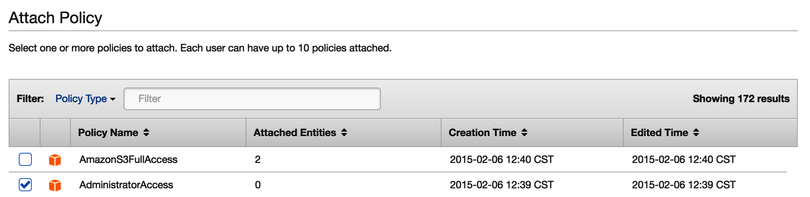
© 2015, Amazon Web Services, Inc. or its affiliates. All rights reserved.
Check the box next to AdministratorAccess, then click the Attach Policy button, and you’re all set. Now you’re ready to create an S3 bucket. After that, you’ll be able to deploy the application!
Creating an S3 Bucket
Now that you have an administrative user, you can create an S3 bucket. The sspa script in the prepared workspace wraps up the AWS CLI commands that not only create the bucket, but also configure it to act as a static web host capable of serving our application. If you have a hostname you’d like to use for this app, it’s important that you enter that as the bucket name (for example, learnjs.benrady.com). Otherwise, use any name you like. Just call sspa with the create_bucket action and your new bucket name as the parameter.
| | learnjs $ ./sspa create_bucket learnjs.benrady.com |
| | make_bucket: s3://learnjs.benrady.com/ |
| | Website endpoint is: |
| | http://learnjs.benrady.com.s3-website-us-east-1.amazonaws.com |
|
|
Amazon S3 bucket names are global, so you can’t pick a name someone else is using. |
If that command completes successfully, you’ll know the new bucket has been created. You’ll probably want to run this again with a slightly different bucket name to create a test or staging environment for your app. When the command exits, in your terminal you should see the sspa script print the URL for the bucket’s website endpoint. Make note of this URL, then run the following command to deploy the app:
| | $ ./sspa deploy_bucket learnjs.benrady.com |
And that’s it! Now, take the website endpoint that the sspa script just printed out, and enter it in your browser; you should see our app. It’s alive! If you don’t see your app, you can double-check the website endpoint in the AWS web console for Amazon S3. If you configured AWS CLI with a region other than us-east-1, it’s possible the URL printed by the sspa command was incorrect.
Once you’ve confirmed the app is deployed, you can clean up the URL by giving the app its own domain name. To do this, you’ll need to map the domain name to the S3 bucket. You can do this by creating a CNAME entry with your DNS provider that uses the endpoint URL as the value for the record. For more detailed instructions on how to do this, refer to Appendix 2, Assigning a Domain Name. Once that’s complete, the deployment will be done, and we’ll be ready to move on to the next step.