Creating a View
User interface design can be one of the more challenging aspects of building an application. To build interfaces your users can navigate with ease, you need to understand the users’ expectations and goals. It’s hard to put yourself in their shoes and think about what they want, but if you have a partially working application in front of you, it can be a lot easier. What is already there inspires you, and what is missing grabs your attention.
|
|
Just as a picture is worth a thousand words, a working prototype is worth a thousand meetings. |
The problem view in our app will challenge users to “fill in the blank” to get a JavaScript function to return a truthy value. The problem, as presented to the users, should look something like this:
| | function problem() { |
| | return 2 + __ === 4; |
| | } |
Our users will try to figure out what JavaScript should be entered in place of the __ to make the problem() function return true. If they do that, the answer will be judged to be correct. This means each problem might have many different correct answers. To design this view, we need to think about the essential elements of this workflow.
This view is all about programming puzzles, so we’ll need a way to present the problem. To provide a bit of context to our users, we’ll want to show a title that includes the problem number. A description of the problem will help them understand exactly what they’re supposed to do. To let them verify their answers, we’ll need a way for users to enter the code that solves the problem. In this chapter, we’re going to put all of these elements together to build our application’s primary view. We’ll add these elements to our view incrementally, checking our assumptions about the workflow along the way.
To improve our problem view, we’ll first extract the markup for this view out to an HTML template. HTML templates are a great (and simple) way to manage markup. They’re flexible, easily testable, and require no special libraries or tools. Using them is much easier than building the markup programmatically using jQuery, if for no other reason than we can use standard HTML editing tools and formatters to create it. Once we’ve created a template, we’ll add a <title> element that we can use to show the title (rather than just appending text to the view). Before we can create this view template, we need to find a place for all the templates in our app to live.
To create a home for the application’s templates, first create a new <div> in the app markup and give it the templates class. We’ll use this element to hold all of our templates. Inside of that templates <div>, create another <div> with the problem-view class and add an <h3> element with the title class.
| | <body> |
| | <div class='markup'> |
| | <div class='view-container container'> |
| | <div class='landing-view'> |
| | <div class='row'> |
| | <div class='one-half column'> |
| | <h3>Learn JavaScript, one puzzle at a time.</h3> |
| | <a href='#problem-1' class='button button-primary'>Start Now!</a> |
| | </div> |
| | <div class='one-half column'> |
| | <img src='/images/HeroImage.jpg'/> |
| | </div> |
| | </div> |
| | </div> |
| | </div> |
| » | <div class='templates'> |
| » | <div class='problem-view'> |
| » | <h3 class='title'></h3> |
| » | </div> |
| » | </div> |
| | </div> |
| | <script type='text/javascript'> |
| | $(window).ready(learnjs.appOnReady); |
| | </script> |
| | </body> |
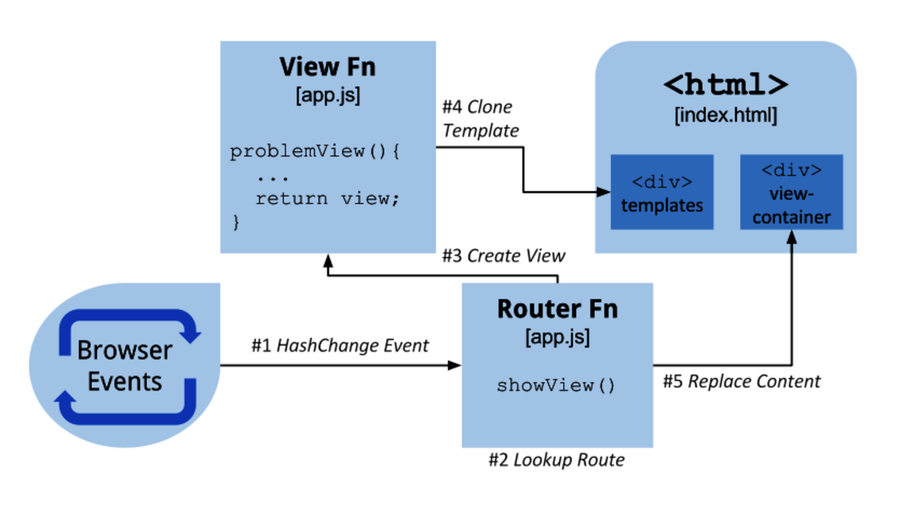
Next, you need to make a copy of this template in the problemView() function. Copying it lets you rebuild the view over and over again, without having to worry about state from one instance leaking into another. To do this, select the problem-view <div> out of the templates <div>, and use jQuery’s clone() function to make a copy. You can see this clone operation in the updated version of our router figure.
Once you have that copy, you need to update the text for the <title> element. You can do this by selecting the <title> element with jQuery, then using the problem number to build the text for the title. Once that’s done, return the view’s markup from the view function. With all those changes, the problem view function should look like this:
| | learnjs.problemView = function(problemNumber) { |
| | var view = $('.templates .problem-view').clone(); |
| | view.find('.title').text('Problem #' + problemNumber); |
| | return view; |
| | } |
The last thing you’ll need to do is to hide the templates <div> from the user. We don’t want our templates showing up in the app, and you can hide them with a little bit of CSS. Add a rule to the inline <style> element in the <head> of index.html, like so:
| | <style type="text/css" media="all"> |
| | body { margin-top: 30px; } |
| | .templates { display: none; } |
| | </style> |
Now, if you open the app and click the call to action button, it should switch to the problem view and show a simple title.

Using templates to create views like this makes it much easier to manage markup, while still keeping the application flexible and dynamic enough to show any content we like. jQuery makes it easy to clone, change, and append these templates without having to add a specific templating library, and as you’ll see later, we can extend this technique to other parts of our application.
To build the rest of our problem view, we can add a description of the problem, the problem code itself, and a place for the users to provide an answer. Before we add any of that, however, we need to figure out where all this data is going to come from, and how we’re going to make it available to our app. In short, we need a data model.
While I think it extremely important to design for testability, and the best way to design for testability is to write tests first, this isn’t a book about testing. So I’ll continue to demonstrate tests that show a novel or advanced technique, but I’m going to spare you any tests that are similar to ones you’ve seen earlier in the book.
However, the rest of the code in this book is written test first. To do otherwise would leave you with an incomplete picture of how to build this kind of web application. It’s one thing to design software that works for today; designing software that will continue to work as you change it is much more challenging. You can see all the tests (along with code) at pragprog.com.[29] If you have any questions about how a particular piece of code was tested, you’ll find the answer there.