Log Shipping
Database Mirroring
Database Clustering
High availability (HA) is a term that we covered for components of SharePoint 2010 and the Windows Server operating system in Chapter 6, “Windows Server 2008 High Availability,” but there is another integral part of SharePoint 2010’s ecosystem that has the ability to be highly available: its SQL Server databases. Because SharePoint is so dependent on the availability of its databases to serve content to its users, a good case can be made that your SQL Server database instance(s) should be the first area of your farm that you review when planning for HA. Microsoft has wisely recognized the importance of making SQL Server highly available and provides several options and tools to assist in that endeavor. In addition, several third-party tools are available that you can use to support your SQL Server HA configuration and execution.
The first step you must take in planning and designing your SQL Server HA architecture is to evaluate your environment’s HA requirements and available budget. SQL Server HA can have a high cost associated with it, which you must consider when determining exactly how to implement it and establish the amount of uptime you are expected to provide for your SharePoint environment.
Three built-in options are available for SQL Server HA (depending on the type of SQL Server license in use): log shipping, database mirroring, and clustering. Each of these options can be a viable solution for your SharePoint environment, but determining which one best fits the needs and limitations of your organization and environment is an important activity that you need to be sure to include early in your SharePoint design process. After all, your decision has lasting implications and is not easily changed without affecting SharePoint. This is yet another item for discussion that you should cover with your database administrator. Your administrator’s insights and expertise are invaluable for not only selecting an HA solution but also implementing it and supporting it over time.
Note
Each of these HA solutions may require the purchase of additional Windows Server, SharePoint, and SQL Server licenses and hardware to implement, adding definitive costs to your environment, regardless of what licenses or hardware approach you decide to take. Microsoft states that passive SQL Server installations configured for HA do not require additional licenses unless they process queries. You should contact your Microsoft licensing or sales resources for specific information about how to properly license your HA resources. You may also be able to leverage virtualization products from Microsoft or VMware to reduce hardware costs by creating multiple virtual servers on a single physical host, but you must carefully evaluate the performance and support implications of this option. Furthermore, these solutions can involve the use of separate datacenters to host the servers used to make SQL Server highly available, allowing your SharePoint databases to keep serving content because they can fail over to servers in a completely different geographic location. Although this can be valuable, it adds infrastructure costs and solution complexity and can introduce the potential for latency as data is transferred between the datacenters.
The visual examples provided in this chapter were generated in a testing environment using the following platforms and components. Depending on how your environment is configured, your experiences may vary slightly.
Operating system. Microsoft Windows Server 2008 R2 Enterprise Edition (build 7600)
Database. Microsoft SQL Server 2008 Developer Edition with Service Pack (SP) 1 (build 10.0.2740)
Web server. Microsoft Internet Information Services (IIS) 7.5
SharePoint. SharePoint Foundation 2010 Release Candidate 1 (build 4730)
Originally introduced as a supported feature with SQL Server 2005, log shipping is an available HA feature in every SQL Server edition except Express. Log shipping takes advantage of the platform’s backup functionality that was covered in Chapter 7, “SQL Server 2008 Backup and Restore” and uses it to create a second iteration of the target (or primary) database in a separate database instance. It creates a secondary copy of the primary database by taking a transaction log backup from the primary database and copying it to a secondary database. The transaction log copy process needs to occur regularly to keep the secondary database synchronized with its primary source in case a disaster occurs and it is needed. One advantage of log shipping is that once the backup of the transaction log is created in the primary database instance, the remainder of the process occurs in the secondary database instance, allowing the primary instance to return to normal activities.
Log shipping requires at least two servers—a primary and a secondary—and allows the use of an optional third server to monitor the log-shipping operation.
Primary. This is the database you want to back up to a SQL Server instance on a separate server. All configuration of the log-shipping process must occur on this server. You must back up the primary database using the Full or Bulk-Logged recovery models for the backups to be used with log shipping; log shipping is not available when the target database uses the Simple recovery model. A target database can have only one primary server, but you can ship its logs to multiple secondary servers for redundancy.
Secondary. This is the database that functions as a separate backup copy of your primary database. You must initially restore the secondary database from a full backup of the primary database using either the Restore with No Recovery or Restore with Standby options before you can update it with transaction logs via log shipping. A single secondary server can host multiple databases backed up via log shipping.
Monitor. This server lives up to its name by tracking all the activities of the log-shipping process, such as transaction log backup dates, secondary server transaction log copy and restore dates, and information on any failures or errors that may occur. A monitor server is not required to use log shipping, but if you do decide to use it, you should host it somewhere other than your primary or secondary server. A single monitor server can track multiple log-shipping configurations.
SQL Server executes four distinct SQL Server Agent jobs as part of the log-shipping process:
Backup. The SQL Server Agent executes this job on the primary server to back up the target database, log the action to the local server (as well as the monitor server), and clean up any old backup files or logs created by previous iterations of the job. This job kicks off the log-shipping process; when it is finished, SQL Server initiates a Copy job on the secondary server and returns the target database to normal processing. By default, Backup is configured to run every 2 minutes, but you can configure it to run more or less frequently based on your requirements.
Copy. The SQL Server Agent executes this job on the secondary server to copy the transaction log backup from the primary server to the secondary server. Its actions are logged on the secondary server and reported to the monitor server, and then it deletes any old backup files or logs.
Restore. The SQL Server Agent executes this job to restore the copied transaction log to the secondary database and bring it in line with the content of the primary target database. Its actions are logged on the secondary server and reported to the monitor server; then it deletes any old files or logs associated with the job.
Alert. If a monitor server is configured for the log-shipping process, this job is created on the monitor server and shared by all servers using the monitor server. The SQL Server Agent executes this job to raise alerts when any job within the log-shipping process fails to run successfully to completion. Additional configuration must be completed for SQL Server to deliver these alerts to an operator. If a monitor is not configured, alert jobs must be configured individually on the primary and secondary servers to report the result of the jobs run on each server.
Your environment must meet the following requirements to enable log shipping for one or more of your SQL Server databases:
Servers. In addition to the server hosting your primary SQL Server database instance, you must have a second database instance hosting on a separate server to function as the secondary server. A third monitor server is optional.
File share. A network file share must be available to store the backed up transaction logs. Microsoft recommends, but does not require, that this file share be located somewhere other than your primary or secondary server in the interest of enhanced availability for your data.
SQL Server license. All servers participating in the log-shipping process must be running one of the following versions of SQL Server: Server 2008 or 2008 R2 Workgroup Edition, Server 2008 or 2008 R2 Web Edition, SQL Server 2008 or 2008 R2 Standard Edition, SQL Server 2008 or 2008 R2 Datacenter Edition, or SQL Server 2008 or 2008 R2 Enterprise Edition. Log shipping is not available with SQL Server Express Edition.
Case sensitivity. All servers participating in the log-shipping process must have the same SQL Server case sensitivity configuration.
Recovery model. You must back up the database targeted for log shipping using the Full or Bulk-Logged recovery models.
SQL Server Agent. The SQL Server agent service must be running on each server for the associated jobs to execute. In most cases this service is active by default, but if it is not running, the log-shipping process is not fully functional.
The following steps provide an example of how to enable and configure SQL Server log shipping with a primary and secondary server:
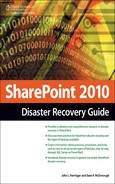
Open SQL Server Management Studio and right-click on the database you are targeting for log shipping. Select the Properties item from the menu.
When the Database Properties dialog box opens (see Figure 8.1), click the Transaction Log Shipping link in the left pane.
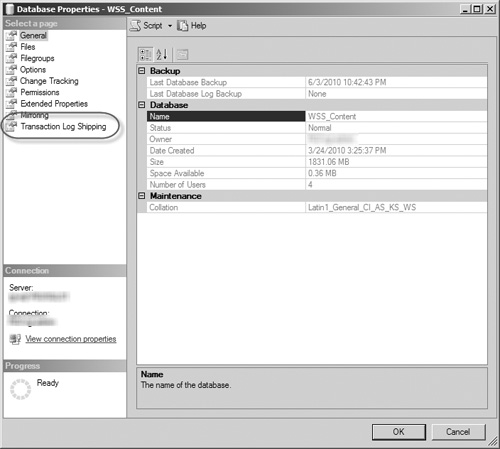
This action opens the Transaction Log Shipping page (see Figure 8.2) with most of its options disabled. Click the Enable This as a Primary Database in a Log Shipping Configuration check box to enable the other fields, buttons, and items in the page.
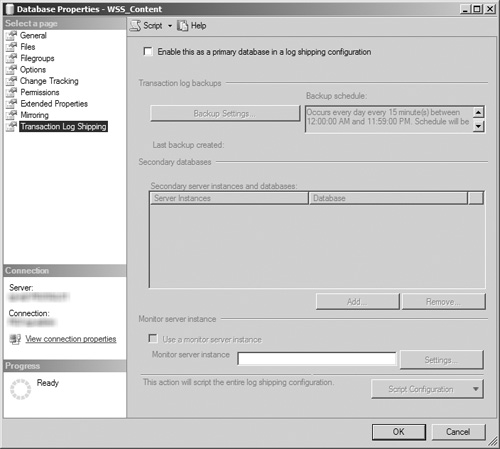
To open the Transaction Log Backup Settings dialog box (see Figure 8.3), click the now enabled Backup Settings button.
In the Network Path to Backup Folder text box, enter the Universal Naming Convention (UNC) path for the network share you have designated as the storage location for the backed up transaction logs. If you have chosen to use a local folder on the primary server, leave this field blank and enter the path to that directory in the If the Backup Folder Is Located on the Primary Server, Type a Local Path to the Folder text box.
Configure the Delete Files Older Than and Alert if No Backup Occurs Within fields according to the needs and requirements of your system. The first field helps to keep your transaction log backups from overwhelming your storage system, whereas the second warns your database’s operators if its transaction logs are not being backed up on a regular basis.
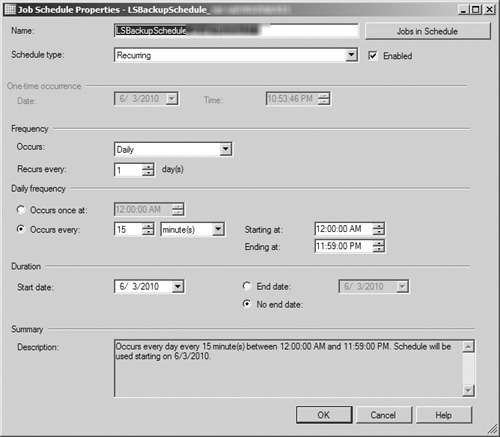
In the Backup Job section, you have the option of renaming the job used to back up the target database if the default name provided is not sufficiently descriptive. More importantly, clicking the Schedule button opens the Job Schedule Properties dialog box (see Figure 8.4), allowing you to configure how frequently the database’s transaction logs are backed up and sent to the secondary server. You can modify the various schedule settings for the backup in this window; be sure to closely review the Summary text field to confirm that the settings match your preferred schedule before clicking the OK button to save your changes.
Tip
As with any other scheduled activity within your farm, such as SharePoint backups, search crawls, or other regular activities, be careful about when you decide to have the transaction logs backed up and shipped to the secondary server. These processes could incur some (if not considerable) overhead for your environment and have the potential to impact the experience for your end users, especially if there are other resource-intensive activities running at the same time. It may be difficult, but at a minimum you need to be aware of the possibility for contention with these and other scheduled activities.
To save your changes to the Transaction Logs Backup Settings, click the OK button. This returns you to the Transaction Log Shipping page of the database’s Properties window.
Now that you have configured the backup of the primary database’s transaction logs, click the Add button in the Secondary Databases section to select a secondary server to receive the backed up logs.
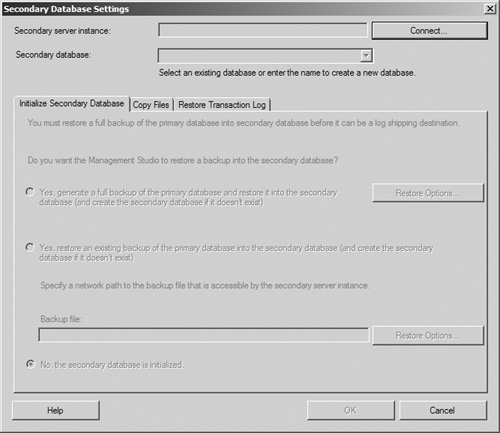
This opens the Secondary Database Settings dialog box (see Figure 8.5). By default, most of the items are disabled when this dialog box first opens; you must connect to the secondary server to be able to modify them. Click the Connect button to open a SQL Server login screen, and enter the connection data for the secondary server’s database instance to proceed.
The Initialize Secondary Database tab is now enabled, allowing you to select whether you want the secondary database initialized by a fresh full database created by the log-shipping process, by an existing full backup that has already been taken, or to inform SQL Server that the database has already been initialized. Select the option button next to the correct option for your system, configure any necessary Restore Options, and then click the Copy Files tab.
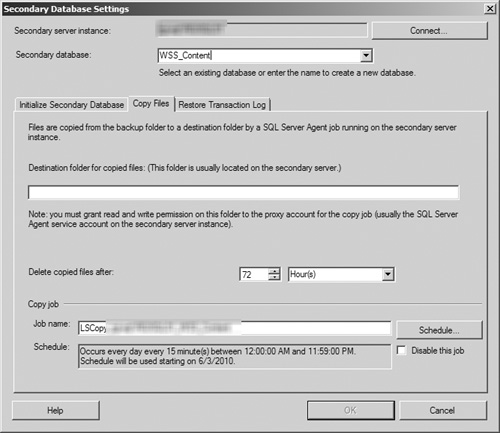
In the Copy Files tab (see Figure 8.6), you must provide a destination directory on the secondary server for the transaction log backup files copied from the primary server. (The window’s OK button is not enabled until you enter a value in this field.) You can also configure how long these log files are retained, when operators should be alerted in case of an outage, and the schedule by which the log files are copied from the primary server to the secondary server. After you have completed the Copy Files configuration, click the Restore Transaction Log tab to continue.
Tip
The schedule for copying files to the secondary server should match the schedule for transaction log backups as closely as possible. Copying the files with a greater frequency can result in the same data being copied multiple times, whereas a lesser frequency can result in the loss of transaction data if backups are overwritten or deleted before they can be copied.
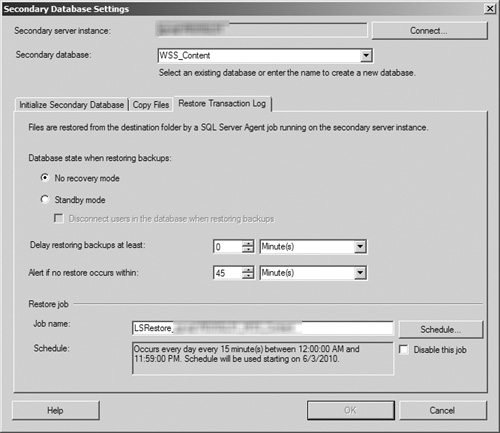
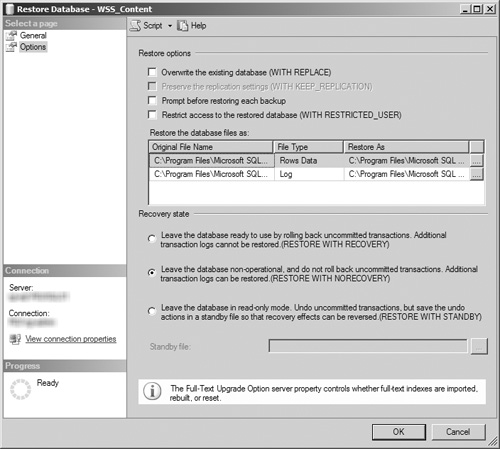
In the Restore Transaction Log tab (see Figure 8.7), you must select the state that the database is in while restoring backups. The No Recovery Mode option is selected by default, but you can also opt to place the database in Standby Mode. The tab also allows you to delay a restore, alert an operator if a restore cannot be run, and change the schedule for restore operations.
After you have completed your Secondary Database Settings configurations, click the OK button to return to the Database Properties dialog box.
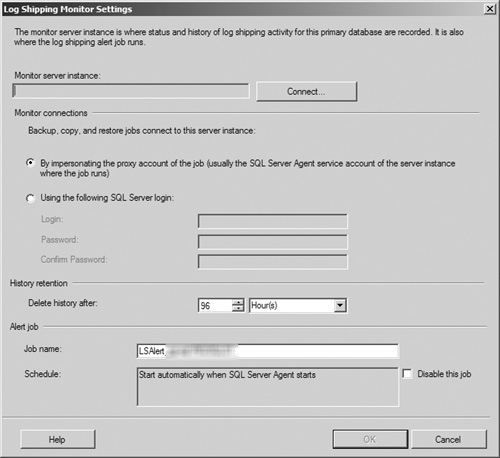
If you want to configure a monitor server for the log-shipping process, select the Use a Monitor Server Instance check box in the Monitor Server Instance section. This enables the Settings button in that section; click it to open the Log Shipping Monitor Settings dialog box (see Figure 8.8.).
When the Log Shipping Monitor Settings dialog box opens, click the Connect button to open a SQL Server login screen and enter the connection data for the monitor server’s database instance to proceed. In this dialog box, you can also configure which account is used to connect to the monitor server, how long the monitor server retains history data, and when alert jobs are scheduled to run. After you have completed your configuration, click the OK button to return to the Database Properties dialog box.
After you have completed the log-shipping configuration for the database, click the OK button in the Database Properties dialog box to commit your changes.
To verify that the log-shipping configuration was completed successfully, review the status of the SQL Agent jobs on each server and confirm that they are running as expected and without error.
As with SQL Server database backups in general, several types of SharePoint databases cannot be preserved via SQL Server log shipping. The following list addresses each type of database and whether it can be made highly available via transaction log shipping.
Configuration database. You should not log-ship SharePoint configuration databases; configuration databases are farm specific. A configuration database is intended to be used only with the original farm it is attached to.
Search databases. Because search databases are tightly integrated with the index files stored on the file system of a SharePoint crawl server, you should not log-ship them. The time it takes to transfer log files between primary and secondary servers can result in inconsistencies between the database and the indices. In the case of a disaster, it is likely a better option to re-create the indices from scratch or back them up using the Central Administration site or PowerShell than a SQL Server backup. If the SharePoint content databases that are being log-shipped are attached to a standby farm, you can use that farm’s search components to crawl and index them.
Some Service Application databases. It is difficult to succinctly identity exactly what databases for SharePoint 2010 Service Applications cannot be log-shipped because of the large number of Service Applications available as well as the fact that the Service Application Framework is extensible and supports the creation of custom Service Applications. For a good list of what Service Application databases can and cannot be log-shipped, as well as general criteria for making the distinction, see http://technet.microsoft.com/en-us/library/ff628971.aspx. Also, review any documentation available for each Service Application to determine its specific availability for log shipping or lack thereof.
Content databases. You can log-ship SharePoint content databases to a secondary server. You can also attach them to a standby SharePoint farm for limited read-only viewing, if you restore them in Restore in Standby mode. Depending on how the standby farm is set up, some functions such as search, user profiles, and people search may not be available without some extra configuration efforts.
As you can see in the list, not every type of SharePoint database is highly available through SQL Server log shipping. This directly influences how you should use log shipping to implement HA for your SharePoint farm’s databases, because you can’t simply switch over to your secondary log-shipped databases if your primary databases are lost. You can take two approaches when using SQL Server log shipping with SharePoint: creating standalone secondary clones of your Service Application and content databases or creating a full standby SharePoint farm based on your log-shipped Service Application and content databases. Because you cannot make your configuration and search databases highly available via log shipping, you must build a new farm to host the log-shipped Service Application and content databases to restore your environment to its users.
The first option means that you are not going to build a new farm until a disaster occurs, but it does reduce your startup time because the content is preserved in a separate database host and ready to be reintroduced back into the farm. If an outage hits a single database, it gives you a running resource to add back into your farm. The fact that this option takes more time to use in a recovery scenario does then require that you have greater leeway in terms of your recovery time objective (RTO) for your SharePoint farm. The second option allows you to have a full, up-to-date replacement available for your farm in the case of a catastrophic event, shortening the time that your environment is unavailable to your users and allowing you to meet a much smaller RTO window. Although the specifics of implementing the first option have already been covered in the chapter, you need to take additional steps to create a full standby SharePoint farm using log-shipped databases.
Building a standby SharePoint farm provides a system for the log-shipped Service Application and content databases to be integrated into and gives you a fallback option if a disastrous event should befall your primary production SharePoint farm. It also gives you a read-only environment where users can view data or run reports without impacting the performance of your production farm. (Keep in mind that this may influence how the platforms in your standby farm are licensed.) You can use the following steps as a guide to build your own standby Share-Point farm.
Configure log shipping for each database selected to be replicated into the standby farm using the Restore to Standby mode.
Install SharePoint in the standby farm, using the SQL Server database instance hosting the log-shipped databases as the database host for the standby farm.
Note
If possible, use PowerShell (you can also use VBscript or another compatible scripting language, but others are not as ... powerful ... as PowerShell, if you get our drift) to script the installation and configuration of both your primary and standby SharePoint farms. This gives you a much higher probability of creating identical deployments in both environments, which in turn gives you a higher probability of success for your log-shipping configuration. In general, take special care to apply the same patches, hotfixes, or updates to the operating systems, SharePoint, and SQL Server in the standby farm as have been applied to your production farm. You must build the standby farm to the same SharePoint version as your production farm. If your production farm has any custom code or language packs installed, also install them to the standby farm.
Configure the standby farm to match the setup of the production farm. (SharePoint 2010’s new configuration-only backup and restore functionality may be helpful here; see Chapter 9 “SharePoint 2010 Central Administration Backup and Restore” and Chapter 10, “SharePoint 2010 Command Line Backup and Restore: PowerShell” for more information.) If you have a Service Application configured in your production farm, you must either create a new Service Application to match it or restore a backup of the Service Application from the production farm into the standby farm so you can be certain that the configuration matches exactly. (See the previously referenced document on Microsoft’s TechNet Web site for information on how to configure specific Service Applications, as well as the product document for the Service Application itself.) Although you should conduct a search in the standby farm, disable any search crawls unless you specifically need them. Confirm that the standby farm’s MySite configuration matches that of the production farm’s.
To build the new standby Web applications for each Web application in your production farm, execute steps 2 through 11 from the list in the “Restoring a SQL Backup to a New SharePoint Environment” section in Chapter 7, adding the log-shipped content databases to each new Web application.
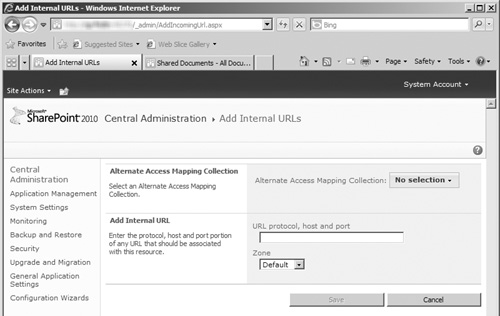
In the standby farm, configure an alternate access mapping (AAM) that points to the URL of your production farm; see Figure 8.9 for an example of the Add Internal URLs page.
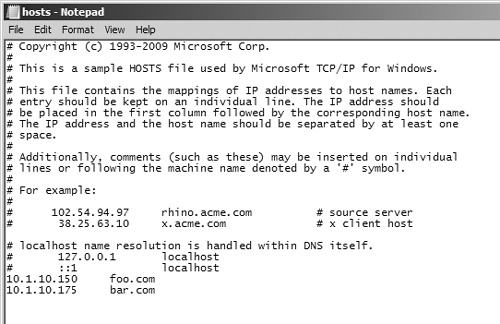
On the file system of all the Web front-end (WFE) servers in the standby farm, open the server’s Hosts file (typically located at
%WINDIR%system32driversetc). See Figure 8.10 for an example. Then add an entry pointing the production farm’s URL at the server’s local loopback IP address, 127.0.0.1. This ensures that any requests for the production farm that originate on the local server are directed back to the local server, not a server in your production farm.If you are using SharePoint Server 2010, Search Server 2010, or Search Server 2010 Express, in the standby farm open the Search content source named “Local Office Server SharePoint Sites” for editing. Remove any URLs that refer to local servers in the standby farm or the URL of the standby farm, and replace them with the URL of the production farm.
Tip
Unless you have a specific need to make search queries in the standby farm, try to ensure that no crawls are scheduled to run in the farm until it is needed in the case of a failover. This reduces the resources that the standby environment uses and makes it easier to configure search for the proper targets should a failover occur.
Your standby farm is now ready to be used as a read-only copy of your production farm that can be failed over to in case of an outage or disaster.
Caution
Once your standby farm is created, be careful to duplicate every configuration change or update that you make to your primary SharePoint farm to your standby farm. If the two environments are not kept in sync, you risk displaying inconsistent content to your users or worse, breaking your standby farm entirely when it attempts to use your modified Service Application and content databases that are log-shipped into it.
Although using SQL Server log shipping as your HA solution has several benefits, it also has quite a few drawbacks that you must consider when evaluating the approach. This is not to say that log shipping is or is not a good solution. Our main caution is that you pay close attention to the items that follow and determine how they relate to your environment, needs, and limitations. You may find that log shipping fits you like a glove, or you may find that one of the other HA solutions in this chapter is what you need to bring long-term stability to your database environment.
Log shipping may be the right HA solution for your environment for a variety of reasons. The following list outlines its positive attributes. Take a look to see if it meets your needs.
Independence. The jobs used to log-ship a database are not tied to SharePoint, nor are they impacted by any other processes in the SQL Server database instance. This means that changes to your SharePoint configuration or its databases do not directly impact or harm your log-shipping procedures.
Cost effectiveness. Unlike some other HA solutions (such as clustering), log shipping does not require high-priced components and (as noted earlier) can be implemented for the costs that may or may not be associated with provisioning and licensing an additional SQL Server instance.
Highly configurable nature. As described earlier, a large number of options and configurations to be set for log shipping allow it to meet the needs of your environment.
Read-only availability. If you want, you can create a read-only version of your SharePoint environment using its log-shipped content databases for research or reporting purposes to reduce the load placed on your primary farm.
Low impact on performance. Once the transaction logs of your SharePoint database are backed up, the log-shipping process is executed on the server(s) hosting the secondary database and has no affect on the performance of your primary database server.
Unlimited use. You can log-ship as many databases in an instance as you want; the platform imposes no hard limit. (Keep in mind that you may still encounter limits imposed by the capacity of your hardware or network infrastructure.)
Use of backups. The transaction log backups that the log-shipping process uses to update the secondary database can restore the primary database to a previous point in time as necessary. This means that you can make your database highly available and implement a backup/ restore solution for it at the same time, an option not available with SQL Server’s other HA solutions. In this situation, it is still necessary to perform full backups of your transaction logs over time, otherwise restore operations are going to take much longer to implement all of the differential backups back to the original full backup, but completely feasible.
Capture completeness. Because SQL Server records information about a database update to the database’s transaction log before it even writes it to the database, all the requested database modifications received by SQL Server leading up to the moment of an outage are copied over to the secondary server and written to that database.
Distribution and redundancy. By requiring a secondary database instance to host your secondary database, log shipping makes your system more highly available by providing fallback options for your primary database server. The ability to ship database logs to multiple secondary database instances means that you can further limit your risk by increasing the number of fallback options you have available.
Geographic redundancy. Log shipping does not face the distance limitations that come with database mirroring or failover clustering, allowing copies of your databases to be distributed to remote locations for true redundant protection of your data from large-scale disasters.
FILESTREAM compatibility. SharePoint databases configured to use SQL Server’s FILE-STREAM provider for Remote Binary Large Object (BLOB) Storage (RBS) can be log-shipped to a standby database instance for preservation. You can log-ship other third-party RBS providers if the provider supports it.
As with most technology solutions, log shipping in SQL Server 2008 is not a perfect solution. Review the following list to see where it falls short and how that might affect your SharePoint environment.
Manual failover. Out of the box, SQL Server does not automatically fail a system over to the log-shipped secondary database if the primary database goes down. Although it is true that log shipping does have a third server role—the monitor role—that role only tracks the status of log-shipping operations; it cannot make the log-shipping database instance a primary if something happens to the original primary instance. You can do additional configuration to automate this process, but by default you must manually switch over to the log-shipped databases. This can impact the time it takes to restore your system after an outage, depending on how quickly your IT staff is notified of the outage and what availability they have to restore the system to the log-shipped databases.
Latency. Updates are not immediately copied to the secondary database when they are made in the primary database. Several factors can affect the time it takes for them to make it over to the secondary database, including these: the frequency with which your transaction logs are backed up, the size of those logs, and the bandwidth available between the primary and secondary databases. The data in your secondary database is not going to be up to date until the transaction logs are copied to it and restored, which can impact the content of a standby farm. Because log shipping does not update in real-time, you cannot use it to restore a database to the point in time immediately prior to a failure. If your organization’s recovery point objective (RPO) and RTO requirements for SharePoint mandate instantaneous failover with no lost transactions or data, log shipping is not a viable HA solution for your SQL Server environment.
Poor status visibility. Although the log-shipping process generates status reports for all its actions and allows for the configuration of a monitoring server, this information is not going to be easily available. You can access these reports only by logging on to the server where they are stored; the reports only raise alerts to operators of the associated SQL Server instances when they log into the instances. Additional custom measures or the use of a monitoring platform such as the Operations Manager platform from Microsoft is going to be required to make this information available to your SharePoint administrators or to automatically deliver the alerts as they occur without requiring administrators to log into a system.
Not a complete solution. As previously mentioned, you are not able to log-ship all your SharePoint databases, requiring additional steps such as building a whole new farm or creating a standby farm to use the log-shipped databases in the case of a disaster.
Errors and data loss. Any errors that are written to your primary databases are also transferred to your secondary databases via log shipping. Log shipping is not to prevent the loss of data due to accidental deletion; if it is deleted in the primary database, it is also deleted in the secondary database once the transaction is log-shipped over.
If the features and functionality of log shipping in SQL Server 2008 seem appealing but you still have concerns about some or all of the drawbacks to the process, have no fear. There are, however, other alternatives when it comes to HA for SQL Server, and the next one on the list, database mirroring, offers several enhancements to log-shipping’s feature set while also improving on its weaknesses. (Keep in mind that database mirroring comes with its own set of weaknesses and drawbacks.) Although the two options are similar, there are definitely some differences between the two, especially when it comes to the increased cost of implementing database mirroring. In addition, you can implement both log shipping and database mirroring for your SharePoint environment, giving you the best of both worlds.
This isn’t to say that log shipping is necessarily inferior to the other HA solutions available for SQL Server: database mirroring or failover clustering. Microsoft has designed these solutions to offer you a range of flexible and configurable options to meet your environment’s specific needs, and log-shipping can play an important role in your disaster recovery design. Log shipping allows you to meet shorter RTOs than normal SQL Server backups, because you already have a copy of your databases up and running in a SQL Server environment, at a much lower cost than mirroring or clustering thanks to its less expensive infrastructure requirements. Log shipping also enables you to provide broader protection of your environment, because logs can be shipped to multiple locations and to diverse geographic locations. Finally, log shipping is attractive because you can use it with a much broader range of SQL Server functionality, such as RBS.
SQL Server’s database mirroring functionality is similar to log shipping in the way it maintains a copy of the primary database for HA purposes; both approaches copy transaction log data from the primary to the secondary database. Although the similarities between the two HA solutions for SQL Server may be striking, the differences between them are even more so. Database mirroring differs from log shipping in several areas, the three most apparent being when the transaction log data is copied to the secondary server, how that data is transferred from one server to another, and how the databases behave when the primary server suffers an outage.
Database mirroring’s most appealing advantage over log shipping is that transactions committed to the primary database are copied over to the secondary database instance at once after they are written to the database. This gives database mirroring a distinct advantage over log shipping by reducing latency and ensuring that the contents of the secondary database are completely current. When the transactions are sent to the secondary database, the individual transaction records are sent to the secondary database via TCP, not transaction log backups via a file system copy. But the most desirable aspect of database mirroring is that you can configure it to automatically fail over to the secondary server should the primary server suffer an outage. That’s a big change from log-shipping’s reliance on a manual failover.
Tip
If the network being used to send the transaction records is not secure, take precautions to secure and encrypt the database mirroring traffic as it is sent. For specific information on this subject, Microsoft has published an article on database mirroring transport security at http://msdn.microsoft.com/en-us/library/ms186360%28v=SQL.100%29.aspx.
Database mirroring requires at least two servers—a principal and a mirror—and allows the use of an optional third server, a witness, to automate failovers from the principal to the mirror in the case of an outage on the principal.
Principal. This is the database you want to mirror to a SQL Server instance on a separate server. You must back up the principal database using the Full recovery model for the database to use database mirroring; mirroring is not available when using the Simple or Bulk-Logged recovery models. There can be only one principal server for a target database, and it can have only one mirror server as a partner in the mirroring session. You can implement this role on servers using the Enterprise or Standard licenses for SQL Server.
Mirror. This is the database that functions as the mirroring partner for your principal database. You must initially restore the mirror database from a full backup of the principal database using the Restore with No Recovery option (and then any transaction log backups required to make the database up to date) before you can update it with transactions via database mirroring. See Figure 8.11 for an example of where this setting is selected. See the “How to Restore a SQL Server 2008 Database Backup” section of Chapter 7 for more information on how to restore a database in the SQL Server Management Studio. A single secondary server can host multiple databases acting as mirrors to principal databases on other servers. Databases hosted on the mirror instance not acting as a mirror can also be principal databases in database mirroring with other database instances. You can implement this role on servers using the Enterprise or Standard licenses for SQL Server.
Witness. This server is optional and is needed only if you require SQL Server to automatically fail over to the mirror database if a failure or outage occurs on the principal database. The witness server does not perform resource-intensive activities or host content as part of the database mirroring process; its only role is to detect a failure in the principal database and enable automatic failover to the mirror. You can implement this role on servers using the Enterprise, Standard, Workgroup, or Express Edition licenses for SQL Server.
Your environment must meet the following requirements to enable database mirroring for one or more of your SQL Server databases:
Servers. In addition to the server hosting your principal SQL Server database instance, you must have a second database instance hosting on a separate server to function as the mirror server. A witness server is optional but is required if you want to have automatic failover.
SQL Server license. The principal and mirror servers must be running one of the following versions of SQL Server: SQL Server 2008 or 2008 R2 Standard Edition (synchronous mirroring only; the various modes of database mirroring available are discussed later in this section), or SQL Server 2008 or 2008 R2 Enterprise Edition. The witness server must be running one of the following versions of SQL Server: SQL Server Express Edition, SQL Server 2008 or 2008 R2 Standard Edition, SQL Server 2008 or 2008 R2 Workgroup Edition, or SQL Server 2008 or 2008 R2 Enterprise Edition. Database mirroring is not available with SQL Server Embedded Edition.
Permissions. Your mirror database instance must provide the same permissions and roles that are granted to your principal database instance.
Recovery model. The database targeted for database mirroring must be backed up using the Full recovery model.
The following steps provide an example of how to enable and configure SQL Server database mirroring with a principal, mirror, and witness server.
Open SQL Server Management Studio and right-click on the target database for database mirroring. Select the Properties item from the menu.
When the Database Properties dialog box opens (see Figure 8.1), click the Mirroring page link in the left pane.
This action opens the Mirroring page (see Figure 8.12) with most of its options disabled. Click the Configure Security button to configure the database mirroring security settings.
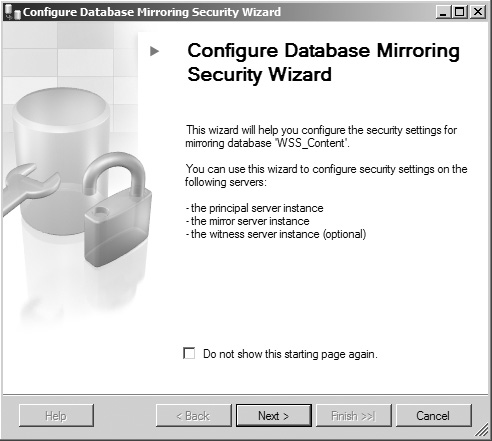
This opens the Configure Database Mirroring Security Wizard, as shown in Figure 8.13; click the Next button to continue.
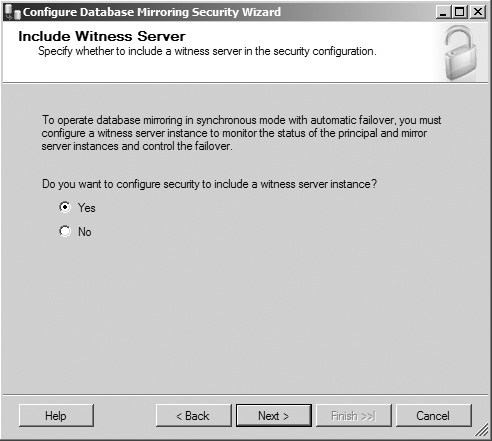
The wizard next prompts you for witness server configuration information (see Figure 8.14). If you want to set up a witness server and enable automatic failover for this database mirroring configuration, select the Yes option and click the Next button. If not, select the No button and click the Next button. In this example, select the Yes option button to configure a witness server.
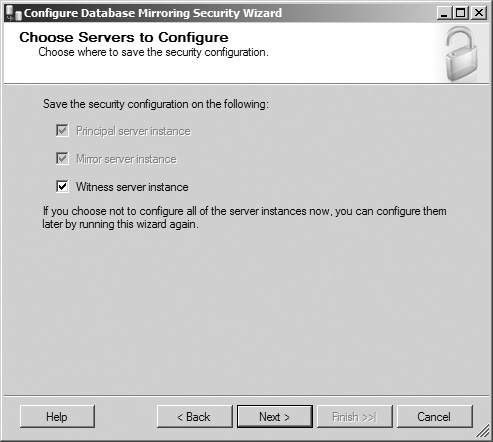
The wizard’s Choose Servers to Configure screen opens (see Figure 8.15), displaying the three database mirroring server roles that can have the database mirroring security configuration saved on them, with check boxes to the left of them. The check boxes for the principal and mirror server instances are checked by default and disabled to prevent the selection from being modified. The witness server instance check box is checked by default but can be unchecked. Ensure that all three server instances are checked, and click the Next button to continue.
This opens the wizard’s Principal Server Instance screen (see Figure 8.16). In this screen, you are shown the current database instance hosting the principal database for the mirroring process in a disabled drop-down menu. In this window, you can opt to have SQL Server encrypt each transaction as it is sent from the principal server by selecting the associated check box, specify the networking port that the principal server uses to communicate with the mirror and witness server, and rename the endpoint for transactions sent from the principal server. When you have entered the information and configuration data for your principal database instance, click the Next button to continue.
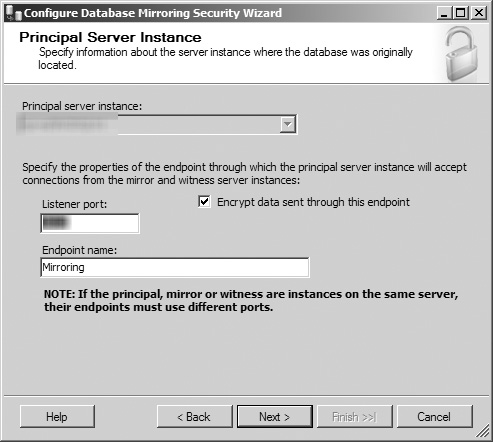
Figure 8.16. The Principal Server Instance screen in the Configure Database Mirroring Security Wizard.
Tip
If you have previously established a database mirroring endpoint for the target database, the Encrypt Data check box, the Listener Port text field, and the Endpoint Name text field are disabled, preventing you from modifying the configured endpoint. To change the current mirroring endpoint, you must execute Transact-SQL commands to
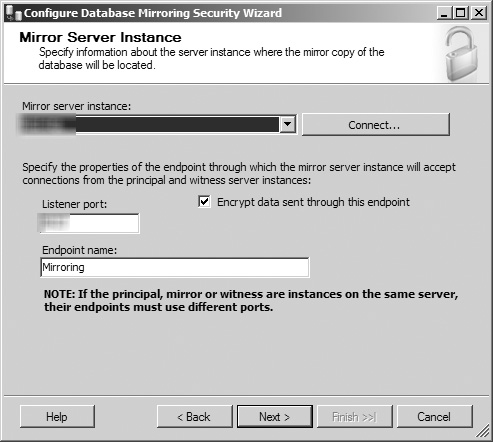
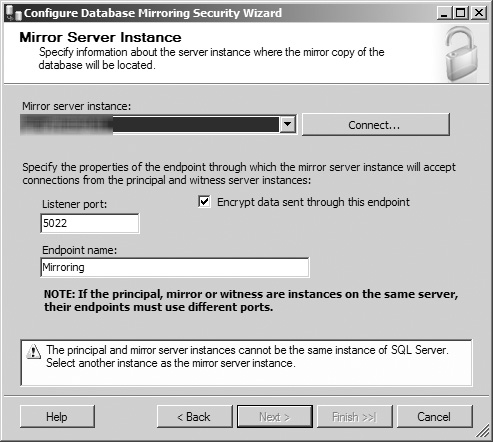
DROPorALTERthe mirroring endpoint.The wizard proceeds to the Mirror Server Instance screen (see Figure 8.17), which looks similar to the Principal Server Instance screen in Figure 8.16, except that the database selection drop-down menu is now enabled. In this screen, you can select the database instance hosting the mirror database for the mirroring process from the drop-down menu. If the desired database instance is not available in the drop-down menu, click the Connect button to open a dialog box to log into the database instance or select the Browse for More option from the drop-down menu. After selecting the current database instance, you can opt to have SQL Server encrypt each transaction as it is sent from the mirror server by selecting the associated check box, specify the networking port that the principal server uses to communicate with the mirror and witness server, and rename the endpoint for transactions sent from the principal server. If you attempt to select the same database instance as the one you established as the principal server, SQL Server displays an error message instructing you to select another instance, and the Next button is disabled (see Figure 8.18). After you have entered valid information and configuration data for your mirror database instance, click the Next button to continue.
The wizard again opens a screen similar to the Principal Server Instance screen in Figure 8.16—the Witness Server Instance screen (see Figure 8.19)—and it has the database selection drop-down menu enabled. In this screen, you can select the database instance hosting the witness database for the mirroring process from the drop-down menu. If the desired database instance is not available in the drop-down menu, click the
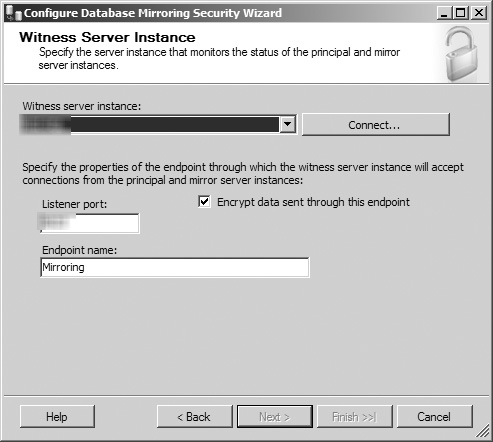
Figure 8.19. The Witness Server Instance screen in the Configure Database Mirroring Security Wizard.
Connect button to open a dialog box to log into the database instance, or select the Browse for More option from the drop-down menu. After selecting the current database instance, you can opt to have SQL Server encrypt each transaction as it is sent from the witness server by selecting the associated check box, specify the networking port that the principal server uses to communicate with the mirror and witness server, and rename the endpoint for transactions sent from the principal server. Like the mirror server screen, if you attempt to select the same database instance as the one you established as the principal or mirror server, SQL Server displays an error message similar to Figure 8.18 instructing you to select another instance, and the Next button is disabled. After you have entered valid information and configuration data for your witness database instance, click the Next button to continue.
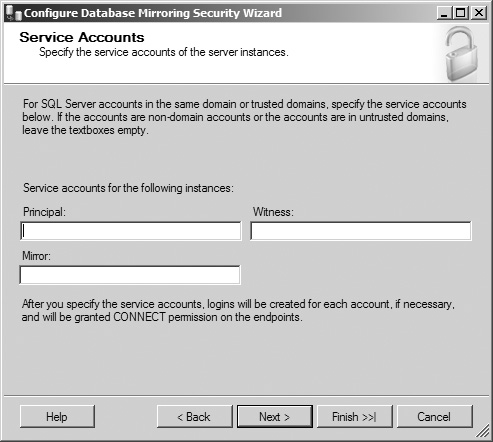
The Service Accounts screen opens, allowing you to specify a service account in DOMAINACCOUNT format for each of the servers in the database mirroring configuration. As Figure 8.20 shows, the screen provides instructions regarding when accounts should and should not be specified, as well as what actions SQL Server takes if the accounts listed do not currently have SQL Server logins. Once you’ve configured the account information, click the Next button to continue.
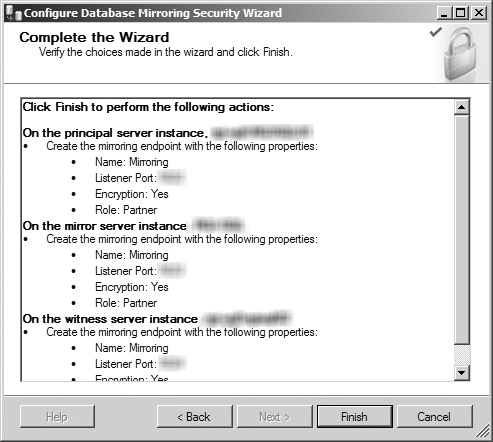
The last screen of the wizard is now displayed (see Figure 8.21), allowing you to review what you have configured before clicking the Finish button to finalize the security configuration process. If you see any items that need to be modified, click the Back button to navigate to them and make your changes. When you are ready, click the Finish button to complete the wizard and have SQL Server begin to configure the database monitoring configuration’s security.
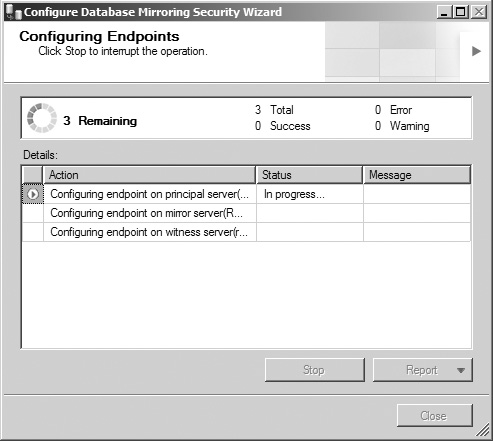
The Configuring Endpoints screen (see Figure 8.22) displays the progress of the security configuration as it executes. Once the tool is finished, ensure that all tasks have completed with a status of Success, review the status messages and reports as needed, and click the Close button to return to the Mirroring page of the database’s Properties window.
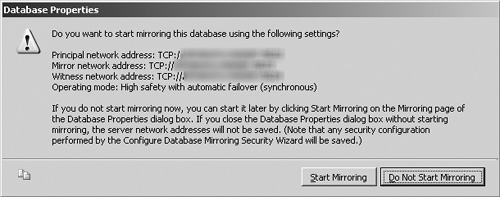
After SQL Server has completed the endpoint configuration process, the wizard closes and you are prompted with a window asking if you want to start database mirroring for the target database using the configuration that just completed, as shown in Figure 8.23. Click the Start Mirroring button if you are ready to enable the process, or click the Do Not Start Mirroring button if you are not. In this example, the Do Not Start Mirroring button was clicked.
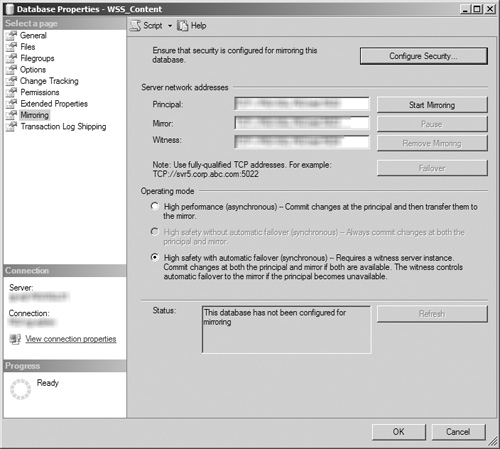
Regardless of whether you choose to start the mirroring process, when you return to the Mirroring page, it is apparent that many more fields are now enabled after security was configured, as shown by Figure 8.24. In the Server Network Address section, the text fields for the Principal, Mirror, and Witness servers are now enabled and populated with the network connection string used to contact each of these servers. If you did not start mirroring in step 13, only the Start Mirroring button is enabled. If you did start mirroring in step 13, the Pause, Remove Mirroring, and Failover buttons are enabled. In the Operating Mode section, the High Performance (Asynchronous) and High Safety with Automatic Failover (Synchronous) option buttons are enabled if you chose to include a witness server in step 5. If you did not include a witness server in step 5, the High Performance (Asynchronous) and High Safety Without Automatic Failover (Synchronous) option buttons are enabled. In both cases, the latter radio button is selected by default. The Status section contains a text box displaying the database mirroring status for the database and a Refresh button, which is disabled if mirroring has not been started. If the Status field indicates that the database has not been configured for mirroring, click the Start Mirroring button to initiate the process.
After mirroring has been started for the database, you can suspend the process by clicking the Pause button. A dialog box is displayed asking you to confirm your request, and you are then returned to the Mirroring page. The former Pause button is now marked as the Resume button and can be clicked to resume the mirroring process for the database.
Note
Pausing the mirroring process places the mirrored database in a suspended status and results in transactions not being transferred from the principal database to the mirrored database until mirroring is resumed. You can use the Pause option as a short-term solution to improve performance on the principal database instance, but you should not use it for extended periods. The transaction log of the principal database is not truncated while mirroring is paused so that all logged transactions can be sent to the mirrored database once the process is resumed. If mirroring is not resumed in a timely fashion, the transaction log can grow too large and use all of its available disk space, ultimately causing an outage of the principal database if it cannot write to its transaction logs.
To completely stop the database from being mirrored, click the Remove Mirroring button. A dialog box is displayed asking you to confirm your request, and you are then returned to the Mirroring page. To restart mirroring for this database, you must manually re-create all the configured mirroring settings. This action permanently removes the mirroring associations and security settings between the principal, mirror, and witness servers, but the copy of the mirrored database is not deleted from the mirror database instance.
Note
If you chose to keep the mirrored database, you must perform a Restore with Recovery action against it to make it available, because it was originally created using Restore with No Recovery. You should consider renaming the mirrored database to avoid confusion between it and the principal database.
To manually fail a database over from its principal to its mirror, click the Failover button. A dialog box is displayed asking you to confirm your request, and you are then returned to the Mirroring page. After completing the failover, the mirroring server roles of the two databases have been swapped, so the original principal now has the mirror role and the original mirror is now the principal database.
If you want to change the operating mode of the mirroring process, simply select the button next to the option you want and click OK, closing the database’s Properties window and saving your changes.

Step 14 briefly discussed a crucial component of SQL Server’s database mirroring functionality: the operating mode. The option you select for this section directly impacts how SQL Server handles your mirrored database in the case of an outage. The three options available are described next:
High Performance (Asynchronous). This operating mode commits changes to the principal database, sends them to the mirror, and then proceeds with normal processing without waiting for confirmation by the mirror server that the transfer was successful. High Performance mode offers improved performance because the principal server is not waiting on the mirror server to execute operations, but there is also an increased risk of error due to the lack of confirmation. This database mirroring mode is better suited when the operational performance of the database is more important to your organization and a zero-loss RPO isn’t a strict requirement.
High Safety Without Automatic Failover (Synchronous). This operating mode does not mark a transaction as completed until it has been written to the transaction log of both servers. Because it does not require a witness server, the database must be manually failed over to the mirror in the case of an outage. If your organization requires that a mirrored database meet a zero-loss RPO target, High Safety Without Automatic Failover is the best database mirroring choice available.
High Safety with Automatic Failover (Synchronous). This operating mode does not mark a transaction as completed until it has been written to the transaction log of both servers, but it does provide automatic failover because it requires a witness server. High Safety with Automatic Failover mode is best suited if your organization places a high priority on realtime RTO targets for databases; the availability of automatic failover means that the database’s downtime is limited to the time it takes to bring the mirror online.
As previously stated, one of the most attractive features for database mirroring is its ability to provide automatic failover capabilities for your SharePoint databases in the event of an outage on your principal database instances. It is also important to understand that this important feature is only available with one of database mirroring’s three operational modes: High Safety with Automatic Failover. Neither High Performance nor High Safety Without Automatic Failover allows for the mirroring configuration to be redirected from the principal to the mirror should an error occur on the principal. This fact, combined with some compatibility issues discussed in the following section, makes the operating modes without automatic failover much less compelling and useful. If you want to create a secondary copy of a database without automatic failover, consider using log shipping or database backups before using database mirroring. Both log shipping and backups require far less in terms of IT resources to implement and are much more flexible than database mirroring with the ability to create multiple redundant copies of a single database—something not possible with mirroring. In general, take some time to carefully consider the requirements and implications of your options prior to implementing database mirroring in your environment. The choice you make directly affects your database architecture, the performance of your system, and your disaster recovery and HA planning.
If you have had any experience using database mirroring as an HA solution for previous versions of SharePoint, you know that it wasn’t a very good story. It wasn’t as if the two solutions were incompatible, but there was a major piece of the puzzle that just wasn’t there: true automatic failover. SQL Server’s High Safety with Automatic Failover operating mode worked just fine and was definitely capable of failing over from the principal to the mirror when the situation called for it, but the problem was that SharePoint had no way of knowing that a failover had happened. And because it didn’t know about failovers, it couldn’t automatically update itself to point at the mirror instead of the principal, which meant that every server in a given SharePoint farm would have to be updated every time a failover occurred to point the farm at the correct database instance and database names.
The good news is that we have a much different story to tell about database mirroring with SharePoint 2010. It comes down to this: SharePoint 2010 is now “mirroring aware,” which means it can recognize when SQL Server automatically fails databases from the principal to the mirror and update its configuration throughout the farm accordingly. Human intervention or custom scripting is no longer required to set up SharePoint to properly use database mirroring as a SQL Server HA solution.
Microsoft has stated several recommendations and requirements you should understand, follow, or make your best effort to follow to achieve the best possible stability and consistency for your SharePoint database mirroring configuration. The following list outlines several of these items and describes their purpose:
Network latency less than one millisecond. Latency is the time it takes for a data packet to travel from one point to another over a network. It can be measured for one-way trips or for round trips, although the latter is used much more commonly. The less latency your network has, the faster data moves between your servers. Database mirroring requires low latency to ensure that the mirror is kept as closely synchronized with the principal as possible. One major cause of network latency is physical distance, which means that principal and mirror servers often need to be located near each other and eliminates some of the true redundancy of the solution. Please note that this is a recommended value, not a requirement.
Network bandwidth one gigabyte per second (GB/s) or greater. Bandwidth measures the amount of data that can be transferred over a network within a given period of time, usually one second. Microsoft recommends (not requires) that your network be capable of transferring at least 1GB of data per second between nodes in the network, due to the high amount of data that will be in the target databases’ transaction logs as they are copied from the principal to the mirror.
Physical computing resources. Microsoft recommends that both the physical and mirror SQL Server hosts be provisioned with sufficient processing, memory, storage, and networking resources to accomplish mirroring without impact on performance. Note the number of databases you are going to mirror in your environment; the more databases you mirror, the greater the strain on your servers. The good news is that, by default, database transaction logs are compressed by SQL Server 2008 as they are sent from the principal to the mirror. That does require more processing power to compress the files, but it ensures that the smallest possible file is sent over the network, which reduces network traffic and shortens the time it takes to deliver each file.
Database recovery model. As noted earlier in this chapter, database mirroring requires that the target database is backed up using the Full recovery model. By default, SharePoint creates several databases that are configured to use the Simple recovery model; you are required to change that setting to configure them for mirroring and need to account for the additional overhead that accompanies change.
Database permissions. The service accounts used by various components in your SharePoint environment must be configured to have the same rights in the SQL Server instance hosting the mirrored database as they do in the principal SQL Server instance. Pay attention to the rights granted the service account serving as the identity of all SharePoint’s IIS application pools (especially the account for the Central Administration site), the database access service account, the default content access account, all accounts associated with Service Applications, and user accounts that have been added to the Farm Administrations SharePoint group.
Unique instance names. If possible, do not configure the SQL Server instance hosting mirrored databases with the same server and instance names as the principal instance. This can add a great deal of unnecessary confusion and complexity to your environment and make it difficult to determine which instance is currently hosting which role in the configuration.
SQL aliases. You can use SQL Server aliases to abstract the actual address of a SQL Server instance, allowing a client computer to be configured to target the alias rather than the SQL Server instance directly. This abstraction is helpful for applications that have strong ties to their databases, such as SharePoint, because it adds more flexibility on the use of those database resources than is normally available. If the address for that SQL Server instance should change, or if a different server altogether is used, all that is required is a change to the SQL Server alias, rather than a major configuration change to the application. SQL Server aliases make database integration and management much easier for SharePoint in general and should be used whenever possible in your mirroring configuration. Should a mirroring target change, once the change is made in SQL Server’s setup, you can update SharePoint via a small modification to the alias instead of a complex change to the farm’s configuration.
Operational mode. SharePoint can only be configured for awareness of database mirroring configurations that are using the High Safety with Automatic Failover operational mode. If either of the other two operational modes are used to configure the mirror and SQL Server fails over from the principal database to its mirror, administrator intervention or custom scripting is required to point SharePoint at the mirror database instead of the principal.
The first thing you need to do if you want to set up database mirroring for your SharePoint farm’s databases is to actually configure the mirroring in SQL Server, using the information and steps outlined earlier in this chapter. Make sure to take into account the items listed in the “SharePoint Database Mirroring Recommendations and Requirements” section, because they are crucial toward ensuring the best possible stability and integration for your mirroring configuration in conjunction with your SharePoint environment. Once mirroring is configured in SQL Server, you have two options available for making your SharePoint farm aware of your mirrored databases: the SharePoint Central Administration Site and PowerShell.
Tip
Please note that you are responsible for setting up the mirroring configuration in SQL Server for the databases that you want to mirror; SharePoint 2010 does not do that configuration for you. But the good news is that it does validate the mirroring configuration to ensure that it is properly set up and enabled once you notify SharePoint that a given database is mirrored.
If you are most comfortable administering SharePoint through its graphical user interface (GUI), the Central Administration site, you should be glad to hear that you can register SharePoint’s content databases as mirrored in it. But, and this is a pretty big “but,” keep in mind that we said “content databases” there. You can only use the Central Admin site to register mirroring for SharePoint content databases associated with a Web application, not Service Application databases or the farm’s configuration database. These items can still be made mirroring aware within SharePoint; it’s just that you must use PowerShell to do so.
Because of this limitation, registering a content database as mirrored in the Central Admin site is best used for one-off situations rather than a wholesale activity for every database within the farm. To set up a content database to make it aware of its mirroring configuration, see the instructions that follow:
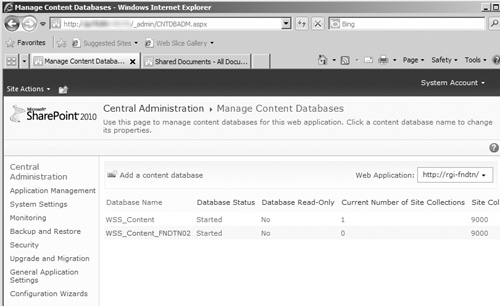
Open the Manage Content Databases page. (It’s found in the Databases section of the Application Management page.) See Figure 8.25 for an example of the Manage Content Databases page in the Central Administration site.
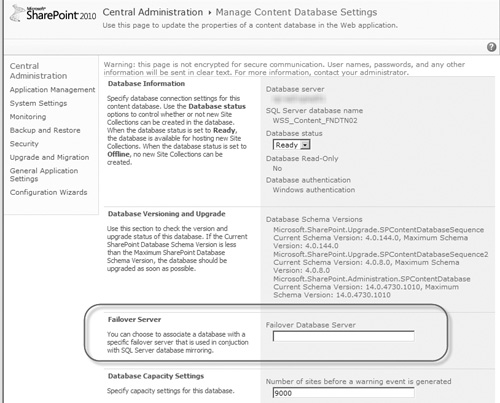
In the Manage Content Databases page, click the link for the content database you have mirrored in SQL Server to open the Manage Content Database Settings page (see Figure 8.26).
Once the Manage Content Databases page opens, locate the Failover Server section (circled in Figure 8.26). Enter the fully qualified domain name (FQDN) of the server (or the SQL alias pointing to it that you configured on the SharePoint server, which we highly recommend) hosting the mirror version of the database in the Failover Database Server field, and click the OK button at the bottom of the page to save your changes. If SharePoint is able to validate the mirroring configuration, you are returned to the Manage Content Databases page without error.
If you prefer doing your administration from the command line, or you want to configure mirroring awareness for SharePoint databases other than content databases, PowerShell is the way to go. Use the Get-SPDatabase cmdlet to obtain an object based on the name of the SharePoint database you are mirroring, and then update that object’s AddFailoverServiceInstance property with the name of the SQL Server instance hosting the mirrored database. For more information on PowerShell and its vastly expanded role in SharePoint administration, see Chapter 10.
Although you have to make some tough decisions when configuring database mirroring for use with SharePoint’s databases, a good portion of your configuration choices is driven by other factors—mainly, how your infrastructure is or can be implemented to meet your needs. For some enterprises, it may not be cost effective to implement multiple farms in geographically diverse locations, whereas for others it may be a business-critical requirement, and each option (plus all those in between) affects how you can use database mirroring and what can be mirrored.
For a single farm environment with components hosted in multiple datacenters, again you can use all three operating modes, but in this case you need to address sticking points as part of the architecture. In this type of environment, the mirrored database instance is hosted in a separate datacenter from the principal instance, providing geographical redundancy in the case of an outage. If you are using multiple datacenters to host your database mirroring configuration, pay special attention to the latency and bandwidth requirements listed previously in this section. These constraints mean that the datacenters must be capable of providing large, fast connections to the servers they host and that, in most cases, these datacenters must be located closely to reduce latency (at the cost of increasing risk to localized catastrophes).
If you have multiple farms in separate datacenters, the synchronous operating modes for database mirroring really are not an option because of the time it would take for a transaction to be sent across the network and written to each database, and the results sent back across the network. These activities are directly influenced by network latency—something that is unavoidable over a wide area network (WAN) connection between datacenters that do not share large, fast connections. You can still use database mirroring with the asynchronous operating modes to provide mirrored copies of your crucial SharePoint data. The other drawback to using mirroring for multiple farms is that, like log shipping, you can use it only to mirror your content databases or Service Application databases as long as their associated Service Application is not hosting SharePoint’s search functionality.
Tip
If using the High Performance (Asynchronous) or High Safety Without Automatic Failover operating modes for your mirroring configuration, there is no benefit to having a witness server. Witness servers are only required to provide automatic failover capabilities for a mirroring configuration using the High Safety with Automatic Failover operating mode; they are unnecessary when using the other two operating modes.
Are you still unsure whether database mirroring is the best HA solution for your SQL Server 2008 instances and SharePoint databases? The following list describes the strong points of database mirroring and their benefits for SharePoint to help you with your decision:
Independent. Like log shipping, database mirroring’s functionality is not tied to SharePoint, nor is it affected by any other processes in the SQL Server database instance. This means that changes to your SharePoint configuration or its databases do not directly impact or harm your database mirroring procedures.
Highly configurable. There are several options and configurations to be set to allow database mirroring to meet the needs of your environment.
Easily configurable. Not only is database mirroring straightforward for an administrator to set up and configure, but the infrastructure to host it does not require specific hardware to implement it. Keep in mind that this does not necessarily mean it is easy to operate.
Immediate. When a change is made to a principal database, it is also immediately sent to the mirror.
Automated. If a witness server is configured along with the principal and mirror servers, when an outage occurs, a failover from the principal to the mirror can be automatically executed without administrator intervention, especially when combined with SharePoint 2010’s awareness of mirroring configurations.
Responsive. Failovers are executed quickly, regardless of whether they are manually or automatically requested.
Distributed and redundant. As previously explained, you can use database mirroring in various ways to ensure the long-term stability of your SQL Server environment and the SharePoint farm that depends on it.
Database mirroring also comes with its own set of drawbacks that you must consider before deciding to implement it, as described here:
One mirror per database. A database cannot be mirrored more than once, creating a single point of failure for your HA solution. Regularly test and confirm your database mirroring configuration to ensure that it continues to function as expected.
No easy read-only option. Mirrored databases cannot be made available for read-only querying without the creation of an additional snapshot based on the mirror.
Operational mode limitations. Although you can use SharePoint with all three operational modes for SQL Server database mirroring, the only mode that it makes sense to use is High Safety with Automatic Failover. SharePoint is not capable of automatically failing over to a mirrored database with the High Performance or High Safety Without Automatic Failover modes, and some SharePoint databases can only be mirrored with the High Safety with Automatic Failover mode or not at all. (See http://technet.microsoft.com/en-us/library/cc748824.aspx for more information on SharePoint Server 2010, its databases, and what can or cannot be mirrored.) Because the other operational modes do not offer the valuable feature of automatic failover, if you are not able to use the High Safety with Automatic Failover mode, or you do not want to use it, you may find that you are better served using log shipping to protect your SharePoint databases, rather than mirroring.
Performance impact. Database mirroring requires multiple processing threads on its host servers, which can negatively affect the performance of your databases in general (specifically utilizing CPU and RAM), especially as more and more databases in the instance are mirrored. If you plan to highly utilize database mirroring, make sure you have the horsepower to account for it.
Dependence on networking. Attempting to do synchronous database mirroring in a network with suboptimal bandwidth or latency leads to performance issues for your principal database and the SharePoint environment that uses it.
Geographical limitation. Although database mirroring can be distributed across multiple datacenters, Microsoft has stated that these datacenters cannot be more than a few miles away from each other, which limits its ability to deliver true geographical redundancy.
Inability to configure failover criteria. Administrators cannot configure or manage the criteria that SQL Server uses to determine when the configuration should be failed over from the principal to the mirror. Because SharePoint 2010 is now mirroring aware, this is less of a concern, but it is still problematic that you cannot configure its tolerances to allow for the specific state of your environment.
Incompatibility with RBS. Databases configured to use RBS cannot be mirrored, regardless of whether they are using Microsoft’s FILESTREAM provider or a third-party provider.
Complexity. Database mirroring can be an order of magnitude more involved to implement than SQL Server backups or log shipping. It takes careful research and planning to develop a mirroring solution that is completely compatible with your infrastructure, SQL Server, and SharePoint configurations, due to mirroring’s specific requirements. These requirements and several of the items listed can also make operation of a mirrored environment challenging.
Database mirroring is certainly a viable HA solution for SQL Server that’s worth serious consideration. It lets you automatically fail over to a fallback database instance should your production database fail. It also gives you the confidence of knowing that the data in your fallback instance is an exact copy of your production database. It is flexible and can be used with various hardware and software configurations. But you may find that it is not a good fit for the needs of an organization and its HA requirements. What if you need your databases to always be online and cannot suffer an outage of even an hour while you update your SharePoint farm to point at your mirrored database instance? What if you need more than one fallback instance to add additional redundancy to your environment but the performance implications of log shipping rule it out as an option? These are just two examples of when configuring a cluster of servers running SQL Server may be the best solution to your problems.
Clustering is not unique to SQL Server or even to database platforms in general. A server cluster consists of two or more servers, each configured identically, that are designed to consistently serve up an application or platform even if an error or outage occurs on one of the members of the cluster. Although this section focuses on how to use clustering with SQL Server, you can use it to provide HA capabilities for various platforms, such as Microsoft Exchange, Microsoft Hyper-V, and many more.
This section puts the spotlight on the failover clustering solution included in Windows Server 2008, but it is by no means the only clustering platform available to you for your SharePoint and SQL Server environment. Other clustering solutions are available in the marketplace to provide a viable HA solution for your database environment, each offering unique functionality, options, and challenges to give you some flexibility over how you cluster your SharePoint database. Although some products may be specific to the UNIX or Linux platforms, others, such as Symantec’s Veritas Cluster Server, are completely compatible with SharePoint and SQL Server and have been successfully implemented as enterprise clustering solutions in the most demanding of situations.
Note
The decision to highlight Windows Server failover clustering in this section is not meant to endorse it as a clustering product or indict its competitors. The goal is to show you how to implement a widely used clustering product for your SharePoint and SQL Server environment, not laud one product over another. It is up to you to evaluate the products in this space and determine which one is the best solution for your enterprise, its infrastructure, and its requirements. Like so many other aspects of SharePoint, this is not a one-size-fits-all kind of situation.
One advantage of clustering as the HA solution for your SQL Server environment is the flexibility it gives you in designing the architecture of your solution. To create a cluster, you need at least two servers; that way you can create two separate nodes within the cluster. Clustering’s flexibility is that you can place more than one server in a node (failover clustering allows up to 16 servers in a node, depending on the edition of Windows Server 2008 being used), and you are not required to have the same number of servers in each node. So if you want to create a node with one server and a node with two servers, that option is available to you. You can also have up to 16 nodes in a cluster. Each node is expected to be able to serve as the primary provider of database services for the cluster, so that if a node is taken down or suffers an outage, you can bring another node in the cluster online to continue that service with no or little downtime.
Failover clustering is available as an included component of Windows Server 2008’s Enterprise and Datacenter editions. Microsoft is careful to state that failover clustering is intended to be used as an HA solution but is not completely fault tolerant. Fault tolerant describes systems and solutions designed with an extremely high degree of redundancy and the ability to provide nearly instantaneous recovery times; the downside is that these systems often come with a prohibitively high price tag to match. Failover clustering was designed to enable systems to be highly available while using standardized, cost-effective hardware and software, rather than the specialized systems leveraged by a fault-tolerant solution. This is not to say that failover clustering is necessarily a low-cost solution, but it can implement an effective HA solution failover clustering at a much lower cost than a fully tricked-out solution designed to be fault tolerant.
Some aspects of clustering with failover clustering are inflexible—specifically the hardware required for the servers in the cluster and the way that hardware must be configured. The following list outlines the hardware and networking needs you are likely to encounter for failover clustering:
Servers. As mentioned previously, at least two servers must be available to create a database cluster with failover clustering. Unlike log shipping and database mirroring, these servers cannot host databases that exist outside the cluster. Take special care to evaluate the needs of your database environment and confirm that the hardware configuration you select can meet those needs in a clustered configuration.
Note
In Windows Server 2003, Microsoft Clustering Services (MSCS) required the hardware used for a failover cluster to be on the Windows Hardware Compatibility List (HCL); that’s changed in Windows Server 2008. Now, a failover cluster’s hardware must be marked by its vendor as “Certified for Windows Server 2008,” and the entire configuration must be validated with a new tool, the Validate a Configuration Wizard. (It is also known as the Cluster Validation Tool, or CVT.) This tool consists of a series of simulations and tests designed to confirm that the hardware planned for use in a failover cluster meets the specifications necessary to run it. The Validate a Configuration Wizard can also be run against a configured failover cluster as an additional test of its configuration to further ensure that it is ready for use, something we strongly encourage.
Identical configurations. Each server within the cluster must have an identical configuration for its RAM, CPU, system disk, and so on.
Redundant network hardware. Each server within the cluster must have at least two network interface cards (NICs): one for communication with the clients accessing the database server, and one to connect to its cluster node for heartbeat and status updates.
Advanced network hardware. Each server within the cluster must be able to establish fast and reliable communications with the other members of the cluster, usually via specific hardware solutions such as a crossover cable (in the simplest case) or fiber optic cable.
Specialized storage. Each server within the cluster must be able to access a centralized storage system, such as a storage area network (SAN), to access the data created, stored, and updated by a cluster, such as database files. Failover clustering follows the “shared-nothing” model in its use of storage within a cluster, meaning that all the servers in a cluster can access the cluster’s storage repository, but it is updated and managed by only one server at a time: the primary server or node in the cluster.
High-speed connection to shared storage. Each server must have a high-speed connection to the cluster’s central storage, such as Small Computer System Interface (SCSI), Fibre Channel (FC), or Internet SCSI (iSCSI).
Network resources. At a minimum, you must provide a Network Basic Input/Output System (NetBIOS) name and a unique static Internet Protocol (IP) address for the cluster, as well as static IP addresses for all the NICs that servers within the cluster use.
Note
For more detailed information from Microsoft on the hardware requirements of Windows Server 2008 failover clustering, see http://technet.microsoft.com/en-us/library/dd197454%28WS.10%29.aspx.
After you have procured, installed, and configured your hardware and network solution, you are ready to start configuring a database failover cluster using SQL Server 2008 and failover clustering. When you have built your servers and installed the Windows Server 2008 operating system on them, you must complete some prerequisite steps in the operating system of each server:
Enable the failover clustering feature. You can enable this feature from the Initial Configuration Tasks window or the Server Manager in Windows Server 2008 Enterprise or Datacenter, as well as Windows Server 2008 R2 Enterprise or Datacenter.
Do not install antivirus. Microsoft recommends not installing antivirus software on the server nodes in your cluster, because it can cause conflicts or problems with MSCS.
Do not compress hard drives. You must uncompress the hard drive on each server node where SQL Server is to be installed.
Mount shared storage. Windows Server allows additional drives or storage volumes to be mounted, including those presented via shared storage. It also requires a drive letter to be assigned to each drive when it is mounted, which limits a server to 25 mount points. You can avoid this latter limitation by mounting a local physical drive to a letter, such as D, and then mounting your shared volumes as directories under the D volume, a process known as a mount-point folder path.
Your system should now be ready for failover clustering to be configured and a cluster to be created with at least two servers functioning as nodes within the cluster. Unfortunately, this chapter cannot provide a walkthrough of how to configure a failover cluster; the shared storage required by the cluster is not a resource that you can easily acquire, and the available technical resources for creating the scenarios and walkthroughs in this book do not include shared storage. The following list highlights several issues to consider as part of planning and configuring your server cluster with failover clustering for it to host a SQL Server database instance:
Cluster service account. Microsoft recommends the creation of a service account to be used as the identity of the failover clustering service running on each server node in the cluster. This account must be a domain account granted Local Administrator rights on every server in the cluster. This account must also be able to log into your clustered SQL Server database instance with public rights to monitor its status. By default, the server’s Local Administrators group has this right, but in some cases database administrators remove that access as a security measure.
SQL Server service accounts. The service accounts to be used as the identity of SQL Server’s various services running on each server node in the cluster must be domain accounts, not local accounts on each server node.
Turning on and off server nodes and storage. Review Microsoft’s instructions for configuring failover clustering (http://technet.microsoft.com/en-us/library/dd197547%28WS.10%29.aspx), because they contain specific information regarding when to turn on and off the various server nodes and storage resources during a cluster’s configuration.
Quorum mode. With Windows Server 2008, Microsoft changed the way failover clustering tracked the status and health of the cluster. MSCS previously used a storage resource, called a quorum disk, to store the cluster’s configuration data and log files on a dedicated volume, which was inevitably a single point of failure. Failover clustering’s new approach for determining quorum requires that each node submit a “vote” for its status, and if a majority of votes are available, the cluster has achieved quorum. This removes the dependency on a single item, making failover clusters much more stable. You can actually use multiple quorum modes in a failover cluster; the Validate a Configuration Wizard recommends a quorum mode when it runs, and Microsoft’s advice is to use that recommendation unless you have specific reasons to select another mode.
Failover Cluster Management application. If your installed version of Windows Server 2008 includes the failover clustering feature, you can find this application in the Start menu’s Administrative Tools directory. This is the tool you must use to create and manage your server clusters.
Cluster name. The name of your cluster should follow Domain Name Services (DNS) naming rules. You can use upper- and lowercase letters, numbers, and dashes in the name, which must be between 1 and 63 characters. The name should also be unique within its parent domain.
Storage configuration options. When running the New Server Cluster Wizard through the Cluster Administrator tool, in its Select Computer page, you are prompted to enter the name of the first computer to be added as a node in the new cluster. This page also includes an Advanced button that, when clicked, opens a dialog box where you can allow the wizard to automatically configure the cluster’s shared storage (called the Typical configuration) or to manually do it yourself (Advanced configuration). With the Typical configuration, the wizard selects all the disks in the mounted shared source as disks available to the cluster and creates resources within the cluster for these disks. If you select the Advanced configuration, you must use the
Cluster.exeexecutable to configure the cluster’s shared storage.Heartbeat. After you’ve created the cluster and added additional server nodes to it, make sure to configure the heartbeats that the cluster uses to confirm that the network interfaces for each node are functioning properly. Without this configuration, the cluster has no way to know if a server node is available within a cluster.
Configuration review and testing. Just because you have successfully created and configured your cluster does not mean your work is done. You should immediately test your cluster and confirm that it functions without error and is able to successfully fail over from one node to another when the primary node is unavailable. Review all server logs to confirm that no errors are being reported within the cluster. You should establish regular tests of this process, and any other cluster functions that you find mission critical, to verify that the cluster continues to function as designed.
Now that you have created your failover cluster, complete with at least two server nodes within it, you are ready to install SQL Server and create your database instance in the failover cluster. As with the creation of the server cluster, due to resource limitations, it’s not possible to provide you with a detailed description of the steps necessary to create your database instance successfully. However, the following is a checklist of items that you should review and evaluate while completing the process:
Follow SQL Server security best practices. Configure your new instance with the same security settings and measures as nonclustered instances, while taking into account the special requirements of the cluster service account and the fact that your SQL Server service accounts must be domain accounts.
Install SQL Server on a cluster. To install SQL Server on each server node in the cluster, simply log on to the cluster at its shared IP address (rather than the address of the server acting as the active node in the cluster) and run the SQL Server installer. SQL Server is built to be aware of and work in a clustered environment. The installer can detect the cluster environment and install the software to each server node in the cluster you select through the wizard.
Validate the components to install. If you are installing SQL Server via the GUI wizard, check the Create a SQL Server Failover Cluster check box in the Components to Install page. It appears as an indented item underneath the SQL Server Database Services check box and is not checked by default. You must check it for the installer to install SQL Server to all the nodes within the cluster.
Determine how to name your instances. You can create failover clusters using either the default instance for the cluster or a named instance. The choice is up to you.
Review your failover configuration. Installing a single database instance in the cluster is referred to as an Active/Passive failover configuration. You can also configure multiple instances to be hosted within a single cluster, referred to as an Active/Active failover configuration. In an Active/Active configuration, you must assign each instance a different primary server within the cluster. This configuration allows SharePoint’s databases to be separated between the instances for scalability purposes.
Caution
If you are considering implementing an Active/Active failover configuration, remember that in a failover scenario, multiple active clusters can be hosted on a single node within the cluster. This means that each node in the cluster must be configured with sufficient hardware resources to host both clusters, or you must be willing to accept degraded performance for both clusters until an additional node can be brought online to accept one of the active clusters.
Correctly name the virtual server. The value provided in the Virtual Server Name page of the installation wizard should be the name of the cluster, not the name of the current active node within the cluster.
Install SQL Server on every node in the cluster. In the Cluster Node Configuration page, select every server node in the cluster so that SQL Server is installed to all of them.
Test your system. When the installation wizard completes, completely test your system to confirm that the database instance is available to client connections, is not reporting errors, and can be successfully failed over from one node to another. Establish regular tests of this process, and any other cluster functions that you find mission critical, to verify that the cluster continues to function as designed.
Now that you have successfully created a failover cluster for a SQL Server database instance, you can consider the implications of using that instance to host SharePoint databases. One major advantage to the use of a failover cluster for your SharePoint database instance(s) is that you can use it to host all types of SharePoint databases without a special configuration (beyond what it takes to create and configure the cluster). The only step requiring specific attention is how you identify the address of the database instance when creating the SharePoint farm; you must submit the name of the cluster, not the name of the active server node for the cluster.
Note
SharePoint 2010 requires that SQL Server 2008 be patched at least to Service Pack 1 (SP1) and Cumulative Update 2 (CU2) if using it in a failover cluster.
SharePoint views the clustered instance as it does any other database instance. During installation of your farm, it creates all its needed databases without error. The configuration, Central Administration content, and Search databases can be hosted in the clustered instance because the name of the cluster is used and written to these databases instead of the name of the active server node in the cluster. So, in the case of an outage on the active server node, when the cluster fails over to another server node, you can still use these databases. The only outage that SharePoint experiences is during the failover itself; when the new active node comes online in the cluster, service is returned to normal without requiring updates to the SharePoint farm.
Note
Keep in mind that you can use SQL aliases with a failover cluster, even though the address for the clustered instance that SharePoint uses does not change regardless of which node in the cluster is active. You should still consider using SQL aliases to further abstract the location of the clustered instance away from SharePoint to give yourself greater flexibility and scalability with your SQL Server back end.
Database clustering is a powerful, high-availability tool for SQL Server 2008 that offers several reasons for being a viable option for your SharePoint databases. The following list covers the most compelling reasons for its use:
True automatic failover. When an active node within a cluster suffers an outage or failure, the cluster automatically fails over to another node within the cluster. Because SharePoint references the identity of the cluster and not a specific node within it, you do not need to update a farm’s configuration data to recognize the change in database hosts.
Patching without outages. You can complete Windows and SQL Server patching without making the cluster itself unavailable. Simply apply your patches to the inactive nodes in the cluster, then fail over the cluster manually to those update nodes, and patch the remaining nodes. You can do this without interrupting the services that the cluster provides by taking advantage of the cluster’s failover functionality.
Rapid failover. Clustering your database means that, in the case of an outage, your system has a drastically shorter time to return to normal service. It only takes the amount of time required for the cluster administration process to switch over to another server in the node; no manual intervention or configuration is required to implement the failover.
Scalable. Because Windows Server 2008, failover clustering, and SQL Server 2008 support up to 16 server nodes within a cluster and use flexible shared technology for storage, you can configure your clustering solution in a variety of ways to meet the needs of your system and easily expand it to grow with your system.
Compatible with log shipping. Like database mirroring, databases hosted with a cluster can be log shipping to another instance to provide even more redundancy for your data.
Choice of SQL Server backup model. Unlike in database mirroring, you can back up databases in a cluster using any backup model. The only exception to this is if you are also using log shipping or database mirroring with your cluster, in which case the constraints of the associated technology also apply.
Unfortunately, database clustering also comes with some disadvantages that can prove to be stumbling blocks to its implementation. Following are those disadvantages:
Network requirements. Although server nodes within a cluster can be located in separate datacenters, the bandwidth requirements for heartbeats and shared storage connectivity mean that nodes usually cannot be more than a few miles from one another.
SAN storage requirements. The technology required to implement shared storage, from both a hardware and software perspective, requires special expertise to implement, operate, and maintain. This also adds a dependency on yet another system for your SharePoint environment’s overall health and well-being.
Costs. In addition to the effort required to implement shared storage, the hardware and software for the technology come at a high price. Various providers and configurations are available in the marketplace, but even the low end of the cost spectrum may prove prohibitive for your budget.
Fault tolerance. Log shipping and database mirroring provide a certain level of fault tolerance because the redundant data they preserve is stored on a storage medium completely separate from that of its source. Because clustering uses shared storage to store the data files for your databases, an outage to that shared storage configuration affects your entire cluster and the applications that use it.
At least one blanket statement can be made when it comes to SQL Server and HA: no one ever wants a database to crash or become unavailable, especially not a SharePoint database. Unfortunately, even with the improvements that have been made in the quality, speed, and capacity of modern IT infrastructure and the software that runs on it, such events are inevitable. Hard drives fail, network connections are yanked, and lightning strikes, no matter what you do to try to prevent it. Your responsibility as an administrator is not to prevent the impossible; it is to design your system so that when disaster strikes, it has minimum impact on the least number of users possible. Microsoft recognizes this, and the solutions available to enable HA for SQL Server 2008 show the effort the company has put into helping you succeed in your role.
As a SharePoint administrator, you must be even more cognizant of your system’s dependency on its database provider. An outage of your company’s intranet, for even an hour, can result in a drastic loss of productivity and revenue. As SharePoint evolves as an application platform, organizations are finding more and more creative uses and ways to stretch it to its limits. You need your environment and its back-end databases to be as stable as possible, and SQL Server HA plays a large role in creating that stability.
Log shipping, database mirroring, and clustering offer attractive HA solutions for your database instances, but they also come with drawbacks that you need to carefully weigh and test. It is somewhat frustrating that there is no cut-and-dried solution to specific HA circumstances, but this is not an entirely bad thing. The range of approaches available to you and your database administrator gives you a great deal of flexibility when implementing SQL Server HA for your SharePoint environment, not only in how you configure a specific procedure but also because you have the ability to combine procedures to overcome their individual deficiencies.
Regardless of how you make your SQL Server databases highly available, you should seriously reflect on the possibility of implementing them in your environment. If the content in your SharePoint farm is business critical, irreplaceable, or unique, you should do everything you can to protect it. If your users depend on your SharePoint sites to always be available and cannot perform their work without SharePoint, you need to make sure it is online when they need it.
Now that you have SQL Server HA under your belt, see if you can confidently answer the following questions about SQL Server HA. You can find the answers to these questions in Appendix A, “Chapter Review Q&A,” found on the Cengage Learning Web site at http://www.courseptr.com/downloads.