Chapter 1. Working with Sites and Workspaces
To understand the power of Windows SharePoint Services, you must first understand how SharePoint sites organize and access content. A SharePoint site is a web site that creates the base structure for everything you do with Windows SharePoint Services. SharePoint sites provide you with the ability to collaborate on documents, facilitate a meeting, and organize your team’s content and ideas.
In this chapter, you will learn about:
The types of sites SharePoint supports
How to access, browse, and search a SharePoint site
How to create and edit a SharePoint site
How to personalize a SharePoint site
After reading this chapter, you should have a strong understanding of managing and working with SharePoint sites.
Types of SharePoint Sites
Windows SharePoint Services gives you the ability to create sites for both internal and external use. Within the context of Windows SharePoint Services, a site can be either a team site or a workspace. Team sites provide users with a place where they can collaborate on projects. Workspaces are designed to facilitate more specific tasks, such as reviewing documents or planning a meeting.
Team Site
A basic SharePoint site is known as a team site. When you install SharePoint, a default top-level team site is automatically created. This first team site provides you with a starting point for creating additional team sites or workspaces.
A basic team site incorporates many individual collaboration tools, or Web Parts, including:
- Lists
Lists form the heart of a SharePoint site and can be used for many things, from storing documents to creating alerts to creating discussions and surveys.
- Document libraries
Document libraries let you store documents in a SharePoint site. You can apply access rights to grant or deny users access to specific document libraries. Also, you can use version control to document each change a user makes to a document.
- Picture libraries
Picture libraries allow you to store, manipulate, and control image files in many formats, including .bmp, .gif, and .jpg.
- Discussions
A SharePoint discussion is a built-in message board that allows the team to discuss issues in an interactive way.
- Surveys
A survey is an interactive form that allows team members to provide feedback in an organized fashion.
Every item in this list is a Web Part. Web Parts are reusable components that you can add to team sites and workspaces. Web Parts provide most of the functionality within any SharePoint site. Web Parts are discussed in Chapters Chapter 2 and Chapter 3.
A team site increases team productivity by giving team members a central web site for document management, team discussions, surveys, alerts, tasks, and lists. Figure 1-1 displays a typical team site.
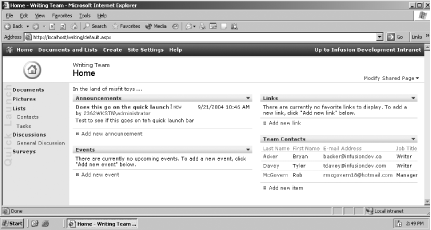
Note that the team site is divided into several distinct content zones, allowing for easy navigation and organization. Each content zone contains related elements. For example, the left-most zone is colored blue and contains navigation links, whereas the middle zone contains two Web Parts (Announcements and Events). You can organize your site in the manner that best suits your particular team. Organizing a site and its zones is discussed in Section 1.2.
Document Workspace
A document workspace is a specialized team site designed to facilitate collaboration on shared documents. A document workspace lets you create:
Lists
Document libraries
Discussions
Surveys
Naturally, you can add any other Web Parts that you might need to the site as well.
Document workspaces look very much like team sites. If the members of your team use Office 2003, they can also access and work with the documents in a document workspace using Office applications such as Excel, Word and PowerPoint. Integrating Office applications with SharePoint is discussed further in Chapter 5.
Meeting Workspace
A meeting workspace is used to create and manage meetings. Meeting workspaces provide users with the ability to:
Use document libraries
Display meeting attendees
Create meeting agendas
Set meeting objectives
Meeting workspaces use a different structure than document workspaces and team sites. By reducing the navigation and the options for displaying content, meeting workspaces make organizing and discussing a meeting easier for participants. Figure 1-2 displays a sample meeting workspace.
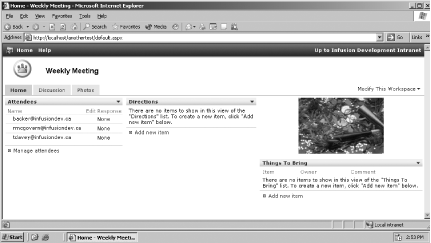
Note that the meeting workspace lacks the left navigation bar and the middle and right content zones found at a team site. Instead, the workspace is designed specifically for presenting information about a meeting, including the attendee list, directions to the meeting, the meeting agenda, a “things to bring” list, and other meeting-specific content.
Working with SharePoint Sites
SharePoint Services helps you locate a site by providing navigation links, a search framework, and standardized site layouts. These features help increase the productivity of your team and other users by reducing the time spent trying to locate a site or master the details of a new site layout.
Locating a Site
In order to work with a SharePoint site, you must first know how to get to it from a web browser. Without knowing its direct link, finding the site can be challenging. SharePoint solves this problem by providing a page that lists all available sites.
Tip
Once your system administrator installs SharePoint, he will provide you a URL that points to the SharePoint home page. If you do not know this URL, ask your SharePoint administrator to provide you with the appropriate link.
From the Manage Sites and Workspaces page, you can access:
To access this page:
Go to the SharePoint home page and click Documents on the Quick Launch menu or Documents and Lists on the top menu bar.
Click the Sites link on the lefthand menu under the See Also section.
The current view displays the team sites you can access. If you want to view the document workspaces and meeting workspaces as well, click All under the section Select a View on the lefthand side. To filter just document workspaces or meeting workspaces, you can select the associated links on the lefthand side.
Figure 1-3 shows the list of all sites and workspaces at the Infusion Development intranet site.

Browsing a Site
Once you have found a specific site, you can click the title of the site, which will forward you to the home page. Figure 1-4 displays a typical team site home page, in this case the site used by the writers of this book.

SharePoint separates a site into three distinct navigation areas. While the content in these areas may change, their location will usually remain the same.
Top menu bar
The top menu bar remains the same across all sites and workspaces unless advanced customization tactics are used. The top menu bar provides links to the following areas:
- Home
A link back to the home page of the site.
- Documents and Lists
A link to the Documents and Lists main page. From here, you can manage all documents and lists within the site.
- Create
A link to the Create page. From here, you can create new Web Parts, including:
Document libraries
Picture libraries
Lists
Custom lists
Discussion boards
Surveys
Web pages
Each of these items is described in Chapter 2. You must have appropriate access rights to create any of the above items. Access rights are discussed in Chapter 4.
- Site Settings
A link to the Site Settings main page. From here, you can manage your personal information and the site settings you have permission to modify.
- Help
A link to the Help main page. Help appears in a new window, and allows the user to browse for help while still accessing the site.
- Up to <SharePoint Main Site Name>
Quick Launch menu
The Quick Launch menu is found on the navigation bar located on the lefthand side of a SharePoint page and provides most of your navigation needs for accessing libraries and lists. Any library or list can be added and removed from the Quick Launch menu. This provides you with full control over the contents in the menu.
The Quick Launch menu is organized into five categories on the home page:
- Documents
Quick links to all document libraries.
- Pictures
Quick links to all picture libraries.
- Lists
- Discussions
Quick links to all discussions. Although the Web parts are called discussion boards, the quick launch bar always references these parts as Discussions.
- Surveys
Quick links to all surveys.
Each of these items is discussed in Chapter 2.
When you browse a SharePoint team site, the links on the Quick Launch menu change depending on the page being viewed. For example, when you select the Documents link on the Quick Launch menu, the menu changes to display the Select a View and See Also links.
The biggest change to the Quick Launch menu occurs with meeting workspaces. A meeting workspace does not have a Quick Launch menu. Instead, the workspace has tabs that provide the navigation for the site.
Main content
With the top and the lefthand side of a page devoted to site navigation, the remaining part of the page contains the main content of the site. The main content of a site is always changing, depending on which page you are viewing.
The home page main content area provides sections that a user typically needs to access immediately. For example, in a meeting workspace, the main page contains sections for attendees, agendas, objectives and documents.
With sufficient privileges, you can add and remove these sections in your personal view or for all users. Customization is discussed later in this chapter.
From the home page, you can navigate to pages that display a single item or Web Part. For example, from a “Writers Team” site, you might link to a page displaying a discussion on a particular book project, as shown in Figure 1-5.

Single-item pages display a limited set of choices. For example, on the discussion board page, you can only perform tasks that relate to the discussion, such as viewing an existing thread or creating a new discussion.
Other secondary pages contain Web Parts that have a wider range of choices. Figure 1-6 shows a Documents and Lists page. This page displays the libraries and lists that are available to users. Once you select a specific library or list, you will see a new page that looks more like a single-item page.

Not only can you select a specific library or list, you can also sort the items in each section by description, number of items, or last modified date.
Searching a Site
Previous versions of SharePoint handled searching using Internet Information Services (IIS) catalogs. IIS catalogs index documents within a file system, limiting your search to those documents rather than all of the content in the site. To fix this limitation, Windows SharePoint Services stores all content, documents, and settings in a database. Now, instead of using IIS catalogs to search, SharePoint uses the full-text searching capabilities of the database. Searching the database ensures that all content, documents, and settings are searched.
Tip
Search is limited to installations of SharePoint using Microsoft SQL Server 2000 as the database. Microsoft SQL Server Desktop Engine 2000 (WMSDE) does not support searching. For more information on choosing a database, see Chapter 6.
Enabling and disabling searching
In order to search a SharePoint site, you need to enable searching within SharePoint. Only site administrators can enable or disable the search setting. To enable or disable searching:
Open the SharePoint Central Administration site.
Click Configure Full Text Search from the Component Configuration section.
Click the “Enable full-text searching and index component” checkbox.
Searching a site
With searching enabled, a new search text box appears on the top right of all site pages. To execute a search, enter a search string in the text box and click on the arrow button. Figure 1-7 shows the results of a search on the Search Results page.

You can click on any result to access the returned item. If you performed the search within a subsite, you can search for additional results by clicking the “Search for <search string> on <main site title>” link. This will expand your search to include all the sites within SharePoint.
Creating Your Own Sites
Once a team site has been created for your company or group, you can create additional sites and workspaces. SharePoint places no restrictions on the number of sites you create; however, you may be limited by the quality of the hardware on which the site resides. Larger, more powerful computers with more memory can host more sites than smaller, less powerful machines.
When you create your own site, you will usually choose a site template that automatically generates a predefined layout. Once the site is in place, you can modify it by adding additional Web Parts, rearranging its layout, or performing other customizations.
Using a Predefined SharePoint Template
A site template provides a default structure and starting point for creating a team site. Some companies use a site template to ensure that a consistent style is maintained throughout all of its SharePoint sites. Even after a template is implemented, you can still make modifications to the site by adding additional Web Parts or by changing the site layout.
A SharePoint team site comes equipped with eight predefined templates. You can use any of these templates for your own site, or you can create a new site template for your own use. Windows SharePoint Services includes the following default site templates:
- Team site
Includes both document libraries and lists teams can use to manage information.
- Blank site
Using a web page editor, you can add SharePoint Services features to your site. This option leaves you with a blank site with no features on its home page.
- Document workspace
Provides everything necessary for managing documents, including a document library, a task list, and a links Web Part.
- Basic meeting workspace
Provides the basic skeleton for a meeting, including a document library and the list items attendees, agenda, and objectives Web Parts.
- Blank meeting workspace
Similar to a blank site, a blank meeting workspace gives you full customization over the meeting site.
- Decision meeting workspace
Provides everything necessary to manage decisions, including everything in a basic meeting workspace with the addition of the decisions list Web Part.
- Social meeting workspace
Provides everything necessary to manage social occasions, including picture library, attendees, discussions, directions, images, and things to bring Web Parts.
- Multipage meeting workspace
Provides a basic meeting skeleton, including agenda, attendees, and objectives, and two blank pages for customization.
Anyone with permission to create a new site can create one with a site template. To implement a site template:
Click on the Create link on the top link bar.
Select Sites and Workspaces.
Enter the following information:
The title of the site
The description of the site
The URL of the site
The user permissions mode
Click the Create button.
Select a template from the Template list on the righthand side. Figure 1-8 shows the Template Selection page.
Click OK.

Using Custom Site Templates
If the eight default templates are not sufficient to meet your needs, you can create a custom site template. The process of creating a custom site template requires that you have administrator-level permissions for the site.
To create a custom site template:
Click Site Settings on the top menu bar.
Select Go to Site Administration under the Administration section.
Click “Save site as template” under the Management and Statistics section.
Enter the following information into the form that is displayed:
The filename to use for the site template in the File name text box.
The title to use for the template in the Template title text box. This will appear in the template gallery selection box.
A description for the template in the Template description box.
Optionally, you can include all the content that currently exists in the site. To do this, select the Include content checkbox.
Click OK.
Modifying a Site
Once you have created your own SharePoint site, you can modify it through its Site Settings page. The modifications you can make will depend on your permissions on the site. For example, if you are assigned to the web developer group, you will be able to make many different modifications. However, if you are assigned to the reader group, you won’t be able to make any changes. For more information on permissions, see Chapter 4.
To modify a site, select the Site Settings link on the top menu bar of the site page, as shown in Figure 1-9.
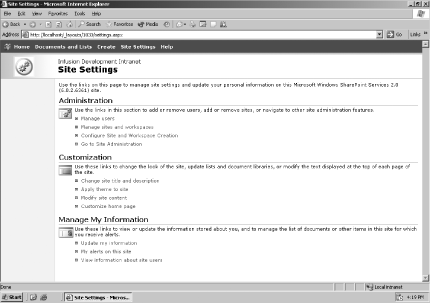
The following options are available under the Customization section:
- Change site title and description
To change the title and description of a site:
Select “Change site title and description.”
Enter the title of the site in the Title text box and the description of the site in the Description text box.
Click OK.
- Apply theme to site
Themes are special color packages that can drastically change the look and feel of a site. Themes are discussed in more detail in the Section 1.6. To apply a theme to a site:
Select “Apply theme to site.”
Select a theme from the theme list box.
Click the Apply button.
- Modify site content
To modify the content of a site:
Select “Modify site content.”
The screen shows all the lists, document libraries, discussion boards, and surveys that are available. From this screen, you can customize any of these Web Parts or create a new content item.
Click on an existing content item to modify the item.
Click “Create new content” to be brought to the Create Page section.
Select “Customize home page,” which will take you to the site home page in design mode.
In order to change the home page for your personal view, see the Section 1.6.1 later in this chapter.
Creating Extra Pages
In addition to letting you modify a site you create, SharePoint also allows you to add pages to your team site. By creating additional pages, you can customize the design of pages in your team site. A basic page looks and acts like an HTML page; however, you can design it entirely within the SharePoint environment. Chapter 1 and Chapter 3 discuss how to create more complex pages that require the use of Web Parts.
To create an extra page:
Click on the Create link on the top menu bar.
Click on Basic Page under the Web Pages section.
Enter a name and select a save location for the new web page and click Create.
The Rich Text Editor dialog box appears. Use this form to design the page, adding tables, text, links, and other items.
Click the Save button.
You might, for instance, create a custom page containing a simple HTML table, such as the Web Part page shown in Figure 1-10.

Tip
Note that the table shown in Figure 1-10 is coded in pure HTML. You can easily create such content using the Web Parts described in Chapter 2 and Chapter 3 of this book.
To view the page you created, navigate to the section you specified as its save location. For instance, if you saved the additional pages in the Linked Libraries section, you could access the page by:
Click on Documents and Lists from the top menu bar.
Select Linked Libraries under the Document Libraries section.
Click on the page you created.
Figure 1-11 shows an additional page in the Linked Libraries section of the team site.
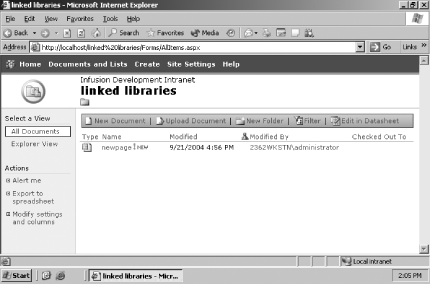
Note that some users may have rights to modify the page you created. If another user modifies the page, you would see the user’s name in the Modified By column. Similarly, a user may check the page for editing. For more information on the version control built into a library, see section Section 2.4.
Personalizing a Site
For a user, the layout and design of a site is just as important as the content. A user will want the ability to make the site his own by choosing a layout and styles that suit his personality. SharePoint supports personalization that allows users to:
Modify a site
Move Web Part locations
Apply themes
Add alerts
Some or all of these personalization features may be limited by the user’s specific permission level within a specific site. For more information on permissions, see Chapter 4.
Changing the Arrangement of Web Parts on a Page
Through your personal view you can change the layout of Web Parts on a team site page. Whenever you view the page, you will see it displayed the way you have specified. Other users who view the page will either see their own personal view, or the default view.
SharePoint allows you to:
Delete Web Parts
Add new Web Parts
Change the location of Web Parts on the screen
To modify the layout of a page:
Click on the link Modify My Page.
Select the option “Design this page” in the menu that appears. SharePoint changes the page to design mode.
Drag and drop Web Parts from one location to another to create your personal view. Remove Web Parts from the screen by clicking the X button.
Figure 1-12 shows a team site home page displayed in design mode. Notice that while in design mode, the main content is surrounded by two frames: Left and Right. You can move any Web Part from the Right side to the Left side by simply dragging and dropping.

Modifying the Settings of a Web Part
In design mode you can also modify the settings of a Web Part. If you have the proper site permissions, you can change the appearance, layout, and custom features of any Web Part. To modify a Web Part:
Click on the down arrow inside the Web Part title bar.
A list of options appears. Select Modify My Web Part.
The screen changes to resemble Figure 1-13.
On the righthand side of the screen you can specify the modifications to the Web Part. In this section, you can change the appearance, layout, and custom options for the Web Part.
Click OK.

All the modifications you make are only visible when you view the page. None of your personal modifications will change the view other users see.
Applying Themes
Themes allow you to apply a uniform site style across an entire site. Only users assigned to the web designer or administrator site group can create a theme and apply it to a site. When a theme is applied to the site, every user will see the same theme.
Themes are custom style sheets that, when applied to a site, change the colors, fonts, and overall appearance of the site. SharePoint ships with twenty default themes that you can choose from. You can also create a custom theme through Microsoft FrontPage and add it to the list of available themes. Creating a theme is beyond the scope of this book and requires advanced development knowledge.
To apply a theme to a SharePoint team site, perform the following actions:
Click the Site Settings link on the top link bar.
Select “Apply theme to web site” under the Customization section. Figure 1-14 shows the Apply Theme to web site page.
Select one of the themes on the righthand side. The team site will preview on the lefthand side with the new theme.
Click the Apply button to assign the theme to the site.

To remove a theme, follow the first two steps mentioned above. At Step 3, select No Theme (Default) and click the Apply button.
Setting Alerts
As a user, you can set an alert to notify you by email if a particular piece of content changes. You can create an alert to track the following items:
Document libraries
Documents
Picture libraries
Images
Lists
List items
Discussion boards
Discussion messages
Surveys
For example, a user may decide to sign up for an alert on a discussion board. If any other user posts a response to a discussion item, or creates a new item, the first user receives an email notification. This feature is particularly useful for discussion board moderators.
Warning
The only drawback to alerts relates to security. If you delete a user or remove a user’s access rights from content in SharePoint, the user will continue to receive alerts that he created on that content. To fix this situation, the administrator must remove all alerts that the user originally created on the content.
Creating an alert
The procedure you follow to create an alert is similar for all content, regardless of whether you are creating the alert for a document, list, discussion, or image. You will need to fill in three main areas of a form to create an alert:
- Send Alerts To
The email address where the alert will be sent
- Change Type
Which modification to the item will create an alert
- Alert Frequency
How often to be notified
To add an alert to an item such as a document library, perform the following steps:
Click on the document library to which you want to add the alert.
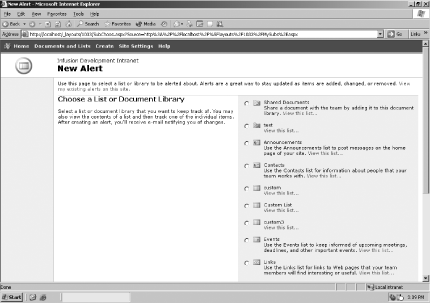
Select the Alert Me link on the lefthand side. Figure 1-15 shows the New Alert page that is displayed after clicking the Alert Me link.
Your email address is pulled from the SharePoint configuration information. You should always verify that the email address is correct. If your email address is incorrect, click on the “Change my e-mail address” link to change your email address.
Select the type of changes that you want to be alerted to under the Change Type section. The alert type options include:
- All changes
Whenever a change is made, you are alerted.
- Added items
Whenever a new item is added, you are alerted.
- Changed items
Whenever an item is modified, you are alerted.
- Deleted items
Whenever an item is deleted, you are alerted.
- Web discussion updates
Whenever a web discussion based on this library is updated, you are alerted.
Select how often you want to receive alerts under the Alert Frequency section. The alert frequency options include:

- Send e-mail immediately
At defined intervals (five minutes is the default), SharePoint sends out immediate alerts. You will receive an email at the default interval time whenever any change is made.
- Send a daily summary
You will receive a daily email summarizing all changes. If no changes occurred during a day, you won’t get an email.
- Send a weekly summary
You will receive an email once a week summarizing all changes. Once again, if no changes occurred during the week, you won’t get an email.
Viewing your alerts
Once you have created an alert for yourself, you may need to delete the alert or change the settings of the alert. SharePoint lists all of your alerts for a site on the My Alerts page. To view your alerts for a site:
Click on the Site Settings link on the top menu bar.
Select “My alerts on this site” under the Manage My Information section. After selecting “My alerts on this site,” the My Alerts on this Site page is displayed. Figure 1-16 shows the My Alerts on this Site page.

On this page, you can add, edit, and delete your alerts.
Deleting an alert
To delete an alert or a group of alerts from your My Alerts page:
Select the checkbox beside each alert that needs to be deleted.
Click the Delete Selected Alerts button.
Select OK when the message box appears to confirm the deletion.
Adding an alert
To add an alert to your My Alerts page, click the Add Alert button.
Clicking the Add Alert button brings up the New Alert page displayed in Figure 1-17:
Select which list or document library for which you wish to create an alert. Alternatively, you can view the items in the list or document library to add an alert for an individual item.
After selecting the list or document library, click Next.
Follow Steps 3-5 in the section " Section 1.6.4.1 " to fill in the form, then select OK.
To edit the settings of an alert:
Click on the name of the alert you wish to edit.
You can modify the same options that you set during the creation processed outlined in the section Chapter 1.
Click OK to save the changes or Delete to delete the alert.