
Chapter 3. Extending Site Pages
SharePoint Services includes features that allow you to extend the functionality of a basic team site. SharePoint Services implements Web Parts to link to external web sites, system folders, or files, as well as allow users to configure how the content is displayed.
A rich text editor provided by SharePoint Services allows you to create HTML pages without having to write any HTML code. Users with no coding experience can easily add formatted web pages to the team site.
Web Parts in SharePoint Services can also communicate with each other. This powerful feature allows you to create a Web Part that provides the data for another Web Part on your team site without having to write intricate code.
You can also build complex Web Part pages that can display several unrelated pieces of information on one page. By displaying several Web Parts on one page, users no longer have to navigate to multiple pages or web sites to retrieve information.
In this chapter you will learn:
How to link external content to your team site, including HTML pages, system folders, and files
How to create static HTML pages without writing cumbersome HTML code
The benefit of connecting Web Parts to allow your Web Parts to produce or consume information from other Web Parts
The benefits of creating custom Web Parts that extend the functionality of the standard Web Parts offered by SharePoint Services
By the end of this chapter, you should understand the benefits and methods of linking external content to your SharePoint team sites.
Linking to External Content
Windows SharePoint Services includes Web Parts that allow you to link to external content such as documents, shared folders, and web sites that aren’t part of the actual team site. By adding a Page Viewer Web Part to your team site, you can display external files, folders, or web sites to users in a transparent fashion. In other words, you can extend the reach of your team site in order to present content that is not under your direct control.
Adding a Page Viewer Web Part
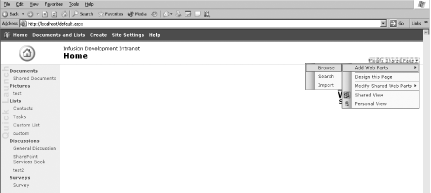
A Page Viewer Web Part provides a window for displaying external content on a shared page. For example, you could link to a stock ticker, or an important spreadsheet that contains all product codes that users need to create invoices. In either case, the content is not under your direct control, so you can’t simply add it to a standard Web Part. Figure 3-1 shows how you browse the Web Part list to add Web Parts to your team site.
To add a Page Viewer Web Part:
Click on the “Modify Shared page” link in the top-right corner of the page.
Select Add Web Parts → Browse.
Select the Page Viewer Web Part from the list.
Select Left or Right from the Add to drop-down list to add your part to the lefthand or righthand side of the page.
Click OK.
Personalizing a Page Viewer Web Part
SharePoint Services Web Parts support personalization. That is, each user can configure his view of a site. As the site designer, you can configure a Page Viewer Web Part in the Page Viewer Web Part configuration menu to allow a user to specify how the Web Part appears on the page. Many of the properties are style choices, but some options are worth noting.
Set the height and width properties for the Web Part:
To ensure the Web Part is always the same size, set the properties to a fixed pixel size. The user will not be able to adjust the size of the part.
To allow the window size to change depending on the content being displayed, select the “Adjust to fit zone” radio button.
To display the Page Viewer Web Part on the page, select the Visible checkbox.
To determine where the Web Part is displayed (that is, the order) on your page, enter a numeric value in the Part Order text field. If you enter a
1, the Page Viewer Web Part will be displayed as the first item in its area. If you don’t enter a value, the user will be able to adjust the Web Part order.If you want the user to have the option to minimize the Page Viewer Web Part, select the “Allow Minimize” checkbox.
If you want the user to be able to close the Page Viewer Web Part, select the “Allow Close” checkbox. If this checkbox is not selected, the Page Viewer Web Part will always be displayed.
If you want the user to be able to change the location of the Page Viewer Web Part, select the “Allow Move” checkbox.
Linking to a web site
Linking a Page Viewer Web Part to an external web page allows you to display the information from any web site in a frame contained on your page. For example, your site could link to a web site that displayed a news ticker, weather updates, or stock information. To link to a web site:
Click “Open tool pane” in the Page Viewer Web Part.
In the Page Viewer menu, select the Web Page radio button.
Type the URL of the web site you want to display in the Link text field. To test if the link you entered is valid, click on the Test Link hyperlink. If the hyperlink is valid, the web site is loaded into a pop-up viewer window. If the hyperlink is invalid, the pop-up viewer displays a Page Not Found error page.
Type a title for your Web Part in the Title text field.
Configure the appearance and layout of your Page Viewer Web Part.
Figure 3-2 shows the configuration options that are available when you create a Page Viewer Web Part.

Linking to a folder
If you link a Page Viewer Web Part to a system folder, your users will be able to view any documents or subfolders stored in the parent folder. For example, you might want to link to a folder containing corporate standards documents. The documents are not under the control of your group, so you wouldn’t want to put them in a document library Web Part. However, you need to have access to the files. A Page Viewer Web Part is the perfect choice for this scenario because it provides seamless access to the files without granting editing rights. To link to a folder:
Click “Open tool pane” in the Page Viewer Web Part.
In the Page Viewer menu, select the Folder radio button.
In the Link text field, type the path to the folder you want to display (for example,
C:InetPub).Configure the appearance and layout of your Page Viewer Web Part.
Linking to a file
You can also use a Page Viewer Web Part to display a specific file. For example, you could add a Page Viewer Web Part to the employee timesheet page, so that each time a user fills out a weekly timesheet he can see a file displaying all of the valid project numbers. To link to a file:
Click “Open tool pane” in the Page Viewer Web Part.
In the Page Viewer menu, select the File radio button.
Click Browse and navigate to the file you want to display.
Configure the appearance and layout of your Page Viewer Web Part.
Figure 3-3 displays a page that contains three Page Viewer Web Parts. The first Page Viewer Web Part (1) is called “Web Page” and is linked to the CodeNotes web site. The second Page Viewer Web Part (2) is called “Folder” and is linked to the C:InetPub folder. The final Page Viewer Web Part (3) is called “File” and is linked to an XML file.

Notice that each of the Page Viewer Web Parts displays a different style of content. The Web Page Viewer (1) displays the web page as you’d see it inside of Internet Explorer, whereas the Folder Page Viewer (2) displays a view reminiscent of a Windows Explorer tab.
Creating HTML Pages
From time to time, you may need to create a static web page on your team site. Although you could create the page externally and link to it with a Page Viewer Web Part, you can also take advantage of the built-in HTML features of SharePoint Services. You can create a page by adding text, pictures, and tables through your web browser without writing any HTML code. By default, all of the web pages you create are stored in the shared documents library.
To create an HTML page in SharePoint Services:
Click Create in the top menu bar located at the top of the page.
Click Basic Web Page to open up the New Basic Page form.
Figure 3-4 shows the New Basic Page, which is used to create new HTML pages for your team site:
Type a name for your web page in the Name text field. Note that your page is always given the extension .aspx even though the page only contains basic HTML.
If you want to overwrite an existing file with the same name, select the “Overwrite if file already exists?” checkbox.
Select where you want to save the web page from the Document Library drop-down list.
Click Create.

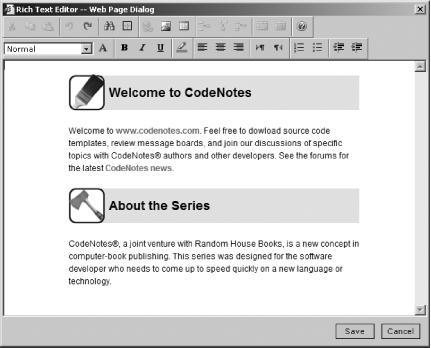
Figure 3-5 shows the Rich Text Editor - Web Page Dialog box that is launched after you click the Create button. You can use the Web Page Dialog box to create simple .aspx pages without writing tedious HTML code. You can add and format text, insert images, and create tables and lists just as you would in Microsoft Word.
Sharing Information Between Web Parts
SharePoint Services Web Parts can communicate with other Web Parts. Web Parts can be connected and synchronized to each other and to external data sources. The SharePoint architecture supports connection interfaces that allow you to configure one Web Part to provide information and another to consume it.
For example, at your company’s human resources team site, each employee’s file might contain the scheduled dates for performance reviews. The Employee File document library would pass the scheduled dates to the announcement Web Part. The announcement list would automatically retrieve new review dates from the Employee File document library and update itself accordingly.
Providing Information to a Web Part
To provide information to a Web Part:
In the design mode of your team site, click on the down arrow of the Web Part that will provide the information (for example, the Employee File Web Part).
In the pop-up menu, select Connections → Provide Row To and select the Web Part that will consume the information.
Figure 3-6 shows how you can configure a Web Part to provide information to another Web Part without writing any configuration code.

Tip
The actual code that sends and receives events is beyond the scope of this book. However, you can work with your developers to create custom Web Parts that provide additional communication options within your Windows SharePoint Services sites.
The Employee File Web Part will now broadcast information to the announcements Web Part.
Consuming Information from a Web Part
Not only do you have to establish the link from the provider Web Part (the Employee File) to the consuming Web Part (the announcements list), you also have to tell the consumer Web Part how to use the information. In this example, you want the announcements list to display a new row based on the data sent by the Employee File Web Part.
To consume information from a Web Part:
In the design mode, click on the down arrow of the Web Part that will consume the information (for example, the Announcements Web Part).
In the resulting menu, select Connections → Get Sort/Filter From and select the Web Part that will provide the information (for example, the Employee File Web Part).
Figure 3-7 shows how you can configure a Web Part to consume information from another Web Part without writing any configuration code.

Custom Web Part Pages
Although you can combine individual Web Parts into a site, you may want to group individual Web Parts into a complex Web Part page. By implementing a Web Part page, you can display lists, charts, text, and images as a single Web Part component. Organizing related data and web pages eliminates the time and steps required for users to constantly access multiple web pages and data sources. For example, you can build a custom Web Part page that displays a customer’s contact information, orders, and invoices. All three pieces of information will be grouped as a single Web Part control.
Web Part pages can be used to:
Web Part Galleries
Any Web Parts that are available for you to add to your SharePoint Services team site are stored in Web Part galleries. Depending on how your site is configured, Web Parts can be stored in any of four galleries:
- Site Web Part gallery
Any site-level Web Part made available by the server administrator is stored in the Site Web Part gallery.
- Web Part Page gallery
Any Web Part that is available to a page, but not visible on a Web Part page is stored in the Web Part Page gallery. When a Web Part is closed (not deleted), they are still available to a user.
- Online Web Part gallery
Microsoft created several Web Parts (for example, MSNBC stock tickers, weather, and news Web Parts) that are stored in the online Web Part gallery. Eventually, the Online Web Part gallery will include Web Parts created by other software vendors.
- Virtual Server Web Part gallery
If your company has several sites, it makes sense to store any commonly used Web Parts in one centralized location. The Virtual Server Web Part gallery stores any Web Parts that can be used across multiple sites.
Creating a Custom Web Part Page
The easiest way to create a custom Web Part page is through the New Web Part Page form. After creating a page with the New Web Part page form, you can easily design the page in a web browser.
To create a new custom Web Part page:
Click Create in the top menu bar located at the top of the page.
Under Web Pages, click Web Part Page to open the New Web Part Page dialog.
Figure 3-8 shows the New Web Part Page screen that you can use to create new Web Part pages and choose the template that your Web Part page uses:
In the dialog, type a name for your Web Part page in the Name text field. Once again, your custom page will always have an .aspx extension.
If you want the new page to overwrite existing files with the same name, select the “Overwrite if file exists?” checkbox.
Select the layout you want for your Web Part page from the Layout Template list box. The template determines the graphical layout of your Web Part (for example, whether the Web Part has a header or footer, and the number of columns displayed to the user). Figure 3-9 displays the “Header, Left Column, Body” template.
Select a location to save your new Web Part page from the Document Library drop-down list. You have to save all custom Web Part pages in a valid document library.
Click Create.

After you click the Create button, your newly created Web Part page opens in the design view. Figure 3-9 shows a Web Part page in design view. Depending on the layout you chose, you will have several Web Part zones in which you can drag and drop existing Web Parts from the Web Part list. The Web Part page has three Web Part zones (a header, a left column, and a body zone).

For example, you could drag and drop an image Web Part into the header zone to add a company’s logo to your page. You could then add custom lists to the left column and
Modifying Your Web Parts Page in an HTML Editor
Most Web Part page properties can be accessed and modified directly through a web browser. In some cases you may want to make advanced modifications to your Web Parts page. Web Parts pages are stored as ASP.NET (.aspx) files. Therefore, you can modify Web Parts pages with an HTML editor such as Microsoft FrontPage. Figure 3-10 shows a Web Part page opened in FrontPage. Using FrontPage to edit your SharePoint Services team site gives you more control over the information you choose to display, as well as how you display it. For example, you can:
Modify the theme of a Web Part page
Modify the Web Part template
Modify zone properties
Add or edit HTML code
Create customized data views from XML or database sources

You can also add web controls (for example, counters, navigation controls, and applets) that cannot be added through the basic SharePoint Services web interface. To add a control to your page:
Open the page in Microsoft FrontPage 2003 by selecting File → Open and navigating to your page.
Insert a web component on your page by selecting Insert → Web Component.
Select the type of component you want to add to your page. You can insert any valid web component type, including applets, counters, or additional navigation.
Save your page.
Once you have edited a page outside of WSS, any changes should automatically appear when you refresh your view of the site.
Creating customized data views
Implementing the data view Web Part allows you create customized data views by connecting to any data source that generates XML (for example, SQL Server, XML files, XML web services, and standard SharePoint Services lists).
Once you connect to a data source, you can drag and drop the data source onto a SharePoint Services page and customize the data view to display selected information in customized formats (for example, adding borders, filtering data, and sorting).
Create Your Own Web Parts Programmatically
In some cases, the functionality offered by existing Web Parts may not match the functionality you need for your site. If you use a design environment compatible with SharePoint Services such as Microsoft Visual Studio .NET, you can access all the features available to ASP.NET to create custom Web Parts that match your desired functionality. Programmatically you can:
Define new views
Create forms
Retrieve database information and display information on an .aspx page
Add additional content types to your SharePoint Services team site (for example, Macromedia Flash movies)
Add Active Server Pages (ASP.NET pages) to the site
The steps involved in creating a custom Web Part are beyond the scope of this book.