
Managing Your Environment
You’ve used environment variables to store data, managed processes, and created your own shortcuts to make your environment more personal, but there are a few additional tools you can use to go to the next level.
Using direnv to Manage Environment Variables
If your experiences with software development are anything like mine, you’re probably juggling a few different API keys for things. Perhaps your application uses a token to keep cookies secure or an API token for managing cloud servers. Many apps push developers to place these tokens in environment variables, but this can clog up your .bashrc files.
The direnv program lets you keep environment variables with your project. When you enter the directory, direnv sets the environment variables you need. When you leave the directory, those variables are removed.
Install direnv with the package manager. On Ubuntu, use this command:
| | $ sudo apt install direnv |
On macOS, use the following:
| | $ brew install direnv |
This installs direnv, but you also need to activate it by adding some code to your .bashrc file:
| | $ echo 'eval "$(direnv hook bash)"' >> .bashrc |
If you want to handle situations where direnv isn’t installed, you could instead add this section to your file, which tests if direnv is installed and activates it:
| | if hash direnv 2>/dev/null; then |
| | eval "$(direnv hook bash)" |
| | fi |
Apply the changes to your environment:
| | $ source ~/.bashrc |
direnv works by looking for a file named .envrc in your current working directory. If it finds it, it loads the file. For safety and security reasons, it won’t do it the first time without asking you.
Try it out. Create a new directory named project and create the file .envrc in that directory. Add an export statement to that file to set a SHIELD_PASSWORD environment variable:
| | $ mkdir project |
| | $ cd project/ |
| | $ echo 'export SHIELD_PASSWORD=12345' > .envrc |
| | direnv: error .envrc is blocked. Run `direnv allow` to approve its content. |
When you create the file, direnv notices and says it’s blocked. It needs your permission to load it. Run direnv allow and it’ll load the file:
| | $ direnv allow |
| | direnv: loading .envrc |
| | direnv: export +SHIELD_PASSWORD |
Print out the value with echo:
| | $ echo $SHIELD_PASSWORD |
| | 12345 |
Now, leave the directory and print the value again. It’ll be gone:
| | $ cd .. |
| | direnv: unloading |
| | $ echo $SHIELD_PASSWORD |
Switch back to the directory again and your value is reloaded:
| | $ cd - |
| | /home/brian/project |
| | direnv: loading .envrc |
| | direnv: export +SHIELD_PASSWORD |
| | |
| | $ echo $SHIELD_PASSWORD |
| | 12345 |
If you change the file, direnv alerts you again. Add a new value to the file:
| | $ echo 'export LUGGAGE_COMBO=12345' > .envrc |
| | direnv: error .envrc is blocked. Run `direnv allow` to approve its content. |
Run direnv allow again to load the changes:
| | $ direnv allow |
| | direnv: loading .envrc |
| | direnv: export +LUGGAGE_COMBO |
Whenever direnv notices something’s different in your file, it lets you know. If you see this warning and you didn’t make a change, you should open up .envrc and find out what changed.
One final note: if you’re going to use direnv to store sensitive information, be sure to tell your version control software to ignore the .envrc file so you don’t accidentally check it in to version control. If you’re using Git, add .envrc to your project’s .gitignore file.
Monitor and Manage Resources with htop
The top command gives you a basic overview of your system, but it’s limited to just displaying data. The htop program lets you see more detailed information, but also lets you filter the process list and even stop processes that may have gotten out of control.
Install htop on Ubuntu with apt:
| | $ sudo apt install htop |
And on macOS, install it with brew:
| | $ brew install htop |
Then, launch htop:
| | $ htop |
The htop interface appears, which looks like this:
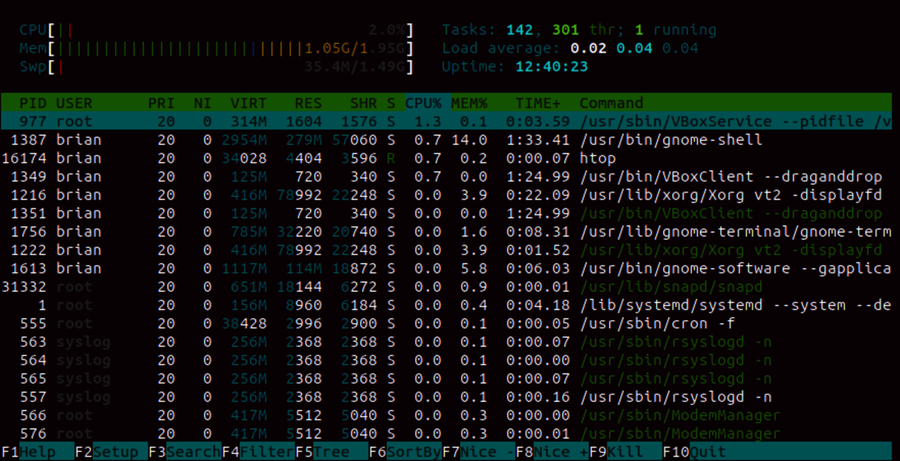
The interface shows graphs for memory and CPU usage and shows a list of processes.
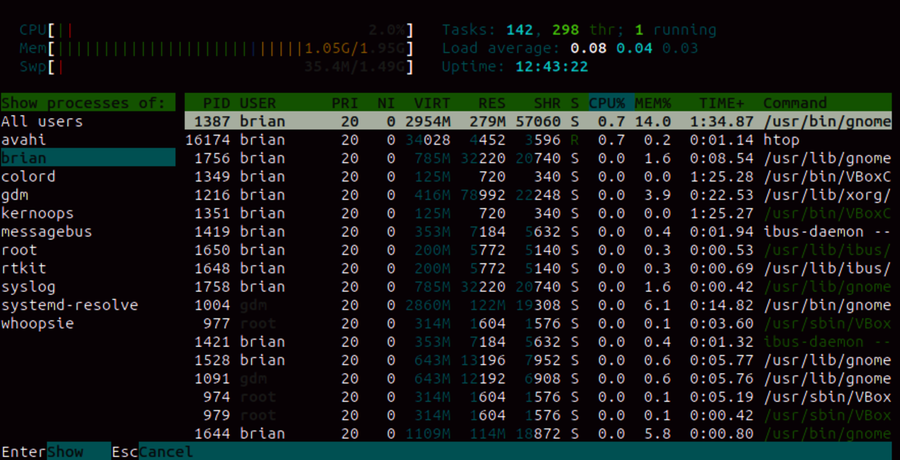
Press u to see a list of users. Select your user to see only the processes owned by your user.
You can also search for a process by pressing F3. You can then type the name of the process to highlight it. Pressing Enter selects the process. From here, you can send signals to the process by pressing k, or press F9 to kill the selected process.
htop gives you a lightweight control panel for working with the processes on your machine, and it can come in handy if your graphical process manager isn’t responding.
Autocompleting Files, Directories, Processes, and More with fzf
Navigating a more complex filesystem, like a codebase, can be challenging, even with tab completion. fzf is a tool that lets you navigate your filesystem, history, and even processes by searching for partial words. It’s a fuzzy finder for your shell.
On macOS, you can install it with Homebrew.
| | $ brew install fzf |
Once installed, run the following command to install scripts that enable default keybindings:
| | $ /usr/local/opt/fzf/install |
Unfortunately, fzf isn’t available through Ubuntu’s package manager. To install fzf on Ubuntu, you’ll grab its source code from Github[29] and run an installer script. The easiest way to do this is to install Git on your Ubuntu machine and use it to clone the source code repository. Git isn’t covered in this book; you’re just going to use it to fetch the fzf program.
First, use apt to install the git package:
| | $ sudo apt install git |
Next, use git to download fzf to the ~/.fzf directory:
| | $ git clone --depth 1 https://github.com/junegunn/fzf.git ~/.fzf |
| | Cloning into '/home/brian/.fzf'... |
| | remote: Enumerating objects: 95, done. |
| | remote: Counting objects: 100% (95/95), done. |
| | remote: Compressing objects: 100% (88/88), done. |
| | remote: Total 95 (delta 4), reused 22 (delta 2), pack-reused 0 |
| | Unpacking objects: 100% (95/95), done. |
When you use git clone, you download the current version of the files along with all previous versions. The --depth 1 option tells Git to only grab the current version.
Now run the installer:
| | $ ~/.fzf/install |
When asked if you want to enable fuzzy autocompletion, press y and press Enter. Do the same when asked if you want to enable keybindings, and again when asked to update your shell configuration files.
Time to start using this tool. First, reload your shell configuration files to activate the keybindings and shortcuts fzf installed for you:
| | $ source ~/.bashrc |
In Creating Directories, you created this directory structure:
| | files |
| | ├── code |
| | │ ├── elm |
| | │ ├── go |
| | │ └── js |
| | ├── docs |
| | │ ├── diagrams |
| | │ └── markdown |
| | ├── movies |
| | ├── music |
| | └── photos |
If you’ve deleted it, create it again with this command:
| | $ mkdir -p files/{movies,music,photos,docs/{diagrams,markdown},code/{go,js,elm}} |
Now, use fzf to navigate to the files/code/elm directory. Press Alt+c. This brings up a menu for changing directories:
| | $ `__fzf_cd__` |
| | > |
| | 42/42 |
| | > Templates |
| | Downloads |
| | Desktop |
| | Public |
| | Videos |
| | ... |
Type elm at the prompt, and the result shrinks:
| | $ `__fzf_cd__` |
| | > elm |
| | 1/42 |
| | > files/code/elm |
The path files/code/elm fills in. Press Enter and the current working directory changes.
Switch back to your home directory:
| | $ cd |
Let’s use fzf to copy files/code/elm to ~/elm.
Type cp -r, followed by a space, followed by Ctrl+t. The fzf menu appears. Type elm into the box:
| | > elm |
| | 11/104 |
| | > files/code/elm |
| | ... |
Press Enter on the path and the path fills in. You can then type the rest of the copy command:
| | $ cp -r files/code/elm ~/elm |
You can use fzf in conjunction with commands like cat, cd, and more. The sequence **, followed by the Tab key will use fzf instead of the normal tab-completion behavior you’re used to. Try it out by using cat to display the ~/.inputrc file:
| | $ cat **<Tab> |
The fzf menu appears, displaying several files:
| | > |
| | 724/724 |
| | > . |
| | .inputrc |
| | Templates |
| | test.html |
| | Downloads |
| | ... |
Select .inputrc from the list by using the arrow keys and press Enter to add the file to the line. If you don’t see it, type a few characters of the filename, and ensure you’re in your home directory. fzf can only look in the current directory and subdirectories; it’s not able to look at parent directories.
Not every command works with this out of the box. For example, if you try this with nano instead of cat, you’ll get the default tab completion. fzf has a built-in list of commands it supports, but you can add others.
Open your ~/.bashrc file and add this command after the existing fzf line:
| | [ -f ~/.fzf.bash ] && source ~/.fzf.bash |
| » | # Add additional completion commands |
| » | complete -F _fzf_path_completion -o default -o bashdefault nano |
Save the file, source it with source ~/.bashrc to apply the changes, and try using nano to open a file using fzf:
| | $ nano **<Tab> |
| | > |
| | 724/724 |
| | > . |
| | .inputrc |
| | bhcldev-code.zip |
| | Templates |
| | test.html |
| | Downloads |
| | ... |
The keybindings you installed with fzf remapped Ctrl+r, so you can use this same interface to search through your command history. Give it a try and you’ll see something like this:
| | $ `__fzf_history__` |
| | 410 sudo apt update |
| | 411 git |
| | 412 sudo apt install git |
| | 413 git clone --depth 1 https://github.com/junegunn/fzf.git ~/.fzf |
| | 414 ~/.fzf/install |
| | 415 mkdir -p files/{movies,music,photos,docs/{diagrams,markdown}.... |
| | 416 source ~/.bashrc |
| | > 417 cd files/code/elm |
Type source at the prompt, and watch as the results filter down. You can use the Up and Down arrows to select entries in the list as well, or press Esc to cancel.
Finally, you can use fzf to locate processes and kill them. Launch the responder program located in the book’s code download:
| | $ ~/sharptools/code/responder/linux/responder start & |
| | [1] 3155 |
Type kill -9, followed by a space, then press Tab. fzf displays a list of processes:
| | > |
| | 231/231 |
| | > root 1 0 0 00:49 ? 00:00:00 /sbin/init splash |
| | root 2 0 0 00:49 ? 00:00:00 [kthreadd] |
| | root 3 2 0 00:49 ? 00:00:00 [kworker/0:0] |
| | ... |
Use this to locate responder. When you find it, press Enter and the process ID is entered on the line.
| | $ kill -9 3155 |
Verify it’s been killed with jobs:
| | $ jobs |
| | [1]+ Killed ~/code/running_commands/responder/linux/responder start |
fzf gives you an incredible amount of power in a lightweight tool.
Serving a Directory with Python
If you have a directory full of files and you want to serve them over the network, you don’t have to install and configure a web server if you already have Python installed. Python has a built-in web server module you can invoke directly from the command line. This is great for testing a single-page application locally or sharing some files with others quickly.
Try it out. Create a new directory named pythonsite and switch to it:
| | $ mkdir pythonsite |
| | $ cd pythonsite |
Then, create an HTML page named index.html:
| | $ cat << 'EOF' > index.html |
| | > <h1>My Website</h1> |
| | > <p>This is served from Python!</p> |
| | > EOF |
With the file in place, you can start the web server:
| | $ python3 -m http.server |
This starts a web server running on port 8000. Open your browser and visit http://localbost:8000, and you’ll see your file.
The terminal displays the web request:
| | Serving HTTP on 0.0.0.0 port 8000 (http://0.0.0.0:8000/) ... |
| | 127.0.0.1 - - [03/Mar/2019 22:10:07] "GET / HTTP/1.1" 200 - |
| | 127.0.0.1 - - [03/Mar/2019 22:10:07] code 404, message File not found |
| | 127.0.0.1 - - [03/Mar/2019 22:10:07] "GET /favicon.ico HTTP/1.1" 404 - |
This server is listening on all interfaces by default, which means you can provide your IP address to others and they can access your server, provided you’ve allowed traffic through any firewalls.
Stop the server with Ctrl+c. Return to your home directory before moving on.
Viewing Colored Source Code with Pygments
Commands like cat and less are great for viewing the contents of a file, but when you’re looking at code, syntax coloring makes things easier to see. This comes in handy especially when previewing a diff file before applying it.
The Pygments library for Python can scan code and produce colored output. When you install it globally, you’ll get a pygmentize command that can print a file to your screen with color.
Install Pygments using the pip3 command:
| | $ pip3 install Pygments |
Once installed, use it to read a file. Create the following Ruby file named person.rb in your current directory:
| | class Person |
| | |
| | attr_accessor :first_name, :last_name |
| | |
| | def initialize(first_name, last_name) |
| | @first_name = first_name |
| | @last_name = last_name |
| | end |
| | |
| | def full_name |
| | "#{self.first_name} #{self.last_name}" |
| | end |
| | |
| | end |
Then, use pygmentize to view the file in color.
| | $ pygmentize -g person.rb |
The output displays on the screen. If the default is too difficult to see, you can use a different color scheme. Use pygmentize -L styles to list the color schemes. Test each one with the -O switch to find the one you like. The native scheme is a nice choice:
| | $ pygmentize -O style=native -g person.rb |
If your terminal can support 256 colors, you can make things look even nicer:
| | $ pygmentize -O style=native -g -f terminal256 person.rb |
Since that command is a lot to type, make a shell alias for it. Add this to your .bashrc file:
| | alias colorize="pygmentize -O style=native -g -f terminal256" |
Remember to reload your shell settings with source ~/.bashrc.
If you have a larger file you want to view, you can pipe the output to less, but you have to use the -R option so that the less command interprets the colors:
| | $ pygmentize -O style=native -g -f terminal256 person.rb | less -R |
Or, with your alias, use this:
| | $ colorize person.rb | less -R |
This lets you use all of less’s features to navigate through the code, including its search feature.
Keeping a Log with jrnl
Keeping a log of what you worked on throughout the day will help you identify where you’re spending your time and help you see your accomplishments. If you make this a habit, you can use it as a reference when your boss inevitably asks you what you worked on all quarter. In addition, taking some time to reflect on the work you’ve done at the end of your day can help you collect your thoughts and prepare for the future. jrnl[30] lets you keep a journal of your thoughts right from your terminal and lets you query your entries for search terms and tags.
jrnl is written in Python. On Ubuntu, install it with pip:
| | $ pip3 install jrnl |
If you want to be able to create encrypted journals, install jrnl like this:
| | $ pip3 install --upgrade keyrings.alt |
| | $ pip3 install jrnl[encrypted] |
The first command ensures that the keyrings.alt library is up to date. The second installs jrnl with support for encryption.
On macOS, you should install jrnl with Homebrew instead. This method installs encrypted journal support too:
| | $ brew install jrnl |
Now that jrnl is installed, you can create your first journal entry. Create an entry like this:
| | $ jrnl Set up my first journal |
Since this is the first journal entry, jrnl asks you where you’d like to save your journal and if you want to encrypt its contents:
| | Path to your journal file (leave blank for ~/journal.txt): |
| | |
| | Enter password for journal (leave blank for no encryption): |
| | [Journal created at /home/brian/journal.txt] |
| | [Entry added to default journal] |
Make another journal entry with some more context:
| | $ jrnl This is a short title. This is a note that goes with the journal entry. |
This creates a note with a short title, followed by some additional notes. jrnl uses sentence-ending punctuation to separate the journal entry from its notes.
Now, view the journal contents for today:
| | $ jrnl -on today |
| | 2019-03-03 22:04 Set up my first journal |
| | |
| | 2019-03-03 22:04 This is a short title. |
| | | This is a note that goes with the journal entry. |
To make modifications to these entries, pass the --edit flag, which opens the journal entries in your text editor. Once you save the changes and exit, the entries update.
If you forgot about a meeting earlier in the week, you can still add an entry for it:
| | $ jrnl last monday at 9am: Meeting with the team. |
To view it, tell jrnl to show you the entries for last Monday:
| | $ jrnl -on "last monday" |
| | 2019-02-18 09:00 Meeting with the team. |
Or view the entries from the beginning of your journal to today using -until:
| | $ jrnl -until today |
| | 2019-02-18 09:00 Meeting with the team. |
| | |
| | 2019-03-03 22:04 Set up my first journal |
| | |
| | 2019-03-03 22:04 This is a short title. |
| | | This is a note that goes with the journal entry. |
In addition, you can use tags to organize your entries so you can find them faster. Just add the @ symbol to a word in your journal entry:
| | $ jrnl last Tuesday at 4pm: Deployed the @awesomeco app to production. |
Then, look for any entries with that tag:
| | $ jrnl -until today @awesomeco |
| | 2019-02-19 16:00 Deployed the @awesomeco app to production. |
Or count the tags:
| | $ jrnl --tags @awesomeco |
| | @awesomeco : 1 |
Finally, you can customize jrnl by editing the file ~/.jrnl_config and modifying the settings. You can even configure it to have multiple journals, like a default journal for work and another one for a diary of your personal thoughts:
| | { |
| | "default_hour": 9, |
| | "linewrap": 79, |
| | "encrypt": false, |
| | "default_minute": 0, |
| | "tagsymbols": "@", |
| | "editor": "nano", |
| | "timeformat": "%Y-%m-%d %H:%M", |
| | "highlight": true, |
| | "journals": { |
| | "default": "~/Dropbox/journal/work.txt", |
| | "diary": "~/Dropbox/journal/diary.txt" |
| | } |
| | } |
That’s just the beginning. You can perform more complex searches, export your journal, and even star items you want to find more quickly.
jrnl reduces the friction in creating a journal of your thoughts that’s portable and searchable. Make using it a habit, and three months from now you’ll be glad you did.
Next, you’ll look at a few tools that make working with external APIs easier.