
Configuring a Network
In Chapter 8, Networking Tools, you will learn how to use some tools to communicate with other computers. You will install the OpenSSH server so you can transfer files, and install a small server so you can test the web server connections. To access those services in your virtual machine from your host OS, you have to let VirtualBox know how to route the traffic.
VirtualBox has a few different networking modes. The default mode, NAT, short for Network Address Translation, works like the router you might have in your home. The operating system in the virtual machine can access the outside network by forwarding the requests to the host operating system, just like how your home router lets you use a single Internet connection across all of your devices. The downside with this approach is that you can’t access any services running inside of the virtual machine from the host OS unless you configure port forwarding. This is doable, but you can make things easier on yourself by using VirtualBox’s “Host-only” networking option to create a private network between the host machine running VirtualBox and the guest machine running inside of VirtualBox.
First, go to the File menu and select the Host Network Manager tab. Double-click the network listed and set the IPv4 address to 192.168.99.1. If you have a different value in this box, change it to this new value so you can follow along with the rest of the book. And if there’s no network defined, press the Create button to add one as shown in the first figure.
The 192.168. address range is reserved for small private networks, which is exactly what we’re creating here. You’ll learn more about this in Chapter 8, Networking Tools.

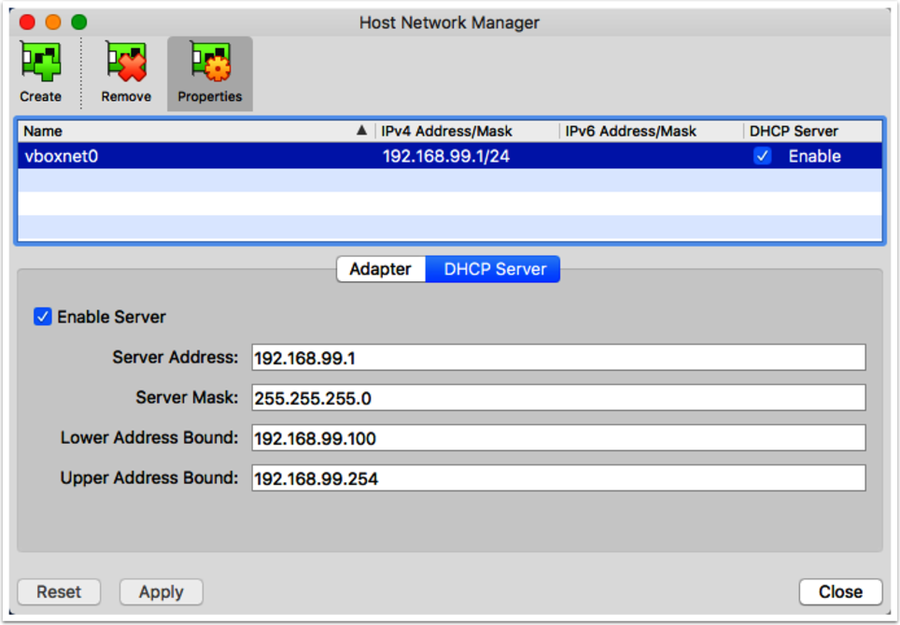
Next, select the DHCP tab. The DHCP tab configures how VirtualBox assigns IP addresses to guests on this private network. Ensure the DHCP server is enabled and set the DHCP Server address to 192.168.99.1. Ensure the Subnet Mask is 255.255.255.0. Then set the Lower Address Bound to 192.168.99.100 and the Upper Address Bound to 192.168.99.254. As shown in the second figure.
Press Apply to save the changes. Then press Close to close the window.
Now you can configure your virtual machine to use this new network. Select your Ubuntu virtual machine in the main VirtualBox window, click the Settings icon, and select the Network tab. You’ll see that Adapter 1 is enabled and configured to use NAT for its network type. Leave this setting alone, as this is what allows your guest machine to access the Internet.
Instead, select the Adapter 2 tab and check the box to enable the adapter. Then choose Host-only Adapter for the type. Your configuration should look like this:

Press OK to configure the machine.
These settings ensure that you’ll be able to access your guest operating system from your host operating system, and vice-versa.
You now have a virtual computer configured, but it won’t do much until you install your operating system. Let’s do that now.