
Chapter 4: Node JavaScript
Writing JavaScript for Node.JS and the browser is a remarkably different experience. Node.JS takes the basic language, and just like browsers did, adds different APIs on top of it to ensure writing code that’s meant to power networked applications feels as natural as possible.
Throughout this chapter you will examine certain APIs that are not part of the language as it was conceived in its specification, but that both Node and browsers have. But more importantly, you will also go through the core Node.JS additions that are considered, as the title of this chapter implies, “Node JavaScript.”
The first difference you’ll look at pertains to the global object.
The global object
In the browser, window is the global object. Anything that you define in window becomes available to all parts of your code. For example, setTimeout is in reality window., and
setTimeoutdocument is window.document.
Node has two similar objects that provide a cleaner separation:
• global: Just like window, any property attached to global becomes a variable you can access anywhere.
• process: Everything that pertains to the global context of execution is in the process object. In the browser, there’s only one window, and in Node, there’s only one process at any given time. As an example, in the browser, the window name is window.name, and in Node, the name of the process is process.title.
Later chapters dig deeper into the process object because it provides broad and interesting functionality, especially pertaining to command-line programs.
Useful globals
Some functions and utilities available in the browser are not part of the language specification but rather are useful things that browsers added on top, which today are generally considered to be JavaScript. These are often exposed as globals.
For example, setTimeout is not part of ECMAScript, but a function that browsers deemed important to implement. As a matter of fact, even if you tried, you wouldn’t be able to rewrite that function in pure JavaScript.
Other APIs are in the process of being introduced to the language (and are at the proposal stage), but Node.JS adds them because they’re needed for us to write our programs effectively. An example of this is a the setImmediate API, which in Node.JS it finds its equivalent in process.nextTick
This function allows you to schedule the execution of a function at the next iteration of the event loop:
console.log(1);
process.nextTick(function () {
console.log(3);
});
console.log(2);
Imagine it as something similar to setTimeout(fn, 1) or “call this function in the most immediate future in an asynchronous way.” You can then understand why the previous example will output the numbers in the order 1, 2, 3.
A similar example is console, which was originally implemented by Firebug, the Firefox plugin to aid development. As a result, Node includes a global console object with useful methods, such as console.log and console.error.
The module system
JavaScript, in its pure form, is a world of globals. All the APIs that are normally used in the browser setTimeout, document, and so on are globally defined.
When you include third-party modules, the expectation is that they also expose a global variable (or many). For example, when you include <script src=”http://code.jquery.com/jquery-1.6.0.js”> in an HTML document, you later refer to this module through the global jQuery object:
<script>
jQuery(function () {
alert(‘hello world!’);
});
</script>
The fundamental reason for this is that in its specification, JavaScript doesn’t describe an API for module dependency and isolation. As a result, including multiple “modules” in this way results in a pollution of the global namespace and potential naming collisions.
Node ships with a lot of useful modules that are the fundamental toolkit for building out modern applications; they include http, net, fs, and many more. And as you saw in Chapter 1, “The Setup,” especially with the help of NPM, you can easily install hundreds more.
Instead of defining a number of globals (or evaluating a lot of code that you might not use), Node decided to introduce a simple yet extremely powerful module system, the roots of which are three globals: require, module, and exports.
Absolute and relative modules
I use the term absolute modules for the ones that Node finds by internally inspecting the node_modules directory, or modules that Node ships within its core, like fs.
As you saw in Chapter 1, if you have a colors module installed, its path becomes ./node_modules/colors.
Therefore, you can require that module by its name without pointing to any directory:
require(‘colors’)
This particular module alters String.prototype, so it doesn’t export an API. The fs module, however, exports a number of functions that you can leverage:
var fs = require(‘fs’);
fs.readFile(‘/some/file’, function (err, contents) {
if (!err) console.log(contents);
});
Modules can also leverage the module system internally, to produce code with a clean separation of APIs and abstractions. But instead of having to declare each part of a certain module or app as a separate module with its own package.json file, you can leverage what I’ll call relative modules.
Relative modules point require to a JavaScript file relative to the working directory. To illustrate, create two files named module_a.js and module_b.js and a third file named main.js, all in the same directory
module_a.js
console.log(‘this is a’);
module_b.js
console.log(‘this is b’);
main.js
require(‘module_a’);
require(‘module_b’);
Then run main (see Figure 4-1):
$ node main
As you can see in Figure 4-1, Node is unable to find module_a or module_b. The reason is that they weren’t installed with NPM, they’re not in a node_modules directory, and Node most certainly doesn’t ship with them.
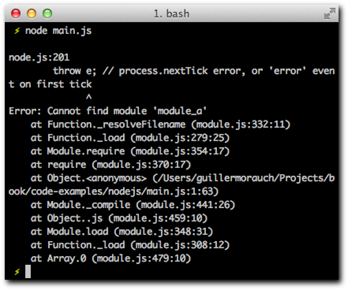
Figure 4-1: Error shown when trying to require module_a, which can’t be found
What you need to do for this example to run is to prepend ./ to the require parameters:
main.js
require(‘./module_a’)
require(‘./module_b’)
Now run this example again (see Figure 4-2).
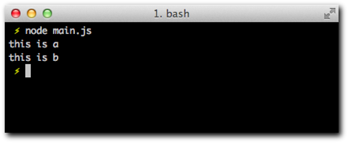
Figure 4-2: Module requirements are executed successfully
Success! The two modules execute. Next, I describe how you can make these modules expose APIs that you can assign to a variable when you call require.
Exposing APIs
For a module to expose an API that’s expressed as the return value of a require call, two globals, module and exports ,come into play.
By default, each module exports an empty object {}. If you want to add properties to it, you can simply reference exports:
module_a.js
exports.name = ‘john’;
exports.data = ‘this is some data’;
var privateVariable = 5;
exports.getPrivate = function () {
return privateVariable;
};
Now test it out (see Figure 4-3):
index.js
var a = require(‘./module_a’);
console.log(a.name);
console.log(a.data);
console.log(a.getPrivate());

Figure 4-3: Showing the values exposed by the API of module_a
In this case, exports happens to be a reference to module.exports, which is an object by default. If setting individual keys in this object is not enough, you can also override module.exports completely. This is a common use case for modules that export constructors (see Figure 4-4):
person.js
module.exports = Person;
function Person (name) {
this.name = name;
};
Person.prototype.talk = function () {
console.log(‘my name is’, this.name);
};
index.js
var Person = require(‘./person’);
var john = new Person(‘john’);
john.talk();
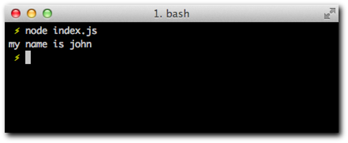
Figure 4-4: OOP-style JavaScript with Node.JS modules example
As you can see, in this index you no longer receive an Object as the return value, but a Function, thanks to overriding module.exports.
Events
One of the fundamental APIs in Node.JS is the EventEmitter. In both Node and browser JavaScript, a lot of the code depends on events you listen on or events you emit:
window.addEventListener(‘load’, function () {
alert(‘Window is loaded!’);
});
The DOM APIs in the browser that deal with events are mainly addEventListener, removeEventListener, and dispatchEvent. They are present on a number of different objects, from a window to an XMLHTTPRequest.
The following example makes an AJAX request (in modern browsers) and listens on the stateChange to know when data is ready:
var ajax = new XMLHTTPRequest
ajax.addEventListener(‘stateChange’, function () {
if (ajax.readyState == 4 && ajax.responseText) {
alert(‘we got some data: ‘ + ajax.responseText);
}
});
ajax.open(‘GET’, ‘/my-page’);
ajax.send(null);
In Node, you also listen to and emit events everywhere. Node therefore exposes the Event API that defines
Emitteron, emit, and removeListener methods. It’s exposed as process.EventEmitter:
eventemitter/index.js
var EventEmitter = require(‘events’).EventEmitter
, a = new EventEmitter;
a.on(‘event’, function () {
console.log(‘event called’);
});
a.emit(‘event’);
This API a lot less verbose than the DOM equivalent, and Node uses it internally and lets you easily add it to your own classes:
var EventEmitter = process.EventEmitter
, MyClass = function (){};
MyClass.prototype._proto__ = EventEmitter.prototype;
Therefore, all the instances of MyClass have encapsulated events support:
var a = new MyClass;
a.on(‘some event’, function () {
// do something
});
Events are central to Node’s non-blocking design. Since Node usually doesn’t “respond right away” with data (because that would imply blocking the thread while waiting on a resource), it usually emits events with data instead.
As an example, consider an HTTP server again. When Node fires the callback with an incoming request, all its data might not be immediately available. This is the case for example for POST requests (that is, the user submitting a form).
When the user submits a form, you normally listen on the data and end events of a request:
http.Server(function (req, res) {
var buf = ‘’;
req.on(‘data’, function (data) {
buf += data;
});
req.on(‘end’, function () {
console.log(‘All the data is ready!’);
});
});
This is a common use-case in Node.JS: you “buffer” the contents of the request (data event), and then you can do something with it when you’re sure all the data has been received (end event).
In order for Node to let you know that a request has hit the server as soon as possible, regardless of whether all its data is present or not, it needs to rely on events. Events in Node are the mechanism by which you get notified of things that haven’t occurred yet, but are bound to occur.
Whether an event will be fired or not depends on the API that implements it. For example, you know that ServerRequest inherits from EventEmitter, and now you also know that it emits data and end events.
Certain APIs emit error events, which might or might not happen at all. There are events that only fire once (like end), or others that could fire more than once (like data). Some APIs only emit a certain event when certain conditions are met. For example, after a certain event happens some other event might be guaranteed not to be fired again. In the case for an HTTP request, you fully expect no data events to happen after an end event. Otherwise, your app would malfunction.
Similarly, sometimes for the use case of your application you only care about registering a callback for an event only once, regardless if it fires again in the future. Node provides a shortcut method for this:
a.once(‘an event’, function () {
// this function will be called only once, even if the event is triggered again
});
To understand what type of events are available and what their contracts (the “rules” the given API defines for triggering them) are, you usually refer to the API documentation of the given module. Throughout the book you’ll learn the core Node module APIs and some of the most important events, but always keeping the API handy will be a very helpful habit.
Buffers
Another deficiency in the language that Node makes up for, besides modules, is handling of binary data.
Buffer is a global object that represents a fixed memory allocation (that is, the number of bytes that are put aside for a buffer have to be known in advance), which behaves like an array of octets, effectively letting you represent binary data in JavaScript.
A part of its functionality is the capability to convert data between encodings. For example, you can create a buffer from the base64 representation of an image and then write it down to a file as a binary PNG that can actually be used:
buffers/index.js
var mybuffer = new Buffer(‘==ii1j2i3h1i23h’, ‘base64’):
console.log(mybuffer);
require(‘fs’).writeFile(‘logo.png’, mybufffer);
For those not familiar with base64, it’s essentially a way of writing binary data with only ASCII characters. In other words, it allows you to represent something as complex as an image in simple English characters (therefore taking up a lot more hard drive space).
Most of the Node.JS APIs that do data IO take and export data as buffers. In this example, the writeFile API from the filesystem module takes a buffer as a parameter to write out the file logo.gif.
Run it and open the file (see Figure 4-5).
$ node index
$ open logo.png
As you can see as the result of the console.log call with the Buffer object, it’s a simple interface to the raw bytes that make up an image.
Figure 4-5: The GIF file created from the buffer base64
representation in the script showing the Node.JS logo
Summary
You have now looked at the major differences between the JavaScript you write for the browser and the one you write for Node.JS.
You have a basic grasp of the APIs that Node added for patterns that are extremely common in day-to-day JavaScript but absent from the main language specification, such as timers, events, binary data, and modules.
You know the equivalent of window in Node world, and that you can leverage existing developer utilities like console.