
Chapter 7: HTTP
Hypertext Transfer protocol, or HTTP, is the protocol that powers the web, and, as discussed in Chapter 6, it sits on top of the TCP stack,
Throughout this chapter you’ll learn how to leverage the Node.JS Server and Client APIs. Both are really easy to use to get started, but you’ll also learn some of the shortcomings that come up when building actual websites and web applications with them. For that, in the coming chapters I will introduce you to abstractions that sit on the HTTP server to introduce reusable components.
Keep in mind that since you’re programming both the server and the website as part of the same code, every time you make changes with your text editor to code that’s running, you need to restart the Node process that powers it to have the changes reflect. At the end of this chapter I’ll teach you how to leverage a tool to make this process straightforward.
To get started, let’s review the anatomy of the HTTP protocol.
The structure of HTTP
The protocol is structured around the concept of requests and responses, materialized in Node.JS as objects of the http.ServerRequest and http.ServerResponse constructors, respectively.
When a user first browses to a website, the user agent (the browser) creates a request that gets sent to the web server over TCP, and a response is emitted.
What do requests and responses look like? To find out, first create a Hello World Node HTTP server that listens on http://localhost:3000:
require(‘http’).createServer(function (req, res) {
res.writeHead(200);
res.end(‘Hello World’);
}).listen(3000);
Next, establish a telnet connection and write your own request:
GET / HTTP/1.1
After typing GET / HTTP/1.1, press Enter twice.
The response, illustrated in Figure 7-1, comes in right afterward!
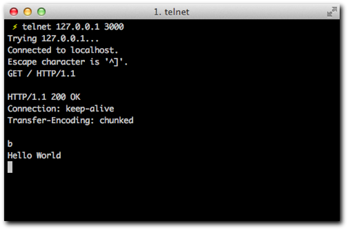
Figure 7-1: The response produced by our HTTP server.
The response text looks like this:
HTTP/1.1 200 OK
Connection: keep-alive
Transfer-Encoding: chunked
b
Hello World
0
The first relevant section of this response is the headers, which you’ll read about next.
Headers
As you can see, HTTP is a protocol in the same fashion as IRC. Its purpose is to enable the exchange of documents. It utilizes headers that precede both requests and responses to describe different aspects of the communication and the content.
As an example, think of the different types of content that web pages deliver: text, HTML, XML, JSON, PNG and JPEG images, and a large number of other possibilities.
The type of content that’s sent is annotated by the famous Content-Type header.
Look at how this applies in practice. Bring back hello world, but this time add some HTML in there:
require(‘http’).createServer(function (req, res) {
res.writeHead(200);
res.end(‘Hello <b>World</b>’);
}).listen(3000);
Notice that the word World is surrounded by bold tags. You can check it out with the rudimentary TCP client again (see Figure 7-2).

Figure 7-2: The Hello <b>World</b> response
The response is just what you might expect:
GET / HTTP/1.1
HTTP/1.1 200 OK
Connection: keep-alive
Transfer-Encoding: chunked
12
Hello <b>World</b>
0
Now, however, see what happens when you look at it with a browser (see Figure 7-3).
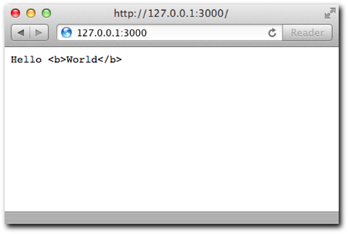
Figure 7-3: The browser shows the response as plain text.
That doesn’t look like rich text, but why?
As it occurs, the HTTP client (the browser) doesn’t know what type of content you’re sending because you didn’t include that as part of your communication. The browser therefore considers what you’re seeing as content type text/plain, or normal plain text, and doesn’t try to render it as HTML.
If you adjust the code to include the appropriate header, you fix the problem (see Figure 7-4):
require(‘http’).createServer(function (req, res) {
res.writeHead(200, { ‘Content-Type’: ‘text/html’ });
res.end(‘Hello <b>World</b>’);
}).listen(3000);
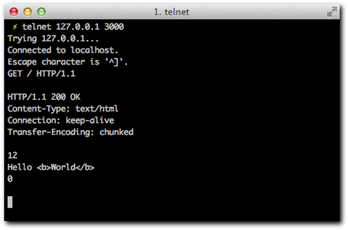
Figure 7-4: The response, this time with the additional header.
The response text is as follows:
HTTP/1.1 200 OK
Content-Type: text/html
Connection: keep-alive
Transfer-Encoding: chunked
12
Hello <b>World</b>
0
Notice the header is included as part of the response text. The same response is parsed out by the browser (see Figure 7-5), which now renders the HTML correctly.
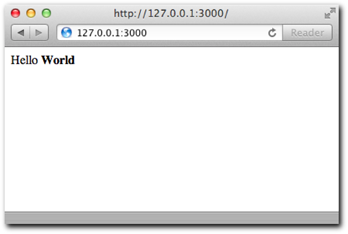
Figure 7-5: The browser now shows the word World in bold rich text.
Notice that despite having specified a header with the writeHead API call, Node still includes two other headers: Transfer-Encoding and Connection.
The default value for the Transfer-Encoding header is chunked. The main reason for this is that due to Node asynchronous nature, it’s not rare for a response to be created progressively.
Consider the following example:
require(‘http’).createServer(function (req, res) {
res.writeHead(200);
res.write(‘Hello’);
setTimeout(function () {
res.end(‘World’);
}, 500);
}).listen(3000);
Notice that you can send data as part of multiple write calls, before you call end. In the spirit of trying to respond as fast as possible to clients, by the time the first write is called, Node can already send all the response headers and the first chunk of data (Hello).
Later on, when the setTimeout callback is fired, another chunk can be written. Since this time around you use end instead of write, Node finishes the response and no further writes are allowed.
Another instance where writing in chunks is very efficient is when the file system is involved. It’s not uncommon for web servers to serve files like images that are somewhere in the hard drive. Since Node can write a response in chunks, and also allows us to read a file in chunks, you can leverage the ReadStream filesystem APIs for this purpose.
The following example reads the image image.png and serves it with the right Content-Type header:
require(‘http’).createServer(function (req, res) {
res.writeHead(200, { ‘Content-Type’: ‘image/png’);
var stream = require(‘fs’).createReadStream(‘image.png’);
stream.on(‘data’, function (data) {
res.write(data);
});
stream.on(‘end’, function () {
res.end();
});
}).listen(3000);
By writing the image as a series of chunks, you ensure:
• Efficient memory allocation. If you read the image completely for each request prior to writing it (by leveraging fs.readFile), you’d probably end up using more memory over time when handlings lots of requests.
• You write data as soon as it becomes available to you.
In addition, notice that what you’re doing is piping one Stream (an FS one) onto another (an http.ServerResponse object). As I’ve mentioned before, streams are a very important abstraction in Node.JS. Piping streams is a very common action, so Node.JS offers a method to make the above example very succinct:
require(‘http’).createServer(function (req, res) {
res.writeHead(200, { ‘Content-Type’: ‘image/png’);
require(‘fs’).createReadStream(‘image.png’).pipe(res);
}).listen(3000);
Now that you understand why Node defaults to a chunked transfer encoding, let’s talk about connections.
Connections
If you compare your TCP server implementation and your HTTP server implementation side by side, you might notice they’re similar. In both cases, you call createServer, and in both cases, you get a callback when a client connects.
A fundamental difference, however, is the type of object you get in that callback. In the case of the net server, you get a connection, and in the case of an HTTP server, you get request and response objects.
The reason for this is two-fold. First, the HTTP server is a higher-level API that gives you tools to handle the specific set of functionality and behaviors inherent to the HTTP protocol.
For example, look at the headers property of the request object (the req parameter in the example) when a common web browser accesses the server (see Figure 7-6). For this experiment, use console.log on the req.headers property:
require(‘http’).createServer(function (req, res) {
console.log(req.headers);
res.writeHead(200, { ‘Content-Type’: ‘text/html’ });
res.end(‘Hello <b>World</b>’);
}).listen(3000);
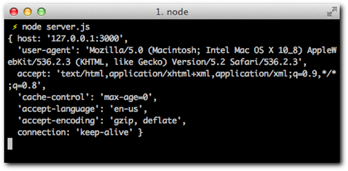
Figure 7-6: The ServerRequest headers property as output by console.log.
Notice that Node does a lot of the heavy work for you. It takes the incoming message by the browser, analyzes it (parses it), and constructs a JavaScript object that you can conveniently use from your scripts. It even makes the headers lowercase so that you don’t have to remember if it was Content-type or Content-Type or Content-TYPE.
The second, even more important reason is that browsers don’t use just a single connection when they access websites. Modern browsers can open up to eight different connections to a same host and send requests over all of them in an effort to make websites load faster.
Node wants to make it easy for you to worry just about requests and not connections. Therefore, even though you can still access the TCP connection through the property req.connection, you are mostly going to get involved with the request and response abstractions here.
By default, Node tells browsers to keep the connection alive and send more requests through it. This is expressed by the keep-alive value of the Connection header you saw previously. Normally this is the desired behavior in the interest of performance (since browsers don’t need to waste time tearing down and restarting new TCP connections), but you can also override this header by passing a different value to the writeHead call, such as Close.
For your next project, you utilize the Node HTTP APIs to perform a real-world task: process a form that the user submits.
A simple web server
Throughout this project you’ll leverage some of the key concepts outlined above, like the Content-Type header.
You’ll also learn how web browsers exchange encoded data as part of form submissions, and how to parse them into JavaScript data structures.
Creating the module
As usual, you start by creating the directory where your project is going to live and a package.json file:
{
“name”: “http-form”
, “description”: “An HTTP server that processes forms”
, “version”: “0.0.1”
}
You test it by running npm install. An empty line should be printed because the project has no dependencies.
Printing out the form
Just as in the Hello <b>World</b> example, you are going to print out some HTML. In this case, you want to represent a form. Place the following contents in your server.js file
require(‘http’).createServer(function (req, res) {
res.writeHead(200, { ‘Content-Type’: ‘text/html’ });
res.end([
‘<form method=”POST” action=”/url”>’
, ‘<h1>My form</h1>’
, ‘<fieldset>’
, ‘<label>Personal information</label>’
, ‘<p>What is your name?</p>’
, ‘<input type=”text” name=”name”>’
, ‘<p><button>Submit</button></p>’
, ‘</form>’
].join(‘’)); }).listen(3000);
Notice that for the sake of syntax clarity, I structured the response text as an array that gets combined into a string with the join method. Otherwise, the example is equivalent to Hello World.
Notice that the <form> contains an endpoint URL /url and a method POST. Also notice that the input the user types has a name of name.
Now you can run the server:
$ node server.js
Next, point the browser, as shown in Figure 7-7, to see the rendered form for the HTML you output:

Figure 7-7: The rendered page for your form should look like this.
You can try pressing Enter. The browser then elaborates a new request (one that contains the data), but because all the code does right now is print out that HTML, the result after pressing Enter should be the same (see Figure 7-8). Type in a name and click Submit.
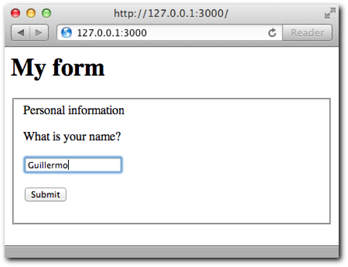
Figure 7-8: An example of the form submission.
As a result of the submission, the URL changes, but the response is constant, as shown in Figure 7-9.
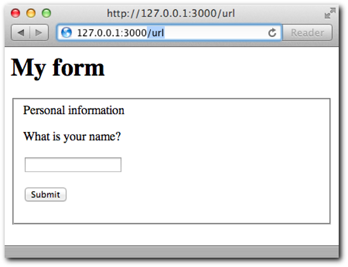
Figure 7-9: Despite the submission, Node will handle the request in the same way,
therefore sending the same HTML again.
In order to have Node treat the submission request differently and produce an appropriate response, you need to learn about inspecting the request method and URL.
Methods and URLs
Obviously, when the user presses Enter, you want to display something different. You want to process the form.
To that end, inspect the url property of the request object. The code for server.js should now look like this:
require(‘http’).createServer(function (req, res) {
if (‘/’ == req.url) {
res.writeHead(200, { ‘Content-Type’: ‘text/html’ });
res.end([
‘<form method=”POST” action=”/url”>’
, ‘<h1>My form</h1>’
, ‘<fieldset>’
, ‘<label>Personal information</label>’
, ‘<p>What is your name?</p>’
, ‘<input type=”text” name=”name”>’
, ‘<p><button>Submit</button></p>’
, ‘</form>’
].join(‘’));
} else if (‘/url’ == req.url) {
res.writeHead(200, { ‘Content-Type’: ‘text/html’ });
res.end(‘You sent a <em>’ + req.method + ‘</em> request’);
}
}).listen(3000);
If you go to the / URL, as shown in Figure 7-10, nothing changes.

Figure 7-10: The request handler still shows the same HTML when we go to the URL.
If you type in /url, you see something like Figure 7-11. The supplied URL matches the req.url in the else if clause, and the appropriate response is produced.
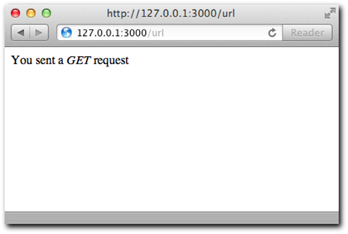
Figure 7-11: What you see when you go to /url as a result of req.url changing.
However, when you enter your name through the form, you see a message like that in Figure 7-12. The reason for this is that browsers will send the form data in the HTTP method specified in the action attribute of the <form> tag. The req.method value will be POST in this case, thus producing what you see in Figure 7-12.
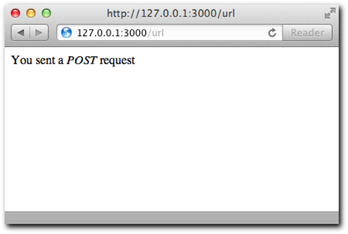
Figure 7-12: In this case req.method is POST.
As you can see, you’re dealing with two different variables of the request: the URL and the method.
Node.JS puts in the url property everything that follows the hostname. If you navigate
to http://myhost.com/url?this+is+a+long+url, the contents of url are /url?this+is+a+long+url.
The reigning protocol of the web, HTTP/1.1 (as you may remember from the telnet example in Chapter 6), establishes different methods for a request:
• GET (the default)
• POST
• PUT
• DELETE
• PATCH (the newest)
The idea behind this is that an HTTP client picks a method to alter a resource on a server, which is located by its URL, with certain data as the body of the request.
Data
When you sent HTML, you had to define a Content-Type along with the body of your response.
Symmetrically to a response, a request can also contain a Content-Type and body of data.
To process forms effectively, you absolutely need these two pieces of information. Just like the browser doesn’t know if the Hello World is going to be HTML or plain text unless you explicitly indicate so, how do you know if the user is sending her name in JSON, XML, or plain text? The code for server.js should look like this now:
require(‘http’).createServer(function (req, res) {
if (‘/’ == req.url) {
res.writeHead(200, { ‘Content-Type’: ‘text/html’ });
res.end([
‘<form method=”POST” action=”/url”>’
, ‘<h1>My form</h1>’
, ‘<fieldset>’
, ‘<label>Personal information</label>’
, ‘<p>What is your name?</p>’
, ‘<input type=”text” name=”name”>’
, ‘<p><button>Submit</button></p>’
, ‘</form>’
].join(‘’));
} else if (‘/url’ == req.url && ‘POST’ == req.method) {
var body = ‘’;
req.on(‘data’, function (chunk) {
body += chunk;
});
req.on(‘end’, function () {
res.writeHead(200, { ‘Content-Type’: ‘text/html’ });
res.end(‘<p>Content-Type: ‘ + req.headers[‘content-type’] + ‘</p>’
+ ‘<p>Data:</p><pre>’ + body + ‘</pre>’);
});
}
}).listen(3000);
What is going on here? You are listening to the data and end events. You create a body string that gets populated with different chunks, and then you consider that you have all the data only after the end events fires and not before.
The reason for this is that Node.JS allows you to process the data as it comes to the server. Because data can come in different TCP packets, it’s entirely possible that in real-world usage, you get a piece of the data first and sometime later you get the remainder.
Submit the form again and take a look at the response in Figure 7-13.
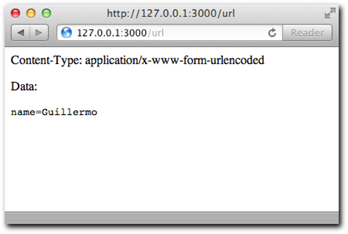
Figure 7-13: In this example you output the Content-Type and request
data back to the page.
For example, when you search on Google, the URL can look like that in Figure 7-14.

Figure 7-14: The highlighted part in the URL when a search is performed is q=<search term>.
Notice the fragment for the search in the URL gets encoded in the same way the form contents do. That’s why the Content-Type in this case is called urlencoded.
This particular fragment of URLs is also known as the query string.
Node.JS provides a module called querystring that makes it easy to parse those strings into data you can easily access in the same way it does with headers. Create a file qs-example.js with the following contents and run it (see Figure 7-15).
console.log(require(‘querystring’).parse(‘name=Guillermo’)); console.log(require(‘querystring’).parse(‘q=guillermo+rauch’));
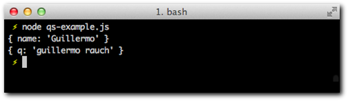
Figure 7-15: The output for the parse function calls.
As you can see, the querystring module is capable of taking a string and producing an Object data-structure from it. This parsing process is homologous to Node taking the headers from the HTTP request data and producing the headers object you can easily access.
You’ll leverage the query string module to easily access the form field that’s submitted with the form.
Putting the pieces together
You’re now ready to parse the incoming body data and display it to the user. server.js should now have the following contents. Notice that in the end request event we now run the body through the querystring parse module, you get the name key from the produced Object and output it back to the user. Keep in mind that name matches the name attribute of the <input> tag defined in the HTML you first output. The server.js code now looks as follows:
var qs = require(‘querystring’);
require(‘http’).createServer(function (req, res) {
if (‘/’ == req.url) {
res.writeHead(200, { ‘Content-Type’: ‘text/html’ });
res.end([
‘<form method=”POST” action=”/url”>’
, ‘<h1>My form</h1>’
, ‘<fieldset>’
, ‘<label>Personal information</label>’
, ‘<p>What is your name?</p>’
, ‘<input type=”text” name=”name”>’
, ‘<p><button>Submit</button></p>’
, ‘</form>’
].join(‘’));
} else if (‘/url’ == req.url && ‘POST’ == req.method) {
var body = ‘’;
req.on(‘data’, function (chunk) {
body += chunk;
});
req.on(‘end’, function () {
res.writeHead(200, { ‘Content-Type’: ‘text/html’ });
res.end(‘<p>Your name is <b>’ + qs.parse(body).name + ‘</b></p>’);
});
}
}).listen(3000);
You point the browser and voila! (See Figure 7-16.)
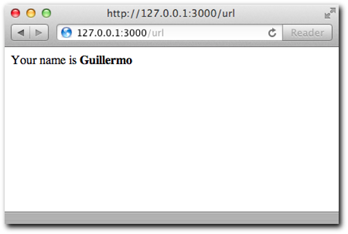
Figure 7-16: The name field that you see
Bullet-proofing
A problem still exists in the preceding example: what happens if no URL is matched by your conditional statements?
If you try going to the URL /test, you see that the server never responds, and the user agent (browser) just hangs.
To solve this problem, you can send back the status code 404 (Not Found) if the server doesn’t know how to treat the request. Notice that in server.js you add an else clause that calls writeHead with the 404 status code:
var qs = require(‘querystring’);
require(‘http’).createServer(function (req, res) {
if (‘/’ == req.url) {
res.writeHead(200, { ‘Content-Type’: ‘text/html’ });
res.end([
‘<form method=”POST” action=”/url”>’
, ‘<h1>My form</h1>’
, ‘<fieldset>’
, ‘<label>Personal information</label>’
, ‘<p>What is your name?</p>’
, ‘<input type=”text” name=”name”>’
, ‘<p><button>Submit</button></p>’
, ‘</form>’
].join(‘’));
} else if (‘/url’ == req.url && ‘POST’ == req.method) {
var body = ‘’;
req.on(‘data’, function (chunk) {
body += chunk;
});
req.on(‘end’, function () {
res.writeHead(200, { ‘Content-Type’: ‘text/html’ });
res.end(‘<p>Your name is <b>’ + qs.parse(body).name + ‘</b></p>’);
});
} else {
res.writeHead(404);
res.end(‘Not Found’);
}
}).listen(3000);
You can now consider your first HTTP web server complete! The code is not as clean as it could be, but you’ll learn the right way to write more complex HTTP servers in the coming chapters.
Moving on, you’ll learn the counterpart of the Server API: the HTTP Client.
A twitter web client
The importance of learning how to make requests to other web servers from Node.JS cannot be overstated.
HTTP has become a protocol not just for exchanging markup that’s meant to be rendered and presented to the user (thanks to HTML), but also a fundamental way of transmitting data between servers in different networks. JSON is quickly becoming the de-facto standard data format for this, which puts Node.JS in a very good position to establish its server-side dominance, as the notation was born out of the JavaScript object literal syntax.
For this example, you’ll learn how to query the Twitter API, get some JSON, which you’ll decode into a data structure that you can loop over and produce a human-readable terminal output form.
Creating the module
As usual, you start by creating the directory where your project is going to live and a package.json file:
{
“name”: “tweet-client”
, “description”: “An HTTP tweets client”
, “version”: “0.0.1”
}
Making a simple HTTP request
Analogous to the TCP client you created, and not by coincidence, you instantiate a Client object with a static method on the http module called request.
To get familiar with it, bring back the typical HTTP server:
require(‘http’).createServer(function (req, res) {
res.writeHead(200);
res.end(‘Hello World’);
}).listen(3000);
Then write a client that gets the response and prints it out in colors to the console:
require(‘http’).request({
host: ‘127.0.0.1’
, port: 3000
, url: ‘/’
, method: ‘GET’
}, function (res) {
var body = ‘’;
res.setEncoding(‘utf8’);
res.on(‘data’, function (chunk) {
body += chunk;
});
res.on(‘end’, function () {
console.log(‘
We got: �33[96m’ + body + ‘�33[39m
’);
});
}).end();
The first thing you do is call the request method. This initializes a new http.Client object.
Request
Notice that you collect the body in chunks in the same way you did for the requests sent from the web browser in the server section of this chapter. The remote server you’re connecting to might respond in different data chunks that you need to put together to get a complete response. It might happen that all the data comes in one data event, but you can’t really know.
Therefore, you listen on the end event to, in this case, log the body to the console.
In addition, you also set the default encoding on the response object to utf8 with setEncoding, because all you want to print to the console is text. As an example, if you try to download a PNG image with the client, trying to print it as a utf8 string would not be ideal.
Now run the server and then the client (see Figure 7-17):
$ node client
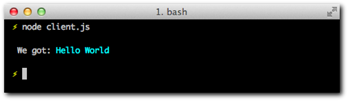
Figure 7-17: The response from our Hello World server is displayed after the client
successfully requests it.
Next, you’ll learn how to also send data along with your request.
Sending a body of data
Notice that after you call request in the preceding example, you also have to call end.
The reason for this is that after you create a request, you can continue to interact with the request object prior to sending it to the server.
And an example of that is if you want to send data to the server, as you see in the next example.
Remember the form you created in the browser? Reproduce that here, but this time for the client, use Node, and for the <form>, use stdin, incorporating the knowledge you learned in Chapter 5.
The server processes the form:
var qs = require(‘querystring’);
require(‘http’).createServer(function (req, res) {
var body = ‘’;
req.on(‘data’, function (chunk) {
body += chunk;
});
req.on(‘end’, function () {
res.writeHead(200);
res.end(‘Done’);
console.log(‘
got name �33[90m’ + qs.parse(body).name + ‘�33[39m
’);
});
}).listen(3000);
The client does the opposite. By using the stringify method of the querystring module, you can turn an object into a urlencoded body of data:
var http = require(‘http’)
, qs = require(‘querystring’)
function send (theName) {
http.request({
host: ‘127.0.0.1’ , port: 3000
, url: ‘/’
, method: ‘POST’
}, function (res) {
res.setEncoding(‘utf8’);
res.on(‘end’, function () {
console.log(‘
�33[90m request complete!�33[39m’);
process.stdout.write(‘
  your name: ‘);
});
}).end(qs.stringify({ name: theName }));
}
process.stdout.write(‘
  your name: ‘);
process.stdin.resume(); process.stdin.setEncoding(‘utf-8’);
process.stdin.on(‘data’, function (name) {
  send(name.replace(‘
’, ‘’));
});
Notice that data is passed to the end method, in the same way you do when you create a response in the server.
In this case, don’t worry about the chunks of data that you can get from the server. You simply know that when end is called, you can print the text request complete and ask the user again for data.
Figure 7-18 shows the action side by side. On the left, the server is showing the name that’s submitted with the form on the left through stdin.
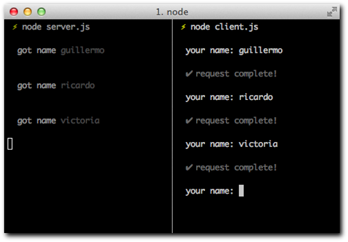
Figure 7-18: When prompted on the right for name, I typed one in and pressed enter,
which is correctly processed by the server on the left.
Now that you learned how to send data along with a request, you have seen almost the full extent of the request API. Let’s continue with our main goal!
Getting tweets
Now you’re ready for some real real-world HTTP! Create a command called tweets that takes a search argument and displays the latest tweets about that given topic.
If you look at the documentation for the public search API for Twitter, you can see that URLs look like this: http://search.twitter.com/search.json?q=blue+angels.
And the result looks like this (notice I cut it short at the end)
{
“completed_in”:0.031,
“max_id”:122078461840982016,
“max_id_str”:”122078461840982016”,
“next_page”:”?page=2&max_id=122078461840982016&q=blue%20angels&rpp=5”,
“page”:1,
“query”:”blue+angels”,
“refresh_url”:”?since_id=122078461840982016&q=blue%20angels”,
“results”:[ {
// …
Once again, the usual suspects: the search term is urlencoded (q=blue+angels), and the result is JSON. The tweets are in the results array in the object that forms the response.
Because you’re producing a command that takes an argument, like you saw in Chapter 5, you want to access argv. With the querystring module, you produce the URL and then obtain the response data. The method to access the resource is obviously GET and the port 80, both of which are defaults you can skip (for the sake of clarity in this first HTTP client example, I still included the GET option).
var qs = require(‘querystring’)
, http = require(‘http’)
var search = process.argv.slice(2).join(‘ ‘).trim()
if (!search.length) {
  return console.log(‘
  Usage: node tweets <search term>
’);
}
console.log(‘
searching for: �33[96m’ + search + ‘�33[39m
’);
http.request({
host: ‘search.twitter.com’
, path: ‘/search.json?’ + qs.stringify({ q: search })
}, function (res) {
var body = ‘’;
res.setEncoding(‘utf8’);
res.on(‘data’, function (chunk) {
body += chunk;
});
res.on(‘end’, function () {
var obj = JSON.parse(body);
obj.results.forEach(function (tweet) {
console.log(‘ �33[90m’ + tweet.text + ‘�33[39m’);
console.log(‘ �33[94m’ + tweet.from_user + ‘�33[39m’);
console.log(‘--’);
});
});
}).end()
When you execute it, it will validate the processs.argv array to know if you have a search term (see Figure 7-19), and output help text otherwise.
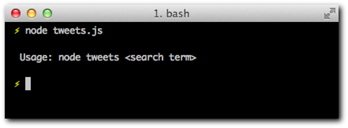
Figure 7-19: The command being run without a search term.
When you supply arguments, the search is executed, as shown in Figure 7-20. Twitter responds with JSON, which is looped over after being parsed in the end event handler, and output back to the user.
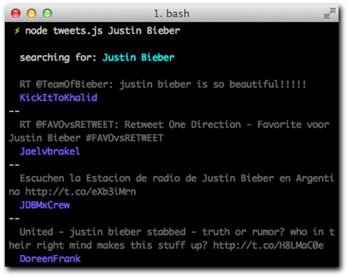
Figure 7-20: In this case I searched for Justin Bieber, and some interesting tweets come back.
So far you’ve been using the http.request pretty extensively. You’ve mostly made GET requests, which one could say are the most common. Web services usually expose more GET endpoints than POST or PUT. Sending data (a request body) along with a request is also fairly uncommon.
Node.JS tries to make the most common use case for requests easy by exposing request.get. The Twitter API call (with http.request) could be rewritten like this:
http.get({
host: ‘search.twitter.com’
, path: ‘/search.json?’ + qs.stringify({ q: search })
}, function (res) {
var body = ‘’;
res.setEncoding(‘utf8’);
res.on(‘data’, function (chunk) {
body += chunk;
});
res.on(‘end’, function () {
var obj = JSON.parse(body);
obj.results.forEach(function (tweet) {
console.log(‘ �33[90m’ + tweet.text + ‘�33[39m’);
console.log(‘ �33[94m’ + tweet.from_user + ‘�33[39m’);
console.log(‘--’);
});
});
})
The only real difference is that you don’t need to call end, and you make it slightly more explicit that you’re getting data. The API accepts a method parameter, which defaults to GET, so this method provides little extra usefulness.
With this improvement, we’re still repeating ourselves a lot. Next up, I’ll introduce you to a tool called superagent, an API that sits on top of the HTTP Client API to make these workflows easier.
A superagent to the rescue
More often than not, the HTTP clients you create will follow a common pattern: you want to get all the response data, execute a parser based on the Content-Type of the response, and do something with it.
When sending data to the server, the situation is similar. You’ll want to make a POST request, and encode an object as JSON.
A module called superagent solves this by extending the response object with useful additions, some of which I’ll show you next.
The examples in this section use superagent version 0.3.0. Create a new directory and install superagent locally inside:
$ npm install [email protected]
To get the JSON data for a request, provided the server responds with the right Content- that indicates the response contains JSON, superagent will automatically buffer and parse it and place it as
Typeres.body. Create a file called tweet.js with the following contents:
var request = require(‘superagent’);
request.get(‘http://twitter.com/search.json’)
.send({ q: ‘justin bieber’ })
.end(function (res) { console.log(res.body); });
If you run the file, you’ll see the Object that results from decoding the JSON response. You can still access the raw response text b accessing res.text.
Notice that you also didn’t need to encode the query string manually, since superagent knows that if you try to send data with a GET request, that means encoding it as part of the URL as a query string.
To set a header for the request, you can do so by calling set. In the following example I set the Date header with the request:
var request = require(‘superagent’);
request.get(‘http://twitter.com/search.json’)
.send({ q: ‘justin bieber’ })
.set(‘Date, new Date)
.end(function (res) { console.log(res.body); });
Both send and set can be called multiple times, which makes it a progressive API: you can build out the object progressively, and then call end when you’re done.
The simplicity of this API does not stop at GET requests. Similarly, superagent exposes put, post, head, and del methods.
The following example POSTs a JSON-encoded object:
var request = require(‘superagent’);
request.post(‘http://example.com/’)
.send({ json: ‘encoded’ })
.end();
JSON is the default encoding. If you want to change it, simply adjust the Content-Type of the request by calling set.
Reloading HTTP servers with up
By now, you probably already noticed that it can get somewhat annoying to continuously reload a Node process manually in order for a web browser to reflect the changes you make to your servers code with your text editor.
The most naive way to tackle this problem is to simply reload the process every time a code change is detected. This can work well for development, but when you deploy your web servers to production, you probably want to make sure requests that are in-flight (in other words, requests that are in progress at the time you want to reload your code) are not killed along with the old process.
I developed a tool called up to tackle this problem in a very safe and reliable way. For development, simply install the up executable with NPM:
$ npm install –g up
Then, you need to ensure that you structure your code in such a way that you export the Node HTTP Server you want to reload, instead of calling listen. This is because up will call listen for you, and it needs to be able to access the Server instance. For example, create a new directory and place a file server.js with the following contents:
module.exports = require(‘http’).createServer(function (req, res) {
res.writeHead(200, { ‘Content-Type’: ‘text/html’ });
res.end(‘Hello <b>World</b>’);
});
Now cd to that directory, run the server by summoning up and passing the --watch and --port options:
$ up –watch –port 80 server.js
--watch will leverage the appropriate Node APIs to detect changes to any file in the working directory. Try pointing your browser to this server, then editing server.js and changing the Hello <b>World</b> text. As soon as you save the file, refresh your browser, and your changes are reflected immediately!
Summary
You learned a lot about writing HTTP with Node. You started out by understanding the basics of HTTP from the perspective of a protocol that sits on top of TCP.
You took a careful look at the default response Node.JS produces in a Hello World example. You can recognize the default headers, and you understand why they’re there.
You learned the importance of headers in HTTP requests and how to change the default one in server responses. You also have a fundamental understanding of the encoding formats that are normally used to exchange data with browsers, and what tools Node offers to parse incoming data and work with it.
After writing a working web server, you also took a look at the client APIs, which are very useful for web services interoperability in the modern web. After observing the most common use cases, you successfully queried the Twitter API, but it soon became evident that the same code was written over and over again. For that reason you were also introduced to a new API that sits on top of the core Node.JS one to make things easier. The module that’s the focus of the next chapter, Connect, does the same thing for web servers, but there’s a lot more to learn.
Finally, I introduced up, a command-line utility (also available as a JavaScript API) to make the servers you write from now on easier to test as you iterate on the code and make changes to it. Remember: in order to leverage it moving forward, make sure your modules export the http.Server instance returned by createServer.