
Chapter 8: Connect
Node.js provides basic APIs for common network applications. So far, you have looked at the basic APIs for TCP servers and an API for HTTP that builds on top of it.
Most real-world applications, however, perform a series of common tasks that you probably don’t want to re-implement on top of primitive APIs over and over again.
Connect is a toolkit that sits on top of the HTTP server to provide a new way of organizing code that interfaces with request and responses, around units called middleware.
To illustrate the benefits of code reuse through middleware, assume this sample structure for a website:
$ ls website/
index.html images/
Under the images directory, you have four images:
$ ls website/images/
1.jpg 2.jpg 3.jpg 4.jpg
The index.html simply displays the four images, and you want to access the website through http://localhost as in other examples (see Figure 8-1):
<h1>My website</h1>
<img src=”/images/1.jpg”>
<img src=”/images/2.jpg”>
<img src=”/images/3.jpg”>
<img src=“/images/4.jpg“>

Figure 8-1: A simple static website demonstrating Connect’s capabilities
To show the simplicity Connect offers for the world of HTTP applications, this chapter shows how to write this simple website with the native http API and later with the connect API.
A simple website with HTTP
As usual, you start by requiring the http module for the server and the fs module for reading files:
/**
* Module dependencies.
*/
var http = require(‘http’)
, fs = require(‘fs’)
Then you initialize the server and handle the request-response cycles:
/**
* Create the server.
*/
var server = http.createServer(function (req, res) {
// …
});
And finally you listen:
/**
* Listen.
*/
server.listen(3000);
Now back to the createServer callback. You need to check that the URL matches a file in the directory, and if so, read the file and serve it. In the future, you might want to add more images, so you need to make sure it’s dynamic enough to support this capability.
The first step is to check that the method is GET and the URL starts with /images and finishes with .jpg. If the url is ‘/’, you serve index.html (with the shortcut function serve you write later). Otherwise, you send the status 404 Not Found, as follows:
if (‘GET’ == req.method && ‘/images’ == req.url.substr(0, 7)
&& ‘.jpg’ == req.url.substr(-4)) {
// …
} else if (‘GET’ == req.method && ‘/’ == req.url) {
serve(__dirname + ‘/index.html’, ‘text/html’);
} else {
res.writeHead(404);
res.end(‘Not found’);
}
Then you use fs.stat to check that the file exists. You use the Node global constant __dirname to reference the directory where the server lives. After the first “if”, you’d place the next statement.
fs.stat(__dirname + req.url, function (err, stat) {
});
You do not use the synchronous version of fs.stat (fs.statSync). If you did, you would block other requests from being processed while the files are being sought in the disk, which is undesirable for a server to handle high concurrency. For reference, we discussed this in Chapter 3.
If an error occurs, you abort the process and send the HTTP status code 404 to signal that you can’t find the requested image. You also should do this if the stat succeeds but the supplied path is not a file, as shown here. The following snippet goes in the fs.stat callback.
if (err || !stat.isFile()) {
res.writeHead(404);
res.end(‘Not Found’);
return;
}
Otherwise, you serve the image. The following line follows the if:
serve(__dirname + req.url, ‘application/jpg’);
Finally, you write the serve function afterwards, which, as you might have guessed, takes the path of the file to serve and includes the ‘Content-Type’ header which is necessary, as you saw, for the browser to know what type of resource you’re sending:
function serve (path, type) {
res.writeHead(200, { ‘Content-Type’: type });
fs.createReadStream(path).pipe(res);
}
Remember the subsection about Streams in Chapter 6? An HTTP Response is a write-only Stream. And you can create a Stream from a file that’s read-only. And you can pipe the filesystem stream to the HTTP Response! The preceding short snippet of code is roughly equivalent to this:
fs.createReadStream(path)
.on(‘data, function (data) {
res.write(data);
})
.on(‘end’, function () {
res.end();
})
It’s also the most effective and recommended method for serving static files.
Putting all the pieces together, you get
/**
* Module dependencies.
*/
var http = require(‘http’)
, fs = require(‘fs’)
/**
* Create the server.
*/
var server = http.createServer(function (req, res) {
if (’GET’ == req.method && ’/images’ == req.url.substr(0, 7)
&& ’.jpg’ == req.url.substr(-4)) {
fs.stat(__dirname + req.url, function (err, stat) {
if (err || !stat.isFile()) {
res.writeHead(404);
res.end(’Not Found’);
return;
}
serve(__dirname + req.url, ’application/jpg’);
});
} else if (’GET’ == req.method && ’/’ == req.url) {
serve(__dirname + ’/index.html’, ’text/html’);
} else {
res.writeHead(404);
res.end(’Not found’);
}
function serve (path, type) {
res.writeHead(200, { ’Content-Type’: type });
fs.createReadStream(path).pipe(res);
}
});
/**
* Listen.
*/
server.listen(3000);
Now you’re done! The next step is to run the following:
$ node server
Then point your browser to http://127.0.0.1:3000, and you should see your website!
A simple website with Connect
This website example highlights a few common tasks frequently involved in creating a website:
• Serving static files
• Handling errors and bad or missing URLs
• Handling different types of requests
Connect, as a layer on top of the http API, provides some facilities to make these repeatable processes easier to implement so that you can focus on the real purpose of your application. It lets you stick to the DRY pattern: Don’t Repeat Yourself.
The example can be simplified tremendously thanks to Connect. You first create package.json with the dependency “connect” in a new directory.
{
“name”: “my-website”
, “version”: “0.0.1”
, “dependencies”: {
“connect”: “1.8.7”
}
}
Then you install it:
$ npm install
Next, you require it:
/**
* Module dependencies.
*/
var connect = require(‘connect’)
You create the http.Server through Connect:
/**
* Create server.
*/
var server = connect.createServer();
You use() the static middleware. You explore the concept of middleware in the next section and go in greater depth in the coming chapters. For now, it’s important to understand that middleware is a simple JavaScript function. In this case, we configure the static middleware by passing some parameters to connect.static, which returns a function.
/**
* Handle static files.
*/
server.use(connect.static(__dirname + ‘/website’));
You place index.html and the images directory under /website to ensure you don’t serve undesired files.
Then you listen():
/**
* Listen.
*/
server.listen(3000);
Now you’re done! Connect can even handle 404s for you, so also try going to /made-up-url.
Middleware
To understand middleware better, go back to the node HTTP example. Remove the logic and focus for a minute on what you’re trying to do:
if (‘GET’ == req.method && ‘/images’ == req.url.substr(0, 7)) {
// serve image
} else if (‘GET’ == req.method && ‘/’ == req.url) {
// serve index
} else {
// display 404
}
As you can see, the application tries to do only one of three things every time a request
comes. If you also want to log requests, for example, you would add this piece of code to the top:
console.error(‘ %s %s ‘, req.method, req.url);
Now imagine a larger application that can do many different things, depending on the different variables at play for each request:
• Log requests and how long they take
• Serve static files
• Perform authorization
These tasks can make handling code in a single event handler (the callback that you pass to createServer) a very convoluted process.
Simply put, middleware is made up of functions that handle the req and res objects but also receive a next function that allows you to do flow control.
If you want to write the same application using the middleware pattern, it would look like this:
server.use(function (req, res, next) {
// you always log
console.error(‘ %s %s ‘, req.method, req.url);
next();
});
server.use(function (req, res, next) {
if (‘GET’ == req.method && ‘/images’ == req.url.substr(0, 7)) {
// serve image
} else {
// let other middleware handle it
next();
}
});
server.use(function (req, res, next) {
if (‘GET’ == req.method && ‘/’ == req.url) {
// serve index
} else {
// let other middleware handle it
next();
}
});
server.use(function (req, res, next) {
// last middleware, if you got here you don’t know what to do with this
res.writeHead(404);
res.end(‘Not found’);
});
You not only benefit from the expressive power (the ability to break down the app into smaller units), but also benefit from the reusability. As you will see, Connect already ships middleware that performs common tasks. To do request logging, you can simply use the following:
app.use(connect.logger(‘dev’))
And that handles logging!
The next section explains how to write middleware that alerts you when a certain request is taking a long time to respond.
Writing reusable middleware
Middleware that notifies you when a request is taking too long can be useful under many circumstances. For example, imagine you have a page that makes a series of requests to a database. Under your tests, everything responds within 100 milliseconds (ms), but you want to make sure you log whenever processing is taking longer than that.
You start by creating middleware in a separate module (file) called request-time.js.
The purpose of this module is to expose a function that returns a function. This is a very common pattern for middleware that allows for configurability. When you summoned connect.logger in the previous example, you passed a parameter to it, and that returns the function that eventually handles the requests.
The module for now takes a single option, the number of milliseconds after which you want to log the request as problematic:
/**
* Request time middleware.
*
* Options:
* - 'time’ (‘Number’): number of ms after which you log (100)
*
* @param {Object} options
* @api public
*/
module.exports = function (opts) {
// …
};
First, you default the time to 100:
var time = opts.time || 100;
Then you return the function that will become the middleware:
return function (req, res, next) {
In the middleware itself, you should first create a timer that fires within the time specified:
var timer = setTimeout(function () {
console.log(
‘�33[90m%s %s�33[39m �33[91mis taking too long!�33[39m’
, req.method
, req.url
);
}, time);
Now you have to make sure to clear (that is, stop or cancel) the timer if the response finishes within 100ms. Another common pattern in middleware is to override functions (also known as monkey-patch) so that when other middleware calls them, you can perform a certain action.
In this case, when the response end()s, you want to clear the timer:
var end = res.end;
res.end = function (chunk, encoding) {
res.end = end;
res.end(chunk, encoding);
clearTimeout(timer);
};
You first keep a reference around to the original function (var end = res.end). Then, within the overridden function, you restore the original, call it, and then clear the timer.
Finally, you should always let other middleware look at the request, so you call next. Otherwise, your app wouldn’t do anything!
next();
The complete middleware code looks like this:
/**
* Request time middleware.
*
* Options:
* - ‘time’ (‘Number’): number of ms after which we log (100)
*
* @param {Object} options
* @api public
*/
module.exports = function (opts) {
var time = opts.time || 100;
return function (req, res, next) {
var timer = setTimeout(function () {
console.log(
‘�33[90m%s %s�33[39m �33[91mis taking too long!�33[39m’
, req.method
, req.url
);
}, time);
var end = res.end;
res.end = function (chunk, encoding) {
res.end = end;
res.end(chunk, encoding);
clearTimeout(timer);
};
next();
};
};
To test this example, create a quick Connect app that has two different routes: one that gets resolved quickly and one that takes a second:
You start with the dependencies:
# sample.js
/**
* Module dependencies.
*/
var connect = require(‘connect’)
, time = require(‘./request-time’)
Next, create the server:
/**
* Create server.
*/
var server = connect.createServer();
You log requests:
/**
* Log requests.
*/
server.use(connect.logger(‘dev’));
Then you implement the middleware:
/**
* Implement time middleware.
*/
server.use(time({ time: 500 }));
You implement the fast handler:
/**
* Fast response.
*/
server.use(function (req, res, next) {
if (‘/a’ == req.url) {
res.writeHead(200);
res.end(‘Fast!’);
} else {
next();
}
});
Then you implement the simulated slow route:
/**
* Slow response.
*/
server.use(function (req, res, next) {
if (‘/b’ == req.url) {
setTimeout(function () {
res.writeHead(200);
res.end(‘Slow!’);
}, 1000);
} else {
next();
}
});
As usual, you make the server listen:
/**
* Listen.
*/
server.listen(3000);
You run the server:
$ node server
And then, as shown in Figure 8-2, visit http://localhost:3000/a with the browser (the fast route).
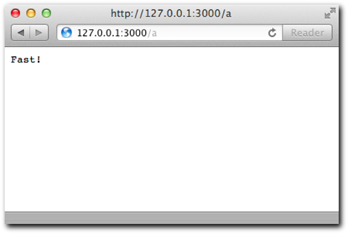
Figure 8-2: A simple route (/a) being shown to the browser.
If you look at the console shown in Figure 8-3, you can see the logger middleware in action.

Figure 8-3: The logs shown in the console after accessing route /a
Figure 8-4 shows the slow route (/b).
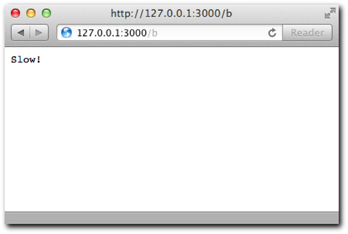
Figure 8-4: The slow route /b response in the browser
Figure 8-5 depicts the console and shows the middleware in action!
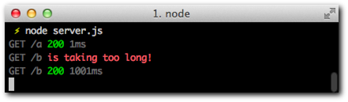
Figure 8-5: The logs after accessing route /b reveal the warning produced by your
first middleware
Next up, you’ll go through some of the built-in middleware that Connect ships with due to the high level of reusability they have in common web applications.
Static middleware
Static middleware is probably among the most common type of middleware you will use during the development of web applications with Node.
Mounting
Connect allows middleware to be mounted to specific URLs. For middleware like static, this can be really useful because it allows you to map an arbitrary URL to any directory in your filesystem.
For example, assume you want to serve a directory called /images when the URL /my-images is requested. You can do it with mounting:
server.use(‘/my-images’, connect.static(‘/path/to/images’));
maxAge
The static middleware takes an option called maxAge that specifies how long a certain resource can be cached in the client’s user agent. This capability is useful when you know a certain asset is not going to change, and you don’t want the user’s browser to re-request it.
For example, it’s common practice for web applications to bundle up all the client-side JavaScript into a file that represents a revision number. You can add the maxAge option to ensure those get cached forever:
server.use(‘/js’, connect.static(‘/path/to/bundles’, { maxAge: 10000000000000 });
hidden
The other option static takes is hidden. If this option is set to true, Connect serves files that begin with a dot (.) and are considered hidden in Unix filesystems:
server.use(connect.static(‘/path/to/resources’, { hidden: true });
Query
Sometimes in your applications you have optional data associated with a URL that you send as part of the query string.
For example, consider the url /blog-posts?page=5. If you point your browser to that URL, then Node populates req.url with a string:
server.use(function (req) {
// req.url == “/blog-posts?page=5”
});
Most likely, though, you actually want to access the value contained in that querystring.
If you implement the query middleware, you get a req.query object automatically with those values:
server.use(connect.query);
server.use(function (req, res) {
// req.query.page == “5”
});
Again, parsing the query string is a common task for applications that Connect greatly simplifies. Just as in the static example where you stopped including the require call for the fs module, you no longer need to worry about using the querystring module.
This middleware is included automatically for you in Express, the web framework subject of the next chapter. Another very useful middleware is logger, which is described next.
Logger
The logger middleware is a useful diagnostics tool for your web application. It prints out information about incoming requests and outgoing responses to the terminal.
There are different built-in logging formats you can use
• default
• dev
• short
• tiny
For example, in order to leverage the dev logger format you would initialize the logger middleware as follows:
server.use(connect.logger(‘dev’));
Consider the following example, a typical “Hello World” HTTP server with the logger middleware in use:
var connect = require(‘connect’);
connect.createServer(
connect.logger(‘dev’)
, function (req, res) {
res.writeHead(200);
res.end(‘Hello world’);
}
).listen(3000);
Notice that I passed a series of middleware functions as parameters to the createServer helper function. This is equivalent to initializing a Connect server and calling use twice.
When you go to http://127.0.0.1:3000 in your browser, you’ll notice two lines get output:
GET / 200 0ms
GET /favicon.ico 200 2ms
The browser is requesting /favicon.ico and /, and the connect logger is displaying the method for the request, in addition to the response status code, and how long the process took.
dev is a concise and short logging format, giving you insight into behavior and performance while you’re testing out your web apps.
The logger middleware allows custom strings that represent the format of your output.
Say you want to log only the method and the IP:
server.use(connect.logger(‘:method :remote-addr’));
You can also log headers by using the dynamic tokens req and res. To log the content-length and the content-type of the response along with how long it took to produce, you use the following:
server.use(connect.logger(‘type is :res[content-type], length is ‘
+ ‘:res[content-length] and it took :response-time ms.’));
Note: Remember that, in Node, request/response headers are always lowercase.
If you apply it to the original website that requests four images, you can see some interesting output, as shown in Figure 8-6. (Make sure you request on a fresh cache and clear your browser data prior to running the example.)
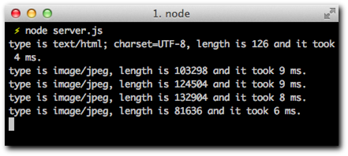
Figure 8-6: Your custom logger in action
Following is the complete list of tokens you can use:
• :req[header] (for example, :req[Accept])
• :res[header] (for example, :res[Content-Length])
• :http-version
• :response-time
• :remote-addr
• :date
• :method
• :url
• :referrer
• :user-agent
• :status
You can also define custom tokens. Say you want a shortcut called :type that refers to the Content-Type of the request; in that case, you use the following:
connect.logger.token(‘type’, function (req, res) {
return req.headers[‘content-type’];
});
The next middleware to consider is body parser, which automates another task you’ve been manually writing for http servers so far.
Body parser
In one of the examples in the http module, you used the qs module to parse the body of a POST request.
Connect can also help here! You can leverage bodyParser as follows:
server.use(connect.bodyParser());
Then you can get the POST data in the req.body:
server.use(function (req, res) {
// req.body.myinput
});
If you send JSON from the client in a POST request, req.body also is populated accordingly because bodyParser looks at the Content-Type of the request.
Handling uploads
Another function of the bodyParser is leveraging a module called formidable that allows you to access the files that the user uploaded.
For this example, you can use a shortcut way of calling createServer and pass all the middleware you need to it:
var server = connect(
connect.bodyParser()
, connect.static(‘static’)
);
In the folder static/, you create index.html with a simple form to handle a file upload:
<form action=”/” method=”POST” enctype=”multipart/form-data”>
<input type=”file” />
<button>Send file!</button>
</form>
Then you can add simple middleware to see what req.body.file looks like:
function (req, res, next) {
if (‘POST’ == req.method) {
console.log(req.body.file);
} else {
next();
}
}
You’re ready to test it! To do so, upload the file Hello.txt, as shown in Figure 8-7.
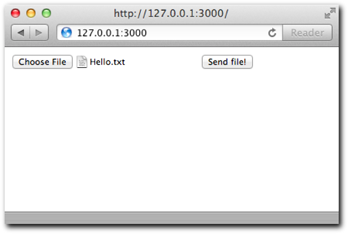
Figure 8-7: Uploading a sample text file from the browser
Then look at the server output, as shown in Figure 8-8.
As you can see, you get an object that describes the upload with some useful properties. Now print the upload back to the user:
if (‘POST’ == req.method && req.body.file) {
fs.readFile(req.body.file.path, ‘utf8’, function (err, data) {
if (err) {
res.writeHead(500);
res.end(‘Error!’);
return;
}
res.writeHead(200, { ‘Content-Type’: ‘text/html’ });
res.end([
‘<h3>File: ‘ + req.body.file.name + ‘</h3>’
, ‘<h4>Type: ‘ + req.body.file.type + ‘</h4>’
, ‘<h4>Contents:</h4><pre>’ + data + ‘</pre>’
].join(‘’));
});
} else {
next();
}
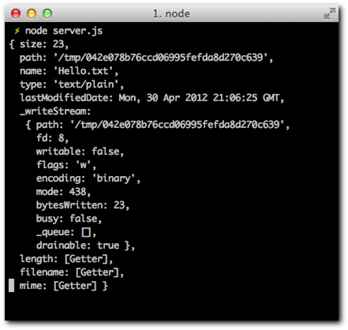
Figure 8-8: The uploaded file object representation in req.body shown through
the console
Uploading the file again reveals its contents (see Figure 8-9).
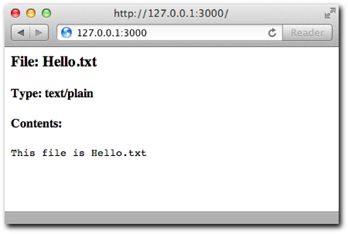
Figure 8-9: The contents of sample file Hello.txt shown through the browser
after the successful upload
Multiple files
If you want to handle multiple uploads, all you need to do is add [] to the name attribute of your input:
<input type=”file” name=”files[]” />
<input type=”file” name=”files[]” />
Then req.body.files contains an array of objects like the one you saw in the Hello.txt example before.
Cookies
In a similar fashion to query, Connect can aid in the process of parsing and exposing cookies.
When a browser sends cookies, it does so through the Cookie header. Its format is somewhat similar to the query string of a URL. Look at a sample request that includes this header:
GET /secret HTTP/1.1
Host: www.mywebsite.org
Cookie: secret1=value; secret2=value2
Accept: */*
To access those values (secret1 and secret2) without having to parse manually or use regular expressions, you can turn to the cookieParser middleware:
server.use(connect.cookieParser())
And, as you could expect, you can access the values through a req.cookies object:
server.use(function (req, res, next) {
// req.cookies.secret1 = “value”
// req.cookies.secret2 = “value2”
})
Session
In most web applications, the concept of a “user session” that spawns over multiple requests is necessary. Every time you need to “log in” to a website, you’re probably leveraging some form of session system that relies on setting a cookie on the browser that is sent with subsequent requests.
Connect makes it really easy to do this. For this example, you create a simple login system. You’re going to store the credentials in a users.json file that looks like this:
{
“tobi”: {
“password”: “ferret”
, “name”: “Tobi Holowaychuk”
}
}
The first thing you do is require Connect and the users file:
/**
* Module dependencies
*/
var connect = require(‘connect’)
, users = require(‘./users’)
Notice that you can require JSON files! When you only need to export data, you don’t need to include module.exports, and you can export it as JSON directly.
Next, you include the logger, bodyParser and session middleware. Because sessions depend on sending a cookie to the user, the session middleware needs to be preceded by the cookieParser middleware:
var server = connect(
connect.logger(‘dev’)
, connect.bodyParser()
, connect.cookieParser()
, connect.session({ secret: ‘my app secret’ })
For security reasons, you have to supply a secret option when you initialize the session middleware.
The first middleware checks whether the user is logged in; otherwise, you let other middleware handle this task:
, function (req, res, next) {
if (‘/’ == req.url && req.session.logged_in) {
res.writeHead(200, { ‘Content-Type’: ‘text/html’ });
res.end(
‘Welcome back, <b>’ + req.session.name + ‘</b>. ‘
+ ‘<a href=”/logout”>Logout</a>’
);
} else {
next();
}
}
The second one displays a form for logging in:
, function (req, res, next) {
if (‘/’ == req.url && ‘GET’ == req.method) {
res.writeHead(200, { ‘Content-Type’: ‘text/html’ });
res.end([
‘<form action=”/login” method=”POST”>’
, ‘<fieldset>’
, ‘<legend>Please log in</legend>’
, ‘<p>User: <input type=”text” name=”user”></p>’
, ‘<p>Password: <input type=”password” name=”password”></p>’
, ‘<button>Submit</button>’
, ‘</fieldset>’
, ‘</form>’
].join(‘’));
} else {
next();
}
}
The next one actually checks that the credentials exist and logs in the user as a result:
, function (req, res, next) {
if (‘/login’ == req.url && ‘POST’ == req.method) {
res.writeHead(200);
if (!users[req.body.user] || req.body.password != users[req.body.user].password) {
res.end(‘Bad username/password’);
} else {
req.session.logged_in = true;
req.session.name = users[req.body.user].name;
res.end(‘Authenticated!’);
}
} else {
next();
}
}
Notice that you modify an object called req.session. This object is saved whenever the response is sent, and you don’t have to save it manually. You store the name and mark logged_in as true.
Finally, you handle the logout action in a similar fashion:
, function (req, res, next) {
if (‘/logout’ == req.url) {
req.session.logged_in = false;
res.writeHead(200);
res.end(‘Logged out!’);
} else {
next();
}
}
The complete code should look like this:
/**
* Module dependencies
*/
var connect = require(‘connect’)
, users = require(‘./users’)
/**
* Create server
*/
var server = connect(
connect.logger(‘dev’)
, connect.bodyParser()
, connect.cookieParser()
, connect.session({ secret: ‘my app secret’ })
, function (req, res, next) {
if (‘/’ == req.url && req.session.logged_in) {
res.writeHead(200, { ‘Content-Type’: ‘text/html’ });
res.end(
‘Welcome back, <b>’ + req.session.name + ‘</b>. ‘
+ ‘<a href=”/logout”>Logout</a>’
);
} else {
next();
}
}
, function (req, res, next) {
if (‘/’ == req.url && ‘GET’ == req.method) {
res.writeHead(200, { ‘Content-Type’: ‘text/html’ });
res.end([
‘<form action=”/login” method=”POST”>’
, ‘<fieldset>’
, ‘<legend>Please log in</legend>’
, ‘<p>User: <input type=”text” name=”user”></p>’
, ‘<p>Password: <input type=”password” name=”password”></p>’
, ‘<button>Submit</button>’
, ‘</fieldset>’
, ‘</form>’
].join(‘’));
} else {
next();
}
}
, function (req, res, next) {
if (‘/login’ == req.url && ‘POST’ == req.method) {
res.writeHead(200);
if (!users[req.body.user] || req.body.password != users[req.body.user].password) {
res.end(‘Bad username/password’);
} else {
req.session.logged_in = true;
req.session.name = users[req.body.user].name;
res.end(‘Authenticated!’);
}
} else {
next();
}
}
, function (req, res, next) {
if (‘/logout’ == req.url) {
req.session.logged_in = false;
res.writeHead(200);
res.end(‘Logged out!’);
} else {
next();
}
}
);
/**
* Listen.
*/
server.listen(3000);
Now try out this simple login system. First, as shown in Figures 8-10 and 8-11, make sure basic security works.
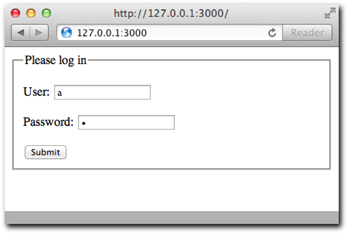
Figure 8-10: Trying out a login with bad credentials
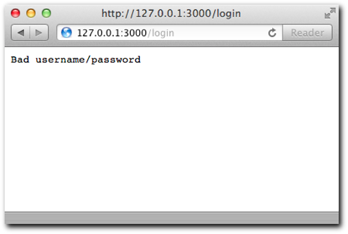
Figure 8-11: The bad credentials result in unsuccessful login as expected
Now , as depicted in Figure 8-12, try logging in with one of the users in users.json.
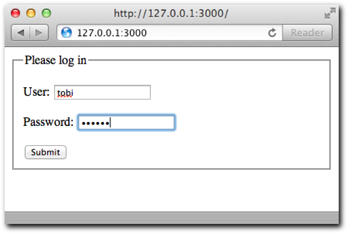
Figure 8-12: Login attempt with a valid user
Figure 8-13 illustrates a successful login.
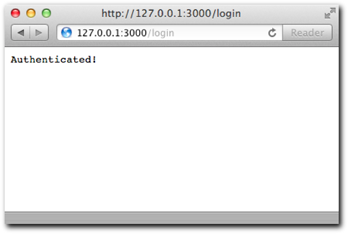
Figure 8-13: Success page after login
In Figure 8-14, you’ve returned to the main page after a successful login.
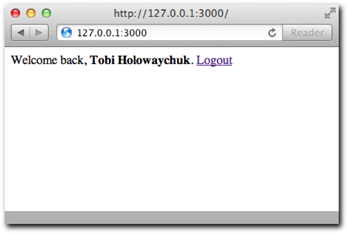
Figure 8-14: The result of going back to the main page once logged in
In order to have sessions work in a production-ready manner, you should learn how to persist them with Redis.
REDIS sessions
Try the following: while logged in, restart your node server and then refresh your browser. Notice that the session is now gone!
The reason is that the default store for the session middleware is Memory. This means that the session data is stored in memory, and when the process dies, the sessions die with it.
This result is not a bad thing while you’re developing applications, but it certainly can be detrimental for production applications. In those scenarios, you should swap the store with one that can persist reloading your node application, such as Redis (more on Redis in Chapter 12).
Redis is a small, fast database that a module called connect-redis leverages to store session data so that it lives outside the Node process.
You can set it up like this (you must have Redis installed):
var connect = require(‘connect’)
, RedisStore = require(‘connect-redis’)(connect);
Then you include it by passing the store option to the session middleware:
server.use(connect.session({ store: new RedisStore, secret: ‘my secret’ }))
Now you’re done! Sessions outlive your Node processes.
methodOverride
Older browsers are incapable of creating requests (like Ajax) of certain methods such as PUT, DELETE, or PATCH. A common way to address this shortcoming for these specific user agents is to send a GET or POST request and to append a _method variable to the query string of the URL with the real intended method.
For example, if you want to PUT a resource from IE, you could send a request like this:
POST /url?_method=PUT HTTP/1.1
For your middleware to think that that request is actually a PUT request, you can include the methodOverride middleware:
server.use(connect.methodOverride())
Remember that middleware gets executed sequentially, so make sure it’s placed before you include other middleware that handles requests.
basicAuth
For certain projects, sometimes you just need a basic authentication layer (see Figure 8-15) that’s controlled by the user agent.

Figure 8-15: A login dialog shown by the browser (basic authentication)
Connect makes it really easy to add this layer through the basicAuth middleware.
As an example, create a toy authentication system that relies on the administration authorizing users through the command line.
You first receive user input:
process.stdin.resume();
process.stdin.setEncoding(‘ascii’);
Then you add the basicAuth middleware:
connect.basicAuth(function (user, pass, fn) {
process.stdout.write(‘Allow user �33[96m’ + user + ‘�33[39m ‘
+ ‘with pass �33[90m’ + pass + ‘�33[39m ? [y/n]: ‘);
process.stdin.once(‘data’, function (data) {
if (data[0] == ‘y’) {
fn(null, { username: user });
}
else fn(new Error(‘Unauthorized’));
});
})
Notice that you use the once method on the stdin EventEmitter because you only care about receiving data from the command line once per request.
The middleware is simple to use. It supplies the user and pass as parameters, and it supplies a callback to be invoked upon successful or failed authorization.
If the authorization succeeds, you pass null as the first argument (or an Error if it doesn’t succeed) and the user object to populate req.remoteUser with.
You then declare the next middleware, which gets executed only if the authentication succeeds:
, function (req, res) { res.writeHead(200); res.end(‘Welcome to the protected area, ‘ + req.remoteUser.username); }
Then you submit your credentials (see Figure 8-16).
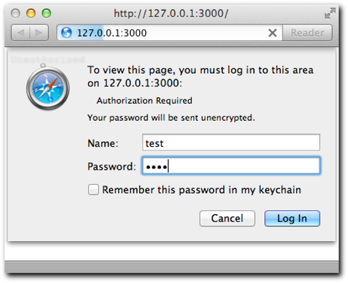
Figure 8-16: Filling the login dialog with sample credentials
Finally, as shown in Figure 8-17, you (in)securely authorize from the command line!

Figure 8-17: The server console reveals the authentication request which is responded to
Figure 8-18 shows the web site after a user has been authenticated via the command line.
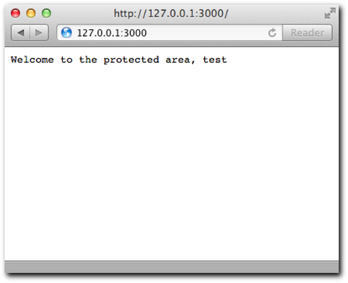
Figure 8-18: After the user is authorized through the terminal, the request is authorized
Summary
In this chapter you learned the benefits of leveraging middleware as building blocks for code organization and reusability around requests and responses in HTTP servers. In this case, Connect is the module that supplies the infrastructure to do this in a very expressive way.
You compared having a single request handler in contrast with separating logic into smaller units connected by the next middleware function parameter.
You also looked at the middleware that Connect bundles that solves a variety of common needs for the development of websites and web applications. You now understand how to write your own middleware, and how to make them reusable through the Node.JS module system.