

Open source IT operations management
This chapter describes the solutions and tools that are deployed to help and maintain IT operations.
This chapter includes the topics:
4.1 Open source IT operations management overview
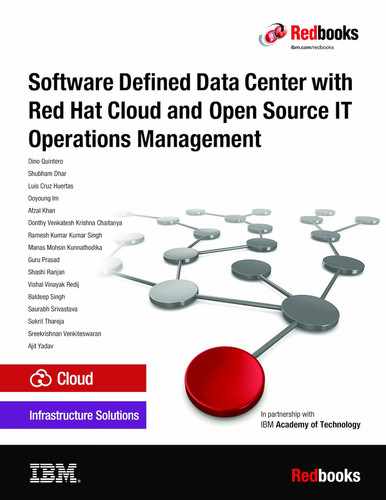
IT operations management is achieved through integrated open source tools that provide management of public, private, and hybrid cloud environments, as shown in Figure 4-1. This section discusses the minimum requirements for IT operations management, such as proactive monitoring with Prometheus, SLA dashboards in Grafana, log analysis and monitoring with ELK stack, IT Service Management with IT Operational Portal (iTop), and Unified visualization layer with Liferay portal.

Figure 4-1 Cloud management-integrated solutions
IT operations require service management, such as incidents management, system monitoring, and log analysis as a key function and container platform and container image repository for agile project methodology and portability.
IT operations consist of a portal for integrated UI, service management for SLA and notification, Grafana for timeseries graphs, Prometheus for system collected data, and Kibana for analytics UI and analytics data.
IT operations use containers for prompt application development and easy management. Red Hat OpenShift is chosen as a most popular container platform.
The following tasks are considered to analyze open source before deploying applications on Red Hat OpenShift:
•Using containerized open source: Create an application that uses a container.
•Setting up storage configuration: A container that is required to store configuration .yaml files, file storage, and store the data in database. Red Hat OpenShift provides configMaps and PersistentVolumeClaim (PVC) to pod configuration.
•Managing updated containers and deploying a new application.
Quota setup, the number of replicas, autoscaling for containers, network, and security are required for a production environment.
Enterprise Management Systems (EMS) as shown in Figure 4-2 consists of a portal for the integrated UI, Service Management for SLA and notification, Grafana for timeseries graphs, Prometheus for system-collected data and Kibana for the analytics UI and analytics data.

Figure 4-2 Enterprise Management Systems
EMS uses containerized applications for prompt application development and easy management. Deploying applications includes the following tasks:
•Using Containerized open source - Create an application that uses a container.
•Setting up storage configuration: A container that is required to store a configuration .yaml file, file storage, and store the data in database. Red Hat OpenShift provides configMaps and PersistentVolumeClaim (PVC) to pod configuration.
•Managing updated containers and deploying a new application.
4.2 Creating and managing applications on Red Hat OpenShift
This section explains how to create and manage applications on Red Hat OpenShift.
4.2.1 Creating an integrated portal by using Liferay
A new application uses Docker images from Docker Hub, sets up a configuration, pushes a customized image to Red Hat quay.io, and builds a Red Hat OpenShift container, as shown in Figure 4-3.

Figure 4-3 Sequence of new application creation
This process is designed for multiple application developers to configure and add features. Configurations and features are available for the portal, service management and analysis, user interface, and setting up Prometheus, exporters, fluentd, Elasticsearch, and Kibana (FLK).
Complete the following steps:
1. Create a portal by using the Liferay container.
2. Create an environment as follows:
$ podman run -it -p 8080:8080 liferay/portal:7.1.0-ga1-201809012030
$ podman ps
[root@bm2 ~]# podman ps
CONTAINER ID IMAGE COMMAND CREATED STATUS PORTS NAMES
a509934a8439 docker.io/liferay/portal:7.1.0-ga1-201809012030 /bin/sh -c /etc/l... 10 days ago Up 7 seconds ago 0.0.0.0:8080->8080/tcp nostalgic_mayer

Figure 4-4 Liferay Basic Configuration window
After you set up the portal, complete the following steps:
1. Upload you customized container with your customized configuration, and then, commit and push the container (see Figure 4-5 and Figure 4-6):
$podman login quay.io
$podman commit container id quay.io/<quay-id>/<repository-name>

Figure 4-5 Saving the container
$podman push quay.io/<quay-id>/<repository-name>:<tag>

Figure 4-6 Push the container

Figure 4-7 Quay.io window: Repository tags
3. Create a new-app to Red Hat OpenShift with customized container:
$ oc new-app portal --name=portal quay.io/manasmohsin/liferay:1
4. Create a service account to run this container:
$oc create serviceaccount useroot
5. Assign authority to the service account:
$oc adm policy add-scc-to-user anyuid -z useroot
6. Run the container as service account user root:
$oc edit dc/portal
7. Add serviceAccountName user root, as shown in Figure 4-8.

Figure 4-8 Add service account name user root
8. Set up the portal for access (see Figure 4-9):
$oc expose svc/portal
$oc get route

Figure 4-9 Route to access the portal
Browse the portal-empproject.apps-crc.testing, as shown in Figure 4-10.

Figure 4-10 Portal window
4.2.2 Creating a Prometheus in Red Hat OpenShift
To create a Prometheus in Red Hat OpenShift, build a Prometheus container image by using the configuration files, as shown in Figure 4-11. You also can deploy a standard image from Docker Hub and add the configuration file to Red Hat OpenShift.
Before deploying a new application, the application must be analyzed to use Kubernetes features.

Figure 4-11 Prometheus configuration structure for this book
Create a Prometheus by using the command from Prometheus official image:
$oc new-app docker.io/prom/prometheus:latest
Red Hat OpenShift provides configmaps for the configuration files. Two files are used (prometheus.yml and alert_rules.yml) under the prometheus directory:
[user2@server prometheus]$ ll
total 8
-rwxr-xr-x. 1 user2 user2 2668 Apr 15 22:29 alert_rules.yml
-rwxr-xr-x. 1 user2 user2 3451 Apr 15 20:34 prometheus.yml
$oc create configmap prometheusdir-config --from-file=prometheus/
$ oc get configmap/prometheusdir-config
[user2@server ~]$ oc get configmap/prometheusdir-config
NAME DATA AGE
prometheusdir-config 3 19h
List the Prometheus configuration by running the following command (see Example 4-1):
$oc describe configmap/prometheusdir-config
Example 4-1 List the configuration map for Prometheus
[user2@server prom]$ oc describe configmap/prometheusdir-config
Name: prometheusdir-config
Namespace: emsproject
Labels: <none>
Annotations: <none>
Data
====
alert_rules.yml:
----
groups:
- name: example
rules:
- alert: InstanceDown2
expr: up == 0
for: 1m
labels:
severity: 1
priority: 1
summary: "Instance {{ $labels.instance }} down"
description: "{{ $labels.instance }} of job {{ $labels.job }} has been down for more than 5 minutes."
- alert: NodeDiskReadCount
expr: node_disk_reads_completed_total > 9134000
for: 1m
labels:
severity: 4
priority: 4
summary: "Instance {{ $labels.instance }} has Node Disk Read Count crossing threshold Issue"
description: "{{ $labels.instance }} of job {{ $labels.job }} has Node Disk Read Count > 1134000"
- alert: NodeFileSystemFree
expr: node_filesystem_files_free > 9043381
for: 1m
labels:
severity: 2
priority: 2
summary: "Instance {{ $labels.instance }} has Node File System Free crossing threshold Issue"
description: "{{ $labels.instance }} of job {{ $labels.job }} has Node File System Free > 1043381"
- alert: NodeCPUSecondTotal
expr: node_cpu_seconds_total{mode="iowait"} > 940095
for: 1m
labels:
severity: 1
priority: 1
summary: "Instance {{ $labels.instance }} has Node CPU Second Total crossing threshold Issue"
description: "{{ $labels.instance }} of job {{ $labels.job }} has Node CPU Second Total > 840095."
- alert: HostHighCpuLoad
expr: avg by(instance)(irate(node_cpu_seconds_total {mode="user"} [1m]) * 100) > 95
for: 1m
labels:
severity: 1
priority: 1
summary: "Host high CPU load {{ $labels.instance }}"
description: "CPU load is > 95%"
- alert: HostHighCpuLoad
expr: avg by(instance)(irate(node_cpu_seconds_total {mode="user"} [1m]) * 100) > 70
for: 1m
labels:
severity: 2
priority: 2
summary: "Host high CPU load {{ $labels.instance }}"
description: "CPU load is > 70%"
- alert: HostOutOfMemory
expr: node_memory_MemAvailable_bytes / node_memory_MemTotal_bytes * 100 < 35
for: 5m
labels:
severity: 3
priority: 3
summary: "Host out of memory {{ $labels.instance }}"
description: "Node memory is filling up ...only 20% left)."
- alert: HostOutOfDiskSpace
expr: (node_filesystem_avail_bytes {device="tmpfs",mountpoint="/run"} * 100) / node_filesystem_size_bytes{device="tmpfs",mountpoint="/run"} > 91
for: 5m
labels:
severity: 1
priority: 1
summary: "Host out of disk space {{ $labels.instance }}"
description: "Disk is almost full..only 9% left"
prometheus.yml:
----
# my global config
global:
scrape_interval: 20s # Set the scrape interval to every 15 seconds. Default is every 1 minute.
evaluation_interval: 15s # Evaluate rules every 15 seconds. The default is every 1 minute.
# scrape_timeout is set to the global default (10s).
# Alertmanager configuration
alerting:
alertmanagers:
- static_configs:
#path_prefix: /alertmanager
- targets:
- prom.redbooks.info:9093
#- alertmanager:9093
#- 169.38.67.66:9093
# Load rules once and periodically evaluate them according to the global 'evaluation_interval'.
rule_files:
- 'alert_rules.yml'
# - "first_rules.yml"
# - "second_rules.yml"
# A scrape configuration containing exactly one endpoint to scrape:
# Here it's Prometheus itself.
scrape_configs:
# The job name is added as a label `job=<job_name>` to any timeseries scraped from this config.
- job_name: 'prometheus'
# metrics_path defaults to '/metrics'
# scheme defaults to 'http'.
static_configs:
- targets: ['prom.redbooks.info:9090']
- job_name: 'node_exporter'
static_configs:
- targets: ['prom.redbooks.info:9100']
- targets: ['134.209.22.37:9100']
- targets: ['169.38.131.87:9100']
- targets: ['tomcat.redbooks.info:9100']
- targets: ['node1-sql.redbooks.info:9100']
- targets: ['node2-sql.redbooks.info:9100']
relabel_configs:
- source_labels: [__address__]
regex: 'prom.redbooks.info:9100'
target_label: instance
replacement: 'prometheus_server'
- source_labels: [__address__]
regex: '134.209.22.37:9100'
target_label: instance
replacement: 'external_server'
- source_labels: [__address__]
regex: '169.38.131.87:9100'
target_label: instance
replacement: 'elk_server'
- source_labels: [__address__]
regex: 'tomcat.redbooks.info:9100'
target_label: instance
replacement: 'tomcat_server'
- source_labels: [__address__]
regex: 'node1-sql.redbooks.info:9100'
target_label: instance
replacement: 'node1-sql_server'
- source_labels: [__address__]
regex: 'node2-sql.redbooks.info:9100'
target_label: instance
replacement: 'node2-sql_server'
- job_name: 'mysqld_exporter'
static_configs:
- targets: ['node1-sql.redbooks.info:9104']
- targets: ['node2-sql.redbooks.info:9104']
- targets: ['node1-sql.redbooks.info:9144']
- job_name: 'apache'
static_configs:
- targets: ['tomcat.redbooks.info:9117']
- job_name: 'java'
static_configs:
- targets: ['tomcat.redbooks.info:8181']
relabel_configs:
- source_labels: [__address__]
regex: 'tomcat.redbooks.info:8181'
target_label: instance
replacement: 'tomcat'
- job_name: 'ipmi_exporter'
scrape_interval: 1m
scrape_timeout: 30s
metrics_path: /ipmi
scheme: http
file_sd_configs:
- files:
- /root/prometheus-2.16.0.linux-amd64/targets.yml
refresh_interval: 5m
relabel_configs:
- source_labels: [__address__]
separator: ;
regex: (.*)
target_label: __param_target
replacement: ${1}
action: replace
- source_labels: [__param_target]
separator: ;
regex: (.*)
target_label: instance
replacement: ${1}
action: replace
- separator: ;
regex: .*
target_label: __address__
replacement: ipmi-exp.redbooks.info:9290
action: replace
Events: <none>
Set up configmap in a container:
$oc set volume dc/prometheus --add --mount-path=/etc/prometheus --name=prometheusdir-volume-1 -t configmap --configmap-name=prometheusdir-config
To see the pod configuration, run the following command as shown in Example 4-2:
$oc get dc/prometheus -o yaml
Example 4-2 Shows the Pod configuration
[user2@server ~]$ oc get dc/prometheus -o yaml
apiVersion: apps.openshift.io/v1
kind: DeploymentConfig
metadata:
annotations:
openshift.io/generated-by: OpenShiftNewApp
creationTimestamp: "2020-04-17T00:42:40Z"
generation: 3
labels:
app: prometheus
app.kubernetes.io/component: prometheus
app.kubernetes.io/instance: prometheus
name: prometheus
namespace: emsproject
resourceVersion: "1168910"
selfLink: /apis/apps.openshift.io/v1/namespaces/emsproject/deploymentconfigs/prometheus
uid: 3f738a00-5551-4951-ae4b-29033a7cdd14
spec:
replicas: 1
revisionHistoryLimit: 10
selector:
deploymentconfig: prometheus
strategy:
activeDeadlineSeconds: 21600
resources: {}
rollingParams:
intervalSeconds: 1
maxSurge: 25%
maxUnavailable: 25%
timeoutSeconds: 600
updatePeriodSeconds: 1
type: Rolling
template:
metadata:
annotations:
openshift.io/generated-by: OpenShiftNewApp
creationTimestamp: null
labels:
deploymentconfig: prometheus
spec:
containers:
- image: docker.io/prom/prometheus@sha256:0ec13a50dfa65ec1cf8583ef640271e14392534f1d2c21f758eb0e0e441f7540
imagePullPolicy: Always
name: prometheus
ports:
- containerPort: 9090
protocol: TCP
resources: {}
terminationMessagePath: /dev/termination-log
terminationMessagePolicy: File
volumeMounts:
- mountPath: /prometheus
name: prometheus-volume-1
- mountPath: /etc/prometheus
name: prometheusdir-volume-1
dnsPolicy: ClusterFirst
restartPolicy: Always
schedulerName: default-scheduler
securityContext: {}
terminationGracePeriodSeconds: 30
volumes:
- emptyDir: {}
name: prometheus-volume-1
- configMap:
defaultMode: 420
name: prometheusdir-config
name: prometheusdir-volume-1
test: false
triggers:
- type: ConfigChange
- imageChangeParams:
automatic: true
containerNames:
- prometheus
from:
kind: ImageStreamTag
name: prometheus:latest
namespace: emsproject
lastTriggeredImage: docker.io/prom/prometheus@sha256:0ec13a50dfa65ec1cf8583ef640271e14392534f1d2c21f758eb0e0e441f7540
type: ImageChange
status:
availableReplicas: 1
conditions:
- lastTransitionTime: "2020-04-17T00:42:53Z"
lastUpdateTime: "2020-04-17T00:42:53Z"
message: Deployment config has minimum availability.
status: "True"
type: Available
- lastTransitionTime: "2020-04-17T00:55:18Z"
lastUpdateTime: "2020-04-17T00:55:21Z"
message: replication controller "prometheus-2" successfully rolled out
reason: NewReplicationControllerAvailable
status: "True"
type: Progressing
details:
causes:
- type: ConfigChange
message: config change
latestVersion: 2
observedGeneration: 3
readyReplicas: 1
replicas: 1
unavailableReplicas: 0
updatedReplicas: 1
To see configMap from the Red Hat OpenShift console, click Workloads → Config Maps → prometheusdir-config, as shown in Figure 4-12.

Figure 4-12 Config Maps window
To make the service available by using a URL, run the following command:
$oc expose svc/prometheus
To enable a URL to browser the service, run the following command:
$oc get route
[user2@server ~]$ oc get route/prometheus
NAME HOST/PORT PATH SERVICES PORT TERMINATION WILDCARD
prometheus prometheus-emsproject.apps-crc.testing prometheus 9090-tcp None
Browse the URL to see the prometheus.yml configuration, as shown in Figure 4-13.

Figure 4-13 Prometheus Targets configuration window
Browse to see the alert_rules.yml configuration, as shown in Figure 4-14.

Figure 4-14 Prometheus Alerts window
4.2.3 Creating a Grafana in Red Hat OpenShift
To create a Grafana, the environment parameters and storage configuration that is shown in Figure 4-15 are required.

Figure 4-15 Grafana environment parameters
Complete the following steps:
1. Import the image, as shown in Example 4-3:
$ oc import-image docker.io/grafana/grafana:latest --confirm
Example 4-3 Import image
[user2@codeReady mysql]$ oc import-image docker.io/grafana/grafana:latest --confirm
imagestream.image.openshift.io/grafana imported
Name: grafana
Namespace: emsproject
Created: Less than a second ago
Labels: <none>
Annotations: openshift.io/image.dockerRepositoryCheck=2020-05-13T01:43:07Z
Image Repository: image-registry.openshift-image-registry.svc:5000/emsproject/grafana
Image Lookup: local=false
Unique Images: 1
Tags: 1
latest
tagged from docker.io/grafana/grafana:latest
* docker.io/grafana/grafana@sha256:44e41d00685a13783555fa1e8efc2a5e5e70e1fa16db5523035cbedca8bd7eb7
Less than a second ago
Image Name: grafana:latest
Docker Image: docker.io/grafana/grafana@sha256:44e41d00685a13783555fa1e8efc2a5e5e70e1fa16db5523035cbedca8bd7eb7
Name: sha256:44e41d00685a13783555fa1e8efc2a5e5e70e1fa16db5523035cbedca8bd7eb7
Created: Less than a second ago
Annotations: image.openshift.io/dockerLayersOrder=ascending
Image Size: 88.5MB in 8 layers
Layers: 2.787MB sha256:4167d3e149762ea326c26fc2fd4e36fdeb7d4e639408ad30f37b8f25ac285a98
175B sha256:dd2bf2ad25d9d32fef2c99adb7ffd54d17080f96ad545b1bfd42f6f8c5c7c917
3.79MB sha256:bc3026833a3ad08f8733ebf2e57e7af5355403b99324ab3023dd4efa4cb915d0
8.001MB sha256:8789bc1f4250fc3b69bd532c4bf0279661e69f64433c517b224caf09a31024fb
8.645MB sha256:fc931efc1e7156b41bad35b7c72f556ce588bdbbb9b613584ae1208d77417f44
65.26MB sha256:09de0f0f5c9117c85fdbf7f26bdfb5ccebc4d6c5910fd344dde5475dde13747b
10.42kB sha256:b9833e14e8a252ae554575daaa553755ef239ebe6e5b6a8d74bf70a0aa3cc38a
1.249kB sha256:763366917f499837db1ef79ff416a87b3716623a9072cda4b429d5abe497a377
Image Created: 2 weeks ago
Author: <none>
Arch: amd64
Entrypoint: /run.sh
Working Dir: /usr/share/grafana
User: grafana
Exposes Ports: 3000/tcp
Docker Labels: <none>
Environment: PATH=/usr/share/grafana/bin:/usr/local/sbin:/usr/local/bin:/usr/sbin:/usr/bin:/sbin:/bin
GF_PATHS_CONFIG=/etc/grafana/grafana.ini
GF_PATHS_DATA=/var/lib/grafana
GF_PATHS_HOME=/usr/share/grafana
GF_PATHS_LOGS=/var/log/grafana
GF_PATHS_PLUGINS=/var/lib/grafana/plugins
GF_PATHS_PROVISIONING=/etc/grafana/provisioning
2. Create a Grafana in Red Hat OpenShift by running the following command:
$oc new-app docker.io/grafana/grafana:latest
-e "GF_PATHS_CONFIG=/etc/grafana/grafana.ini"
-e "GF_PATHS_DATA=/var/lib/grafana"
-e "GF_PATHS_HOME=/usr/share/grafana"
-e "GF_PATHS_LOGS=/var/log/grafana"
-e "GF_PATHS_PLUGINS=/var/lib/grafana/plugins"
-e "GF_PATHS_PROVISIONING=/etc/grafana/provisioning" docker.io/grafana/grafana:latest
3. Create a physical volume storage (pvc) and mount pvc for Grafana by running the following command:
$oc set volume dc/grafana --add --mount-path=/var/lib/grafana/ --name=grafana-volume-1 -t pvc --claim-name=pvc-grafana-1 --claim-size=25G
4. If you configure an existing pvc, run the following command:
$oc set volume dc/grafana --add --mount-path=/var/lib/grafana/ --name=grafana-volume-1 -t pvc --claim-name=pvc-grafana-1
5. To see the pvc details, run the $oc get pvc command:
[user2@server data]$ oc get pvc
NAME STATUS VOLUME CAPACITY ACCESS MODES STORAGECLASS AGE
pvc-grafana-1 Bound pv0015 100Gi RWO,ROX,RWX 32m
6. To see the Grafana configuration details, run the $oc get dc/grafana -o yaml command, as shown in Example 4-4.
Example 4-4 Grafana yaml configuration file
[user2@server ~]$ oc get dc/grafana -o yaml
apiVersion: apps.openshift.io/v1
kind: DeploymentConfig
metadata:
annotations:
openshift.io/generated-by: OpenShiftNewApp
creationTimestamp: "2020-04-17T03:16:39Z"
generation: 4
labels:
app: grafana
app.kubernetes.io/component: grafana
app.kubernetes.io/instance: grafana
name: grafana
namespace: emsproject
resourceVersion: "1198233"
selfLink: /apis/apps.openshift.io/v1/namespaces/emsproject/deploymentconfigs/grafana
uid: e6c964fb-7441-42fc-bcb5-0f9b6eb90224
spec:
replicas: 1
revisionHistoryLimit: 10
selector:
deploymentconfig: grafana
strategy:
activeDeadlineSeconds: 21600
resources: {}
rollingParams:
intervalSeconds: 1
maxSurge: 25%
maxUnavailable: 25%
timeoutSeconds: 600
updatePeriodSeconds: 1
type: Rolling
template:
metadata:
annotations:
openshift.io/generated-by: OpenShiftNewApp
creationTimestamp: null
labels:
deploymentconfig: grafana
spec:
containers:
- env:
- name: GF_PATHS_CONFIG
value: /etc/grafana/grafana.ini
- name: GF_PATHS_DATA
value: /var/lib/grafana
- name: GF_PATHS_HOME
value: /usr/share/grafana
- name: GF_PATHS_LOGS
value: /var/log/grafana
- name: GF_PATHS_PLUGINS
value: /var/lib/grafana/plugins
- name: GF_PATHS_PROVISIONING
value: /etc/grafana/provisioning
image: docker.io/grafana/grafana@sha256:bdef6f27255a09deb2f89741b3800a9a394a7e9eefa032570760e5688dd00a2f
imagePullPolicy: Always
name: grafana
ports:
- containerPort: 3000
protocol: TCP
resources: {}
terminationMessagePath: /dev/termination-log
terminationMessagePolicy: File
volumeMounts:
- mountPath: /var/lib/grafana
name: grafana-volume-1
dnsPolicy: ClusterFirst
restartPolicy: Always
schedulerName: default-scheduler
securityContext: {}
terminationGracePeriodSeconds: 30
volumes:
- name: grafana-volume-1
persistentVolumeClaim:
claimName: pvc-grafana-1
test: false
triggers:
- type: ConfigChange
- imageChangeParams:
automatic: true
containerNames:
- grafana
from:
kind: ImageStreamTag
name: grafana:latest
namespace: emsproject
lastTriggeredImage: docker.io/grafana/grafana@sha256:bdef6f27255a09deb2f89741b3800a9a394a7e9eefa032570760e5688dd00a2f
type: ImageChange
status:
availableReplicas: 1
conditions:
- lastTransitionTime: "2020-04-17T03:17:08Z"
lastUpdateTime: "2020-04-17T03:17:08Z"
message: Deployment config has minimum availability.
status: "True"
type: Available
- lastTransitionTime: "2020-04-17T03:24:25Z"
lastUpdateTime: "2020-04-17T03:24:28Z"
message: replication controller "grafana-3" successfully rolled out
reason: NewReplicationControllerAvailable
status: "True"
type: Progressing
details:
causes:
- type: Manual
message: manual change
latestVersion: 3
observedGeneration: 4
readyReplicas: 1
replicas: 1
unavailableReplicas: 0
updatedReplicas: 1
7. Set up Grafana access by running the following commands:
$oc expose svc/grafana
$oc get route/grafana
[user2@server ~]$ oc get route/grafana
NAME HOST/PORT PATH SERVICES PORT TERMINATION WILDCARD
grafana grafana-emsproject.apps-crc.testing grafana 3000-tcp None
8. Create the configuration map (see Example 4-5):
$oc create configmap grafana-config --from-file=conf/
conf/grafana.ini
Example 4-5 Grafana configuration file
##################### Grafana Configuration Example #####################
#
# Everything has defaults so you only need to uncomment things you want to
# change
# possible values : production, development
;app_mode = production
# instance name, defaults to HOSTNAME environment variable value or hostname if HOSTNAME var is empty
;instance_name = ${HOSTNAME}
#################################### Paths ####################################
[paths]
# Path to where grafana can store temp files, sessions, and the sqlite3 db (if that is used)
;data = /var/lib/grafana
# Temporary files in `data` directory older than given duration will be removed
;temp_data_lifetime = 24h
# Directory where grafana can store logs
;logs = /var/log/grafana
# Directory where grafana will automatically scan and look for plugins
;plugins = /var/lib/grafana/plugins
# folder that contains provisioning config files that grafana will apply on startup and while running.
;provisioning = conf/provisioning
#################################### Server ####################################
[server]
# Protocol (http, https, h2, socket)
;protocol = http
# The ip address to bind to, empty will bind to all interfaces
;http_addr =
# The http port to use
;http_port = 3000
# The public facing domain name used to access grafana from a browser
;domain = localhost
# Redirect to correct domain if host header does not match domain
# Prevents DNS rebinding attacks
;enforce_domain = false
# The full public facing url you use in browser, used for redirects and emails
# If you use reverse proxy and sub path specify full url (with sub path)
;root_url = %(protocol)s://%(domain)s:%(http_port)s/
# Serve Grafana from subpath specified in `root_url` setting. By default it is set to `false` for compatibility reasons.
;serve_from_sub_path = false
# Log web requests
;router_logging = false
# the path relative working path
;static_root_path = public
# enable gzip
;enable_gzip = false
# https certs & key file
;cert_file =
;cert_key =
# Unix socket path
;socket =
#################################### Database ####################################
[database]
# You can configure the database connection by specifying type, host, name, user and password
# as separate properties or as on string using the url properties.
# Either "mysql", "postgres" or "sqlite3", it's your choice
;type = sqlite3
;host = 127.0.0.1:3306
;name = grafana
;user = root
# If the password contains # or ; you have to wrap it with triple quotes. Ex """#password;"""
;password =
# Use either URL or the previous fields to configure the database
# Example: mysql://user:secret@host:port/database
;url =
# For "postgres" only, either "disable", "require" or "verify-full"
;ssl_mode = disable
;ca_cert_path =
;client_key_path =
;client_cert_path =
;server_cert_name =
# For "sqlite3" only, path relative to data_path setting
;path = grafana.db
# Max idle conn setting default is 2
;max_idle_conn = 2
# Max conn setting default is 0 (mean not set)
;max_open_conn =
# Connection Max Lifetime default is 14400 (means 14400 seconds or 4 hours)
;conn_max_lifetime = 14400
# Set to true to log the sql calls and execution times.
;log_queries =
# For "sqlite3" only. cache mode setting used for connecting to the database. (private, shared)
;cache_mode = private
#################################### Cache server #############################
[remote_cache]
# Either "redis", "memcached" or "database" default is "database"
;type = database
# cache connectionstring options
# database: will use Grafana primary database.
# redis: config like redis server e.g. `addr=127.0.0.1:6379,pool_size=100,db=0,ssl=false`. Only addr is required. ssl may be 'true', 'false', or 'insecure'.
# memcache: 127.0.0.1:11211
;connstr =
#################################### Data proxy ###########################
[dataproxy]
# This enables data proxy logging, default is false
;logging = false
# How long the data proxy should wait before timing out default is 30 (seconds)
;timeout = 30
# If enabled and user is not anonymous, data proxy will add X-Grafana-User header with username into the request, default is false.
;send_user_header = false
#################################### Analytics ####################################
[analytics]
# Server reporting, sends usage counters to stats.grafana.org every 24 hours.
# No ip addresses are being tracked, only simple counters to track
# running instances, dashboard and error counts. It is very helpful to us.
# Change this option to false to disable reporting.
;reporting_enabled = true
# Set to false to disable all checks to https://grafana.net
# for new vesions (grafana itself and plugins), check is used
# in some UI views to notify that grafana or plugin update exists
# This option does not cause any auto updates, nor send any information
# only a GET request to http://grafana.com to get latest versions
;check_for_updates = true
# Google Analytics universal tracking code, only enabled if you specify an id here
;google_analytics_ua_id =
# Google Tag Manager ID, only enabled if you specify an id here
;google_tag_manager_id =
#################################### Security ####################################
[security]
# disable creation of admin user on first start of grafana
;disable_initial_admin_creation = false
# default admin user, created on startup
;admin_user = admin
# default admin password, can be changed before first start of grafana, or in profile settings
;admin_password = admin
# used for signing
;secret_key = SW2YcwTIb9zpOOhoPsMm
# disable gravatar profile images
;disable_gravatar = false
# data source proxy whitelist (ip_or_domain:port separated by spaces)
;data_source_proxy_whitelist =
# disable protection against brute force login attempts
;disable_brute_force_login_protection = false
# set to true if you host Grafana behind HTTPS. default is false.
;cookie_secure = false
# set cookie SameSite attribute. defaults to `lax`. can be set to "lax", "strict", "none" and "disabled"
;cookie_samesite = lax
# set to true if you want to allow browsers to render Grafana in a <frame>, <iframe>, <embed> or <object>. default is false.
allow_embedding = true
# Set to true if you want to enable http strict transport security (HSTS) response header.
# This is only sent when HTTPS is enabled in this configuration.
# HSTS tells browsers that the site should only be accessed using HTTPS.
# The default version will change to true in the next minor release, 6.3.
;strict_transport_security = false
# Sets how long a browser should cache HSTS. Only applied if strict_transport_security is enabled.
;strict_transport_security_max_age_seconds = 86400
# Set to true if to enable HSTS preloading option. Only applied if strict_transport_security is enabled.
;strict_transport_security_preload = false
# Set to true if to enable the HSTS includeSubDomains option. Only applied if strict_transport_security is enabled.
;strict_transport_security_subdomains = false
# Set to true to enable the X-Content-Type-Options response header.
# The X-Content-Type-Options response HTTP header is a marker used by the server to indicate that the MIME types advertised
# in the Content-Type headers should not be changed and be followed. The default will change to true in the next minor release, 6.3.
;x_content_type_options = false
# Set to true to enable the X-XSS-Protection header, which tells browsers to stop pages from loading
# when they detect reflected cross-site scripting (XSS) attacks. The default will change to true in the next minor release, 6.3.
;x_xss_protection = false
#################################### Snapshots ###########################
[snapshots]
# snapshot sharing options
;external_enabled = true
;external_snapshot_url = https://snapshots-origin.raintank.io
;external_snapshot_name = Publish to snapshot.raintank.io
# Set to true to enable this Grafana instance act as an external snapshot server and allow unauthenticated requests for
# creating and deleting snapshots.
;public_mode = false
# remove expired snapshot
;snapshot_remove_expired = true
#################################### Dashboards History ##################
[dashboards]
# Number dashboard versions to keep (per dashboard). Default: 20, Minimum: 1
;versions_to_keep = 20
# Minimum dashboard refresh interval. When set, this will restrict users to set the refresh interval of a dashboard lower than given interval. Per default this is not set/unrestricted.
# The interval string is a possibly signed sequence of decimal numbers, followed by a unit suffix (ms, s, m, h, d), e.g. 30s or 1m.
;min_refresh_interval =
#################################### Users ###############################
[users]
# disable user signup / registration
;allow_sign_up = true
# Allow non admin users to create organizations
;allow_org_create = true
# Set to true to automatically assign new users to the default organization (id 1)
;auto_assign_org = true
# Set this value to automatically add new users to the provided organization (if auto_assign_org above is set to true)
;auto_assign_org_id = 1
# Default role new users will be automatically assigned (if disabled above is set to true)
;auto_assign_org_role = Viewer
# Require email validation before sign up completes
;verify_email_enabled = false
# Background text for the user field on the login page
;login_hint = email or username
;password_hint = password
# Default UI theme ("dark" or "light")
;default_theme = dark
# External user management, these options affect the organization users view
;external_manage_link_url =
;external_manage_link_name =
;external_manage_info =
# Viewers can edit/inspect dashboard settings in the browser. But not save the dashboard.
;viewers_can_edit = false
# Editors can administrate dashboard, folders and teams they create
;editors_can_admin = false
[auth]
# Login cookie name
;login_cookie_name = grafana_session
# The lifetime (days) an authenticated user can be inactive before being required to login at next visit. Default is 7 days,
;login_maximum_inactive_lifetime_days = 7
# The maximum lifetime (days) an authenticated user can be logged in since login time before being required to login. Default is 30 days.
;login_maximum_lifetime_days = 30
# How often should auth tokens be rotated for authenticated users when being active. The default is each 10 minutes.
;token_rotation_interval_minutes = 10
# Set to true to disable (hide) the login form, useful if you use OAuth, defaults to false
;disable_login_form = false
# Set to true to disable the signout link in the side menu. useful if you use auth.proxy, defaults to false
;disable_signout_menu = false
# URL to redirect the user to after sign out
;signout_redirect_url =
# Set to true to attempt login with OAuth automatically, skipping the login screen.
# This setting is ignored if multiple OAuth providers are configured.
;oauth_auto_login = false
# limit of api_key seconds to live before expiration
;api_key_max_seconds_to_live = -1
#################################### Anonymous Auth ######################
[auth.anonymous]
# enable anonymous access
;enabled = false
# specify organization name that should be used for unauthenticated users
;org_name = Main Org.
# specify role for unauthenticated users
;org_role = Viewer
#################################### Github Auth ##########################
[auth.github]
;enabled = false
;allow_sign_up = true
;client_id = some_id
;client_secret = some_secret
;scopes = user:email,read:org
;auth_url = https://github.com/login/oauth/authorize
;token_url = https://github.com/login/oauth/access_token
;api_url = https://api.github.com/user
;allowed_domains =
;team_ids =
;allowed_organizations =
#################################### GitLab Auth #########################
[auth.gitlab]
;enabled = false
;allow_sign_up = true
;client_id = some_id
;client_secret = some_secret
;scopes = api
;auth_url = https://gitlab.com/oauth/authorize
;token_url = https://gitlab.com/oauth/token
;api_url = https://gitlab.com/api/v4
;allowed_domains =
;allowed_groups =
#################################### Google Auth ##########################
[auth.google]
;enabled = false
;allow_sign_up = true
;client_id = some_client_id
;client_secret = some_client_secret
;scopes = https://www.googleapis.com/auth/userinfo.profile https://www.googleapis.com/auth/userinfo.email
;auth_url = https://accounts.google.com/o/oauth2/auth
;token_url = https://accounts.google.com/o/oauth2/token
;api_url = https://www.googleapis.com/oauth2/v1/userinfo
;allowed_domains =
;hosted_domain =
#################################### Grafana.com Auth ####################
[auth.grafana_com]
;enabled = false
;allow_sign_up = true
;client_id = some_id
;client_secret = some_secret
;scopes = user:email
;allowed_organizations =
#################################### Azure AD OAuth #######################
[auth.azuread]
;name = Azure AD
;enabled = false
;allow_sign_up = true
;client_id = some_client_id
;client_secret = some_client_secret
;scopes = openid email profile
;auth_url = https://login.microsoftonline.com/<tenant-id>/oauth2/v2.0/authorize
;token_url = https://login.microsoftonline.com/<tenant-id>/oauth2/v2.0/token
;allowed_domains =
;allowed_groups =
#################################### Generic OAuth ##########################
[auth.generic_oauth]
;enabled = false
;name = OAuth
;allow_sign_up = true
;client_id = some_id
;client_secret = some_secret
;scopes = user:email,read:org
;email_attribute_name = email:primary
;email_attribute_path =
;auth_url = https://foo.bar/login/oauth/authorize
;token_url = https://foo.bar/login/oauth/access_token
;api_url = https://foo.bar/user
;allowed_domains =
;team_ids =
;allowed_organizations =
;role_attribute_path =
;tls_skip_verify_insecure = false
;tls_client_cert =
;tls_client_key =
;tls_client_ca =
#################################### SAML Auth ###########################
[auth.saml] # Enterprise only
# Defaults to false. If true, the feature is enabled.
;enabled = false
# Base64-encoded public X.509 certificate. Used to sign requests to the IdP
;certificate =
# Path to the public X.509 certificate. Used to sign requests to the IdP
;certificate_path =
# Base64-encoded private key. Used to decrypt assertions from the IdP
;private_key =
;# Path to the private key. Used to decrypt assertions from the IdP
;private_key_path =
# Base64-encoded IdP SAML metadata XML. Used to verify and obtain binding locations from the IdP
;idp_metadata =
# Path to the SAML metadata XML. Used to verify and obtain binding locations from the IdP
;idp_metadata_path =
# URL to fetch SAML IdP metadata. Used to verify and obtain binding locations from the IdP
;idp_metadata_url =
# Duration, since the IdP issued a response and the SP is allowed to process it. Defaults to 90 seconds.
;max_issue_delay = 90s
# Duration, for how long the SP's metadata should be valid. Defaults to 48 hours.
# Friendly name or name of the attribute within the SAML assertion to use as the user's name
;assertion_attribute_name = displayName
# Friendly name or name of the attribute within the SAML assertion to use as the user's login handle
;assertion_attribute_login = mail
# Friendly name or name of the attribute within the SAML assertion to use as the user's email
;assertion_attribute_email = mail
#################################### Basic Auth ##########################
[auth.basic]
;enabled = true
#################################### Auth Proxy ##########################
[auth.proxy]
;enabled = false
;header_name = X-WEBAUTH-USER
;header_property = username
;auto_sign_up = true
;sync_ttl = 60
;whitelist = 192.168.1.1, 192.168.2.1
;headers = Email:X-User-Email, Name:X-User-Name
# Read the auth proxy docs for details on what the setting below enables
;enable_login_token = false
#################################### Auth LDAP ##########################
[auth.ldap]
;enabled = false
;config_file = /etc/grafana/ldap.toml
;allow_sign_up = true
# LDAP backround sync (Enterprise only)
# At 1 am every day
;sync_cron = "0 0 1 * * *"
;active_sync_enabled = true
#################################### SMTP / Emailing ##########################
[smtp]
;enabled = false
;host = localhost:25
;user =
# If the password contains # or ; you have to wrap it with triple quotes. Ex """#password;"""
;password =
;cert_file =
;key_file =
;skip_verify = false
;from_address = [email protected]
;from_name = Grafana
# EHLO identity in SMTP dialog (defaults to instance_name)
;ehlo_identity = dashboard.example.com
[emails]
;welcome_email_on_sign_up = false
;templates_pattern = emails/*.html
#################################### Logging ##########################
[log]
# Either "console", "file", "syslog". Default is console and file
# Use space to separate multiple modes, e.g. "console file"
;mode = console file
# Either "debug", "info", "warn", "error", "critical", default is "info"
;level = info
# optional settings to set different levels for specific loggers. Ex filters = sqlstore:debug
;filters =
# For "console" mode only
[log.console]
;level =
# log line format, valid options are text, console and json
;format = console
# For "file" mode only
[log.file]
;level =
# log line format, valid options are text, console and json
;format = text
# This enables automated log rotate(switch of following options), default is true
;log_rotate = true
# Max line number of single file, default is 1000000
;max_lines = 1000000
# Max size shift of single file, default is 28 means 1 << 28, 256MB
;max_size_shift = 28
# Segment log daily, default is true
;daily_rotate = true
# Expired days of log file(delete after max days), default is 7
;max_days = 7
[log.syslog]
;level =
# log line format, valid options are text, console and json
;format = text
# Syslog network type and address. This can be udp, tcp, or unix. If left blank, the default unix endpoints will be used.
;network =
;address =
# Syslog facility. user, daemon and local0 through local7 are valid.
;facility =
# Syslog tag. By default, the process' argv[0] is used.
;tag =
#################################### Usage Quotas ########################
[quota]
; enabled = false
#### set quotas to -1 to make unlimited. ####
# limit number of users per Org.
; org_user = 10
# limit number of dashboards per Org.
; org_dashboard = 100
# limit number of data_sources per Org.
; org_data_source = 10
# limit number of api_keys per Org.
; org_api_key = 10
# limit number of orgs a user can create.
; user_org = 10
# Global limit of users.
; global_user = -1
# global limit of orgs.
; global_org = -1
# global limit of dashboards
; global_dashboard = -1
# global limit of api_keys
; global_api_key = -1
# global limit on number of logged in users.
; global_session = -1
#################################### Alerting ############################
[alerting]
# Disable alerting engine & UI features
;enabled = true
# Makes it possible to turn off alert rule execution but alerting UI is visible
;execute_alerts = true
# Default setting for new alert rules. Defaults to categorize error and timeouts as alerting. (alerting, keep_state)
;error_or_timeout = alerting
# Default setting for how Grafana handles nodata or null values in alerting. (alerting, no_data, keep_state, ok)
;nodata_or_nullvalues = no_data
# Alert notifications can include images, but rendering many images at the same time can overload the server
# This limit will protect the server from render overloading and make sure notifications are sent out quickly
;concurrent_render_limit = 5
# Default setting for alert calculation timeout. Default value is 30
;evaluation_timeout_seconds = 30
# Default setting for alert notification timeout. Default value is 30
;notification_timeout_seconds = 30
# Default setting for max attempts to sending alert notifications. Default value is 3
;max_attempts = 3
# Makes it possible to enforce a minimal interval between evaluations, to reduce load on the backend
;min_interval_seconds = 1
#################################### Explore #############################
[explore]
# Enable the Explore section
;enabled = true
#################################### Internal Grafana Metrics ##########################
# Metrics available at HTTP API Url /metrics
[metrics]
# Disable / Enable internal metrics
;enabled = true
# Graphite Publish interval
;interval_seconds = 10
# Disable total stats (stat_totals_*) metrics to be generated
;disable_total_stats = false
#If both are set, basic auth will be required for the metrics endpoint.
; basic_auth_username =
; basic_auth_password =
# Send internal metrics to Graphite
[metrics.graphite]
# Enable by setting the address setting (ex localhost:2003)
;address =
;prefix = prod.grafana.%(instance_name)s.
#################################### Grafana.com integration ##########################
# Url used to import dashboards directly from Grafana.com
[grafana_com]
;url = https://grafana.com
#################################### Distributed tracing ############
[tracing.jaeger]
# Enable by setting the address sending traces to jaeger (ex localhost:6831)
;address = localhost:6831
# Tag that will always be included in when creating new spans. ex (tag1:value1,tag2:value2)
;always_included_tag = tag1:value1
# Type specifies the type of the sampler: const, probabilistic, rateLimiting, or remote
;sampler_type = const
# jaeger samplerconfig param
# for "const" sampler, 0 or 1 for always false/true respectively
# for "probabilistic" sampler, a probability between 0 and 1
# for "rateLimiting" sampler, the number of spans per second
# for "remote" sampler, param is the same as for "probabilistic"
# and indicates the initial sampling rate before the actual one
# is received from the mothership
;sampler_param = 1
# Whether or not to use Zipkin propagation (x-b3- HTTP headers).
;zipkin_propagation = false
# Setting this to true disables shared RPC spans.
# Not disabling is the most common setting when using Zipkin elsewhere in your infrastructure.
;disable_shared_zipkin_spans = false
#################################### External image storage ##########################
[external_image_storage]
# Used for uploading images to public servers so they can be included in slack/email messages.
# you can choose between (s3, webdav, gcs, azure_blob, local)
;provider =
[external_image_storage.s3]
;endpoint =
;path_style_access =
;bucket =
;region =
;path =
;access_key =
;secret_key =
[external_image_storage.webdav]
;url =
;public_url =
;username =
;password =
[external_image_storage.gcs]
;key_file =
;bucket =
;path =
[external_image_storage.azure_blob]
;account_name =
;account_key =
;container_name =
[external_image_storage.local]
# does not require any configuration
[rendering]
# Options to configure a remote HTTP image rendering service, e.g. using https://github.com/grafana/grafana-image-renderer.
# URL to a remote HTTP image renderer service, e.g. http://localhost:8081/render, will enable Grafana to render panels and dashboards to PNG-images using HTTP requests to an external service.
;server_url =
# If the remote HTTP image renderer service runs on a different server than the Grafana server you may have to configure this to a URL where Grafana is reachable, e.g. http://grafana.domain/.
;callback_url =
[panels]
# If set to true Grafana will allow script tags in text panels. Not recommended as it enable XSS vulnerabilities.
;disable_sanitize_html = false
[plugins]
;enable_alpha = false
;app_tls_skip_verify_insecure = false
[enterprise]
# Path to a valid Grafana Enterprise license.jwt file
;license_path =
[feature_toggles]
# enable features, separated by spaces
;enable =
$oc set volume dc/grafana --add --mount-path=/etc/grafana/conf --name=grafana-volume-2 -t configmap --configmap-name=grafana-config
9. If you have Grafana storage from an existing Podman or Docker, copy it to the container and rollout the Pod:
$ oc cp grafana.db <container-name>:/var/lib/grafana
For example:
[user2@server data]$ oc cp grafana.db grafana-3-2m5m4:/var/lib/grafana
$oc rollout latest dc/grafana
10. Browse Grafana from the data, as shown in Figure 4-16.

Figure 4-16 Loading from existing Grafana data
4.2.4 Creating an alertmanager in Red Hat OpenShift
To create an alert manager in Red Hat OpenShift, you must deploy an alertmanager container and update the prometheus.yml file to point to the alertmanager URL, as shown in Figure 4-17.

Figure 4-17 Prometheus.yml pointing to alertmanager
To create an alertmanager, run the following commands:
$oc new-app docker.io/prom/alertmanager:latest
$oc expose svc/alertmanager
$oc get route
For example:
[user2@server prometheus]$ oc get route|grep alert
alertmanager alertmanager-emsproject.apps-crc.testing alertmanager 9093-tcp
To browse alert manager, change in the prometheus.yml file the alertmanagers targets with the alert manager URL; for example, ex.alertmanager-emsproject.apps-crc.testing.
Check the .yml file, as follows (see Example 4-6):
$cat prometheus.yml
Example 4-6 Check contents prometheus.yml file
[user2@server prometheus]$ cat prometheus.yml
# my global config
global:
scrape_interval: 20s # Set the scrape interval to every 15 seconds. Default is every 1 minute.
evaluation_interval: 15s # Evaluate rules every 15 seconds. The default is every 1 minute.
# scrape_timeout is set to the global default (10s).
# Alertmanager configuration
alerting:
alertmanagers:
- static_configs:
#path_prefix: /alertmanager
- targets:
- alertmanager-emsproject.apps-crc.testing
#- alertmanager:9093
#- 169.38.67.66:9093
# Load rules once and periodically evaluate them according to the global 'evaluation_interval'.
rule_files:
- 'alert_rules.yml'
# - "first_rules.yml"
# - "second_rules.yml"
# A scrape configuration containing exactly one endpoint to scrape:
# Here it's Prometheus itself.
scrape_configs:
# The job name is added as a label `job=<job_name>` to any timeseries scraped from this config.
- job_name: 'prometheus'
# metrics_path defaults to '/metrics'
# scheme defaults to 'http'.
static_configs:
- targets: ['prom.redbooks.info:9090']
- job_name: 'node_exporter'
static_configs:
- targets: ['prom.redbooks.info:9100']
- targets: ['134.209.22.37:9100']
- targets: ['169.38.131.87:9100']
- targets: ['tomcat.redbooks.info:9100']
- targets: ['node1-sql.redbooks.info:9100']
- targets: ['node2-sql.redbooks.info:9100']
relabel_configs:
- source_labels: [__address__]
regex: 'prom.redbooks.info:9100'
target_label: instance
replacement: 'prometheus_server'
- source_labels: [__address__]
regex: '134.209.22.37:9100'
target_label: instance
replacement: 'external_server'
- source_labels: [__address__]
regex: '169.38.131.87:9100'
target_label: instance
replacement: 'elk_server'
- source_labels: [__address__]
regex: 'tomcat.redbooks.info:9100'
target_label: instance
replacement: 'tomcat_server'
- source_labels: [__address__]
regex: 'node1-sql.redbooks.info:9100'
target_label: instance
replacement: 'node1-sql_server'
- source_labels: [__address__]
regex: 'node2-sql.redbooks.info:9100'
target_label: instance
replacement: 'node2-sql_server'
- job_name: 'mysqld_exporter'
static_configs:
- targets: ['node1-sql.redbooks.info:9104']
- targets: ['node2-sql.redbooks.info:9104']
- targets: ['node1-sql.redbooks.info:9144']
- job_name: 'apache'
static_configs:
- targets: ['tomcat.redbooks.info:9117']
- job_name: 'java'
static_configs:
- targets: ['tomcat.redbooks.info:8181']
relabel_configs:
- source_labels: [__address__]
regex: 'tomcat.redbooks.info:8181'
target_label: instance
replacement: 'tomcat'
- job_name: 'ipmi_exporter'
scrape_interval: 1m
scrape_timeout: 30s
metrics_path: /ipmi
scheme: http
file_sd_configs:
- files:
- /root/prometheus-2.16.0.linux-amd64/targets.yml
refresh_interval: 5m
relabel_configs:
- source_labels: [__address__]
separator: ;
regex: (.*)
target_label: __param_target
replacement: ${1}
action: replace
- source_labels: [__param_target]
separator: ;
regex: (.*)
target_label: instance
replacement: ${1}
action: replace
- separator: ;
regex: .*
target_label: __address__
replacement: ipmi-exp.redbooks.info:9290
action: replace
When a prometheusAlert is received, alertmanager receives the incident, as shown in Figure 4-18, Figure 4-19 on page 261, and Figure 4-20 on page 261.

Figure 4-18 Alertmanager Alerts Filter

Figure 4-19 Alertmanager Filter: alertname HostOutOfDiskSpace

Figure 4-20 Alertmanager Filter: alertname description
4.2.5 Creating an iTop in Red Hat OpenShift
To create an iTop in Red Hat OpenShift, deploy the iTop container and create a persistence directory to store mysql database and web content (see Figure 4-21).

Figure 4-21 iTop directory structure
To create an iTop container in Red Hat OpenShift, run the following command:
$oc new-app docker.io/vbkunin/itop
To make the service available, run the following command:
$oc expose svc/itop
To create two Persistent volume claims (PVC) in the .yml file (one for the database and one for web content) run the following command (see Example 4-7 and Example 4-8 on page 263):
$oc create -f itop-pvc.yml
Example 4-7 Persistent volume claim: pvc-itop-1
apiVersion: v1
kind: PersistentVolumeClaim
metadata:
annotations:
name: pvc-itop-1
namespace: emsproject
spec:
accessModes:
- ReadWriteOnce
resources:
requests:
storage: 100G
status:
accessModes:
- ReadWriteOnce
- ReadWriteMany
- ReadOnlyMany
capacity:
storage: 100Gi
phase: Bound
Example 4-8 Persistent volume claim: pvc-itop-3
apiVersion: v1
kind: PersistentVolumeClaim
metadata:
annotations:
name: pvc-itop-3
namespace: emsproject
spec:
accessModes:
- ReadWriteOnce
resources:
requests:
storage: 100G
status:
accessModes:
- ReadWriteOnce
- ReadWriteMany
- ReadOnlyMany
capacity:
storage: 100Gi
phase: Bound
The following commands set the persistent volumes and mounting paths for the database and the web content:
$oc set volume dc/itop --add --mount-path=/var/lib/mysql/itop_db --name=itop-volume-1 -t pvc --claim-name=pvc-itop-1 --overwrite
$oc set volume dc/itop --add --mount-path=/var/www/html --name=itop-volume-3 -t pvc --claim-name=pvc-itop-3 --overwrite
To import from the environment, copy the web content to the container that is deployed on persistence:
$oc get pods
$oc cp /home/user2/itop/backup/html itop-3-n6h2s:/var/www/
itop-3-n6h2s is container id from the output of "oc get pods"
If a mysql database is available from an environment, export the database:
$oc cp /home/user2/itop/itop_db.sql itop-6-qg7bl:/tmp
itop-6-qg7b is the container id from "oc get pods"
To export the database data, run the following command:
$mysqldump --add-drop-table -uroot itop_db > itop_db.sql
Then, import the data by running the following command:
$mysql -uroot itop_db< itop_db.sql
Example 4-9 shows the final iTop deployment configuration content.
Example 4-9 iTop configuration
[user2@codeReady itop]$ oc get dc/itop -o yaml
apiVersion: apps.openshift.io/v1
kind: DeploymentConfig
metadata:
annotations:
openshift.io/generated-by: OpenShiftNewApp
creationTimestamp: "2020-04-21T02:13:25Z"
generation: 6
labels:
app: itop
app.kubernetes.io/component: itop
app.kubernetes.io/instance: itop
name: itop
namespace: emsproject
resourceVersion: "577573"
selfLink: /apis/apps.openshift.io/v1/namespaces/emsproject/deploymentconfigs/itop
uid: 2d5554de-2506-4ca6-b214-6d2977ff0cd4
spec:
replicas: 1
revisionHistoryLimit: 10
selector:
deploymentconfig: itop
strategy:
activeDeadlineSeconds: 21600
resources: {}
rollingParams:
intervalSeconds: 1
maxSurge: 25%
maxUnavailable: 25%
timeoutSeconds: 600
updatePeriodSeconds: 1
type: Rolling
template:
metadata:
annotations:
openshift.io/generated-by: OpenShiftNewApp
creationTimestamp: null
labels:
deploymentconfig: itop
spec:
containers:
- image: docker.io/vbkunin/itop@sha256:d402e866384b2c74c75cfaaeca9e21f945798e4b310c79fa023962fe01f0f249
imagePullPolicy: Always
name: itop
ports:
- containerPort: 3306
protocol: TCP
- containerPort: 80
protocol: TCP
resources: {}
terminationMessagePath: /dev/termination-log
terminationMessagePolicy: File
volumeMounts:
- mountPath: /var/www/html
name: itop-volume-3
- mountPath: /var/lib/mysql/itop_db
name: itop-volume-1
dnsPolicy: ClusterFirst
restartPolicy: Always
schedulerName: default-scheduler
securityContext: {}
serviceAccount: useroot
serviceAccountName: useroot
terminationGracePeriodSeconds: 30
volumes:
- name: itop-volume-3
persistentVolumeClaim:
claimName: pvc-itop-3
- name: itop-volume-1
persistentVolumeClaim:
claimName: pvc-itop-1
test: false
triggers:
- type: ConfigChange
- imageChangeParams:
automatic: true
containerNames:
- itop
from:
kind: ImageStreamTag
name: itop:latest
namespace: emsproject
lastTriggeredImage: docker.io/vbkunin/itop@sha256:d402e866384b2c74c75cfaaeca9e21f945798e4b310c79fa023962fe01f0f249
type: ImageChange
status:
availableReplicas: 1
conditions:
- lastTransitionTime: "2020-04-21T02:13:51Z"
lastUpdateTime: "2020-04-21T02:13:51Z"
message: Deployment config has minimum availability.
status: "True"
type: Available
- lastTransitionTime: "2020-04-21T02:17:05Z"
lastUpdateTime: "2020-04-21T02:17:08Z"
message: replication controller "itop-4" successfully rolled out
reason: NewReplicationControllerAvailable
status: "True"
type: Progressing
details:
causes:
- type: Manual
message: manual change
latestVersion: 4
observedGeneration: 6
readyReplicas: 1
replicas: 1
unavailableReplicas: 0
updatedReplicas: 1
Browse iTop (see Figure 4-22). Find the URL by running the following command:
$oc get route itop

Figure 4-22 iTop Welcome window
In a production environment, the database is running as a separate pod and service.
To use mysql as a name for the pod, use mysql during the database configuration, for example:
$oc new-app docker.io/mysql:5.7.29 -e MYSQL_ROOT_PASSWORD=$password
To check whether the configuration was successful and to find the two pods, run the following command:
$oc get pods
For example:
[user2@server ]$ oc get pods
NAME READY STATUS RESTARTS AGE
itop-3-deploy 0/1 Completed 0 3h46m
itop-4-c7drm 1/1 Running 1 76m
itop-4-deploy 0/1 Completed 0 76m
mysql-1-deploy 0/1 Completed 0 3h24m
mysql-1-gmqsb 1/1 Running 0 3h23m
4.2.6 Creating a webhook in Red Hat OpenShift
To create a webhook in Red Hat OpenShift, create a webhook container. A configuration file that is named hook.json is included with webhook, as shown in Figure 4-23.

Figure 4-23 The webhook JSON file
In this scenario, webhook starts a send message, which is written in bash and adds modules that were pulled from the webhook image.
The webhook_j3 is a customized image:
$oc new-app quay.io/manasmohsin/webhook_j3:v3
Create a configmap to store webhook.json (see Example 4-10):
$oc create configmap webhook-config --from-file=/home/user2/webhook/hooks.json
$oc get configmap/webhook-config -o yaml
Example 4-10 The webhook configuration yaml file
[user2@codeReady ~]$ oc get configmap/webhook-config -o yaml
apiVersion: v1
data:
hooks.json: |
[
{
"id": "runscript",
"execute-command": "/home/j123/sendmessage.sh",
"command-working-directory": "/home/j123/",
"pass-arguments-to-command":
[
{
"source": "payload",
"name": "alerts.0.labels.instance"
},
{
"source": "payload",
"name": "alerts.0.labels.alertname"
},
{
"source": "string",
"name": "is above threshold"
},
{
"source": "string",
"name": "HARD"
},
{
"source": "payload",
"name": "alerts.0.labels.severity"
},
{
"source": "payload",
"name": "alerts.0.labels.priority"
},
{
"source": "payload",
"name": "alerts.0.labels.summary"
},
{
"source": "payload",
"name": "alerts.0.labels.description"
}
]
}
]
kind: ConfigMap
metadata:
creationTimestamp: "2020-04-22T05:56:18Z"
name: webhook-config
namespace: emsproject
resourceVersion: "1025467"
selfLink: /api/v1/namespaces/emsproject/configmaps/webhook-config
uid: 0c2fb58e-ee91-4e29-b587-71c7737b68cf
Remove the empty volume and add the configmap volume:
$oc set volume dc/webhookj3 --remove --mount-path=/etc/webhook --name=webhookj3-volume-1 --confirm
$ oc set volume dc/webhookj3 --add --mount-path=/etc/webhook --name=webhook-volume-1 -t configmap --configmap-name=webhook-config --overwrite
Find volumemount and volume in the deployment descriptor (see Example 4-11):
$oc get dc/webhookj3 -o yaml
Example 4-11 Search deployment descriptor
[user2@codeReady ~]$ oc get dc/webhookj3 -o yaml
apiVersion: apps.openshift.io/v1
kind: DeploymentConfig
metadata:
annotations:
openshift.io/generated-by: OpenShiftNewApp
creationTimestamp: "2020-04-23T06:42:40Z"
generation: 4
labels:
app: webhookj3
app.kubernetes.io/component: webhookj3
app.kubernetes.io/instance: webhookj3
name: webhookj3
namespace: emsproject
resourceVersion: "1029372"
selfLink: /apis/apps.openshift.io/v1/namespaces/emsproject/deploymentconfigs/webhookj3
uid: b2844165-8244-453d-976d-8be9c5e46f34
spec:
replicas: 1
revisionHistoryLimit: 10
selector:
deploymentconfig: webhookj3
strategy:
activeDeadlineSeconds: 21600
resources: {}
rollingParams:
intervalSeconds: 1
maxSurge: 25%
maxUnavailable: 25%
timeoutSeconds: 600
updatePeriodSeconds: 1
type: Rolling
template:
metadata:
annotations:
openshift.io/generated-by: OpenShiftNewApp
creationTimestamp: null
labels:
deploymentconfig: webhookj3
spec:
containers:
- image: quay.io/manasmohsin/webhook_j3@sha256:0cfa40a5572aa08dec1b290a74f56baf7e2a3538c702fb38d16f47ff42340065
imagePullPolicy: IfNotPresent
name: webhookj3
ports:
- containerPort: 9000
protocol: TCP
resources: {}
terminationMessagePath: /dev/termination-log
terminationMessagePolicy: File
volumeMounts:
- mountPath: /etc/webhook
name: webhookj3-volume-1
dnsPolicy: ClusterFirst
restartPolicy: Always
schedulerName: default-scheduler
securityContext: {}
terminationGracePeriodSeconds: 30
volumes:
- configMap:
defaultMode: 420
name: webhook-config
name: webhookj3-volume-1
test: false
triggers:
- type: ConfigChange
- imageChangeParams:
automatic: true
containerNames:
- webhookj3
from:
kind: ImageStreamTag
name: webhookj3:v6
namespace: emsproject
lastTriggeredImage: quay.io/manasmohsin/webhook_j3@sha256:0cfa40a5572aa08dec1b290a74f56baf7e2a3538c702fb38d16f47ff42340065
type: ImageChange
status:
availableReplicas: 1
conditions:
- lastTransitionTime: "2020-04-23T06:42:54Z"
lastUpdateTime: "2020-04-23T06:42:54Z"
message: Deployment config has minimum availability.
status: "True"
type: Available
- lastTransitionTime: "2020-04-23T06:43:39Z"
lastUpdateTime: "2020-04-23T06:43:41Z"
message: replication controller "webhookj3-3" successfully rolled out
reason: NewReplicationControllerAvailable
status: "True"
type: Progressing
details:
causes:
- type: ConfigChange
message: config change
latestVersion: 3
observedGeneration: 4
readyReplicas: 1
replicas: 1
unavailableReplicas: 0
updatedReplicas: 1
Find configmap from the Red Hat OpenShift console, as shown in Figure 4-24.

Figure 4-24 Red Hat OpenShift web console: $oc expose svc/webhookj3
Update the alertmanager if the webhook URL is not configured correctly.

Figure 4-25 alertmanager status
4.2.7 Creating an ELK in Red Hat OpenShift
This section describes how to create an ELK deployment.
Elasticsearch deployment
To create an Elasticsearch application, run the following command:
$oc import-image docker.elastic.co/elasticsearch/elasticsearch:7.6.2 --confirm
For example:
[user2@codeReady html]$ oc get is elasticsearch
NAME IMAGE REPOSITORY TAGS UPDATED
elasticsearch image-registry.openshift-image-registry.svc:5000/emsproject/elasticsearch 7.6.2 33 seconds ago
$oc new-app -e "discovery.type=single-node"
docker.elastic.co/elasticsearch/elasticsearch:7.6.2
$oc set volume dc/elasticsearch --add --mount-path=/usr/share/elasticsearch/data --name=elasticsearch-volume-1 -t pvc --claim-name=pvc-elasticsearch-1 --claim-size=100G --overwrite
$oc expose svc elasticsearch
$oc get route elasticsearch
For example:
[user2@codeReady ~]$ oc get route elasticsearch
NAME HOST/PORT PATH SERVICES PORT TERMINATION WILDCARD
elasticsearch elasticsearch-emsproject.apps-crc.testing elasticsearch 9200-tcp None
Kibana deployment
To create the Kibana application, the Elasticsearch URL is required as an input parameter (see Example 4-12):
$oc new-app -e ELASTICSEARCH_HOST=[ELASTIC_ROUTE] docker.elastic.co/kibana/kibana:7.6.0
Example 4-12 Create Kibana application
$oc new-app -e ELASTICSEARCH_HOST="http://elasticsearch-emsproject.apps-crc.testing/" docker.elastic.co/kibana/kibana:7.6.0
$oc expose svc kibana
$oc get route kibana
For example:
[user2@codeReady tmp]$ oc get route kibana
NAME HOST/PORT PATH SERVICES PORT TERMINATION WILDCARD
kibana kibana-emsproject.apps-crc.testing kibana 5601-tcp None
Metricbeat deployment
To create Metricbeat to push the data from Prometheus to Elasticsearch, run the following command:
$oc create configmap metricbeat-config --from-file=/home/user2/metricbeat/metricbeat.yml
Example 4-13 shows the content of metricbeat.yml.
Example 4-13 metricbeat.yml file
[user2@codeReady tmp]$ cat metricbeat.yml
metricbeat.modules:
- module: system
period: 10s
metricsets:
- cpu
- load
- memory
- network
- process
- process_summary
- socket_summary
#- entropy
#- core
#- diskio
#- socket
#- services
process.include_top_n:
by_cpu: 5 # include top 5 processes by CPU
by_memory: 5 # include top 5 processes by memory
- module: system
period: 1m
metricsets:
- filesystem
- fsstat
processors:
- drop_event.when.regexp:
system.filesystem.mount_point: '^/(sys|cgroup|proc|dev|etc|host|lib)($|/)'
- module: system
period: 15m
metricsets:
- uptime
- module: prometheus
period: 10s
hosts: ["http://prometheus-emsproject.apps-crc.testing"]
metrics_path: /metrics
- module: prometheus
metricsets: ["collector"]
enabled: true
period: 10s
hosts: ["http://prometheus-emsproject.apps-crc.testing"]
metrics_path: /metrics
- module: prometheus
period: 10s
hosts: ["http://prometheus-emsproject.apps-crc.testing"]
metrics_path: '/federate'
query:
'match[]': '{__name__!=""}'
processors:
- add_cloud_metadata: ~
- add_docker_metadata: ~
output.elasticsearch:
hosts: '${ELASTICSEARCH_HOSTS:elasticsearch:9200}'
username: '${ELASTICSEARCH_USERNAME:}'
password: '${ELASTICSEARCH_PASSWORD:}'
You must add the serviceAccountName in the deployment descriptor:
$oc new-app -e output.elasticsearch.hosts="http://elasticsearch-emsproject.apps-crc.testing/"
-e setup.kibana.host=”http://elasticsearch-emsproject.apps-crc.testing/”
docker.elastic.co/beats/metricbeat:7.6.2
Example 4-14 Configure configmap
$oc set volume dc/metricbeat --add --mount-path=/usr/share/metricbeat/metricbeat.yml
--sub-path=metricbeat.yml
--name=metricbeat-volume-1 -t configmap --configmap-name=metricbeat-config
From the metricbeat.yml file, two modules are enabled: System and Prometheus.
Verify that the respective module data is ingested or not using the discover feature of Kibana, as shown in Figure 4-26 and Figure 4-27.

Figure 4-26 System module data

Figure 4-27 Prometheus module data
4.3 Monitoring by using Prometheus and Grafana
This section describes monitoring by using Prometheus and Grafana.
4.3.1 Prometheus
Prometheus is a systems and service time-series monitoring system. It is 100% open source and community driven. It collects metrics from configured targets at specified intervals, evaluates rule expressions, displays the results, and triggers alerts if some condition is observed to be true.
|
Note: For more information, including documentation, examples, and guides, see this website.
|
Prometheus includes the following main distinguishing features as compared to other monitoring systems:
•A multi-dimensional data model (timeseries that are defined by metric name and set of key and value dimensions).
•A flexible query language to take advantage of this dimensionality.
•No dependency on distributed storage; single-server nodes are autonomous.
•TimeSeries collection occurs by way of a pull model over HTTP.
•Pushing timeseries is supported by way of an intermediary gateway.
•Targets are discovered by way of service discovery or static configuration.
•Multiple modes of graphing and dashboarding support.
•Support for hierarchical and horizontal federation.
Figure 4-28 shows an architectural overview of Prometheus.

Figure 4-28 Architecture overview
4.3.2 Installing Prometheus server
Complete the following steps to install Prometheus V2.17.1 on Red Hat Enterprise Linux server V7.7:
1. Create a system user and group for Prometheus by running the following command (see Figure 4-29):
# useradd -m -s /bin/false prometheus

Figure 4-29 Create Prometheus user and group
2. Check that the user was created by running the following command (see Figure 4-30):
# id prometheus

Figure 4-30 Prometheus ID
3. Create the following directories and provide the required permissions: Create prometheus configuration directory under /etc/ (see Figure 4-31) and data directory under /var/lib/ (see Figure 4-32); then, change the directory permissions (see Figure 4-33).
# mkdir /etc/prometheus

Figure 4-31 Prometheus configuration directory
# mkdir /var/lib/prometheus

Figure 4-32 Prometheus data directory
# chown prometheus:prometheus /var/lib/prometheus

Figure 4-33 Directory permissions
4. Run the curl command to download the latest release of Prometheus archive and extract it to get the binary files in a Red Hat Enterprise Linux server, as shown in Figure 4-34.
# curl -s https://api.github.com/repos/prometheus/prometheus/releases/latest | grep browser_download_url | grep linux-amd64 | cut -d '"' -f 4 | wget -qi -

Figure 4-34 Download Prometheus archive and extract it

Figure 4-35 Validate the tar file
6. Extract the downloaded archive .tar file and validate the content files by running the following command (see Figure 4-36):
# tar -xvf prometheus-2.17.1.linux-amd64.tar.gz

Figure 4-36 Extract the archive
7. Validate the extracted directory, as shown in Figure 4-37.

Figure 4-37 Validate the directory
8. Check the content that was created, as shown in Figure 4-38.

Figure 4-38 Check the content
9. Place these directories into your binary $PATH location and under the configuration folder.
Copy the directories (see Figure 4-39) and place them as follows (see Figure 4-40):
# cp prometheus promtool /usr/local/bin/

Figure 4-39 Copy the directories
# cp -r consoles/ console_libraries/ /etc/prometheus/

Figure 4-40 Place them in the configuration folder
10. Copy the yml file from the extracted directory to the Prometheus configuration directory (see Figure 4-41):
# cp prometheus.yml /etc/prometheus/

Figure 4-41 Copy the yml file to the Prometheus configuration
11. Validate the contents of the directory (see Figure 4-42):
# ls -l /etc/prometheus/prometheus.yml

Figure 4-42 List the directory contents
# vi /etc/prometheus/prometheus.yml

Figure 4-43 Edit the prometheus.yml file
13. Create systemd service for Prometheus. Edit the /etc/system/system/prometheus.service file as follows (Figure 4-44):
# vi /etc/systemd/system/prometheus.service

Figure 4-44 Edit prometheus.service file
14. Set the required directory permissions as shown in Figure 4-45, Figure 4-46, Figure 4-47, and Figure 4-48.
# cd /etc/prometheus

Figure 4-45 Check the contents of the /etc/prometheus directory
# chown -R prometheus:prometheus /etc/prometheus

Figure 4-46 Change the directory permissions
# chmod -R 775 /etc/Prometheus

Figure 4-47 Modify the permission access
# chown -R prometheus:prometheus /var/lib/prometheus/

Figure 4-48 Modify the /var/lib/prometheus/ directory access
# systemctl daemon-reload
# systemctl start prometheus

Figure 4-49 Reload daemon and start service
# systemctl status prometheus.service

Figure 4-50 Check service status
16. Check the Prometheus server in your browser. By default, Prometheus is running on port 9090. Verify the tool installation (see Figure 4-51):
http://<server-ip>:9090

Figure 4-51 Prometheus server
Complete the following steps to install Prometheus as Red Hat Enterprise Linux container:
1. Podman is a tool for running Linux containers. Subscribe, then enable extras channel to install Podman (see Figure 4-52 on page 282):
# subscription-manager repos --enable=rhel-7-server-rpms
# subscription-manager repos --enable=rhel-7-server-extras-rpms
# subscription-manager repos --enable=rhel-7-server-optional-rpms

Figure 4-52 Enable Podman
2. Install Podman by using the following command (for the installation output, see Figure 4-53, Figure 4-54, Figure 4-55 on page 283, Figure 4-56 on page 283, and Figure 4-57 on page 284):
# yum install podman -y

Figure 4-53 Install Podman

Figure 4-54 Podman installation continues

Figure 4-55 Podman install continues

Figure 4-56 Installation continues

Figure 4-57 Podman install completes
3. Install the latest Prometheus container image (see Figure 4-58):
# podman pull prom/prometheus

Figure 4-58 Install latest updates
4. Verify the container image (see Figure 4-59):
# podman images

Figure 4-59 Verify image
5. Run the container and verify the status (see Figure 4-60):
# podman run -d -p 9090:9090 prom/prometheus
# podman ps

Figure 4-60 Run and verify status
6. Check the Prometheus server in your browser (see Figure 4-61):
http://<server-ip>:9090

Figure 4-61 Prometheus server window
4.3.3 Installing node exporter (node exporter, ipmi exporter, mysql exporter, JMX exporter
This section describes installing node exporter and its components.
Installing the node exporter
Node exporters are components that send various hardware and kernel-related metrics from the system to the Prometheus server for monitoring. They are deployed at each client and configured to emit the data on a port of client system. Prometheus listens to the port and receives all the data.
Complete the following steps to download and install the node exporter on a Linux system:
1. SSH to the server, as shown in Figure 4-62.

Figure 4-62 Log in to the system
2. Run the following commands to create a folder and download the node exporter file into the folder, as shown in Figure 4-63 on page 286:
mkdir <dir_name>
cd <dir_name>
wget https://bit.ly/3e5lK8M

Figure 4-63 Download the node exporter
tar -xzvf node_exporter-0.18.1.linux-amd64.tar.gz

Figure 4-64 Extract the node exporter tar file
4. Copy the node_exporter file to bin by running the following commands:
cd node_exporter-0.18.1.linux-amd64
cp node_exporter /usr/local/bin
5. Create a user (node_exporter) to run the node_exporter as service, and give full access to the node_exporter file to the user that was created:
useradd --no-create-home --shell /bin/false node_exporter
chown node_exporter:node_exporter /usr/local/bin/node_exporter
6. Create an entry in the system to run node exporter as service:
echo '[Unit]
Description=Node Exporter
Wants=network-online.target
After=network-online.target
[Service]
User=node_exporter
Group=node_exporter
Type=simple
ExecStart=/usr/local/bin/node_exporter
[Install]
WantedBy=multi-user.target' > /etc/systemd/system/node_exporter.service
7. To enable node_exporter as service, run the following commands:
systemctl daemon-reload
systemctl start node_exporter
systemctl enable node_exporter
8. Check whether the service is running by running the following command (see Figure 4-65 on page 287):
ps -uax | grep node_exporter

Figure 4-65 Check running service
9. After validating that the service is running, the Prometheus settings can be updated and Prometheus can be restarted.
The Prometheus settings are updated as follows:
job_name: 'node_exporter'
scrape_interval: 5s
static_configs:
targets:
<IP:9100>
relabel_configs:
source_labels: [__address__]
regex: <IP:9100>
target_label: instance
replacement: <new_name>
action: replace
JMX exporter
JMX exporter is one of the exporters that is custom built for Java applications. As in this use case, the application is Java-based and deployed in Apache Tomcat as a web application to monitor the application metrics that JMX used.
Setting up JMX
To set up JMX, complete the following steps:
1. Log in to the server where the application is going to be deployed as root.
2. Check whether tomcat is running:
ps -eaf | grep tomcat
3. If tomcat is running, stop it by running the following command:
PATH_TOMCAT/bin/shutdown.sh
4. Run the following commands to download the JAR file and configuration file for jmx:
mkdir /opt/monitoring
cd /opt/monitoring
wget https://repo1.maven.org/maven2/io/prometheus/jmx/jmx_prometheus_javaagent/0.12.0/jmx_prometheus_javaagent-0.12.0.jar
wget https://github.com/prometheus/jmx_exporter/blob/master/example_configs/tomcat.yml
5. Run the following command to run JMX as javaagent when tomcat runs:
export JAVA_OPTS="$JAVA_OPTS -javaagent:/opt/monitoring/jmx_prometheus_javaagent-0.3.0.jar=9095:/opt/monitoring/tomcat.yml"
6. Start tomcat again by running the following command:
PATH_TOMCAT/bin/startup.sh
The command runs tomcat and the JMX metrics are available at:
http://<IP>:9095/metrics
The configuration in Prometheus is similar to that of node exporter, for example:
-job_name: 'java_metrics'
scrape_interval: 5s
static_configs:
targets:
- <IP>:9095
relabel_configs:
- source_labels: [__address__]
regex: <IP>:9095
target_label: instance
replacement: <new_name>
action: replace
IPMI exporter
IPMI exporter is one of the exporters that uses freeIPMI software to fetch the IPMI metrics. The IPMI exporter is installed on a server that can connect to other bare metal servers over the private IP network.
Setting up IPMI
The freeIPMI application must be installed and configured to fetch bmc, chassis, and IPMI data. Complete the following steps:
1. Log in to the server where the application is going to be deployed as root.
2. Check whether ipmimonitoring is accessible, as shown in Figure 4-66.

Figure 4-66 Check ipmimonitoring availability
3. If it is not accessible, run the following command after checking that freeIPMI was installed:
ipmi-exporter ALL = NOPASSWD:/usr/sbin/ipmimonitoring, /usr/sbin/ipmi-sensors, /usr/sbin/ipmi-dcmi, /usr/sbin/bmc-info, /usr/sbin/ipmi-chassis
4. RUn the following commands to download the ipmi_exporter tar file:
mkdir /opt/monitoring (if monitoring is not existing)
cd /opt/monitoring
wget https://github.com/soundcloud/ipmi_exporter/releases/download/v1.1.0/ipmi_exporter-v1.1.0.linux-amd64.tar.gz
tar -xvf ipmi_exporter-v1.1.0.linux-amd64.tar.gz
cd ipmi_exporter-v1.1.0.linux-amd64
cp ipmi.conf ipmi.conf.bak
Example 4-15 Update the ipmi.conf file
# Configuration file for ipmi_exporter
# This is an example config for scraping remote hosts via IPMI.
# Information required to access remote IPMI interfaces can be supplied in the
# 'modules' section. A scrape can request the usage of a given config by
# setting the `module` URL parameter.
modules:
default:
# These settings are used if no module is specified, the
# specified module doesn't exist, or of course if
# module default is specified.
user: "user_name"
pass: "_password_"
# The below settings correspond to driver-type, privilege-level, and
# session-timeout respectively, see `man 5 freeipmi.conf` (and e.g.
# `man 8 ipmi-sensors` for a list of driver types).
driver: "LAN_2_0"
privilege: "user"
# The session timeout is in milliseconds. Note that a scrape can take up
# to (session-timeout * #-of-collectors) milliseconds, so set the scrape
# timeout in Prometheus accordingly.
timeout: 10000
# Available collectors are bmc, ipmi, chassis, and dcmi
# If not specified, all three are used
collectors:
- bmc
- ipmi
- chassis
# Got any sensors you don't care about? Add them here.
# exclude_sensor_ids:
dcmi:
# Use these settings when scraped with module=dcmi.
user: "user_name"
pass: "_password_"
privilege: "admin"
driver: "LAN_2_0"
collectors:
- dcmi
thatspecialhost:
# Use these settings when scraped with module=thatspecialhost.
user: "user_name"
pass: "_password_"
privilege: "admin"
driver: "LAN"
collectors:
- ipmi
# Need any special workaround flags set? Add them here.
# Workaround flags might be needed to address issues with specific vendor implementations
# e.g. https://www.gnu.org/software/freeipmi/freeipmi-faq.html#Why-is-the-output-from-FreeIPMI-different-than-another-software_003f
# For a full list of flags, refer to:
# https://www.gnu.org/software/freeipmi/manpages/man8/ipmi-sensors.8.html#lbAL
workaround_flags:
- discretereading
6. Run the ipmi_exporter by running the following command:
./ipmi_exporter --config.file=./ipmi.conf
Exporter is up and running at http://<IP>:9290/metrics.
7. A targets.yml file must be added to the Prometheus server with following content:
---
- targets:
- IPMI_server_1_Private_IP
- IPMI_server_2_Private_IP
.
.
- IPMI_server_n_Private_IP
labels:
job: ipmi_exporter
The targets file must contain all of the IPMI servers’ private IPs for which the metrics must be scrapped. It is often kept with the Prometheus .yml file.
The configuration in Prometheus must be updated as shown in Example 4-16.
Example 4-16 Prometheus configuration file updates
- job_name: ipmi_exporter
honor_timestamps: true
scrape_interval: 1m
scrape_timeout: 30s
metrics_path: /ipmi
scheme: http
file_sd_configs:
- files:
- <path_to_targets.yml>
refresh_interval: 5m
relabel_configs:
- source_labels: [__address__]
separator: ;
regex: (.*)
target_label: __param_target
replacement: ${1}
action: replace
- source_labels: [__param_target]
separator: ;
regex: (.*)
target_label: instance
replacement: ${1}
action: replace
- separator: ;
regex: .*
target_label: __address__
replacement: <IP/DNS_Name>:9290
action: replace
4.3.4 Alertmanager
Alertmanager triggers webhook when the alert is received from Prometheus. The Alertmanager configuration is in alertmanager.yml ($HOME/Alertmanager/alertmanager-0.20.0.linux-amd64/alertmanager.yml), as shown in Example 4-17.
Example 4-17 alertmanager.yml
global:
resolve_timeout: 1m
route:
group_by: ['alertname','instance']
group_wait: 10s
group_interval: 15s
repeat_interval: 1h
#receiver: 'web.hook'
#receiver: 'default-receiver'
receiver: email-me
inhibit_rules:
- source_match:
severity: '1'
target_match:
severity: '2'
# Apply inhibition if the alertname is the same.
equal: ['alertname','summary','instance']
receivers:
- name: email-me
email_configs:
- to: [email protected]
from: [email protected]
smarthost: smtp.gmail.com:587
auth_username: [email protected]
auth_identity: [email protected]
auth_password: uylugagvfofasqgt
send_resolved: true
require_tls: true
webhook_configs:
- url: 'http://169.38.67.66:9000/hooks/runscript'
send_resolved: true
4.3.5 Webhook
Webhook is started by Alertmanager to run actions when an alert is received from Prometheus. The sendmessage.sh that is included in the webhook configuration sends a message to iTop, as shown in Example 4-18 on page 292.
Example 4-18 /home/j123/hooks.json
[
{
"id": "runscript",
"execute-command": "/home/j123/sendmessage.sh",
"command-working-directory": "/home/j123/",
"pass-arguments-to-command":
[
{
"source": "payload",
"name": "alerts.0.labels.instance"
},
{
"source": "payload",
"name": "alerts.0.labels.alertname"
},
{
"source": "string",
"name": "is above threshold"
},
{
"source": "string",
"name": "HARD"
},
{
"source": "payload",
"name": "alerts.0.labels.severity"
},
{
"source": "payload",
"name": "alerts.0.labels.priority"
},
{
"source": "payload",
"name": "alerts.0.labels.summary"
},
{
"source": "payload",
"name": "alerts.0.labels.description"
}
]
}
]
Run webhook by using the following command:
$ /root/Alertmanager/webhook -hooks /home/j123/hooks.json -verbose
Webhook logs show that webhook is triggered and creates a ticket in iTop by using REST API. To send a message to iTop for service management, the running script (sendmessage.sh) is run, as shown in Example 4-19.
Example 4-19 /home/j123/sendmessage.sh
#!/bin/bash
##################################################################################
# #
# Example script for creating a UserRequest ticket via the REST/JSON webservices #
# #
##################################################################################
# iTop location and credentials, change them to suit your iTop installation
ITOP_URL="http://169.38.131.81/itop/"
ITOP_USER="admin"
ITOP_PWD="p@ssw0rd"
# Parameters checking, see below for default values
if [ "$1" == "" ]; then
echo "Missing parameter 1: host"
exit -1
else
HOST="$1"
fi
if [ "$2" == "" ]; then
echo "Missing parameter 2: Service"
exit -1
else
SERVICE="$2"
fi
if [ "$3" == "" ]; then
echo "Missing parameter 3: Service Status"
exit -1
else
SERVICE_STATUS="$3"
fi
if [ "$4" == "" ]; then
echo "Missing parameter 4: Service State Type"
exit -1
else
SERVICE_STATUS_TYPE="$4"
fi
if [ "$5" == "" ]; then
echo "Missing parameter 5: Urgency"
exit -1
else
URGENCY="$5"
fi
if [ "$6" == "" ]; then
echo "Missing parameter 6: Priority"
exit -1
else
PRIORITY="$6"
fi
if [ "$7" == "" ]; then
echo "Missing parameter 7: Summary"
exit -1
else
SUMMARY="$7"
fi
if [ "$8" == "" ]; then
echo "Missing parameter 8: Description"
exit -1
else
DESCRIPTION="$8"
fi
# Default values, adapt them to your configuration
TICKET_CLASS="Incident"
ORGANIZATION="SELECT Organization JOIN FunctionalCI AS CI ON CI.org_id=Organization.id WHERE CI.name='"${HOST}"'"
#ORGANIZATION="Demo"
TITLE="$SUMMARY - is raised for metric - $2"
DESCRIPTION="$DESCRIPTION - is raised on $HOST"
#CALLER="prometheus"
# Let's create the ticket via the REST/JSON API
if [[ ( "$SERVICE_STATUS" != "OK" ) && ( "$SERVICE_STATUS" != "UP" ) && ( "$SERVICE_STATUS_TYPE" == "HARD" ) ]]; then
CIS_LIST='[{"functionalci_id":"SELECT FunctionalCI WHERE name="'"$1"'"", "impact_code": "manual"}]'
JSON_DATA='{"operation":"core/create", "class":"'"${TICKET_CLASS}"'", "fields": {"functionalcis_list":'"${CIS_LIST}"', "org_id":"'"${ORGANIZATION}"'", "title":"'"$SUMMARY"'", "urgency":"'"$URGENCY"'","priority":"'"$PRIORITY"'","description":"'"$DESCRIPTION"'"}, "comment": "Created by the Monitoring", "output_fields": "id"}'
RESULT=`wget -q --post-data='auth_user='"${ITOP_USER}"'&auth_pwd='"${ITOP_PWD}"'&json_data='"${JSON_DATA}" --no-check-certificate -O - "${ITOP_URL}/webservices/rest.php?version=1.0"`
PATTERN='"key":"([0-9])+"'
if [[ $RESULT =~ $PATTERN ]]; then
echo "Ticket created successfully"
echo $PATTERN
else
echo "ERROR: failed to create ticket"
echo $RESULT
fi
else
echo "Service State Type != HARD, doing nothing"
fi
Figure 4-67 shows the log of running sendmessage.sh.

Figure 4-67 sendmessage.sh
To customize the webhook container, a Dockerfile is created, as shown in Example 4-20.
Example 4-20 /home/j123/webhook/Dockerfile
FROM almir/webhook:latest
LABEL maintainer="[email protected]"
USER root
RUN mkdir /home/j123/
WORKDIR /home/j123/contianer
COPY hooks.json /etc/webhook/
COPY sendmessage.sh /home/j123/
CMD ["-verbose", "-hooks=/etc/webhook/hooks.json", "-hotreload"]
In the Dockerfile directory, build the container image and push the container image to quay.io as follows:
$cd /home/j123/webhook/Dockerfile
$docker build -t quay.io/manasmohsin/webhook_j3:v6 .
$docker push quay.io/manasmohsin/webhook_j3:v6
After you push the image, you can find it by browsing to the following link (in our scenario):
https://quay.io/repository/manasmohsin/webhook_j3?tab=tags
The quay.io is providing a vulnerability test for the image. Figure 4-68 shows that this custom image passed the vulnerability test.

Figure 4-68 Red Hat Quay.io: Repository Tags window
4.3.6 Grafana
By using Grafana, users can query, visualize, understand, and send alerts about metric data that was collected from servers or applications. Various storage options are available that can be used to store the metrics and Grafana is adaptive in terms of data sources. It creates dashboards of the metrics that can be used to understand the on-going historical behavior. It allows users to create filters and manage with the data based on the filters.
Complete the following steps to deploy Grafana on Linux:
1. Define inbound rules.
Check that you have port 3000 (Grafana runs to allow communication at this port) open for access from the defined sources. For the sake of easing the process, all of the ICMP, TCP, and UDP ports are open for the source, as shown in Figure 4-69. Specific rules can be added.

Figure 4-69 Define inbound rules
2. Define outbound rules.
Check whether this system can communicate with other devices. For ease, all of the ports are open to access from all of the IPs, as shown in Figure 4-70.

Figure 4-70 Define outbound rules
3. Update and upgrade the server:
sudo apt-get update
sudo apt-get upgrade
4. Reboot the system:
sudo reboot
5. Install wget if not available already:
sudo apt-get -y install wget
6. Install the latest Grafana:
echo 'deb https://packages.grafana.com/oss/deb stable main' >> /etc/apt/sources.list
curl https://packages.grafana.com/gpg.key | sudo apt-key add -
sudo apt-get update
sudo apt-get -y install grafana
7. Start and enable the Grafana server:
systemctl daemon-reload
systemctl start grafana-server
8. Enable to start the Grafana server on boot:
systemctl enable grafana-server.service
9. Check the server status:
systemctl status grafana-server
The Grafana server is now active (that is, running).
|
Note: The Grafana configuration is stored in /etc/grafana/grafana.ini. This configuration must not be changed. If changes are required, copy the original file and change that copied file.
|
10. Access Grafana.
Go to http://<IP>:3000.

Figure 4-71 Grafana log in window
After these credentials are entered, the password can be changed or can be skipped and changed later.
Prometheus data source in Grafana
Grafana supports multiple data sources and for our example, Prometheus is used as the data source. Because metrics can be read and stored in Prometheus, it makes life easier when we Prometheus support is in Grafana. This support allows for the creation of dashboards from metrics data and understanding the server state by using dashboards at run time easy and efficient.
Setting up Prometheus as the data source
Complete the following steps:
1. Log in to Grafana at http://<IP>:3000. Enter your credentials, as shown in Figure 4-71 on page 298.
2. Add a data source.
After logging in to Grafana, the Welcome window looks as shown in Figure 4-72. This window is where the Create a data source option is green and enabled. Also, no dashboards were starred or recently accessed.

Figure 4-72 Grafana welcome pane
3. Click Add Data Source or go to Configuration and select Data Source to add data source. For the current use case, select Prometheus, which is shown under the time series databases as the data source, as shown in Figure 4-73.

Figure 4-73 Add data source pane
The Data Sources addition page is shown in Figure 4-74.

Figure 4-74 Data Sources pane: Type Prometheus
4. Enter a Unique Name, URL (Prometheus URL), and set the HTTP Method as GET.
These settings are sufficient to integrate Prometheus. However, if some level of authentication is needed for Prometheus, you might have to provide it in the settings, as shown in Figure 4-74.

Figure 4-75 Successful data source integration message
After successful addition, the data source appears in the Data Sources list, as shown in Figure 4-76.

Figure 4-76 Data Source: Configuration Organization pane
The data now can be fetched from the Prometheus server and plotted in dashboard windows.
4.3.7 Adding SLA dashboard
This section describes how to add a SLA in the Grafana dashboard.
Setting up SLA dashboards
Dashboards in Grafana can be set up in various ways. This flexibility enables quick setup and variety. Options also are available that allow users to tweak an existing concept to their need instead of redeveloping the concept from scratch.
Consider the following points:
•It can be developed from scratch; for example, by going through metrics individually and adding windows per needed in a dashboard.
•User can use dashboards that are developed by others and uploaded to Grafana labs.
•User can import a JSON form of a dashboard.
Complete the following steps:
1. After logging in to Grafana UI, select the plus sign (+) and select Dashboard.

Figure 4-77 Manage dashboards and folders
3. Click Import (see Figure 4-77). The window in which you import a dashboard from JSON opens, as shown in Figure 4-78.

Figure 4-78 Import pane: Upload dashboard
4. Click Upload .json file (see Figure 4-78 on page 302) to choose the JSON file and upload it from a file selector window. After the file is selected and uploaded, a few properties can be updated, such as Name, Folder, and Prometheus Data Source.
By default, the dashboard is named when it is created. Although it is not necessary to update the folder, it is suggested that you select it and create it if it is not available. The data source must be added because it is a mandatory field to import the dashboard.

Figure 4-79 Import pane: Importing Dashboard
After the import process is complete, the dashboard is updated with the graphs and plots, as shown in Figure 4-80.

Figure 4-80 Systems Metrics Dashboard
The dashboard includes options to update the data every 5, 10, or 30 seconds. By default, 30 seconds is selected.
The option is available to select the metrics of the last n hours or minutes to show in the graph. By default, 1 hour of data is shown and it is updated every 30 seconds.
If multiple jobs exist, they are listed in JOB menu. Similarly, drop-down menus for hosts and IPs are also provided. Selecting any combination or individual displays filtered data that is based on the selection, and updates the plots with the available data.
4.4 Service management by using IT Operational Portal
This section describes how to perform system management with iTop.
4.4.1 iTop overview
iTop is an open source web-based IT Service Management tool. It is ITIL oriented and allows users to manage user requests, incidents, problems, changes, and service catalog in a single platform and configuration items and their relationships in a flexible CMDB.
Features
iTop includes the following features:
•Fully configurable Configuration Management (CMDB)
•HelpDesk and incident management
•Service and contract management
•Change management
•Configurable SLA management
•Graphical impact analysis
•CSV import tool for any data
•Consistency audit to check data quality
•Data synchronization (for data federation)
Installation of iTop
iTop relies on Apache/IIS, MySQL, and PHP as prerequisites for installation.
To install iTop V2.6.3 on Red Hat Enterprise Linux server V7.7, install Apache server.
Apache is an open source multi-platform web server. It provides a full range of web server features including CGI, SSL, and virtual domains.
To install Apache, enter the following command (see Figure 4-81 on page 305):
# yum install httpd -y

Figure 4-81 Install Apache server
Figure 4-82 shows dependencies that are resolved during the installation.

Figure 4-82 Solving dependencies
Figure 4-83 shows the continuation of the installation of Apache server.

Figure 4-83 Installation continues
Figure 4-84 shows the completed installation message.

Figure 4-84 Install complete
Installing httpd-devel package
Install the httpd-devel package by running the following command (see Figure 4-85):
# yum install httpd-devel

Figure 4-85 Install httpd-devel
Figure 4-86 shows the dependencies check and continuing with the installation.

Figure 4-86 Checking dependencies
Figure 4-87 shows the continuation of the dependencies updating process.

Figure 4-87 Updating dependencies
Figure 4-88 shows the continuation of the installation, verification, and updating procedure.

Figure 4-88 Installation continues
Figure 4-89 shows the installation completion.

Figure 4-89 Installation complete
Starting Apache Server
Start the Apache service and configure it to start automatically on every restart (see Figure 4-90) by running the following command:
# service httpd restart
# chkconfig httpd on

Figure 4-90 Configure the Apache service
Testing Apache installation
Open your web browser and browse to http://localhost/ or http://server-ip-address/, as shown in Figure 4-91.

Figure 4-91 Red Hat Enterprise Linux: Test Page
Installing MySQL server
MySQL is an enterprise class open source database. Complete the following steps to install MySQL server:
1. Download the binaries for MySQL Server 5.7.29 (see Figure 4-92):
# wget https://dev.mysql.com/get/mysql-5.7.29-1.el7.x86_64.rpm-bundle.tar
Figure 4-92 Download binaries
2. Untar the RPM package.
Browse to the location where the mysql-5.7.29-1.el7.x86_64.rpm-bundle.tar file was downloaded and run the following command (see Figure 4-93):
# tar -xvf mysql-5.7.29-1.el7.x86_64.rpm-bundle.tar
Figure 4-93 Untar the binaries
After completing the untar, these files are available, as shown in Figure 4-94.

Figure 4-94 Binaries files after untar
3. Install the mysql-community-common package.
This package contains common files that are needed by MySQL Client Library and MySQL Server (see Figure 4-95):
# yum install mysql-community-common-5.7.29-1.el7.x86_64.rpm
Figure 4-95 Install of mysql-community-common package
4. Install the mysql-community-libs package.
This package contains the shared libraries for MySQL Client Applications (see Figure 4-96):
# yum install mysql-community-libs-5.7.29-1.el7.x86_64.rpm
Figure 4-96 Install mysql-community-libs package
# yum install mysql-community-client-5.7.29-1.el7.x86_64.rpm
Figure 4-97 Install mysql-community-client package
# yum install mysql-community-server-5.7.29-1.el7.x86_64.rpm
Figure 4-98 Install mysql-community-server package
7. Initialize the database (see Figure 4-99):
# mysqld -initialize -user=mysql
Figure 4-99 Initialize the database
8. After the installation is complete, browse to the data directory that is specified in /etc/my.cnf and check whether it is populated with data, as shown in Figure 4-100.

Figure 4-100 Postinstallation check
9. Retrieve the temporary password for the MySQL Login.
The mysqld -initialize command generates an initial temporary password for root user. This password is stored in the mysql.log file (as shown in Figure 4-101) that is specified in the my.cnf. Copy this password for logging in to MySQL Service.
|
Note: Without this password, it is not possible to log in to MySQL for the first time.
|

Figure 4-101 Password stored in mysql.log file
|
Note: The password can be found on the last line of the file or search the file for string temporary password is generated.
|
10. Start the MySQL service (see Figure 4-102):
# service mysqld start
Figure 4-102 Start MySQL service
11. Check if MySQL process is running (see Figure 4-103):
# ps -ef | grep mysql
Figure 4-103 Check MySQL process
12. Run the mysql_secure_configuration command for securing the mysql:
# mysql_secure_configuration
Change the password for the root user, as shown in Figure 4-104.
|
Note: When prompted by the message Enter password for user root, enter the temporary password that is generated in the mysql.log file. This process sets the new password as required.
|

Figure 4-104 Changing the root user password
After the password is set, follow the instructions to secure mysql service. Log in to MySQL service by using the new root password.
13. Install PHP.
PHP (recursive acronym for PHP: Hypertext Preprocessor) is a widely used open source general purpose scripting language that is well-suited for web development and can be embedded into HTML.
a. Install PHP packages (see Figure 4-105 on page 314):
# yum -y install php php-mysql php-common php-gd php-mbstring php-mcrypt php-devel php-xml php-imap php-ldap php-mbstring php-odbc php-pear php-xmlrpc php-soap php-cli graphviz
|
Note: For brevity, only the initial installation output and the completion output are shown.
|

Figure 4-105 Install PHP packages
Figure 4-106 shows the output of the completion of the install of the PHP packages.

Figure 4-106 Completion of the installation of the PHP packages
b. Adjust the following PHP settings (see Figure 4-107):
# vi /etc/php.ini
post_max_size = 32M
-- Save & Quit (:wq)

Figure 4-107 Adjusting a PHP setting
c. Restart Apache server to load the new configuration (see Figure 4-108):
# service httpd restart

Figure 4-108 Restart the Apache server
14. Download and install iTop:
# yum -y install zip unzip

Figure 4-109 Install zip

Figure 4-110 Extract files
# cd /var/www/html
# wget https://sourceforge.net/projects/itop/files/itop/2.6.3/iTop-2.6.3-5092.zip

Figure 4-111 Download iTop
Figure 4-112 shows the completion of the download.

Figure 4-112 Downloading iTop continues
c. Extract the package and rename the web directory as iTop (see Figure 4-113):
# unzip iTop-2.6.3-5092.zip
# mv web itop

Figure 4-113 Rename the web directory
d. Create the following directory and make them writable:
# mkdir /var/www/html/itop/conf
# mkdir /var/www/html/itop/env-production
# chmod 777 /var/www/html/itop/conf/
# chmod 777 /var/www/html/itop/data
# chmod 777 /var/www/html/itop/env-production/
# chmod 777 /var/www/html/itop/log
e. Complete the installation by using a web browser:
http://<Server_ip_address>/itop
Installing iTop V2.7.0-beta as Red Hat Enterprise Linux container
Complete the following steps to install iTop V2.7.0:
1. Podman is a tool for running Linux containers. Subscribe, then enable extras channel to install Podman (see Figure 4-114):
# subscription-manager repos --enable=rhel-7-server-rpms
# subscription-manager repos --enable=rhel-7-server-extras-rpms
# subscription-manager repos --enable=rhel-7-server-optional-rpms

Figure 4-114 Subscribe and enable extras channels
2. Install Podman (see Figure 4-115):
# yum install podman -y

Figure 4-115 Install Podman
Figure 4-116 shows the completion of the installation of Podman. A few output windows were omitted.

Figure 4-116 Completing the installation of Podman
3. Install the latest Prometheus container image (see Figure 4-117):
# podman pull vbkunin/itop

Figure 4-117 Install Prometheus container image
4. Run iTop container (see Figure 4-118):
# podman run -d -p 8000:80 --name=my-itop vbkunin/itop:2.7.0-beta

Figure 4-118 Running iTop container
5. Check the status (see Figure 4-119):
# podman ps

Figure 4-119 Status check
6. Complete the installation by using a web browser:
http://<Server_ip_address>/itop
iTop installation wizard
This section shows the iTop installation wizard:
1. Assess the iTop installation setup by using a web browser:
http://<Server_ip_address>/itop

Figure 4-120 iTop Installation Wizard window

Figure 4-121 iTop: Install or Upgrade choice window
4. Select the I Accept the terms of the licenses of the 59 components mentioned above box and then, click Next, as shown in Figure 4-122.

Figure 4-122 iTop License Agreement window
5. Enter the following database server connection:
– Server Name: localhost
– Login: root
– Password: Default password is blank. You can use the password you created.
– In the Database field, select Create a new Database: itop_db

Figure 4-123 iTop Database Configuration window
7. Enter the following Administrator Account information:
– Login: admin
– Password: <Password>
– Confirm password: <Password>
– Language: English

Figure 4-124 iTop Administrator Account window
9. For the Sample Data option, if you directly use it in production environment, select the I am installing a production instance, create an empty database to start from option and click Next (see Figure 4-125).

Figure 4-125 iTop Miscellaneous Parameters window

Figure 4-126 iTop Configuration Management options window

Figure 4-127 iTop Service Management options window
12. Select ITIL Compliant Tickets Management → User Request Management, Incident Management, and Customer Portal. Click Next, as shown in Figure 4-128.

Figure 4-128 iTop Tickets Management options window

Figure 4-129 iTop Change Management options window
14. Select the Known Errors Management and Problem Management options. Click Next, as shown in Figure 4-130.

Figure 4-130 iTop Additional ITIL tickets window

Figure 4-131 iTop Ready to install window
Figure 4-132 shows the completion of the installation. Click Enter iTop.

Figure 4-132 iTop Done window
The iTop dashboard window is displayed as shown in Figure 4-133.

Figure 4-133 iTop dashboard
4.4.2 Generating an App password for Postfix to access Google accounts
This section explains how to generate an App password for third-party applications; for example, Postfix to access Google accounts.
Prerequisites
To generate a password for Postfix, you must have a valid Google Gmail account.
The solution
Complete the following steps to generate a password for Postfix:
1. Log in to Google Gmail, as shown in Figure 4-134.

Figure 4-134 Shows access to an email account
2. Click Account Setting (upper right corner) and then, click the Manage Your Google Account tab, as shown in Figure 4-135.

Figure 4-135 Account configuration settings: Manage Google account

Figure 4-136 Google account: Security configuration
The Security settings window opens, as shown in Figure 4-137.

Figure 4-137 Google account: Security settings pane

Figure 4-138 Enter account password
The App passwords window opens, as shown in Figure 4-139.

Figure 4-139 Google Account: App password pane
5. In the Select app section, select the other (Custom Name) option and enter postfix, as shown in Figure 4-140.

Figure 4-140 App password window: Select application to generate password

Figure 4-141 App password generated
The generated password is added to the sasl_password file during the Postfix configuration. For more information, see 4.4.3, “Mail extension with iTop” on page 337.
4.4.3 Mail extension with iTop
This section describes how to configure postfix for email messaging.
Traditional email transport
How the mail setup works when a mail server is in your environment is shown in Figure 4-142.

Figure 4-142 email framework
Problem statement
You can see a traditional mail transport in Figure 4-142, but this case requires to route mail from a machine in the cloud where no mail server exists. Therefore, the question is: How is the mail routed without an SMTP server?
Postfix must be configured to send email by using an external SMTP provider, such as Gmail, Mandrill, SendGrid, Amazon SES, or any other SMTP server, for several reasons. One reason is to avoid getting your mail flagged as spam if your current server’s IP was added to a spam list.
Prerequisites
To implement Postfix, the following prerequisites must be met:
•Your fully qualified domain name (FQDN)
•All updates are installed
•A valid user name and password for the SMTP mail provider (Mandrill or SendGrid)
•The libsasl2-modules package is installed and current
•Postfix package is installed
•The cyrus-saslp package is installed
The solution
Complete the following steps to deploy the Postfix solution:

Figure 4-143 Install Postfix
2. View the installed package, as shown in Figure 4-144.

Figure 4-144 Check the installed package

Figure 4-145 Install cyrus-sasl packages
4. View the installed package, as shown in Figure 4-146.

Figure 4-146 Installed packages
5. Configure Postfix by adding or changing the following parameters in the /etc/postfix/main.cf file (see Figure 4-147):
– relayhost = [smtp.gmail.com]:587
– smtp_sasl_auth_enable = yes
– smtp_sasl_auth_enable = yes
– smtp_sasl_password_maps = hash:/etc/postfix/sasl_passwd
– smtp_sasl_security_options = noanonymous
– smtp_sasl_tls_security_options = noanonymous
– smtp_use_tls = yes
– smtp_tls_policy_maps = hash:/etc/postfix/tls_policy

Figure 4-147 Configure Postfix
6. Add Gmail’s user name and password in the /etc/postfix/sasl_passwd file [smtp.gmail.com]:587 [email protected]:uylugagvfofasqgt, as shown in Figure 4-148.

Figure 4-148 Add email credentials
|
Note: The password is the App password with which you sign in to your Google account from apps on devices that do not support 2-step verification.
|
For more information about generating an App password generation, see this web page.
7. Google requires TLS in the Postfix’s SMTP client. This TLS is added in the /etc/postfix/main.cf file, which is related to tls_policy:
smtp_tls_policy_maps = hash:/etc/postfix/tls_policy
8. Create the database files by running the following commands:
#chmod 600 /etc/postfix/sasl_passwd
#postmap /etc/postfix/sasl_passwd
#postmap /etc/postfix/tls_policy
9. Start the postfix service by running the following command:
#systemctl start postfix
10. Enable the postfix service by running the following command:
#systemctl enable postfix
11. Check the status of Postfix service, as shown in Figure 4-149.

Figure 4-149 Check status of postfix service
12. Send an email to the remote user and verify the status in the relayhost in the /var/log/maillog file, as shown in Figure 4-150.

Figure 4-150 Text email configuration
A test mail arrives in your Gmail inbox, as shown in Figure 4-151.
Figure 4-151 Test email arrives
4.4.4 Fixing Python-pip package installation issues
When you cannot install python modules or manager on server (for example, 169.38.67.66) whereas you can install the modules on another server (for example, 169.38.122.215), complete the following steps to address the issue:

Figure 4-152 Server (iTop) on which the package is already installed

Figure 4-153 Server on which the package is not installed
2. Attempt to install the package on the server (vsi-servicemanagement). No package is available, as shown in Figure 4-154.

Figure 4-154 Attempt installation: python package
Listing the contents show that the required package is not in the software repository; therefore, it is not available in the system, as shown in Figure 4-155.

Figure 4-155 List repository contents on vsi-servicemanagement
Listing the contents of the second system (iTop) shows that the required package is available in the software repositories, as shown in Figure 4-156.

Figure 4-156 List repository contents on iTop
3. Copy the required repository from the system iTop to the vsi-servicemanagement system, as shown in Figure 4-157.

Figure 4-157 Copy the repository
4. After copying the repository, rerun the package installation command, as shown in Figure 4-158.

Figure 4-158 Installing the Python software packages
The required Python module and package are installed in the vsi-servicemanagement system, as shown in Figure 4-159.

Figure 4-159 Python installation completed
4.5 Log monitoring and analysis
This section shows the installation and configuration of the tools to be used for log monitoring and analysis.
4.5.1 Elasticsearch installation and configuration
This section describes the installation and configuration of Elasticsearch.
Node and server preparation
Complete the following steps to prepare the node and server:
1. Verify the current file system on the server, as shown in Figure 4-160.

Figure 4-160 Check the server’s file system
2. Create a file system that is separate from the operating system’s file system. To do this, verify whether a disk is available by running the command that is shown in Figure 4-161.

Figure 4-161 Checking for an available disk
Figure 4-161 shows a disk is available for use: Disk /dev/xvdc.
3. To initialize the physical volume (PV) for later use by the Logical Volume Manager (LVM), run the following command:
pvcreate /dev/xvdc
4. Construct an XFS file system by running the following command:
mkfs.xfs /dev/xvdc
5. Create a volume group (VG) on the block devices by running the following command. A new VG that is named apps is created on /dev/xvdc:
vgcreate apps /dev/xvdc
6. Create a logical volume in a VG apps_lv with disk space that us allocated by running the following command:
lvcreate -n apps_lv -L 99.9G apps
7. Construct an XFS file system by running the command as follows:
mkfs.xfs /dev/apps/apps_lv
8. Run the following command to get UUID for /dev/apps/apps_lv:
blkid /dev/apps/apps_lv
9. The /etc/fstab system configuration file contains all available disks, disk partitions, and their options. Add the following line to get the /<dir>/elk file system mounted:
UUID=8ae781ac-d6b2-41de-b5ab-99feb420e675 /<dir>/elk xfs defaults,noatime 1 2
10. Run the mount command to mount the file system in sequence under the server main root (/) partition per partition required:
mount -a
11. Verify that the file system is mounted with allocated file system space by running the display file system command, as shown in Figure 4-162.

Figure 4-162 Check mounted file systems
Support matrix
For more information about the various possible compatibility matrixes (see Figure 4-163), see this web page.

Figure 4-163 Matrix support
For example:
Java (JVM) version
This section describes the Java version requirements:
•Elasticsearch is built by using Java and requires at least Java 8 to run. Only Oracle’s Java and the OpenJDK are supported.
•The same JVM version must be used on all Elasticsearch nodes and clients.
•Recommend installing Java version 1.8.0_131 or later. Elasticsearch refuses to start if the wrong Java version is used.
•The version of Java that Elasticsearch uses can be configured by setting the JAVA_HOME environment variable.
•Open JDK rpm can be downloaded from this web page or follow the instructions at this web page to install Java according to the operating system that is used.
•After Java is installed, verify the Java version by running the following command:
[root@localhost ~]# java -version
openjdk version "1.8.0_31"
OpenJDK Runtime Environment (build 1.8.0_31-b13)
OpenJDK 64-Bit Server VM (build 25.31-b07, mixed mode)
User ID details
The following user ID were created while rpm was installing ELK:
•logstash:x:485:480:logstash:/opt/logstash:/sbin/nologin
•elasticsearch:x:496:491:elasticsearch user:/home/elasticsearch:/sbin/nologin
•kibana:x:495:490::/home/kibana:/bin/bash
RPM installation
Complete the following steps to install Elasticsearch:
|
Note: The RPM package is suitable for installation on Red Hat, Centos, SUSE Linux Enterprise Server, openSUSE, and other RPM-based systems. RPMs can be downloaded from the Elasticsearch website or from the Elasticsearch RPM repository.
|
The latest version of Elasticsearch can be found in the Download Elasticsearch web page.
Previous versions can be found in the Past Releases web page.
2. Select the suitable version, click Download to download the rpm package to the local machine, and then, SFTP it to the servers.
3. Run the following command across all the nodes and complete the installation:
rpm -ivh elasticsearch-7.6.0-x86_64.rpm
If Elasticsearch is not starting on installation, run the following statements to configure the Elasticsearch service to start automatically by using systemd:
sudo systemctl daemon-reload
sudo systemctl enable elasticsearch.service
You can start the Elasticsearch service by running the following command:
sudo systemctl start elasticsearch.service
For more information about RPM installation, see this web page.
At this web page, more information about the initial configuration of Elasticsearch, running Elasticsearch in your system, and checking whether Elasticsearch is running in your system, also is available.
Running Elasticsearch in your system
To configure Elasticsearch to start automatically when your system starts, run the following commands across all nodes:
sudo /bin/systemctl daemon-reload
sudo /bin/systemctl enable elasticsearch.service
Elasticsearch can be started and stopped as follows:
sudo systemctl start elasticsearch.service
sudo systemctl stop elasticsearch.service
These commands provide no feedback as to whether Elasticsearch was started successfully. Instead, this information is written to the log files that are in /var/log/elasticsearch/ (the elasticsearch.log is the log file with this information).
By default, the Elasticsearch service does not log information in the systemd journal. To enable journalctl logging, the --quiet option must be removed from the ExecStart command line in the elasticsearch.service file.
When systemd logging is enabled, the logging information is available by running the journalctl commands, as shown in the following examples:
•To tail the journal:
sudo journalctl -f
•To list journal entries for the Elasticsearch service:
sudo journalctl --unit elasticsearch
•To list journal entries for the Elasticsearch service starting from a specific time:
sudo journalctl --unit elasticsearch --since "2020-03-16 18:17:16"
You can use the man journalctl help command for more options or see this web page.
Directory layout of the data
Table 4-1 lists the location structure for the data.
Table 4-1 Data location structures
|
Type
|
Description
|
Default location
|
Setting
|
|
home
|
Elasticshare home directory or $ES_HOME.
|
/usr/share/elasticsearch
|
|
|
bin
|
Binary script,s including Elasticsearch to start a node and elasticsearch-plugin to install plug-ins.
|
/usr/share/elasticshare/bin
|
|
|
conf
|
Configuration files, including elasticsearch.yml.
|
/etc/elasticshared
|
path.conf
|
|
conf
|
Environment variables including heap size and file descriptors.
|
/etc/config/elasticsearch
|
|
|
data
|
The location of the data files of each index and shard allocated on the node. Can hold multiple locations.
|
/var/lib/elasticsearch
|
path.data
|
|
logs
|
Log files location.
|
/var/log/elasticsearch
|
path.logs
|
|
plugins
|
Plugin files location. Each plug-in is contained in a subdirectory.
|
/usr/share/elasticshare/plugins
|
|
|
repo
|
Shared file systems repository locations. Can hold multiple locations. A file system repository can be placed in any subdirectory of any directory that is specified here.
|
Not configured
|
path.repo
|
|
scripts
|
Location of script files.
|
/etc/elasticsearch/scripts
|
path.scripts
|
Configuring Elasticsearch
Elasticsearch loads its configuration from the /etc/elasticsearch/elasticsearch.yml file by default. The format is available at this web page.
The configuration files contain settings that are node-specific (such as node.name and paths), or settings that a node requires to join a cluster, such as cluster.name and network.host.
Important Elasticsearch configurations
Check the configuration file details that are available in /etc/elasticsearch/:
•elasticsearch.yml for configuring Elasticsearch
•log4j2.properties for configuring Elasticsearch logging
The configuration file format is in YAML format. The following parameters are changed in the configuration files:
|
Note: Check that all the nodes include similar changes to their configuration files. For more information, see this web page.
|
•cluster.name: elasticsearch: The cluster name that was decided.
•node.name: ${HOSTNAME}: The host name can be specified or a reference to the host name provided (by specifying the host name variable).
•path.data: /<dir>/elk/data: The path where Elasticsearch stores its data.
•path.logs: /var/log/elasticsearch/: The path where the logs are stored.
•bootstrap.memory_lock: true: To avoid memory issues, when this parameter is set to true, the MAX_LOCKED_MEMORY parameter in /etc/sysconfig/elasticsearch and LimitMEMLOCK=infinity parameter in the elasticsearch.conf file must be uncommented or set if these do not have these values assigned to them (see Example 4-21). For more about this parameter setting, see “Important system configurations” on page 348.
•network.host: 0.0.0.0/169.38.122.221: For a single node.
•http.port: 9200: Default port that is used.
Example 4-21 elasticsearch.yml uncommented line
[root@virtualserver01 elasticsearch]# grep "^[^#;]" elasticsearch.yml
node.name: virtualserver01.IBM-PoC-MSIP.cloud
path.data: /<dir>/elk/data
path.logs: /var/log/elasticsearch
network.host: 169.38.122.221
http.port: 9200
discovery.seed_hosts: ["169.38.122.221"]
cluster.initial_master_nodes: ["169.38.122.221"]
bootstrap.memory_lock: true
bootstrap.system_call_filter: false
The log configuration file Log4j2.properties includes all of the details that are set up correctly. Confirm that the following parameters are set:
•appender.rolling.type = RollingFile
•appender.rolling.fileName = ${sys:es.logs.base_path}${sys:file.separator}${sys:es.logs.cluster_name}.log
•appender.rolling.filePattern = ${sys:es.logs.base_path}${sys:file.separator}${sys:es.logs.cluster_name}-%d{yyyy-MM-dd}.log
•appender.rolling.policies.time.type = TimeBasedTriggeringPolicy
•appender.rolling.policies.time.interval = 1
•appender.rolling.policies.time.modulate = true
Distributions that use systemd require that system resource limits be configured by way of systemd rather than the /etc/sysconfig/elasticsearch file. For more information about the configuration, see this web page.
Important system configurations
The following settings must be addressed before going to production:
•JVM heap size: The jvm.options file in the etc/elasticsearch path must be updated as follows:
– Elasticsearch assigns the entire heap that is specified in jvm.options by way of the Xms (minimum heap size) and Xmx (maximum heap size) settings:
• Set the minimum heap size (Xms) and maximum heap size (Xmx) to be equal to each other.
• The more heap available to Elasticsearch, the more memory it can use for caching. However, too much heap can subject you to long garbage collection pauses.
• Set Xmx to no more than 50% of your physical RAM to ensure that enough physical RAM exists for kernel file system caches.
– Because the plan is to run multiple components, such as ELK stack on the same set of servers, it is better to use the default 2 GB values for these Xms and Xmx parameters.
•Systemd-related .conf file: For systems that use systemd, the parameter for the number of open files and the LimitMEMLOCK parameter are updated in the elasticssearch.conf file. It is created manually after the elasticsearch.service.d file is created under path /etc/systemd/system/. This .conf file is an updated version of the default elasticsearch.service file in the /usr/lib/systemd/system/ path.
•Disable swapping: Because configuration changes were made, you should not see any swapping that occurs in the Linux boxes that are running Elasticsearch.
•File descriptors: Elasticsearch uses many file descriptors or file handles. Running out of file descriptors can be disastrous and most likely lead to data loss. This setting for a system with systemd option is done in the .conf file that is in /etc/systemd/system/elasticsearch.service.d. The parameter is LimitNOFILE=65536.
•Virtual memory: Elasticsearch uses a hybrid mmapfs/niofs directory by default to store its indexes. The default operating system limits on map counts is likely to be too low, which can result in out of memory exceptions. To set this value permanently, update and add the vm.max_map_count (vm.max_map_count=262144) setting in /etc/sysctl.conf.
•Number of threads: Elasticsearch uses several thread pools for different types of operations. It is important that it can create threads whenever needed. Make sure that the number of threads that the Elasticsearch user can create is at least 2048. This setting is managed in the .conf file that is created in the systemd-related .conf file. You also can make sure that the /etc/security/limits.conf file is updated with the following lines:
# allow user 'elasticsearch' mlockall
elasticsearch soft memlock unlimited
elasticsearch hard memlock unlimited
After all of these settings are completed, it is best to restart the Elasticsearch service. It must up before moving on to the next step.
4.5.2 Kibana
Complete the following steps to perform an RPM installation of Kibana on one of the Elasticsearch server nodes:
1. Download the Kibana software from this web page.
2. Select the suitable version per the compatibility matrix.
For more information about setting up Kibana, see this web page.
Installing Kibana
Complete the following steps:
1. Download Kibana V5.5.0 from this web page.
2. Move the kibana-5.5.0-x86_64.rpm package file to the designated server.
3. As the root user, run the rpm -ivh kibana-7.6.0-x86_64.rpm command. After the installation is complete, see “Running Kibana in the system”.
Running Kibana in the system
To configure Kibana to start automatically when the system starts, run the following commands:
sudo /bin/systemctl daemon-reload
sudo /bin/systemctl enable kibana.service
Kibana can be started and stopped by running the following commands:
sudo systemctl start kibana.service
sudo systemctl stop kibana.service
These commands provide no feedback as to whether Kibana was started successfully. Instead, this information is written to the log files in /var/log/kibana/.
Directory layout for Kibana
The RPM places configuration files, logs, and the data directory in the suitable locations for an RPM-based system, as listed in Table 4-2.
Table 4-2 Data directory layout for Kibana
|
Type
|
Description
|
Default location
|
|
home
|
Kibana home directory or $KIBANA_HOME.
|
/usr/share/kibana
|
|
bin
|
Binary scripts including Kibana to start the Kibana server and kibana-plugin to install plug-ins.
|
/usr/share/kibana/bin
|
|
conf
|
Configuration files including kibana.yml.
|
/etc/kibana
|
|
data
|
The location of the data files that are written to disk by Kibana and its plug-ins.
|
/var/lib/kibana
|
|
optimize
|
Transpile source code. Specific administrative actions (for example, installing plug-in) result in the source code being retranspile dynamically.
|
/usr/share/kibana/optimize
|
|
plugins
|
Plugin files location. Each plugin is contained in a subdirectory.
|
/usr/share/kibana/plugins
|
Configuring Kibana by way of the configuration file
The Kibana server reads properties from the kibana.yml file on start. The default settings configure Kibana to run on localhost:5601. To change the host, port number, or to connect to Elasticsearch running on a different machine, you must update your kibana.yml file (see Example 4-22).
Open the /etc/kibana/kibana.yml file in vi edit mode and update the following parameters. Uncomment the following parameters within the .yml file:
•server.port: 5601: Check that this port is open.
•server.host: "169.38.122.221": The server name to which the remote connections connect.
•server.name: "virtualserver01": A more readable name of the Kibana server.
•elasticsearch.url: "http://169.38.122.221:9200": One of the Elasticsearch server details.
•elasticsearch.requestTimeout: 30000: Time in milliseconds that Kibana waits for response from Elasticsearch.
Example 4-22 kibana.yml uncommented lines
[root@virtualserver01 kibana]# grep "^[^#;]" kibana.yml
server.port: 5601
server.host: "169.38.122.221"
server.name: "virtualserver01"
elasticsearch.hosts: ["http://169.38.122.221:9200"]
elasticsearch.requestTimeout: 30000
logging.dest: /var/log/kibana/kibana.log
Configuring Kibana with Elasticsearch
Before you can start using Kibana, you must configure which Elasticsearch indexes to explore. The first time you access Kibana, you are prompted to define an index pattern that matches the name of one or more of your indexes; that is, all you need to configure to start using Kibana. For more information, see this web page.
Kibana can be started and stopped by running the following commands (logged as root user):
systemctl start kibana.service
systemctl status kibana.service
journalctl -u kibana.service → This is the option to check for any error log messages
systemctl stop kibana.service
Accessing Kibana
Kibana is a web application that you access through port 5601. By using your web browser, browse to the machine where Kibana is running and specify the port number.
You can reach the Kibana server’s status page by browsing to localhost:5601/status. The status page displays information about the server’s resource usage and lists the installed plug-ins.
4.5.3 Logstash
This section describes how to install Logstash in only one of the nodes. The logs are ingested into the setup from this node.
Begin by downloading the suitable version of Logstash (per the compatibility matrix), from this web page.
Move the RPM package logstash-7.6.0.rpm to the suitable server for installation. For example, under /<dir>/elk/rpms within the server, as performed with the previous software.
Installing Logstash
This section describes how to install RPM for Logstash. As a root user, run the command from the directory where the Logstash rpm package is located:
rpm -ivh logstash-7.6.0.rpm
Directory layout
After installing Logstash, the directory layout is as listed Table 4-3.
Table 4-3 Directory layout for Logstash
|
Type
|
Description
|
Default location
|
Setting
|
|
home
|
Home directory of the Logstash installation.
|
/usr/share/logstash
|
|
|
bin
|
Binary scripts, including Logstash to start Logstash and logstash-plugin to install plug-ins.
|
/usr/share/logstash/bin
|
|
|
settings
|
Configuration files, including logstash.yml, jvm options, and start options.
|
/etc/logstash
|
path.settings
|
|
conf
|
Logstash pipeline configuration files.
|
/etc/logstash/configd
|
path.config
|
|
logs
|
Log files.
|
/var/log/logstash
|
path.logs
|
|
plugins
|
Local, non-Ruby-Gem plug-in files. Each plug-in is contained in a subdirectory. Recommended for development only.
|
/usr/share/logstash/plugins
|
path.plugins
|
Logstash configuration files
Logstash has the following types of configuration files:
•Pipeline configuration files, which define the Logstash processing pipeline.
•Settings files, which specify options that control Logstash startup and execution.
Pipeline configuration files
You create pipeline configuration files when you define the stages of the Logstash processing pipeline. On the RPM, you place the pipeline configuration files in the /etc/logstash/conf.d directory. For more information about the configuration file, see this web page.
Setting files
The settings files are defined in the Logstash installation. Logstash includes the following settings files:
•logstash.yml: Contains Logstash configuration flags. You can set flags in this file instead of passing the flags at the command line. Any flags that you set at the command line override the corresponding settings in the logstash.yml file.
•jvm.options: Contains JVM configuration flags. Specify each flag on a separate line. You can also use this file to set the locale for Logstash.
•startup.options (Linux): Contains options used by the system-install script in /usr/share/logstash/bin to build the suitable startup script for the system.
4.5.4 Elasticsearch Filebeat integration
Filebeat is a lightweight shipper for forwarding and centralizing log data. Filebeat is installed as an agent on your servers. Filebeat monitors the log files or locations that you specify, collects log events, and forwards them to Elasticsearch or Logstash for indexing.
Download the suitable version of Filebeat (per the compatibility matrix), from this web page.
Move the downloaded RPM package filebeat-7.6.0-x86_64.rpm to the suitable server for installation. For example, under /<dir>/elk/rpms within the server.
Installing Filebeat
As root user, run the following command from the directory where filebeat rpm package is located:
rpm -ivh filebeat-7.6.0-x86_64.rpm
Directory layout for Filebeat
Table 4-4 lists the directory layout after the installation of Filebeat.
Table 4-4 Filebeat directory layout
|
Type
|
Description
|
Default location
|
Configuration option
|
|
home
|
Home of the Filebeat installation.
|
N/A
|
path.home
|
|
bin
|
The location of the binary files.
|
{path.home}/bin
|
N/A
|
|
config
|
The location for configuration files.
|
{path.home}
|
path.config
|
|
data
|
The location for persistent data files.
|
{path.home}/data
|
path.data
|
|
logs
|
The location of the logs created by Filebeat.
|
{path.home}/logs
|
path.logs
|
Configuring Filebeat
To configure Filebeat, edit the configuration file. For rpm and deb, you find the configuration file at /etc/filebeat/filebeat.yml. A full example configuration file also is available at /etc/filebeat/filebeat.reference.yml.
Filebeat input selection
The main configuration unit in Filebeat is the inputs. They are responsible for locating specific files and applying basic processing to them.
The main configuration that is applied to inputs is path (or paths) to the file you want to track, but you can use other configuration options, such as defining the input type and encoding to use for reading the file, excluding and including specific lines, and adding custom fields.
Filebeat can be configured to track multiple files or define multiple inputs if you have input-specific configurations that you want to apply.
Filebeat support multiple modules. For more information, see this web page.
The following example filebeat input section monitors all of the files that end with .log in location /var/log/, and send the log messages to Elasticsearch or to Logstash, depending on the filebeat output section:
filebeat.inputs:
- type: log
#Change value to true to activate the input configuration
enabled: true
paths:
- "/var/log/*.log"
Filebeat output section
Filebeat configuration files define to where you want to ship the data. Many supported output options are available, including console, file, cloud, Redis, and Kafka. However, in most cases, you use the Logstash or Elasticsearch output types. Define a Logstash instance for more advanced processing and data enhancement.
For forwarding logs to Elasticsearch:
output.elasticsearch:
hosts: ["localhost:9200"]
For forwarding logs to Logstash:
output.logstash:
hosts: ["localhost:5044"]
For more information about multiline logs that are related to configurations, see this web page.
4.5.5 Elasticsearch Metricbeat installation
This section describes how to install elastic Metricbeats in only one node. Metricbeat collects the metrics from the Prometheus instance remotely.
Download the suitable version of Logstash (per the compatibility matrix), from this web page.
Move the RPM package metricbeat-7.6.0-x86_64.rpm to the suitable server for installation. For example, under /<dir>/elk/rpms within the server.
Installing Metricbeat
This section describes how to perform the RPM install of Metricbeat. As root user, run the following command from the directory where metricbeat rpm package is located:
rpm -ivh metricbeat-7.6.0-x86_64.rpm
Directory layout for Metricbeat
Table 4-5 lists the directory layout after the installation of Metricbeat.
Table 4-5 Metricbeat directory layout
|
Type
|
Description
|
Location
|
|
home
|
Home of the metric installation.
|
/usr/share/metricbeat
|
|
bin
|
The location of the binary files.
|
/usr/share/metricbeat/bin
|
|
conf
|
The location for configuration files.
|
/etc/metricbeat
|
|
data
|
The location for persistent data files.
|
/var/lib/metricbeat
|
|
logs
|
The location for the logs created by metricbeat
|
/var/log/metricbeat
|
Metricbeat module
Metricbeat is a lightweight shipper that can be installed on a specific server to periodically collect metrics from the operating system and services that are running on the server. Metricbeat takes the metrics and statistics that it collects and ships them to the output that you specify, such as Elasticsearch or Logstash.
Metricbeat start and stop command are as follows:
service metricbeat start
service metricbeat stop
The unit file that is included in the packages sets the -e flag by default. This flag makes Metricbeat log to stderr and disables other log outputs. Systemd stores all output sent to stderr in journald.
To review the Metricbeat logs, ruin the following command:
journalctl -u metricbeat.service
To enable default logging to /var/log/metricbeat, the metricbeat.service file under /lib/systemd/system must be modified to enable Metricbeat logging to default location /var/log/metricbeat by commenting the following line:
#Environment="BEAT_LOG_OPTS=-e"
Metricbeat helps to monitor servers by collecting metrics from the system and services running on the server. Multiple modules are available for monitoring,
Metricbeat system module
The system module enables monitoring servers. The following default metricsets are available:
•cpu
•load
•memory
•network
•process
•process_summary
In the /etc/metricbeat/moduls.d folder, enable the Metricbeat system module by renaming the module from system.yml.disable to system.yml.
Consider the following points:
•Metricbeat must be installed on each server from which metricdata must be collected.
•The following important settings must be updated in the metricbeat.yml file:
#Modules Section
metricbeat.config.modules:
# Glob pattern for configuration loading
path: ${path.config}/modules.d/*.yml
# Dashboard Section
setup.dashboards.enabled: true
#KIBANA Section
setup.kibana:
host: "169.38.131.87:5601"
#Output Section as below to send data directly to elasticsearch.
output.elasticsearch:
hosts: ["169.38.131.87:9200"]
•Metricbeat includes a default dashboard for each module. Default dashboards can be enabled by using the metricbeat.yml file in the /etc/metricbeat/metricbeat.yml directory.
•After the data is loaded into Elasticsearch and the default dashboard is loaded into Kibana, its sample dashboard view for the host overview and system dashboard are available, as shown in Figure 4-164 and Figure 4-165.

Figure 4-164 All hosts overview dashboard

Figure 4-165 Host overview dashboard
Metricbeat Prometheus module
The Prometheus collector metricset scrapes data from Prometheus exporters. To scrape metrics from a Prometheus exporter, configure the hosts field to it. The path to retrieve the metrics from (/metrics by default) can be configured with metrics_path. This module can scrape all metrics that are stored in a Prometheus server by using the federation API and pointing this configuration to the Prometheus server.
Example 4-23 shows a prometheus.yml file that includes modules metricset and federation API.
Example 4-23 Sample prometheus.yml
# Module: prometheus
# Docs: https://www.elastic.co/guide/en/beats/metricbeat/7.6/metricbeat-module-prometheus.html
- module: prometheus
period: 10s
hosts: ["169.38.131.88:9090"]
metrics_path: /metrics
#username: "user"
#password: "secret"
- module: prometheus
metricsets: ["collector"]
enabled: true
period: 10s
hosts: ["169.38.131.88:9090"]
metrics_path: /metrics
- module: prometheus
period: 10s
hosts: ["169.38.131.88:9090"]
metrics_path: '/federate'
query:
'match[]': '{__name__!=""}'
After data is loaded into Elasticsearch and the default dashboard is loaded into Kibana, the view in Kibana and the sample dashboard for Prometheus is displayed, as shown in Figure 4-166.

Figure 4-166 Metricboard Prometheus overview dashboard
Metricbeat for MYSQL module
This module periodically fetches metrics from MySQL servers. The default metricset is status. The MySQL module supports the standard configuration options.
The following example is a sample mysql.yml file:
- module: mysql
metricsets:
- status
# - galera_status
period: 10s
#hosts: ["root:secret@tcp(127.0.0.1:3306)/"]
hosts: ["prom_exporter:prom_exporter@tcp(169.38.131.90:3306)/"]
After the data is loaded into Elasticsearch and default dashboard is loaded into Kibana, the view in Kibana and the sample dashboard for Host overview and system dashboard is displayed, as shown in Figure 4-167.

Figure 4-167 Metricbeat MYSQL dashboard overview
4.6 Unified dashboards and portals with Liferay
This section describes how to integrate the components into the Liferay portal.
4.6.1 Configuring and integrating all Cloud components and tools into the portal
Complete the following steps:
1. Get the portal URL after creating the portal application by running the following command:
$oc get route
2. Browse to the URL and then, click Sign In. Click the menu in the left top, as shown in Figure 4-168. Then, click New (+) on the right side of the menu.
Figure 4-168 Welcome page

Figure 4-169 Control window to add pages to the portal

Figure 4-170 Collections pane: Adding to the portal

Figure 4-171 Add Page pane: Name

Figure 4-172 General pane: Add the URL

Figure 4-173 Public Pages pane: Selecting the items
Pages can be added in the Liferay portal by using the same steps.
..................Content has been hidden....................
You can't read the all page of ebook, please click here login for view all page.