
05 | TYPICAL SHOOTING SCENARIOS |
SHOOTING SCENARIO PORTRAIT

KEY PRINCIPLES
- The key to a portrait like this is shallow depth of field. So shoot in APERTURE PRIORITY mode and start with the lowest aperture your lens offers (such as f/2.8 or f/4).
- Remember to focus on the eyes.
- If the image is too dark or too light, use EXPOSURE COMPENSATION to adjust the brightness level.
- If the image is blurry from a slow shutter speed, raise the ISO to increase your sensor’s sensitivity to light, thus allowing for a faster shutter speed.
- Remember to use a focal length of 50mm or greater so that you don’t distort your subject’s face.
SHOOTING SCENARIO GROUP PORTRAIT

KEY PRINCIPLES
- In order to get everyone in focus, you need a deep depth of field. So shoot in APERTURE PRIORITY mode and set the aperture between f/8–f/16.
- Focus on the person in the middle of the group. Check focus by zooming in to view it at 100% and check the faces in the group. If anyone is out of focus, use a smaller aperture for deeper depth of field.
- Use MULTI METERING mode to account for the light in the entire scene.
- Arrange the group so they can all see you (and you can see them).
- Use EXPOSURE COMPENSATION if the image is too bright or too dark.
- If image is blurry, raise the ISO to allow the camera to use a faster shutter speed.
SHOOTING SCENARIO LANDSCAPE

KEY PRINCIPLES
- Shoot in APERTURE PRIORITY mode to control depth of field, and start with f/16 to ensure deep depth of field.
- Use a tripod to eliminate camera movement. Whenever your camera is on a tripod, also make sure STEADYSHOT (image stabilization) is turned off.
- Use MULTI METERING mode and SINGLE-SHOT AF (AF-S).
- Set the ISO to a low setting (100–200) to avoid any digital noise.
- Shoot in RAW so that you have the most information available when editing later.
- Consider BRACKETING your exposures.
SHOOTING SCENARIO FREEZE ACTION

KEY PRINCIPLES
- Use SHUTTER PRIORITY mode and set the shutter speed to a value that will freeze the action. The appropriate shutter speed depends on your subject and its movement, but could be anywhere between 1/500–1/8000 sec.
- Use CONTINUOUS AF (AF-C) so that the camera keeps focusing as the subject moves.
- Try the FLEXIBLE SPOT focus area setting to make it easier to focus on the subject and not the background or foreground.
- If the image is dark or blurry, raise the ISO or try AUTO ISO to automatically have the camera adjust the ISO as needed.
SHOOTING SCENARIO SHOWING MOTION—PANNING
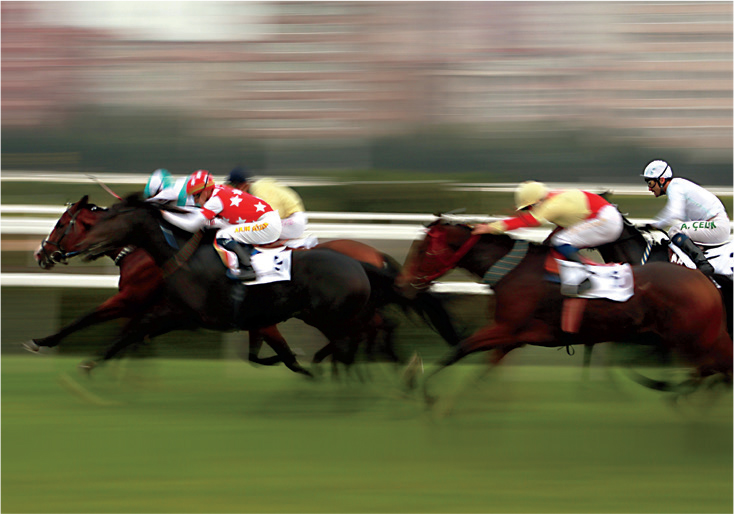
KEY PRINCIPLES
- Shoot in SHUTTER PRIORITY mode and set the shutter speed to a value that is slow enough to allow for the subject to move during the exposure.
- Follow the subject across the frame as you shoot.
- Try using the LCD monitor (instead of the viewfinder) to watch the speed of the subject, making it easier to track.
- Use CONTINUOUS AF (AF-C), as well as ZONE focus area.
SHOOTING SCENARIO LOW-LIGHT ACTION

KEY PRINCIPLES
- Shoot in APERTURE PRIORITY mode and use a wide aperture such as f/2.8 or f/4.
- Use SPOT METERING and meter on the subject’s face.
- Use CONTINUOUS AF (AF-C) and the FLEXIBLE SPOT focus area.
- Set the ISO to 1600 or higher, depending on the amount of available light.
- If the image is blurry, increase the ISO to allow for a faster shutter speed.
SHOOTING SCENARIO LONG EXPOSURE
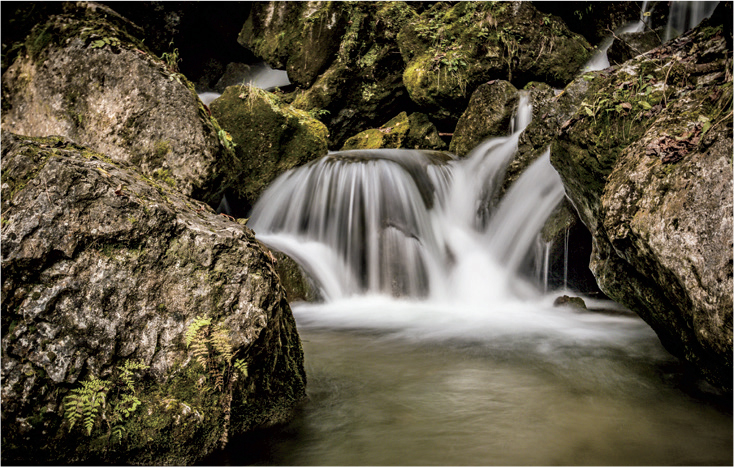
KEY PRINCIPLES
- Use MANUAL Shooting mode, which allows you to use the BULB shutter speed for long exposures.
- Use a tripod to keep the camera stable. Turn off STEADYSHOT (image stabilization).
- Use the SINGLE-SHOT AF (AF-S) focus mode, or try manual focus if the camera is having a hard time locking on focus.
- Use a low ISO (100–400) and shoot RAW to ensure a high-quality file.
- Use an optional remote release with a lock to avoid touching (shaking) the camera.
SHOOTING SCENARIO MACRO/CLOSE-UP

KEY PRINCIPLES
- Shoot in APERTURE PRIORITY mode and use a small aperture to ensure you achieve enough depth of field (this image was shot at f/13).
- Use MULTI METERING to analyze the light in the entire frame.
- A tripod is very useful for keeping the camera steady.
- Use MANUAL FOCUS and zoom in to confirm your focus is tack-sharp.
- Try using a dedicated macro lens or close-up filters to make sure you can achieve sharp focus when you’re so close to the subject.
..................Content has been hidden....................
You can't read the all page of ebook, please click here login for view all page.