CHAPTER 4
Casting and Molding
MANY YEARS AGO, ALL THE WORK TO BE ACCOMPLISHED on a performer’s face had to be done on the face for that performance only. Products such as spirit gum, cotton batting, adhesive tape, collodion (both flexible and nonflexible), nose putty, mortician’s waxes, thread, and other materials were employed. However, the make-up artist now can premake several of a needed appliance out of rubber and synthetic latices, plastics in a great variety, gelatins, and other prosthetic materials so that a fresh appliance with a finely blendable edge is available whenever required. The clarity of the image structure of the screen and the closeness of the audience in small theaters require this excellence.
To achieve this, the first step is to make a duplicate positive casting of the performer’s face or the body part required with a permanent material such as plaster or stone. From this casting, the make-up concept can be sculpted in modeling clay called plastalene and a negative made of the newly sculpted features. Then, by various methods, a copy of the sculpture is made, called an appliance, or prosthesis, in a skinlike, flexible material that is attached to the performer to delineate a character for a specific part. Impression and duplicating materials for molding and casting can be quite varied and different, and each is employed to accomplish a particular purpose.
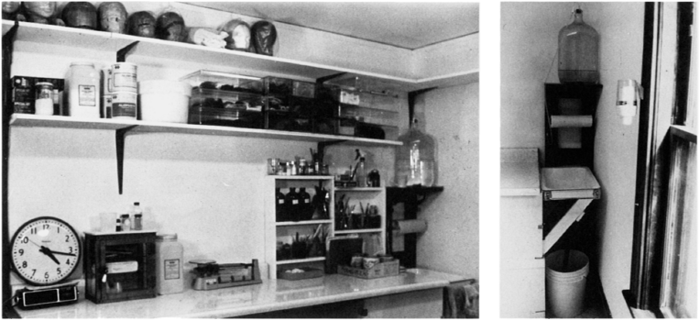
FIGURE 4.1 The author’s small appliance laboratory. It illustrates the water arrangement with a 5-gallon bottle siphoning water through glass and plastic tubing to a small sink with a rubber hose drain to a 5 -gallon bucket. In this way, no insoluble plaster goes down the regular plumbing, yet sufficient water is available for most molding and casting.
Although make-up laboratory work and knowledge are not part of the requirements of various make-up unions’ entrance tests, the developments and principles form the modern extension of character make-up. Even those make-up artists who have no particular desire or even skill in the lab should know, as part of their complete knowledge of the present field, the language and techniques of this advanced branch of the profession. We shall try to survey briefly the salient points here for reference.
LABORATORY TECHNIQUES

FIGURE 4.2 The author’s developmental lab.
To begin with, the work area of the make-up lab should be separate from the make-up room due to the fact that the procedures of the lab often require the use of materials that create considerably more debris and mess, and at the same time the equipment and products employed are different, requiring their own work and storage space (Figure 4.1–4.3). The lab room should be well lit and ventilated (with a fan-exhaust hood if possible) and should have some strong work tables for both sitting and standing work levels, a linoleum-covered floor, plenty of electrical outlets, and substantial shelves for books, molds, casts, storage, and so forth. Great care must be taken to clean sinks so the drains do not become clogged with plaster or other residue. For a small lab, a safe way is to use a siphon or spigot system on a 5-gallon water container to a small sink whose drain is simply a rubber hose that leads to a 5-gallon bucket. The latter can be emptied carefully when the residues settle in the bottom, and water can be separated from the solid masses (which can then be thrown in the trash bucket). Large labs sometimes have special filter systems built in to their sinks.
As for personnel, one will find that there are always many neophytes interested almost solely in sculpting, mold making, prosthesis making, experimenting with new items, and doing make-up research rather than the (to them!) more mundane daily straight make-up application that takes up at least 80 percent of the make-up artist’s normal career. Almost all the new make-up labs in California (where the bulk of the work is done in this field) have a stream of young hopefuls who want to work in that area of make-up, but competition—and talent—is quite fierce and extensive. Certain specialists have evolved whose work has been outstanding, but there is always more room for the best. Almost every procedure in lab work is enhanced and aided in time and effort by more than one person doing the particular job, so a crew system has been developed, and therefore, the finished product may be a blend of the work of many hands and minds.
As in all cases where enormous talent has affected the output, there are those in the production field who have no concept of the time, energy, and effort that must be put in to produce a laboratory creation. Many directors and producers have never understood or even taken the time to see the involved procedures that may be necessary to devise a prosthetic appliance, special make-up effect, or such and thus often set time frames for completion of lab work that is unrealistic. The more complicated and the more innovative make-up effects become, the more competition for exciting and new visual results will be asked for—almost as a matter of course.
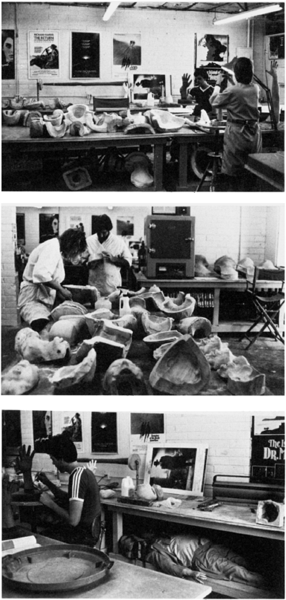
FIGURE 4.3 Three views of Tom Burman’s Studio where “monsters are made” from molds and casts by the ton.
However, in today’s rapidly advancing technologies, it does not seem that a day goes by without some new laboratory method, material, technique, or discovery being made that improves and adds to our knowledge of make-up magic. As such, make-up artists are closely akin to magicians and illusionists in the sense that once a new trick is invented or produced, someone is bound to improve upon it.
It should be borne in mind that the products and tools mentioned herein are the author’s recommended ones solely because they have been found to achieve the purpose he has desired. There are, no doubt, other methods and procedures as well as products and items that will accomplish similar techniques or parallel ones so one should always look for other ways to do the job. Artists who rest on old methods, regardless of their tried-and-true qualities, will more likely than not be left behind by those willing to research and test further to improve any make-up procedure or item. Look for both the unusual and the commonplace when searching because, as with any concept or working method, both innovation and adaptation will solve most problems. As well, every make-up lab technician has run into problems, breakage, and disasters, so plan every phase carefully and follow directions closely, but don’t be discouraged if something goes wrong. Redo it, and most times, whatever you do will be better.
Appendices A and B provide listings of many equivalent products in addition to addresses of suppliers and manufacturers of special items.
IMPRESSION MATERIALS
Impression materials are used in taking casts and making molds of a positive, or original, item by making a negative into which plaster or stone can be poured to form a duplicate positive (Figure 4.4).
There are rigid types of impression materials such as plaster, Ultracal, and dental or tool stones, and there are flexible varieties such as the thermoplastic, reversible types of moulages, and the nonreversible alginates. Each material is rather specific in use and is best suited for certain purposes. No one material will do the work as well as a combination of methods and applications.
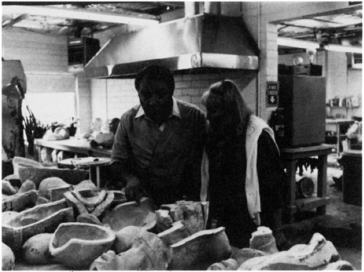
FIGURE 4.4 Tom Burman explains the complications of a special mold to Gena Kehoe.
Rigid Impression Materials
Materials that harden and form a nonflexible cast or mold include the various plasters and stones. Although there are many varieties of these, we limit our selection to a few for ease in operation and suitability for makeup work.
Dental Plaster
This is a quick-setting (3 to 4 minutes from liquid to hard) material for use when speed of casting and setting is important. It is the weakest of the rigid materials, so it should not be used where strength of the cast or mold is a prime requisite.
To mix, add the plaster to cold water, making small mixes because the setting time is so rapid that a set will occur before a large mixture can be spatulated properly. A thin mix will take longer to set than a thick mix but will be weaker in tensile strength. Keep adding plaster to the water until the surface of the water is covered. Then immediately mix by spatulation until a smooth creme is obtained. Generally, 10 to 15 seconds is taken for mixing with water, so this leaves about 2 minutes for application to the subject before setting time is reached.
Dental plaster can be used to take small impressions of parts such as noses, chins, eye sockets, or fingers and for repair of casting plaster molds where speed and not strength is required. It makes an excellent waste mold material because it breaks away easily. It is generally sold in 10-pound cans.
#1 Casting Plaster
The U.S. Gypsum Company makes most of the casting plasters and stones, and they can be readily purchased from large building supply companies in 100-pound bags. They should be stored in a dry place in plastic covered trash cans placed on a wheeled platform for ease in handling.
Casting plaster is a white material that sets in about 20 to 25 minutes and is the standard type of plaster used in making many casts. It is not suitable, however, for pressure molds or for those that require any heat curing. It is the best for any slush or paint-in latex molds as it has good absorptive qualities. To hasten the setting time when taking casts of faces or other body parts, add a teaspoonful of sodium chloride (common table salt) to each quart of water used in the mix. In this book, we shall refer to casting plaster only as plaster.
Hydrocal and Ultracal
These are low expansion gypsums that are considerably harder than plaster and can be used for pressure- or
heat-cured molds. Although there are varieties such as Hydrocal A-11 and B-11 (two setting grades), the Ultracal 30 is most used by the make-up lab technician because it is a superstrength product. It is recommended where extreme accuracy and additional surface hardness are required, and it is harder and stronger than Hydrocal A-11 or B-11. It also has the lowest coefficient of expansion rate of any gypsum cement available, but its very gradual set and ample plasticity make it ideal for the splash casting that this work requires. It dries with a grayish color so as to distinguish casts and molds made of this material from plaster. Ultracal 60 is similar in all respects except that it has a set of about 1 hour and is designed for very large models where additional working time and the highest possible degree of accuracy are required.
Dental or Tool Stones
This is one of the hardest of the casting materials and is a somewhat heavier material than other rigid types. It has low absorption qualities so is not suitable for slush latex molding. Its setting time is similar to that of Ultracal 30, and most of the professional lab technicians are split between these two excellent materials for any foamed latex or urethane molds.
Although dental stones come in a variety of colors, they are more expensive than pink tool stone (made by Kerr), which is a similar if not identical stone. It is best purchased, therefore, from a jewelry manufacturing supply house than a dental supply for reasons of price. Both Ultracal and stones become quite hot as they harden and so should not be used to take facial or body casts.
The mixing procedures for plaster, Ultracal, and stone are similar, and the strength, hardness, and density of the cast depends upon the amount of water used in the mixing. With all mixes, a thin mixture sets more slowly than a thick one. Small quantities can be prepared in flexible rubber or plastic bowls that dental technicians use, or large mixes can be done in polyethylene kitchen wash bowls (which are available in most department stores in kitchen wares).
Before use, always loosen up the surface of the gypsum material so it will not have any lumps. Then place the desired amount of water in the container. This can only be judged by experience, but remember that gypsum materials are cheap and it is better to have too much than too little when casting. The gypsum can then be added a little at a time with a large spoon or ladle, sifting the material in so that it does not enter the water in lumps. To make a regular mix, keep adding the gypsum material into the water until the surface of the water is completely covered with dry material. Then allow this mix to soak undisturbed for about 2 minutes, when the surface of the material will take on the appearance of a dried river bed. Now stir with a spoon or a nonflexible spatula until a cremey mix is obtained. It is then ready for immediate use. If one wants a thin mix to make a splash coating in the mold, put less gypsum material in the water and stir right away to remove any lumps. Dental technicians often use a very stiff mix of dental stone for making positive casts of teeth or for imbedding the casting in a tray. Such requires vigorous spatulation in the bowl to get the mix smooth and workable.
A number of methods can be used to further strengthen Ultracal or stone molds, and they vary from expert to expert. As usual, you will find that whatever works best for you is what you will settle upon. Basic strengthening of the mold is done by Werner Keppler and Terry Smith with wet hemp fiber applied in layers. Gus Norin always used spun glass, but this material is difficult to handle. Dick Smith uses a 5-ounce burlap in strips, which he says is easier to handle than the loose fiber and can be guided more readily into the areas that require the most strengthening. He also uses a wire cloth for strengthening the outer surface of small molds. John Chambers sometimes employs an acrylic latex cement hardener from the Wilhold Company, while Dick Smith uses Acryl 60 to reinforce the strength of Ultracal 30, employing 100 cubic centimeters of Acryl 60 with 100 cubic centimeters of water and then adding 660 grams of Ultracal 30 for a sample mix. Sources for these supplies are given in Appendix B. It should be noted that these strengtheners may be found to be an aid to the longevity of molds that require baking or for pressure molds to prevent cracking. Also, the heavier and thicker the mold is, the longer the baking time will be for foamed latex.
Flexible Impression Materials
Moulage
Years ago there was only one flexible impression product, known as moulage (one trade name was Negocoll). This was a reversible material that had to be heated up in a double boiler and brushed on to the part of the body to be cast while it was rather hot. It did not have much tensile strength, so a heavy coating was necessary along with a mother mold of plaster to hold the correct shape and act as a retaining form. It could be reused many times as long as the water content was kept to the correct level. Still, it was a tricky material to use and required much preparation and care afterward.
Alginates
Today we have a number of impression materials, called alginates, that are simple to prepare, are easy to apply, require no heating, and form a considerably stronger gel than moulage. Dental alginates have a normal setting time of about 3 minutes, so a technician must work quite rapidly if he or she wishes to take an impression. However, these alginates have been used with considerable success by many make-up artists.
Recently the Teledyne-Getz Company, one of the major producers of the dental alginate, has introduced a Prosthetic Grade Cream (PGC), which is a colorless, odorless, fine-grade, slow-setting alginate impression material. Normally, PGC sets in 4.5 ± .5 minutes, but a retarder may be added to allow as much as 16 minutes of use before setting. This PGC has a long shelf life of up to 5 years when stored at room temperature in a sealed container.
The Mid-America Dental Company also makes a prosthetic grade alginate product that has a 5-minute set time. Their directions state that warmer water than 70°F hastens the gel while colder water slows it, and up to 25 percent more water can be used for easier mixing. They also recommend to maintain the gelled alginate on the subject for about 3 minutes beyond the gel time because the material gains strength during this period. Otherwise, the directions and material are similar to PGC by Teledyne.
In use, all alginates should be shaken in the container to fluff up the powder and ensure uniformity. They come with two small measures, one for water and one for the powder. The faster setting types are affected by temperature, and warm, humid weather will hasten the setting time. Some workers use ice water to extend the setting time. PGC is rated for use between 70° to 77° F and from 40% to 60% relative humidity, so it has a wide latitude for use. Alginates of all grades are measured quite similarly, with two scoops of powder for one full vial of water—that is 17.7 grams of powder to 50 cubic centimeters of water.
To mix, measure out the desired amount of water into a mixing bowl, and add the powder. Immediately spatulate for about 45 seconds, and transfer directly to the portion being cast. Once gelation takes place, a second coat of alginate will not adhere to the first unless the area is brushed with a solution of sodium carbonate (monohydrate) in water (a teaspoon of powder in 6 ounces of hot water and dissolve). This will make the surface tacky; then additional alginate mix may be added. A retarder can be made with a solution of tri-sodium phosphate or may be obtained from Teledyne-Getz (PGC Retarder) or Mid-America.
This material will take deep undercuts and can be applied in a far thinner application than the moulage. It must, however, be supported by a mother mold for most applications, and impressions made with alginates must be used to make positive casts immediately as they commence to dry out very fast. Many people submerge the finished alginate impression in water while they are mixing the positive casting material, but if two are taking the cast, one can have the positive material immediately ready for use when the alginate impression is removed from the original (face, arm, and so on). As PGC has less than 3 percent deformation, very accurate casts can be made with it. However, with the use of any extra retarder, the physical properties of PGC are reduced in value. The retarder is not recommended for the standard dental alginates as they will become lumpy and fail to set properly.
DUPLICATING MATERIALS
Duplicating materials differ from impression materials in that the latter are generally used to take primary or original casts of the subject, while the former are used in making duplicates of the original positive by making a permanent negative mold suitable for this operation.
Formerly, heavy concentration and thickened natural latex compounds were utilized for duplication as well as a heat-melt synthetic material called Koroseal. However, we now have a series of cold molding compounds in polysulfide rubber, silicon rubbers, and polyurethane synthetic rubbers that serve as very fine duplicating materials and exhibit great flexibility as well as have a variety of hardnesses to duplicate many varied materials.
Cold Molding Compounds
Although a number of firms make cold molding compounds, the Perma-Flex Mold Company and the Smooth-On Corporation make a number of flexible compounds that are used in the make-up lab for duplicating purposes. Perma-Flex CMC Blak-Tufy, Blak- Stretchy, Gra-Tufy, and UNH are polysulfide liquid molding materials cured at room temperature by means of catalysts. They are available in three- and two-component systems, and while the two-part systems are fast and produce good duplicates, the three-part systems are indefinitely stable while the others have a shorter finished product shelf life.
Blak-Stretchy is the most elastic of the types, with a 9 to 1 elongation and a durometer hardness of between 12 and 15. It has a working time of 20 to 30 minutes. The first coats can be applied free flowing, then Cab-o-Sil M-5 can be added to the mix to thicken it so it can be spatulated on. It is a two-part system so has a cast storage life of about 4 months of shape retention. Its weight is about 12 pounds to the gallon, and like other black materials, it is reinforced with carbon black. Curing time is 20 hours at 80° F.
Blak-Tufy is a three-part system that cures in 16 hours at 80° F and has a durometer hardness of 23 to 25. In-between hardnesses can be produced by mixing Blak-Stretchy and Blak-Tufy.
Gra-Tufy is a similar product to Blak-Tufy except that it has a zinc oxide reinforcement pigment instead of the black. It is useful when snow-white plaster casts are necessary in reproduction. Elongation is similar to Blak-Tufy at 4 to 1. Its weight is 15 pounds to the gallon.
UNH is similar to Gra-Tufy except that the set time makes an extremely fast cure possible. The setting time is 5 to 10 minutes, with usable molds available in less than an hour at 80° F. This is a three-part system and has a hardness of 20 to 22 on the durometer.
Regular CMC carries no reinforcing pigments or filler and is considered to be the most dimensional of the cold molding compounds. The base A polymer is a clear viscous liquid cured by additions of B and C curatives in various proportions to get work life and setting time from 1 hour to overnight. Regular is the least viscous of all the cold molding compounds and is often used as a safe thinner for any of the other polysulfide cold molding compounds. Durometer hardness is 14 to 15. Directions for use of these polysulfide materials are available with the products from the Perma-Flex Company.
Perma-Flex makes another type of cold molding compound that deserves experimentation, the P-60 and P-60-S series. These are two-component systems. They are amine polysulfides whose shelf life extends to a year or more. The item to be cast can be given a two-coat layer, then a layer of open weave fibreglass cloth and another layer of compound. This will provide a strong but lightweight mold. In use, as these are all flexible molding materials, a mother mold of plaster is recommended to hold the shape of the cold molding compound. The compound needs to be properly keyed into the plaster to set correctly for duplicating. Open weave burlap can also be used for a reinforcing material.
To duplicate a plaster positive, it must be first given a couple of thin coats of orange shellac. Then it is coated with a silicon mold release for ease in separation.
Another type of duplicating material is Perma-Flex CMC Blu-Sil, which is a room-temperature-set two-component system consisting of a white silicone type fluid base A, and a blue-colored modified silicone catalyst B. It is designed to be mixed at the time of use into a fluid that will set to a flexible rubbery solid about 30 on the durometer. It is often used when a duplicate is to be made of a very delicate positive. Few or no parting agents are required. However, its cost is double that of most polysulfides.
Another variety of elastomer (rubberlike substance) for making molds is Smooth-On Corporation’s PMC- 724, which is a polyurethane and polysulfide synthetic rubber compound. Part A is a brown thin liquid, and Part B is a white syrup that remains pourable for at least 20 minutes when mixed. At a mix ratio of 10 A to 100 B, it has a durometer hardness of about 40. Sonite Seal Release Wax or petroleum jelly are suitable release agents, and shellac can be used to seal porous casts before duplicating with PMC-724. A Part C is available to achieve varying degrees of durometer hardness down to 6, and a Part D can be added to produce varying viscosities in the mixed uncured rubber. Consistencies can range from a thin latex paint to a greaselike putty that can be buttered on to vertical surfaces. Up to 80 parts of Part C can be added to make the softest mold, and only 2 parts of Part D need be added to make the mix very heavy. PMC-724 remains usable for at least six months from shipment date in unopened containers stored in a cool, dry location. None of these duplicating elastomers is suitable for skin use, and none has a long shelf life so order what you need when you need it rather than stocking it in the lab. Also see page 000 for its use as a prosthetic material.
SEPARATORS
Separating mediums are also known as parting agents, mold lubes, or releasing compounds and serve to ensure that two materials, similar or dissimilar, can be easily withdrawn from each other when desired. Some separating mediums are more versatile than others, and some are for a specific purpose or material.
In addition to preventing adhesion, separators must provide upon the faces of the model or mold a continuous, non-water-soluble, and smooth film that possesses little or no frictional resistance to movement across its surface. A properly selected sealer-separator combination prevents penetration of moisture from the fluid gypsum material into the pores of the mold or hair on the body. It also allows free movement of the set gypsum as it expands. The basic requirements of a satisfactory separation medium are that it:
1. Prevents adhesion of the cast;
2. Protects and lubricates the surface of the mold;
3. Spreads easily and uniformly in a thin, continuous insoluble film;
4. Will not react destructively with the gypsum surface or with the mold surface.
One of the most versatile separators in general use is petroleum jelly. This can be used to separate any gypsum material from any other during casting procedures. It is also used to coat facial or body hair when taking a cast with either a rigid or a flexible impression material. It can be used full strength or diluted with two parts of RCMA Studio Make-up Remover for a thinner mix.
Many varieties of liquid alginate dental separators can be adapted for make-up use. These are heavy liquids that can be painted on a gypsum cast and that form a film when dry (also see pages 89–90 on transferring plastalene). These separators are excellent for use with tooth plastics to gypsum (see pages 113–115). Dental technicians also employ thin sheets of wet cellophane for separation and to obtain a glossy surface on acrylic teeth in the mold. Dental supply houses carry these items as does RCMA on their Special Materials list.
Silicons are also good release agents and PMA Silicon
Mold Release or Dow Corning Compound DC-7 are excellent for coating any gypsum material to separate many plastic compounds such as RCMA Molding Material, Plastic Cap Material and others. It can be used full strength or can be diluted with methylene chloride or MEK.
It is well to keep separate brushes for use with the above two separators so that they can just be wiped clean after use rather than cleaned each time in a strong solvent.
Many sculptors use a separator made from 120 grams of stearic acid and 540 cubic centimeters of kerosene. However, to avoid the odor of the kerosene, Studio Make-up Remover can be substituted for the solvent. The stearic acid is melted and the SMR carefully added by stirring after the melt has been removed from the heat.
Another favorite sculpture separator is one made by dissolving shavings of Ivory Soap in hot water to form a saturated solution. Both the stearic acid and the soap separators are brushed into the molds until the surface appears glazed.
Alginates and plastalene do not require separators from gypsum materials. However, if the plastalene is coated with Plastic Cap Material, some technicians use a very thin coating of the silicon type mold release over the surface of the positive so that the cap material does not stick to the negative when it is separated after casting.
Sealers
Many technicians coat their porous plaster or stone face casts with thin orange shellac (dissolved only in alcohol) to protect them from the oils in the plastalene and to make separation easier. Polyurethane lacquers are used to coat molds for use with some foam latices or for those employed for flexible urethane castings.
CAST OF THE FACE
The face is the basic body area for which most appliances are made, and the life mask is a primary tool for the make-up lab technician. To prepare for taking the impression in PGC, sit the subject in a comfortable chair with a headrest (Figure 4.5). Make certain that the head is not in a completely horizontal position as otherwise the chin and neckline will be distorted in the cast. Some workers prefer a 45° angle while others will cast with the head almost erect. If just a limited front section is to be cast, the hair can be covered with a shower cap, but if a more extensive cast is desired, a rubber or plastic bald cap can be attached. Any hair showing—brows, lashes, moustaches, or head hair— must be coated with petroleum jelly in a liberal fashion. As well, the entire face can be given a very thin coat of petroleum jelly or mineral oil. Of course, all women’s street make-up should be removed. Cover the clothing of the subject with a plastic make-up cape.
If just the upper part of the face, such as the eye and forehead area, is to be taken, the nostrils can be filled with cotton batting and covered with petroleum jelly, with the subject breathing through the mouth. However, if the entire face is to be cast, some workers use drinking straws in the nostrils while others prefer to work carefully abound the nostril area. One excellent method is to cover the nostrils with PGC while the subject holds his or her breath, then with a forceful expulsion of air from the nostrils, a breathing passage will be cleared. Take care to explain this procedure carefully to the subject prior to commencing the impression so that complete confidence will be gained before the PGC is on the face.
Usually, 20 scoops of powder (177 grams) to 500 cubic centimeters of water will be sufficient for a full face. Some technicians mix the entire batch at one time, while others split it in half and start with one batch and then go to the second before the first batch sets. However, this means that at least two people must be doing the cast—one to apply and the other to mix. With the dental alginate (3-minute set time) this was necessary, but with the PGC, which has a longer working time, one person can do the impression.

FIGURE 4.5 (A) Casting a face. The subject is prepared and the PGC is applied. (B) The PGC and the plaster mother mold are being removed. (C) An Ultracal 30 positive being cast.
Although some apply the PGC to the face with the hands, the material tends to set faster because the hands are warm while a brush or spatula is not. If you do use the hand method, it is well to have a basin of water close by to rinse the hands whenever necessary.
Don’t throw excess alginate, plaster, or stone down the drain of a sink. It will stop up the trap and the pipes! It is best to work with a sink setup over a 5- gallon bucket. The liquid can be decanted off later and the residue on the bottom thrown into the trash bucket.
Mix the PGC as directed on page 000, and apply to the face with a 1-inch paint brush or a flexible spatula. The usual method is to start at the forehead area and work down the face as the PGC will run somewhat during application. Always do the nose and nostril area last. Also take care in the under-chin area that a coating of the PGC is brushed to adhere under the chin. Unless the ears are covered with the shower cap (or a huck towel), their cavities should be protected with cotton batting covered with petroleum jelly. To ensure that the mother mold will adhere to the PGC, strips of burlap (used for strengthening Ultracal molds—terry cloth may also be used) about 2 by 4 inches can be imbedded in the PGC surface before it sets. These can be placed on the forehead, cheeks, mouth and chin areas.
After the PGC is set to a rubbery mass, it must be covered with a mother mold of rigid material. Some workers prefer the fast set dental plaster made in thin mixes and brushed on in successive coats until about a half-inch thickness is obtained. A layer of cheesecloth can be placed over the plaster and another thin coat brushed in for the final application. This will provide more strength to the rather fragile dental plaster. Others use plaster bandages of the type employed by medical personnel for making broken limb casts. This is obtainable from medical supply houses and, although rather expensive, does an excellent job. Follow the directions given with the plaster bandage for application. If accelerated set is desired, warm water with a bit of salt is used for the dipping of the bandage. Short, overlapping sections can cover some of the longer ones that are placed around the head until the proper thickness is obtained. Usually ¼ inch of bandage thickness is sufficient in strength for this type of mother mold. Finally, some technicians simply accelerate the set of casting plaster with the addition of a teaspoonful of salt in a quart of water, and use this for the mother mold. Again, take care around the nasal passages and allow breathing holes in the mother mold material.
The plaster will heat up somewhat, and when it cools off, the impression is ready to remove from the face. If the strips of burlap have been embedded in the PGC, the cast will come off the face intact with the PGC stuck to the mother mold. Having the subject make a few faces will loosen the PGC from the face and facilitate removal. A mixture of dental plaster can then be used to seal up the open nasal passages on the mother mold. Be certain to coat the inside surface of this plaster with petroleum jelly so that it will not stick to the positive to be cast. One can also fill these nostril holes with plastalene if desired.
The impression is now ready for making the positive cast (Figure 4.6). This should be done immediately as the alginate will commence to shrink as it dries out. To support the cast, one can put it in a cardboard shoe box or a plastic bowl. If the PGC begins to separate from the mother mold at the edges, metal hair clips can be used to hold them together. Another method is to use a dental product made by Johnson and Johnson called Secure Dental Seal, which is a paper-thin, 100 percent adhesive that can be wetted and placed between the alginate and the plaster of the mother mold to form a good temporary bond that will control a thin alginate edge and maintain the shape required. It is far better than the soft dental adhesive cream material that is used by some workers for this purpose as it does not require a heavy coating that might distort the casting.
Another adhesive material can be made by dissolving a product called Vistanex in a solvent such as toluene. This can be painted on the outer part of the alginate and the inner surface of the mother mold. It dries rapidly and will adhere the two parts on contact when they are pressed together.

FIGURE 4.6 Various facial casts and section casts.
A mixture of casting plaster, Ultracal 30, or stone can then be brushed into the negative PGC mold. Blowing the thin coating around with sharp breaths will remove bubbles from the surface. More liquid gypsum can then be poured into the mold. When the mixture begins to thicken, one can spatulate the mix up the sides of the mold so that the cast will be about an inch thick all around while being hollow in the center. Unless one wants a very heavy positive, it is not necessary to fill the negative cavity completely. If more than one positive is desired, don’t use the burlap strips on the PGC so that the mother mold can be removed from the PGC and then it can be carefully stripped from the positive and replaced in the mother mold. Another positive cast can then be made immediately. Otherwise, one must pry the mother mold away from the PGC (often breaking it in the process), and strip the PGC away from the positive and discard it.
The positive can then be scraped free of any small casting imperfections, the nostrils cleaned out, and the edges of the cast smoothed out with a metal plaster tool. If the cast is heavier on one side than the other, a Surform tool can be used to scrape away the excess plaster or stone. Mark the back of the positive with the name of the subject, the date, and possibly a serial number for cataloging the molds. As the positive will not have thoroughly hardened yet, a sharp pencil is best to mark in this data.
Another way to take a face cast is with casting plaster. The face is prepared the same way, and a mix of casting plaster is applied directly to the face with a 1-inch bristle brush. The same precautions should be observed in applying the plaster to the nostril areas as were described for alginate.
This is a slower method because the casting plaster (salted to accelerate the set) takes a longer time to set, but no mother mold is required and if the subject is patient and does not move, an excellent impression can be taken. When the plaster is beginning to cool after its warming-up period is over, the impression can be removed from the face. A saturated solution of Ivory soap in water is then brushed into the impression as a separator. Use this soap solution copiously, brushing out the foam and bubbles until an even sleazy coating can be felt on the mold. Allow to dry for 15 minutes, then pour up a stone or Ultracal positive. When the stone has set and hardened, a few sharp blows with a chisel and mallet will crack the plaster negative from the harder positive. Do not attempt to separate the stone positive from the plaster negative until the stone has completely hardened; otherwise the positive may be damaged when cracking off the plaster.
Some technicians use plaster to take a cast of the entire head. Again the hair should be covered with a bald cap and the subject placed so that he or she is face down on a stack of towels or hard pillow. A piece of lead wire is stretched around the head just behind the ears to get an accurate outline of the head. This wire outline is then placed on a piece of strong cardboard and the head shape traced out. The outline is then cut out, and this form is slipped over the head to form a retaining wall for the plaster. The cardboard surface can be greased with petroleum jelly for ease in separation. The back of the head is then taken in plaster. When this impression has set, the subject is carefully turned around and up to the normal facial casting position. The cardboard retainer is then removed and keys can be cut into the plaster on each side and at the top of the impression with the end of a spatula. The impression should be at least 1 inch thick on the edge so that this can be done. The surface of the edge can then be coated with petroleum jelly and the cast of the face taken in casting plaster as previously described. Normally, the ear cavity is filled a bit more with cotton and petroleum jelly than with alginate for ease in separation when the cast is removed.
When the plaster impression of the face has set, it can be removed. The cast of the back of the head is then removed, and both halves are fitted together to make the positive. The inside of the impressions should be coated with the soap mixture and then, with the two halves held together with large elastic bands (made from auto tire tubes) or heavy cord, a positive can be cast.
To make the usual hollow cast, fill the mold about half full with a thin mix of stone or Ultracal 30. Carefully spread the material around the inside of the mold by rolling it in different directions to ensure an even coating. The excess can then be poured out and this flash coat allowed to semi-set before another thin mix is applied in the same manner. After three such coatings, the positive can be strengthened with small sections of burlap if desired, and more stone is poured into the mold and can be worked around inside with the hand to ensure an even coating (Figure 4.7).
When the positive has completely set, the plaster negative is carefully cracked away by tapping it with a small hammer to split the plaster. Some workers use a chisel and a wooden mallet for this. This is one of the oldest methods of making a full head cast. A newer method was devised by Dick Smith and is described and illustrated in Figure 4.10 by Tom Savini. In most cases, face casts that will be used for plastalene sculpture are coated with orange shellac or clear lacquer to seal the pores of the gypsum material and make the cast easier to clean.
SCULPTURE MATERIALS
The term modelling clay encompasses two types of claylike materials. One is a water-based clay that is purchased as a powder and mixed with water to the desired consistency for use as a modelling material. Sculptures made of this material must be kept damp so they will not dry out and crack. It finds some use in the makeup lab but is not the best sculpturing material. Makeup artists find that the oil-based plastalene or plasticine serves their purposes better. It comes in many grades from a very soft #1 to a hard #4. It can be obtained in the normal dark green shade or in a white. Opinions vary considerably as to the most useful variety, but most technicians use the dark green in either the #2 or the #4 hardness. It comes in 2-pound blocks (see Appendix B).
FIGURE 4.7 The open weave burlap recommended by Dick Smith for strengthening molds and casts (see Appendix B).
The tools for use with plastalene modelling are usually small and wooden (generally much smaller than the clay sculpture tools fine artists use), and the smallest wire tools are used as well (Figure 4.8). This is mainly because the make-up lab technician starts with a face cast in gypsum material and adds the plastalene to achieve the sculpture rather than starting with a large, roughly shaped head of plastalene and carving it to shape with tools. When adding clay to a plaster or stone positive, always apply only a bit at a time until the desired shape is built up. The wooden tools with the flat ends can do this work, while the fine wire tools can be used to diminish the sculpture a bit at a time. The surface can also be scraped with a piece of coarse burlap to remove a thin layer of clay.
Texturing the surface to make it appear to have pores can be accomplished with a small knobbed-end wooden tool, with a plastic stipple sponge, or with a grapefruit tool made by coating the surface of various citrus fruits with a few coats of casting latex, drying this with a hand hair dryer, and then peeling off the latex after powdering it. This will take an impression of the surface of the orange or grapefruit (hence, the spatulas, a plaster knife, two metal plaster carving tools. (B) Sculpture tools, LEFT TO RIGHT: A small spatula; two wire tools for nostrils, lines, wrinkles; three wooden carving tools for plastalene (the smallest are the most useful); a pointed ball-head wooden tool for making pores. name!), which has a great similarity to the human skin.
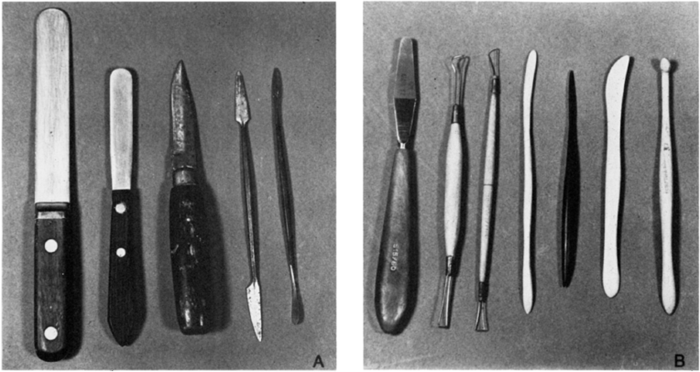
FIGURE 4.8 (A) Metal tools, LEFT TO RIGHT: Stiff and flexible
To smooth plastalene, a brush dipped in isopropyl alcohol will serve for small areas. For a larger expanse, some petrolatum jelly or mineral oil can be rubbed sparingly on the surface with the hands or a wide brush. Take care not to use too much of the latter two materials as they will soften the surface of the sculpture. Some workers will coat a finished sculpture in plastalene with three coats of RCMA Plastic Cap Material (clear type) to provide a surface that will still take some tool and texture markings to refine the sculpture.
If one uses the sponge method, they will find that the various grades of polyurethane stipple sponges work better than the red rubber ones because the latter often leave bits of rubber imbedded in the plastalene. More often than not, a combination of the grapefruit, the sponge, and the knob tool will produce the best results for the varying skin pore textures.
Another method is to make latex stamps of skin texture areas. This can be done from the life mask cast of an older person who has good forehead wrinkles, for example. Just coat the original positive with a number of coats of casting latex (depending upon the thickness of the stamp desired), dry, and then remove it. This negative impression can be then used to press into a forehead plastalene area to obtain a reasonably good sculpture of forehead wrinkles. This method cannot be used too successfully on the soft parts of the face like the eye area, but it is suitable on the bonier parts.
Due to shrinkage of latex pieces, some size allowances can be made on appliances that cover a large area. This is one reason why many technicians make multiple appliances rather than one large face piece.
As well as wooden tools for plastalene, there are various metal tools with cutting edges for trimming plaster and stone, rasps and Surform tools for removing more material, and some labs even have machine tools with coarse wheels to rapidly cut and shape gypsum casts.
Two kinds of spatulas are used in the lab. One is the regular flexible type that is used for measuring small amounts of material for weighing, applying alginate to the face, and many other uses. The other is a stiff metal one that is obtainable from a dental supply house for mixing alginate or plaster. A strong bladed knife is needed for trimming, and a heavy screwdriver is useful for prying apart two-piece molds.
Plastic bristle 1-inch paint brushes, some with regular short handles and others with long handles (for getting into castings easier), will find much use, as will some #10 round sable hair brushes as well as some cheaper Chinese bristle brushes (for paint-in latex application) (Figure 4.9). A few wig-cleaning bristle brushes are handy for scrubbing plastalene out of plaster and stone molds as are some bristle stipple brushes of small sizes.
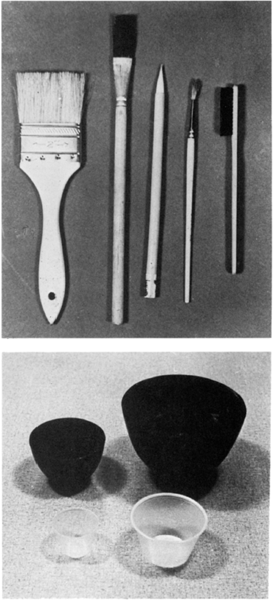
FIGURE 4.9 TOP: Brushes, LEFT TO RIGHT: Soft bristle brush for cap material or other uses; long-handled bristle brush for use with plaster; Chinese bristle brush for paint-in latex work; #10R sable brush for many applications; bamboo-handled bristle brush for cleaning plastalene from castings, BOTTOM: Two black rubber dental bowls for mixing small batches of alginate or gypsum materials and two small polyethylene measuring cups for weighing various foam ingredients.
Sculptor’s calipers for measuring head size and shape are useful for making large castings and a hand or electric drill with a ¼- and a ⅜-inch bit for drilling escape holes in positive casts for foamed latex or urethane and a ¾-inch half-round coarse reamer or rasp bit for cutting keys.

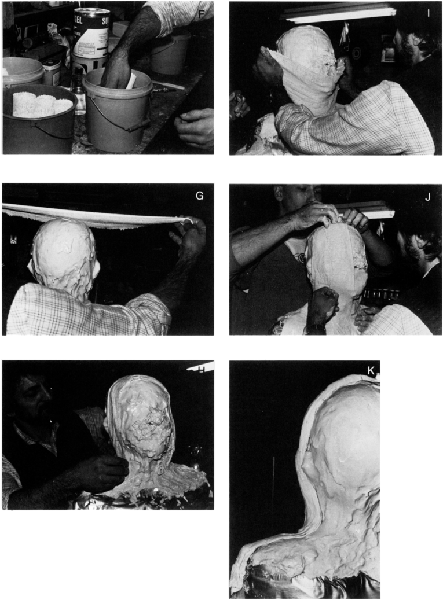
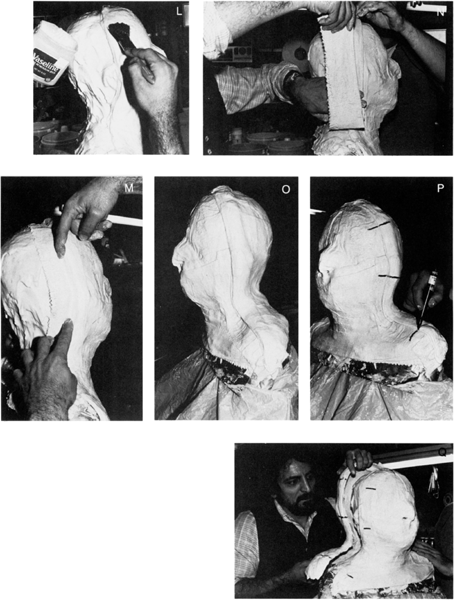
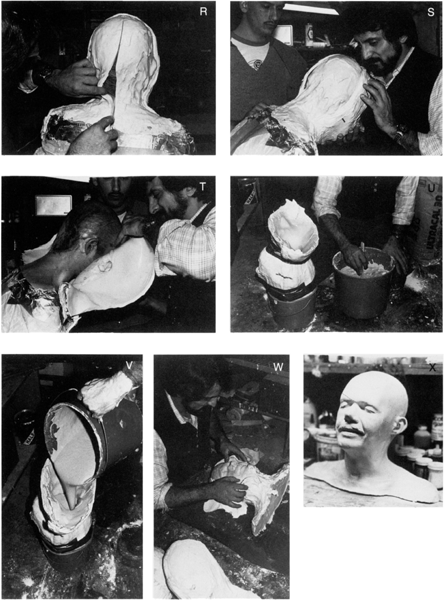
FIGURE 4.10 Casting a full head and shoulders. (Photos and casting courtesy Tom Savini from Grand Illusions J (A) The subject’s head is covered with a plastic cap and adhered to cover all the hair. The brows, lashes, and facial hair are generously coated with petroleum jelly while the entire skin to be cast is also covered with a fine coat as well. (B) Tom mixes a large batch of the alginate in a kitchen mixer after weighing and measuring the proportions carefully. (C) With the aid of an assistant, he commences to apply the alginate all over the face and head, taking care around the nose section. He generally fills the ear cavity with cotton and petroleum jelly as can be seen here and, unless the ears must be part of the cast, fills the back of them with a plastic wax material to avoid heavy undercuts. Note that the subject has been covered with a plastic sheeting, which is held to the body with gaffer tape. (D) The mouth and nose area being worked on with care. (E) The head, neck, and shoulders covered with alginate. (F ) Previously cut and rolled strips of plaster bandage are soaked in water for use. (G) The first strip goes over the head (H) and down to the neck area on both sides. (I) Plaster bandages on the neck (J) and face area, again taking care not to cover the nostril vents for breathing. The face is covered to a thickness of about four layers of bandage on the front half. (K) The front section of the head, face, and shoulders with the plaster bandage. (L) A coating of petroleum jelly is given to the first 3 inches of the plaster bandage. (M) Overlapping the first 2 inches of the front plaster bandage, more plaster bandage is used to start the back section of the mother mold. (N) A careful placing of the first bandage to ensure a good overlap and fit for the two halves of the mother mold is important. (0) The back section of the mother mold completed. (P) Felt pen marks made to aid in refitting the two halves of the mother mold for casting the head later. (Q) The back half of the mother mold is gently removed. (R) With a metal spatula the alginate is cut up the back of the head and a wooden tool used to separate it from the subject. (S) The head in a forward inclined position. (T) With the head forward, the alginate and front half of the mother mold are removed with care. To prevent the alginate from separating from the front half of the mother mold, he imbeds a layer of a terrycloth material into the alginate on the forehead, mouth, and chin area and down each side of the face. See page 167 for directions on adding to a set alginate surface if the alginate sets too soon before this can be done. (U) With the mold put together, the sides matching on the lines, and the alginate held to the sides of the mother mold if necessary with a false teeth gel, it can be taped, as shown, to a plastic bucket with gaffer tape and the mold held together with the same. Cord can also be used, but the tape is convenient and works well. The nostril holes can be filled with quick-set dental plaster or some plastalene forced in. A mix of Ultracal 30 is made. (V) After a splash coat is worked around the mold, the head is filled with the remaining Ultracal. Some workers prefer to make a head about one inch thick to save weight, but the usual full head is solid for strength. (W) When the Ultracal is set, the mother mold is removed and the alginate separated from the head. (X) After the usual minor clean-up around the ears and nostrils and any imperfections such as small holes or bumps are filled and removed, we have a completed perfect head cast.
Dental sculpture tools such as dental spatulas, curved tip tools used for handling dental amalgam for filling teeth, and others will be found useful for tooth sculpture (Figures 4.11 and 4.12).
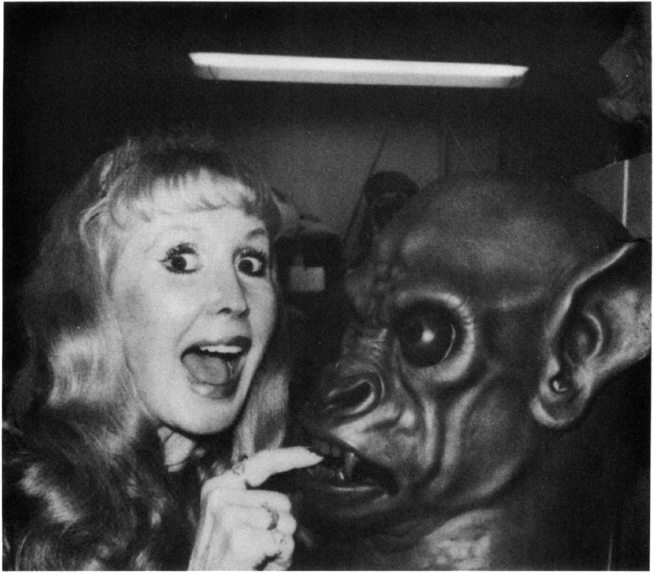
Stan Winston feels the life mask is only a guide and serves, along with many close-up photos, as a basis for sculpting in plastalene a head and face with the expression he wishes ta use as a perspective for the make-up (see Figures 2.24 and 2.25 for his “Manimal” makeup). He imbeds false eyes and teeth in the sculpture to add to its lifelike qualities to aid his conceptions (Figure 4.13). He feels that many times he can capture an expression in photos that he cannot in a life mask, and the clay sculpture gives him what he seeks. P.S. One has to be a very good sculptor to do this!
MOLDS
Flat Plate Molds
The simplest of the two-piece molds is the flat plate type. With this basic casting one can make scars, cuts, bruises, moles, and other small appliances that do not require specific facial contours. When the prostheses made on the flat plate are adhered to the skin, they take on the natural curve of the area without any trouble in most cases.
To make a flat plate mold, form a rectangle whose inside measurements are about 6 by 10 inches, with four pieces of l-by-2-inch wooden blocks (Figure 4.14). These can be held in place on a glass surface with four lumps of plastalene at the corners. The inside surface of the wood as well as the glass should be coated with petroleum jelly as a separator. Make some clay keys by rounding 1-inch balls of plastalene in the palms of the hands, then cutting them in half with a strand of thread. Place them about a half-inch from the corners of the enclosure. Make a thin coat of stone or Ultracal 30, and blow it in to remove the bubbles. (A sculptor’s trick is to use sharp breaths of air blown in on a thin liquid plaster mix surface to remove all the small surface bubbles.) Then fill up the enclosure with the remaining mixture. A strip of burlap can be used as a strengthener if desired, but the basic thickness of the plate is normally sufficient for most uses.
FIGURE 4.11 ½- to ¾-inch rotary files for use in cutting keys in gypsum materials. They work best in a good drill press or, if need be, in a hand-held electric drill.
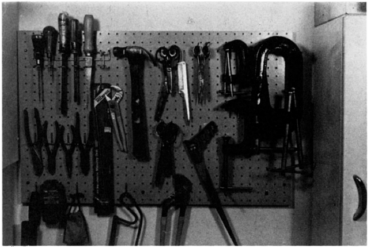
FIGURE 4.12 Various tools and clamps that are useful in the prosthetics lab.
When the stone or Ultracal 30 has set, remove the blocks and slide the cast off the glass plate. The plastalene in the keys can be pried out with a wooden modelling tool. The keys can then be sanded with medium then fine sandpaper so that there are no undercuts. For use, items can be modelled on the plate with plastalene, with a ¼-inch gutter left around each of the items modelled and the remainder of the plate clayed in to a depth of about ¼-inch. Petroleum jelly can then be applied to the exposed stone areas in the gutter and keys, and surround the plate with another set of greased wooden blocks ( 1 by 4 inches), and secure with plastalene at the corners to form a box around the plate. Stone or Ultracal 30 can then be mixed and added in the usual way to fill the cavity. Each of the plates, when completed, should be about 1¼ inches thick.
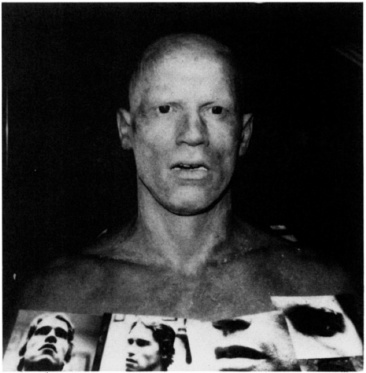
FIGURE 4.13 Working from photographs of Arnold Schwartzenegger, Stan Winston sculpted a very accurate reproduction in plastalene as a work model for the effects he created in the film The Terminator.

FIGURE 4.14 Flat plate molds. (A) The sculpture of some bruises and a cut are made in plastalene. (B) After the plastalene gutters have been made, the flat plate is surrounded by wooden blocks held together with lumps of plastalene. These wooden blocks have been lacquered and coated with petroleum jelly as have the areas of the plate showing around the sculptures on the plate for ease in separation. (C) After Ultracal has been mixed and poured in, the mold set and separated, we have the two halves of the flat plate mold. (D) The plastalene is removed from the flat plate positive and 114-inch holes drilled into the Ultracal for vent holes. This mold was then coated with a polyurethane lacquer and employed to cast foamed polyurethane pieces. (E) The appliances (with flash removed) of foamed polyurethane.
When the stone or Ultracal 30 has set, remove the retaining wall and separate the mold. The keys may then be lightly sanded after the plastalene has been thoroughly cleaned off both sides of the mold. Acetone can be used for this cleaning or TCTFE (trichlorotri- fluoroethane) (Prosthetic Adhesive A Thinner is this variety of solvent). The mold is now ready for use with foamed latex or foamed urethane. The sculpted side of this type of mold can also be employed for paint- in plastic molding material as well. In the case of the latter, the smooth surface side upon which the original sculpture was done is not required as the plastic molding material uses an open-face mold.
Slush and Paint-in Molds
The basic casting latex molds are those that are taken as a negative in casting plaster of a plastalene sculpture on a facial cast. Noses are probably the most commonly used prostheses in make-up work as the change of a nasal structure can delineate a character more quickly than any other. Many make-up artists take a full cast of the face to get the correct proportions of the face when modelling a new nose, chin, cheeks, eyebags, and so on and make all their casts and molds directly from the original positive. Others take an additional cast only of the area (such as the nose) desired for use in making the necessary prosthetic mold.
This individual mold can be taken in PGC or even directly in dental plaster. The nostrils should be blocked with cotton batting and covered with petroleum jelly, leaving sufficient clearance to get a clear impression of the nostril areas. During the casting operation, the subject may breathe through the mouth as it will be free of plaster. Paint the plaster on the face with a 1- inch bristle paint brush, taking care not to get any in the nostrils or the mouth. Cover about half the eye sockets and cheeks with plaster to get sufficient edges for the final positive. Don’t forget to put petroleum jelly on the eyebrows and lashes for ease in separation.
When the plaster is set, remove the cast and pour up the positive with Ultracal 30 or stone using either petroleum jelly or the soap method in a thin coat for a separator. Another good separator for plaster to stone is the stearic acid-kerosene one discussed on page 73. When the stone has set, the dental plaster negative can be easily cracked away, leaving the stone positive ready for use.
The Nose
To make a slush or brush application mold from this section mold of the nose (or using a full face cast), model the desired shape in plastalene on this positive, making certain that the blending edges are smooth so they will be imperceptible in the finished appliance. Take care that the nostrils are sufficiently filled on the positive with plastalene so they will not have any undercut that will prevent the removal of the negative cast to be taken. However, sculpt the nostrils so they will look natural and fit closely to the nose in the finished appliance (Figure 4.15).
The nose exhibits one of the more varied skin pore areas of the body. Sometimes the pores are small and almost imperceptible on someone with fine skin, and at other times the pores are large and the surface of the skin quite rough. Generally, a slight overporing is normally called for during sculpture as some of the fine details are lost in the casting of the negative on the surface of the appliance. Only by experience can the technician know what is the correct depth and extent of making pores.

FIGURE 4.15 Simple paint-in latex nose. A plaster negative (LEFT) made from a positive plastalene sculpture on a positive cast of a nose (RIGHT). A painted-in casting latex nose made in the negative mold.
For a clown nose (which is generally slush cast), no pores are called for. Thus, the surface should be made as slick as possible by dipping the fingers in water (or mineral oil) and rubbing them on the surface of the plastalene.
It should also be noted that sometimes only a nose bridge or tip need be made so the sculpture need not be overextensive. However, the undercuts on the nostrils must be filled as well as the outer curve of the alae with plastalene to avoid undercuts.
When the modelling is completed, coat the remainder of the exposed positive with petroleum jelly as a separator. The sculpture should then be surrounded with a clay wall about ¾ inch higher than the tip of the sculptured nose and at least ¾ inch from the sculpture all around. As the casting latex builds up by absorption into the plaster negative, this amount of thickness is minimal. Larger casts should be thicker (1 to 2 inches) to allow for an absorptive surface.
Some technicians spray the surface of the sculpture with aerosol solution or Kodak Photo Flo (1 cubic centimeter in 200 cubic centimeters of water) to reduce the possibility of surface bubbles in the plaster. Paint in, then blow in, a mix of casting plaster to cover all the sculpture and surroundings, and carefully spatulate and pour in the remainder of the mix to fill the cavity of the plastalene retaining wall. Some workers use a vibrator table to hasten the removal of all bubbles while others tap the mold on the table top to force any bubbles to the surface of the plaster.
As soon as the plaster heats up and cools, the two sides can be pried apart with the blade of a screwdriver. Any plastalene remaining in the negative should be carefully removed with a wooden modelling tool, taking care not to scratch the surface of the negative. Allow the negative cast to dry out for about an hour, then it can be cleaned of any remaining plastalene with a small bristle brush dipped in acetone or TCTFE. Rinse the negative in water before each use, and the latex appliance made in the cast will separate out easily when it is completed and dried.
If the negative is to be used for brush application, no further preparation is needed, but if a slush molded appliance is to be made, the negative requires that a plaster wall be built up in the area of the upper lip on the mold so that an even level will be achieved when the casting latex is poured into the mold.
The advantage of any slush or brush-applied latex piece is that it will fit many faces because the inner surface is not made to fit any particular face the way foamed latex appliances are. However, one cannot achieve the more skinlike quality on the outer surface of any slush or paint-in appliance that a foamed one will display (see page 96).
Whenever any additional plaster is to be added to a mold or cast, the surface should be thoroughly wetted with water before the new plaster is applied. Such additions work much better with a freshly made negative as it has a greater water content than one that has been left to dry out—even overnight.
Any repairs on the negative, like holes left by errant surface bubbles that may not have been dissipated when the cast was vibrated, can be easily made by scraping the underside of the negative with a metal tool to remove some plaster and using this to do the repair rather than making a new mix. Dental tooth filling tools are best to get into small places for these repairs.
Oriental Eyelids or the Epicanthic Eyefold
For these, a cast of the upper face from the nose to the hairline can be taken or the full face cast used (Figure 4.16). Very little poring is needed on the lids themselves. If one wishes to make a series of stock Oriental eyelids, it is well to vary the eyelid curves so they can be adjusted to fit a number of Caucasoid eyes. Again, the negative should be taken in casting plaster and made about an inch thick.
Bald Caps
Latex bald caps can be made in a negative plaster mold or painted on a positive one (Figure 4.17). To make a negative-type mold, get a small-sized balsa wood head form from a hat supply house and slice it into nine fairly equal sections by two cuts made one way, then turning the head 90° and making two cuts again. Then put the sides together and hold them in place along the neck portion of the head with heavy elastic bands. Coat the entire head with a #1 or #2 plastalene, smoothing out the surface to form a bald head sculpture. The surface can be lightly pored to give it some texture. A retaining wall of plastalene is added to the desired shape of the mold, and then it can be sprayed with the Photo Flo solution.
A good spray gadget is one made for spray painting small objects, called a PreVal Sprayer made by the Precision Valve Corporation and sold in many paint stores. It consists of a bottle for the liquid and a removable unit that has the propellant and spray tip. The latter screws onto the bottle and can be used to spray many liquids. Buy several and keep one with the Photo Flo solution ready for use.
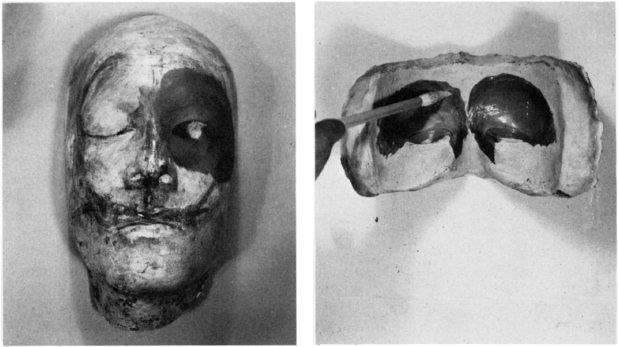
FIGURE 4.16 Epicanthic eyefold, LEFT: A face cast with one side sculpted in plastalene of an epicanthic eyefold. RIGHT: The finished negative mold made from plaster being painted in with casting latex to form a large appliance that will cover the brows as well. A smaller piece may also be painted-in that will just cover the eyelid area with the same material. Such appliances can also be made of foamed urethane or latex.

FIGURE 4.17 Slush bald cap mold, LEFT: A balsa wood head ( which has been previously section-cut in nine parts and held with an elastic band at the base) is covered with a coating of plastalene. RIGHT: A one-inch-thick plaster mold made of this form with the form removed. This mold is used for slush casting quick latex bald caps.
The retaining wall should be about 1½ inches high, and the casting plaster negative taken of the plastalene positive must be that thickness all around. When the plaster is beginning to set, cover it with cheesecloth, and brush over a bit more casting plaster to strengthen the mold. When the plaster has fully set and cooled, remove the elastic bands from the balsa wood head, and carefully draw out the center section of the cut head. This can be facilitated by passing a piece of coat hanger wire through this section before putting it together to make the mold. Once this center section is out, the others will remove easily without cracking the negative. Remove the excess clay and the mold is ready for use.
The same basic method can be used for making positive stone or Ultracal heads for plastic caps. However, do not make the casting plaster negative over 3/4 inch thick, and do not use any cheesecloth reinforcement. When the plastalene has been cleaned out of the negative, coat the inside with petroleum jelly and fill the cavity with a stone or Ultracal mix. The mix should be spatulated up and around the negative so that the finished cast is about ½ to ¾ inch thick all around in a hollow shell. When the stone or Ultracal 30 has set, the plaster can be cracked away and you have a positive cast to paint or spray the cap plastic. As previously mentioned, casting latex can also be used on a positive head, but the head positive should be of plaster. Due to the separating medium (silicon grease type) used on the head molds for plastic cap material, molds so treated will not work with painted-on casting latex.
Generally, if the surface of the plastalene positive original has been pored sufficiently, the positive gypsum head will have a proper surface for painting on plastic cap material or latex as the finished cap will then be reversed for use.
To make a head mold for spraying, where the adjustment of the spray on the final coating can be made to provide a more textured coat, some technicians make the head mold as slick as possible for ease in removal, and of course, the bald cap is not reversed. John Chambers had some head molds that were chrome plated, while Bob Schiffer has made some from fibreglass, both of which are very smooth and work quite efficiently for spraying.
If one can borrow a positive head mold and wishes to make a copy, there are a number of ways that a duplicate mold can be taken. One of the basic ways is to use a flexible duplicating material such as PMC-724 or Perma Flex’s Gra-Tufy CMC (see pages 71–72). Another way is to make a three-piece duplicating mold of stone or Ultracal 30. This type of mold is the same as would be made to serve as a mother mold for the flexible impression material as well (Figure 4.18).
Basically, one would divide the head mold down the center with a plastalene wall about 1½ inches high, with the division line on side one (so that when the wall is removed, the line is still on the center line of the head). A stone or Ultracal mix is then brushed and spatulated onto side one to a thickness of about 1 inch and allowed to set and cool. (Always remember that where any gypsum product meets another in casting, a separating medium is necessary.) The clay wall is then removed and keys cut into the sides of the mold (three are sufficient), and the sides are covered with a thin coat of petroleum jelly as a separator. Side two is then taken to match the thickness of side one. When this has set and cooled, two angle keys can be cut to a depth of about ¼ to ½ inch about 1 inch apart. A cap cavity is then formed out of plastalene of the top area of the head mold and this taken in the same

FIGURE 4.18 (A) A positive stone or Ultracal head on a stand and turntable (for ease in spraying or painting the caps). (B) Showing one side of a section cast made to duplicate this head mold. Keys are cut (C) And the other side is made (note keys cut on top). (D) Then a cap is cast to hold them together. (E) The completed three-piece mold put together. It is a good idea to coat the inside of the mold and the rim with two coats of material (remember to use a separator). This third cast should have a flat top, so the plastalene wall should be higher on two sides, and the surface can be flattened with a board that has been lacquered and then covered with petroleum jelly. When this part has set and cooled, the three pieces can be separated and the original removed. The mold is then reassembled and is ready for use.
If a flexible material was used in making the mold, the procedures would be approximately the same for making the three-piece mother mold. Then in the disassembly, the flexible mold is removed from the original and replaced in the mother mold for preparing the negative for use. The negative is filled with stone lacquer to seal the surface. Small chipped areas can be filled with plastalene and then the mold given a coat of petroleum jelly as a separator. Ultracal 30 can then be used to make positive heads in this mold. (F) A head mold or full head mold can also be made of poly sulfide duplicating material for a seamless flexible mold (see also page 000) as shown here by Tom Burman.
or Ultracal, and a duplicate is made in the usual way. This type of duplicating mold will allow one to make a number of reproductions of the original. Check the basic shelf life of any duplicating material in the plastic varieties if you want to save the mold for future use. Of course, a stone or Ultracal 30 duplicating mold will last indefinitely with care taken in its separation from the duplicates.
Full Head Castings
Full, slip-over casting latex heads can be made with a slush cast of either one- or three-piece construction. These must be made of casting plaster and be about 2 inches thick. Such molds should be reinforced with burlap strips for strength. A mix of 20 percent Ultracal 30 with casting plaster will also add strength and not diminish the slush molding time excessively.
For use, these large molds must be securely tied together with heavy cord or rope. Take care in using clamps on plaster molds as the extra pressure exerted by the clamp may crack the mold.
Many other areas of the face and body can be cast and slush or paint-in appliances made. To get the best fit as well as the most natural appearance, however, foamed latex or urethane prostheses are far superior, especially for movement and fit.
The Two-piece Mold
The two-piece, or positive-negative, mold is required for foamed appliances or for any pressure-molded ones. In theory, the positive cast is modelled upon, with the desired shape of the appliance to be made, in plastalene. Then a negative is made of this, the clay is removed, and the mold is filled with the appliance material, placed together, cured, and separated, and the appliance is ready for use. The procedure is similar to that given for the two-part flat plate mold on page 82.
To make a mold for a foamed latex or foamed ur-
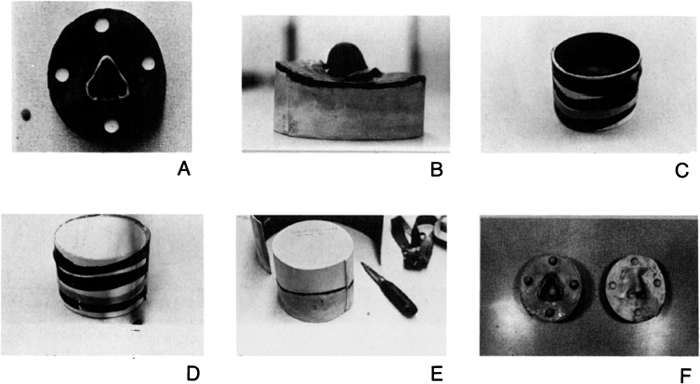
FIGURE 4.19 Two-piece mold. (A) and (B) Two angles of an imbedded nose that has been sculpted in plastalene and the gutters made. Note that the nostrils have been employed as a run-off for the excess material when the nose is being made rather than the usual hole drilled through the positive on the tip of the nose. (C) The positive has been circled with a piece of inlaid linoleum and held together with rubber bands cut from an old auto inner tube. The inside of the linoleum has been greased with petroleum jelly. Sheet lead or rubber can also be used for this. (D) The ethane small piece—say, a nose—from a full-face cast, a plastalene wall is built around the nose of the cast to a height of about ¼ to ½ inch above the tip of the nose (Figure 4.19). This cavity is then filled with PGC alginate and allowed to set. Then the clay wall is removed and the alginate separated from the face cast. This will produce a section negative into which is poured an Ultracal 30 or stone mix to make a positive. When set, this positive is then imbedded in another rather heavy mix of the same gypsum material. Generally, a surrounding round wall is made to hold the stone or Ultracal 30 mix out of 3-inch-wide linoleum, rubber floor mat, sheet lead, or even 6-inch plastic pipe. As the positive has still a great amount of moisture in it, it will incorporate itself into the new gypsum mix readily. Carefully place the positive in the center of the cavity, and with a dental spatula, seal the edges in so that the blend is perfect.
A good way to prepare the surface of a formica- covered table to do this procedure is to rub on a thin coat of petroleum jelly. Some workers prefer to use a glass plate or even a board with a formica top. The linoleum or other material wall can be secured with cloth adhesive tape to keep its shape.
Although with small molds there is less chance of negative portion poured with Ultracal 30. (E) The rubber bands and linoleum removed. A plaster knife is used to clean up any flash and to round the edges of the mold. The markings are made in pencil just before the Ultracal has set, giving the type of appliance, date, and if desired, a number for cataloging. (F) The finished two-part mold with the plastalene removed and the surface given two coats of clear lacquer to seal it. This mold will be used for casting foamed urethane noses. breakage than with larger ones, many lab technicians use fibre, fibreglass cloth, or burlap in the mold. Others prefer to use a circle of wire cloth around the positive section mold, taking care to imbed this fully within the mold.
When the stone or Ultracal starts to heat up in the set, remove the retaining wall, and while the material is not yet quite hard, scoop out three or four circular keys with the round end of a spatula or knife blade. Clean up the edges and fill any defects. The desired shape of the appliance can now be sculpted on this built-up positive form in plastalene and gutters formed for an overflow area. Clean the key areas and apply a separator on them and the overflow where the stone or Ultracal 30 can be seen. The surface can then be sprayed with the Kodak Photo Flo solution and the form enclosed in a 6-to-8-inch (depending upon the height of the sculpture) circle of linoleum or such. Heavy elastic bands or cloth adhesive tape can be used to hold the form in shape. A stone or Ultracal 30 mix is then added in the usual manner to fill the cavity, and reinforcement material is added if desired.
When the stone or Ultracal 30 is completely set and almost cool, remove the wall and separate the two sides of the mold. The plastalene is then removed and cleaned off the mold, and the keys can be lightly sanded to remove any burrs. The mold is now ready for use.
Molds made for foamed latex prostheses should not be more than 1½ inches thick to allow good heat penetration for curing the latex. Also, if the appliance is large or deep, it is a good idea to have a vent hole for overflow as well. On large noses this hole can be drilled through the positive on the nose tip with a ¼- to-5/16-inch drill (Figures 4.20 and 4.21).
Two-piece molds for foamed polyurethanes are quite similar to those for foamed latex except that the urethane molds can be heavier as no baking is required.
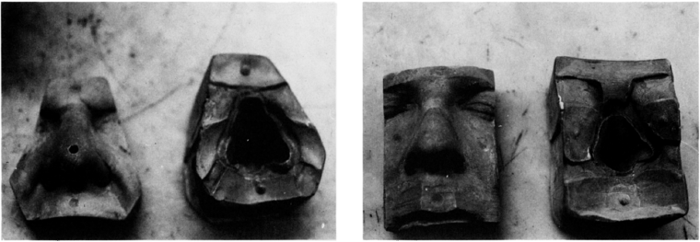
FIGURE 4.20 A smaller foamed latex type nose mold for just a nose tip, showing the conventional escape hole bored into the tip of the positive.
(Molds by Werner Keppler. )
Large molds that might be for extensive forehead pieces or for full heads can entail a positive core head and a two-piece negative. Not only are these molds made to have vent holes, but also they may be employed as filling holes for a gun filled with foamed latex that is forced into the mold. Large molds must often be clamped together as the mold is being filled, and flanges must be made to give a purchase point for these clamps. Of course, the larger the mold, the more strengthening it must have, both with a product such as Acryl 60 cement hardener and burlap or fibre added to the molds. It is also a good idea to mark one side of the molds with a heavy marking pen or to scratch a line down the sides of both of the molds to see easily how to put the molds together during use.
Some lab technicians coat the sculpted plastalene with RCMA Plastic Cap Material when making two-piece molds so that when separated after making the negative, no plastalene will stick to it, making cleaning of the negative easier. This coating should be removed from the plastalene with acetone for reuse of the clay material. There are many methods employed for making the positive-negative types of molds, and books relative to these methods may be found in the Bibliography.
Incidentally, all molds used for foamed procedures must be thoroughly dried out before use. One good way is to put them in an oven at low heat (100°– 150°F) and leave them overnight.
Plastalene Transfers
Dick Smith often sculpts a facial transformation on the life mask, then removes sections of plastalene intact and transfers them to an individual section positive for making the two-piece molds. Using a clean, fresh dental stone life mask, he brushes on two coats of alginate dental separator and dries the surface with a hair dryer. He then sculpts his appliances with #2 plastalene as

FIGURE4.21 Another Keppler mold for foamed latex for a nose tip but with channels cut for the excess rather than the hole as in the previous figure. See Chapter 5 for other two-piece molds.
usual on the life mask, finishing the detail and the edges. He then coats the plastalene with a layer of clear plastic cap material.
The entire life mask and sculpture is then submerged in cold water for about an hour, at which time some of the plastalene sections may loosen from the life mask while others can be easily pried away. Large areas like the forehead may have to be cut in half to remove easily. These sections of plastalene are then carefully transferred to section positives. He recommends coating the section positive with petroleum jelly and then pressing on the sculpture and smoothing down the edges. The texture, edges, and minor repairs needed after the transfer can then be done as can the plastalene flashing for casting and the negatives poured up. In this manner one can get a better perspective of how the sculptured pieces will appear on the full face rather than just estimated on a section positive. RCMA makes a special heavy grade of alginate separator that is excellent for this use as well as for making acrylic teeth.
Molds for Teeth
Plastic teeth and caps that are pressure or heat cured are made in special metal flasks. However, for most make-up purposes, two-piece dental stone molds will suffice.
The first step in casting the mouth is to cast the upper or lower teeth (or both) to have a basic cast to work on. A dental supply house (see Appendix B) can furnish all the necessary materials and tools for this step as well as the materials to make the teeth. A set of impression plates, for both the upper and lower teeth, can be obtained in a number of sizes that will fit inside the mouth. They are available in plastic or metal. Also, it is a good idea to buy a set of rubber dental base molds to make neat finished castings to work with.
For a cast of the upper teeth, a mix of quick-set dental alginate can be made and placed in the tray. This is inserted in the mouth and pressed up to cast the upper teeth. This type of alginate sets quite rapidly (2 to 3 minutes) so the cast can be removed as soon as the alginate is firm. A mix of dental stone should be then brushed into the negative alginate mold (while still in the tray) and then additional stone added to fill the cast. Many dental technicians employ a vibrator to ensure that the mold is well filled and packed with the stone and to dissipate any bubbles that might be formed. The rest of the stone mix should be poured into a rubber dental base mold. When the stone is of a plastic consistency, the tray is inverted onto the stone in the base mold and the join smoothed out.
When the stone has completely set, the tray with the alginate can be removed, with the alginate attached and the casting removed from the base mold. The edges can be trimmed with metal tools to form a neat casting. The lower teeth can be cast in the same manner using the lower teeth trays and the same rubber forms. As there are a number of methods for making acrylic teeth, the special molds for these are discussed in the section on tooth plastics in Chapter 5.