
CHAPTER 5
Latex and Plastic Appliances
AN INCREASING NUMBER OF COMPOUNDS AND MATERIALS are being used by make-up artists to produce appliances. The criterion is always that the prosthesis looks and behaves as natural as possible for the use intended and designed. Today we have casting latex to make slush or paint-in appliances, foamed latex products, foamed urethanes, gelatins, solid molded plastics, and waxes for constructions. This chapter covers each of these materials and their basic uses.
Of all the compounds utilized for appliances, natural rubber is by far the most popular and useful. Commencing in the late 1930s make-up artists began experimenting with various forms of these products, starting with the brush-applied method into a plaster mold and later the use of the two-piece foamed latex materials.
Beyond the making of the molds and casts, the make-up artist now had to learn a bit of chemistry to make the mixes necessary for use and to understand the variety of solvents, polymers, colorants, and so forth that were part of the vocabulary of the make-up laboratory technician. Telephone calls to manufacturers, visits to the prosthetic clinics of the Veterans Administration, discussions with chemists, and finally, comparing notes with other make-up artists interested in these new and exciting directions were all part of the education of those who wanted to learn and master these challenging techniques. Times may change but avidity for learning should never diminish.
Latex
Latex is a milky white fluid that is produced by the cells of various seed plants (such as milkweed, spurge, and poppy families) and is the source of rubber, guttapercha, chicle, and balata. Most natural rubber today comes from coagulating this juice and is a polymer of isoprene.
Synthetic rubberlike substances can be obtained by polymerization of some plastic materials and may also be called a synthetic rubber, or synthetic latex. The term elastomer means rubberlike, and there are many categories to which this term can be applied.
Natural rubber latex as employed by the make-up professional usually refers to a pure gum latex that has no fillers and is of varying density. Some are thinner for use as balloon-type rubber (for making bladders and so forth) while others are thicker (like those employed for some foam latex formulas). When rubber latex has fillers, like zinc oxide, it can be used for casting as it will build in thickness when left in a slush mold or can be added on with painting-in methods. Some natural rubber latices are prevulcanized—that is, pretreated so they do not require a heat cure— while others require such heat treatment to cure them.
Synthetic rubbers and latices can be polysulfides, polyurethanes, acrylics, and so on. One thus should take care in defining a material as just liquid latex without explaining which type or grade it might be.
The hardness of the finished product can be determined with a Shore durometer. While a reading of 40 refers to approximately the hardness of automobile tire rubber, a reading of 10 is a much softer finished product—more what a make-up artist might wish to employ as a soft duplicating material.
For make-up purposes, three types of latex molding methods are employed: the slush molding method, the paint-in (or on) manner, and the foamed latex procedures cover the general use.
Grades of Latices
Many grades of latex compounds are available from a multitude of sources and can be employed for slush, paint-in, duplicating, or foamed latex.
Natural rubber latices that have no fillers dry with a yellowish translucence and an elastic resiliency such as might be found in elastic bands or balloons. The General Latex Corporation has 1-V-10 that can be used for dipping or making thin pieces. RCMA also supplies a pure gum latex that is excellent for bladder effects: These natural rubber latices are prevulcanized and have good stability, fast drying rates, good water resistance, and excellent aging properties and flexibility.
Slush molding latices have higher solids (due to the fillers) and higher viscosities. They can be easily colored with dyes or colloidal colors and are prevulcanized. RCMA supplies a casting latex for slush molding and brush coating. RCMA also supplies a casting filler that can be stirred into the casting latex to hasten the build-up in slush casting and to provide more viscosity for brush application (see Appendix B for other suppliers). For foamed latices and their components, see the section, “Foamed Latex,” later in this chapter.
Coloration
Coloration of appliances made with latices can be done intrinsically—that is, with color added to the initial formulation before curing—or extrinsically—with color added over the finished appliance. Intrinsic coloration is best done with universal colors like those supplied by RCMA or paint stores, and a drop or so of burnt sienna color is usually sufficient to color a pint of latex as a light flesh tone. Other colors such as reds, ochres, and blues can be added for coloration, but it should be kept in mind that the color of the finished material is usually quite darker than what the liquid appears before curing. Testing on a plaster plate will show the end color before adding too much.
Dyes may also be used for coloration of water-based latices, and a 10 percent solution is usually sufficient to add drop by drop to achieve the best color. Unfillered latices will deepen in coloration considerably more than the fillered types of slush or paint-in latices. Some workers use 30 percent dye solutions for intrinsically coloring a foamed latex so that the higher concentration of dye in water will not affect the water balance of the mix. Colloidal colors such as universal colors, however, are considered to be more manageable and more versatile than dyes for coloring most latex products.
Extrinsic coloration of appliances requires special vehicles for the color as some affect natural rubber or synthetic rubber appliances. Cake make-up foundations, creme-stick foundations, and a number of the creme-cake foundations in general use for make-up foundations on the skin, do not work as a prosthetic base, just as the old greasepaints did not either. The main reason is that they contain mineral oil, which has a tendency either to attack the rubber or to whiten out after application. (Note: All RCMA Color Process Foundations can be used with latex appliances.) Max Factor formerly made a product called Rubber Mask Greasepaint that was essentially a castor oil vehicle base that did not attack the rubber. However, other theatrical make-up companies have copied this foundation so it is available. Also, RCMA has devised a new variety of foundation that is called Appliance Foundation that is superior to the old rubber mask greasepaint types. They also make an AF Powder that has more coverage than the regular RCMA No-Color Powder for use with these foundations (also see page 128). Powdering AF Foundations with AF Powder will produce a more matte surface on an appliance than a No-Color Powder, so sometimes a light stipple of glycerin will restore a better surface halation to an appliance.
The RCMA AF or Appliance Foundation series have
replaced the RCMA PB (Prosthetic Base) materials as the newer AF series are a thicker form of foundation from which the oils do not separate as is prevalent with most of the “rubber mask greasepaint” types, nor are they sticky and hard to blend as are some of the firmer ones.
The AF series is obtainable in the basic Color Wheel primary colors of Red, Yellow and Blue, that can be combined to form any of the other in-between or secondary colors. As well, it comes in White, Black, Brown (KN-5 shade) and the earth colors of Ochre-1624, Warm Ochre-3279, Burnt Sienna-2817, and Red Oxide-6205 which are some of the main basic color ingredients that are components of the majority of skin color foundation shades. In addition, RCMA makes a number of matched shades to their regular Color Process Foundations such as KW-2 and KM-2. Other useful shades are constantly being added to the line due to the wide acceptance of the AF type of makeup for a high-coverage use.
The AF series come in various sizes and also in kit form of six colors per tray which is great convenience for carrying in the makeup kit.
The AF series can be applied with brushes or sponges and provides a super-coverage of both skin and appliances made of foam latex or plastic as well as for slush or paint-in molded rubber.
The mixing of earth colors with the bright colors and the dilution with white will produce almost any shade of foundation. As most make-up artists who employ appliances in their work prefer to mix their own shades for the particular intended use, this provides an excellent basic method. The colors are easily spatulated together on a glass or plastic plate to the required shade. It is a good idea to mix more than is required so that one does not run out of special color during the job at hand. The extra can be stored in a container for future use. It is also well to keep track of the mix by marking down the amounts of the basic materials used, such as so many spatula tips or spoonsful of one shade to another in case additional material must be mixed.
The AF Kits are numbered as #1, #2, etc. #1 has 1624 (Ochre), 2817 (Burnt Sienna), 3279 (Warm Ochre), 6205 (Red Oxide), KW-2 and KM-2. Kit #2 has Red, Yellow, Blue, Black, White and Brown-KN-5. Other kits with regular matched Color Process shades are also being made. Special kits are available to order for specific use.
Although the viscosity of the AF series is high, its blendability and coverage is superior for any type of appliance.
A new concept of extrinsic coloration is being done with acrylic emulsion colors. Dick Smith devised a mixture of RCMA Prosthetic Adhesive B and acrylic paints that coats a foamed latex appliance with an excellent surface material. His basic formula is an equal mix of PA-B and Liquidtex tube colors. This he stipples on the appliance with the urethane stipple sponges after giving the appliance a stipple coat of PA-B and powdering. To lessen the halation, he might stipple on a coat of Liquidtex Matte Medium.
For temporary coloration (as it has a tendency to crack off with age), Craig Reardon painted the ET heads with universal colors mixed with regular rubber cement (Figure 5.1). Also, some firms make a paint for latex castings with xylol as the solvent. The latter seems to incorporate the color quite well into the latex but does not give as fleshlike a look as the Dick Smith mixture (he calls that PAX).
RCMA also makes a special line of flexible acrylic foamed latex or foamed urethane paint colors for make-up use, which are similar to the PAX material which can be painted or stippled on to the appliances. There are matting agents that can be added to produce a less shiny coating as well. A new series with FDA certified colors has also been developed by RCMA, called Appliance Paint (AP) series, and is available in colors matching the Appliance Foundation (AF) series.
pH Value
Natural rubber latices are suspensions in ammoniacal water, and the correct pH value for most systems is

FIGURE 5.1 Craig Reardon with one of the ET heads that he painted.between 10 to 11. pH test papers can be obtained from chemical supply houses. The excess ammonia loss of natural rubber latices can be corrected with a 2 percent solution of ammonium hydroxide in water, testing as one adds the solution to obtain the proper pH.
Fillers
Latices used for slush or paint-in casting can be adjusted for various degrees of stiffness or hardness of finished product by the addition of a filler. This filler can be prepared by adding 25 grams of zinc oxide to 100 cubic centimeters of distilled water, or it can be purchased from RCMA as Casting Filler. Depending upon the degree of opacity and stiffness required, anywhere from 1 to 10 percent of filler can be added by stirring into any prevulcanized latex for slush use.
Softeners
To make softer latex pieces, any latex compound can have a plasticizer added to it which consists of 400 grams of stearic acid, 500 grams of distilled water, 100 grams of oleic acid, 12 grams of potassium hydroxide, and 12 grams of ammonium hydroxide (28 percent). This mixture can be added 5 cubic centimeters (to 100 cubic centimeters of latex compound) at a time, testing a finished piece in between, to achieve the degree of softness required. Such products also affect the drying time of the latex as well as the durability of it.
Thickeners
Most natural and synthetic latices can be thickened to a soft, buttery consistency in a few minutes by stirring in Acrysol GS. This product is the sodium salt of an acrylic polymer and is supplied at 12 to 13 percent solids in water solution. For most applications, the use of 0.10 to 2 percent Acrysol GS (solids on latex solids) is adequate. Natural rubber has approximately 60 percent solids, and thus, 5 to 10 cubic centimeters of Acrysol GS added to 100 cubic centimeters of latex will thicken it considerably. This mix can then be spatulated into a mold to add bulk to a particular section for paint-in or slush molding. Note that thickeners retard the drying time of any latex compound.
As the Acrysol GS is a very heavy, viscous liquid, a diluted solution in water will work better for additions to latices. Therefore, if the Acrysol GS is diluted 50-50 in water, it will have half the strength of the stock solution and should be used accordingly. Tincture of green soap can also be employed as a latex compound thickener for some applications.
Latex Appliances
Slush or Slip Casting
Casting latex is poured into a slush-type mold and allowed to set for a period of 10 to 30 minutes, depending upon the thickness of the desired appliance (Figure 5.2). The excess latex is then poured back in the container and the mold turned upside down to drain. It can be force dried with a hand-held hair dryer, set under a large hair dryer, or placed in a low-heat oven. Drying time varies with the thickness of the prosthesis, but separation from the mold is relatively simple due to shrinkage of the latex. It should be noted that the appliance will have rather heavy edges and is unsuitable for blending into the face during application.

FIGURE 5.2 Slush casting. (A) A nose mold is filled with casting latex and allowed to set until the buildup is about 1/16 to 1/8 inch. (B) The latex is poured out of the mold and the surface of the latex dried with a hand-held hair dryer. Unless oven cured in a low heat for about 1 hour, the mold should be left to air cure for about 8 hours after the latex has been thoroughly dried. (C) The nose is then removed and trimmed for use. Clown noses are usually made by this method as their edges do not need to be thin for blending into the skin. As with all slush- or paint-in-type molds, to reuse them after they are dry (especially after oven curing), they should be rinsed in clean water before use. This restores some of the moisture in the mold and prevents the latex from adhering strongly to the plaster when the appliance is removed. Otherwise, no separating medium is required for latex-to-gypsum castings.
A slush cast nose is generally made for clowns as they will last longer than the delicate paint-in or foamed pieces. Full heads often found in joke and costume shops are made in this manner as well as full or partial appliances made for extras in a production where special make-ups are required but do not have to have any facial movement.
Paint-in or Brush Application Molding
This method consists of painting casting latex into the mold in successive overlapping coats with the thinnest being closest to the edge of the prosthesis. While a slush molded piece has a heavy ungraduated edge, the brush application method will allow the blending edge to be carefully controlled. This is quite necessary because a casting latex edge cannot be dissolved into the skin area as can many of the plastic types. Another advantage of a painted-in piece is it can be built up more heavily where it is necessary. For example, the alae and the bridge of the nose will require extra coats to produce an appliance that will hold the proper shape.
Sometimes workers add small pieces of paper towelling in to strengthen a piece. The towelling should always be torn into shape rather than cleanly cut to produce more graduated edges. It is then placed where desired with a brush and additional casting latex coated over the paper to make it a part of the prosthesis.
Medium-sized Chinese bristle brushes are used for this work by many technicians due to their size, configuration, and cost. Always work up a good lather of soapsuds on a cake of Ivory Soap with the brush and wipe it lightly before putting it into the casting latex. This procedure prevents the latex from solidifying or building up on the bristles of the brush and facilitates its cleaning in cold running water after use. It is a good practice to pour some casting latex in a 16-ounce wide mouth jar for painting use. The brush should always be left in the latex when not in use between coats so that it will not dry out. Leaving the latex-covered brush on a counter top for just a few minutes can ruin it for further use. Sometimes a coated brush can be salvaged by soaking it in RCMA Studio Brush Cleaner overnight.
Some appliances require special attention and painting—for example, Oriental eyelids where the lid area must be painted heavily enough to hold the proper shape while the upper portion that is attached to the skin must blend off in a thin coat. It is a good idea to have a series of eyelid molds (see Figure 4.16) and to paint up a sample of each for try-ons when a number of them are required. Then the eyelids can be individually fitted and the area to be painted in casting latex noted (as eyes tend to be different, some lids may be attached higher or lower on the frontal bone for the best effect).
Another case is the making of latex bald caps for extras or large casts. This method consists of pouring some casting latex into the mold cavity and turning the mold back and forth, with the latex being carried higher and higher each time and forming an edge. This procedure should be carried out carefully so that the leading edge around the forehead line of the hair receives only one or two such coatings of casting latex. Don’t let the latex sit in the mold without this turning agitation because it will build in rings that might be apparent when the piece is dried out for use. Experience will show how long this procedure must be kept up to obtain a bald-effect cap that is both fine at the edges and heavy enough in the crown to hold its shape.
Pour off the excess out of the back portion of the mold, and drain fully before drying the surface with a hand-held hair dryer. Half an hour of drying is required generally, and then the mold can be set aside for another hour or so to cure fully. The cap can then be peeled off the mold, and to insure that it will retain its shape, it should be placed over a head form for about another hour so the surface can fully dry out. It is then ready for use (see mold shape in Figure 4.17).
Inflatable Bladder Effects
Many special effects transformations or illusions employ the use of some form of inflatable bladder whose effect is to ripple the surface of the skin to indicate violent changes taking place systemically (Figure 5.3). In essence, these bladders are inflatable plastic or latex balloons that can be controlled in size and flexibility by the introduction of air into them through fine plastic tubing. Such bladders may be concealed under surface appliances made of foamed latex, urethane, or plastic molding material so when they are inflated and/ or deflated, it appears that the surface of the skin is expanding as air is introduced into the bladder or contracting as the air is let out. As such, a rippling effect can be created like that on William Hurt’s arm in Dick Smith’s make-up in the film Altered States (Warners, 1980) and Rick Baker’s Werewolf.
To make a simple bladder, pure gum latex can be used. Make a plaster flat plate (a good size would be 6 by 12 inches and about an inch thick for a permanent stock plate) with a smooth surface. Sketch an outline with a #2 lead pencil of the two sides of the bladder, and paint on three even coats of RCMA Pure Gum Latex, right to the edges of the outline, drying each coat thoroughly between with a hand-held hair dryer. This will normally give a sufficient thickness for the walls of the bladder, but larger-sized bladders can be made with additional coats for more strength.
Cut out a piece of heavy waxed paper, allowing about ½-inch clearance to the edge of the outline. On larger bladders, allow at least 3/4-inch (for an adhering
edge). This waxed paper will delineate the inside dimension of the bladder, which of course can be made in many shapes.
Dust this waxed paper cutout with RCMA No-Color Powder on both sides, and lay it down on the latex-painted shape on one side. Take care not to powder the surface of the latex. Carefully peel up the other side of the bladder and fold it over to fit exactly the outline of the other side. Press the edges together firmly so that the latex will adhere to itself to form the two sides of the bladder. Strip off the other side of the bladder from the plaster, and trim the latex nozzle end to within about 1/8 inch from the waxed paper end.
To remove the waxed paper, push in a small rounded wooden modeling tool to force an entrance and then remove it. Insert in its place a drinking straw whose end has been dipped into No-Color Powder. Blow in the powder into the bladder cavity on each side. Then the waxed paper insert can be teased out with a pair of dental college pliers or tweezers. The bladder with a nozzle end is now complete. Clear plastic tubing can be obtained from a medical or chemical supply house and inserted into the nozzle of the bladder. This can be sealed in with Johnson & Johnson 1/2-inch Dermicel Clear Tape and then coated over with pure gum latex. The bladder is then ready to be attached and used.
Although the illustrated bladder has no excess edge for attachment to the skin, the 1/2- to 3/4-inch excess previously described during manufacture can be used for the adhesion area. RCMA Prosthetic Adhesive A is best for these bladders as it has excellent retention (see page 52 for other bladder uses).
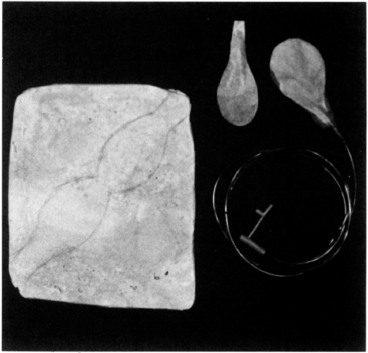
FIGURE 5.3 Bladder effects. Various inflatable bladder effects are often seen in transformations. These can be made of PMC-724 (see page 49) or in pure gum latex. This is a plaster flat plate with an outline inscribed in pencil. A finished bladder is shown after having been attached to the tubing with Dermicel tape and a coat of pure gum latex as a sealer over it. In the center is the cutout wax paper used to keep the sides of the bladder from each other when it is folded over.
Foamed Latex
The present-day ultimate in prosthetic appliance use for make-up purposes is the employment of foamed latex. It is unsurpassed for the best possible effects as well as adhesion to the skin. Since MGM’s classic, The Wizard of Oz (1939), when Jack Dawn, then head of the make-up department, employed foamed appliances for the unforgettable characters of the Cowardly Lion, the Tin Man, and the Scarecrow as well as many others in the film, foamed latex has been the mainstay of tridimensional character work in motion pictures. In the early days of television in New York in the 1940s and 1950s, studios relied mainly on painted-in casting latex appliances for their low cost and rapidity of making them that was needed due to the lack of preparation time allowed to make-up artists for television shows. Today, foamed latex has become the standard for most appliances for professional make-up work.
Like many laboratory procedures that have been developed strictly in the make-up field, the parameters of the chemistry and mixing of foamed latex have been found to extend beyond the seeming restrictions of the expensive scientific or special equipment to ordinary, easily obtained ones (Figure 5.4). At first, special handmade beaters, bowls, and laboratory ovens were considered to be required, but many labs today use kitchen-type Sunbeam Mixmasters with regular beaters and bowls, along with either standard electric kitchen ovens or the newer air convection table-top type. Only when full heads and bodies must be made are larger ovens required and restaurant-type Hobart mixers employed.
However, still some conditions do not vary much,
and general room temperature and humidity do affect foaming procedures. The optimum is 68 to 72° F and a midrange of humidity. It is not difficult to maintain such with air conditioning and heating today. Higher temperatures will cause faster gelling and setting, while lower temperatures will extend the time. Successful foaming operations are impractical below 60° F.
Small quantities of ingredients can be weighed in plastic cups and the standard bowls of the Mixmaster used. Some artists mark the foaming volume on these bowls (five volumes is approximately correct for most appliances). All measurements given are for wet unfoamed ingredients, and a basic mix can often do quite a few small pieces. As it is rather impractical to mix very small amounts, most workers fill the molds that they are presently working on and, with the remaining material, fill some stock molds for extra pieces. Otherwise, much foamed product is wasted.
Wholesalers of foamed latex ingredients normally sell 5 gallons as a basic lot, but 1-quart sizes of both the three-part latex and the four-part Burman formula are available through RCMA. Some other suppliers will furnish 1-gallon lots. It should be noted that a lot consists of the measured amount of the basic latex material plus all the necessary chemicals for the foaming operation, although they are also available separately from most sources. European users will find a very soft and excellent foam available through Christopher Tucker in England.
The Three-part Foamed Latex
1.Mix Parts A, B, and C thoroughly to be sure there is no material separated and caked on the bottom of the containers.
2.Combine 170 grams (6 ounces, or 3/4 cup) of Part A and 22 grams (1 tablespoon) of Part B in a mixing bowl.
3.Mix with electric mixer to three to six times the original volume, depending on the firmness desired.
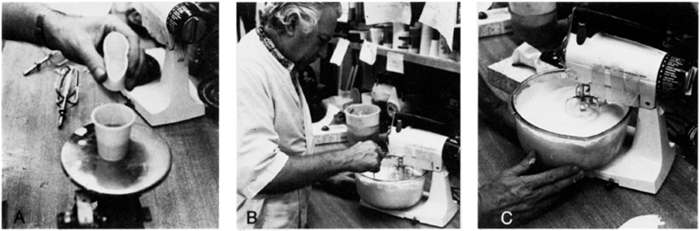
FIGURE 5.4 Mixing foamed latex. (Lab work by Werner Keppler.) (A) Paper cups used to measure ingredients by weight. (B) Beating foam in a kitchen mixer with regular beaters. (C) The latex mix beat to correct volume and refined.

FIGURE 5.5 A nose mold for foamed latex. (A) Filling the negative with a spoonful of the foam. (B) The positive set on and hand pressure applied. (C) After baking, the mold is separated. Gloves are used to hold the still hot mold. (D) The appliance removed. Flash or run-off can be seen. (E) Comparison with a file photo upon which the nose was based for duplication.
4. Add 6 grams (1/2 teaspoon) of Part C, and mix until uniformly mixed (about 1 minute).
5. Pour or inject into your mold and allow to stand undisturbed until gelled. Place in oven and cure (bake) at 200° F for 4 to 5 hours. If the material gels (sets up) too fast, reduce the amount of Part C used gradually until you get the amount of working time you need. Normally it is not desirable to exceed 10 minutes after the addition of Part C.
However, one of the most knowledgeable lab technicians in California, Werner Keppler, who formerly headed the Universal Studio laboratory and is now at TBS in Burbank, has modified and simplified the foaming procedures, making small to large appliances with a minimum of difficulty. He prefers to use the three-part material and makes minor adjustments for each run if need be (Figures 5.5 and 5.6).
Using the regular Mixmaster bowls, Keppler’s overall mixing time is 10 minutes, and his measurements are made in plastic cups. One cup of Part A (the latex) in the small bowl is about the minimum, and this will
do half a dozen noses, while four cups in the large bowl will suffice for a full head.
His molds are prepared by coating a fully dried out, cool mold with two coats of thinned-out clear lacquer. After this has dried, he coats them with a thin brushing of castor oil and then uses Mold Release prior to use. He also prefers the Kerr Toolstone (about 2 inches thick) with fibre (hemp casting fibre) reinforcement for making his molds.
To prepare for a run, Keppler lays out his molds side by side coated with Mold Release. The foamed ingredients are measured on a scale and poured into the mixing bowl along with a few drops of burnt sienna universal color to make slightly flesh-tinted appliances. If he decides that he wants softer than usual foam, he adds two drops of glycerin per cup of Part A. He then hand mixes the ingredients a bit and places them under the mixer, starting at a slow speed and gradually turning the speed wheel up to the desired one. Timing begins when mixing by machine starts.
With the small bowl, he mixes at a speed of 7 the measured ingredients Part A (latex) and Part B (curing agents) and with the large bowl, the speed is 12, for 4 1/2 minutes. He then tests the mix by dipping a kitchen knife into the mass. If the mix does not fall off the blade readily, he estimates that it is ready. He then turns the mixer to speed 1 to refine the foam for 3 1/2 to 4 minutes. He then adds the Part C (gelling agent) and beats for the remaining time (about 1 minute), stirring down to the bottom of the bowl with his knife blade to insure that the gelling agent is thoroughly mixed in. He also hand reverses the motion of the spinning bowl to aid in removing all the excess or large bubbles that might have formed. If the piece is a large one, he often adds the same amount of water to the gelling agent to slow down the gell time.
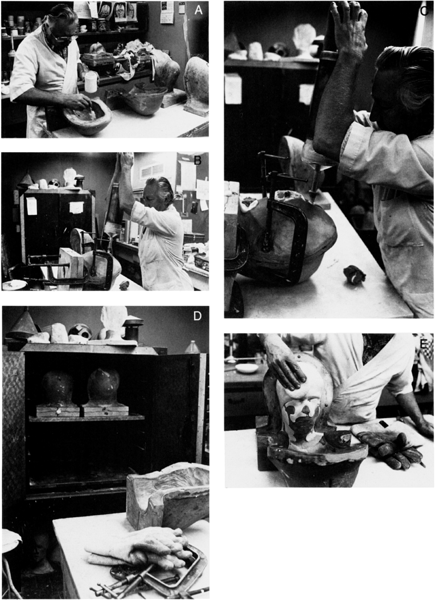
FIGURE 5.6 A full head mold for foamed latex. (A) Coating the negative with separator. (B) For a large mold with many surfaces, a special gun is filled with the foamed latex mix and injected into a hole drilled into the mold surface for this purpose. This particular mold is a three-piece affair with a front, back, and core all held securely together for casting with large screw clamps. (C) As the mold fills, two exit holes for the excess material are seen. As the foam bubbles through the one closest to the injection hole, it is stopped up with plastalene. The second hole has just been plugged with the clay material before removing the injection gun. (D) The injected molds are placed in the large oven for baking at the proper temperature and timing. (E) The cured appliance is removed from the oven and the front half of the mold opened and powdered. (F) The back half of the mold is removed as the latex head remains on the core section of the mold. Note that as the piece is a head and forehead appliance only, the core face portion has been cut away to remove any undercuts. Note also the excess foamed latex that has flowed into the prepared channels away from the front blending edge of the appliance. (G) Leo Lotito, make-up department head of TBS Studios (LEFT), views the completed appliance with Terry Smith (RIGHT), the make-up designer for the production (The Last Star Fighter, Lorimar Productions, 1984). Note also the two approximately half-inch projections that are the injection point and one of the excess flow holes of the mold. These will be removed, and the hair portion of the appliance will cover them. For a large piece like this, Werner often paints the inside of the mold with a coating of the latex used for the foaming procedure to give a skin to the surface of the appliance. Werner (CENTER) is seen recoating the molds with castor oil prior to allowing them to cool off slowly before another use. Large molds are covered with towels or blankets to slow cooling process. These molds were made of Kerr Toolstone

FIGURE 5.6 A full head mold for foamed latex. (A) Coating the negative with separator. (B) For a large mold with many surfaces, a special gun is filled with the foamed latex mix and injected into a hole drilled into the mold surface for this purpose. This particular mold is a three-piece affair with a front, back, and core all held securely together for casting with large screw clamps. (C) As the mold fills, two exit holes for the excess material are seen. As the foam bubbles through the one closest to the injection hole, it is stopped up with plastalene. The second hole has just been plugged with the clay material before removing the injection gun. (D) The injected molds are placed in the large oven for baking at the proper temperature and timing. (E) The cured appliance is removed from the oven and the front half of the mold opened and powdered. (F) The back half of the mold is removed as the latex head remains on the core section of the mold. Note that as the piece is a head and forehead appliance only, the core face portion has been cut away to remove any undercuts. Note also the excess foamed latex that has flowed into the prepared channels away from the front blending edge of the appliance. (G) Leo Lotito, make-up department head of TBS Studios (LEFT), views the completed appliance with Terry Smith (RIGHT), the make-up designer for the production (The Last Star Fighter, Lorimar Productions, 1984). Note also the two approximately half-inch projections that are the injection point and one of the excess flow holes of the mold. These will be removed, and the hair portion of the appliance will cover them. For a large piece like this, Werner often paints the inside of the mold with a coating of the latex used for the foaming procedure to give a skin to the surface of the appliance. Werner (CENTER) is seen recoating the molds with castor oil prior to allowing them to cool off slowly before another use. Large molds are covered with towels or blankets to slow cooling process. These molds were made of Kerr Toolstone.agents) and with the large bowl, the speed is 12, for 4 1/2 minutes. He then tests the mix by dipping a kitchen knife into the mass. If the mix does not fall off the blade readily, he estimates that it is ready. He then turns the mixer to speed 1 to refine the foam for 3 1/2 to 4 minutes. He then adds the Part C (gelling agent) and beats for the remaining time (about 1 minute), stirring down to the bottom of the bowl with his knife blade to insure that the gelling agent is thoroughly mixed in. He also hand reverses the motion of the spinning bowl to aid in removing all the excess or large bubbles that might have formed. If the piece is a large one, he often adds the same amount of water to the gelling agent to slow down the gell time.
He then pours into his molds immediately and holds them shut until the excess material gells to the touch. Large molds are filled with an injection gun and are clamped shut during this procedure as they are filled.
Keppler bakes the molds in a 200° F oven for 2½ hours for a small piece and full heads or large molds for 5 1/2 to 6 hours. On completion of bake time, the molds are removed from the oven with welders’ gloves and taken apart. Small molds are opened and the piece is left out to air dry, while larger appliances are left on the positive side of the mold after being taken apart and replaced in the oven for about 1/2 hour so that their more extensive surfaces can fully dry out.
He then coats the molds, while hot, with some castor oil with a paint brush and sets them aside to cool off. Large molds are covered with towels to slowly dissipate the heat. The molds must cool off completely before another use.
He fills small holes in a finished foam appliance with a mixture of pure gum latex into which Cabosil
M-5 has been stirred to thicken it. Sometimes, when the head is a large one, he will coat the negative mold surface with a brush coat of Part A before pouring in the foam mixture, especially if the modelling is intricate and detailed on the finished piece. This “skins” the mold and becomes a part of the appliance during the baking.
Some additional notes on the three-part foamed latex are from Dick Smith, who uses it only occasionally since he seems to prefer the four-part latex mix. He does not recommend the use of the castor oil separator but does lacquer-coat his molds and uses a stearic-acid-type mold release. When beating the foam he sets his mixer on the highest speed for about 2 minutes so that the volume of the mix will be increased to about four volumes. Three volumes will make a firm foam, four volumes a soft foam, and five volumes a very soft piece. He then turns the machine down to a speed of about 3 and refines the foam for 3 minutes. This way the volume remains about the same, but the foam cell structure becomes finer.
He measures out the gelling agent with a spoon that has been waxed (the gelling agent won’t stick to a waxed surface) or a small receptacle such as a cut-off paper cup that has been coated with a paste wax. A level teaspoon of gelling agent is about 8 grams, which he normally uses. If the foam mixture doesn’t gell within 15 minutes after the mix is stopped, it will start to break down and collapse the foam. A good average time is between 5 and 10 minutes for gellation, when the room temperature is in the mid-seventies.
He also mixes his color in the gelling agent, using casein artist tube colors slightly thinned with water. A light flesh tone is provided with a teaspoon of color with 1/4 teaspoon of water for a standard mix (using burnt sienna as the colorant).
Like Keppler, Smith uses a spoon to scoop out the foam from the mixing bowl and pours it carefully into the mold, taking care not to entrap any bubbles. If the negative has deep texture or pits, the foam mix should be poked into these with a pointed wooden modelling tool. Special care should be taken with nose tips.
Smith cautions that too much foam should not be placed in a small mold as it will make it too difficult to press completely closed. He recommends a preheated oven of 210° F. With a mold about 4 inches high, 3 hours’ baking time should be sufficient. When the foam is believed to be cured, the mold should be removed from the oven and gently pried open. The foam should be poked in an inconspicuous spot (such as an overflow area). If it stays indented, it is not baked enough. Leave the piece on the positive half of the mold, and return it to the oven for another half-hour. Test it again before removing completely. He also recommends that all molds be wrapped or covered in old bath towels to prevent rapid cooling or cracking.
Foam can be made softer to the touch by adding 3 grams of Nopco 1444-B from Diamond Shamrock Chemical Company to the 22 grams of Part B and then adding it to Part A. If you want to beat to volume 5, also add 10 grams of water to the ingredients before beating.
As one can readily see, foamed latex mixtures can be varied by different technicians to achieve what they consider to be the most efficient or simplest method of use. Certainly there is little contradiction in the methods, and they show the versatility of the material as well as slightly different approaches to achieving the same end result.
Most lab technicians that employ dental or tool stone molds will coat them when hot with castor oil, but this method should not be employed for Ultracal molds as it often leaves the edges of the appliances gummy. Use only the Mold Separator with the latter after the mold has cooled off and before the next use.
The Four-part Foamed Latex
Some basic differences in the three-part and the four-part foamed latex procedures are noted here.
Sponge rubber will cure properly only in a thoroughly dry mold. When one mixes gypsum products a large amount of water is used. Some of this water goes into the molecular change when the gypsum sets up, but the rest has to be removed from the mold before it is suitable for molding sponge rubber. Separate the two halves of the mold, and bake at 200° F for 4 to 6 hours if a small mold and from 10 to 12 hours if larger.
Once the mold is dry, it should not be heated above 200° F as the water of crystallization will leave and
the mold material will break down. Mold separator should be applied in a thin coat to both halves of the dry mold only where the modelling occurred. Do not allow this material to get into the keys. When the mold is thoroughly cold and the separator has dried, the sponge can be poured in.
Room temperature and humidity have a great bearing on the operations and results. With an optimum room temperature of 68 to 72° F, it may be necessary to vary the amount of gelling agent from between 9 and 16 grams to have the foam jell in about 10 minutes.
Using the deluxe model of the Mixmaster with the small bowl, the beater speeds and times should be carefully noted for each batch. (Note that some other kitchen mixer models usually beat too fast at their slowest speeds and so are unsuitable.) As the latex is stabilized with ammonia, the recommended speeds will assure that sufficient remains in the mix so that it will gell with 14 grams of gelling agent. If it is beaten faster or to too high a volume or the temperature of the latex or air is too warm, the mix will gell too fast—even during the mixing process. Conversely, if the latex or air is too cold, 15 minutes of beating time will not remove enough ammonia and the foam will not gell in 30 or more minutes. If, during the final refining process of slow beating, the speed of the beaters is too fast, a nice fine foam cannot result and the mix will set up too fast. Also, with some other beaters that do not fit the contours of the bowl correctly, poor mixing of ingredients will result.
To insure a very slow low speed, one can connect a light dimmer fixture (or studio light dimmer) in series with the Mixmaster. The controls of the Mixmaster are then set at 12 (the highest speed) and all the speeds set up with the dimmer. One must carefully calibrate the dimmer switch with markings to indicate the speeds of 1, 5, and 6 for correct operations. This way, the Mixmaster runs much cooler and quieter, and infinite speed control is possible.
Although the latex is simply stirred carefully to remove any lumps, the three other components—curing agent, foaming agent, and gelling agent—should be thoroughly shaken up just before weighing them; otherwise the heavier ingredients will settle to the bottom while the lighter ones will be poured off first. Thus, the first batch mixed and the last will have the same mix if they are properly shaken. Otherwise the formula will vary considerably—and so will the foaming operation. The four-part latex is considerably thicker than the three-part one, so turning the containers every 2 weeks on the shelf is quite important to avoid settling and extend shelf life.
To prepare the foam mix, pour 12 grams of curing agent into the mixing bowl and add 30 grams of foaming agent and 150 grams of the latex, and mix thoroughly with a rubber spatula. Adjust the beaters so they fit to the sides of the bowl and then:
Begin the mixing and foaming cycle.
1 minute at speed #2 (mixing)
7 minutes at speed #8 (whipping)
4 minutes at speed #4 (refining)
2 minutes at speed #2 (ultra-refining)
Then add 14 grams of gelling agent (shake bottle first!) taking 30 seconds to do so and staying at speed #2. Finally, continue mixing at speed #2 for 1 more minute, turning the bowl back against the beating action to assure a complete mix. This gives a total beating time of 15½ minutes. (Timings are for 70°F.)
The mix can then be poured into the prepared molds. Roll the molds around to cover the necessary surfaces, then slowly set on the other half of the mold and add weights to close it tightly. The remaining foam can be poured on a glass or formica sheet where it should set to a solid mass in 10 to 30 minutes. When you can press it down with a finger and a permanent indentation is formed, you may put the molds in the preheated oven and bake 5 1/2 hours at 200° F. When the time has elapsed, the now vulcanized piece can be removed from the molds and the molds put back into the oven to cool slowly. Don’t forget to turn the oven off! To prolong the shelf life of the latex, it should be kept as close to 70° F as possible.
Four-part foamed latex formulas, such as GM Foam or Burman Foam, do not recommend the castor oil treatment for the molds. Rather, after the new mold is thoroughly dried out in an oven of about 150° F for four hours (more for larger molds) and allowed to cool, it should be liberally coated on the inside surface with a stearic acid type of Mold Release and allowed to set. When dry, the surface should then be carefully whisked dry with a bristle-type brush. Before each use, the surface of the mold should be coated with a thin application of the GM or Burman Mold Release. In general, the mold surface preparation is similar for most four-part systems, as the repeated castor oil application often makes the edges of the finished appliances gummy.
Another suggestion is to add the color directly to the latex, tinting a gallon at a time, and then storing the latex in 1/2-gallon brown glass wide-mouth bottles until ready for use.
Most workers agree that overcuring in an oven of no more than 200° F will neither ruin the appliance nor the mold, but careful watch should still be paid to all timings for foamed products. Large-sized batches might require double the beating time—for example, batches that cannot be handled in the large Mixmaster bowl and that require the large restaurant kitchen-type Hobart mixers.
Regarding the injection by gun of large molds,
breathing holes or exit holes placed along the line of the injection flow are necessary, and as the foam begins to escape from each successively, they can be plugged with a blob of plastalene until the mold is filled and the material has gelled. These blobs of clay can be removed before the mold is placed in the hot oven.
Carl Fullerton, who often works with Dick Smith, considers the four-part foam to be superior and experiments constantly with it to get better results. In a move to save the molds from calcining due to excessive heat, as well as the shock of going to and from a hot oven, he does not preheat his oven, but turns it on just before putting his filled molds into the oven. In this way, the cold mold goes into a relatively cold oven. He turns the oven up to 200° F, or just under sometimes, and bakes for only 1 to 1 1/2 hours. He then turns off the oven and leaves the mold to cool for about 3 hours. At that time both the oven and the mold should be cooled off. He then takes the mold out and separates it. His theory is that the shorter baking time not only saves the mold but also makes a stronger appliance. Again, personal experimentation will allow the lab technician to devise individual methods and techniques based on the experiences of others as well as researching new ideas.
Some of the main differences between the two systems, the three- and four-part formulas, is the lacquer sealing of the molds for the three-part foam that is not recommended for the four-part method; the amount of beating time—for example, only 10 minutes for the three-part formula and 15½ minutes for the four-part one; the speed recommendations for each; the baking timings; and, of course, the basic chemistry of each formulation. As well, the three-part materials carry a somewhat greater latitude for storage as well as use temperature than the other. Nevertheless, in all cases, the final product is the ultimate criterion, and whichever one the make-up artist decides upon to use, he or she might also be smart to test the other system to have a means of comparison on a particular project. Also, although simplification of any manufacturing process leads to faster and less complicated procedures, the final outcome should not suffer unless the compromise will accomplish the same result.
In this vein, the newer flexible polyurethane foams might be considered. Certainly, with more experimentation and possibly even more improved products, these materials will gain more favor and use by makeup artist technicians as their two-part formula does not require any beating with a machine or baking in an oven as well as the piece being completed in less than an hour from the start of the entire operation.
Repairing and Cleaning Foamed Latex Appliances
When an appliance first comes out of a mold, it may have small defects (especially in a large section or a full headpiece). These can be repaired by mixing some pure gum latex with Cabosil M-5 (see page 116), or the inside can sometimes be strengthened by brush coating in a thin piece of netting or nylon stocking.
Rips or tears made when the mask or large piece is removed from the performer can sometimes be repaired by using Prosthetic Adhesive A on each side of the tear, drying a few minutes, and then contacting the sides for adhesion to take place. Then both surfaces, inner and outer, can be stippled lightly with some pure gum latex to disguise the line.
Normally, any foamed latex appliance can be cleaned of most adhesives and make-up coloration by immersing it in acetone and squeezing the solvent through the foam. Two baths will normally take out all the color and adhesion, but the piece will shrink. Shrinkage can be somewhat controlled by a method recommended by Dick Smith in which he adds 1 part of light mineral oil to 6 parts of Ivory Liquid or Joy detergent in a bowl large enough to immerse the piece. The liquid should be squeezed through the foam until it is saturated—about 2 minutes. Then rinse out the detergent from the appliance with about 10 to 20 rinses of cold water. The foam should have expanded about 10 percent. If the detergent mix is decreased to about 4 parts with one of mineral oil, this results in about a 20 percent enlargement. The appliance can then be placed in a warm oven to dry. He also states that this procedure is not exact and to make tests before trying it on a valuable appliance. Generally, such methods may be employed when a fresh prosthesis is not available but are not normal practice.
Basic Procedures for Handling Latex Appliances
As both natural and synthetic latices will stick to each other and the edges may curl and be difficult to straighten out, it is standard procedure to powder any appliance before removing it from any mold. This also can be said for plastic caps, plastic molding materials, and the like. RCMA No-Color Powder or unperfumed talc can be used because they will not impart any color to the appliance. Also, when the prosthesis is removed from the mold, it is a good practice to powder the outside or face of it as well as the back.
Plastics are widely used by make-up lab technicians for a variety of uses and appliances. For such they can be divided into foamed urethanes, solid urethanes, cap materials, molding materials, tooth plastics, special construction plastics, and gelatin materials.
Foamed Urethanes
A number of these products see increasing employment in the lab. The semiflexible types can be used for filling or supporting certain molds or constructions, while

FIGURE 5.7 Foamed urethane heads. (A) A commercial plastisol full head form (LEFT) from a beauty supply firm (RMCA can furnish these) that is suitable for some applications. It fits on a standard adjustable wig block stand that can be clamped to a table top. (RIGHT:) The latex filled-with-foam heads made by Werner Keppler for beard laying (see Chapter 3). (B) A self-skinning type of urethane foam head made by Gary Boham with a plastic PVC pipe insert that will also fit on the wig block stand.
the flexible types can replace some foamed latex applications.
Semiflexible Types
What industrial chemists think is a flexible type of urethane may not be quite flexible enough for the make-up artist. Rigid urethanes, in the strict sense, are those with little or no flexible qualities, but the semiflexible types do have flex to them but might not be as resilient to the touch as what a make-up artist might class the foamed or sponge rubber appliances. There are, however, some new skinlike urethanes with which we will deal later.
One product we might put in the semiflexible class is made by the Hastings Plastics Company and is excellent as a filler product when a slush molded item must be made that will hold its shape. Werner Keppler has made some heads using this technique that are suitable for laying on premade beards (Figure 5.7). Using a face cast in casting plaster, he cut out all the undercuts around the nose and removed part of the forehead area, only keeping intact the area of the face where the beard normally grows. The ears were also cut down, leaving only an indication so that sideburns can be laid in the correct area. He then made a negative mold of this face in casting plaster about 2 inches thick. Separating the two, he had a negative of the face. Into this he poured a lightly fillered casting latex and let it build up to about 1/8 inch in thickness. He then poured out the latex and almost dried the slush piece (so that it would not shrink too much). At this point, he made a mix of the Hathane polyurethane 1640C-54 and filled the cavity. As it foamed up, he laid a silicon-greased board and weight over the top of the mold so that the foam would not spread but be confined. It is necessary to determine exactly how much foam mixture to add as it does expand. Also, the mold must be so made that it has a flat top so that the board can be put on top of it. When the foam has set, the head can be removed and a hole drilled up through the bottom and fitted with a plastic tube so that the form can be set on a head form support. This particular polyurethane comes in a range of densities from 4 pounds per cubic foot to 16 pounds per cubic foot. Many companies make numerous varieties of this type of foaming product (see Appendix B).
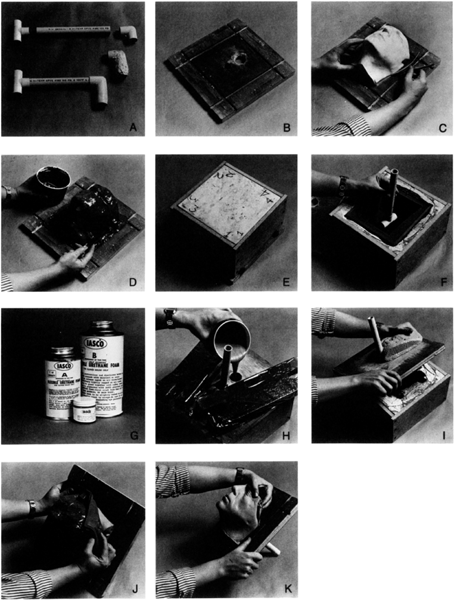
FIGURE 5.8 (opposite page) Making a foamed urethane face block. (Photos and lab work courtesy Gary Boham.) (A) (TOP) The pipe sections are shown, (MIDDLE) The elbow covered with fiber glass material. (BOTTOM) The finished support with the extended elbow finished to fit a wig block stand. (B) A plywood board with the gasket channels cut and the holes drilled for the support rod and for pouring. (C) The plaster mold sealed to the board with plastalene. (D) RTV 700 flexible mold is made. The keys shown at the sides were made of cut foamed urethane and sealed into the flexible mold with the material. (E) The base of the plaster mother mold must be flat so that it will set straight upon inversion to make the heads. Rigidity is maintained with the particle board box. (F) Placement of the support rod. (G) IASCO two-part self-skinning flexible urethane foam and the flesh colorant material. (H) The mixed foam material is poured into the closed mold. Note the positioning of the clamped pipe support and the stage weights. (I) The foam having set, the mold is opened. (J) The flexible duplicating mold is stripped from the foam head still attached to the board. (K) The foam head pulled away from the board. The finished head can be seen in Figure 5.7 (B).
Gary Boham makes his beard block as well as full heads for ventilation hair with a flexible self-skinning urethane foam that has a 5-pound density and sets rapidly (Figure 5.8). The support rod is made of 3/4-inch PVC tubing. A T-connector is cemented to one end of the pipe and imbedded in the foam during manufacture of the head. A special elbow joint is made by using a regular PVC joint covered with fibreglass resin. The tapered portion of a wig clamp is covered with masking tape to serve as a release agent and then inserted into the open end of the 90° 3/4-inch elbow joint. A thin layer of fiberglass resin is applied and then wrapped with fiberglass cloth or tape. The continuous-strand type gives slightly more strength than the cloth. After curing, the wig stand can be removed by twisting and pulling and the completed fiberglass connector sanded as necessary.
The head form can be any ear-to-ear cast of a male head of average size that is either cut to shape and flattened on the top and bottom portions to form a block of the desired size. Although the one illustrated in Figure 5.7B does not include the forehead, it is a good idea to do so if the block is to be used to make any eyebrows. Another way is to make a section mold of a face cast using alginate for duplication (if one does not wish to ruin a good original face casting).
A wooden base is made as illustrated in Figure 5.8B with plywood or 3/4-inch particle board that is at least 3 inches longer and wider than the plaster mold. Center the mold on the board and trace its outline. Using a router or table saw, cut gasket channels all around
the four sides of the mold, 1 inch away from the widest portions. These channels should be about 1/4 inch wide and 1/4 inch deep. One inch below the center of where the mold will fit on the board, drill a hole about 1/4 inch larger than the outside dimension of the plastic pipe to serve as a support rod for the head form. Then 1 inch up from this hole, drill a 1 1/2-inch hole for pouring in the foam and to allow an exit hole for the excess during the foaming procedure. Seal both sides of the board with two coats of a polyurethane lacquer. Then center the head on the board, and seal down with plastalene.
To make a flexible duplicating mold, a number of products can be used, but the one recommended here is GE’s RTV 700 with Beta 2 curing agent (see Appendix B for suppliers). The surface of the original plaster mold should be sealed with lacquer before use in most cases. This is a high elongation and tear strength material with a variety of curing agents available for room temperature use. No heating is required. An amount of 10 parts of base to 1 part of curing agent is recommended, and mixing is done by hand using a spatula or paint stirrer. Avoid rapid stirring so as not to induce bubbles into the mass, and mix for about a minute; then apply to the mold with a spatula. Any bubbles should be broken by passing the spatula over the surface. The pour time is about 1/2 hour and the work time about an hour more. Allow to stand at room temperature until the mass has completely set, but with this curing agent, a minimum of 3 hours is required. Take care that the molding material extends just beyond the gasket channel. A minimum thickness of about 1/4 inch is desirable so add additional layers as required. The edges may be reinforced with gauze to prevent any tearing when removed from the mold. Make certain to shake the curing agent well before mixing it into the base. The finished mold has a Shore A Durometer reading of 30 and an elongation of about 400 percent. Shrinkage for this use is minimal. A three-piece mother mold of plaster is recommended, and it can be confined in a box made of particle board as shown in Figure 5.8E. The flexible mold is stripped from the plaster head, the mother mold is inverted, and the flexible mold is set in. Keys can be made to ensure proper and correct fitting. The wooden portions of the mother mold, the base board, and all tools can be coated with paste wax for a separating medium, as well as the surface of the flexible duplicating mold. Trewax is a good product for this.
The support rod is placed inside the negative flexible mold and passed through the board, which is carefully fitted into the gasket portion of the mold. The correct height of the plastic pipe can be maintained with a spring clamp as shown (Figure 5.8H), lifting it up about an inch from the surface of the flexible mold to be embedded there. Stage weights (wrapped in plastic wrap as a separator) can be employed to hold down the spring clamp and board during the foaming procedure or a clamp arrangement can be devised.
The foam material used was IASCO’s two part self-skinning flexible urethane foam using 240 grams of Part B to 80 grams of Part A. This can be tinted with fleshtone plastisol pigment if desired, mixing it into the Part B before adding the Part A. Mixing time is about 20 seconds before the foam will start to rise when the material should be poured into the large hole of the cast. Expansion and exotherm action start immediately, so steady the support pipe and apply some body weight to the mold to aid in weighting it.
The foam will set in about 1 minute, and the mold can be opened in 5 minutes. The flexible mold can be removed and the head stripped from the base board. The excess can be trimmed with a sharp knife or shears. The block can be cleaned with acetone to remove any excess wax, and the special elbow joint can be glued with PVC cement to the end of the pipe support. The length of this pipe support can be varied to suit, but 6 to 8 inches is normally long enough.
With experimentation, full heads, prosthetic arms or legs, and other items can be made with this same self-skinning foam. Imbedding wire forms in it is also possible to govern the position of appendages. A burnt sienna shade of colorant will be found to be useful for most Caucasoid appliances, while Negroid or Oriental skins can be simulated by the addition of a burnt umber or ochre shades, respectively. This foam has excellent solvent resistance for normal usage and is rather easy to use overall.
Flexible Polyurethane Foam
A unique material is made by BJB Enterprises called TC-274 A/B, which is a two-component flexible foam system specifically developed for low density molding, and like most of these polyurethane foams, it is just a matter of mixing A with B, noting how much time is allowed to mix, then how long it takes to foam, and finally, how long the cure time is to complete the project. This particular material has a density range about 3.5 to 4 pounds per cubic foot, but it is very soft. It has a cream time of 90 seconds at 75° F and a cure time of 15 to 20 minutes at room temperature, depending upon part size and cross section. It offers low oral, skin, and eye toxicity; low vapor pressure; and good storage stability. Shelf life is six months at room temperature, but may last considerably longer.
For molding, a regular two-piece mold similar to that employed for sponge rubber is used, although one can make it a trifle heavier to last longer (Figure 5.9). The mold should be prepared by coating it with a polyurethane lacquer to seal the gypsum material. It should then be warmed slightly and coated with BJB Mold Release #86 or RCMA MR-8 (which is a wax in solvent) two or three times, drying in between coats. A single nose will take about 8 grams of Part B and 2 grams of Part A mixed and then poured into the negative. The positive is then pressed on and the mold clamped for about 20 minutes. Test the overflow foam with the finger, and keep clamped until the foam is not tacky any longer. The molds can then be separated and the piece removed for immediate use.
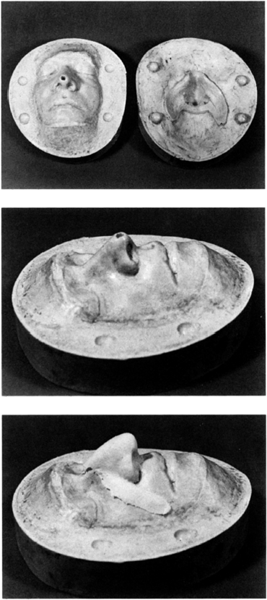
FIGURE 5.9 Flexible urethane appliance, TOP: A two-part mold for making flexible urethane appliances. Note that it is constructed in a heavier form than the normal foamed latex molds for a similar-sized appliance, MIDDLE: The male portion of the mold, BOTTOM A finished piece showing the fine edges possible with this versatile material.
Considerable research has been done on this product by Werner Keppler and David Quashnick of California, and some very fine foamed work has been done with it. The Part B can be intrinsically colored with universal colors or RCMA Color Tint Light (1 drop per 10-gram mixture) before mixing. It will be noticed that the manufacturer recommends a 4-to-1 (B to A) mix, while experimentation may prove that a 5-to-1 mix will produce a softer product more suitable for make-up use.
Werner Keppler makes gang nose molds for the TC-274 mix with five different noses (Figure 5.10). It takes a 30-gram B and 6-gram A mixture just to fill the cavities and give sufficient overflow. These appliances can be attached and made up like any other. The TC-274 A/B polyurethane foam material is available from RCMA as is the MR-86 and MR-8 Mold Release.
Solid Polyurethane Elastomers
It is sometimes convenient to make a core mold or an item in a more solid compound that has some elastomeric qualities. BJB makes a multipurpose elastomer
numbered TC-430 A/B that is suitable for a variety of applications (available from RCMA in small quantities). This material has a high tear strength, ability to accept coloration, and being odorless, a high acceptance in the medical prosthetic industry. It can be used to make both positive casts and negative molds, and most thermoset liquid plastics and gypsums can be readily cast in molds of TC-430 A/B.
TC-430 A/B is available in two versions: TC-430 A/B for casting and TC-430 A/B-10 as a brushable grade. The standard versions of these are white, but they also come in clear (which yellows with aging).
Equal weights of the two parts are mixed together and have a work life of 30 minutes at 75° F in a 100-gram mass. Cure time is 24 hours at room temperature and 48 hours for full properties. Heat cure of 200° F only accelerates demold time, which is 4 hours at room temperature and 2 hours at 200° F. Again, good ventilation is recommended during its use and avoid skin contact with the liquid materials.
To increase the hardness, use 60 percent Part A and 40 percent Part B. To make the end product softer, use 40 percent Part A and 60 percent Part B. This will make a difference of ± 10 durometer hardness.
When TC-430 A/B is used to reproduce molds from gypsum or other porous materials, a silicon release #1711 is recommended. Shrinkage is very low and the material has good tensile strength and elongation, plus with a 50/50 ratio mix, the durometer A hardness is 50 to 55. A note about this durometer A reading: This is a means of comparing the relative hardness of a mass with a scale of 0 to 100. Soft, very flexible materials will be 6 to 10, while a stiffer product (such as auto tire) would be 40 to 50 (also see page 93 for further information).

FIGURE 5.10 A gang mold for noses, TOP LEFT: Werner Keppler pours flexible urethane into a gang mold, BOTTOM LEFT: The mold is clamped shut. Note the excess coming out of the overflow holes, which were made in the nostril area of the noses. ABOVE: The separated mold, showing the noses in a row still in the negative portion of the mold.
Some general basic notes on urethanes of all varieties will help those who handle these materials. Storage in an area between 70° and 90° F is best. During colder weather the resin should be inspected to assure that there is no crystallization. If the resin appears cloudy or the hardener becomes gummy, the component should be heated to 120° to 160° F and stirred until the material returns to its proper smooth liquid consistency.
Use only metal or plastic mixing containers and spatulas as paper cups and wood stir sticks have been known to contaminate the ingredients as they are porous and can absorb moisture in storage.
Weigh all parts accurately and always mix thoroughly. Polyethylene mixing containers are good because the cured urethane will not adhere to them.
Molds should always be quite dry and made non-porous. A slightly warmed mold is preferred. The sealing process must be done with a material that will withstand the exotherm generated when the urethane cures and must not melt at the peak temperature.
There will be some shrinkage as in all rubber or urethane materials, but this depends greatly upon the thickness (cross section) and configuration of the casting.
Always use any urethane with adequate ventilation, and avoid skin contact with the uncured ingredients. Protective barrier creams are recommended for the hands, and brushes and equipment may be cleaned with MEK if the solid urethanes are being mixed and have not hardened. General cleaning can be done with soap and water or a 1-to-1 mixture of toluene and isopropyl alcohol.
RCMA can furnish 8-ounce quantities of both foamed and solid urethane materials for laboratory work.
Cap Material
Bald front wigs and fully bald head appliances have been made with a number of materials and in a variety of ways, but the only really good bald cap material is made from a vinyl resin of the Union Carbide Corporation called VYNS. There are a number of formulas in use employing MEK or acetone (or a mixture of the two) as a solvent plus a plasticizer to control the degree of desired softness. A basic formulation is 25 grams of VYNS to 75 grams of MEK and adding 10 to 25 grams of plasticizer.
There are many plasticizers on the market, among them, dibutylphathalate (DBP) and dioctylphathalate (DOP). The Monsanto Company also makes a series of plasticizers called Santicizers, and their # 160 is used where DBP is called for and #711 for DOP. The DOP will retain the soft quality of a cap material and be less affected by ultraviolet than DBP.
After dissolving all the solid in the liquids, cap material can be tinted by using some of the RCMA PB Foundation shaken in. To make a bald cap one
requires a positive mold made from plaster, stone, metal, or even fiberglass. One of the production methods to make thin caps is to spray the cap material with a Pasche L head airbrush with a medium (#3) nozzle. John Chambers sprays about five heads at a time, one after the other, with about six coats of spray. In this way, the first head sprayed will have just about set when the second coating is applied after spraying head number 5 in the sequence. Careful guiding of the spray, plus a rather rough final coating spray is best as the caps, when removed from the molds, will not be reversed. As such, head forms for spraying are made quite smooth for ease in removal of the plastic cap from the form.
A more tedious method, but one that allows full control over the thinness of the blending edge wherever one wants it and a heavier weight of material on the hairline or the pate, is done by painting the plastic cap material on a head form that has a slight pore effect on the surface. When completed, this cap will be reversed to show this pored surface.
The best way to make caps is to have a ventilated spray hood for either the spraying or the painting due to the fumes of the solvents. Otherwise, this operation should be carried out in the open air on a calm day or with a fan blowing the fumes out a window. The cap plastic can be brushed on with a 2 1/2-inch oxhair or sable hair brush in a flowing manner rather than brushed back and forth the way one would paint. The brush should always be well wet with material as it will evaporate very rapidly. Most metal molds do not require any separating medium, but others should be lightly rubbed with a silicon mold release and wiped almost dry for ease in separation. Head molds can be lightly marked in pencil in the general shape of the hairline so that a reference point is available when graduating the coats to make a fine blending edge on the cap.
For a full, regular thickness cap, brush on 5 coats over the entire head form. Then brush on 25 coats just up to the hairline marking, graduating the coats to form a thin edge. Finish off with a few more coats over the entire head. Coats should take about 10 minutes to dry between each one, so again, doing a number of heads one after the other will save overall time.
Always remove any stray hairs immediately if they fall out of the brush while painting the cap on the mold. A small sable brush is best for this operation. The same precautions about dust and dirt in the air should be observed about painting caps as with any fine varnish or lacquer. Never sweep the room or in other ways disturb any settled dust while caps are being sprayed or painted as dirt specks will ruin the caps.
Allow the cap to remain on the mold overnight to air cure. Caps can also be cured and much shrinkage prevented by placing the finished cap on the mold in an oven at 150° F for 5 minutes.
To remove the cap from the mold, cut a line with a sharp knife or razor blade around the base of the head mold through the plastic material, and carefully strip the cap from the mold. To prevent edge turnover or the cap sticking to itself, a good powdering before removing the cap from the mold and on the other side after removal is best (No-Color powder is good for this). Some very shiny (chrome-plated metal) molds need only the edge to be started and then the cap can be easily rolled off.
Another way of making a partial bald cap is to use a try-on cap on the performer and carefully mark out the hairline that must be covered and where the hair-piece is to be added on top of the bald cap area. As the cap will be made quite heavy, it is often not necessary to make a blending edge in the back of the neck area as it will not be adhered there. The top or pate area can be made quite heavy with 45 to 60 coats, depending upon the desired weight. Also, when the cap is made for one particular performer, the edge can be painted with a finely graduated painting that becomes heavier and thicker more quickly than on a stock cap.
Cap material can also be used to make thin sections that will be used to cover eyebrows. Generally these can be made by painting cap material on a flat plate and building edges and sufficient weight for covering the hairs. Some brows will require heavier buildups than others to cover the coarse hairs.
Clear cap material is also employed by some sculptors to cover their plastalene modelling. Additional sculpture can still be done over the coating, or fine lines can be refined (see page 77). RCMA supplies two grades of cap material: one tinted for cap use and the other clear for sculpture. It is fast drying and can be thinned with acetone if it thickens during use. For a slower set, thin with MEK.
Molding Plastics
Molding plastics can be divided into two categories: those that are simply painted into a negative mold in layers to form a piece and those that are pressure molded in a two-piece mold.
Paint-in Plastic Molding Material
RCMA furnishes a Molding Material in Light (KW shade), Deep (KM shade), and Dark (KN shade) that can be painted into a negative mold in successive coats to build an appliance. This Molding Material also is available in a thicker, quicker drying form in a tube under the name of Scar or Blister Making Material by RCMA. Essentially, they are methacrylates in a solvent with plasticizer and are excellent for temporary appliances. Due to the manner in which they are made and the basic qualities of the material, appliances should be produced only a day or so before use. Otherwise there is a tendency (of all such molded plastics) to lose
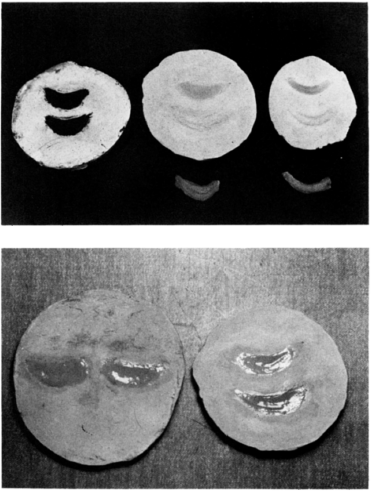
FIGURE 5.11 Plastic molding material, TOP: (LEFT) A set of eyebags sculpted in plastalene on a plaster flat plate, (MIDDLE AND RIGHT) Finished plastic molding material appliances, BOTTOM: The appliances painted into mold before powdering and removal.
some of the sculptured surface during long storage periods. However, appliances made with this material are soft and flexible and are easily adhered to the skin with Prosthetic Adhesive A. (Formulas for similar materials can be found on page 111.)
Negative molds should be coated with RCMA Silicon Mold Release or silicon grease before use, taking care not to brush too much into the fine sculpturing. This type of material is especially good to make eyebags when time and budget do not allow foamed ones to be made. The liquid Molding Material should be put in a small wide mouth jar with an easily cleaned stopper or cap and thinned out a bit with acetone. Make certain that you stir the stock bottle to disperse all the coloration that might have settled to the bottom during storage.
Eyebags can be sculpted on a flat plate and a negative mold of stone or Ultracal 30 made (Figure 5.11). After the silicon separator has been applied, give the bags (don’t overpaint for a blending edge) 10 coats of the thinned-out Molding Material, allowing them to air dry (don’t use the hair dryer as it will bubble the material) between coats. Slightly heavier coats can then be applied as the cavity of the sculpted eyebags begins to fill up. Dry between coats. Finally, lay in a heavy
coat of material so that the level of the eyebag is built up higher than the mold surface, and set aside to dry overnight. As the solvent evaporates completely, the level of the built-up portion will shrink down to slightly below the surface level of the mold so the appliance can be attached flat to the skin. To remove, powder the surface and tease an edge up with a sharp tool and then peel out the appliance. It is then ready for immediate use.
This material can also be used to make interesting forehead pieces for gunshot wounds, veins that pulsate, and such. For example, for a gunshot wound, take a negative cast of the forehead area in salt-accelerated casting plaster (Figure 5.12). The surface can be sealed with the RCMA Silicon Mold Release agent and the coatings built up by brushing the Molding Material into the form to cover the entire forehead area, making a good blending edge just above the eyebrows and at the point where the nose meets the forehead, as well as all around the hairline edge. The thickness of the appliance can be increased near the center of the hairline where either the performer’s own hair or a small hairpiece will cover this edge.
After painting on about 15 coats of thinned Molding Material, a small-diameter polyethylene plastic tube can be imbedded with its end about in the middle of the forehead. This tubing should be about 4 feet long so that the other end will be off camera with a blood syringe attached. Hold the tube in position and carefully paint in a few coats of material to imbed it into the surface of the appliance. Adhesive tape can be used to position and hold the tubing where you want it to stay. Then add more coatings of the Molding Material

FIGURE 5.12 TOP: A plaster cast of a forehead with a bullet hole cut into the center to show where the tubing must end. BOTTOM: After painting into a negative mold, an appliance with a tube imbedded into the material. The hole is cut with a sharpened metal tube and the plug saved for later insertion.
over that to fully seal and cover the tubing, graduating the coatings away from the tubing so that it won’t be seen as a bulge when the appliance is attached to the face. Thicker coats can be applied until the desired amount is reached.
Let the appliance dry on the mold overnight, and strip it off, taking care that the tube remains firmly imbedded in the appliance. Always select a color of Molding Material that will be closest to the skin coloration of the performer so that little foundation will be required for coverage. Next, with a sharp, round punch, about the size of the bullet hole, cut out a circle just below the end of the imbedded tube. The hole in the tube can then be cleared with a sharp instrument. A needle about the tube size can be imbedded in a wooden dowel point first. The protruding head portion makes a good tool for this. Save the cutout portion of the plastic as this will be used as a plug. Attached to a length of clear filament, this plug can be pulled out as part of the bullet-hit sequence before the blood flows through the tubing.
Dick Smith has imbedded removable strips cut in the shape of veins in this material and, in use, filled the spaces with a fluctuating air stream to simulate the pulsation of forehead veins. Small bruises, cuts, scars, moles, burn tissue, and many other marks can be made similarly with this type of Plastic Molding Material. One of the main advantages of the Molding Material is that its blending edges are soluble in acetone. Thus, it can be washed in to be imperceptible.
Press Molding Material
This is a polyvinyl butyral plastic that is employed to make appliances with a method devised by Gustaf Norin a number of years ago. Although it is employed relatively seldom, the procedure is an interesting one that produces an appliance whose edges are soluble in isopropyl alcohol (Figure 5.13).
The original formulation consists of 4 1/2 fluid ounces (by measure) of Vinylite XYSG (a white powder, polyvinyl butyral) dissolved in 32 fluid ounces of isopropyl alcohol. Then add a plasticizer mixture of 25 cubic centimeters (cc) castor oil, 25 cc DBP, and 50 cc isopropyl alcohol. If a harder appliance is desired, use 10 cc castor oil, 10 cc DBP, and 25 cc alcohol. Mix well and keep tightly capped until use.
To prepare the plastic for molding, pour some of the compound into clean, cold water, and with clean, well-scrubbed hands knead the then coagulated mass until it stiffens into a ball (Figure 5.14). This squeezing will press out all the solvent alcohol into the water and should take about 3 minutes (for a piece large enough to form a nose). Remove the plastic from the water and it will now be a semitranslucent white mass. Stretch a clean, lintless dish towel, often called a huck towel, over the knee, and carefully roll the plastic back and forth for about 15 minutes to dry out all the water
from it. It is important that, when ready to color and place in the mold, no water content remains in the plastic as this will cause shrinkage.
When the mass is dry to the touch, dip the roll of material into some dry calcium carbonate to give it some opacity, and knead this well into the material. A slight coloration can be imparted by rubbing the material lightly on a cake of a pale shade of dry cheek-color and kneading the color into the material. To hasten the drying out period, a stream of warm air from a hand-held hair dryer may be used, taking care that the material does not stick to the fingers due to the heat. It is well to keep dipping the fingers into No-Color Powder to prevent sticking during this part of the operation. Do any coloration gradually, a bit at a time, and do not color deeply as the plastic has a propensity to deepen in shade as it cures and, again, a pale shade is easier to cover with make-up than a dark one.
The material is now ready to place in the mold, which is a pressure type made of dental stone (see page 201 for pressure-type molds). Grease the female side with petroleum jelly, and lightly wipe the male side with the same separating medium. Place the material on the negative female side, spreading it out into the general shape of the desired prosthesis, and put the two sides of the mold carefully together. Place about 200 pounds of pressure on the mold for about 15 minutes. Large sections may require up to 400 pounds of pressure to get a fine blending edge and correct construction of the material. Twenty-five-pound iron stage weights are very good for applying this pressure. Build them up by crossing two over two at right angles

FIGURE 5.13 Comparative casts. TOP: A foamed latex nose mold. BOTTOM: A pressure casting or foamed urethane sized mold.
FIGURE 5.14 Press molding, TOP LEFT: Plastic poured into water and coagulated, TOP RIGHT: Opacity and color kneaded into plastic. BOTTOM LEFT: Stage weights used for pressure on mold, BOTTOM RIGHT: Finished appliance on the male side of the mold after pressing and trimming edges.
until the correct weight is achieved. Sitting on the built-up weight platform will increase the pressure if necessary.
After the required pressing time, remove the weights and open the mold carefully. The negative side, which was greased, should release quite easily and leave the completed prosthesis on the positive male side. If the appliance is well made with no bubbles or defects, let it stand overnight on the open mold. However, if the appliance has defects such as thick edges or lack of completeness, add a bit more molding material where necessary and repress the material for about 10 minutes. Separate and check once more. If perfect, leave the mold open overnight, but if still defective, repair in the same manner. Sometimes rearranging or replacing the material is necessary to get a perfect pressing.
The prosthesis can be removed from the mold the next day by lightly brushing under the edge of the appliance with a small flat brush covered in No-Color Powder or very fine talc. Then the overflow excess plastic material that forms in the gutters during the pressing can be cut away from the appliance, leaving just enough of the thin blending edge to adhere the appliance to the skin. This blending edge can be thinned out to a very fine edge against the positive mold with a flat sable brush that has been dipped in isopropyl alcohol. It is best to keep the appliance on the male mold or another positive cast of the same until ready
for use. It is also a good idea to make up plaster duplicates of the male side of the mold for this purpose so as to leave the actual mold free to do another pressing if necessary.
To adhere this type of appliance to the skin, cover the area where the prosthesis is to be placed with a coating of the liquid plastic molding compound and dry thoroughly. Powder this area with No-Color Powder, and center the appliance in place. With a small brush carefully touch under the appliance with isopropyl alcohol. This will immediately dissolve the appliance into the adhesive coat of molding compound, attaching the prosthesis firmly to the skin. Carefully wash the edges of the appliance into the skin with the alcohol, and powder the appliance and the edges with No-Color Powder or very fine talc. Do not use the so-called translucent or neutral powders for this type of appliance as these powders do have color and fillers that will affect the coloration of the piece. Extrinsic coloration can be done with a high-pigment creme-type foundation like RCMA Color Process Foundations or similar types.
Tooth Plastics
Dental acrylic resins of methyl or ethyl methacrylates are supplied as a monomer, a colorless liquid, and a polymer, a fine powder that comes in a number of shades. For additional coloration, there are liquid stains that can be painted over any finished denture material.
When the monomer and the polymer are mixed together, the polymer is partially dissolved so that the mixture becomes a doughlike plastic mass. The monomer in the mixture is then polymerized to form the solid acrylic resin. Two types of acrylic resins are used by dental technicians and dentists. In one, the polymerization is activated by heating the mixture, and in the other, polymerization is activated chemically. The latter type is self-curing and is generally the variety employed by make-up lab technicians for teeth. One of the best textbooks on oral anatomy and techniques, titled Dental Technician, Prosthetic (1965), is published for training prosthetic dental technicians in the U.S. Navy and is available through the U.S. Government Printing Office (NAVPERS 10685-C).
The Lang Company makes a number of materials for dental use that can be adapted by make-up lab technicians:
Jet Tooth Shade Acrylic A very fast-setting, self-curing powder and liquid combination available in shades 59, 60, 61, 62, 65, 66, 67, 68, 69, 77, 81, 87, and Light and Dark Incisal.
Jet Denture Repair Acrylic Strong and fast setting, this self-curing acrylic is colorfast in Pink, Fibred Pink, Translux, and Clear and is used for simulating gum tissue.
Colored Jet Acrylic Self-curing resins that set hard in
less than 10 minutes. Available in colored powders with clear liquid monomer or with clear powder and colored liquids. Tans, greens, reds, blues, yellows, violet, and black are available in sets.
Flexacryl-Soft Rebase Acrylic An ethyl methacrylate formulation that is plasticized to remain resilient in a cushionlike consistency for a number of months. This material is nonirritating and dimensionally stable.
Warm weather and humidity will affect these self-curing polymers during mixing. Working time can be extended with chilled mixing containers for large batches.
In most cases, the polymer powder is wetted with the monomer to make the casting. Many workers coat the negative cast with a brushing of monomer and then add a bit of powder to start, then drop powder and liquid a bit at a time to form the mass. As long as it appears glossy, it can be worked and brushed into a form.
To make teeth, one can employ a number of techniques. Each one is a bit different and more designed for make-up use than regular dental application. The simplest way to make flat-form teeth for imbedding in gum material is to fill preformed plastic crown forms with tooth shade acrylic and allow them to set. Oddshaped or special teeth can be made by spatulating additional material on these formed teeth. One can also obtain various preformed teeth from supply houses that serve dentists to identify tooth shades and shapes. Sometimes dentists have a set of discontinued artificial teeth that they will give you if you ask for them.
One method is described by Lee Baygan in his book on prostheses for make-up, The Techniques of Three-Dimensional Make-up (Watson Guptill, 1982), where he sculpts the desired teeth in plastalene on the positive dental stone cast. Using petroleum jelly as a separator on the gypsum portion of the cast, he takes a negative of the sculpted teeth in alginate in the dental tray. When the alginate is set, he removes it and, since the next step may take some time, immerses the alginate negative in water to prevent any shrinkage due to air drying. The plastalene is removed from the positive (or negative if any becomes, imbedded), and the positive is given a coating of petroleum jelly. The negative is then removed from the water and the surface quickly dried (don’t use heat). Self-curing tooth shade acrylic polymer powder is added to the tooth cavities. The liquid monomer is added with an eyedropper, and the mass is mixed with a small narrow tool. Adding a bit of each at a time will fill the teeth and allow some extra for flash over the gums (which he has allowed for in the plastalene modeling). The positive is then placed carefully over the negative and the two pressed together and held for a minute or two until set. Put
aside and let the acrylic fully harden for about 30 minutes.
The two sides can then be separated and the teeth pried from the positive cast. The casting of the teeth is then trimmed with a Mototool and polished so that no rough edges are felt. The teeth may be colored (or discolored) with acrylics and then given a coat of 5-minute epoxy. This can be yellowed for some effects. The epoxy will gloss the teeth to a natural shine. Baygan then recommends that a bit of flesh pink be added to an epoxy mix and painted on the gum section of the acrylic to simulate the gums.
Tom Savini’s Grande Illusions (1983) on special make-up effects shows a method of making a set of vampire teeth by building up a wax covering over the teeth in the stone cast and then imbedding some artificial teeth into this wax in front of the teeth on the cast. He also makes some long incisors by mixing the polymer-monomer into a heavy paste and, wearing surgical gloves, rolls the material to get the shape of the desired tooth. Filing and grinding produce the finished teeth. Using a medicine dropper, monomer is used to wet the area above the teeth, and some pink gum shade polymer powder is sprinkled on. The process is repeated until the proper amount is built up to surround the teeth in front. The wax is removed after the acrylic is set (about 10 minutes), and the back of the teeth are treated in the same manner to form around them. Small dental tools can be used to sculpt around the gums and teeth.
When the material is set, it can be removed from the positive form, and you will have a dental plate that fits directly over the subject’s own teeth. They can be finished with acrylic lacquer if need be to restore the shine. Dental powder or cream can be used to hold the teeth in for use in the mouth.
If someone has teeth with a space between, a set of snap-on tooth caps can be made by making a cast of the front teeth and then imbedding them in a heavy stone-reinforced mold or a dentist’s flask (Figures 5.15 and 5.16). Make a mix of the proper tooth shade, and after coating the positive side with an alginate release agent, put on a layer of the mix and place a sheet of cellophane separator on top of the plastic. Close the mold and put it in a dental press for a minute or two. Remove the mold from the press, separate the two halves, lift the cellophane separator sheet, and using light pressure, with a sharp scalpel trim off the excess flash material from the appliance, then repress the appliance in the mold press for a minute or so. Repeat this until no excess is extruded from the prosthesis. Replace the cellophane sheet with a new one each time a repress is made. When the appliance is complete and perfect, leave the mold halves separated until the material sets. Then ease the appliance off the positive cast and clean and polish it with burrs, abrasive paper discs, rubber cups, and felt wheels (with a paste of chalk or

FIGURE 5.15 Tooth caps. (A) Flasked male mold of actual teeth. (B) Male and female mold before pressing. (C) The finished caps on the male mold.
tin oxide and water) in that order. These very thin caps should then clip on to the real teeth and look perfectly natural. By the way, they are not made for eating and are rather fragile, so keep them in a small plastic box when not in use.
Variations of these methods include sculpting the teeth in an inlay wax material rather than in plastalene
or using a Flexacryl-Soft Rebase Acrylic for making the pink gum material for teeth, which may be easier on the wearer. Colored acrylics can be used to make teeth of any shade for certain effects, while the Flex-acryl-Soft material can be used alone to make an appliance that would cover all the teeth for a toothless gum effect.
It is not a good idea to apply any of the polymer-monomer mixture directly into the mouth to form teeth as it may firmly attach itself to the subject’s teeth. Work only from a tooth cast, and always trim the finished plate so that the performer’s speech will not be impaired—unless that is the desired effect. If too much acrylic is formed on the inside portion of a tooth prosthesis, it may produce lispy speech patterns.
Special Construction Plastics
Certain special effects require construction plastics such as epoxies, fiberglass, polyester resins, and other such industrial materials often employed by auto repair shops (see page 44). Most of these are rigid materials although some technicians are also using the flexible urethanes and polysulfide products as well. None of these is for application to the skin, and they represent mostly substances that are being adapted to make the dummies, figures, puppets, and simulations of humans or animals that are usually mechanically operated that serve to replace a living thing to achieve situations that might either be physically impossible or that might prove to be dangerous to a living person or animal.
Sometimes these materials are used as part of an overall make-up effect and the finished piece attached to the body. See Tom Burman’s special make-up on page 121. In general, the special construction plastics and other materials serve as a stimulation to new makeup effects, and in the future, more industrial products designed for other uses will find their way into the laboratories of the creative lab technician/make-up artist.
Again, great care should be taken with researching not only the finished qualities and restrictions that might affect the human skin on all these products but also whether or not any dangers exist in the use of the raw materials to laboratory personnel. None of these materials is classified for cosmetic use so great care should be taken whenever their use is contemplated. Also see the section “Duplicating Materials” earlier in this chapter.
One use of two-part epoxy is for glossing over latex or plastics to make false eyes. One method is to paint ping-pong balls with artist’s enamels in the shape and color of eyes and then giving them a coating of the epoxy. This material comes in a handy two-barrelled ejector type of dispenser that can be purchased in hardware stores. This fast-drying epoxy can also be used to put a gloss on teeth in latex masks.
Polyester resin used by auto repair shops with fibre-glass
cloth comes with a can of resin and a tube of curing agent plus some open fibre or mesh cloth to soak into the compounded resin. Also available from the same source are the fillered polyester resins that are used as auto body fillers. Both types set hard and can be worked with files and sandpaper to make various constructions.
Gelatin Materials
In addition to synthetic processed materials, one can also include animal gelatin for the manufacture of special constructions (see page 34). A basic formula recommended by Tom Burman is as follows:
20 grams of gelatin powder,
12 cc of distilled water,
100 cc of glycerin.
Set this mixture aside to saturate for 45 minutes. First, heat to 140° F in a water bath to melt the mass, then pour into a plastic bag (Ziplok type) and flatten out to cool. For use, this gelatin compound can be made opaque with talc and titanium dioxide, and water-soluble vegetable colors can be used for various shades. Dry colors could also be ground into the dry mixture of talc and titanium dioxide, while kaolin can be used as a filler if required. Tom Burman uses this formula gelatin with a red coloration for blood effects for certain projects. Nonmetallic powders were incorporated into
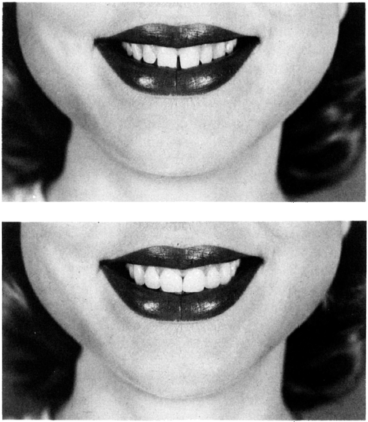
FIGURE 5.16 Tooth caps, TOP: The natural teeth without caps. BOTTOM: Appearance after adding temporary caps. Bonding can produce the same effect on a more permanent basis.
the gelatin mix by Stan Winston for his robot make-ups.
Softer constructions can be made with 15 grams of gelatin and 25 grams for harder ones in the given formulation. Another formula calls for 50 cc of Sorbitol and 50 cc of glycerin with 1 gram of salicylic acid as a preservative or a few drops of oil of wintergreen.
The molds used are similar to any type of pressure mold that is well greased with petroleum jelly as a separating medium. In use, the gelatin material is melted, fillered, and colored and then poured into the negative, or female, mold. The positive is then placed on and weights or clamps applied to hold the molds together. When the material is cold, the molds are separated and the appliance powdered and removed.
Books on make-up seldom stress the importance of selecting the proper adhesive to keep the appliances firmly attached to the skin or one material to another so that the overall effect is never destroyed by an appliance, hairpiece, or other special material coming loose. Oftentimes, re-attachment takes more time and clean up than the time that should have been taken to attach the item properly in the first place. No matter how well the molds were made and the appliances formed, if they are not properly adhered, the entire effect is lost.
There are many varied adhesives used for make-up work, some very versatile and others very specific in use. The directions for use must be accurately followed. Certainly new adhesives will be found in the future, and make-up personnel should research and experiment with any new ideas they come across. However, take care with any adhesive that it can be removed from the skin before using it for any make-up purposes or application of hair goods. Some of the fast-drying superglues used for pottery, metal, and other materials (such as Cyanoacrylate types) should never be used on the skin because they are very difficult to remove. Therefore, a good adhesive should be easy to apply, set rapidly, be dilutable for use, and be removable with a solvent that is not harmful to the skin. In addition, the adhesive should be a proper one for sticking one surface to another without adversely affecting either one. Finally, never use any adhesive on the skin without testing it first—preferably on yourself—and if any adhesive causes any skin irritation on a performer, discontinue its use and seek another for the job.
Matting and Thixotropic Agents
Many materials, among them adhesives and sealers, can be made to set with less shine or be made thicker for certain applications by the addition of special clays or earths or with microsilicas that are made in many
grades and particle sizes. The Cabot Corporation makes a number of grades of Cab-o-sil, which is a fumed silicon dioxide used to increase solution viscosity. They also will reduce sheen but do not produce a truly flat or matte effect as will some of the larger-particle silicon dioxide types. Cab-o-sil, like all the others of this type, is a very fine white powder that is quite light in weight. M-5 is the lightest weight grade (2.3 pounds per cubic foot) that the make-up technician might employ, and it can be dispersed in a solution under low rates of shear. The MS-7 (4.5 pounds per cubic foot) is almost twice as heavy and is best dispersed with high shear equipment. Both will thicken many liquids (such as latices or resin gum solutions) by forming a network of particles. A nonionic surfactant such as Triton X-100 (Rohm and Haas Co.) can be added (0.5 percent) to further thicken some solutions. The nominal particle size of Cab-o-sil is 0.014 microns, and it can be used in combination with larger-particle silicon dioxides to promote suspension and reduce hard settling. A variety of this material is the processed silica like Tullanox, which makes the product superhydrophobic.
FIGURE 5.17 Application of small appliances. TOP LEFT: Kenneth Smith before make-up for the NBC production of War and Peace in which he played General Kutuzov, TOP RIGHT: A foamed latex nose is attached with Matte Plasticized Adhesive as is a slush molded blind eye appliance, BOTTOM LEFT: A scar is added on the cheek with scar material along with a wig and sideburns, and the eyebrows are grayed with some hair added as well, BOTTOM RIGHT: The completed make-up as designed by Dick Smith and applied for the production by the author.
The larger-particle Syloids (Grace Chemical) or Degussa’s TS-100 have more matting effect. Syloid 244 (4 pounds per cubic foot) has an average particle size of 3.3 microns diameter but can settle out of solution—even after dispersal by high shear—unless suspenders are added to the mix. TS-100 varies in particle size from 2 to 10 microns with an average value of 4 microns in diameter. Its particular quality is that it can be added to a solution under low shear and will increase in thickening effect at about the same rate that the flattening resultant increases. For example, 1 ounce of a basic resin adhesive can be matted with 1 gram of TS-100 to produce an adhesive that can be finger tacked to remove the shine, while 2 grams of TS-100 will produce a gell that dries matte without tacking.
Clays such as kaolin and the Attapulgus varieties of AT-40 or Pharmosorb produce a flattening if added to resin adhesives, but although they do settle out readily, they are easily shaken back into solution. However, an excess of the latter has a tendency to whiten or gray upon full drying after application. It takes almost 3 teaspoonsful of Pharmasorb in 1 ounce of resin adhesive to give an adequate matting effect but, unlike some of the silicas, does little to add to the adhesive quality of a resin gum solution. Also see pages 14 and 15 for further explanations of the use of matting materials in RCMA adhesives and sealers.
General Applications
Most appliances, slush or paint-in latex, foamed latex or foamed urethanes can be attached with Matte Plasticized Adhesive. This type of adhesive is a Matte Adhesive with special plasticizers added to provide an adherent that sets with more tack and does not crystallize like ordinary spirit gums.
With small prostheses, apply a coat of the adhesive to the edge of the appliance, and allow some of the solvent to evaporate (Figure 5.17). Then carefully place the appliance on the desired area and press into place. Take care that adhesive is painted on the blending edge but not over it. If some of the adhesive is left on the surrounding skin, carefully remove it with a Q-Tip lightly dipped in alcohol. Never paint over the edge of an appliance with adhesive after it has been adhered to seal the edge as this excess adhesive will darken with the application of any foundation. Instead, to seal the edge, use a material that will seal but not discolor. Some make-up artists use RCMA Matte Plastic Sealer, while others prefer a latex-type eyelash adhesive. Either one of these products can be lightly stippled on with a small section of stipple sponge held in a pair of curved dental college pliers. Before using an edge sealer, check that the appliance is fully attached right to the edge. If there are any loose spots, lift the appliance with the college pliers, carefully brush
a touch of adhesive under the edge, and press down the appliance to the skin with a damp huck towel.
Some make-up artists prefer to attach the pieces with eyelash adhesive and to stipple over the entire surface of foam appliances with the same adhesive to seal the surface. Others use Prosthetic Adhesive A or B. These are contact-type adhesives and so both surfaces, the skin, and the appliance must be coated. As neither one of these adhesives fully dries to the touch, it should be lightly powdered with No-Color Powder on the surface of the adhesive coatings before centering the piece on the skin, then pressed in to complete the adhesion.
On a large piece, many artists adhere only the center portion of the appliance by coating just the skin area, leaving about half an inch of blending edge adhesive free. A brush with a small amount of adhesive is then passed under the edges, and the piece is pressed in to the face or body part with a damp towel. Take care that the blending edges of the appliance do not roll over to form a visible demarcation to the surrounding skin area. Such folds can be eased out with a brush dipped in alcohol and re-adhered if Matte Plasticized Adhesive is used.
Coloration may be done with any RCMA Color Process Foundation that has been slightly thinned with Foundation Thinner, or any shade of RCMA AF Foundation may be used. Some of the latter are heavier and stickier than others, but all are designed to give a heavy cover to both the skin and the appliances. Both the polyurethane sponge and brushes can be used for application and then the surface powdered with either PB Powder for a matte effect or No-Color Powder for one with more halation. The latter does not absorb the oils in the PB Foundations as well as the PB Powder, however. If the surface appears too dry, appliances can be overstippled with a bit of glycerin or RCMA Tears and Perspiration to restore some surface shine without affecting the foundation. Some make-up artists make a mixture of glycerin and a bit of isopropyl alcohol for a thinner mix for the stippling.
Foamed urethane appliances can be attached in the same manner, but if the outer skin of the foam is porous, it can be coated with RCMA Matte Plastic Sealer before applying the foundation. Either Color Process Foundation, AF, or PB Foundations will work over this type of appliance; liquid or water-based cake foundation does not. RCMA also makes a very flexible acrylic-base foundation called Acrylid, specially compounded for use with foamed latex or flexible urethane foam appliances in a number of basic colors (AP series).
Latex and Plastic Bald Caps
Latex bald caps are employed solely for mob scenes or extra work but are still effective except for close shots. Films on American Indians in the eighteenth and early

FIGURE 5.18 Applying a bald cap. LEFT: A plastic bald cap is marked at the hairline with a brown pencil and is stretched to estimate the fit on the head, MIDDLE: After cutting and adhering, the edge is being stippled with eyelash adhesive or edge stipple to further disguise the blend and seal the edge of the cap. RIGHT: The completed attachment of the cap.
nineteenth centuries when the scalp lock was worn can use latex caps, and the front blend edge is often disguised by a streak of warpaint. These caps can be generally applied with RCMA Matte Plasticized Adhesive or Prosthetic Adhesive A. Plastic bald caps are much thinner and more fragile than the latex variety but can be applied to have an imperceptible edge. The same adhesives as recommended for latex caps can be used.
Applying a Latex Cap
Slip the cap over the performer’s head, and mark line with a brown make-up pencil about a half-inch from the edge of the front of the hairline, close around the ears, and allow about 1 inch below the hairline in the back. Remove the cap and cut along the line, then replace it on the head.
The front edge can be adhered by passing a #10 round sable brush dipped in Matte Plasticized Adhesive under the blending edge and pressing out the excess with a damp huck towel. The cap can be adhered around the ears and back in the same way, then the edges stippled with eyelash adhesive and dried with a hand-held hair dryer.
The cap can be made up with AF or PB Foundations or with RCMA Color Process Foundation on a sponge dampened with Foundation Thinner. If the head is to appear with a scalp lock, the rest of the hairline should be stippled with a dark gray beard stipple to simulate stubble growth. For some bald effects where the cap does not fit well in the back of the head, costume design can sometimes cover this defect.
Applying a Plastic Bald Cap
As plastic bald caps are generally thinner and more translucent than the latex variety, it is easier to trace
the hairline for cutting the excess cap material (Figure 5.18). When the cap has been refitted to the head, start attaching the forehead area first by passing the adhesive brush under the edge with some Matte Platicized Adhesive. Avoid using too much adhesive so as not to dissolve the edge of the cap. Press the front down with a slightly dampened huck towel to make
FIGURE 5.19 A partial bald cap used to cover the hairline of Sarah Churchill as young Queen Elizabeth I for a Hallmark Theatre production. This cap was not attached at the back and a wig was used for the hairstyle that covered the back of the neck as did the costume (hairstyling by Jack (M) LeGoms).

FIGURE 5.20 Partial bald cap. (A) Basil Sydney before make-up. (B) A heavy (50 coats painted) bald cap has been made to fit the actor’s hairline exactly and is being attached with Matte Plasticized Adhesive. (C) The wig and sideburns are added with RCMA Special Adhesive #1. (D) Added mutton chops lengthened sideburns. (E) After the addition of the moustache, the face was covered with a light coating of foundation and then blended carefully. As the Special Adhesive #1 was used on the lace and attached to the bald cap, the foundation was blended right over it. Shadows, highlights, and age lines were then added. (F) The completed make-up for Emperor Franz Josef of Austria. (Make-up by the author for an NBC production with make-up design by Dick Smith.)
the edge smooth. Then stretch the sides downward by the sideburn tab, smoothing out the front and side so that no wrinkles appear, and pass the adhesive-dipped brush under the edges and press them in place with the towel. It is easier to attach a cap with two make-up artists working together since then one can stretch one side while the other side is being stretched and attached so that both sides will have approximately the same tension. However, one person can still do it. The cap area at the back of the ears can be adhered to the head and along the hair line in the back.
The back of the head is the most difficult to attach if the hair is not cut close. If the costume will cover the back of the head, don’t adhere it so the wearing of the cap will be more comfortable for the performer.
If the rear of the cap is to be attached, then the back of the neck where the adhesion must take place should be cleanly shaven; otherwise the hair will prevent positive adherence. If the cap must be applied to a woman or man with long hair, carefully pin the hair as flat to the head as possible, taking care that no bobby pins point outward to puncture the cap. It is also a good idea to place the crown of a previously used cap over the top of the head prior to application of the outer cap to protect the cap further from bobby pins and to smooth out the rough surface created by the pinning down of the hair. This extra inner cap need not be adhered as the pressure of the outer cap will hold it in place.
Sometimes when just the front of the head need be


FIGURE 5.21 Character creation for Michael Ironside in Spacehunter. (Make-up and photos by Tom Burman.)
bald, there is a Velcro type of hair bandage that can be wrapped around the forehead area and then slid up to flatten out and push back the hair (Figure 5.19). Prosthetic Adhesive A can also be used to attach a bald cap by cutting the cap completely to shape and size and then coating the inner surface of the blending-attaching inside edge with a half-inch strip of Prosthetic Adhesive A. This will dry quickly and it should then be powdered with No-Color Powder. Then place and center the cap on the head, and roll back the leading edge on the forehead line and carefully coat the skin with Prosthetic Adhesive A, dry it, and lightly powder it. This adhesive does not really dry to the touch as it is a contact type, so the light powdering simply takes out some of the tack. Then carefully roll the edge back on to the forehead, and when perfectly centered, roll the sides back one at a time and repeat the process. When this is done start pressing the blending edge of the cap firmly into the skin with a dry towel or a polyurethane sponge. This will complete the contact, and the cap will be securely attached. Unlike the Matte Plasticized Adhesive, once the bond is made, the cap cannot be repositioned by lifting an edge and regluing.
Do around the ears and back of the head in the same manner. The blending edges can then be washed into the skin with a brush lightly dipped in acetone. Take care in this operation that you do not get much acetone on the cap as it will eat right through the thin edges and ruin the blend. The edge can then be additionally disguised by stippling the blend area with RCMA Matte Plastic Sealer, or eyelash adhesive may be used. The stipple should be thoroughly dried with a hand-held hair dryer before applying any foundation. Color Process Foundations, or AF Foundations may be used,
or the cap may be stippled with the Prosthetic Adhesive B and tube paint mixture described on page 94 or RCMAAP series.
Heavy Partial Bald Caps
The heavier, painted-on bald cap described on page 119 can be attached with Matte Plasticized Adhesive by placing the cap on the head in the required position (Figure 5.20). The edge is then turned up, first on the forehead, and a coat of adhesive is applied to the skin, allowed to set for a few minutes, and then pressed down on the skin. The same process is repeated on the sides. The cap can then be blended into the skin with acetone and pressed with a small-bladed dental spatula to smooth the edge. Stipple on Matte Plastic Sealer or eyelash adhesive as previously described. The Prosthetic Adhesive A method can also be used.
Lace hair goods can be attached to the cap with RCMA Special Adhesive #1. This has a heavy matting material in a solution similar to cap material and must be well shaken before use. The hairpieces are held in the proper position, and the adhesive is applied over the lace. This adhesive dries very quickly and totally matte, incorporating the lace into the cap so that it is imperceptible. Other adhesives may dissolve the cap material or produce an excessive shine in the lace area. This Special Adhesive #1 is only for use on the cap, so Matte Adhesive can be employed where the lace meets the skin.
For coloration, some make-up artists stipple the entire cap area with Matte Plastic Sealer that has been colored with foundation to the desired shade. Any RCMA Color Process Foundation can be used for this and the color worked into the sealer with a dental spatula on a glass plate.
The incorporation of a number of appliance elements is used in the make-up shown in Figure 5.21 by Tom Burman on Michael Ironside for the film, Spacehunter, where he plays a character being kept alive by a mechanical support system controlled by his brain—hence, the special steel cranial plate with its attached circuitry. First, the performer’s head was covered with a plastic bald cap with an extra long neck length attached with RCMA Prosthetic Adhesive A. Next, foam latex appliances on the forehead, chin, nose, nasolabial folds, ears, neck, and cheeks were adhered with RCMA Prosthetic Adhesive B. The edges of the latex appliances were blended together with a mixture of eyelash-adhesive-type latex and the PA-B. The foundation and other coloration are prosthetic bases of Tom’s manufacture, with shadows and highlights to complete the effect. The cranial plate was made of vacuum-formed
sheet butyrate and painted with a silver lacquer. The rivets and other circuitry were made of clear dental acrylic cast in alginate and tinted with a gold-colored lacquer. The whole plate was then assembled and adhered to the head with Prosthetic Adhesive B (so as not to dissolve the cap material base).
The special teeth were made by taking an impression of the actor’s teeth, sculpting the desired look in dental wax, and taking a cast with a poly sulfide mold. The bases of the teeth were made in Flexacryl-Soft acrylic, and a veneer was made of wax. This was then turned over to dental lab technician, Armando Ramos, who cast the teeth in chrome and polished them. Due to their close fit, the teeth were simply held in place by suction. The final photos show the extreme versatility allowed by the soft foam appliances as well as the actor’s feeling for the role.