
7
Adding Spring Boot Security with JWT
In the previous chapter, we learned mainly how to generate automated documentation for our created APIs in our Spring Boot project. We learned how to add and use the features and properties of springdoc-openapi, configure the plugin on the project, and access the generated JSON and YAML documentation. We also learned how to implement the Swagger UI to make our documentation interactive and allow us to test endpoints directly on the browser.
This chapter will now focus on the security side of our application. We will discuss the concept of Cross-Origin Resource Sharing (CORS) and how it can secure our application. We will also be discussing the features and implementation of Spring Security in Spring Boot, the concept of JSON Web Token (JWT), and Identity as a Service (IDaaS).
In this chapter, we will cover the following topics:
- Understanding CORS
- Adding a CORS policy
- Understanding Spring Security
- Authentication and authorization in Spring Boot
- IDaaS
Technical requirements
The link to the finished version of this chapter’s code is here: https://github.com/PacktPublishing/Spring-Boot-and-Angular/tree/main/Chapter-07/superheroes.
Understanding CORS
We might have already encountered the term CORS several times when creating our applications as developers. Still, we may ask questions such as what does CORS do? Or what is the advantage of implementing CORS in our application? With these questions in mind, we will dive deeply, in this section, into the concepts and features of CORS and understand how it is used to secure our applications.
CORS is a header-based mechanism that allows a server to define a set of domains, schemes, or ports permitted to access the application’s resources. CORS is commonly used in REST APIs. Different frontend applications can access the APIs under our backend applications, especially in complex architectures. We don’t want our APIs to be accessed by unknown applications, and CORS is responsible for securing this part.
Let’s see a simple example of a cross-origin request. Say we have a frontend application with a domain of https://domain-one.com and a backend application served with a domain of https://domain-two.com. We can see that our application is served with different domains, and once the frontend application sends a request to the backend, this is considered a cross-origin request.
We should never forget that browsers restrict cross-origin requests by default, and same-origin requests are the only ones allowed for requesting resources unless the origin requesting the resources includes the proper CORS headers and is permitted on the backend application. This is just a simple example of how CORS works. Let’s look at a more detailed overview of the concept of CORS.
How CORS works
CORS is a header-based mechanism, which means that the first step to achieving cross-origin sharing is to add new HTTP headers that will describe the list of origins that are permitted to access resources. These headers can be described as our key to communication. The HTTP headers are divided into two categories, which are as follows:
- Request headers
- Response headers
Request headers
Request headers are the headers required for the client to make use of the CORS mechanism. They are as follows:
- Origin: This indicates the origin of the requesting client or simply the host of your frontend application.
- Access-Control-Request-Method: This header is used on a preflight request to indicate the HTTP method used to make the request.
- Access-Control-Request-Headers: This header is used on a preflight request to indicate the list of HTTP headers used for the request.
Let’s see an example of what a request would look like using the request headers:
curl -i -X OPTIONS localhost:8080/api/v1
-H 'Access-Control-Request-Method: GET'
-H 'Access-Control-Request-Headers: Content-Type, Accept'
-H 'Origin: http://localhost:4200
Response headers
Response headers are the headers that the servers send back with the response. They are as follows:
- Access-Control-Allow-Origin: This is a header used to specify the origin of accessing the resource on the server.
- Access-Control-Expose-headers: This header indicates the headers that the browser can access.
- Access-Control-Max-Age: This is a header that indicates the information of preflight request expiration.
- Access-Control-Allow-Credentials: This is a header that indicates that a browser can access the response when the request has valid credentials.
- Access-Control-Allow-Headers: This header indicates the list of headers allowed to be used in a request.
- Access-Control-Allow-Methods: This is a header that indicates the list of request methods that are allowed to be used in the server.
Let’s see an example of what response we would like with the given headers:
HTTP/1.1 204 No Content
Access-Control-Allow-Origin: *
Access-Control-Allow-Methods: GET,HEAD,PUT,PATCH,POST,DELETE
Vary: Access-Control-Request-Headers
Access-Control-Allow-Headers: Content-Type, Accept
Content-Length: 0
Date: Sun, 16 Nov 2022 3:41:08 GMT+8
Connection: keep-alive
These are the standard headers that we will use to allow the CORS mechanism, but there are several different scenarios in which cross-origin sharing works.
Simple requests
These are requests that don’t trigger CORS preflight requests and, having no initial request, will be sent to the server for validation. To consider a request to be simple, it should satisfy the following conditions:
- Uses the POST and GET methods.
- Contains headers that can be manually set, such as Accept, Accept-Language, Content-Language, and Content-Type.
- Content-Type should have one of the following types: text/plain, multipart/form-data, or application/x-www-form-urlencoded.
- No ReadableStream object is used in the request.
Let’s see an example of a simple request:
GET /content/test-data/ HTTP/1.1
Host: example.host
User-Agent: Mozilla/5.0 (X11; Linux x86_64) AppleWebKit/537.36 (KHTML, like Gecko) Chrome/77.0.3865.90 Safari/537.36
Accept: text/html,application/xhtml+xml,application/xml;q=0.9,*/*;q=0.8
Accept-Language: en-us,en;q=0.5
Accept-Encoding: gzip,deflate
Connection: keep-alive
Origin: https://frontend.com
This request will perform a simple exchange between the client and the server. In response, the server returns the header with Access-Control-Allow-Origin: *, which means that the resource or endpoint can be accessed by any origin.
Preflight requests
The browser sends a test or first HTTP request using the OPTIONS method to validate that the request is permitted or safe. Preflight requests will always occur on cross-origin requests as preflight requests check whether a different origin is allowed or permitted to access the resource.
Let’s see an example of a preflight request:
OPTIONS /content/test-data/ HTTP/1.1
Host: example.host
User-Agent: Mozilla/5.0 (X11; Linux x86_64) AppleWebKit/537.36 (KHTML, like Gecko) Chrome/77.0.3865.90 Safari/537.36
Accept: text/html,application/xhtml+xml,application/xml;q=0.9,*/*;q=0.8
Accept-Language: en-us,en;q=0.5
Accept-Encoding: gzip,deflate
Connection: keep-alive
Origin: https://frontend.com
Access-Control-Request-Method: POST
Access-Control-Request-Headers: X-PINGOTHER, Content-Type
The preceding example shows that the preflight request uses the OPTIONS request method to execute the preflight request. The OPTIONS method is used to identify more information from the servers to know whether the actual request is permitted.
We can also see that Access-Control-Request-Method and Access-Control-Request-Headers are identified. This indicates the request headers and request method to be used in the actual request.
Here is the header info:
HTTP/1.1 204 No Content
Date: Sun, 16 Nov 2022 3:41:08 GMT+8
Server: Apache/2
Access-Control-Allow-Origin: https://frontend.com
Access-Control-Allow-Methods: POST, GET, OPTIONS
Access-Control-Allow-Headers: X-PINGOTHER, Content-Type
Access-Control-Max-Age: 86400
Vary: Accept-Encoding, Origin
Keep-Alive: timeout=2, max=100
Connection: Keep-Alive
Now, in the preceding example, this is an example response returned after the preflight request. Access-Control-Allow-Origin indicates that access to resources is only allowed on the specified domain (https://frontend.com in the example). Access-Control-Allow-Methods confirms that POST and GET are valid methods. Access-Control-Allow-Headers ensures that X-PINGOTHER and Content-Type are proper headers for the actual request.
We have learned the basic concepts of CORS; now, we will implement CORS in our Spring Boot application in the next section.
Adding a CORS policy
We have learned how CORS works and the advantage it brings to the security of our applications. Now, we will configure and implement a CORS policy in our Spring Boot project.
There are several ways to configure CORS on our project. We will discuss them one by one.
CORS applications for each method
We can enable CORS on a single endpoint; this means that we can specify different permitted origins for other endpoints. Let’s have a look at the following example:
@CrossOrigin
@GetMapping
public List<AntiHeroDto> getAntiHeroes(Pageable pageable) {
  ..code implementation
}
In our Spring Boot project, we have the getAntiHeroes() method. To enable CORS on a specific method, we will use the @CrossOrigin annotation. We can see that we have not configured any other settings, and this applies the following:
- All origins are permitted.
- HTTP methods that are allowed are the ones configured for the method (in this method, the allowed HTTP method is GET).
- The time of the preflight response is cached at 30 minutes.
We can also specify the configuration of the CORS policy by adding the values of the origin, methods, allowedHeaders, exposedHeaders, allowedCredentials, and maxAge:
@CrossOrigin(origin = "origin.example")
@GetMapping
public List<AntiHeroDto> getAntiHeroes(Pageable pageable) {
  ..code implementation
}
CORS applications at the controller level
In the previous configuration, we were adding CORS to each method. Now, we will add the CORS policy at the controller level. Let’s have a look at the following example:
@CrossOrigin
@AllArgsConstructor
@RestController
@RequestMapping("api/v1/anti-heroes")
public class AntiHeroController {
.. methods
}
We can see that @CrossOrigin is added at the class level. This means that the CORS policy will be added to all the methods under AntiHeroController.
CORS application at the controller and method levels
We can combine the application of CORS at both the controller and method levels in our application. Let’s have a look at the following example:
@CrossOrigin(allowedHeaders = "Content-type")
@AllArgsConstructor
@RestController
@RequestMapping("api/v1/anti-heroes")
public class AntiHeroController {
    private final AntiHeroService service;
    private final ModelMapper mapper;
    @CrossOrigin(origins = "http://localhost:4200")
    @GetMapping
    public List<AntiHeroDto> getAntiHeroes(Pageable   pageable) {
… code implementation
     }
We can see in our example that we have applied the @CrossOrigin annotation at both the controller and method levels, @CrossOrigin(allowedHeaders = "Content-type") will be used on all the methods under AntiHeroController, and @CrossOrigin(origins = http://localhost:4200) will be applied only on the getAntiHeroes() method, thus other methods will allow all origins.
Global CORS configuration
The last way we can implement a CORS policy is by using global configuration, which means that our CORS policy applies to all the existing methods in our project. There are several ways to implement global CORS configuration, and we will see how to implement CORS by using CorsFilter:
- The first step is to add a configuration class for our CORS policy. To accomplish this, go to the config folder of our project and create a new class named CorsConfig. We will add the @Configuration annotation to identify this class as a configuration upon starting the application, and we should have the following code:
@Configuration
public class CorsConfig {}
- The next step is to create our CorsFilter Bean. We will just create a new method with @Bean that returns a CorsFilter object:
@Bean
CorsFilter corsFilter() {CorsConfiguration corsConfiguration =
new CorsConfiguration();
}
- Under the corsFilter() method, we will place all of our CORS settings. We will instantiate a CorsConfiguration object that we will use to set the attributes by calling several methods. The methods that we will use are as follows:
- The setAllowCredentials() method indicates whether the browser should send credentials such as cookies with cross-origin requests. This means that we want to set this option to true if we retrieve cookies and Cross-Site Request Forgery (CSRF) tokens:
corsConfiguration.setAllowCredentials(true);
- The setAllowedOrigins() method allows us to set the permitted origins that can access our endpoints. These are the domains for the trusted frontend applications. In the following example, we have set http://localhost:4200, which will be the development server of our frontend application:
corsConfiguration.setAllowedOrigins(Arrays.asList("http://localhost:4200")); - The setAllowedHeaders() method allows us to configure the list of headers permitted in the HTTP requests. In the preceding example, we have set several headers that can be used in the requests:
corsConfiguration.setAllowedHeaders(
Arrays.asList(
"Origin",
"Access-Control-Allow-Origin",
"Content-Type",
"Accept",
"Authorization",
"Origin, Accept",
"X-Requested-With",
"Access-Control-Request-Method",
"Access-Control-Request-Headers"
)
);
- The setExposedHeaders() method allows us to specify the list of response headers from the server. We can use this method to limit the headers on the response for security measures:
corsConfiguration.setExposedHeaders(
Arrays.asList(
"Origin",
"Content-Type",
"Accept",
"Authorization",
"Access-Control-Allow-Origin",
"Access-Control-Allow-Origin",
"Access-Control-Allow-Credentials"
)
);
- The setAllowedMethods() method will allow us to add the HTTP request methods that are authorized to be used to access the endpoints. In the following example, we have configured GET, POST, PUT, DELETE, and OPTIONS as the allowed methods since we are only building a simple Create, Read, Update, and Delete (CRUD) application:
corsConfiguration.setAllowedMethods(
Arrays.asList("GET", "POST", "PUT", "DELETE","OPTIONS")
);
- The setAllowCredentials() method indicates whether the browser should send credentials such as cookies with cross-origin requests. This means that we want to set this option to true if we retrieve cookies and Cross-Site Request Forgery (CSRF) tokens:
- The last step we need to do is register the CORS configuration. We will instantiate a new urlBasedCorsConfigurarationSource() and use the registerCorsConfiguration() method for the registration. The first parameter is "/**", which indicates that the configuration applies to all the methods found in the application, and the second parameter is corsConfiguration, which is the configuration we have created:
var urlBasedCorsConfigurationSource =
new UrlBasedCorsConfigurationSource();
urlBasedCorsConfigurationSource.registerCorsConfiguration(
"/**",
corsConfiguration
);
return new CorsFilter(urlBasedCorsConfigurationSource);
- After the registration, we will use the configuration source as a parameter for CorsFilter, and this is how our corsFilter() method would look after successfully configuring the CORS settings:
@Bean
CorsFilter corsFilter() {CorsConfiguration corsConfiguration =
new CorsConfiguration();
corsConfiguration.setAllowCredentials(true);
corsConfiguration.setAllowedOrigins(
Arrays.asList("http://localhost:4200"));corsConfiguration.setAllowedHeaders(
Arrays.asList("Origin","Access-Control-Allow-Origin",
"Content-Type","Accept","Authorization",
"Origin, Accept","X-Requested-With",
"Access-Control-Request-Method",
"Access-Control-Request-Headers"));
corsConfiguration.setExposedHeaders(
Arrays.asList( "Origin","Content-Type",
"Accept","Authorization",
"Access-Control-Allow-Origin",
"Access-Control-Allow-Origin",
"Access-Control-Allow-Credentials"));
corsConfiguration.setAllowedMethods(
Arrays.asList("GET", "POST", "PUT", "DELETE","OPTIONS")
);
var urlBasedCorsConfigurationSource =
new UrlBasedCorsConfigurationSource();
urlBasedCorsConfigurationSource
.registerCorsConfiguration(
"/**",
corsConfiguration
);
return new CorsFilter(
urlBasedCorsConfigurationSource);
}
Having started our application, we will now apply the CORS configuration to all the methods in our project. We have successfully implemented a CORS policy in our application, but this is just part of how we secure our application.
In the next section, we will discuss the concept of Spring Security and how to implement it in a Spring Boot project.
Understanding Spring Security
Spring Security is an application-level security framework widely used in Spring Boot applications. It is a flexible authentication framework that provides most of the standard security requirements for Java applications. Spring Security is popular owing to the fact that it allows developers to integrate different authorization and authentication providers on the fly with the other modules available.
As we’re using Spring Security in our application, we do not need to code security-related tasks from scratch as Spring Security has these features under the hood.
Let’s discuss the concepts of Spring Security further.
Features of Spring Security
Spring Security mainly focuses on integrating authentication and authorization into applications. To compare the two, authentication refers to validating that a user can access your application and identifying who the user is. This mainly refers to the login page itself. On the other hand, authorization is used for more complex applications; this relates to the operations or actions that a specific user can do inside your applications.
Authorization can be accomplished by integrating roles to implement user access controls. Spring Security also provides different password encoders – one-way transformation passwords – which are as follows:
- BCryptPasswordEncoder
- Argon2PasswordEncoder
- Pbkdf2PasswordEncoder
- SCryptPasswordEncoder
The preceding list is of the most commonly used password encoders and can be accessed directly when using Spring Security. It also provides different features that will help you to meet security requirements, which are as follows:
- Lightweight Directory Access Protocol (LDAP): A protocol for containing and accessing distributed directory information services over an internet protocol.
- Remember me: This feature provides a capability to remember a user from a single machine to prevent logging in again.
- Single Sign-On (SSO): This feature allows users to access multiple applications with a single account, centralizing user information.
- Software localization: This feature gives the capability to develop a user interface with our preferred language.
- HTTP authorization: This feature provides authorization.
- Basic access authentication: This feature provides the base authentication process, which requires a username and password for requests.
- Digest access authentication: This feature provides more secure authentication that confirms the user’s identity before accessing resources.
- Web form authentication: A form will be generated that will authenticate the user credentials directly from the web browser.
Spring Security offers a wide range of features for the application. In this case, the design of Spring Security is divided into separate Java Archive (JAR) files based on its functionality, only requiring the installation of the needed part for our development.
The following is a list of JAR files that are included in the Spring Security module:
- spring-security-core: The standard requirement for an application to use Spring Security. Spring-security-core consists of the core authentication classes and interfaces.
- spring-security-web: This JAR file is used for web authentication and URL-based access control. It is found under org.springframework.security.web.
- spring-security-config: This JAR file is used for implementing Spring Security configuration, using XML and Java. All classes and interfaces are found under org.springframework.security.config.
- spring-security-ldap: This JAR file is required for implementing LDAP in our application. All classes and interfaces are found under org.springframework.security.ldap.
- spring-security-oauth2-core: This JAR file is used to implement the OAuth 2.0 authorization framework and OpenID Connect Core. The classes are located under org.springframework.security.oauth2.core.
- spring-security-oauth2-client: This JAR file provides the OAuth login and OpenID client support. All classes and interfaces are located under org.springframework.security.oauth2.client.
- spring-security-openid: This JAR file is used for OpenID web authentication support to validate users with an external OpenID server.
- spring-security-test: This JAR file is used to support testing for the Spring Security application.
- spring-security-cas: This JAR file implements web authentication with a CAS SSO server. All classes and interfaces are found under org.springframewok.security.cas.
- spring-security-acl: This JAR file is used to integrate security into the application’s domain object. We can access the classes and interfaces under org.springframework.security.acls.
We have now learned about the different features and modules that Spring Security offers. In the next section, we will learn how to implement authentication and authorization using Spring Security in our Spring Boot application.
Authentication and authorization in Spring Boot
We have already discussed the concepts of Spring Security in the previous section; now, we will learn how to integrate Spring Security into our Spring Boot application. As we move on to the examples, we will be using all the modules and features of Spring Boot Security.
Authentication and authorization are the most common concepts that we come across when we implement security in our applications. These are the two validations we apply for our application to be secure.
Configuring Spring Boot and implementing authentication
We will first implement authentication in our application. We first need to add the Spring Boot Security dependency to our project. To add the dependency, we will add the following to pom.xml:
<dependency>
   <groupId>org.springframework.boot</groupId>
   <artifactId>spring-boot-starter-security</artifactId>
</dependency>
Reload the project to install the new dependency and run the server. Let’s try to visit localhost:8080 to open the Spring Boot application project in the browser. As we can see, a login page is now applied to our project as we’ve installed Spring Boot Security:

Figure 7.1 – Login page integrated from Spring Boot Security
To create credentials for the login, we can configure the username and password under the application.properties file by placing the following setting:
spring.security.user.name=admin
spring.security.user.password=test
In the preceding example, we have used admin as the username and test as the password for our Spring Boot Security login, which will allow us to log in successfully to our application.
We have now successfully set up Spring Boot Security for our project, and this automatically applies authentication to our endpoints. The next step we need to do is add a configuration for our security; we would want to override the default configuration and implement a customized login endpoint for our application to give access to our other endpoints provided.
To start with the configuration, let’s first create a new class named SecurityConfig under the config file. We will extend our new SecurityConfig class with WebSecurityConfigurerAdapter. This adapter allows us to override and customize the configuration of WebSecurity and HttpSecurity, and after extending the class, we will override the first two methods:
@Override
protected void configure(AuthenticationManagerBuilder auth) throws Exception {
    //We will place the customized userdetailsservice here in the following steps
}
@Bean(name = BeanIds.AUTHENTICATION_MANAGER)
@Override
public AuthenticationManager authenticationManagerBean() throws Exception {
    return super.authenticationManagerBean();
}
The first method that we will override on WebSecurityConifigurerAdapter is the configure(AuthenticationManagerBuilder auth) method, which accepts AuthenticationManagerBuilder, which is used to build LDAP authentication, JDBC-based authentication, adding a custom UserDetailsService, and adding AuthenticationProviders. In this case, we will use this to access userDetailsServiceMethod() to customize our authentication. We will do that in the following steps as we have not yet created our modified UseDetailsService.
The second method is authenticationManagerBean(); we override this method to expose AuthenticationManager as a bean in our application, which we will later use in AuthenticateController. The next step is to implement the configuration we want for our HTTP requests. To achieve this, we will override the configure(HttpSecurity http) method.
HttpSecurity allows us to call methods that will implement configuration for web-based security requests for the HTTP requests. By default, the security configuration will be applied to all HTTP requests, but we can also set only specific requests by using the requestMatcher() methods. HttpSecurity is the same as the Spring Security XML configuration.
Let’s discuss the standard methods under HttpSecurity:
- csrf(): Enables the CSRF protections. This is enabled by default.
- disable(): Disables the initial configurations; a new version can be applied after calling the method.
- antMatcher("/**"): By default, our configuration will be applied to all HTTP requests. We can use the antMatcher() method to specify the URL patterns where we want to apply the configuration.
- antMatchers("/**"): Similar to the antMatcher() method, but accepts a list of patterns where we want to apply the configuration.
- permitAll(): Specifies that access to any URL endpoints are allowed by anyone.
- anyRequest(): Applies to any type of HTTP request.
- authenticated(): Specifies that any URL endpoints are allowed by any authenticated user.
- exceptionHandling(): Exception handling configuration.
- sessionManagement(): This method is commonly used to manage how many allowed sessions for a user can be active; for example, we configure sessionManagement().maximumSessions(1).expiredUrl("/login?expired"), which indicates that when the user is logged in to another terminal and attempts to log in to another instance, it will automatically log them out of the other instance.
- sessionCreationPolicy(): Allows us to create a policy for when a session should get created; the possible values are ALWAYS, IF_REQUIRED, NEVER, and STATELESS.
In our code, let’s configure a basic configuration for our security. Let’s place the following code inside the configure(HttpSecurity http) method:
@Override
protected void configure(HttpSecurity http) throws Exception {
    http
        // first chain
        .csrf()
        .disable()
        // second chain
        .antMatcher("/**")
        .authorizeRequests()
        // third chain
        .antMatchers("/**")
        .permitAll()
        // fourth chain
        .and()
        .sessionManagement()
        .sessionCreationPolicy(
          SessionCreationPolicy.STATELESS);
}
In the preceding example configuration, we have implemented several configurations for our application. You can notice that we have divided the methods into chains. This is to show the methods are related to each other.
The first chain, with .csrf().disable(), disables the use of CSRF protection. This is just an example, and disabling CSRF is not recommended when building your application. The second chain, with .antMatcher("/**").authorizedRequests(), states that any requests are authorized to be accessed by any users regardless of the role.
This can be modified by specifying the role in the hasRole() method by restricting the users based on the assigned roles. The third chain is .antMatchers("/**").permitAll(), which indicates that any users can access all the URLs, and lastly, sessionManagement().sessionCreationPolicy(SessionCreationPolicy.STATELESS) indicates that no session should be created by Spring Security.
We have successfully created SecurityConfig, which contains all of our configurations for Spring Security; our code should look like the following:
@AllArgsConstructor
@Configuration
@EnableGlobalMethodSecurity(prePostEnabled = true)
public class SecurityConfig extends WebSecurityConfigurerAdapter {
     // removed some code for brevety
    @Override
    protected void configure(HttpSecurity http) throws
      Exception {
        http
                // first chain
                .csrf()
                .disable()
                // second chain
                .antMatcher("/**")
                .authorizeRequests()
                // third chain
                .antMatchers("/**")
                .permitAll()
                // fourth chain
                .and()
                .sessionManagement()
                .sessionCreationPolicy(
                  SessionCreationPolicy.STATELESS);
    }
}
Now, we will move on to the next step, where we will create our endpoints for our user entity.
Creating user endpoints
When implementing CRUD, we need to create our user endpoints. We need to develop these endpoints such that they will be used for the registration of a new user in our database. In this example, we will repeat the steps on how to develop endpoints discussed in w, Documenting APIs with OpenAPI Specification, but we will also create a whole CRUD capability for the user entity.
Let’s create a new user package and make the controller, data, entity, repository, and service packages under the user package.
Creating the user entity
Let’s create the user entity first by creating a new class named UserEntity under the entity package, and we will place the following code:
@Entity
@Data
@AllArgsConstructor
@NoArgsConstructor
public class UserEntity {
  @Id
  @GeneratedValue(strategy = GenerationType.AUTO,
                  generator = "UUID")
  @Column(nullable = false, updatable = false)
  private UUID id;
  @Column(unique = true)
  private String email;
  private String mobileNumber;
  private byte[] storedHash;
  private byte[] storedSalt;
  public UserEntity(String email, String mobileNumber) {
    this.email = email;
    this.mobileNumber = mobileNumber;
  }
}
In the preceding example, we have assigned several properties for UserEntity. We have annotated it with @Entity to indicate that this is a Java Persistence API (JPA) entity. We have configured it with an email address, mobile number, storedHash, and a storedSalt property. storedHash and storedSalt will be used for hashing and verifying the user’s password.
Creating the user DTO
After creating the user entity, we will make the Data Transfer Object (DTO). The DTO is an object that we commonly use for responses or to hide unnecessary properties. We will create a new class named UserDto under the data package, and we will place the following code:
@Data
@AllArgsConstructor
@NoArgsConstructor
public class UserDto {
  private UUID id;
  private String email;
  private String mobileNumber;
  private String password;
}
Creating the user repository
The next thing we need to do is create the repository for our user. Under the repository package, create a new class named UserRepository, and we will extend the class with JPARepository by adding the following code:
@Repository
public interface UserRepository extends JpaRepository<UserEntity, UUID> {
  @Query(
    "" +
    "SELECT CASE WHEN COUNT(u) > 0 THEN " +
    "TRUE ELSE FALSE END " +
    "FROM UserEntity u " +
    "WHERE u.email = ?1"
  )
  Boolean selectExistsEmail(String email);
  UserEntity findByEmail(String email);
}
In the preceding example, we extended UserRepository with JPARepository, which grants all the CRUD capabilities to our repository. We have also created two methods with an @Query annotation, which checks whether the email address already exists.
Creating the user service
The next step is now to create our user service where we will implement the business logic of the application. Under the service package, we will create a new class named UserService, after the creation of the service.
We will place @AllArgsConstructor for the constructor injecting the dependencies and the @Service annotation to let Spring know that this is a service layer, and we will also inject ModelMapper and UserRepository into our service after the annotations and dependency injection.
We can create two methods that allow us to convert an entity into a DTO and vice versa by placing the following code:
private UserDto convertToDto(UserEntity entity) {
  return mapper.map(entity, UserDto.class);
}
private UserEntity convertToEntity(UserDto dto) {
  return mapper.map(dto, UserEntity.class);
}
Now, we will create the code for the basic CRUD functionalities:
- Getting all users: To get all of the users, we will place the following code:
public List<UserDto> findAllUsers() {var userEntityList =
new ArrayList<>(repo.findAll());
return userEntityList
.stream()
.map(this::convertToDto)
.collect(Collectors.toList());
}
The example code returns all the list of users converted into a DTO.
- Getting users by ID: To get a specific user by ID, we will place the following code:
public UserDto findUserById(final UUID id) {var user = repo
.findById(id)
.orElseThrow(
() -> new NotFoundException("User by id " + id +" was not found")
);
return convertToDto(user);
}
This example method retrieves a specific user using the findByID() method of the user repository.
- Creating a new user: The creation of a user is the most important method as this will be the registration method for the credentials. We will divide this into three methods – the first one is the createSalt() method, which will allow us to create a salt for the user’s password.
Let’s place the code for the createSalt() method:
private byte[] createSalt() {
  var random = new SecureRandom();
  var salt = new byte[128];
  random.nextBytes(salt);
  return salt;
}
The next method is createPasswordHash(), which will allow us to hash the user’s password. We use the SHA-512 hashing algorithm and the provided salt to create the method. The following code is for the createPasswordHash() implementation:
private byte[] createPasswordHash(String password, byte[] salt)
  throws NoSuchAlgorithmException {
  var md = MessageDigest.getInstance("SHA-512");
  md.update(salt);
  return md.digest(
    password.getBytes(StandardCharsets.UTF_8));
}
The last method is the createUser() method itself. We will first check whether a password is provided and then whether the email address already exists using the selectExistsEmail() method we have created. Next, after all the validations have passed, make a salt using the createSalt() method and hash the password using createPasswordHash(). Lastly, save the new user in the database. The following code is for the createUser() implementation:
public UserDto createUser(UserDto userDto, String password)
  throws NoSuchAlgorithmException {
  var user = convertToEntity(userDto);
  if (password.isBlank()) throw new
    IllegalArgumentException(
    "Password is required."
  );
  var existsEmail =
    repo.selectExistsEmail(user.getEmail());
  if (existsEmail) throw new   BadRequestException(
    "Email " + user.getEmail() + " taken"
  );
  byte[] salt = createSalt();
  byte[] hashedPassword =
    createPasswordHash(password, salt);
  user.setStoredSalt(salt);
  user.setStoredHash(hashedPassword);
  repo.save(user);
  return convertToDto(user);
}- Updating and deleting a user: The last two methods we need to add are updateUser() and deleteUser(). This is a different method we can implement to give us the capability to edit the details of the user or delete the user in the database.
Let’s see the following code implementation:
public void updateUser(UUID id, UserDto userDto, String password)
  throws NoSuchAlgorithmException {
  var user = findOrThrow(id);
  var userParam = convertToEntity(userDto);
  user.setEmail(userParam.getEmail());
  user.setMobileNumber(userParam.getMobileNumber());
  if (!password.isBlank()) {
    byte[] salt = createSalt();
    byte[] hashedPassword =
      createPasswordHash(password, salt);
    user.setStoredSalt(salt);
    user.setStoredHash(hashedPassword);
  }
  repo.save(user);
}
public void removeUserById(UUID id) {
  findOrThrow(id);
  repo.deleteById(id);
}
private UserEntity findOrThrow(final UUID id) {
  return repo
    .findById(id)
    .orElseThrow(
      () -> new NotFoundException("User by id " + id +
                                  " was not found")
    );
}
We have already created the services needed for our user entity. Now, the last step is to make our controller.
Creating the user controller
The last requirement for the user is to create the controller. We will create a method for findAllUsers(), findUserById(), deleteUserById(), createUser(), and putUser() under the annotated services with specific HTTP requests.
Let’s see the following code implementation:
@AllArgsConstructor
@RestController
public class UserController {
  private final UserService userService;
  @GetMapping("/api/v1/users")
  public Iterable<UserDto> getUsers() {
    return userService.findAllUsers();
  }
  @GetMapping("/api/v1/users/{id}")
  public UserDto getUserById(@PathVariable("id") UUID id) {
    return userService.findUserById(id);
  }
  @DeleteMapping("/api/v1/users/{id}")
  @ResponseStatus(HttpStatus.NO_CONTENT)
  public void deleteUserById(@PathVariable("id") UUID id) {
    userService.removeUserById(id);
  }
  @PostMapping("/register")
  @ResponseStatus(HttpStatus.CREATED)
  public UserDto postUser(@Valid @RequestBody UserDto
                          userDto)
    throws NoSuchAlgorithmException {
    return userService.createUser(userDto,
                                  userDto.getPassword());
  }
  @PutMapping("/api/v1/users/{id}")
  public void putUser(
    @PathVariable("id") UUID id,
    @Valid @RequestBody UserDto userDto
  ) throws NoSuchAlgorithmException {
    userService.updateUser(id, userDto,
                           userDto.getPassword());
  }
We have successfully created our endpoints for our user entity; we can now use the /register endpoint to create a new user for a valid authentication. Now, we will make the login endpoint using JWT.
JWT
JWT is a URL-safe method for communicating data. A JWT can be seen as an encrypted string containing a JSON object with a lot of information. It includes an additional structure consisting of a header payload that uses JSON format. JWTs can be encrypted or signed with a Message Authentication Code (MAC). A JWT is created by combining the header and payload JSON, and the whole token is Base64-URL-encoded.
When to use JWT
JWT is used chiefly on RESTful web services that cannot maintain a client state since JWT holds some information connected to the user. It can provide state information to the server for each request. JWT is utilized in applications that require client authentication and authorization.
JWT example
Let’s have a look at the following JWT example:
eyJhbGciOiJIUzI1NiIsInR5cCI6IkpXVCJ9.eyJzdWIiOiIxMjM0NTY3ODkwIi wibmFtZSI6IlNlaWppIFZpbGxhZnJhbmNhIiwiaWF0IjoxNTE2MjM5MDIyfQ.uhmdFM4ROwnerVam-zdYojURqrgL7WQRBRj-P8kVv6s
The JWT in the given example is composed of three parts – we can notice that it is divided with a dot (.) character. The first string is the encoded header, the second string is the encoded payload, and the last string is the signature of the JWT.
The following block is an example of the decoded structure:
// Decoded header
{
  "alg": "HS256",
  "typ": "JWT"
}
// Decoded Payload
{
  "sub": "1234567890",
  "name": "Seiji Villafranca",
  "iat": 1516239022
}
// Signature
HMACSHA256(
  base64UrlEncode(header) + "." +
  base64UrlEncode(payload),
  secret-key
)
We can see in the preceding example that the three parts are JSON objects, the headers, which contain the algorithm used for signing the JWT, the payload, which holds information that can be used to define the state, and the signature, which encodes both the headers and the payload appended by the secret key.
JWT implementation
We already know the concept and use of JWT; now, we will implement JWT generation in our Spring Boot project. We want to create an authentication endpoint that will return a valid JWT when a valid credential is submitted.
The first step is to add the JWT dependencies to our Spring Boot project.
Let’s add the following XML code to pom.xml:
<dependency>
   <groupId>io.jsonwebtoken</groupId>
   <artifactId>jjwt-impl</artifactId>
   <version>0.11.2</version>
</dependency>
<dependency>
   <groupId>io.jsonwebtoken</groupId>
   <artifactId>jjwt-jackson</artifactId>
   <version>0.11.2</version>
</dependency>
Next, we need to create a package named jwt under our project package, and after its creation, create packages called controllers, filters, models, services, and util. We will start making the necessary models for our authentication endpoint.
Creating the authentication models
We need to create three models for our authentication. The first model is for the request, the next is for the response, and lastly, we have a model containing the user information and one to implement UserDetails from Spring Security.
For the request model, create a new class named AuthenticationRequest under the models’ package. The implementation of the model is shown in the following code:
@Data
@NoArgsConstructor
@AllArgsConstructor
public class AuthenticationRequest implements Serializable {
  private String email;
  private String password;
}
The request only needs the email address and the password, since these are the credentials we need to validate.
Then, for the response model, create a new class named AuthenticationResponse; the implementation of the model is shown in the following code:
@Data
@NoArgsConstructor
@AllArgsConstructor
public class AuthenticationResponse implements Serializable {
  private String token;
}
The response model only contains the token; the JWT is returned once the credentials are validated.
Lastly, for the user principal model, create a new class named UserPrincipal; the implementation of the model is shown in the following code:
@AllArgsConstructor
public class UserPrincipal implements UserDetails {
  private final UserEntity userEntity;
  @Override
  public Collection<? extends GrantedAuthority>
    getAuthorities() {
    return null;
  }
  @Override
  public String getPassword() {
    return null;
  }
  @Override
  public String getUsername() {
    return this.userEntity.getEmail();
  }
  // Code removed for brevity. Please refer using the
  // GitHub repo.
  @Override
  public boolean isEnabled() {
    return false;
  }
}
The use principal model implements UserDetails as this will be our custom user for Spring Security. We have overridden several methods, such as getAuthorities(), which retrieves the list of authorizations of the user, isAccountNonLocked(), which checks whether the user is locked, isAccountNonExpired(), which validates that the user is valid and not yet expired, and isEnabled(), which checks whether the user is active.
Creating the authentication utilities
We need to create the utilities for our authentication; the utilities will be responsible for the JWT creation, validation and expiration checks, and extraction of the information. These are the methods we will use to validate our token.
We will create a class named JwtUtil under the util package, and we will annotate this with an @Service annotation. Let’s start with the methods needed for util.
Let’s create the first two methods that we need to create a valid token:
private String createToken(Map<String, Object> claims, String subject) {
  Keys.
  return Jwts
    .builder()
    .setClaims(claims)
    .setSubject(subject)
    .setIssuedAt(new Date(System.currentTimeMillis()))
    .setExpiration(new Date(System.currentTimeMillis() +
                            1000 * 60 * 60 * 10))
          .signWith(SignatureAlgorithm.HS256, SECRET_KEY)
    .compact();
}
public String generateToken(UserDetails userDetails) {
  Map<String, Object> claims = new HashMap<>();
  return createToken(claims, userDetails.getUsername());
}
The preceding implementation calls several methods from the JWT extension:
- The builder() method, which is responsible for the building of the JWT.
- The setClaims() method, which sets the claims of the JWT.
- The setSubject() method, which sets the subject; in this case, the value is the email address of the user.
- The setIssuedAt() method, which sets the date when the JWT is created.
- The setExpiration() method, which sets the expiration date of the JWT.
- The signWith() method, which signs the JWT with the provided key and algorithm.
The next method we need to implement is the claims extraction. We will use this method mainly to get useful information, such as the subject and the expiration of the token.
Let’s have a look at the following code implementation:
public <T> T extractClaim(String token, Function<Claims, T> claimsResolver) {
  final Claims claims = extractAllClaims(token);
  return claimsResolver.apply(claims);
}
private Claims extractAllClaims(String token) {
  return Jwts
    .parserBuilder()
    .setSigningKey(SECRET_KEY)
     .build()
    .parseClaimsJws(token)
    .getBody();
}
The extractAllClaims() method receives the token and uses the secret key provided by the application. We have called the parseClaimsJWS() method to extract the claims from the JWT.
Now, we will create the methods to extract and check whether the token is expired and extract the username using the extractClaims() method we have created.
Let’s have a look at the following code implementation:
public Date extractExpiration(String token) {
  return extractClaim(token, Claims::getExpiration);
}
private Boolean isTokenExpired(String token) {
  return extractExpiration(token).before(new Date());
}
public String extractUsername(String token) {
  return extractClaim(token, Claims::getSubject);
}
We have used the getExpiration and getSubject built-in functions to get the expiration date and subject from the claims.
Lastly, we will create a method to validate that the token is not yet expired or a valid user is using the token.
Let’s have a look at the following code implementation:
public Boolean validateToken(String token,
                             UserDetails userDetails) {
  final String username = extractUsername(token);
  return (
    username.equals(userDetails.getUsername()) &&
      !isTokenExpired(token)
  );
}
Creating the authentication service
Now, we will create the service for our authentication, as we know that services are responsible for the logic of our application. We will make the following methods, which will verify whether the password is correct using the hash, check whether the user has valid credentials, and provide a method that will override the default authentication.
The first step is to create a new class named ApplicationUserDetailsService under the service package, and we will implement the class using UserDetailsService from Spring Security. We will override the loadUserByUsername() method and execute the following code:
@Override
public UserDetails loadUserByUsername(String email)
  throws UsernameNotFoundException {
  return new UserPrincipal(
    userService.searchByEmail(email));
}
The preceding code calls the searchByEmail() method, which is our custom implementation for checking whether a user exists, and we will return the user as a UserPrincipal object.
The next step is to create the verifyPasswordHash() method, which will validate the user’s password.
Let’s have a look at the following code implementation:
private Boolean verifyPasswordHash(
  String password,
  byte[] storedHash,
  byte[] storedSalt
) throws NoSuchAlgorithmException {
  // Code removed for brevety. Please refer to the GitHub
  // repo
  for (int i = 0; i < computedHash.length; i++) {
    if (computedHash[i] != storedHash[i]) return false;
  }
  // The above for loop is the same as below
  return MessageDigest.isEqual(computedHash, storedHash);
}
The method we have created accepts the password, the stored salt, and the user’s hash. We will first check whether storedHash has a length of 64 and storedSalt has a size of 128 to validate whether it is 64 bytes. We will get the computed hash by using the stored salt and message digest for the password, and lastly, we will check whether the passwords match by seeing whether the calculated hash and stored hash are equal.
The last method we need to implement is the authenticate() method. This is the primary method that our authenticate endpoint will call.
Let’s have a look the following code implementation:
public UserEntity authenticate(String email, String password)
  throws NoSuchAlgorithmException {
  if (
    email.isEmpty() || password.isEmpty()
  ) throw new BadCredentialsException("Unauthorized");
  var userEntity = userService.searchByEmail(email);
  if (userEntity == null) throw new
      BadCredentialsException("Unauthorized");
  var verified = verifyPasswordHash(
    password,
    userEntity.getStoredHash(),
    userEntity.getStoredSalt()
  );
  if (!verified) throw new
      BadCredentialsException("Unauthorized");
  return userEntity;
}
The method first checks whether the user exists using the searchByEmail() method and checks whether the password is valid using the verifyPasswordHash() method that we have created.
Creating the authentication controller
Now, we will create the controllers of our authentication. This would create the primary endpoint for our login. The first step is to create a class named AuthenticateController under the controllers’ package, and next, we will make authenticate() with the following implementation:
@RestController
@AllArgsConstructor
class AuthenticateController {
  private final AuthenticationManager
    authenticationManager;
  private final JwtUtil jwtTokenUtil;
  private final ApplicationUserDetailsService
    userDetailsService;
  @RequestMapping(value = "/authenticate")
  @ResponseStatus(HttpStatus.CREATED)
  public AuthenticationResponse authenticate(
    @RequestBody AuthenticationRequest req
  ) throws Exception {
    UserEntity user;
    try {
      user = userDetailsService.authenticate(
        req.getEmail(), req.getPassword());
    } catch (BadCredentialsException e) {
      throw new Exception("Incorrect username or password",
                           e);
    }
Then, we get the details of the user by calling loadUserByUsername from userDetailsService but don’t forget to pass the email address of the user like so:
    var userDetails = userDetailsService.loadUserByUsername(user.getEmail());
    System.out.println(userDetails);
    var jwt = jwtTokenUtil.generateToken(userDetails);
    return new AuthenticationResponse(jwt);
  }
}
The authenticate() method accepts an AuthenticationRequest body, which requires an email address and password. We will use service.authenticate() we previously created to check whether the credentials are valid. Once this is confirmed, we can generate the token using generateToken() from our utilities and return an AuthenticationResponse object.
Creating the authentication filters
The last step we need to accomplish is to create the filter for our authentication. We will use filters to validate each HTTP request with a valid JWT in the request headers. We need to make sure that a filter is invoked only once for each request. We can achieve this by using OncePerRequestFilter. We will extend our filter class with the filter to ensure that the filter is only executed once for a specific request.
Now, let’s create our authentication filter; first, let’s create a class named JwtRequestFilter under the filters package, and we will extend this class with OncePerRequestFilter, then we will override the doFilterInternal() method, which has parameters of HttpServletRequest, HttpServletResponse, and FilterChain. We will also inject ApplicationUserDetailsService and JwtUtil for the credentials and token validation.
Our code will look like the following:
@AllArgsConstructor
@Component
public class JwtRequestFilter extends OncePerRequestFilter {
  private final ApplicationUserDetailsService
    userDetailsService;
  private final JwtUtil jwtUtil;
  @Override
  protected void doFilterInternal(
    HttpServletRequest request,
    HttpServletResponse response,
    FilterChain chain
  ) throws ServletException, IOException {
  }
}
Now, for the implementation of the method, the first thing we need to do is extract the JWT from the request header. Let’s implement the following code:
//JWT Extraction
final String authorizationHeader =
  request.getHeader("Authorization");
    String username = null;
    String token = null;
    if (
      authorizationHeader != null &&
        authorizationHeader.startsWith("Bearer ")
    ) {
      token = authorizationHeader.substring(7);
      username = jwtUtil.extractUsername(token);
    }
The preceding code retrieves the JWT on the header with an authorization key, and when a token is retrieved, we will extract the username to check whether the user exists.
Then, the next step is to load the user’s details using the retrieved username and check that the token is valid and not yet expired. If the token is good, we will create a UsernamePasswordAuthenticationToken from the user details and the list of the authorized users.
We will set the new authenticated principal in our security context; let’s have a look the following code implementation:
//JWT Extraction section
// JWT Validation and Creating the new
// UsernamePasswordAuthenticationToken
if (
      username != null &&
      SecurityContextHolder.getContext()
        .getAuthentication() == null
    ) {
      UserDetails userDetails =
        this.userDetailsService
         .loadUserByUsername(username);
      if (jwtUtil.validateToken(token, userDetails)) {
        var usernamePasswordAuthenticationToken =
          new UsernamePasswordAuthenticationToken(
          userDetails,
          null,
          userDetails.getAuthorities()
        );
        usernamePasswordAuthenticationToken.setDetails(
          new WebAuthenticationDetailsSource()
            .buildDetails(request)
        );
        SecurityContextHolder
          .getContext()
          .setAuthentication(
            usernamePasswordAuthenticationToken);
      }
    }
    chain.doFilter(request, response);
  }
We have successfully created a filter for our requests, and our authentication endpoints are all configured. The only thing we need to do is finalize our configuration. We would want to modify UserDetailsService with our custom authentication.
To achieve this, we will go back to our SecurityConfig file and place the following code implementation on our configure(AuthenticationManagerBuilder auth) method:
private final ApplicationUserDetailsService userDetailsService;
@Override
protected void configure(AuthenticationManagerBuilder auth) throws Exception {
    auth.userDetailsService(userDetailsService);
}
The next step is we need to add the filter we have created; under the configure(HttpSecurity http) method, we will place the following code:
private final JwtRequestFilter jwtFilter;
@Override
protected void configure(HttpSecurity http) throws Exception {
   …. Http security configurations
   http.addFilterBefore(jwtFilter,
     UsernamePasswordAuthenticationFilter.class);
}
Now that our security configuration is complete, our final step is to add authentication to our anti-hero endpoints. A valid JWT is required upon making a request to the anti-hero endpoints.
To achieve this, we will annotate AntiHeroController with @PreAuthorize("isAuthenticated()") to configure the endpoints with the authentication process:
@PreAuthorize("isAuthenticated()")
public class AntiHeroController {
… methods
}
We have successfully implemented Spring Security and JWT on our application; let’s simulate the endpoints created.
We will send an HTTP GET request for the anti-hero controller to get the list of all anti-heroes:

Figure 7.2 – 403 Forbidden on getting the anti-heroes list
When we send a sample request to one of the anti-heroes, this will now return a 403 error since it requires a valid token from our request headers. In this case, we need to create a new user using the /register endpoint:
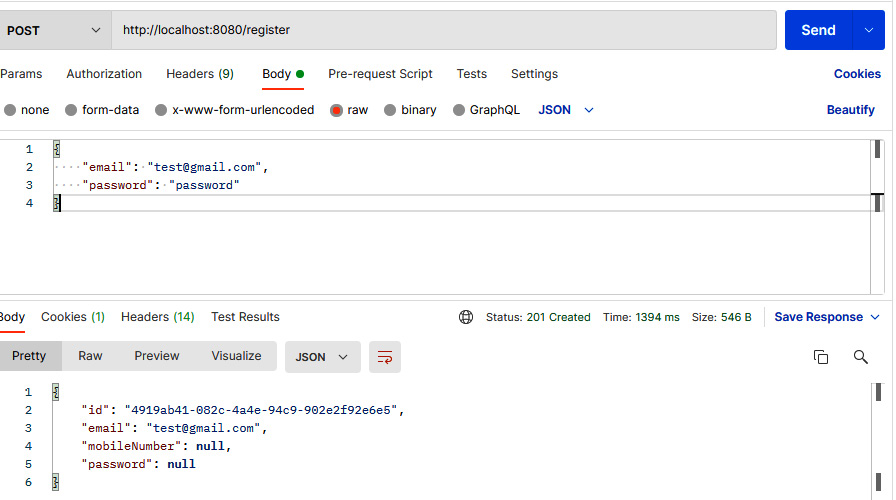
Figure 7.3 – User registration
After successfully creating our user, this is now a valid credential, and we can log in using the /authenticate endpoint:

Figure 7.4 – New credential login
We can see in the preceding example that our login is successful and the /authenticate endpoint returned a valid token. We can now use the token in the request header to send a request to anti-hero endpoints:

Figure 7.5 – Anti-hero endpoint returns the list successfully
We can see in the preceding example that we have used the generated token in our authorization header, and we have received a 200 response and returned the list of anti-heroes.
We have now successfully created the custom authentication and authorization for our Spring Boot application using Spring Security. In the next section, we will discuss an additional topic relating to security, called IDaaS.
IDaaS
In the previous section, we created our custom login authentication using Spring Security. We utilized some of the features of Spring Security and also used JWT to store user states and validate credentials. However, this example is not enough of a reliable and secure way of implementing authentication for our application.
Large and enterprise applications nowadays demand several security features to be able to prevent possible vulnerabilities that can occur. These features can include the architecture and the implementation of other services, such as SSO and Multi-Factor Authentication (MFA). These features can be cumbersome to work with and can require several sprints to modify, leading to a longer time to develop. This is where IDaaS comes to the rescue.
IDaaS is a delivery model that allows users to connect, authenticate, and use identity management services from the cloud. IDaaS helps speed up the development process as all authentication and authorization processes are provided under the hood.
It is commonly used by large and enterprise applications because of the advantages and features it offers. IDaaS systems utilize the power of cloud computing to handle Identity Access Management (IAM), which ensures that the right users access the resources. It is very helpful as companies do not need to worry about security and IAM responsibilities, which are very demanding due to the adaptation of cybersecurity threats.
Types of IDaaS
There are several types of IDaaS available on the market; some providers only provide clients with a directory, others offer several sets of features, which include SSO and MFA, but we will split IDaaS into two categories:
- Basic IDaaS
- Enterprise IDaaS
Basic IDaaS
Small- and medium-sized businesses commonly use basic IDaaS. It usually provides SSO and MFA and a cloud directory for storing credentials.
Basic IDaaS providers are also packaged with a more straightforward interface that gives users the capability to handle configuration and administrative tasks.
Enterprise IDaaS
Enterprise IDaaS, compared to basic IDaaS, is more complex and used by large and enterprise businesses. This is commonly used to extend the IAM infrastructure of the organization and provide access management to web, mobile, and API environments.
There are five requirements that an IDaaS should possess:
- SSO: Gives users the capability to access all platforms and applications using a single authentication
- MFA: Increases the layers of security, requiring the user to present two valid pieces of evidence to prove their identity
- Cloud directory: Provides a cloud directory where data and credentials can be stored
- Access security: Policy-based management for applications for increasing security
- Provisioning: Provides capabilities to automate the exchange of user identities between applications and service providers using System for Cross-Domain Identity Management (SCIM)
Those are the five characteristics required of an IDaaS.
If you are wondering about any examples of an IDaaS that you can use, here are some service providers:
- Google Cloud Identity: Google Cloud Identity provides a wide range of security features for users to enable authentication, access management, and authorization. It is an enterprise IDaaS with several security features, such as SSO, MFA, automated user provisioning, and context-aware access.
To learn more about Google Cloud Identity, you can visit https://cloud.google.com/identity.
- Okta Workforce Identity: Okta is one of the top IDaaS providers on the market. It is also an enterprise IDaaS provider that has several basic and advanced features, such as SSO, MFA, Universal Directory, B2B integration, and API Access Management.
Okta and Auth0 joined forces around 2021, providing identity platforms and solutions such as universal login, password-less authentication, and machine-to-machine communication.
To learn more about Auth0 and Okta, you can visit the following links: https://auth0.com/ and https://www.okta.com/workforce-identity/.
- Azure Active Directory: Azure Active Directory is also an enterprise-grade IDaaS solution, the same as the other providers. It offers a wide range of security solutions, has several features, such as identity governance, unified identity management, and password-less authentication, for users, and best of all has a basic tier that is free to use.
To learn more about Azure Active Directory, you can visit https://azure.microsoft.com/en-us/services/active-directory/.
Summary
With this, we have reached the end of this chapter. Let’s have a recap of the valuable things you have learned. You have learned about the concept and importance of CORS and how it can provide security for accessing resources. We have discussed the different ways that we can implement CORS in our Spring Boot applications, which are at the method level, at the controller level, and a combination of both approaches.
We have also learned about the concept and features of Spring Security and discussed the implementation of custom authentication and authorization in our application. Lastly, we have also learned about IDaaS, a delivery model that allows users to connect, authenticate, and use identity management services from the cloud.
In the next chapter, we will be learning about the integration of event loggers into our Spring Boot application.