
2
Setting Up the Development Environment
In the previous chapter, you learned about Spring Boot in a nutshell and its advantages. We also tackled the latest features of Java 17. The same goes for Angular; you had an overview of Angular and the benefits of using it to develop frontend applications.
This chapter will teach you how to set up your computer’s development environment to develop your full-stack Java and Angular application. We will tackle different IDEs and text editors to write our code and make sure everything has been configured before we start with the development.
Installing everything correctly from the beginning will help us avoid issues and write code without any interruptions.
In this chapter, we will cover the following topics:
- Installing VS Code and IntelliJ IDEA
- Installing Java 17
- Installing SDKMAN
- Setting up IntelliJ IDEA with Java 17
- Installing REST Client VS Code or JetBrains and Angular DevTools
- Installing Git version control
Technical requirements
The following are the links to the software you need to install:
- Download VS Code (for Windows, Mac, and Linux): https://code.visualstudio.com/download
- IntelliJ IDEA for Windows: https://www.jetbrains.com/idea/download/#section=windows
- IntelliJ IDEA for Mac: https://www.jetbrains.com/idea/download/#section=mac
- IntelliJ IDEA for Linux: https://www.jetbrains.com/idea/download/#section=linux
- Download Java 17: https://www.oracle.com/java/technologies/javase/jdk17-archive-downloads.html
- Angular DevTools: https://chrome.google.com/webstore/detail/angular-devtools/ienfalfjdbdpebioblfackkekamfmbnh
- Node.js and Node Package Manager: https://nodejs.org/en/
- PostgreSQL for Windows: https://www.postgresql.org/download/windows/
- PostgreSQL for Mac: https://www.postgresql.org/download/macosx/
- PostgreSQL for Linux: https://www.postgresql.org/download/linux/
- Git Version Control: https://git-scm.com/
Installing VS Code and IntelliJ IDEA
This section will guide you through the installation and configuration of VS Code or IntelliJ IDEA. We will look at the text editor and IDE breakdown of their features and plugins that you can use throughout the development.
VS Code
Download the VS Code installer from https://code.visualstudio.com/download. We suggest installing VS Code regardless of your machine’s OS, because VS Code is lightweight but offers many plugins for Angular development. In addition, VS Code is the most common text editor used by JavaScript developers. The editor supports TypeScript, code formatting, and code navigation and offers many extensions that you can use, especially in developing Angular applications. The following are some of the valuable extensions we can use throughout the development:
- Code Spell Check: This is an extension for checking the spelling of our source code, which helps us avoid issues caused by typos.
- Prettier: This is a code formatting tool that applies proper alignment and indentations on our file after each save.
- Angular Snippets: This is a prevalent extension for Angular developers as it adds snippets for Angular, TypeScript, and HTML, which saves much time in development with the use of snippets to generate codes on the fly.
- Angular Files: This is a valuable extension, especially when you are not familiar with the commands in the Angular CLI; this extension will add a menu where you can generate Angular components, modules, and services without using a CLI.
- Angular2-Switcher: This extension allows us to use shortcut keys to navigate between Angular files.
- REST Client: This is an extension in VS Code for testing backend APIs. Instead of using third-party applications, we can send requests on our VS Code using REST Client.
- JSON to TS: This extension is handy as it automatically converts JSON objects into TypeScript models in our frontend.
- Angular Language Service: This is one of the essential plugins for Angular development. The extension provides Angular Code Completion, Angular Diagnostic Messages, and Go to definition features that make development faster.
This ends VS Code installation and configuration. Your VS Code text editor is now set for Angular development.
IntelliJ IDEA
This IDE is one of the most popular IDEs when developing applications using Java. The IDE offers several features to make development easier and faster. The following is a list of the tools that IntelliJ IDEA offers:
- Terminal: IntelliJ IDEA comes with a built-in terminal. We can execute any commands in the terminal depending on the language we are using for the development. The terminal can be accessed by pressing Alt + F12.
- Quick fixes: IntelliJ IDEA detects syntax errors on the fly. Having this feature, IntelliJ IDEA also suggests quick fixes for developers to easily correct mistakes in the code. The quick fixes can be accessed through a small light bulb that appears when IntelliJ IDEA detects an error.
- IntelliSense: IntelliSense is also known as smart code completion. IntelliJ IDEA analyzes the fragments of code and displays suggestions to complete the code on the fly.
- Advanced refactoring: IntelliJ IDEA offers a wide range of refactoring options. The IDE gives the developer the capability to refactor code automatically. Refactoring can also be accessed in the refactor menu.
- Navigation and search: This is one of the most used features of IntelliJ IDEA and is very handy, especially with large projects. It helps developers find and navigate for a resource, and it can search all of the available controls in the IDE.
- Detecting duplicates: This helps developers find duplicates in code and gives suggestions to the developers.
You should go to https://www.jetbrains.com/idea/download/ to download the installer. In addition, you can download the community version, which is the free version of Visual Studio.
After successfully downloading the IDE, run the installer, and the process is very much straightforward. It will install the IDE automatically in our terminal. After the successful installation of IntelliJ IDEA, we will install plugins/extensions that will help us throughout the development.
To install the plugins, open the IntelliJ IDEA and press Ctrl + Alt + S. This will open the settings window, then you should go to the Plugins menu to access the marketplace:

Figure 2.1 – Marketplace for IntelliJ IDEA plugins
It will list all of the available plugins we can add for our development. We will install the following plugins:
- Lombok: An extension that provides annotations, preventing the writing of getter and setter methods all over again; the annotation provides a fully-featured builder.
- Maven Helper: A tool for Maven projects that helps in analyzing conflicting dependencies. It can display the installed dependencies as a tree and allows developers to examine their relationships.
- Junit 5 Mockito Code Generator: An extension that helps us generate boilerplate codes that we commonly need in writing tests.
- Eclipse Code Formatter: A tool that integrates the code formatter of Eclipse directly to IntelliJ IDEA. This tool is very useful in solving the problem of a standard code style when developers use both Eclipse and IntelliJ IDEs.
- Tabnine: A tool that allows developers to complete lines of code based on a million Java programs. It helps reduce standard errors and enables developers to code faster with the help of AI.
- Add to gitignore: This allows developers to add specific files in .gitgnore to be ignored directly in the IDE without having to type the path one by one.
This ends the installation and configuration of IntelliJ IDEA. Your IDE in your machine is all set.
Installing Java 17
This section will explain what Java 17 is and guide you through the installation of the kit on Windows, macOS, and Linux.
Java 17 is a Java Development Kit (JDK) required for building applications and components using the Java programming language. It is the latest long-term support (LTS) release, meaning that the vendor (Oracle) will support the version for a long time, including the patching of security issues.
Windows installation
Execute the following steps to install Java 17 on Windows:
- Go to https://www.oracle.com/java/technologies/downloads/#jdk17-windows:

Figure 2.2 – Java 17 installer
- Select the installer base on your operating system and download it by clicking the link.
After successful download, open the installer and it will prompt you with a step-by-step installation that you can follow.
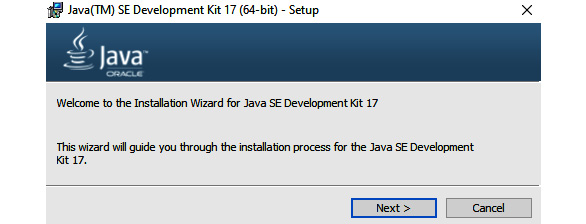
Figure 2.3 – Java 17 installation setup
- Click Next, and this will ask you where to place the JDK 17 on your machine. You can choose your preferred path where to set the JDK, but the default is commonly used.

Figure 2.4 – Java 17 installation destination folder
- Now, this will automatically install the JDK 17 on your machine after successful installation. The following files are also copied to the location:
"C:Program FilesCommon FilesOracleJavajavapathjava.exe"
"C:Program FilesCommon FilesOracleJavajavapathjavaw.exe"
"C:Program FilesCommon FilesOracleJavajavapathjavac.exe"
"C:Program FilesCommon FilesOracleJavajavapathjshell.exe"
We have now successfully installed Java 17 on our Windows machine. Now, we will show you the steps for installing Java 17 on macOS.
macOS installation
There are things to consider when choosing the installer for Java 17 in macOS. First, we need to know that the installation for JDK 17 contains version notation that represents the Feature, Interim, and Update versions. For example, if you are installing interim 1, update 1, and patch 1, the installer name would be as follows:
- macOS x64 systems:
jdk-17.1.1.1_macos-x64_bin.dmg
jdk-17.1.1.1_macos-x64_bin.tar.gz
- macOS aarch64 (64-bit ARM) systems:
jdk-17. 1.1.1_macos-aarch64_bin.dmg
jdk-17. 1.1.1_macos-aarch64_bin.tar.gz
Execute the following steps to install Java 17 on macOS:
- To download the installer go to https://www.oracle.com/java/technologies/downloads/#jdk17-mac and select the installer based on your operating system architecture. You can download either the .dmg or the tar.gz installer.
- Double-click the .dmg file to start the installer. A Finder window will show up and it contains the name of the .pkg file. Double-click the JDK 17. pkg icon to start the installation.
- Click Continue and the installation window will appear. After clicking Install, the following message will be displayed: Installer is trying to install new software. Enter your password to allow this.
- Next, enter your administrator user name and password and click Install software to continue, and this will install the software automatically on your machine.
We have now successfully installed Java 17 on macOS. Now, we will show you the steps for installing Java 17 on Linux platforms.
Linux installation
When installing Java 17 on a Linux system, we also need to be aware of the version notation, as when choosing the installer for macOS. The version format represents the Feature, Interim, and Update versions. So, for example, if we are downloading the interim 1, update 1, and patch 2, then the installer name would be the following:
- Linux x64 systems: jdk-17.1.1.2_linux-x64_bin.tar.gz
- Linux aarch64 systems: jdk-17.1.1.2_aarch64_bin.tar.gz
You can install the JDK on a Linux platform using the archive files or Red Hat Package Manager (RPM):
- Archive Files (.tar.gz) will install a private version of the JDK at any location without affecting other JDK installations. The bundle is available for Linux x66 and Linux aarchx64.
- RPM Packages (.rpm) will execute a system-wide installation of the JDK and require users to have root access.
64-Bit on Linux platforms
To install the JDK for 64-bit Linux platforms, the tar.gz archive file, also known as a tarball, can be downloaded from the following URL: https://www.oracle.com/java/technologies/downloads/#jdk17-linux.
The files that we see are as follows:
- Linux 64: jdk-17.interim.update.patch_linux-x64_bin.tar.gz
- Linux aarch64: jdk-17.interim.update.patch_linux-aarch64_bin.tar.gz
After successfully downloading the tarball file, accept the license agreement and place the .tar.gz file in the directory where you want to install the JDK.
Unpack the file and install the downloaded JDK as follows:
tar zxvf jdk-17.interim.update.patch_linux-x64_bin.tar.gz
Or with the following code:
tar zxvf jdk-17.interim.update.patch_linux-aarch64_bin.tar.gz
After successfully installing the JDK, we can see that it is now installed in a directory called jdk-17.interim.patch.update.
64-Bit on RPM-based Linux platforms
We can install the JDK using RPM binary files for RPM-based Linux platforms, such as Oracle and Red Hat. Before installing the JDK, we must first make sure that we have root access. You can have root access by running the su command and entering the super password.
The RPM file can be downloaded from https://www.oracle.com/java/technologies/downloads/#jdk17-linux, and we get the following files:
- Linux 64: jdk-17.interim.update.patch_linux-x64_bin.rpm
- Linux aarch64: jdk-17.interim.update.patch_linux-aarch64_bin.rpm
Install the package using the following command:
rpm -ivh jdk-17.interim.update.patch_linux-x64_bin.rpm
Or use the following command:
rpm -ivh jdk-17.interim.update.patch_linux-aarch64_bin.rpm
After executing the command, the JDK is now successfully installed on our machine. Then, for future version upgrades, we can execute the following command:
rpm -Uvh jdk-17.interim.update.patch_linux-x64_bin.rpm
rpm -Uvh jdk-17.interim.update.patch_linux-aarch64_bin.rpm
We are done installing and configuring the JDK 17 on our machine on different operating systems. In the next section, we will install SDKMAN.
Installing SDKMAN
This section will explain what the purpose of SDKMAN is in developing Java applications. This section will also guide you through the installation of SDKMAN on Windows, macOS, and Linux.
SDKMAN (Software Development Kit Manager) is a tool for managing parallel versions of Java on our machine. We can have multiple versions of installed Java versions on our computer. You can also install Java directly using SDKMAN. It will automatically install the latest stable version or the version you specify.
SDKMAN is mainly created for Unix operating systems, but it also supports Bash and ZSH shells for other operating systems.
SDKMAN features
The following are the features of SDKMAN:
- SDKMAN makes the installation of Java easier. We will only execute a command with the version we want to install, and it will do all the work.
- SDKMAN also supports Java development packages. It can install SDKs for JVM, such as Groovy and Kotlin.
- SDKMAN can run on all Unix platforms: macOS, Cygwin, Solaris, and Linux.
SDKMAN commands
To see all the SDKs that SDKMAN supports, we can execute the following command:
sdk list
The command will list all the SDKs and the Java library managers we can download on our machine.
To install a specific SDK, for example, we want to install the latest SDK for Java, execute the following command:
sdk install java
If we want to install a specific version of the SDK, we will specify the version in the command as follows:
sdk install java 15-open
To switch between versions when multiple versions are installed on our computer, we will execute the following command:
sdk default java 15-open
Installation on macOS and Linux
It only takes a few commands to install SDKMAN on macOS and Linux. For us to install SDKMAN, we will execute the following command:
curl -s https://get.sdkman.io | bash
After following all the instructions on installing SDKMAN, open a new terminal and execute the following command:
source "$HOME/.sdkman/bin/sdkman-init.sh"
The command will successfully install the manager in your terminal. To check whether the installation is successful, we can execute the following command:
sdk version
This will display the current SDKMAN version installed on your machine.
Installation on Windows
We need several steps to install SDKMAN on Windows since SDKMAN requires Bash tools. In this case, the first thing we need is a Git Bash Environment (MinGW):
- First, we will install 7-Zip, and after successful installation, we will execute the following command to make a symbolic link in the Git Bash environment, having 7-Zip as the zip command:
ln -s /c/Program Files/7-Zip/7z.exe /c/Program Files/Git/mingw64/bin/zip.exe
Now we can use the commands we use in Linux to install the SDKMAN.
- To install SDKMAN, we will execute the following command:
export SDKMAN_DIR="/c/sdkman" && curl -s "https://get.sdkman.io" | bash
- After the installation, restart the Git Bash shell to run the SDKMAN commands. We can execute the following command to verify that our installation is successful:
sdk version
It will prompt the current version of SDKMAN installed in our terminal.
We are done installing and configuring SDKMAN on our machine on different operating systems. In the next section, we will configure IntelliJ IDEA with the installed Java 17.
Setting up IntelliJ IDEA with Java 17
We have installed our IDE (IntelliJ IDEA) and Java 17 on our machine in the previous sections. Now, we will guide you on how to configure Java 17 on new and existing projects.
Using Java 17 on new projects
We only need the following few steps to use Java 17 on our new Java project:
- Open your IntelliJ IDEA terminal and select File | New | New Project.
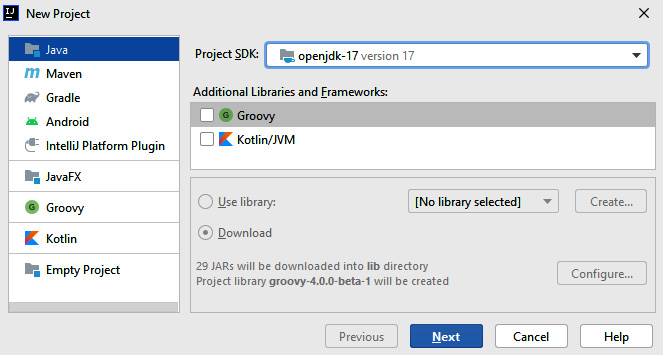
Figure 2.5 – Creating a new project in IntelliJ IDEA
We will see the preceding modal and select the type of project we need to develop. We can also see that we can choose the SDK version we need for our project.
- We will use Java 17, so we need to select OpenJDK-17.
- Click Next and configure your project name and directory. This will set up your Java application with the chosen SDK version.
We have now successfully configured our new project with JDK 17. Now we want to configure existing projects with JDK 17.
Using Java 17 on existing projects
Upon upgrading our project from an older version to Java 17, we need to follow several steps for our applications to work. First, remember that this upgrading to Java 17 step is only the general configuration in upgrading. It depends on the current version of the project. Also, some code and dependencies are being used on your project that are already deprecated.
We only need a few steps to use Java 17 on our existing Java project:
- Open your IntelliJ IDEA IDE and open your existing project.
- Choose File in the menu and select Project Structure. We will see a modal where we can configure our Project Settings.
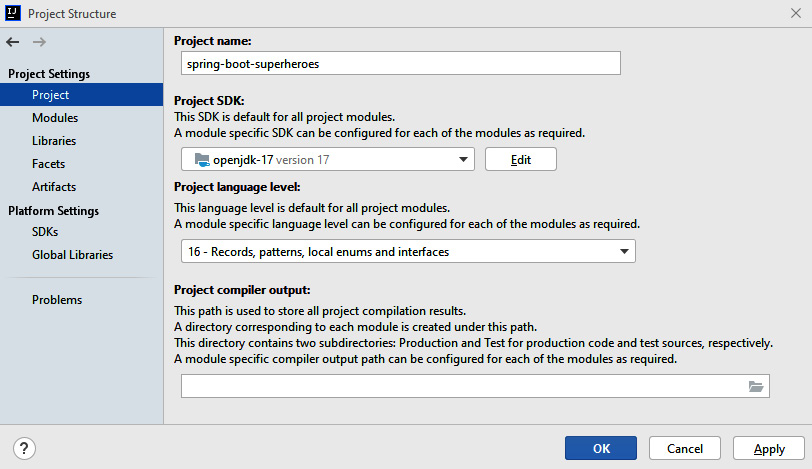
Figure 2.6 – IntelliJ IDEA project settings
- Under the Project SDK field, we will choose openjdk-17 to use Java 17 in our project. We can also select Project language level to use some of the new features of Java 17, such as sealed classes and pattern matching for switch. Remember, when changing Project language level, make sure that the same level is also set for the modules under the Modules tab.
We are now done configuring our project with Java 17. In the next section, we will install helpful tools for our development in Java and Angular, such as REST Client and Angular DevTools.
Installing REST Client VS Code or JetBrains and Angular DevTools
In this section, we will guide you through the installation of REST Client and Angular DevTools. REST Client is an essential tool in RESTful APIs. It is a tool for sending HTTP requests to the API you develop to debug the flow of your code on the endpoint as well as its response. There are several third-party platforms for API testing, such as Postman, but REST Client can be directly installed in your IDE.
Angular DevTools, on the other hand, is a Chrome extension for Angular that provides debugging and profiling capabilities for Angular applications. The extension supports Angular version 9 and later, and it is also Ivy enabled.
Installing REST Client in VS Code
We only need to follow these steps to install REST Client in VS Code:
- First, open VS Code Editor and go to the Extensions tab.
- Search for REST client.
- Select REST Client developed by Huachao Mao and install the extension.

Figure 2.7 – REST Client installation
After installation, we can use the extension by creating HTTP files in our project and writing the endpoints with the HTTP requests. The following is an example format of using REST Client:
GET https://test.com/users/1 HTTP/1.1
###
GET https://test.com /blogs/1 HTTP/1.1
###
POST https://test.com/rate HTTP/1.1
content-type: application/json
{
    "name": "sample",
    "rate": 5:
}
We have now successfully installed REST Client in our VS Code and can test RESTful APIs. Now, we will show you how to install Angular DevTools, which will be important for debugging Angular applications.
Installing Angular DevTools
Angular DevTools is a Chrome extension. To install the extension, you can directly install it from https://chrome.google.com/webstore/detail/angular-devtools/ienfalfjdbdpebioblfackkekamfmbnh and follow these steps:
- Click Add to chrome and we can directly use Angular DevTools on our browser. Remember that we can only use Angular DevTools on Angular applications running in development mode.
- We will see in our developer tools that a new tab named Angular was added.
- Run your Angular project and select the Angular tab.
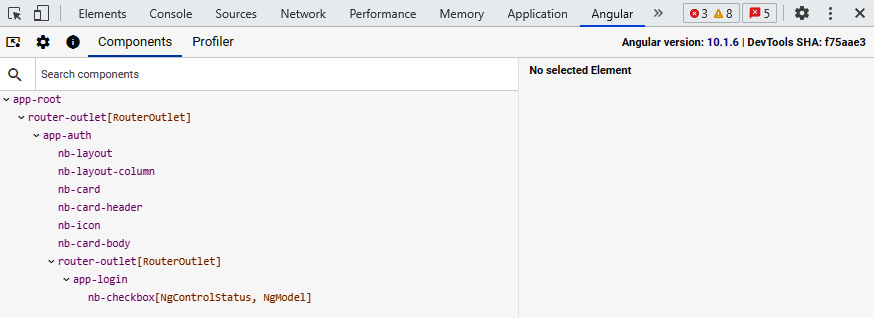
Figure 2.8 – Angular DevTools installation
Angular DevTools will have two tabs: the Components tab, which will display your application structure, and the Profiler tab, which is used to identify application performance and bottlenecks.
We have successfully installed Angular DevTools. Last but not least, we will install Git version control, which will be useful for code versioning and team collaboration.
Installing Git version control
Installing Git, a distributed version control system, will be the last thing we need in development. Git is important for developers as it is used to save your project’s different versions and stages of your repository. Git also helps you revert your repository’s recent working version if you made changes in your code that broke your app and you can’t fix them anymore.
Go to http://git-scm.com/ and click the Download button on the screen to download and install Git.
Now you have learned from this final section about Git version control, where to get it, what it does, and why it is crucial. Let’s summarize everything.
Summary
With this, we have reached the end of this chapter. Let’s have a recap of the valuable things you have learned. You have learned how to install VS Code, its features, and the essential extensions we can use in Angular development.
You have also learned how to install IntelliJ IDEA, its features, and the plugins that we will use in Java development. You have also learned how to install Java 17 and configure it with new and existing projects in IntelliJ IDEA.
SDKMAN is a development kit manager and it gives us the capability to switch JDK versions and install Java development packages directly. REST Client is a tool for testing RESTful APIs without downloading any third-party tools on our machine.
Angular DevTools is a Chrome extension for Angular that provides debugging and profiling capabilities for Angular applications. And last but not least, Git version control is a tool for creating histories of your code where you can quickly revert or create a new version of your application.
In the next chapter, we will be focusing on Spring Boot and its features.