Appendix A. Generating and building Spring Boot projects
In chapter 1, you learned the need for Spring Boot and its features and various components. In the next section, you’ll learn the Spring Initializr tool and, subsequently, explore Spring Boot command-line interface (CLI).
A.1 Generating Spring Boot applications with Spring Initializr
In this section, we’ll introduce the Spring Initializr tool and learn various techniques for generating a Spring Boot project through it.
A.1.1 Introducing Spring Initializr
Spring Initializr (https://start.spring.io/) is a project generation utility that allows you to generate Spring Boot projects. It also enables you to inspect the generated project structure before you download or share it. The generated project includes detail, such as the Spring Boot version; the project language, such as Java, Kotlin, or Groovy; the build framework, such as Maven or Gradle; and a few other configuration parameters.
Spring Initializr has an extensible API, which means you can customize it to suit your requirements. You can use the Web version of Spring Initializr API through a Web browser by visiting https://start.spring.io. You can also use the embedded version of this API integrated into popular IDEs, such as IntelliJ IDEA, Spring Tool Suite, and Microsoft Visual Studio Code.
A.1.2 Technique: Generating a Spring Boot application with the Spring Initializr Web user interface
In this technique, we’ll demonstrate how to generate a Spring Boot application with Spring Initializr Web user interface.
You want to generate a Spring Boot Project through Spring Initializr Web user interface.
Spring Boot provides a default instance of Spring Initializr at https://start.spring.io. This application has a Web-based user interface that allows you to choose various options to generate a Spring Boot project. These options include the project build tool (e.g., Maven or Gradle), language (e.g., Java, Kotlin, or Groovy), Spring Boot release version, and other options.
Figure A.1 shows the https://start.spring.io Web page with the required details. Along with the basic details, such as the Spring Boot version and project metadata, you’ve also selected Spring Web dependency in this example. This dependency provides necessary supports for Web application development.

Figure A.1 Spring Initializr Web User Interface at https://start.spring.io
Spring Initializr changes its user interface periodically. Thus, you may find an altered user interface, depending on when you are reading this book. You may also find a different Spring Boot version if a new Spring Boot version is released.
Following are the list of supported Spring Initializr options for generating a Spring Boot project:
-
Spring Boot version—This option allows you to select the Spring Boot version. Spring Initializr provides the current stable version, previous stable versions, and the snapshot versions. The default selected value is the current stable version.
-
Build system—You can select the build framework for the generated project. The supported build systems are Apache Maven and Gradle. By default, Spring Initializr generates a Maven project.
-
JVM language—You can choose the JVM language for the generated project. For instance, you can generate a Java, Kotlin, or Groovy-based project. The default language is Java.
-
Packaging—A generated Spring Boot project can be packaged as a WAR or JAR file. You can select the packaging type as either JAR or WAR when generating the project. Based on the selection, Spring Initializr provides the packaging configuration in the generated project.
-
Java version—Spring Initializr allows you to choose the Java version for the generated project. Supported versions are Java 15, 11, and 8, where Java 11 is the default Java version. Note that Spring Initializr updates the Java version with newly released Java versions. Therefore, you’ll find different values, depending on when you are accessing this content.
-
Dependencies—Spring Initializr lists the frequently used Spring Boot starters and other required dependencies for you to choose from while generating the project. You can select one or more of these dependencies, depending on your requirement. For instance, if you are generating a Spring Boot Web project with Thymeleaf (https://www.thymeleaf.org), you can select the Spring Web and the Thymeleaf dependencies.
Specify all the parameters in the https://start.spring.io page, and select the required dependencies, as shown in figure A.1. You can then press the Generate button to generate and download the project to your machine. Spring Initializr provides a ZIP archive of the generated project. Figure A.2 shows the folder structure of the generated Spring Boot Maven project.

The generated project contains the following components:
Spring Initializr provides a Maven wrapper to build the generated project. The purpose of it is that you can build the Spring Boot application with Maven without explicitly installing Maven on your machine. You can use the mvnw install command to build the application, as shown in figure A.3. Similarly, if you’ve generated a Gradle-based project, Spring Initializr provides a Gradle wrapper to build the application without explicitly installing Gradle in your machine.

In the project source code, Spring Initializr generates a Java class with the main method in the generated Spring Boot application (e.g., SpringBootAppDemoApplication.java). This class allows you to start the Spring Boot application. You can run this Java file using your IDE’s application start option and see the generated Spring Boot project has started in the HTTP port 8080.
In the project test code, Spring Initializr provides an empty test class (e.g., SpringBootAppDemoApplicationTests.java) to write test cases for your project. Spring Boot automatically includes a few commonly used testing frameworks, such as JUnit, Mockito (https://site.mockito.org/), and XMLUnit (https://www.xmlunit.org/) in your project.
In the resources folder, the generated Spring Boot project has an empty configuration file called application.properties. You can use this file to provide additional configuration to control the application’s behavior. For instance, if you want to run the project in a different HTTP port other than the Spring Boot default port 8080, you can configure it here by specifying the server.port property. Besides, since we’ve selected Spring Web dependency, Spring Initializr has also created the static and template folders for the static Web resources, such as CSS files, images, and HTML template files, respectively.
Spring Initializr also provides two additional features to view and share the generated project for convenience:
-
You can explore the generated project structure on the user interface before downloading it to the local machine. This is a convenient feature that allows you to explore the project components before you download them. Figure A.4 shows the pom.xml file from the explored project components.
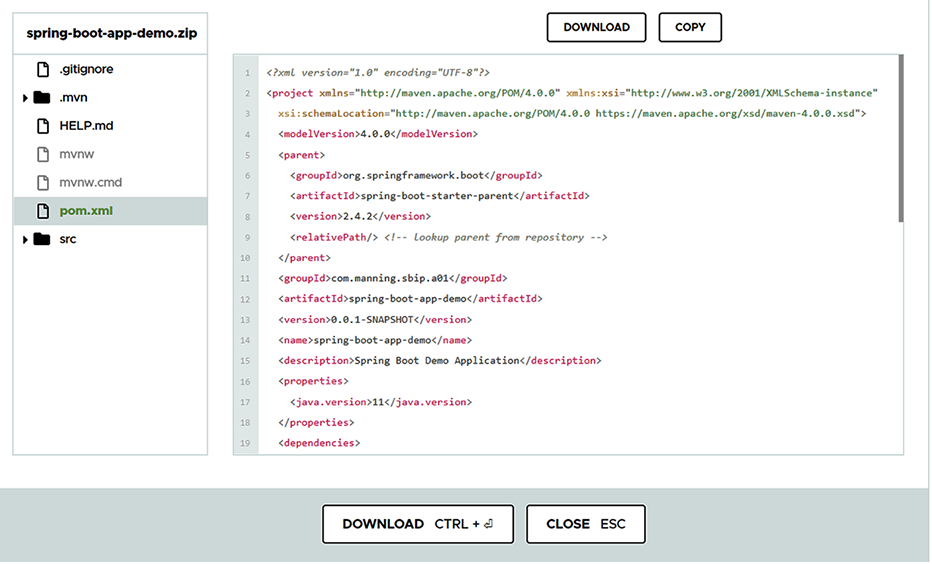
Figure A.4 Exploring the project structure of generated Spring Boot project in https://start.spring.io
-
You can also generate a URL of the project that contains the configurations you’ve selected. This URL can be shared with anyone, and they can find the same selected details and dependencies once they access the shared URL. For example, in listing A.1, the following URL has configurations with Gradle build system, Kotlin language, Java 15, and WAR packaging.
Listing A.1 Sharable URL of the generated project
https:/ /start.spring.io/#!type=gradle-
➥ project&language=kotlin&platformVersion=2.4.3.RELEASE&packaging=war&jvm
➥ Version=15&groupId=com.manning%2Csbip.a01&artifactId=spring-boot-
➥ app&name=spring-boot-
➥ app&description=Spring%20Boot%20project%20for%20Appendix%20A&packageNam
➥ e=com.manning%2Csbip.a01.spring-boot-app&dependencies=web
Spring Initializr is a fantastic tool that has made Spring Boot project generation an extremely easy task. The Web-based UI allows you to provide the configuration parameters needed to generate the project, and in a single click you have a workable project. It also allows you to inspect the generated project structure before you download it to your machine.
Although the Web-based version is useful, you’ll eventually need to import the generated project into an IDE to continue with the application development. To make this process further simplified, Spring Initializr provides an extensible API that major IDE vendors embed, so you can generate the project in the IDE itself. Let’s explore this, using the next technique.
A.1.3 Technique: Generating a Spring Boot application with Spring Initializr in IntelliJ IDEA IDE
In this technique, we’ll show how to generate a Spring Boot application with Spring Initializr in Intellij IDEA IDE.
You want to generate a Spring Boot project through Spring Initializr in IntelliJ IDEA IDE.
Spring Initializr is a flexible API and is frequently used in standalone mode through the Web and the CLI. However, to further simplify the project generation, major IDE vendors have embedded Spring Initializr support into their IDEs. With this technique, you’ll see how to generate a Spring Boot project in IntelliJ IDEA IDE using its built-in Spring Initializr support. You can find the generated project in the companion GitHub repository of this book at http://mng.bz/KByP.
To generate a Spring Boot project, browse to File > New > Project, and Select Spring Initializr, as shown in figure A.5. By default, the IDE selects https://start.spring.io as the Initializr service URL. Alternatively, you can provide your own Spring Initializr URL if you have customized the Initializr Service.

Figure A.5 Generating a Spring Boot Project in IntelliJ IDEA with built-in Spring Initializr support
On the subsequent page, you’ll see the options to provide additional project metadata, such as project coordinates (e.g., group ID, artifact ID, and version), language, packaging type, and Java version, as shown in figure A.6. The group ID, artifact ID, and version allow you to uniquely identify your application. In general, the group ID represents the group or unit the application belongs to. The artifact ID is the application name, and the version is the application version. As you include new features to your application, you increase this version.
The type field indicates the build tool we’ll use in our application. Supported types are Apache Maven and Gradle. Language represents the programming language you’ll use to develop the application. Supported languages are Java, Kotlin, and Groovy. Packaging represents, once you build the application, how it should be packaged. JAR and WAR are supported types.

On the next page, you can choose the dependencies required for your project and the Spring Boot version, as shown in figure A.7.

As shown in figure A.7, you can find the dependencies are categorized in the relevant headers, and all the related dependencies are listed under each category. After selecting the required dependencies, you can choose the project name and location and generate the project.
The IDE pulls the selected dependencies from the central repository and configures the project. Figure A.8 shows the final generated project in the IntelliJ IDEA. If you run the SpringBootAppIdeaApplication using the IDE’s run option, you’ll see the generated Spring Boot project starts in the default HTTP 8080 port.

In this technique, you’ve seen how to generate a Spring Boot project in IntelliJ IDEA IDE. The IDE allows you to specify the Spring Initializr options to generate the project. Once you’ve provided all the required details, it generates the project and shows it in the project explorer. In the next technique, let’s discuss generating a Spring Boot project in the Spring Tool Suite.
A.1.4 Technique: Generating a Spring Boot Application with Spring Initializr using the Spring Tool Suite
In this technique, we’ll discuss how to generate a Spring Boot application with Spring Initializr in Spring Tool Suite (STS).
You want to generate a Spring Boot application through the built-in Spring Initializr in Spring Tool Suite.
Spring Tool Suite (https://spring.io/tools) is an eclipse-based IDE by the Spring team for Spring-based application development. Like the IntelliJ IDEA, STS also has built-in integration with Spring Initializr service and allows you to generate a Spring Boot project through the IDE.
To create a Spring Boot application in STS, click on File > New > Spring Starter Project, and you’ll see the screen shown in figure A.9. You can find the generated project in the companion GitHub repository of this book at http://mng.bz/9Krx.

STS loads these parameters and the default values from https://start.spring.io. On the next page, STS allows you to select the Spring Boot version and specify the required dependencies for your project, as shown in figure A.10.

After selecting the dependencies, STS generates the Spring Boot project and loads the selected dependencies, as shown in figure A.11.

STS provides a boot dashboard for developer convenience. It displays all Spring Boot projects available in the workspace and provides quick control, allowing you to perform several activities, such as restarting and debugging your application. You can run the SpringBootAppStsApplication Java file using the IDE’s run option and see that STS starts the generated Spring Boot project in the default HTTP port 8080.
In this technique, you’ve learned how to generate a Spring Boot project in Spring Tool Suite. Spring Tool Suite, which is a customized version of eclipse for Spring application development, also implements Spring Initializr API and allows you to specify the required options to generate the project. The generated project is then displayed in the project explorer. In the next technique, let’s learn how to generate a Spring Boot project in Microsoft Visual Studio Code—one of the most popular code editors across the technology spectrum.
A.1.5 Technique: Generating a Spring application with Spring Initializr in Visual Studio Code
In this technique, we’ll discuss how to generate a Spring Boot application with Spring Initializr in Visual Studio Code.
You want to generate a Spring Boot application with Spring Initializr in Visual Studio Code.
Visual Studio Code (https://code.visualstudio.com/) is an extension-based popular text editor from Microsoft. This code editor is a lightweight alternative to the popular IDEs to develop Spring Boot applications.
To be able to generate a Spring Boot project in Visual Studio Code or VS Code in short, you need to install the following extensions:
-
Spring Boot tools—This extension provides support for the validation and content assist for Spring Boot application.properties and application.yml properties files, and Spring Boot-specific support for Java files.
-
Spring Initializr Java support—This is a lightweight extension to generate Spring Boot projects using Spring Initializr. This also supports Kotlin and Groovy-based project generation.
-
Spring Boot dashboard—This extension allows you to view and manage all Spring Boot applications in the workspace with features, such as starting, stopping, and debugging the applications.
Pivotal (the company behind Spring Framework) provides an extension pack to develop Spring Boot application applications in VS Code. This pack consists of several extensions, including the three mentioned earlier. You can install this Spring Boot Extension Pack to access the complete extension suite. To install the extension pack, browse to the extensions option in the editor, and search for Spring Boot, as shown in figure A.12.

After successfully installing the extension pack, you can create Spring Boot projects in the editor. To start creating a Spring Boot project, open the Command Palette by browsing to View > Command Palette and searching for Spring Initializr. You’ll find options to create a Maven- or Gradle-based Spring Boot application, as shown in figure A.13.

To create a project, select the required options, and follow along with the parameters. After the project is successfully generated, you will find the folder structure, as shown in figure A.14. On the left side, there is the generated project structure Spring Boot dashboard to start and stop the application, and in the editor, you can explore the project components.

You can find the generated project in the companion GitHub repository of this book at http://mng.bz/jyJz. After project generation, if you need to add additional dependencies, you can do it by using the Edit Starters option of the editor. You can navigate to the pom file and right-click to select the Edit Starters option. The editor will display the previously selected dependencies with the right tick symbol and allow you to specify additional dependencies, as shown in figure A.16.

In figure A.15, we have selected the Edit Starters option, and the Visual Studio Code shows us the previously selected dependencies with the right-tick symbol. We have also selected the Spring Boot DevTools Developer Tools dependency this time.
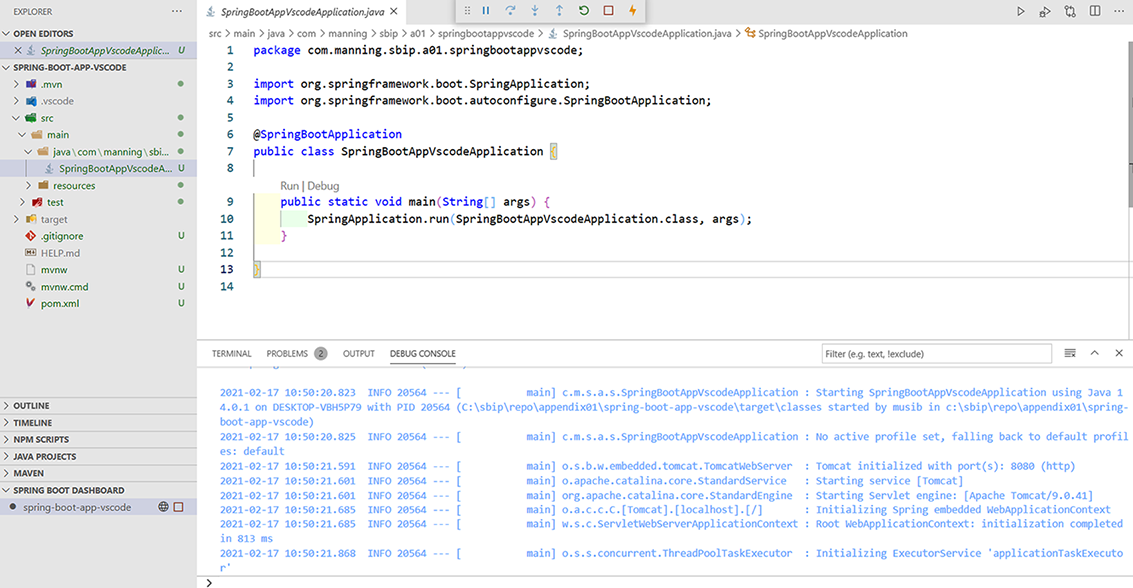
As shown in figure A.16, you can start the application from Spring-Boot Dashboard by clicking the start button and seeing the generated Spring project has started in default HTTP port 8080. Application startup logs are visible in the debug console.
With this technique, you’ve seen how to enable Spring Boot support in VS Code editor and generate a Spring Boot project. VS Code is a popular code editor, and many developers prefer this lightweight alternative for Spring Boot application development.
So far, you’ve seen the UI-based approaches to generate Spring Boot applications. However, there is a community of developers that prefers command-line utilities for their conciseness and simplicity. In the next technique, you’ll see the use of Spring Boot CLI to generate a Spring Boot application.
A.1.6 Technique: Generating a Spring Boot application with Spring Initializr using Command Line Interface
In this technique, we’ll demonstrate how to generate a Spring Boot application with Spring Initializr using Command Line Interface.
You want to generate a Spring Boot Project with Spring Initializr through CLI.
Spring Initializr has an extensible API and provides various ways to generate a Spring Boot project. The Spring Initializr Web interface is a popular option for Spring project generation. However, many developers prefer to use command-line tools to generate the project. Spring Initializr supports several popular third-party command-line tools, such as cURL, HTTPie (https://httpie.org/), and Spring’s own CLI to create a Spring Boot project from the command line.
However, one of the drawbacks while using the CLI is that you need to be familiar with the parameter and dependency names beforehand to use those in the CLI command. To avoid this drawback, Spring provides nicely formatted tabular details of Spring Initializr options, which consist of the build framework, project parameters, and dependency names. This detail can be obtained by accessing the https://start.spring.io URL. Let’s view these details from your command-line tool using the following command: curl https://start.spring.io.

Figure A.17 Accessing https://start.spring.io through cURL
Figure A.17 displays the options of Spring Initializr service in three different sections:
-
The first table provides the available project types. For instance, it lists four project types:
gradle-build,gradle-project,maven-build, andmaven-project. -
The second table provides the set of available parameters, a brief description, and the default values. Most of these parameters are similar to what is available in the Web version with a difference in the
applicationNameandbaseDir. The application name parameter can be used to define the application name instead of deducing it from the name parameter. ThebaseDircan be used to create a base directory in the generated archive, so you can extract the generated ZIP without creating a directory for it first. -
The third table lists all the available dependencies you can use in your project.
You can generate a Spring Boot project with these parameters and the dependencies specified with the -d parameter. Table A.1 demonstrates the usage of Spring Boot project generation with cURL utility.
Table A.1 Using cURL to generate a Spring Boot project
Using this technique, you’ve seen how to use the command-line utility cURL to generate a Spring Boot project. This CLI approach is flexible, and you can control the project generation using the appropriate parameters. Now that you’ve learned to generate a Spring Boot project, let’s explore the various components of the generated project in the next section.
A.2 Bootstrapping and executing a Spring Boot application with Spring Boot CLI
The Spring Boot CLI is a command-line utility that allows you to create prototypes for Spring applications. It allows you to quickly bootstrap a Spring Boot application without the need for a dependency management tool, such as Maven or Gradle. Besides, Spring Boot CLI allows you to use Groovy (https://groovy-lang.org/) script, so you can use familiar, Java-like syntax but with less noisy syntax. For example, Groovy automatically includes several Java packages in your code, and you need not provide import statements for the members from these packages, as shown in listing A.2.
Listing A.2 Packages imported by Groovy by default
You will also investigate a few other features of Groovy, where it is less noisy than Java. But before that, you’ll install Spring Boot CLI and have some hands-on experience.
A.2.1 Installing the Spring Boot CLI
Installing the Spring Boot CLI is easy and can be done in several ways. You can follow any of the following approaches to install Spring Boot CLI:
-
Manual installation through the Spring Boot CLI ZIP
Take the following steps to configure Spring Boot CLI manually:
-
Download the latest Spring Boot CLI archive from the Spring software repository (http://mng.bz/W794) to your machine.
-
Extract the ZIP to the development folder, and you’ll find a folder structure, as shown in figure A.18.
-
Inside the bin directory, you can find the Spring Boot CLI executables.
-
Set the bin directory path in your system’s path environment variable, so you can access CLI’s spring command from anywhere in the command prompt or terminal.
-
-
Install through the package managers, such as Homebrew or Chocolatey
A package manager is software that automates the process of installing, upgrading, configuring, and removing software on your computer. You can use different package managers to install Spring Boot CLI, depending on the operating system you are using. For example, if you are using macOS, you can use Homebrew (https://brew.sh/) to install Spring Boot CLI, as shown in the following listing.
Listing A.3 Installing Spring Boot CLI in macOS using Homebrew
If you are using Windows, you can use Chocolatey (https://chocolatey.org/) to install Spring Boot CLI using the command shown in the following listing.
Listing A.4 Installing Spring Boot CLI in Windows using Chocolatey
Note that you need to install the package manager before you use it to install Spring Boot CLI. You can refer to the links of the package managers for further information on the installation.
-
Install through the Software Development Kit Manager (SDKMAN)
SDKMAN! (https://sdkman.io/) is a software tool for managing Software Development Kits (SDK) in your machine, including Spring Boot CLI. You can download the SDKMAN from their website and install it on your machine. After that, you can use the command shown in the following listing to install Spring Boot CLI using SDKMAN.

Listing A.5 Installing Spring Boot CLI through SDKMAN
Once you have installed and configured Spring Boot CLI, you can verify the installation by accessing the CLI. To access Spring Boot CLI, open the command prompt (in Windows) or a terminal (in macOS/Linux) and type the command shown in the following listing. You can see the output as the installed CLI version.
Listing A.6 Spring Boot CLI version
You can now use the installed CLI to generate a Spring Boot project. Spring Boot CLI defines an init command that connects to https://start.spring.io and allows you to generate a project through Spring Initializr. Like the cURL command, you can obtain a textual representation of the Spring Initializr service by running the spring init --list command. You’ll see a similar screen as that shown in figure A.19.

Figure A.19 Accessing https://start.spring.io through cURL
You can generate a Spring Boot project through the CLI by providing the project parameters and dependencies, as shown in the following listing.
Listing A.7 Spring Boot CLI to generate a Spring Boot project
spring init --dependencies=web,h2 --type=gradle-project --java-version=15 –
➥ -packaging=war spring-boot-gradle-app.zip
The command in listing A.7 generates a Spring Boot Gradle project with the Spring Web and H2 in-memory database dependencies, Java version as Java 15, and project packaging types as WAR. It stores the generated project artifact with the name spring-boot-gradle-app.zip.
A.2.2 Technique: Developing a simple Spring Boot application with Spring Boot CLI
In this technique, we’ll discuss how to develop a Spring Boot application with Spring Boot CLI.
You have successfully installed Spring Boot CLI on your machine, and you want to create a Spring Boot application with it.
It is straightforward to create a Spring application using Spring Boot CLI. You can simply start with a text editor. Let’s begin by defining a basic REST controller that returns with a message. Although this is a straightforward example, you’ll shortly notice the simplicity of the CLI tool and the concise nature of Groovy. It’ll also provide insight into how easy it is to use Spring Boot CLI. Don’t worry if you don’t know what a REST controller is. You’ll learn about it later in the book.
You’ll compare this REST controller with the equivalent Java version to understand the verbosity and the boilerplate code you will need to write if the same controller is written with Java. Create a folder called cli-introduction in C: drive (in Windows) or in the home directory (in macOS or Linux). Then, create a file called application.groovy with the following content inside the cli-introduction folder, as shown in the following listing.
Listing A.8 Groovy REST Controller in Spring Boot CLI
@RestController                         ①
class DemoRestController {
    @GetMapping("/")                    ②
    def hello() {
        "Welcome to Spring Boot CLI"    ③
    }
}
② Maps all HTTP GET requests to this method
③ Response to all GET requests. The return keyword is optional and can be skipped.
In the above Groovy code, you’ve defined a REST controller, which returns a string Welcome to Spring Boot CLI as the output. You can execute this file using the run command of Spring Boot CLI. Open command prompt (in Windows) from C:cli-introduction or a terminal (in macOS and Linux) and execute the command shown in the following listing.
Listing A.9 Executing application.groovy with Spring Boot CLI
You can access this REST endpoint through the Web browser on http://localhost:8080 and notice the output, as shown in figure A.20.

Let’s now see the Java equivalent of the Groovy code, as shown in the following listing.
Listing A.10 Java equivalent code of the Groovy REST controller
package com.manning.spring.boot;

import org.springframework.boot.SpringApplication;
import org.springframework.boot.autoconfigure.SpringBootApplication;
import org.springframework.web.bind.annotation.GetMapping;
import org.springframework.web.bind.annotation.RestController;    ①

@RestController                                                   ②
@SpringBootApplication                                            ③
public class DemoSpringBootApplication {

    public static void main(String[] args) {
        SpringApplication.run(DemoSpringBootApplication.class, args);
    }
    @GetMapping                                                   ④
    public String hello() {
        return "Welcome to Spring Boot CLI";                      ⑤
    }
}
③ Enables Spring Boot features
④ Maps all HTTP GET requests to this method
⑤ Response to all HTTP GET requests. The return keyword is optional.
The Java version has several boilerplate codes compared to the CLI’s Groovy version:
-
Import all the classes and annotations you are using in the Java file.
-
Specify the
@SpringBootApplicationannotation for Spring Boot to perform the autoconfiguration of the application. -
Write a
main()method to start the application and make this REST endpoint available to others.
Understanding the Spring Boot CLI commands
You’ve already seen how to compile and run the Groovy source code using the Spring Boot CLI run command. Following is the complete description of the run command: $ spring run [options] <files> [--] [arguments]. It takes one or more Groovy files with additional options and arguments. Note that -- is used to separate the application options from the spring command line arguments. For example, to start the application in a port other than the default 8080, you can specify a different port using the --server.port argument: $ spring run application.groovy -- --server .port=9090. To find a full list of options supported by the Spring Boot CLI run command, you can use the help command of Spring Boot CLI. For example, if you execute spring run help, you can find the output, as shown in figure A.21.

So far, you are running the application through the Spring Boot CLI tool from the command line. However, this might be fine for quick prototyping and to try out Spring Boot features. But you might not always want to run the application from the command line. You may wish to create a runnable JAR file or create a WAR file to deploy the application in any of your environments. With the Spring Boot CLI, you can easily create a runnable JAR or a WAR file.
For example, you can create a runnable JAR file by using the following command: $ spring jar app.jar application.groovy. This command produces a runnable JAR file that can be executed using the java -jar command. Similarly, you can create a WAR file using the following command: $ spring war app.war application.groovy.
Groovy includes a @Grab annotation, which allows you to explicitly declare third-party dependencies in your application. This annotation allows you to download JAR files, such as a dependency management tool like Maven or Gradle. Spring Boot extends this grabbing technique and attempts to deduce the libraries based on the contents of your code as grab hints.
For instance, the presence of @EnableJms in your code hints Spring Boot CLI to download the necessary libraries required for a Java Messaging Service (http://mng.bz/8ldZ) application. Table A.2 shows the list of grab hints. Some of the grab hints are classes, and some are annotations. You’ll see the use of @Grab annotation shortly in this section.
|
|
Provides support for a Spring MVC application with embedded Tomcat |
|
|
You’ve already seen the use of @RestController in the application.groovy file. The presence of this annotation allows Spring Boot to download necessary dependencies for a Spring MVC application and provides an embedded Tomcat server.
Let’s now provide an additional grab hint in our application.groovy to demonstrate this feature further. Let’s say you want to use Spring Security in the application and leverage the default security features provided by Spring Security. To do so, let’s add @EnableWebSecurity in the application.groovy file, as shown in the following listing.
Listing A.11 A simple Spring Boot REST controller
@EnableWebSecurity
@RestController
class DemoRestController {

    @GetMapping("/")
    def hello() {
        "Spring Boot CLI"
    }
}
Run this application, and you can see that our application now has default Spring Security features enabled. Spring Boot now redirects us to a login page to access the endpoint. You can find the generated password from the console and log in with this and user as user.
Although grab hints seem to be a powerful feature, they are limited, as we have a limited number of such hints. You might need to use a third-party library outside of these hints. To remove this limitation, Spring Boot extends Groovy’s standard @Grab annotation by allowing you to specify a dependency. Therefore, if there is a Groovy hint already in your application, the framework attempts to download it automatically. Later, when no hint is available, you can explicitly add dependencies using @Grab annotation.
For instance, we can tweak our previous example and use @Grab annotation to add the spring-boot-starter-security dependency, as shown in the following listing. Thus, by using @Grab annotation, you can explicitly specify the dependencies needed in your application.
Listing A.12 Using Groovy @Grab annotation to specify additional dependency
@Grab("spring-boot-starter-security")
@RestController
class DemoRestController {

    @GetMapping("/")
    def hello() {
        "Welcome to Spring Boot CLI"
    }
}
The code in listing A.12 downloads the spring-boot-starter-security dependencies. If you run this file with Spring Boot CLI, you can see the CLI is resolving the dependencies and asking you to log in to access the endpoint.
With this technique, you’ve seen the use of Spring Boot CLI by developing a tiny Spring REST Web service. The major takeaway in this technique is the use of Groovy language, which allows you to write concise code. You also don’t need any build framework for dependency management and application packaging. With the next technique, we’ll take this concept further by building a Web application consisting of UI and database.
A.2.3 Technique: Building a Web application using Spring Boot CLI
In this technique, we’ll discuss how to build a Web application using Spring Boot CLI.
You want to build a Web application with UI and database support using Spring Boot CLI.
With the previous technique, you’ve explored Spring Boot CLI and learned the major commands to play with it. Using this technique, you’ll extend that understanding further by developing a Web application with the Spring Boot CLI.
You’ll build a UI-based application that keeps track of the courses in an e-learning platform. In this application, you will use Thymeleaf (https://www.thymeleaf.org/) to manage the UI components and H2 in-memory database (https://www.h2database.com/html/main.html) to persist the course data. Figure A.22 shows the outcome of the application you will build in this technique.

In the development process, you will explore a few of the Spring Boot features, which will be useful in the chapters throughout the book. You can download the completed version of this application from this book’s companion GitHub repository at http://mng.bz/NxgN.
To begin with, create a folder named $ mkdir course-tracker-cli. This folder acts as the root folder of the application. You’ll create two more folders, config and templates, inside the root folder: $ mkdir config templates.
The config folder contains the application.properties file, and the templates folder contains HTML templates. The application.properties file contains optional Spring Boot configuration parameters. For instance, if you need to start the application on a different port than the default port 8080, you can configure the custom port in the application.properties. You can also specify your database or logging configurations in this file.
Figure A.23 shows the UML class diagram of the application you are going to build. You have a Course as the business domain class and a CourseRepository interface where you define the data access methods. The default implementation of this interface is represented by the CourseRepositoryImpl class. Lastly, you have a CourseController class that has an instance of the CourseRepository.

In this application, the Course is the domain class, which represents a course in the application. A course consists of a course ID, name, category, rating, and description. Following is the course.groovy class, as shown in listing A.13.
Listing A.13 Course POJO class
You will use Spring JDBC to communicate with the database. Thus, you will need to create the data access layer, using Spring JdbcTemplate. A JdbcTemplate is Spring’s template-based approach that simplifies the use of JDBC and allows you to avoid common JDBC errors.
Let’s define the CourseRepository interface inside the course-tracker-cli folder with the data access methods shown in listing A.14. In this interface, you declare different data access methods to find course details.
Listing A.14 Course repository interface to define data access methods
interface CourseRepository {
    Iterable<Course> findAll()
    Iterable<Course> findAllByCourseCategory(String category)
}
These data access methods perform the following activities and fetch information from the database:
-
findAllByCourseCategory: Given a course category, it returns all courses that belong to the supplied category
You’ll now define CourseRepositoryImpl class inside the course-tracker-cli folder. This class implements the CourseRepository interface and defines the behaviors of the interface methods.
Le’s explain the actions you’ll perform inside the CourseRepositoryImpl class:
-
You need to annotate this class with
@Repositoryannotation.@Repositoryannotation is a stereotype annotation that indicates that the annotated class is a Spring data repository. Spring Framework provides you a few special annotations that allow you to create an instance of the annotated class automatically. These annotations are known as stereotype annotations, and@Repositoryannotation is one of them. You’ll find a detailed explanation of the@Repositoryinterface in chapter 3. -
You’ll need an instance of
JdbcTemplatein the implemented class, so you can communicate to the database. You’ll use@autowireannotation to do this. By providing this annotation, you ask Spring to provide an instance ofJdbcTemplatewhen it creates an object ofCourseRepositoryImplclass. Besides, declaringJdbcTemplateis a grab hint to the Spring Boot CLI to perform the necessary JDBC setup. -
Lastly, you’ll provide an implementation for all methods defined in the
CourseRepositoryinterface. You’ve used Groovy closure to map theCourseobjects from the result set. If you are familiar with Java lambda expressions, then you can relate Groovy closures with them. You can refer to https://groovy-lang.org/closures.html to read more about Groovy closures.
Create a file called CourseRepositoryImpl inside the root folder of your application with the following content, as shown in the following listing.
Listing A.15 CourseRepositoryImpl class
@Repository                                                           ①
class CourseRepositoryImpl implements CourseRepository {

    @Autowired
    JdbcTemplate jdbcTemplate;                                        ②

    Iterable<Course> findAll() {                                      ③
         jdbcTemplate.query("""SELECT COURSE_ID, COURSE_NAME,
➥ COURSE_CATEGORY, COURSE_RATING, COURSE_DESCRIPTION FROM COURSES""", {
            resultSet, newRow -> new Course(
                id : resultSet.getLong(1),
                name : resultSet.getString(2),
                category : resultSet.getString(3),
                rating : resultSet.getInt(4),
                description : resultSet.getString(5))
         } as RowMapper)
    }

    Iterable<Course> findAllByCourseCategory(String category) {       ④
         jdbcTemplate.query("""SELECT COURSE_ID, COURSE_NAME,
➥ COURSE_CATEGORY, COURSE_RATING, COURSE_DESCRIPTION FROM COURSES WHERE
➥ COURSE_CATEGORY=?""", {
            resultSet, newRow -> new Course(
                id : resultSet.getLong(1),
                name : resultSet.getString(2),
                category : resultSet.getString(3),
                rating : resultSet.getInt(4),
                description : resultSet.getString(5))
         } as RowMapper, category)
    }
}
① Spring stereotype annotation indicates that this class is a Spring Data repository.
② An instance of JdbcTemplate is autowired by Spring. This class lets you access the database easily.
③ Implementation of findAll method to fetch all courses from the database
④ Implementation of findAllByCourseCategory method that fetches all courses belongs to the supplied category from the database
Now that we are ready with the data access methods, let’s define a Spring controller class to handle the incoming user requests. You’ll create the CourseController class inside the course-tracker-cli folder of the application to do this task, as shown in listing A.15.
Apart from handling the incoming request, you are performing several additional activities in the controller. Let’s explain these step by step:
-
You have defined this class with
@controllerannotation. This indicates the class as a Spring controller to handle an incoming request. -
You have defined two endpoints to handle the incoming requests. To keep the application simple, you have defined HTTP GET endpoints only. Below are the endpoints:
-
As discussed previously, you are using the H2 in-memory database for the backend database and Thymeleaf to manage the HTML templates for the UI. Thus, you have used
h2andspring-boot-starter-thymeleafdependencies. -
When you access any of the endpoints, the following activities are done:
-
The HTTP GET request is mapped to the appropriate controller method, as defined in the
CourseControllerclass. -
The database repository class is invoked to fetch the data from the database.
-
This data with a view name is returned by the controller method. In listing A.16, you used a view named
Course. -
The view is then rendered with the fetched data and displayed on the screen.
-
Listing A.16 Course REST controller
@Grab("h2")
@Grab("spring-boot-starter-thymeleaf")                     ①

@Controller                                                ②
@RequestMapping
class CourseController {

    @Autowired
    CourseRepository courseRepository;                     ③
    @GetMapping                                            ④
    def getAllCourses(Model model) {
        model.addAttribute("courses", courseRepository.findAll());
        "courses";
    }

    @GetMapping("{category}")
    def getAllCourses(@PathVariable("category") String category, Model
➥ model) {                                                ⑤
        model.addAttribute("courses",
➥ courseRepository.findAllByCourseCategory(category));
        "courses";
    } }
① Using Groovy’s @Grab annotation to tell Spring Boot to get the H2 database and spring-boot-starter dependencies
② Defines this class as a Spring controller, and HTTP requests can be mapped to this class
③ Autowiring the CourseRepository implementation. In this case, CourseRepositoryImpl will be injected by Spring here.
④ HTTP GET request mapping endpoint to address all GET requests with endpoint /
⑤ HTTP GET request mapping endpoint to address GET requests with /{category}. The category is a PathVariable and is replaced with the actual course category.
You’ve defined the data access object and the controller class to handle the HTTP incoming requests. Let’s now define the view of the application. Create a file named courses.html inside the templates folder of the course-tracker-cli, as shown in listing A.17.
In the view, you’ve done the following:
-
Used Thymeleaf to iterate the courses and displayed the course details in a tabular format. You can refer to appendix B to learn Thymeleaf.
-
You have used Bootstrap (https://getbootstrap.com/) to style the HTML page. If you haven’t worked with Bootstrap before, it is a CSS library that allows you to design your HTML pages.
Listing A.17 Course Tracker HTML template
<html xmlns:th="http:/ /www.thymeleaf.org">
<head>
    <title>Course Tracker</title>
    <meta charset="utf-8"/>
    <meta name="viewport" content="width=device-width, initial-scale=1"/>
    <link rel="stylesheet"
➥ href="https:/ /maxcdn.bootstrapcdn.com/bootstrap/4.0.0/css/bootstrap.min
➥ .css"/>
    <script
➥ src="https:/ /ajax.googleapis.com/ajax/libs/jquery/3.3.1/jquery.min.js">
➥ </script>
    <script
➥ src=”https:/ /cdnjs.cloudflare.com/ajax/libs/popper.js/1.12.9/umd/popper
➥ .min.js"></script>
    <script
➥ src="https:/ /maxcdn.bootstrapcdn.com/bootstrap/4.0.0/js/bootstrap.min.j
➥ s"></script>
</head>
<body>
<nav class="navbar navbar-dark bg-dark">
  <div class="container-fluid">
    <div class="navbar-header">
      <a class="navbar-brand" href="#">Course Tracker</a>
    </div>
  </div>
</nav>
<div class="container h-100">
    <div class="row justify-content-left mt-5 mb-1">
        <h3 id="heading">List of available courses:</h3>
    </div>
    <div class="row table-responsive">
        <table class="table table-striped">
            <thead class="thead-light">
            <tr>
                <th>Id</th>
                <th>Name</th>
                <th>Category</th>
                <th>Rating</th>
                <th>Description</th>
            </tr>
            </thead>
            <tbody>
            <tr th:each="course : ${courses}">
                <td th:text="${course.id}">ID</td>
                <td th:text="${course.name}">Name</td>
                <td th:text="${course.category}">Category</td>
                <td th:text="${course.rating}">Rating</td>
                <td th:text="${course.description}">Description</td>
            </tr>
            </tbody>
        </table>
    </div>
</div>
</body>
</html>
You are almost done with the application, except the database schema definition. If you recall, we are using the H2 in-memory database to persist the data. Spring Boot uses a convention to detect the schema definition files and the data files. It automatically loads the schema if it finds a file called schema.sql and loads the data if it detects a file called data.sql. For now, let’s create both these files inside the course-tracker-cli folder of our application. The following listing shows the schema.sql file in which you are creating the COURSES table.
Listing A.18 The schema.sql file to create the COURSES database table
create table COURSES (
    COURSE_ID identity not null,
    COURSE_NAME varchar(100) not null,
    COURSE_CATEGORY varchar(10) not null,
    COURSE_RATING tinyint not null,
    COURSE_DESCRIPTION varchar(500) not null
);
We also want to load some course details to populate the table with data. The following listing shows the data.sql file containing a few SQL insert statements.
Listing A.19 The data.sql file to load the sample data by Spring Boot
INSERT INTO COURSES(COURSE_ID, COURSE_NAME, COURSE_CATEGORY, COURSE_RATING,
➥ COURSE_DESCRIPTION) VALUES(1, 'Rapid Spring Boot Application
➥ Development', 'Spring', 4, 'Spring Boot gives all the features of the
➥ Spring Framework without all of the complexity');
INSERT INTO COURSES(COURSE_ID, COURSE_NAME, COURSE_CATEGORY, COURSE_RATING,
➥ COURSE_DESCRIPTION) VALUES(2, 'Getting Started with Spring Security
➥ DSL', 'Spring', 5, 'Learn Spring Security DSL in easy steps');
INSERT INTO COURSES(COURSE_ID, COURSE_NAME, COURSE_CATEGORY, COURSE_RATING,
➥ COURSE_DESCRIPTION) VALUES(3, 'Getting Started with Spring Cloud
➥ Kubernetes', 'Spring', 5, 'Master Spring Boot application deployment
➥ with Kubernetes');
INSERT INTO COURSES(COURSE_ID, COURSE_NAME, COURSE_CATEGORY, COURSE_RATING,
➥ COURSE_DESCRIPTION) VALUES(4, 'Getting Started with Python', 'Python',
➥ 3, 'Learn Python concepts in easy steps');
INSERT INTO COURSES(COURSE_ID, COURSE_NAME, COURSE_CATEGORY, COURSE_RATING,
➥ COURSE_DESCRIPTION) VALUES(5, 'Game Development with Python', 'Python',
➥ 4, 'Learn Python by developing 10 wonderful games');
INSERT INTO COURSES(COURSE_ID, COURSE_NAME, COURSE_CATEGORY, COURSE_RATING,
➥ COURSE_DESCRIPTION) VALUES(6, 'JavaScript for All', 'JavaScript', 3,
➥ 'Learn basic JavaScript syntax that can apply to anywhere');
INSERT INTO COURSES(COURSE_ID, COURSE_NAME, COURSE_CATEGORY, COURSE_RATING,
➥ COURSE_DESCRIPTION) VALUES(7, 'JavaScript Complete Guide',
➥ 'JavaScript', 3, 'Master JavaScript with Core Concepts and Web
➥ Development');
The last change before you can execute the application is configuring the H2 database. So far, we’ve only provided the H2 database dependency in the Groovy file. But we also need to provide details, including database username, password, driver class, and URL.
Create a file called application.properties inside the config folder with the details shown in listing A.20. Spring Boot reads these details at the application startup and configures the H2 database automatically.
Listing A.20 H2 database configuration
spring.h2.console.enabled=true                ①
spring.datasource.url=jdbc:h2:mem:testdb
spring.datasource.driverClassName=org.h2.Driver
spring.datasource.username=sa
spring.datasource.password=password
① This ensures that you can access the H2 database console through http://localhost:8080/h2-console.
Adding the database configuration completes the application development, and you are ready to execute the application. You can run the application by executing the spring Boot CLI run command. Open your command prompt or the terminal window and run the following command from the course-tracker-cli folder: $ spring run *. You can see the application starts up and the startup logs in the console. By default, HTTP port 8080 is used to run the application. If you access http:/ /localhost:8080, you can see the output, as shown in figure A.24:

You can also access other endpoints, such as finding all courses that belong to a category by navigating to http:/ /localhost:8080/{category}. For instance, if you visit http://localhost:8080/Spring, you can see all courses belonging to the Spring category. Figure A.25 shows the output. Nice! Thanks to the features of Spring Boot CLI we can track our favorite Spring courses!

Using this technique, you’ve seen the use of Spring Boot CLI for building a full-scale Web application with a frontend and a backend database. You haven’t used any dependency management tool, such as Maven or Gradle; instead, Spring Boot CLI manages the dependencies for us.