- Using a service gateway with your microservices
- Implementing a service gateway using Spring Cloud Gateway
- Mapping microservice routes in the gateway
- Building filters to use correlation ID and tracking
In a distributed architecture like a microservice, there will come a point where we’ll need to ensure that critical behaviors such as security, logging, and tracking users across multiple service calls occur. To implement this functionality, we’ll want these attributes to be consistently enforced across all of our services without the need for each individual development team to build their own solution. While it’s possible to use a common library or framework to assist with building these capabilities directly in an individual service, doing so has these implications:
-
It’s challenging to implement these capabilities in each service consistently. Developers are focused on delivering functionality, and in the whirlwind of day-to-day activity, they can easily forget to implement service logging or tracking unless they work in a regulated industry where it’s required.
-
Pushing the responsibilities to implement cross-cutting concerns like security and logging down to the individual development teams greatly increases the odds that someone will not implement them properly or will forget to do them. Cross-cutting concerns refer to parts or features of the program’s design that are applicable throughout the application and may affect other parts of the application.
-
It’s possible to create a hard dependency across all our services. The more capabilities we build into a common framework shared across all our services, the more difficult it is to change or add behavior in our common code without having to recompile and redeploy all our services. Suddenly an upgrade of core capabilities built into a shared library becomes a long migration process.
To solve this problem, we need to abstract these cross-cutting concerns into a service that can sit independently and act as a filter and router for all the microservice calls in our architecture. We call this service a gateway. Our service clients no longer directly call a microservice. Instead, all calls are routed through the service gateway, which acts as a single Policy Enforcement Point (PEP), and are then routed to a final destination.
In this chapter, we’ll see how to use Spring Cloud Gateway to implement a service gateway. Specifically, we’ll look at how to use Spring Cloud Gateway to
-
Put all service calls behind a single URL and map those calls using service discovery to their actual service instances
-
Inject correlation IDs into every service call flowing through the service gateway
-
Inject the correlation ID returned from the HTTP response and send it back to the client
Let’s dive into more detail on how a service gateway fits into the overall microservices we’re building in this book.
8.1 What is a service gateway?
Until now, with the microservices we built in earlier chapters, we’ve either directly called the individual services through a web client or called them programmatically via a service discovery engine such as Eureka. Figure 8.1 illustrates this approach.

Figure 8.1 Without a service gateway, the service client calls distinct endpoints for each service.
A service gateway acts as an intermediary between the service client and an invoked service. The service client talks only to a single URL managed by the service gateway. The service gateway pulls apart the path coming in from the service client call and determines what service the service client is trying to invoke. Figure 8.2 illustrates how the service gateway directs the user to a target microservice and corresponding instance, like a traffic cop directing traffic.

Figure 8.2 The service gateway sits between the service client and the corresponding service instances. All service calls (both internal-facing and external) should flow through the service gateway.
The service gateway sits as the gatekeeper for all inbound traffic to microservice calls within our application. With a service gateway in place, our service clients never directly call the URL of an individual service, but instead place all calls to the service gateway.
Because a service gateway sits between all calls from the client to the individual services, it also acts as a central PEP for service calls. The use of a centralized PEP means that cross-cutting service concerns can be carried out in a single place without the individual development teams having to implement those concerns. Examples of cross-cutting concerns that can be implemented in a service gateway include these:
-
Static routing—A service gateway places all service calls behind a single URL and API route. This simplifies development as we only have to know about one service endpoint for all of our services.
-
Dynamic routing—A service gateway can inspect incoming service requests and, based on the data from the incoming request, perform intelligent routing for the service caller. For instance, customers participating in a beta program might have all calls to a service routed to a specific cluster of services that are running a different version of code from what everyone else is using.
-
Authentication and authorization—Because all service calls route through a service gateway, the service gateway is a natural place to check whether the callers of a service have authenticated themselves.
-
Metric collection and logging—A service gateway can be used to collect metrics and log information as a service call passes through it. You can also use the service gateway to confirm that critical pieces of information are in place for user requests, thereby ensuring that logging is uniform. This doesn’t mean that you shouldn’t collect metrics from within your individual services. Rather, a service gateway allows you to centralize the collection of many of your basic metrics, like the number of times the service is invoked and the service response times.
Let’s now look at how to implement a service gateway using Spring Cloud Gateway. We’ll use Spring Cloud Gateway because it is the preferred API gateway from the Spring Cloud team. This implementation is built on Spring 5 and is a nonblocking gateway that integrates much easier with the other Spring Cloud projects we’ve used throughout the book.
8.2 Introducing Spring Cloud Gateway
Spring Cloud Gateway is the API gateway implementation built on Spring framework 5, Project Reactor, and Spring Boot 2.0. This gateway is a nonblocking gateway. What does nonblocking mean? Nonblocking applications are written in such a way that the main threads are never blocked. Instead, these threads are always available to serve requests and to process them asynchronously in the background to return a response once processing is done. Spring Cloud Gateway offers several capabilities, including
-
Mapping the routes for all the services in your application to a single URL. The Spring Cloud Gateway isn’t limited to a single URL, however. Actually, with it, we can define multiple route entry points, making route mapping extremely fine-grained (each service endpoint gets its own route mapping). But the first and most common use case is to build a single entry point through which all service client calls will flow.
-
Building filters that can inspect and act on the requests and responses coming through the gateway. These filters allow us to inject policy enforcement points in our code and to perform a wide number of actions on all of our service calls in a consistent fashion. In other words, these filters allow us to modify the incoming and outgoing HTTP requests and responses.
-
Building predicates, which are objects that allow us to check if the requests fulfill a set of given conditions before executing or processing a request. The Spring Cloud Gateway includes a set of built-in Route Predicate Factories.
To get started with Spring Cloud Gateway, let’s
-
Set up a Spring Boot project for Spring Cloud Gateway and configure the appropriate Maven dependencies
8.2.1 Setting up the Spring Boot gateway project
In this section, we’ll set up our Spring Cloud Gateway service using Spring Boot. Like the Spring Cloud Config service and the Eureka service that we already created in previous chapters, setting up a Spring Cloud Gateway service starts with building a new Spring Boot project and then applying annotations and configurations. Let’s begin by creating that new project with the Spring Initializr (https://start.spring.io/) as shown in figure 8.3.

Figure 8.3 Spring Initializr with our Spring Cloud Gateway information
To achieve this setup, you’ll need to follow these steps. Listing 8.1 then shows how the Gateway server pom.xml file should look.
-
Write
com.optimagrowthas the group andgatewayserveras the artifact. -
Write
API Gateway serveras the name,API Gateway serveras the description, andcom.optimagrowth.gatewayas the package name. -
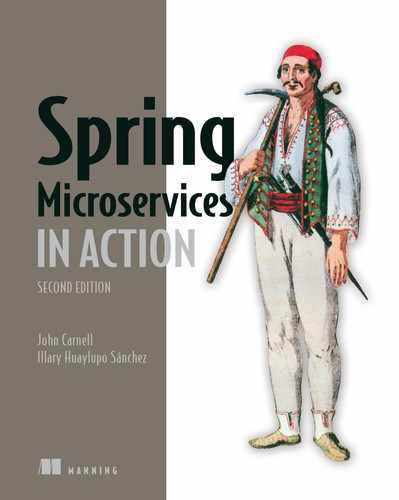
Add the Eureka Client, Config Client, Gateway, and Spring Boot Actuator dependencies as shown in figure 8.4.
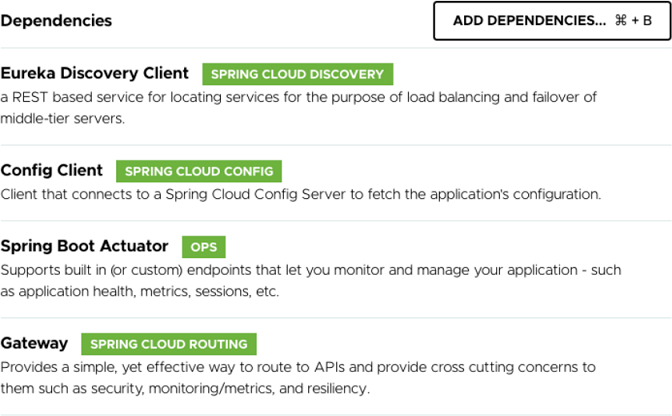
Figure 8.4 Our gateway server dependencies in Spring Initializr
Listing 8.1 Maven pom file for the Gateway server
//Part of pom.xml omitted for conciseness
...
<dependencies>
    <dependency>
        <groupId>org.springframework.boot</groupId>
        <artifactId>spring-boot-starter-actuator</artifactId>
    </dependency>
    <dependency>
        <groupId>org.springframework.cloud</groupId>
        <artifactId>spring-cloud-starter-config</artifactId>
    </dependency>
    <dependency>
        <groupId>
            org.springframework.cloud                                     ❶
        </groupId>
        <artifactId>spring-cloud-starter-gateway</artifactId>
    </dependency>
    <dependency>
        <groupId>org.springframework.cloud</groupId>
        <artifactId>spring-cloud-starter-netflix-eureka-client</artifactId>
        <exclusions>
            <exclusion>
                <groupId>org.springframework.cloud</groupId>
                <artifactId>spring-cloud-starter-ribbon</artifactId>
            </exclusion>
            <exclusion>
                <groupId>com.netflix.ribbon</groupId>
                <artifactId>ribbon-eureka</artifactId>
            </exclusion>
        </exclusions>
    </dependency>
    <dependency>
        <groupId>org.springframework.boot</groupId>
        <artifactId>spring-boot-starter-test</artifactId>
        <scope>test</scope>
        <exclusions>
            <exclusion>
                <groupId>org.junit.vintage</groupId>
                <artifactId>junit-vintage-engine</artifactId>
            </exclusion>
        </exclusions>
    </dependency>
</dependencies>

//Rest of pom.xml removed for conciseness
...
❶ Tells Maven to include the Spring Cloud Gateway libraries
The next step is to set up the src/main/resources/bootstrap.yml file with the configuration needed to retrieve the settings from the Spring Config Server that we previously created in chapter 5. The following listing shows how your bootstrap.yml file should look.
Listing 8.2 Setting up the Gateway bootstrap.yml file
spring:
   application:
      name: gateway-server                ❶
   cloud:
      config:
         uri: http://localhost:8071       ❷
❶ Names the gateway service so that the Spring Cloud Config client knows which service is being looked up
❷ Specifies the location of the Spring Cloud Config Server
NOTE In case you didn’t follow the previous chapter’s code listings, you can download the code created in chapter 7 from the following link: https://github.com/ihuaylupo/manning-smia/tree/master/chapter7.
8.2.2 Configuring the Spring Cloud Gateway to communicate with Eureka
The Spring Cloud Gateway can integrate with the Netflix Eureka Discovery service we created in chapter 6. To achieve this integration, we must add the Eureka configuration in the configuration server for the Gateway service we just created. This may sound somehow complicated, but don’t worry. It is something that we already achieved in the previous chapter.
To add a new Gateway service, the first step is to create a configuration file for this service in the Spring Configuration Server repository. (Remember, this can be a Vault, Git, or filesystem or classpath.) For this example, we’ve created the gateway-server.yml file in the classpath of the project. You’ll find it here: /configserver/src/main/ resources/config/gateway-server.yml.
NOTE The filename is set with the spring.application.name property you defined in the bootstrap.yml for the service. For example, for the Gateway service, we defined the spring.application.name to be gateway-server, so the configuration file must be named gateway-server as well. As for the extension, you can choose between .properties or .yml.
Next, we will add the Eureka configuration data into the configuration file we just created. The following listing shows how.
Listing 8.3 Setting up the Eureka configuration in the Spring Configuration Server
server:
  port: 8072

eureka:
  instance:
    preferIpAddress: true
  client:
    registerWithEureka: true
    fetchRegistry: true
    serviceUrl:
      defaultZone: http://eurekaserver:8070/eureka/
And finally, we’ll add the @EnableEurekaClient in the ApiGatewayServerApplication class. You’ll find this class in the /gatewayserver/src/main/java/com/optimagrowth/ gateway/ApiGatewayServerApplication.java class file. The following listing demonstrates this.
Listing 8.4 Adding @EnableEurekaClient to ApiGatewayServerApplication
package com.optimagrowth.gateway;

import org.springframework.boot.SpringApplication;
import org.springframework.boot.autoconfigure.SpringBootApplication;
import org.springframework.cloud.netflix.eureka.EnableEurekaClient;

@SpringBootApplication
@EnableEurekaClient
public class ApiGatewayServerApplication {

   public static void main(String[] args) {
      SpringApplication.run(ApiGatewayServerApplication.class, args);
   }
}
Now, that we’ve created the basic configuration for our Spring Cloud Gateway, let’s start routing our services.
8.3 Configuring routes in Spring Cloud Gateway
At its heart, the Spring Cloud Gateway is a reverse proxy. A reverse proxy is an intermediate server that sits between the client trying to reach a resource and the resource itself. The client has no idea it’s even communicating with a server. The reverse proxy takes care of capturing the client’s request and then calls the remote resource on the client’s behalf.
In the case of a microservice architecture, Spring Cloud Gateway (our reverse proxy) takes a microservice call from a client and forwards it to the upstream service. The service client thinks it’s only communicating with the gateway. But it is not actually as simple as that. To communicate with the upstream services, the gateway has to know how to map the incoming call to the upstream route. The Spring Cloud Gateway has several mechanisms to do this, including
8.3.1 Automated mapping of routes via service discovery
All route mappings for the gateway are done by defining the routes in the /configserver/src/main/resources/config/gateway-server.yml file. However, the Spring Cloud Gateway can automatically route requests based on their service IDs by adding the following configurations to the gateway-server configuration file as shown in the following listing.
Listing 8.5 Setting up the discovery locator in the gateway-server.yml file
spring:
  cloud:
    gateway:
        discovery.locator:              ❶
          enabled: true
          lowerCaseServiceId: true
❶ Enables the gateway to create routes based on services registered with service discovery
By adding the lines in listing 8.5, the Spring Cloud Gateway automatically uses the Eureka service ID of the service being called and maps it to a downstream service instance. For instance, if we want to call our organization service and use automated routing via the Spring Cloud Gateway, we would have our client call the Gateway service instance using the following URL as the endpoint:
http://localhost:8072/organization-service/v1/organization/958aa1bf-18dc-
➥ 405c-b84a-b69f04d98d4f
The Gateway server is accessed via the http://localhost:8072 endpoint. The service we want to invoke (the organization service) is represented by the first part of the endpoint path in the service. Figure 8.5 illustrates this mapping in action.

Figure 8.5 The Spring Cloud Gateway uses the organization-service application name to map requests to instances of the organization service.
The beauty of using Spring Cloud Gateway with Eureka is that not only do we now have a single endpoint through which we can make calls, but we can also add and remove instances of a service without ever having to modify the gateway. For instance, we can add a new service to Eureka, and the gateway automatically routes calls to it because it’s communicating with Eureka about where the actual physical service endpoints are located.
If we want to see the routes managed by the Gateway server, we can list the routes via the actuator/gateway/routes endpoint on the Gateway server. This will return a listing of all the mappings on our service. Figure 8.6 shows the output from selecting http://localhost:8072/actuator/gateway/routes.
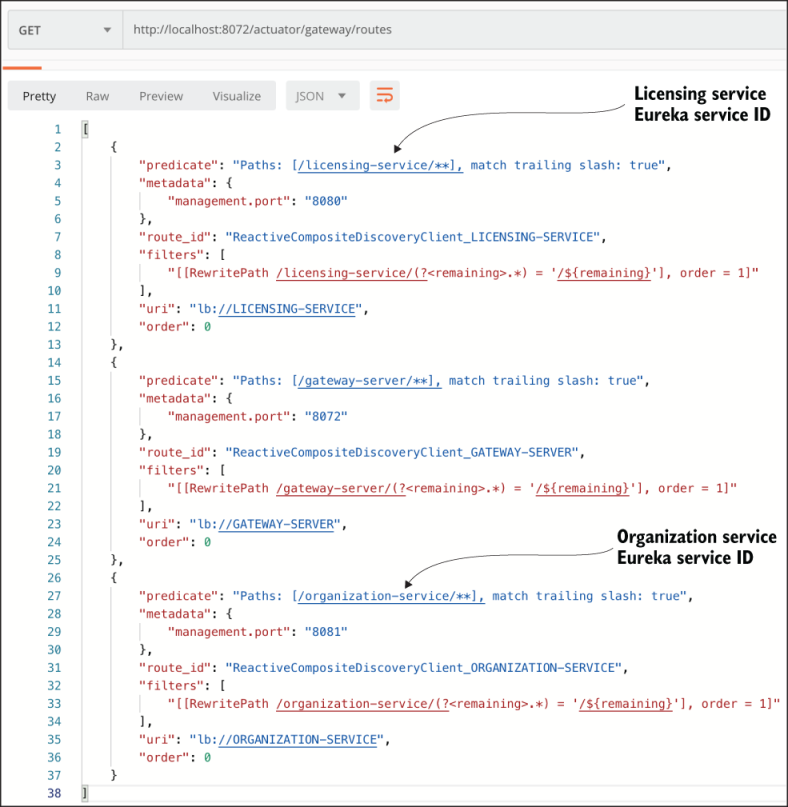
Figure 8.6 Each service that is mapped in Eureka is now mapped as a Spring Cloud Gateway route.
Figure 8.6 shows the mappings for the services registered with the Spring Cloud Gateway. You’ll also notice additional data such as predicate, management port, route ID, filters, and others.
8.3.2 Manually mapping routes using service discovery
Spring Cloud Gateway allows our code to be more fine-grained by allowing us to explicitly define route mappings rather than relying solely on the automated routes created with the Eureka service ID. Suppose we want to simplify the route by shortening the organization name rather than having our organization service accessed in the gateway via the default route, /organization-service/v1/organization/{organization-id}. You can do this by manually defining the mapping for the route in the configuration file /configserver/src/main/resources/config/gateway-server.yml, which is located in the Spring Cloud Configuration Server repository. The following listing shows you how.
Listing 8.6 Mapping routes manually in the gateway-server.yml file
spring:
  cloud:
    gateway:
        discovery.locator:
          enabled: true
          lowerCaseServiceId: true
        routes:
        - id: organization-service                ❶
          uri: lb://organization-service          ❷

          predicates:                             ❸
          - Path=/organization/**

          filters:                                ❹
          - RewritePath=/organization/
                       (?<path>.*), /${path}     ❺
❶ This optional ID is an arbitrary route ID.
❷ Sets the route’s destination URI
❸ The path, although set by the load() method, is just another option.
❹ Filters a collection of Spring web.filters to modify the request or response before or after sending the response
❺ Rewrites the request path, from /organization/** to /**, by taking the path regexp as a parameter and a replacement order
By adding this configuration, we can now access the organization service by entering the /organization/v1/organization/{organization-id} route. Now, if we recheck the Gateway server’s endpoint, we should see the results shown in figure 8.7.

Figure 8.7 The results of the gateway call to /actuator/gateway/routes when manually mapping the organization service
If you look carefully at figure 8.7, you’ll notice that two entries are present for the organization service. One service entry is the mapping we defined in the gateway-server.yml file, which is organization/**: organization-service. The other service entry is the automatic mapping created by the gateway based on the Eureka ID for the organization service, which is /organization-service/**: organization-service.
NOTE When we use automated route mapping where the gateway exposes the service based solely on the Eureka service ID, if no service instances are running, the gateway will not expose the route for the service. However, if we manually map a route to a service discovery ID and there are no instances registered with Eureka, the gateway will still show the route. If we try to call the route for the nonexistent service, it will return a 500 HTTP error.
If we want to exclude the automated mapping of the Eureka service ID route and only have the organization service route that we’ve defined, we can remove the spring .cloud.gateway.discovery.locator entries we added in the gateway-server.yml file, as shown in listing 8.7.
NOTE The decision whether to use automated routing or not should be carefully thought out. In a stable environment where not many new services are added, having to add the route manually is a straightforward task. However, in a large environment with many new services, this is a bit tedious.
Listing 8.7 Removing the discovery locator entries in the gateway-server.yml file
spring:
  cloud:
    gateway:
        routes:
        - id: organization-service
          uri: lb://organization-service
          predicates:
          - Path=/organization/**
          filters:
          - RewritePath=/organization/
                        (?<path>.*), /${path}
Now, when we call the actuator/gateway/routes endpoint on the Gateway server, we should only see the organization service mapping we’ve defined. Figure 8.8 shows the outcome of this mapping.
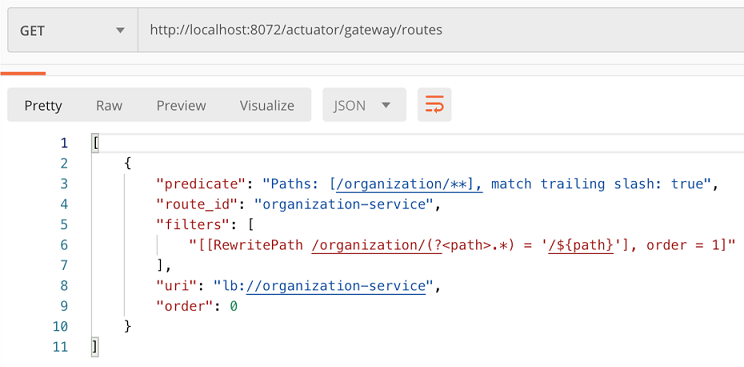
Figure 8.8 The result of the gateway/actuator/gateway/routes call with only a manual mapping of the organization service
8.3.3 Dynamically reloading route configuration
The next thing we’ll look at when configuring routes in Spring Cloud Gateway is how to dynamically refresh routes. The ability to dynamically reload routes is useful because it allows us to change the mapping of routes without having to restart the Gateway server(s). Existing routes can be modified quickly, and new routes will have to go through the act of recycling each Gateway server in our environment.
If we enter the actuator/gateway/routes endpoint, we should see our organization service currently shown in the gateway. Now, if we want to add new route mappings on the fly, all we have to do is make the changes to the configuration file and commit those changes back to the Git repository where Spring Cloud Config pulls its configuration data. Then we can commit the changes to GitHub.
Spring Actuator exposes a POST-based endpoint route, actuator/gateway/ refresh, that will cause it to reload its route configuration. Once this actuator/ gateway/refresh is reached, if you then enter the /routes endpoint, you’ll see that two new routes are exposed. The response of the actuator/gateway/refresh returns an HTTP 200 status code without a response body.
8.4 The real power of Spring Cloud Gateway: Predicate and Filter Factories
Because we can proxy all requests through the gateway, it allows us to simplify our service invocations. But the real power of the Spring Gateway comes into play when we want to write custom logic that will be applied against all the service calls flowing through the gateway. Most often, we’ll use this custom logic to enforce a consistent set of application policies like security, logging, and tracking among all services.
These application policies are considered cross-cutting concerns because we want these strategies to be applied to all the services in our application without having to modify each one to implement them. In this fashion, the Spring Cloud Gateway Predicate and Filter Factories can be used similarly to Spring aspect classes. These can match or intercept a wide body of behaviors and decorate or change the behavior of the call without the original coder being aware of the change. While a servlet filter or Spring aspect is localized to a specific service, using the Gateway and its Predicate and Filter Factories allows us to implement cross-cutting concerns across all the services being routed through the gateway. Remember, predicates allow us to check if the requests fulfill a set of conditions before processing the request. Figure 8.9 shows the architecture that the Spring Cloud Gateway uses while applying predicates and filters when a request comes through the gateway.
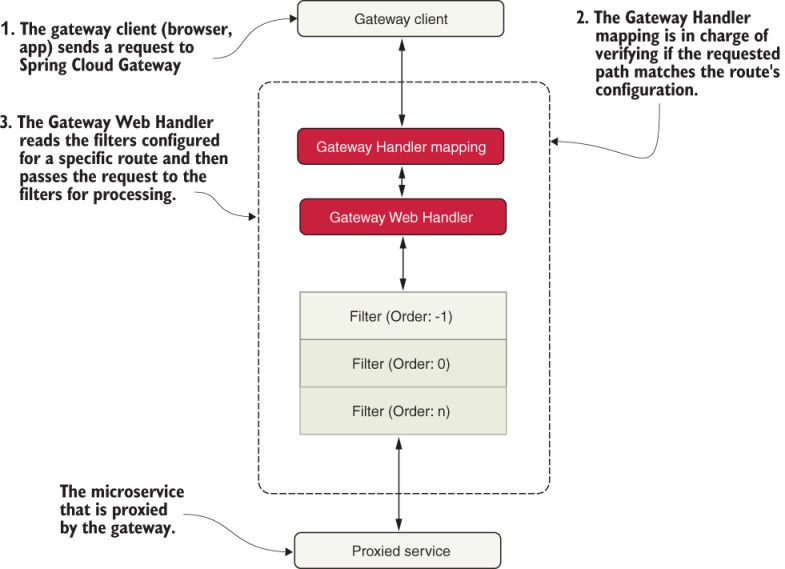
Figure 8.9 How the Spring Cloud Gateway architecture applies the predicates and filters when a request is made.
First, the gateway client (browsers, apps, and so forth) sends a request to Spring Cloud Gateway. Once that request is received, it goes directly to the Gateway Handler that is in charge of verifying that the requested path matches the configuration of the specific route it is trying to access. If everything matches, it enters the Gateway Web Handler that is in charge of reading the filters and sending the request to those filters for further processing. Once the request passes all the filters, it is forwarded to the routing configuration: a microservice.
8.4.1 Built-in Predicate Factories
Built-in predicates are objects that allow us to check if the requests fulfill a set of conditions before executing or processing the requests. For each route, we can set multiple Predicate Factories, which are used and combined via the logical AND. Table 8.1 lists all the built-in Predicate Factories in Spring Cloud Gateway.
These predicates can be applied in the code programmatically or via configurations, like the ones we created in the previous sections. In this book, we only use them via the configuration file under the predicates section, like this:
predicates:
    - Path=/organization/**
Table 8.1 Built-in predicates in Spring Cloud Gateway
8.4.2 Built-in Filter Factories
The built-in Filter Factories allow us to inject policy enforcement points in our code and perform a wide number of actions on all service calls in a consistent fashion. In other words, these filters let us modify the incoming and outgoing HTTP requests and responses. Table 8.2 contains a list of all the built-in filters in Spring Cloud Gateway.
Table 8.2 Built-in filters in Spring Cloud Gateway
8.4.3 Custom filters
The ability to proxy all requests through the gateway lets us simplify our service invocations. But the real power of Spring Cloud Gateway comes into play when we want to write custom logic that can be applied against all the service calls flowing through the gateway. Most often, this custom logic is used to enforce a consistent set of application policies like security, logging, and tracking among all the services.
The Spring Cloud Gateway allows us to build custom logic using a filter within the gateway. Remember, a filter allows us to implement a chain of business logic that each service request passes through as it’s implemented. Spring Cloud Gateway supports the following two types of filters. Figure 8.10 shows how the pre- and post-filters fit together when processing a service client’s request.
-
Pre-filters—A pre-filter is invoked before the actual request is sent to the target destination. A pre-filter usually carries out the task of making sure that the service has a consistent message format (key HTTP headers are in place, for example) or acts as a gatekeeper to ensure that the user calling the service is authenticated (they are whom they say they are).
-
Post-filters—A post-filter is invoked after the target service, and a response is sent back to the client. Usually, we implement a post-filter to log the response back from the target service, handle errors, or audit the response for sensitive information.

Figure 8.10 The pre-filters, target route, and post-filters form a pipeline in which a client request flows. As a request comes into the gateway, custom filters can manipulate the incoming request.
If we follow the flow laid out in figure 8.10, everything starts with a service client making a call to a service that’s exposed through the service gateway. From there, the following takes place:
-
Any pre-filters defined in the gateway are invoked as a request enters the gateway. The pre-filters inspect and modify an HTTP request before it gets to the actual service. A pre-filter, however, cannot redirect the user to a different endpoint or service.
-
After the pre-filters are executed against the incoming request by the gateway, the gateway determines the destination (where the service is heading).
-
After the target service is invoked, the gateway post-filters are invoked. The post-filters inspect and modify the response from the invoked service.
The best way to understand how to implement the gateway filters is to see them in action. To this end, in the next several sections, we’ll build pre- and post-filters and then run client requests through them. Figure 8.11 shows how these filters will fit together in processing requests for our O-stock services.
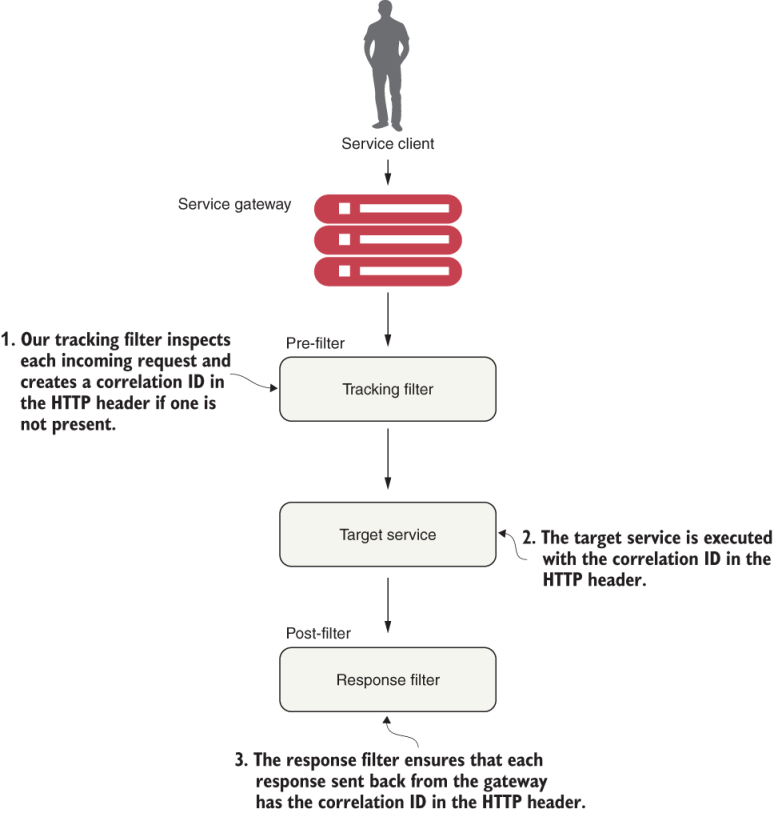
Figure 8.11 Gateway filters provide centralized tracking of service calls and logging. These filters allow us to enforce custom rules and policies against microservice calls.
Following the flow in figure 8.11, we can see the following custom filters in use:
-
Tracking filter—The tracking filter is a pre-filter that ensures that every request flowing from the gateway has a correlation ID associated with it. A correlation ID is a unique ID that gets carried across all the microservices that are executed when carrying out a customer request. A correlation ID allows us to trace the chain of events that occur as a call goes through a series of microservice calls.
-
Target service—The target service can either be an organization or the licensing service. Both services receive the correlation ID in the HTTP request header.
-
Response filter—The response filter is a post-filter that injects the correlation ID associated with the service call into the HTTP response header sent to the client. This way, the client will have access to the correlation ID associated with the request.
8.5 Building the pre-filter
Building filters in the Spring Cloud Gateway is straightforward. To begin, we’ll build a pre-filter, called TrackingFilter, that will inspect all incoming requests to the gateway and determine whether there’s an HTTP header called tmx-correlation-id present in the request. The tmx-correlation-id header will contain a unique GUID (Globally Universal ID) that can be used to track a user’s request across multiple microservices:
-
If the
tmx-correlation-idisn’t present on the HTTP header, our gatewayTrackingFilterwill generate and set the correlation ID. -
If there’s already a correlation ID present, the gateway won’t do anything. (The presence of a correlation ID means that this particular service call is part of a chain of service calls carrying out the user’s request.)
NOTE We discussed the concept of a correlation ID in chapter 7. Here, we’ll walk through how to use Spring Cloud Gateway to generate a correlation ID in more detail. If you skipped around in the book, we highly recommend you look at chapter 7 and read the section on thread context. Our implementation of correlation IDs will be implemented using ThreadLocal variables, and there’s extra work to do in order to have your ThreadLocal variables work.
Let’s go ahead and look at the implementation of the TrackingFilter in listing 8.8. You can also find this code in the book samples directories in the class file /gatewayserver/src/main/java/com/optimagrowth/gateway/filters/TrackingFilter.java.
Listing 8.8 Pre-filter for generating correlation IDs
package com.optimagrowth.gateway.filters;
//Other imports omitted for conciseness

import org.springframework.http.HttpHeaders;
import reactor.core.publisher.Mono;

@Order(1)
@Component
public class TrackingFilter
             implements GlobalFilter {                                     ❶

    private static final Logger logger =
             LoggerFactory.getLogger(TrackingFilter.class);

    @Autowired
    FilterUtils filterUtils;                                               ❷

    @Override
    public Mono<Void> filter(ServerWebExchange exchange,
                      GatewayFilterChain chain) {                          ❸

       HttpHeaders requestHeaders =
           exchange.getRequest().getHeaders();                             ❹
       if (isCorrelationIdPresent(requestHeaders)) {
            logger.debug(
               "tmx-correlation-id found in tracking filter: {}. ",
               filterUtils.getCorrelationId(requestHeaders));
       } else {
            String correlationID = generateCorrelationId();
            exchange = filterUtils.setCorrelationId(exchange,
                   correlationID);
            logger.debug(
               "tmx-correlation-id generated in tracking filter: {}.",
               correlationID);
       }
       return chain.filter(exchange);
    }

    private boolean isCorrelationIdPresent(HttpHeaders
               requestHeaders) {                                           ❺
       if (filterUtils.getCorrelationId(requestHeaders) != null) {
            return true;
       } else {
            return false;
       }
    }

    private String generateCorrelationId() {                               ❻
       return java.util.UUID.randomUUID().toString();
    }
}
❶ Global filters implement the GlobalFilter interface and must override the filter() method.
❷ Commonly used functions across your filters are encapsulated in the FilterUtils class.
❸ Code that executes every time a request passes through the filter
❹ Extracts the HTTP header from the request using the ServerWebExchange object passed by parameters to the filter() method
❺ A helper method that checks if there’s a correlation ID in the request header
❻ A helper method that checks if the tmx-correlation-id is present; it can also generate a correlation ID UUID value.
To create a global filter in the Spring Cloud Gateway, we need to implement the GlobalFilter class and then override the filter() method. This method contains the business logic that the filter implements. Another critical point to note from the previous code is the way that we obtain the HTTP headers from the ServerWebExchange object:
HttpHeaders requestHeaders = exchange.getRequest().getHeaders();
We’ve implemented a class called FilterUtils, which encapsulates common function-ality used by all the filters. It’s located in the /gatewayserver/src/main/java/com/ optimagrowth/gateway/filters/FilterUtils.java file. We’re not going to walk through the entire FilterUtils class, but we’ll discuss several key methods: getCorrelationId() and setCorrelationId(). The following listing shows the code for the FilterUtils getCorrelationId() method.
Listing 8.9 Retrieving the tmx-correlation-id with getCorrelationId
public String getCorrelationId(HttpHeaders requestHeaders){
   if (requestHeaders.get(CORRELATION_ID) !=null) {
      List<String> header = requestHeaders.get(CORRELATION_ID);
      return header.stream().findFirst().get();
   } else{
      return null;
   }
}
The key thing to notice in listing 8.9 is that we first check to see if tmx-correlation-ID is already set on the HTTP headers for the incoming request. If it isn’t there, our code should return null to create one later on. You may remember that earlier, in the filter() method in our TrackingFilter class, we did exactly this with the following code:
} else {
  String correlationID = generateCorrelationId();
  exchange = filterUtils.setCorrelationId(exchange, correlationID);
  logger.debug("tmx-correlation-id generated in tracking filter: {}.",
                correlationID);
}
To set tmx-correlation-id, you’ll use the FilterUtils setCorrelationId() method as shown in the following listing.
Listing 8.10 Setting the tmx-correlation-id in the HTTP headers
public ServerWebExchange setRequestHeader(ServerWebExchange exchange,
                                          String name, String value) {
   return exchange.mutate().request(
      exchange.getRequest().mutate()
      .header(name, value)
      .build())
      .build();
   }

public ServerWebExchange setCorrelationId(ServerWebExchange exchange,
           String correlationId) {
      return this.setRequestHeader(exchange,CORRELATION_ID,correlationId);
}
With the FilterUtils setCorrelationId() method, when we want to add a value to the HTTP request headers, we can use the ServerWebExchange.Builder mutate() method. This method returns a builder to mutate properties of the exchange object by wrapping it with ServerWebExchangeDecorator and either returning mutated values or delegating it back to this instance. To test this call, we can call our organization or licensing service. Once the call is submitted, we should see a log message in the console that writes out the passed-in correlation ID as it flows through the filter:
gatewayserver_1 | 2020-04-14 22:31:23.835 DEBUG 1 --- [or-http-epoll-3] c.o.gateway.filters.TrackingFilter : tmx-correlation-id generated in tracking filter: 735d8a31-b4d1-4c13-816d-c31db20afb6a.
If you don’t see the message on your console, just add the code lines shown in the following listing to the bootstrap.yml configuration file of the Gateway server. Then build again and execute your microservices.
Listing 8.11 Logger configuration in the Gateway service bootstrap.yml file
//Some code removed for conciseness
logging:
  level:
    com.netflix: WARN
    org.springframework.web: WARN
    com.optimagrowth: DEBUG
If you are using Docker, you can execute the following commands in the root directory where the parent pom.xml is located:
mvn clean package dockerfile:build
docker-compose -f docker/docker-compose.yml up
8.6 Using the correlation ID in the services
Now that we’ve guaranteed that a correlation ID has been added to every microservice call flowing through the gateway, we want to ensure that
-
The correlation ID is readily accessible to the microservice that’s invoked.
-
Any downstream service calls the microservice might make also propagate the correlation ID on to the downstream calls.
To implement this, we’ll build a set of three classes for each of our microservices: UserContextFilter, UserContext, and UserContextInterceptor. These classes will work together to read the correlation ID (along with other information we’ll add later) of the incoming HTTP request, map it to a class that’s easily accessible and useable by the business logic in the application, and then ensure that the correlation ID is propagated to any downstream service calls. Figure 8.12 demonstrates how we will build these different pieces for our licensing service.

Figure 8.12 Using a set of common classes so that the correlation ID can be propagated to downstream service calls
Let’s walk through what’s happening in figure 8.12:
-
When a call is made to the licensing service through the gateway, the
TrackingFilterinjects a correlation ID into the incoming HTTP header for any calls coming into the gateway. -
The
UserContextFilterclass, a custom HTTPServletFilter, maps a correlation ID to theUserContextclass. TheUserContextclass stores the values in a thread for use later in the call. -
The licensing service business logic executes a call to the organization service.
-
A
RestTemplateinvokes the organization service. TheRestTemplateuses a custom Spring interceptor class,UserContextInterceptor, to inject the correlation ID into the outbound call as an HTTP header.
8.6.1 UserContextFilter: Intercepting the incoming HTTP request
The first class we’re going to build is the UserContextFilter class. This class is an HTTP servlet filter that will intercept all incoming HTTP requests coming into the service and map the correlation ID (and a few other values) from the HTTP request to the UserContext class. The following listing shows the code for the UserContext class in the licensing-service/src/main/java/com/optimagrowth/license/utils/UserContextFilter .java class file.
Listing 8.12 Mapping the correlation ID to the UserContext class
package com.optimagrowth.license.utils;
//Removed the imports for conciseness

@Component
public class UserContextFilter implements Filter {                         ❶
   private static final Logger logger =

   LoggerFactory.getLogger(UserContextFilter.class);

   @Override
   public void doFilter(ServletRequest servletRequest, ServletResponse
                        servletResponse, FilterChain filterChain)
                          throws IOException, ServletException {

      HttpServletRequest httpServletRequest = (HttpServletRequest)
                                               servletRequest;

      UserContextHolder.getContext()
           .setCorrelationId(                                              ❷
           httpServletRequest.getHeader(UserContext.CORRELATION_ID) );
      UserContextHolder.getContext().setUserId(
           httpServletRequest.getHeader(UserContext.USER_ID));
      UserContextHolder.getContext().setAuthToken(
           httpServletRequest.getHeader(UserContext.AUTH_TOKEN));
      UserContextHolder.getContext().setOrganizationId(
           httpServletRequest.getHeader(UserContext.ORGANIZATION_ID));

      logger.debug("UserContextFilter Correlation id: {}",
                    UserContextHolder.getContext().getCorrelationId());

      filterChain.doFilter(httpServletRequest, servletResponse);
   }
   // Not showing the empty init and destroy methods
}
❶ Registers the filter that’s picked up by Spring through @Component and a javax.servlet.Filter interface implementation
❷ Retrieves the correlation ID from the header and sets the value in the UserContext class
Ultimately, the UserContextFilter will map the HTTP header values you’re interested in to a Java UserContext class.
8.6.2 UserContext: Making the HTTP headers easily accessible to the service
The UserContext class holds the HTTP header values for an individual service client request that is processed by our microservice. It consists of getter/setter methods that retrieve and store values from java.lang.ThreadLocal. The following listing shows the code from the UserContext class, which you’ll find in /licensing-service/src/ main/java/com/optimagrowth/license/utils/UserContext.java.
Listing 8.13 Storing the HTTP header values inside the UserContext class
//Removed the imports for conciseness
@Component
public class UserContext {
    public static final String CORRELATION_ID = "tmx-correlation-id";
    public static final String AUTH_TOKEN     = "tmx-auth-token";
    public static final String USER_ID        = "tmx-user-id";
    public static final String ORGANIZATION_ID = "tmx-organization-id";

    private String correlationId= new String();
    private String authToken= new String();
    private String userId = new String();
    private String organizationId = new String();
}
Here the UserContext class is nothing more than a POJO holding the values scraped from the incoming HTTP request. Next, we’ll use a UserContextHolder class found in /licensing-service/src/main/java/com/optimagrowth/license/utils/ UserContextHolder.java to store the UserContext in a ThreadLocal variable that is accessible by any method being invoked by the thread processing the user’s request. The following listing shows the code for the UserContextHolder class.
Listing 8.14 The UserContextHolder stores the UserContext in a ThreadLocal
public class UserContextHolder {
    private static final ThreadLocal<UserContext> userContext =
                                 new ThreadLocal<UserContext>();

    public static final UserContext getContext(){
        UserContext context = userContext.get();

        if (context == null) {
            context = createEmptyContext();
            userContext.set(context);

        }
        return userContext.get();
    }

    public static final void setContext(UserContext context) {
        Assert.notNull(context,
           "Only non-null UserContext instances are permitted");
        userContext.set(context);
    }

    public static final UserContext createEmptyContext(){
        return new UserContext();
    }
}
8.6.3 Custom RestTemplate and UserContextInterceptor: Ensuring that the correlation ID gets propagated
The last piece of code that we’ll look at is the UserContextInterceptor class. This class injects the correlation ID into any outgoing HTTP-based service request that’s executed from a RestTemplate instance. This is done to ensure that we can establish a link between service calls. To do this, we’ll use a Spring interceptor that’s injected into the RestTemplate class. Let’s look at the UserContextInterceptor in the following listing.
Listing 8.15 Injecting the correlation ID into all outgoing microservice calls
public class UserContextInterceptor implements
           ClientHttpRequestInterceptor {                                  ❶
     private static final Logger logger =
LoggerFactory.getLogger(UserContextInterceptor.class);
     @Override
     public ClientHttpResponse intercept(                                  ❷
                HttpRequest request, byte[] body,
                ClientHttpRequestExecution execution)  throws IOException {
        HttpHeaders headers = request.getHeaders();
        headers.add(UserContext.CORRELATION_ID,
                UserContextHolder.getContext().
                getCorrelationId());                                       ❸
        headers.add(UserContext.AUTH_TOKEN,
                UserContextHolder.getContext().
                getAuthToken());

        return execution.execute(request, body);
     }
}
❶ Implements ClientHttpRequestInterceptor
❷ Invokes intercept() before the actual HTTP service call occurs by the RestTemplate
❸ Takes the HTTP request header that’s being prepared for the outgoing service call and adds the correlation ID stored in the UserContext
To use UserContextInterceptor, we need to define a RestTemplate bean and then add UserContextInterceptor to it. To do this, we’ll define our own RestTemplate bean in the LicenseServiceApplication class. You’ll find the source for this class in /licensing-service/src/main/java/com/optimagrowth/license/. The following listing shows the method that’s added to this RestTemplate.
Listing 8.16 Adding the UserContextInterceptor to the RestTemplate class
@LoadBalanced                                                      ❶
@Bean
public RestTemplate getRestTemplate(){
   RestTemplate template = new RestTemplate();
   List interceptors = template.getInterceptors();
      if (interceptors==null){                                     ❷
          template.setInterceptors(Collections.singletonList(
                  new UserContextInterceptor()));
   }else{
      interceptors.add(new UserContextInterceptor());
      template.setInterceptors(interceptors);
   }

   return template;
}‘
❶ Indicates that this RestTemplate object is going to use the load balancer
❷ Adds UserContextInterceptor to the RestTemplate instance
With this bean definition in place, any time we use the @Autowired annotation and inject a RestTemplate into a class, we’ll use the RestTemplate created in listing 8.16 with the UserContextInterceptor attached to it.
8.7 Building a post-filter receiving correlation ID
Remember, Spring Gateway executes the actual HTTP call on behalf of the service client and inspects the response back from the target service call. It then alters the response or decorates it with additional information. When coupled with capturing data with the pre-filter, a gateway post-filter is an ideal location to collect metrics and complete any logging associated with the user’s transaction. We’ll want to take advantage of this by injecting the correlation ID that we’ve been passing around to our microservices back to the user. This way, we can pass the correlation ID back to the caller without ever having to touch the message body.
The following listing shows the code for building a post-filter. You can find this code in the /gatewayserver/src/main/java/com/optimagrowth/gateway/filters/ ResponseFilter.java file.
Listing 8.17 Injecting the correlation ID into the HTTP response
@Configuration
public class ResponseFilter {

   final Logger logger =LoggerFactory.getLogger(ResponseFilter.class);

   @Autowired
   FilterUtils filterUtils;

   @Bean
   public GlobalFilter postGlobalFilter() {
      return (exchange, chain) -> {
         return chain.filter(exchange).then(Mono.fromRunnable(() -> {
           HttpHeaders requestHeaders = exchange.getRequest().getHeaders();
           String correlationId =
                filterUtils.
                getCorrelationId(requestHeaders);                          ❶
           logger.debug(
               "Adding the correlation id to the outbound headers. {}",
                         correlationId);
               exchange.getResponse().getHeaders().
               add(FilterUtils.CORRELATION_ID,                             ❷
               correlationId);
           logger.debug("Completing outgoing request
                          for {}.",                                        ❸
                          exchange.getRequest().getURI());
           }));
         };
    }
}
❶ Grabs the correlation ID that was passed in to the original HTTP request
❷ Injects the correlation ID into the response
❸ Logs the outgoing request URI so that you have “bookends” that show the incoming and outgoing entry of the user’s request into the gateway
Once we’ve implemented the ResponseFilter, we can fire up our service and call the licensing or organization service with it. Once the service completes, you’ll see a tmx-correlation-id on the HTTP response header from the call, as figure 8.13 shows.

Figure 8.13 The tmx-correlation-id added to the response headers and sent back to the service client
You can also see the log messages in the console (figure 8.14), which write the passed-in correlation ID, e3f6a72b-7d6c-41da-ac12-fb30fcd1e547, as it flows through the pre- and post-filters.
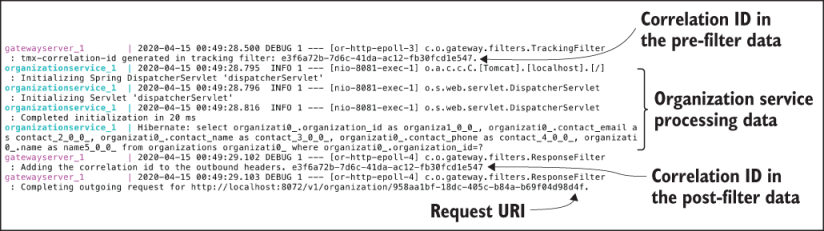
Figure 8.14 Logger output that shows the pre-filter data, the organization service processing data, and the post-filter data
Up to this point, all our filter examples have dealt with manipulating the service client calls before and after they were routed to a target destination. Now, that we know how to create a Spring Cloud Gateway, let’s move on with our next chapter that describes how to secure our microservices using Keycloak and OAuth2.
Summary
-
Spring Cloud Gateway contains a set of built-in Predicate and Filter Factories.
-
Predicates are objects that allow us to check if the requests fulfill a set of given conditions before executing or processing a request.
-
Filters allow us to modify the incoming and outgoing HTTP requests and responses.
-
The Spring Cloud Gateway integrates with Netflix’s Eureka Server and can automatically map services registered with Eureka to a route.
-
Using the Spring Cloud Gateway, you can manually define route mappings in the application’s configuration files.
-
By using Spring Cloud Config Server, you can dynamically reload the route mappings without having to restart the Gateway server.
-
Spring Cloud Gateway allows you to implement custom business logic through filters. With Spring Cloud Gateway, you can create pre- and post-filters.
-
Pre-filters can be used to generate a correlation ID that can be injected into every service flowing through the gateway.
-
Post-filters can be used to inject a correlation ID into every HTTP service response back to a service client.