
3 Working with data
- Using Spring’s
JdbcTemplate - Creating Spring Data JDBC repositories
- Declaring JPA repositories with Spring Data
Most applications offer more than just a pretty face. Although the user interface may provide interaction with an application, it’s the data it presents and stores that separates applications from static websites.
In the Taco Cloud application, you need to be able to maintain information about ingredients, tacos, and orders. Without a database to store this information, the application wouldn’t be able to progress much further than what you developed in chapter 2.
In this chapter, you’re going to add data persistence to the Taco Cloud application. You’ll start by using Spring support for JDBC (Java Database Connectivity) to eliminate boilerplate code. Then you’ll rework the data repositories to work with JPA (Java Persistence API), eliminating even more code.
3.1 Reading and writing data with JDBC
For decades, relational databases and SQL have enjoyed their position as the leading choice for data persistence. Even though many alternative database types have emerged in recent years, the relational database is still a top choice for a general-purpose data store and will not likely be usurped from its position any time soon.
When it comes to working with relational data, Java developers have several options. The two most common choices are JDBC and JPA. Spring supports both with abstractions, making working with either JDBC or JPA easier than it would be without Spring. In this section, we’ll focus on how Spring supports JDBC, and then we’ll look at Spring support for JPA in section 3.3.
Spring JDBC support is rooted in the JdbcTemplate class. JdbcTemplate provides a means by which developers can perform SQL operations against a relational database without all the ceremony and boilerplate typically required when working with JDBC.
To gain an appreciation of what JdbcTemplate does, let’s start by looking at an example of how to perform a simple query in Java without JdbcTemplate.
Listing 3.1 Querying a database without JdbcTemplate
@Override
public Optional<Ingredient> findById(String id) {
  Connection connection = null;
  PreparedStatement statement = null;
  ResultSet resultSet = null;
  try {
    connection = dataSource.getConnection();
    statement = connection.prepareStatement(
        "select id, name, type from Ingredient where id=?");
    statement.setString(1, id);
    resultSet = statement.executeQuery();
    Ingredient ingredient = null;
    if(resultSet.next()) {
      ingredient = new Ingredient(
          resultSet.getString("id"),
          resultSet.getString("name"),
          Ingredient.Type.valueOf(resultSet.getString("type")));
    }
    return Optional.of(ingredient);
  } catch (SQLException e) {
    // ??? What should be done here ???
  } finally {
    if (resultSet != null) {
      try {
        resultSet.close();
      } catch (SQLException e) {}
    }
    if (statement != null) {
      try {
        statement.close();
      } catch (SQLException e) {}
    }
    if (connection != null) {
      try {
        connection.close();
      } catch (SQLException e) {}
    }
  }
  return Optional.empty();
}
I assure you that somewhere in listing 3.1 are a couple of lines that query the database for ingredients. But I’ll bet you had a hard time spotting that query needle in the JDBC haystack. It’s surrounded by code that creates a connection, creates a statement, and cleans up by closing the connection, statement, and result set.
To make matters worse, any number of things could go wrong when creating the connection or the statement, or when performing the query. This requires that you catch a SQLException, which may or may not be helpful in figuring out what went wrong or how to address the problem.
SQLException is a checked exception, which requires handling in a catch block. But the most common problems, such as failure to create a connection to the database or a mistyped query, can’t possibly be addressed in a catch block and are likely to be rethrown for handling upstream. In contrast, consider the following method that uses Spring’s JdbcTemplate.
Listing 3.2 Querying a database with JdbcTemplate
private JdbcTemplate jdbcTemplate;

public Optional<Ingredient> findById(String id) {
  List<Ingredient> results = jdbcTemplate.query(
      "select id, name, type from Ingredient where id=?",
      this::mapRowToIngredient,
      id);
  return results.size() == 0 ?
          Optional.empty() :
          Optional.of(results.get(0));
}
private Ingredient mapRowToIngredient(ResultSet row, int rowNum)
    throws SQLException {
  return new Ingredient(
      row.getString("id"),
      row.getString("name"),
      Ingredient.Type.valueOf(row.getString("type")));
}
The code in listing 3.2 is clearly much simpler than the raw JDBC example in listing 3.1; there aren’t any statements or connections being created. And, after the method is finished, there isn’t any cleanup of those objects. Finally, there isn’t any handling of exceptions that can’t properly be handled in a catch block. What’s left is code that’s focused solely on performing a query (the call to JdbcTemplate’s query() method) and mapping the results to an Ingredient object (handled by the mapRowToIngredient() method).
The code in listing 3.2 is a snippet of what you need to do to use JdbcTemplate to persist and read data in the Taco Cloud application. Let’s take the next steps necessary to outfit the application with JDBC persistence. We’ll start by making a few tweaks to the domain objects.
3.1.1 Adapting the domain for persistence
When persisting objects to a database, it’s generally a good idea to have one field that uniquely identifies the object. Your Ingredient class already has an id field, but you need to add id fields to both Taco and TacoOrder as well.
Moreover, it might be useful to know when a Taco is created and when a TacoOrder is placed. You’ll also need to add a field to each object to capture the date and time that the objects are saved. The following listing shows the new id and createdAt fields needed in the Taco class.
Listing 3.3 Adding ID and timestamp fields to the Taco class
Because you use Lombok to automatically generate accessor methods at run time, there’s no need to do anything more than declare the id and createdAt properties. They’ll have appropriate getter and setter methods as needed at run time. Similar changes are required in the TacoOrder class, as shown here:
@Data
public class TacoOrder implements Serializable {

  private static final long serialVersionUID = 1L;

  private Long id;

  private Date placedAt;
  // ...

}
Again, Lombok automatically generates the accessor methods, so these are the only changes required in TacoOrder. If for some reason you choose not to use Lombok, you’ll need to write these methods yourself.
Your domain classes are now ready for persistence. Let’s see how to use JdbcTemplate to read and write them to a database.
3.1.2 Working with JdbcTemplate
Before you can start using JdbcTemplate, you need to add it to your project classpath. You can do this easily by adding Spring Boot’s JDBC starter dependency to the build as follows:
<dependency>
  <groupId>org.springframework.boot</groupId>
  <artifactId>spring-boot-starter-jdbc</artifactId>
</dependency>
You’re also going to need a database where your data will be stored. For development purposes, an embedded database will be just fine. I favor the H2 embedded database, so I’ve added the following dependency to the build:
<dependency>
  <groupId>com.h2database</groupId>
  <artifactId>h2</artifactId>
  <scope>runtime</scope>
</dependency>
By default, the database name is randomly generated. But that makes it hard to determine the database URL if, for some reason, you need to connect to the database using the H2 console (which Spring Boot DevTools enables at http://localhost:8080/h2-console). So, it’s a good idea to pin down the database name by setting a couple of properties in application.properties, as shown next:
Or, if you prefer, rename application.properties to application.yml and add the properties in YAML format like so:
The choice between properties file format and YAML format is up to you. Spring Boot is happy to work with either. Given the structure and increased readability of YAML, we’ll use YAML for configuration properties throughout the rest of the book.
By setting the spring.datasource.generate-unique-name property to false, we’re telling Spring to not generate a unique random value for the database name. Instead, it should use the value set to the spring.datasource.name property. In this case, the database name will be "tacocloud". Consequently, the database URL will be "jdbc:h2:mem:tacocloud", which you can specify in the JDBC URL for the H2 console connection.
Later, you’ll see how to configure the application to use an external database. But for now, let’s move on to writing a repository that fetches and saves Ingredient data.
Your Ingredient repository needs to perform the following operations:
The following IngredientRepository interface defines those three operations as method declarations:
package tacos.data;

import java.util.Optional;

import tacos.Ingredient;

public interface IngredientRepository {

  Iterable<Ingredient> findAll();

  Optional<Ingredient> findById(String id);

  Ingredient save(Ingredient ingredient);

}
Although the interface captures the essence of what you need an ingredient repository to do, you’ll still need to write an implementation of IngredientRepository that uses JdbcTemplate to query the database. The code shown next is the first step in writing that implementation.
Listing 3.4 Beginning an ingredient repository with JdbcTemplate
package tacos.data;
import java.sql.ResultSet;
import java.sql.SQLException;

import org.springframework.jdbc.core.JdbcTemplate;
import org.springframework.stereotype.Repository;

import tacos.Ingredient;

@Repository
public class JdbcIngredientRepository implements IngredientRepository {

  private JdbcTemplate jdbcTemplate;

  public JdbcIngredientRepository(JdbcTemplate jdbcTemplate) {
    this.jdbcTemplate = jdbcTemplate;
  }

  // ...

}
As you can see, JdbcIngredientRepository is annotated with @Repository. This annotation is one of a handful of stereotype annotations that Spring defines, including @Controller and @Component. By annotating JdbcIngredientRepository with @Repository, you declare that it should be automatically discovered by Spring component scanning and instantiated as a bean in the Spring application context.
When Spring creates the JdbcIngredientRepository bean, it injects it with JdbcTemplate. That’s because when there’s only one constructor, Spring implicitly applies autowiring of dependencies through that constructor’s parameters. If there is more than one constructor, or if you just want autowiring to be explicitly stated, then you can annotate the constructor with @Autowired as follows:
@Autowired
public JdbcIngredientRepository(JdbcTemplate jdbcTemplate) {
  this.jdbcTemplate = jdbcTemplate;
}
The constructor assigns JdbcTemplate to an instance variable that will be used in other methods to query and insert into the database. Speaking of those other methods, let’s take a look at the implementations of findAll() and findById(), shown in the code sample.
Listing 3.5 Querying the database with JdbcTemplate
@Override
public Iterable<Ingredient> findAll() {
  return jdbcTemplate.query(
      "select id, name, type from Ingredient",
      this::mapRowToIngredient);
}

@Override
public Optional<Ingredient> findById(String id) {
  List<Ingredient> results = jdbcTemplate.query(
      "select id, name, type from Ingredient where id=?",
      this::mapRowToIngredient,
      id);
  return results.size() == 0 ?
          Optional.empty() :
          Optional.of(results.get(0));
}

private Ingredient mapRowToIngredient(ResultSet row, int rowNum)
    throws SQLException {
  return new Ingredient(
      row.getString("id"),
      row.getString("name"),
      Ingredient.Type.valueOf(row.getString("type")));
}
Both findAll() and findById() use JdbcTemplate in a similar way. The findAll() method, expecting to return a collection of objects, uses JdbcTemplate’s query() method. The query() method accepts the SQL for the query as well as an implementation of Spring’s RowMapper for the purpose of mapping each row in the result set to an object. query() also accepts as its final argument(s) a list of any parameters required in the query. But, in this case, there aren’t any required parameters.
In contrast, the findById() method will need to include a where clause in its query to compare the value of the id column with the value of the id parameter passed into the method. Therefore, the call to query() includes, as its final parameter, the id parameter. When the query is performed, the ? will be replaced with this value.
As shown in listing 3.5, the RowMapper parameter for both findAll() and findById() is given as a method reference to the mapRowToIngredient() method. Java’s method references and lambdas are convenient when working with JdbcTemplate as an alternative to an explicit RowMapper implementation. If for some reason you want or need an explicit RowMapper, then the following implementation of findById() shows how to do that:
@Override
public Ingredient findById(String id) {
  return jdbcTemplate.queryForObject(
      "select id, name, type from Ingredient where id=?",
      new RowMapper<Ingredient>() {
        public Ingredient mapRow(ResultSet rs, int rowNum)
            throws SQLException {
          return new Ingredient(
              rs.getString("id"),
              rs.getString("name"),
              Ingredient.Type.valueOf(rs.getString("type")));
        };
      }, id);
}
Reading data from a database is only part of the story. At some point, data must be written to the database so that it can be read. Let’s see about implementing the save() method.
JdbcTemplate’s update() method can be used for any query that writes or updates data in the database. And, as shown in the following listing, it can be used to insert data into the database.
Listing 3.6 Inserting data with JdbcTemplate
@Override
public Ingredient save(Ingredient ingredient) {
  jdbcTemplate.update(
      "insert into Ingredient (id, name, type) values (?, ?, ?)",
      ingredient.getId(),
      ingredient.getName(),
      ingredient.getType().toString());
  return ingredient;
}
Because it isn’t necessary to map ResultSet data to an object, the update() method is much simpler than query(). It requires only a String containing the SQL to perform as well as values to assign to any query parameters. In this case, the query has three parameters, which correspond to the final three parameters of the save() method, providing the ingredient’s ID, name, and type.
With JdbcIngredientRepository complete, you can now inject it into DesignTacoController and use it to provide a list of Ingredient objects instead of using hardcoded values (as you did in chapter 2). The changes to DesignTacoController are shown next.
Listing 3.7 Injecting and using a repository in the controller
@Controller
@RequestMapping("/design")
@SessionAttributes("tacoOrder")
public class DesignTacoController {

  private final IngredientRepository ingredientRepo;

  @Autowired
  public DesignTacoController(
        IngredientRepository ingredientRepo) {
    this.ingredientRepo = ingredientRepo;
  }

  @ModelAttribute
  public void addIngredientsToModel(Model model) {
    Iterable<Ingredient> ingredients = ingredientRepo.findAll();
    Type[] types = Ingredient.Type.values();
    for (Type type : types) {
      model.addAttribute(type.toString().toLowerCase(),
          filterByType(ingredients, type));
    }
  }


  // ...
}
The addIngredientsToModel() method uses the injected IngredientRepository’s findAll() method to fetch all ingredients from the database. It then filters them into distinct ingredient types before adding them to the model.
Now that we have an IngredientRepository from which to fetch Ingredient objects, we can also simplify the IngredientByIdConverter that we created in chapter 2, replacing its hardcoded Map of Ingredient objects with a simple call to the IngredientRepository.findById() method, as shown next.
Listing 3.8 Simplifying IngredientByIdConverter
package tacos.web;

import org.springframework.beans.factory.annotation.Autowired;
import org.springframework.core.convert.converter.Converter;
import org.springframework.stereotype.Component;

import tacos.Ingredient;
import tacos.data.IngredientRepository;

@Component
public class IngredientByIdConverter implements Converter<String, Ingredient> {

  private IngredientRepository ingredientRepo;

  @Autowired
  public IngredientByIdConverter(IngredientRepository ingredientRepo) {
    this.ingredientRepo = ingredientRepo;
  }

  @Override
  public Ingredient convert(String id) {
    return ingredientRepo.findById(id).orElse(null);
  }

}
You’re almost ready to fire up the application and try out these changes. But before you can start reading data from the Ingredient table referenced in the queries, you should probably create that table and populate it with some ingredient data.
3.1.3 Defining a schema and preloading data
Aside from the Ingredient table, you’re also going to need some tables that hold order and design information. Figure 3.1 illustrates the tables you’ll need, as well as the relationships between those tables.
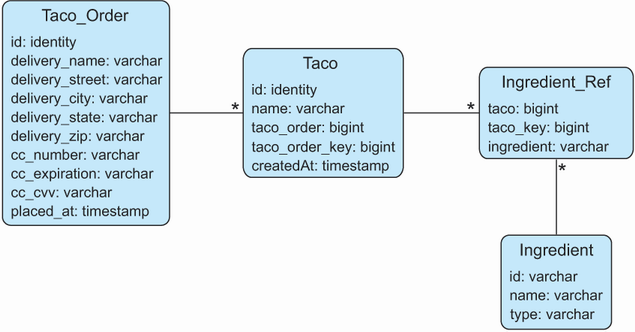
The tables in figure 3.1 serve the following purposes:
-
Ingredient_Ref—Contains one or more rows for each row inTaco, mapping the taco to the ingredients for that taco
In our application, a Taco can’t exist outside of the context of a Taco_Order. Thus, Taco_Order and Taco are considered members of an aggregate where Taco_Order is the aggregate root. Ingredient objects, on the other hand, are sole members of their own aggregate and are referenced by Taco by way of Ingredient_Ref.
Note Aggregates and aggregate roots are core concepts of domain-driven design, a design approach that promotes the idea that the structure and language of software code should match the business domain. Although we’re applying a little domain-driven design (DDD) in the Taco Cloud domain objects, there’s much more to DDD than aggregates and aggregate roots. For more on this subject, read the seminal work on the subject, Domain-Driven Design: Tackling Complexity in the Heart of Software (https://www.dddcommunity.org/book/evans_2003/), by Eric Evans.
The next listing shows the SQL that creates the tables.
Listing 3.9 Defining the Taco Cloud schema
create table if not exists Taco_Order (
  id identity,
  delivery_Name varchar(50) not null,
  delivery_Street varchar(50) not null,
  delivery_City varchar(50) not null,
  delivery_State varchar(2) not null,
  delivery_Zip varchar(10) not null,
  cc_number varchar(16) not null,
  cc_expiration varchar(5) not null,
  cc_cvv varchar(3) not null,
  placed_at timestamp not null
);

create table if not exists Taco (
  id identity,
  name varchar(50) not null,
  taco_order bigint not null,
  taco_order_key bigint not null,
  created_at timestamp not null
);

create table if not exists Ingredient_Ref (
  ingredient varchar(4) not null,
  taco bigint not null,
  taco_key bigint not null
);


create table if not exists Ingredient (
  id varchar(4) not null,
  name varchar(25) not null,
  type varchar(10) not null
);


alter table Taco
    add foreign key (taco_order) references Taco_Order(id);
alter table Ingredient_Ref
    add foreign key (ingredient) references Ingredient(id);
The big question is where to put this schema definition. As it turns out, Spring Boot answers that question.
If there’s a file named schema.sql in the root of the application’s classpath, then the SQL in that file will be executed against the database when the application starts. Therefore, you should place the contents of listing 3.9 in your project as a file named schema.sql in the src/main/resources folder.
You also need to preload the database with some ingredient data. Fortunately, Spring Boot will also execute a file named data.sql from the root of the classpath when the application starts. Therefore, you can load the database with ingredient data using the insert statements in the next listing, placed in src/main/resources/data.sql.
Listing 3.10 Preloading the database with data.sql
delete from Ingredient_Ref;
delete from Taco;
delete from Taco_Order;

delete from Ingredient;
insert into Ingredient (id, name, type)
                values ('FLTO', 'Flour Tortilla', 'WRAP');
insert into Ingredient (id, name, type)
                values ('COTO', 'Corn Tortilla', 'WRAP');
insert into Ingredient (id, name, type)
                values ('GRBF', 'Ground Beef', 'PROTEIN');
insert into Ingredient (id, name, type)
                values ('CARN', 'Carnitas', 'PROTEIN');
insert into Ingredient (id, name, type)
                values ('TMTO', 'Diced Tomatoes', 'VEGGIES');
insert into Ingredient (id, name, type)
                values ('LETC', 'Lettuce', 'VEGGIES');
insert into Ingredient (id, name, type)
                values ('CHED', 'Cheddar', 'CHEESE');
insert into Ingredient (id, name, type)
                values ('JACK', 'Monterrey Jack', 'CHEESE');
insert into Ingredient (id, name, type)
                values ('SLSA', 'Salsa', 'SAUCE');
insert into Ingredient (id, name, type)
                values ('SRCR', 'Sour Cream', 'SAUCE');
Even though you’ve only developed a repository for ingredient data, you can fire up the Taco Cloud application at this point and visit the design page to see JdbcIngredientRepository in action. Go ahead ... give it a try. When you get back, you’ll write the repositories for persisting Taco and TacoOrder data.
3.1.4 Inserting data
You’ve already had a glimpse into how to use JdbcTemplate to write data to the database. The save() method in JdbcIngredientRepository used the update() method of JdbcTemplate to save Ingredient objects to the database.
Although that was a good first example, it was perhaps a bit too simple. As you’ll soon see, saving data can be more involved than what JdbcIngredientRepository needed.
In our design, TacoOrder and Taco are part of an aggregate in which TacoOrder is the aggregate root. In other words, Taco objects don’t exist outside of the context of a TacoOrder. So, for now, we only need to define a repository to persist TacoOrder objects and, in turn, Taco objects along with them. Such a repository can be defined in a OrderRepository interface like this:
package tacos.data;

import java.util.Optional;

import tacos.TacoOrder;

public interface OrderRepository {

  TacoOrder save(TacoOrder order);

}
Seems simple enough, right? Not so quick. When you save a TacoOrder, you also must save the Taco objects that go with it. And when you save the Taco objects, you’ll also need to save an object that represents the link between the Taco and each Ingredient that makes up the taco. The IngredientRef class defines that linking between Taco and Ingredient as follows:
package tacos;

import lombok.Data;

@Data
public class IngredientRef {

  private final String ingredient;

}
Suffice it to say that the save() method will be a bit more interesting than the corresponding method you created earlier for saving a humble Ingredient object.
Another thing that the save() method will need to do is determine what ID is assigned to the order once it has been saved. Per the schema, the id property on the Taco_Order table is an identity, meaning that the database will determine the value automatically. But if the database determines the value for you, then you will need to know what that value is so that it can be returned in the TacoOrder object returned from the save() method. Fortunately, Spring offers a helpful GeneratedKeyHolder type that can help with that. But it involves working with a prepared statement, as shown in the following implementation of the save() method:
package tacos.data;

import java.sql.Types;
import java.util.Arrays;
import java.util.Date;
import java.util.List;
import java.util.Optional;

import org.springframework.asm.Type;
import org.springframework.jdbc.core.JdbcOperations;
import org.springframework.jdbc.core.PreparedStatementCreator;
import org.springframework.jdbc.core.PreparedStatementCreatorFactory;
import org.springframework.jdbc.support.GeneratedKeyHolder;
import org.springframework.stereotype.Repository;
import org.springframework.transaction.annotation.Transactional;

import tacos.IngredientRef;
import tacos.Taco;
import tacos.TacoOrder;

@Repository
public class JdbcOrderRepository implements OrderRepository {

  private JdbcOperations jdbcOperations;

  public JdbcOrderRepository(JdbcOperations jdbcOperations) {
    this.jdbcOperations = jdbcOperations;
  }

  @Override
  @Transactional
  public TacoOrder save(TacoOrder order) {
    PreparedStatementCreatorFactory pscf =
      new PreparedStatementCreatorFactory(
        "insert into Taco_Order "
        + "(delivery_name, delivery_street, delivery_city, "
        + "delivery_state, delivery_zip, cc_number, "
        + "cc_expiration, cc_cvv, placed_at) "
        + "values (?,?,?,?,?,?,?,?,?)",
        Types.VARCHAR, Types.VARCHAR, Types.VARCHAR,
        Types.VARCHAR, Types.VARCHAR, Types.VARCHAR,
        Types.VARCHAR, Types.VARCHAR, Types.TIMESTAMP
    );
    pscf.setReturnGeneratedKeys(true);

    order.setPlacedAt(new Date());
    PreparedStatementCreator psc =
        pscf.newPreparedStatementCreator(
            Arrays.asList(
                order.getDeliveryName(),
                order.getDeliveryStreet(),
                order.getDeliveryCity(),
                order.getDeliveryState(),
                order.getDeliveryZip(),
                order.getCcNumber(),
                order.getCcExpiration(),
                order.getCcCVV(),
                order.getPlacedAt()));

    GeneratedKeyHolder keyHolder = new GeneratedKeyHolder();
    jdbcOperations.update(psc, keyHolder);
    long orderId = keyHolder.getKey().longValue();
    order.setId(orderId);

    List<Taco> tacos = order.getTacos();
    int i=0;
    for (Taco taco : tacos) {
      saveTaco(orderId, i++, taco);
    }

    return order;
  }
}
There appears to be a lot going on in the save() method, but we can break it down into only a handful of significant steps. First, you create a PreparedStatementCreatorFactory that describes the insert query along with the types of the query’s input fields. Because you’ll later need to fetch the saved order’s ID, you also will need to call setReturnGeneratedKeys(true).
After defining the PreparedStatementCreatorFactory, you use it to create a PreparedStatementCreator, passing in the values from the TacoOrder object that will be persisted. The last field given to the PreparedStatementCreator is the date that the order is created, which you’ll also need to set on the TacoOrder object itself so that the returned TacoOrder will have that information available.
Now that you have a PreparedStatementCreator in hand, you’re ready to actually save the order data by calling the update() method on JdbcOperations, passing in the PreparedStatementCreator and a GeneratedKeyHolder. After the order data has been saved, the GeneratedKeyHolder will contain the value of the id field as assigned by the database and should be copied into the TacoOrder object’s id property.
At this point, the order has been saved, but you need to also save the Taco objects associated with the order. You can do that by calling saveTaco() for each Taco in the order.
The saveTaco() method is quite similar to the save() method, as you can see here:
private long saveTaco(Long orderId, int orderKey, Taco taco) {
  taco.setCreatedAt(new Date());
  PreparedStatementCreatorFactory pscf =
          new PreparedStatementCreatorFactory(
      "insert into Taco "
      + "(name, created_at, taco_order, taco_order_key) "
      + "values (?, ?, ?, ?)",
      Types.VARCHAR, Types.TIMESTAMP, Type.LONG, Type.LONG
  );
  pscf.setReturnGeneratedKeys(true);

  PreparedStatementCreator psc =
      pscf.newPreparedStatementCreator(
          Arrays.asList(
              taco.getName(),
              taco.getCreatedAt(),
              orderId,
              orderKey));

  GeneratedKeyHolder keyHolder = new GeneratedKeyHolder();
  jdbcOperations.update(psc, keyHolder);
  long tacoId = keyHolder.getKey().longValue();
  taco.setId(tacoId);

  saveIngredientRefs(tacoId, taco.getIngredients());

  return tacoId;
}
Step by step, saveTaco() mirrors the structure of save(), albeit for Taco data instead of TacoOrder data. In the end, it makes a call to saveIngredientRefs() to create rows in the Ingredient_Ref table to link the Taco row to an Ingredient row. The saveIngredientRefs() method looks like this:
private void saveIngredientRefs(
    long tacoId, List<IngredientRef> ingredientRefs) {
  int key = 0;
  for (IngredientRef ingredientRef : ingredientRefs) {
    jdbcOperations.update(
        "insert into Ingredient_Ref (ingredient, taco, taco_key) "
        + "values (?, ?, ?)",
        ingredientRef.getIngredient(), tacoId, key++);
  }
}
Thankfully, the saveIngredientRefs() method is much simpler. It cycles through a list of Ingredient objects, saving each into the Ingredient_Ref table. It also has a local key variable that is used as an index to ensure that the ordering of the ingredients stays intact.
All that’s left to do with OrderRepository is to inject it into OrderController and use it when saving an order. The following listing shows the changes necessary for injecting the repository.
Listing 3.11 Injecting and using OrderRepository
package tacos.web;
import javax.validation.Valid;

import org.springframework.stereotype.Controller;
import org.springframework.validation.Errors;
import org.springframework.web.bind.annotation.GetMapping;
import org.springframework.web.bind.annotation.PostMapping;
import org.springframework.web.bind.annotation.RequestMapping;
import org.springframework.web.bind.annotation.SessionAttributes;
import org.springframework.web.bind.support.SessionStatus;

import tacos.TacoOrder;
import tacos.data.OrderRepository;

@Controller
@RequestMapping("/orders")
@SessionAttributes("tacoOrder")
public class OrderController {

  private OrderRepository orderRepo;

  public OrderController(OrderRepository orderRepo) {
    this.orderRepo = orderRepo;
  }

  // ...

  @PostMapping
  public String processOrder(@Valid TacoOrder order, Errors errors, SessionStatus sessionStatus) {
    if (errors.hasErrors()) {
      return "orderForm";
    }
    orderRepo.save(order);
    sessionStatus.setComplete();

    return "redirect:/";
  }

}
As you can see, the constructor takes an OrderRepository as a parameter and assigns it to an instance variable that it will use in the processOrder() method. Speaking of the processOrder() method, it has been changed to call the save() method on the OrderRepository instead of logging the TacoOrder object.
Spring’s JdbcTemplate makes working with relational databases significantly simpler than with plain vanilla JDBC. But even with JdbcTemplate, some persistence tasks are still challenging, especially when persisting nested domain objects in an aggregate. If only there were a way to work with JDBC that was even simpler.
Let’s have a look at Spring Data JDBC, which makes working with JDBC insanely easy—even when persisting aggregates.
3.2 Working with Spring Data JDBC
The Spring Data project is a rather large umbrella project comprising several subprojects, most of which are focused on data persistence with a variety of different database types. A few of the most popular Spring Data projects include these:
-
Spring Data JDBC—JDBC persistence against a relational database
-
Spring Data JPA—JPA persistence against a relational database
-
Spring Data MongoDB—Persistence to a Mongo document database
-
Spring Data Cassandra—Persistence to a Cassandra column store database
One of the most interesting and useful features provided by Spring Data for all of these projects is the ability to automatically create repositories, based on a repository specification interface. Consequently, persistence with Spring Data projects has little or no persistence logic and involves writing only one or more repository interfaces.
Let’s see how to apply Spring Data JDBC to our project to simplify data persistence with JDBC. First, you’ll need to add Spring Data JDBC to the project build.
3.2.1 Adding Spring Data JDBC to the build
Spring Data JDBC is available as a starter dependency for Spring Boot apps. When added to the project’s pom.xml file, the starter dependency looks like the following code snippet.
Listing 3.12 Adding the Spring Data JDBC dependency to the build
<dependency>
  <groupId>org.springframework.boot</groupId>
  <artifactId>spring-boot-starter-data-jdbc</artifactId>
</dependency>
You will no longer need the JDBC starter that gave us JdbcTemplate, so you can remove the starter that looks like this:
<dependency>
  <groupId>org.springframework.boot</groupId>
  <artifactId>spring-boot-starter-jdbc</artifactId>
</dependency>
You’ll still need a database, however, so don’t remove the H2 dependency.
3.2.2 Defining repository interfaces
Fortunately, we’ve already created IngredientRepository and OrderRepository, so much of the work in defining our repositories is already done. But we’ll need to make a subtle change to them in order to use them with Spring Data JDBC.
Spring Data will automatically generate implementations for our repository interfaces at run time. But it will do that only for interfaces that extend one of the repository interfaces provided by Spring Data. At the very least, our repository interfaces will need to extend Repository so that Spring Data knows to create the implementation automatically. For example, here’s how you might write IngredientRepository such that it extends Repository:
package tacos.data;
import java.util.Optional;
import org.springframework.data.repository.Repository;
import tacos.Ingredient;

public interface IngredientRepository
         extends Repository<Ingredient, String> {

  Iterable<Ingredient> findAll();

  Optional<Ingredient> findById(String id);

  Ingredient save(Ingredient ingredient);

}
As you can see, the Repository interface is parameterized. The first parameter is the type of the object to be persisted by this repository—in this case, Ingredient. The second parameter is the type of the persisted object’s ID field. For Ingredient, that’s String.
Although IngredientRepository will work as shown here by extending Repository, Spring Data also offers CrudRepository as a base interface for common operations, including the three methods we’ve defined in IngredientRepository. So, instead of extending Repository, it’s often easier to extend CrudRepository, as shown next.
Listing 3.13 Defining a repository interface for persisting ingredients
package tacos.data;

import org.springframework.data.repository.CrudRepository;

import tacos.Ingredient;

public interface IngredientRepository
         extends CrudRepository<Ingredient, String> {

}
Similarly, our OrderRepository can extend CrudRepository as shown in the next listing.
Listing 3.14 Defining a repository interface for persisting taco orders
package tacos.data;

import org.springframework.data.repository.CrudRepository;

import tacos.TacoOrder;

public interface OrderRepository
         extends CrudRepository<TacoOrder, Long> {

}
In both cases, because CrudRepository already defines the methods you need, there’s no need to explicitly define them in the IngredientRepository and OrderRepository interfaces.
And now you have your two repositories. You might be thinking that you need to write the implementations for both repositories, including the dozen methods defined in CrudRepository. But that’s the good news about Spring Data—there’s no need to write an implementation! When the application starts, Spring Data automatically generates an implementation on the fly. This means the repositories are ready to use from the get-go. Just inject them into the controllers and you’re done.
What’s more, because Spring Data automatically creates implementations of these interfaces at run time, you no longer need the explicit implementations in JdbcIngredientRepository and JdbcOrderRepository. You can delete those two classes and never look back!
3.2.3 Annotating the domain for persistence
The only other thing we’ll need to do is annotate our domain classes so that Spring Data JDBC will know how to persist them. Generally speaking, this means annotating the identity properties with @Id—so that Spring Data will know which field represents the object’s identity—and optionally annotating the class with @Table.
For example, the TacoOrder class might be annotated with @Table and @Id as shown in the following code.
Listing 3.15 Preparing the Taco class for persistence
package tacos;
import java.io.Serializable;
import java.util.ArrayList;
import java.util.Date;
import java.util.List;

import javax.validation.constraints.Digits;
import javax.validation.constraints.NotBlank;
import javax.validation.constraints.Pattern;

import org.hibernate.validator.constraints.CreditCardNumber;
import org.springframework.data.annotation.Id;
import org.springframework.data.relational.core.mapping.Table;

import lombok.Data;

@Data
@Table
public class TacoOrder implements Serializable {

  private static final long serialVersionUID = 1L;

  @Id
  private Long id;

 // ...

}
The @Table annotation is completely optional. By default, the object is mapped to a table based on the domain class name. In this case, TacoOrder is mapped to a table named "Taco_Order". If that’s fine for you, then you can leave the @Table annotation off completely or use it without parameters. But if you’d prefer to map it to a different table name, then you can specify the table name as a parameter to @Table like this:
As shown here, TacoOrder will be mapped to a table named "Taco_Cloud_Order".
As for the @Id annotation, it designates the id property as being the identity for a TacoOrder. All other properties in TacoOrder will be mapped automatically to columns based on their property names. For example, the deliveryName property will be automatically mapped to the column named delivery_name. But if you want to explicitly define the column name mapping, you could annotate the property with @Column like this:
@Column("customer_name")
@NotBlank(message="Delivery name is required")
private String deliveryName;
In this case, @Column is specifying that the deliveryName property will be mapped to the column whose name is customer_name.
You’ll also need to apply @Table and @Id to the other domain classes. This includes @Ingredient.
Listing 3.16 Preparing the Ingredient class for persistence
package tacos;

import org.springframework.data.annotation.Id;
import org.springframework.data.domain.Persistable;
import org.springframework.data.relational.core.mapping.Table;

import lombok.AccessLevel;
import lombok.AllArgsConstructor;
import lombok.Data;
import lombok.NoArgsConstructor;

@Data
@Table
@AllArgsConstructor
@NoArgsConstructor(access=AccessLevel.PRIVATE, force=true)
public class Ingredient implements Persistable<String> {

  @Id
  private String id;

  // ...

}
Listing 3.17 Preparing the Taco class for persistence
package tacos;
import java.util.ArrayList;
import java.util.Date;
import java.util.List;

import javax.validation.constraints.NotNull;
import javax.validation.constraints.Size;

import org.springframework.data.annotation.Id;
import org.springframework.data.relational.core.mapping.Table;

import lombok.Data;

@Data
@Table
public class Taco {

  @Id
  private Long id;

  // ...

}
As for IngredientRef, it will be mapped automatically to the table whose name is "Ingredient_Ref", which is perfect for our application. You can annotate it with @Table if you want, but it’s not necessary. And the "Ingredient_Ref" table has no identity column, so there is no need to annotate anything in IngredientRef with @Id.
With these small changes, not to mention the complete removal of the JdbcIngredientRepository and JdbcOrderRepository classes, you now have a lot less persistence code. Even so, the repository implementations that are generated at runtime by Spring Data still do everything that the repositories using JdbcTemplate did. In fact, they have potential for doing even more, because the two repository interfaces extend CrudRepository, which offers a dozen or so operations for creating, reading, updating, and deleting objects.
3.2.4 Preloading data with CommandLineRunner
When working with JdbcTemplate, we preloaded the Ingredient data at application startup using data.sql, which was executed against the database when the data source bean was created. That same approach will work with Spring Data JDBC. In fact, it will work with any persistence mechanism for which the backing database is a relational database. But let’s see another way of populating a database at startup that offers a bit more flexibility.
Spring Boot offers two useful interfaces for executing logic when an application starts up: CommandLineRunner and ApplicationRunner. These two interfaces are quite similar. Both are functional interfaces that require that a single run() method be implemented. When the application starts up, any beans in the application context that implement CommandLineRunner or ApplicationRunner will have their run() methods invoked after the application context and all beans are wired up, but before anything else happens. This provides a convenient place for data to be loaded into the database.
Because both CommandLineRunner and ApplicationRunner are functional interfaces, they can easily be declared as beans in a configuration class using a @Bean-annotated method that returns a lambda function. For example, here’s how you might create a data-loading CommandLineRunner bean:
@Bean
public CommandLineRunner dataLoader(IngredientRepository repo) {
  return args -> {
    repo.save(new Ingredient("FLTO", "Flour Tortilla", Type.WRAP));
    repo.save(new Ingredient("COTO", "Corn Tortilla", Type.WRAP));
    repo.save(new Ingredient("GRBF", "Ground Beef", Type.PROTEIN));
    repo.save(new Ingredient("CARN", "Carnitas", Type.PROTEIN));
    repo.save(new Ingredient("TMTO", "Diced Tomatoes", Type.VEGGIES));
    repo.save(new Ingredient("LETC", "Lettuce", Type.VEGGIES));
    repo.save(new Ingredient("CHED", "Cheddar", Type.CHEESE));
    repo.save(new Ingredient("JACK", "Monterrey Jack", Type.CHEESE));
    repo.save(new Ingredient("SLSA", "Salsa", Type.SAUCE));
    repo.save(new Ingredient("SRCR", "Sour Cream", Type.SAUCE));
  };
}
Here, the IngredientRepository is injected into the bean method and used within the lambda to create Ingredient objects. The run() method of CommandLineRunner accepts a single parameter that is a String vararg containing all of the command-line arguments for the running application. We don’t need those to load ingredients into the database, so the args parameter is ignored.
Alternatively, we could have defined the data-loader bean as a lambda implementation of ApplicationRunner like this:
@Bean
public ApplicationRunner dataLoader(IngredientRepository repo) {
  return args -> {
    repo.save(new Ingredient("FLTO", "Flour Tortilla", Type.WRAP));
    repo.save(new Ingredient("COTO", "Corn Tortilla", Type.WRAP));
    repo.save(new Ingredient("GRBF", "Ground Beef", Type.PROTEIN));
    repo.save(new Ingredient("CARN", "Carnitas", Type.PROTEIN));
    repo.save(new Ingredient("TMTO", "Diced Tomatoes", Type.VEGGIES));
    repo.save(new Ingredient("LETC", "Lettuce", Type.VEGGIES));
    repo.save(new Ingredient("CHED", "Cheddar", Type.CHEESE));
    repo.save(new Ingredient("JACK", "Monterrey Jack", Type.CHEESE));
    repo.save(new Ingredient("SLSA", "Salsa", Type.SAUCE));
    repo.save(new Ingredient("SRCR", "Sour Cream", Type.SAUCE));
  };
}
The key difference between CommandLineRunner and ApplicationRunner is in the parameter passed to the respective run() methods. CommandLineRunner accepts a String vararg, which is a raw representation of arguments passed on the command line. But ApplicationRunner accepts an ApplicationArguments parameter that offers methods for accessing the arguments as parsed components of the command line.
For example, suppose that we want our application to accept a command line with arguments such as "--version 1.2.3" and need to consider that argument in our loader bean. If using a CommandLineRunner, we’d need to search the array for “--version” and then take the very next value from the array. But with ApplicationRunner, we can query the given ApplicationArguments for the “--version” argument like this:
public ApplicationRunner dataLoader(IngredientRepository repo) {
  return args -> {
    List<String> version = args.getOptionValues("version");
    ...
  };
}
The getOptionValues() method returns a List<String> to allow for the option argument to be specified multiple times.
In the case of either CommandLineRunner or ApplicationRunner, however, we don’t need command-line arguments to load data. So the args parameter is ignored in our data-loader bean.
What’s nice about using CommandLineRunner or ApplicationRunner to do an initial data load is that they are using the repositories to create the persisted objects instead of a SQL script. This means that they’ll work equally well for relational databases and nonrelational databases. This will come in handy in the next chapter when we see how to use Spring Data to persist to nonrelational databases.
But before we do that, let’s have a look at another Spring Data project for persisting data in relational databases: Spring Data JPA.
3.3 Persisting data with Spring Data JPA
Whereas Spring Data JDBC makes easy work of persisting data, the Java Persistence API (JPA) is another popular option for working with data in a relational database. Spring Data JPA offers an approach to persistence with JPA similar to what Spring Data JDBC gave us for JDBC.
To see how Spring Data works, you’re going to start over, replacing the JDBC-based repositories from earlier in this chapter with repositories created by Spring Data JPA. But first, you need to add Spring Data JPA to the project build.
3.3.1 Adding Spring Data JPA to the project
Spring Data JPA is available to Spring Boot applications with the JPA starter. This starter dependency not only brings in Spring Data JPA but also transitively includes Hibernate as the JPA implementation, as shown here:
<dependency>
  <groupId>org.springframework.boot</groupId>
  <artifactId>spring-boot-starter-data-jpa</artifactId>
</dependency>
If you want to use a different JPA implementation, then you’ll need to, at least, exclude the Hibernate dependency and include the JPA library of your choice. For example, to use EclipseLink instead of Hibernate, you’ll need to alter the build as follows:
<dependency>
  <groupId>org.springframework.boot</groupId>
  <artifactId>spring-boot-starter-data-jpa</artifactId>
  <exclusions>
    <exclusion>
        <groupId>org.hibernate</groupId>
        <artifactId>hibernate-core</artifactId>
    </exclusion>
  </exclusions>
</dependency>
<dependency>
  <groupId>org.eclipse.persistence</groupId>
  <artifactId>org.eclipse.persistence.jpa</artifactId>
  <version>2.7.6</version>
</dependency>
Note that there may be other changes required, depending on your choice of JPA implementation. Consult the documentation of your chosen JPA implementation for details. Now let’s revisit your domain objects and annotate them for JPA persistence.
3.3.2 Annotating the domain as entities
As you’ve already seen with Spring Data JDBC, Spring Data does some amazing things when it comes to creating repositories. But unfortunately, it doesn’t help much when it comes to annotating your domain objects with JPA mapping annotations. You’ll need to open up the Ingredient, Taco, and TacoOrder classes and throw in a few annotations. First up is the Ingredient class, shown next.
Listing 3.18 Annotating Ingredient for JPA persistence
package tacos;

import javax.persistence.Entity;
import javax.persistence.Id;

import lombok.AccessLevel;
import lombok.AllArgsConstructor;
import lombok.Data;
import lombok.NoArgsConstructor;

@Data
@Entity
@AllArgsConstructor
@NoArgsConstructor(access=AccessLevel.PRIVATE, force=true)
public class Ingredient {

  @Id
  private String id;
  private String name;
  private Type type;
  public enum Type {
    WRAP, PROTEIN, VEGGIES, CHEESE, SAUCE
  }

}
To declare this as a JPA entity, Ingredient must be annotated with @Entity. And its id property must be annotated with @Id to designate it as the property that will uniquely identify the entity in the database. Note that this @Id annotation is the JPA variety from the javax.persistence package, as opposed to the @Id provided by Spring Data in the org.springframework.data.annotation package.
Also note that we no longer need the @Table annotation or need to implement Persistable. Although we could still use @Table here, it is unnecessary when working with JPA and defaults to the name of the class ("Ingredient", in this case). As for Persistable, it was only necessary with Spring Data JDBC to determine whether or not an entity was to be created new, or to update an existing entity; JPA sorts that out automatically.
In addition to the JPA-specific annotations, you’ll also note that you’ve added a @NoArgsConstructor annotation at the class level. JPA requires that entities have a no-arguments constructor, so Lombok’s @NoArgsConstructor does that for you. You don’t want to be able to use it, though, so you make it private by setting the access attribute to AccessLevel.PRIVATE. And because you must set final properties, you also set the force attribute to true, which results in the Lombok-generated constructor setting them to a default value of null, 0, or false, depending on the property type.
You also will add an @AllArgsConstructor to make it easy to create an Ingredient object with all properties initialized.
You also need a @RequiredArgsConstructor. The @Data annotation implicitly adds a required arguments constructor, but when a @NoArgsConstructor is used, that constructor is removed. An explicit @RequiredArgsConstructor ensures that you’ll still have a required arguments constructor, in addition to the private no-arguments constructor.
Now let’s move on to the Taco class and see how to annotate it as a JPA entity.
Listing 3.19 Annotating Taco as an entity
package tacos;
import java.util.ArrayList;
import java.util.Date;
import java.util.List;

import javax.persistence.Entity;
import javax.persistence.GeneratedValue;
import javax.persistence.GenerationType;
import javax.persistence.Id;
import javax.persistence.ManyToMany;
import javax.validation.constraints.NotNull;
import javax.validation.constraints.Size;

import lombok.Data;

@Data
@Entity
public class Taco {

  @Id
  @GeneratedValue(strategy = GenerationType.AUTO)
  private Long id;

  @NotNull
  @Size(min=5, message="Name must be at least 5 characters long")
  private String name;

  private Date createdAt = new Date();

  @Size(min=1, message="You must choose at least 1 ingredient")
  @ManyToMany()
  private List<Ingredient> ingredients = new ArrayList<>();

  public void addIngredient(Ingredient ingredient) {
    this.ingredients.add(ingredient);
  }

}
As with Ingredient, the Taco class is now annotated with @Entity and has its id property annotated with @Id. Because you’re relying on the database to automatically generate the ID value, you also annotate the id property with @GeneratedValue, specifying a strategy of AUTO.
To declare the relationship between a Taco and its associated Ingredient list, you annotate ingredients with @ManyToMany. A Taco can have many Ingredient objects, and an Ingredient can be a part of many Tacos.
Finally, let’s annotate the TacoOrder object as an entity. The next listing shows the new TacoOrder class.
Listing 3.20 Annotating TacoOrder as a JPA entity
package tacos;
import java.io.Serializable;
import java.util.ArrayList;
import java.util.Date;
import java.util.List;

import javax.persistence.CascadeType;
import javax.persistence.Entity;
import javax.persistence.GeneratedValue;
import javax.persistence.GenerationType;
import javax.persistence.Id;
import javax.persistence.OneToMany;
import javax.validation.constraints.Digits;
import javax.validation.constraints.NotBlank;
import javax.validation.constraints.Pattern;

import org.hibernate.validator.constraints.CreditCardNumber;

import lombok.Data;

@Data
@Entity
public class TacoOrder implements Serializable {

  private static final long serialVersionUID = 1L;

  @Id
  @GeneratedValue(strategy = GenerationType.AUTO)
  private Long id;

  private Date placedAt = new Date();

  ...

  @OneToMany(cascade = CascadeType.ALL)
  private List<Taco> tacos = new ArrayList<>();

  public void addTaco(Taco taco) {
    tacos.add(taco);
  }

}
As you can see, the changes to TacoOrder closely mirror the changes to Taco. One significant thing worth noting is that the relationship to the list of Taco objects is annotated with @OneToMany, indicating that the tacos are all specific to this one order. Moreover, the cascade attribute is set to CascadeType.ALL so that if the order is deleted, its related tacos will also be deleted.
3.3.3 Declaring JPA repositories
When you created the JdbcTemplate versions of the repositories, you explicitly declared the methods you wanted the repository to provide. But with Spring Data JDBC, you were able to dismiss the explicit implementation classes and instead extend the CrudRepository interface. As it turns out, CrudRepository works equally well for Spring Data JPA. For example, here’s the new IngredientRepository interface:
package tacos.data;

import org.springframework.data.repository.CrudRepository;

import tacos.Ingredient;

public interface IngredientRepository
         extends CrudRepository<Ingredient, String> {

}
In fact, the IngredientRepository interface we’ll use with Spring Data JPA is identical to the one we defined for use with Spring Data JDBC. The CrudRepository interface is commonly used across many of Spring Data’s projects, regardless of the underlying persistence mechanism. Similarly, you can define OrderRepository for the Spring Data JPA the same as it was for Spring Data JDBC, as follows:
package tacos.data;

import org.springframework.data.repository.CrudRepository;

import tacos.TacoOrder;

public interface OrderRepository
         extends CrudRepository<TacoOrder, Long> {

}
The methods provided by CrudRepository are great for general-purpose persistence of entities. But what if you have some requirements beyond basic persistence? Let’s see how to customize the repositories to perform queries unique to your domain.
3.3.4 Customizing repositories
Imagine that in addition to the basic CRUD operations provided by CrudRepository, you also need to fetch all the orders delivered to a given ZIP code. As it turns out, this can easily be addressed by adding the following method declaration to OrderRepository:
When generating the repository implementation, Spring Data examines each method in the repository interface, parses the method name, and attempts to understand the method’s purpose in the context of the persisted object (a TacoOrder, in this case). In essence, Spring Data defines a sort of miniature domain-specific language (DSL), where persistence details are expressed in repository method signatures.
Spring Data knows that this method is intended to find Orders, because you’ve parameterized CrudRepository with TacoOrder. The method name, findByDeliveryZip(), makes it clear that this method should find all TacoOrder entities by matching their deliveryZip property with the value passed in as a parameter to the method.
The findByDeliveryZip() method is simple enough, but Spring Data can handle even more interesting method names as well. Repository methods are composed of a verb, an optional subject, the word By, and a predicate. In the case of findByDeliveryZip(), the verb is find and the predicate is DeliveryZip; the subject isn’t specified and is implied to be a TacoOrder.
Let’s consider another, more complex example. Suppose that you need to query for all orders delivered to a given ZIP code within a given date range. In that case, the following method, when added to OrderRepository, might prove useful:
List<TacoOrder> readOrdersByDeliveryZipAndPlacedAtBetween(
      String deliveryZip, Date startDate, Date endDate);
Figure 3.2 illustrates how Spring Data parses and understands the readOrdersByDeliveryZipAndPlacedAtBetween() method when generating the repository implementation. As you can see, the verb in readOrdersByDeliveryZipAndPlacedAtBetween() is read. Spring Data also understands find, read, and get as synonymous for fetching one or more entities. Alternatively, you can also use count as the verb if you want the method to return only an int with the count of matching entities.

Figure 3.2 Spring Data parses repository method signatures to determine the query that should be performed.
Although the subject of the method is optional, here it says Orders. Spring Data ignores most words in a subject, so you could name the method readPuppiesBy... and it would still find TacoOrder entities, because that is the type that CrudRepository is parameterized with.
The predicate follows the word By in the method name and is the most interesting part of the method signature. In this case, the predicate refers to two TacoOrder properties: deliveryZip and placedAt. The deliveryZip property must be equal to the value passed into the first parameter of the method. The keyword Between indicates that the value of placedAt must fall between the values passed into the last two parameters of the method.
In addition to an implicit Equals operation and the Between operation, Spring Data method signatures can also include any of the following operators:
As alternatives for IgnoringCase and IgnoresCase, you can place either AllIgnoringCase or AllIgnoresCase on the method to ignore case for all String comparisons. For example, consider the following method:
List<TacoOrder> findByDeliveryNameAndDeliveryCityAllIgnoresCase(
        String deliveryName, String deliveryCity);
Finally, you can also place OrderBy at the end of the method name to sort the results by a specified column. For example, to order by the deliveryName property, use the following code:
Although the naming convention can be useful for relatively simple queries, it doesn’t take much imagination to see that method names could get out of hand for more complex queries. In that case, feel free to name the method anything you want and annotate it with @Query to explicitly specify the query to be performed when the method is called, as this example shows:
In this simple usage of @Query, you ask for all orders delivered in Seattle. But you can use @Query to perform virtually any JPA query you can dream up, even when it’s difficult or impossible to achieve the query by following the naming convention.
Custom query methods also work with Spring Data JDBC but with the following key differences:
-
All custom query methods require
@Query. This is because, unlike JPA, there’s no mapping metadata to help Spring Data JDBC automatically infer the query from the method name. -
All queries specified in
@Querymust be SQL queries, not JPA queries.
In the next chapter, we’ll expand our use of Spring Data to work with nonrelational databases. When we do, you’ll see that custom query methods work very similarly, although the query language used in @Query will be specific to the underlying database.
Summary
-
PreparedStatementCreatorandKeyHoldercan be used together when you need to know the value of a database-generated ID. -
Spring Data JDBC and Spring Data JPA make working with relational data as easy as writing a repository interface.