
16 Administering Spring
- Setting up Spring Boot Admin
- Registering client applications
- Working with Actuator endpoints
- Securing the Admin server
A picture is worth a thousand words (or so they say), and for many application users, a user-friendly web application is worth a thousand API calls. Don’t get me wrong, I’m a command-line junkie and a big fan of using curl and HTTPie to consume REST APIs. But sometimes, manually typing the command line to invoke a REST endpoint and then visually inspecting the results can be less efficient than simply clicking a link and reading the results in a web browser.
In the previous chapter, we explored all of the HTTP endpoints exposed by the Spring Boot Actuator. As HTTP endpoints that return JSON responses, there’s no limit to how those can be used. In this chapter, we’ll see how to put a frontend user interface (UI) on top of the Actuator to make it easier to use, as well as capture live data that would be difficult to consume from Actuator directly.
16.1 Using Spring Boot Admin
I’ve been asked several times if it’d make sense and, if so, how hard it’d be to develop a web application that consumes Actuator endpoints and serves them up in an easy-to-view UI. I respond that it’s just a REST API, and, therefore, anything is possible. But why bother creating your own UI for the Actuator when the good folks at codecentric AG (https://www.codecentric.de/), a software and consulting company based in Germany, have already done the work for you?
Spring Boot Admin is an administrative frontend web application that makes Actuator endpoints more consumable by humans. It’s split into two primary components: the Spring Boot Admin server and its clients. The Admin server collects and displays Actuator data that’s fed to it from one or more Spring Boot applications, which are identified as Spring Boot Admin clients, as illustrated in figure 16.1.

Figure 16.1 The Spring Boot Admin server consumes Actuator endpoints from one or more Spring Boot applications and presents the data in a web-based UI.
You’ll need to register each of your applications with the Spring Boot Admin server, including the Taco Cloud application. But first, you’ll set up the Spring Boot Admin server to receive each client’s Actuator information.
16.1.1 Creating an Admin server
To enable the Admin server, you’ll first need to create a new Spring Boot application and add the Admin server dependency to the project’s build. The Admin server is generally used as a standalone application, separate from any other application. Therefore, the easiest way to get started is to use the Spring Boot Initializr to create a new Spring Boot project and select the check box labeled Spring Boot Admin (Server). This results in the following dependency being included in the <dependencies> block:
<dependency>
  <groupId>de.codecentric</groupId>
  <artifactId>spring-boot-admin-starter-server</artifactId>
</dependency>
Next, you’ll need to enable the Admin server by annotating the main configuration class with @EnableAdminServer as shown here:
package tacos.admin;

import org.springframework.boot.SpringApplication;
import org.springframework.boot.autoconfigure.SpringBootApplication;

import de.codecentric.boot.admin.server.config.EnableAdminServer;

@EnableAdminServer
@SpringBootApplication
public class AdminServerApplication {

    public static void main(String[] args) {
        SpringApplication.run(AdminServerApplication.class, args);
    }

}
Finally, because the Admin server won’t be the only application running locally as it’s developed, you should set it to listen in on a unique port, but one you can easily access (not port 0, for example). Here, I’ve chosen port 9090 as the port for the Spring Boot Admin server:
Now your Admin server is ready. If you were to fire it up at this point and navigate to http://localhost:9090 in your web browser, you’d see something like what’s shown in figure 16.2.
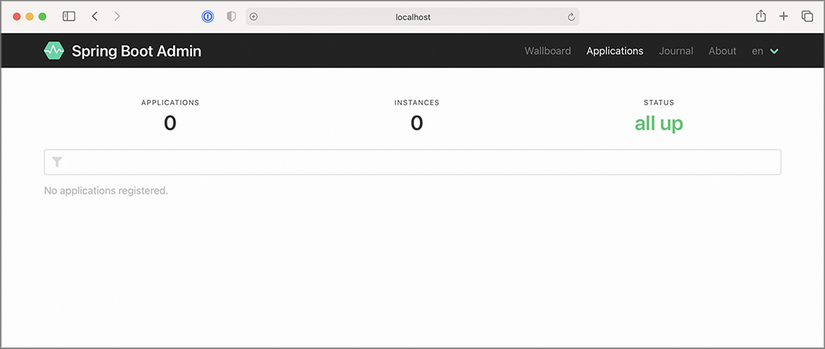
Figure 16.2 A newly created server displayed in the Spring Boot Admin UI. No applications are registered yet.
As you can see, the Spring Boot Admin shows that zero instances of zero applications are all up. But that’s meaningless information when you consider the message below those counts that states No Applications Registered. For the Admin server to be useful, you’ll need to register some applications with it.
16.1.2 Registering Admin clients
Because the Admin server is an application separate from other Spring Boot application(s) for which it presents Actuator data, you must somehow make the Admin server aware of the applications it should display. Two ways to register Spring Boot Admin clients with the Admin server follow:
-
Each application explicitly registers itself with the Admin server.
-
The Admin server discovers applications through the Eureka service registry.
We’ll focus on how to configure individual Boot applications as Spring Boot Admin clients so that they can register themselves with the Admin server. For more information about working with Eureka, see the Spring Cloud documentation at https://docs .spring.io/spring-cloud-netflix/docs/current/reference/html/ or Spring Microservices in Action, 2nd Edition, by John Carnell and Illary Huaylupo Sánchez.
For a Spring Boot application to register itself as a client of the Admin server, you must include the Spring Boot Admin client starter in its build. You can easily add this dependency to your build by selecting the check box labeled Spring Boot Admin (Client) in the Initializr, or you can set the following <dependency> for a Maven-built Spring Boot application:
<dependency>
  <groupId>de.codecentric</groupId>
  <artifactId>spring-boot-admin-starter-client</artifactId>
</dependency>
With the client-side library in place, you’ll also need to configure the location of the Admin server so that the client can register itself. To do that, you’ll set the spring .boot.admin.client.url property to the root URL of the Admin server like so:
Notice that the spring.application.name property is also set. This property is used by several Spring projects to identify an application. In this case, it is the name that will be given to the Admin server to use as a label anywhere information about the application appears in the Admin server.
Although there isn’t much information about the Taco Cloud application shown in figure 16.3, it does show the application’s uptime, whether the Spring Boot Maven plugin has the build-info goal configured (as we discussed in section 15.3.1), and the build version. Rest assured that you’ll see plenty of other runtime details after you click the application in the Admin server.
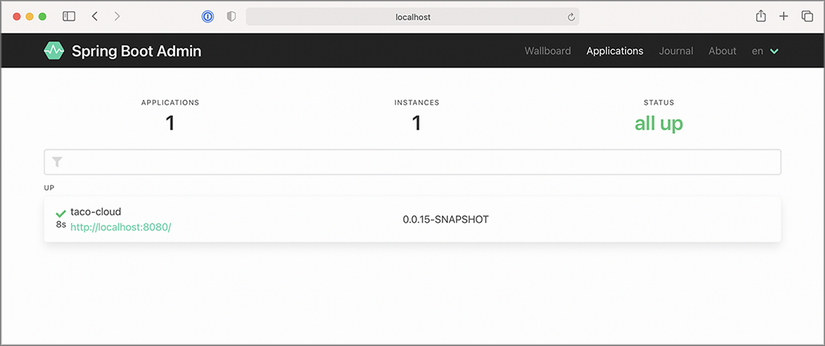
Now that you have the Taco Cloud application registered with the Admin server, let’s see what the Admin server has to offer.
16.2 Exploring the Admin server
Once you’ve registered all of the Spring Boot applications as Admin server clients, the Admin server makes a wealth of information available for seeing what’s going on inside each application, including the following:
In fact, almost anything that the Actuator exposes can be viewed in the Admin server, albeit in a much more human-friendly format. This includes graphs and filters to help distill the information. The amount of information presented in the Admin server is far richer than the space we’ll have in this chapter to cover it in detail. But let me use the rest of this section to share a few of the highlights of the Admin server.
16.2.1 Viewing general application health and information
As discussed in section 15, some of the most basic information provided by the Actuator is health and general application information via the /health and /info endpoints. The Admin server displays that information under the Details menu item as shown in figure 16.4.

Figure 16.4 The Details screen of the Spring Boot Admin UI displays general health and information about an application.
If you scroll past the Health and Info sections in the Details screen, you’ll find useful statistics from the application’s JVM, including graphs displaying memory, thread, and processor usage (see figure 16.5).

Figure 16.5 As you scroll down on the Details screen, you can view additional JVM internal information, including processor, thread, and memory statistics.
The information displayed in the graphs, as well as the metrics under Processes and Garbage Collection Pauses, can provide useful insights into how your application uses JVM resources.
16.2.2 Watching key metrics
The information presented by the /metrics endpoint is perhaps the least human-readable of all of the Actuator’s endpoints. But the Admin server makes it easy for us mere mortals to consume the metrics produced in an application with its UI under the Metrics menu item.
Initially, the Metrics screen doesn’t display any metrics whatsoever. But the form at the top lets you set up one or more watches on any metrics you want to keep an eye on.

Figure 16.6 On the Metrics screen, you can set up watches on any metrics published through the application’s /metrics endpoint.
In figure 16.6, I’ve set up two watches on metrics under the http.server.requests category. The first reports metrics anytime an HTTP GET request is received and the return status is 200 (OK). The second reports metrics for any request that results in an HTTP 404 (NOT FOUND) response.
What’s nice about these metrics (and, in fact, almost anything displayed in the Admin server) is that they show live data—they’ll automatically update without the need to refresh the page.
16.2.3 Examining environment properties
The Actuator’s /env endpoint returns all environment properties available to a Spring Boot application from all of its property sources. And although the JSON response from the endpoint isn’t all that difficult to read, the Admin server presents it in a much more aesthetically pleasing form under the Environment menu item, shown in figure 16.7.

Figure 16.7 The Environment screen displays environment properties and includes options to override and filter those values.
Because there can be hundreds of properties, you can filter the list of available properties by either property name or value. Figure 16.7 shows properties filtered by those whose name and/or values contain the text "spring.". The Admin server also allows you to set or override environment properties using the form under the Environment Manager header.
16.2.4 Viewing and setting logging levels
The Actuator’s /loggers endpoint is helpful in understanding and overriding logging levels in a running application. The Admin server’s Loggers screen adds an easy-to-use UI on top of the /loggers endpoint to make simple work of managing logging in an application. Figure 16.8 shows the list of loggers filtered by the name org.springframework.boot.
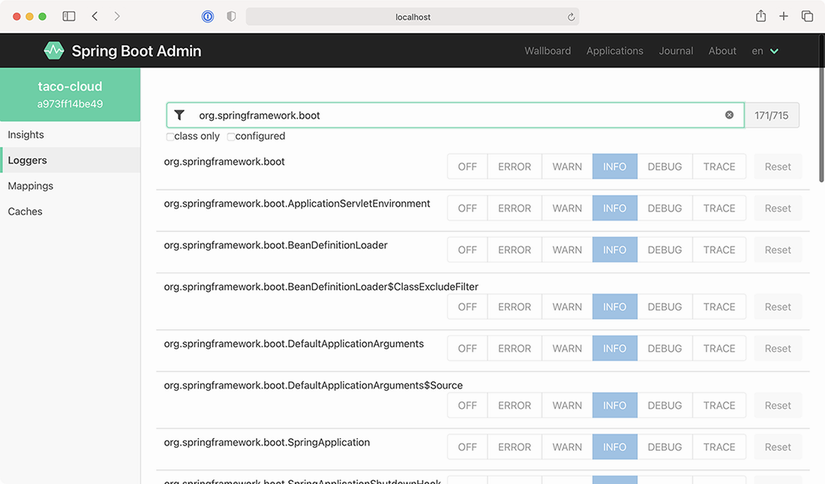
Figure 16.8 The Loggers screen displays logging levels for packages and classes in the application and lets you override those levels.
By default, the Admin server displays logging levels for all packages and classes. Those can be filtered by name (for classes only) and/or logging levels that are explicitly configured versus inherited from the root logger.
16.3 Securing the Admin server
As we discussed in the previous chapter, the information exposed by the Actuator’s endpoints isn’t intended for general consumption. They contain information that exposes details about an application that only an application administrator should see. Moreover, some of the endpoints allow changes that certainly shouldn’t be exposed to just anyone.
Just as security is important to the Actuator, it’s also important to the Admin server. What’s more, if the Actuator endpoints require authentication, then the Admin server needs to know the credentials to be able to access those endpoints. Let’s see how to add a little security to the Admin server. We’ll start by requiring authentication.
16.3.1 Enabling login in the Admin server
It’s probably a good idea to add security to the Admin server because it’s not secured by default. Because the Admin server is a Spring Boot application, you can secure it using Spring Security just like you would any other Spring Boot application. And just as you would with any application secured by Spring Security, you’re free to decide which security scheme fits your needs best.
At a minimum, you can add the Spring Boot security starter to the Admin server’s build by checking the Security checkbox in the Initializr or by adding the following <dependency> to the project’s pom.xml file:
<dependency>
  <groupId>org.springframework.boot</groupId>
  <artifactId>spring-boot-starter-security</artifactId>
</dependency>
Then, so that you don’t have to keep looking at the Admin server’s logs for the randomly generated password, you can configure a simple administrative username and password in application.yml like so:
Now when the Admin server is loaded in the browser, you’ll be prompted for a username and password with Spring Security’s default login form. As in the code snippet, entering admin and 53cr3t will get you in.
By default, Spring Security will enable CSRF on the Spring Boot Admin server, which will prevent client applications from registering with the Admin Server. Therefore, we will need a small bit of security configuration to disable CSRF, as shown here:
package tacos.admin;

import org.springframework.context.annotation.Bean;
import org.springframework.security.config.annotation.web.reactive
.EnableWebFluxSecurity;
import org.springframework.security.config.web.server.ServerHttpSecurity;
import org.springframework.security.web.server.SecurityWebFilterChain;

@EnableWebFluxSecurity
public class SecurityConfig {

    @Bean
    public SecurityWebFilterChain filterChain(ServerHttpSecurity http) throws Exception {
      return http
              .csrf()
                  .disable()
              .build();
    }

}
Of course, this security configuration is extremely basic. I recommend that you consult chapter 5 for ways of configuring Spring Security for a richer security scheme around the Admin server.
16.3.2 Authenticating with the Actuator
In section 15.4, we discussed how to secure Actuator endpoints with HTTP Basic authentication. By doing so, you’ll be able to keep out everyone who doesn’t know the username and password you assigned to the Actuator endpoints. Unfortunately, that also means that the Admin server won’t be able to consume Actuator endpoints unless it provides the username and password. But how will the Admin server get those credentials?
If the application registers directly with the Admin server, then it can send its credentials to the server at registration time. You’ll need to configure a few properties to enable that.
The spring.boot.admin.client.username and spring.boot.admin.client.password properties specify the credentials that the Admin server can use to access an application’s Actuator endpoints. The following snippet from application.yml shows how you might set those properties:
The username and password properties must be set in each application that registers itself with the Admin server. The values given must match the username and password that’s required in an HTTP Basic authentication header to the Actuator endpoints. In this example, they’re set to admin and password, which are the credentials configured to access the Actuator endpoints.
Summary
-
The Spring Boot Admin server consumes the Actuator endpoints from one or more Spring Boot applications and presents the data in a user-friendly web application.
-
Spring Boot applications can either register themselves as clients to the Admin server or the Admin server can discover them through Eureka.
-
Unlike the Actuator endpoints that capture a snapshot of an application’s state, the Admin server is able to display a live view into the inner workings of an application.
-
The Admin server makes it easy to filter Actuator results and, in some cases, display data visually in a graph.
-
Because it’s a Spring Boot application, the Admin server can be secured by any means available through Spring Security.