After completing this chapter, you’ll be able to:
Define and describe reusable code
Define and describe classes
Create an application that relies on a library
Add a test application to the library solution
Test a solution that uses multiple projects
A LIBRARY PROVIDES A MEANS of storing code in such a way that many applications can use it. Just as you borrow a book from a physical library to read and use its content, an application can borrow code from a code library to read and utilize it. Libraries offer many benefits to the developer—the most basic of which is the ability to write code once and use it many times. As you’ve seen, some of the examples in this book so far have reused code principles to accomplish seemingly different tasks. As applications become more complex, the opportunities for code reuse increase.
Note
The term library is appropriate and perhaps the most common designation, but you’ll hear other developers use other terms for libraries. Some of these terms express how the library interacts with the application, such as a Dynamic Link Library (DLL). In other cases, the term is language specific, such as the term module used with languages such as FORTRAN or the package used with Java.
Libraries can store any sort of resource. For example, you could create a library of icons, pictures, video clips, or anything else required to create your application. However, the basic library stores code in an easily used form. Because the .NET Framework is based on namespaces and classes, you’ll find that assemblies used as libraries with C# store code in classes. These namespaces can also hold enumerations and other sorts of code, such as application features. The point is that you should create separate libraries as you recognize opportunities to place commonly used resources in a central storage location. Don’t worry too much about the content for now—the kinds of resources you should store will become apparent as the need arises.
A good way to understand libraries is to build a simple library and then use it from a test application. In fact, most libraries are created in just this way. Some developers create the library first, and then write an application, called a test harness, to test every aspect of the library. A test harness is useful for ensuring that every addition to the library is fully tested. Just as no one individual will borrow every book from a physical library, no one application will use every resource found in a code library. To ensure that the library performs as expected, someone must create and maintain a test harness to verify the library’s content.
The concept of reusable code existed long before Windows even arrived on the scene. The idea of writing code in such a way that many applications can use it even when the developer doesn’t understand what’s happening within the library code is appealing. As an illustration, you’ve relied on reusable code for every example in the book so far, even the examples where you didn’t write any code. The entire .NET Framework—the underlying part of the C# language—is reusable code that itself relies on even lower-level reusable code. So you’ve already used code without having to understand how it works internally. For example, you don’t need to understand the code used to create a button control to use it in an application. In short, the most common and understandable reason to create reusable code is that it makes things simpler.
Placing reusable code inside libraries is the next step. Yes, you can create reusable code for your application by adding methods to the existing application classes. In fact, you used this approach for the REST example in Chapter 6. However, the code shown in Example 6-2 and Example 6-3 is accessible only to that application. Placing this code inside a library would make it accessible to any .NET Framework application that needs it. So libraries make it possible to share reusable code in a way that’s easy to understand.
There are a number of other good reasons to create and use libraries containing reusable code. The following list provides just a few of the most common reasons for writing libraries:
Debugged code. Library code can be fully tested to work in a specific way using a test harness. Consequently, when you work with a library—for example, when troubleshooting a problem—you can focus on the unique code required to perform a task, rather than the common code used to perform any number of tasks.
Speed. After a library is completed, developers tune it to provide maximum speed. All the optimizations are in place for this code, so you should actually see a speed gain for your application even as you develop it.
Reliability. Because library code is typically tested extensively, it’s usually quite reliable. In addition, fixed bugs are fixed for every application using the library after a new version of the library is issued. Having a lot of eyes looking at the code makes it possible to find errors more readily.
Faster development. Anytime you don’t have to write code because someone else has already written it for you, you save time.
Simplicity. Using libraries places some application functionality into a black box—you don’t have to care how it works, just as long as it does. Simplifying application development using libraries makes it less likely that developers will make mistakes.
Not all code is reusable. However, when some developers get a taste for reusable code, they try to force all code to become reusable, usually resulting in ill-conceived libraries that don’t work well—or worse, actually cause significant application problems. You’ll find that certain rules apply to working with reusable code. The following list provides guidelines that help you understand when code is reusable and when it isn’t:
Generic. Good library code is generic enough to fulfill a variety of needs. For example, many application interfaces require buttons, so such code definitely belongs in a library. Likewise, a method that can calculate compound interest for a loan is a good library candidate. In contrast, code that creates output for a specific loan isn’t generic enough, so it isn’t a good library candidate.
Multiuse. If you can’t figure out multiple ways in which to use the code, it probably isn’t a good candidate for a library. The code required to access a web service is an example of something that you could use in multiple ways. On the other hand, the code required to display the output from a web service in a particular user interface isn’t a good candidate because it works only for that application and in that situation.
Well-defined. Sometimes a developer will have a good idea, but it isn’t well-defined. Library code should perform a specific task, such as display a control, configure the operating system, or access the network. Code that can detect strange events isn’t a good candidate because the strange events aren’t well defined.
Time saving. Code segments can be short or long, complex or simple. When code becomes too short and simple, the time required to use the library is actually longer than the time saved by the developer. Anytime a developer could more easily type the code in by hand, the code isn’t a good candidate for inclusion in a library.
Throughout the book you’ve worked with classes without really understanding what classes are. A class is a kind of container—it provides the means for storing code and data in one place so that they’re easy to access. You’ll discover all sorts of heavy primers about classes that veil the entire topic in deep mystery, but the bottom line is that a class is a kind of storage device for code and data that are associated with each other. It’s true that all kinds of deep discussions about classes are possible, but you won’t need them to work with the examples in this book. What you do need at this point is a basic understanding of how classes work so that you can understand what’s happening with the library example in this chapter.
The following sections break classes down into easily understood pieces. Each piece provides a classification of a kind of code or data element within a class. For example, you’ve been working quite a bit with a special kind of method called an event handler. The event handlers you’ve created contain code that answers a request from the user. For example, when the user clicks a button, the event handler performs the requisite task.
Classes contain methods that define a way of doing something. For example, if you want to display something on the user interface, you must define the way to do that or the application won’t know how. A method answers the question of what procedure or process you want the application to use when performing a task.
You use methods to perform all sorts of tasks. Every time the application needs to display something on the user interface, interact with the network, manipulate data, or make a request of the operating system, you use a method to do it. In fact, all your code will appear in a method of some sort. For the purposes of this book, you work with three sorts of methods:
General method. A general method is used to provide a central location for code used by multiple other methods in a class. The code shown in Example 6-2 and Example 6-3 contains good examples of general methods. In this case, multiple event handlers call this code to help them perform specific tasks.
Event handler. Anytime something interacts with the application, such as a user clicking a button or the operating system signaling that something has changed, that interaction generates an event. Your application can simply choose to ignore the vast majority of events that the user, operating system, network, or some other entity generate. When your application does decide to respond to an event, it’ll do so using an event handler. Example 6-5 shows a good example of an event handler that responds to a user click.
Constructor. Part of the purpose of a class is to describe how to build something. In this regard, the class becomes a sort of blueprint. Each class has a constructor, which is a special method that tells the application to perform certain tasks when building an object based on the class. These instructions initialize the display, set up variables, and perform other essential tasks.
You use properties to define how an object based on a class works or appears. A property defines the object in certain ways. Think about an apple for a moment. An apple has a color property—it can be red, green, or yellow. It also has a taste property—it can be sweet or sour. When you view the apples in a basket, you use the apple’s properties to differentiate one apple from another. The size, shape, smell, color, taste, and other properties of the apple make it unique. Likewise, when you create a class, you use properties to describe the objects created from that class and to differentiate one object from another.
Most of the examples in this book use properties. A property can accept information (get), provide information (set), or do both (get/set). In addition, you’ve seen properties that accept a specific data type such as a String or require a value in the form of an enumeration. (See the Using Enumerations section of this chapter for details.) It’s important to provide properties with the type of value they expect, or your application will generate an error. Properties generally have a default value, but in some cases you must define a property value before using the methods in the associated class or the class will generate an error. You’ll discover more about working with properties in the examples in this chapter.
Many of the examples in this book use global variables that are accessible by every method in the class. When variables of this sort are accessible from outside a class that’s meant to be used by multiple applications, they’re called fields. Each field is simply an exposed variable. Using fields in your class is a bad idea because anyone can change a field in an uncontrolled way. In contrast, a property provides a controlled method of accessing variables. This control helps you maintain the purity of the data, enhances security, and improves reliability. The example later in this chapter demonstrates how to avoid using fields in your application.
A class can define events—things that can happen given the right stimulus. When a Button class detects a mouse click within the area that it has drawn for the button on-screen, it generates a Click event. If the application wants to detect this event, it creates a Click event handler to interact with it. Events are extremely useful because they provide a way to create responses to various kinds of activity. The kind of events that a class defines depends on the class purpose. For example, only GUI controls require a Click event—users can’t click a Timer control because it isn’t visible.
An enumeration is a list of items. For example, a list of state abbreviations is an enumeration. You can use enumerations to create any sort of list desired with any sort of data type. The purpose of an enumeration is to limit choices. If you have a property named StateAbbreviation, you obviously don’t want a full state name or a ZIP code provided as input. By creating the property in a particular way, you can tell anyone using the class that you want only one or more values from a specific list of items as an input.
Enumerations may sound very limiting. However, they have some significant benefits; using enumerations whenever you can is actually a good idea. The following list describes some of the ways in which using enumerations can improve your class:
Security. If you create a property that accepts a String as input, the developer interacting with your class can provide any sort of String. The String could contain an incorrect value or it could contain characters that your code isn’t designed to handle. In some cases, the String could also contain a virus or a script designed to gain access to your application in ways that you never intended. The same issue can occur with data of any type (although the String type seems to provide greater opportunities for abuse than any other type). Using an enumeration makes it impossible for someone to send data you don’t want. Although it’s limiting, an enumeration makes it possible to safely handle String data all of the time.
Reliability. Anytime something breaks with your application—when it behaves in an unexpected way—your application becomes unreliable. One common form of breakage is unexpected data. If you leave the properties of your class wide open and don’t check the information they receive, someone is going to find a way to break your application. Using enumerations—and thereby by making it tough to break by using incorrect data—is the surest way to improve the reliability of your application.
Understandability. Many programming errors occur because the developer using a class doesn’t understand the requirements for interacting with its properties. A developer might think that a State property will accept the full state name when you really intended it to accept only an abbreviation. Misunderstandings of this sort are perfectly understandable, common, and extremely frustrating. Using an enumeration makes the choices for a property clear and precise, which saves the developer using the class considerable time and effort.
Development speed. Anytime you can make a class more secure, reliable, and understandable, you obtain a significant improvement in development speed. A developer working with your class will spend less time trying to figure it out, writing the code, debugging errors, and optimizing the result. In short, well-designed classes use enumerations to improve development speed.
Enumerations have a lot to offer to the developer of a class and the developer using the class. You’ll see an example of how to work with enumerations in the example in this chapter.
For the purposes of this book, a structure is a special method of packaging data together. For example, you might want to collect address information for your class. The address information consists of a number of String values that contain name, address, telephone number, and so on. You could provide access to these values using individual properties, which would make it hard for the developer using your class to determine where the address information ends and general class data begins. Using a structure makes it possible for someone to use your class in an organized manner. All the data required to address a specific need resides within this single entity. You’ll see how structures work in the example in this chapter.
For the first time in the book, you need to be able to differentiate between a project and a solution. A solution is a container that can hold one or more projects. Each project is a stand-alone code environment. In this case, the example will use the UseLibrary solution to hold the TestLibrary and TestApplication projects. The TestLibrary project is a library containing reusable code in the form of a class. The TestApplication project is an application that uses the library and tests its various features. The following sections begin by creating the UseLibrary solution and TestLibrary projects. After you create these entities, you’ll define a class that contains the reusable code for the example.
Creating a project within a solution isn’t much different than creating a standalone project as you’ve done throughout the book. There are a few small differences though, and often, these little important details are missed. The following procedure helps you create the TestLibrary project and then save that project within the UseLibrary solution.
Creating a Library Project and Placing it in a Solution
Click New Project. The New Project dialog box appears.
Select Visual C# in the left pane and Class Library in the middle pane. You’ll see a description of the template in the right pane.
Type TestLibrary in the Name field and click OK. The IDE creates a new project for you consisting of a single C# file without any graphical interface, as shown here.
Right-click Class1.cs in Solution Explorer and choose Rename. The IDE will make it possible to rename the file.
Type TestClass.cs and press Enter. You’ll see a dialog box asking you whether you want to rename all instances of Class1 in the file to TestClass.
Click Yes. The Class1 references are all changed to TestClass now.
Click Save All, press Ctrl+Shift+S, or choose File | Save All. A Save Project dialog box appears. Notice the Create Directory For Solution check box in this dialog box.
Select Create Directory For Solution and type UseLibrary in the Solution Name field. Your dialog box should look similar to the one on the next page. (Your Location field entry will differ from mine.)
Click Save. Visual Studio creates a solution named UseLibrary and a project named TestLibrary in the location you specified.


At this point, you’ve created a namespace—a container for holding classes—named TestLibrary and a class named TestClass. The class doesn’t have any content. It contains no properties, methods, events, structures, or enumerations. Even though it will compile, this class is useless right now. The following sections help you create a class with a number of elements in it. This isn’t the sort of class you’d create for real-world use—it’s designed as an instructional aid so that you can see all of the elements at work.
The example class keeps track of a list of colored balls. Each of the balls has a specific list of properties associated with it, such as color, size, and name. The balls are kept in a list that you can use to add and remove balls by name. The example relies on enumerations for as many of the properties as possible and a structure to hold the various ball descriptive elements. The application will also generate events when specific actions occur, such as the addition or deletion of balls from the list. Even though this example seems simple, it does exercise the most common features of classes.
As previously mentioned, a constructor describes what to do when an application creates an object based on the elements described in the class. The class is a blueprint of sorts that an application uses to create an instance of the class, or an object. The act of creating an instance of the class is called instantiation. All these fancy terms simply mean that you’re building an object based on a particular class definition—nothing more.
Every class requires a constructor, which has precisely the same name as the class and no return type. If you don’t specifically create a constructor, the compiler uses a default constructor—a constructor that doesn’t require any input arguments or perform any useful work. The default constructor is empty. The example class will use the constructor to assign values to the variables that the class requires to work and perform other essential startup tasks. Example 8-1 shows the constructor for this example. The global variables appear alongside their matching properties in the Creating the Private Variables and Public Properties section of the chapter. You won’t understand everything in the constructor just yet, but you will by the time you reach the end of this part of the example.
Example 8-1. Defining the class constructor
// Define the class constructor to initialize variables
// and perform other useful tasks.
public TestClass()
{
    // Allow additions and deletions.
    _AllowAdditions = true;
    _AllowDeletions = true;

    // Create an empty ball list.
    _BallList = new List<BallData>();
}
The _AllowAdditions and _AllowDeletions variables determine whether the caller can add or remove balls from the list. The constructor sets these variables to true because most developers will want to add and remove balls at the outset.
Note
It’s a common convention to start private variable names, such as _AllowAdditions and _AllowDeletions, with an underscore character (_) to show that they’re private variables. A public property that works with a private variable, such as AllowAdditions and AllowDeletions, would have no underscore. However, both variable and property have the same name to show they’re meant to work together.
The actual ball list is a List of type BallData. You’ll learn more about the BallData type in the Defining a Structure section of the chapter. The example could have used a simple array to hold the list of balls, but using a List provides access to additional methods that make managing the list easier. All that the constructor does is initialize _BallList—it doesn’t add any balls to the list because the developer wouldn’t expect that.
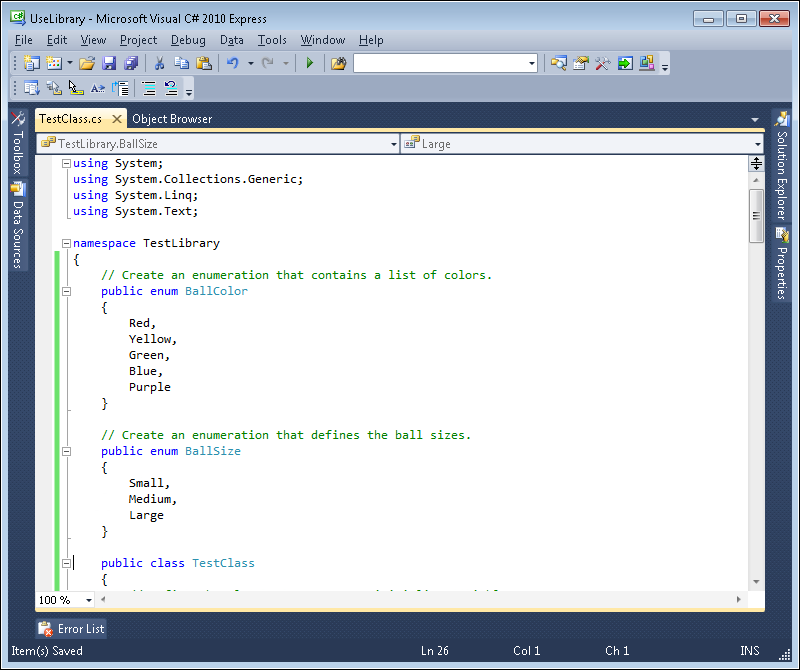
Two of the ball properties will work fine with an enumeration—size and color. Someone could probably argue that balls come in a large number of sizes, but the fact is that the number of sizes is finite and therefore adaptable to an enumeration. You use the enum keyword to define an enumeration. Then, you create a list of comma-separated entries to go into the enumeration, as shown in Example 8-2.
Example 8-2. Enumerating the ball colors and sizes
// Create an enumeration that contains a list of acceptable ball colors.
public enum BallColor
{
    Red,
    Yellow,
    Green,
    Blue,
    Purple
}

// Create an enumeration that defines the possible ball sizes.
public enum BallSize
{
    Small,
    Medium,
    Large
}
If you plan to use the enumeration outside the class, you must define it as public. It’s rare that you’d define an enumeration as private (which means that no one else can see it). Each enumeration must also have a unique name, which is BallColor and BallSize in this case.
Enumerations also usually reside outside the class structure, but within the namespace. This makes the enumeration easier for the developer using your class to access. Consequently, your code should look something like the window in Figure 8-1 after you add the enumerations to it.
Your class will use global variables to hold data, but you don’t want just anyone looking at this information in an uncontrolled manner. Instead, you want to control access to the data through properties. Using properties makes it possible check incoming data in a number of ways to ensure that it’s safe for your class. In addition, you can filter and format outgoing data if desired. As a consequence, variables should always be private in a class, but properties will normally be public so that everyone can access them. Example 8-3 shows the private variables and their associated public properties for this example.
Example 8-3. Defining the variables and properties
// Make it possible to control additions and deletions.
private Boolean _AllowAdditions;
public Boolean AllowAdditions
{
    get { return _AllowAdditions; }
    set { _AllowAdditions = value; }
}
private Boolean _AllowDeletions;
public Boolean AllowDeletions
{
    get { return _AllowDeletions; }
    set { _AllowDeletions = value; }
}

// Define the list of balls for this application.
private List<BallData> _BallList;
public List<BallData> BallList
{
    get { return _BallList; }
}

// The person using the class may want to know how
// many balls are in the list.
public Int32 BallCount
{
    get { return _BallList.Count; }
}
Properties can take a number of forms. The most common form is shown with _AllowAdditions and AllowAdditions. The AllowAdditions property shows how you declare a standard property—one that doesn’t do anything special and allows both get (read) and set (write) access. You can use this sort of setup as long as you’re certain that the class user won’t do anything with the property that will cause damage to the object. In this case, Boolean values are safe. The _AllowDeletions and AllowDeletions pair works the same way.
Tip
Another way to create standard properties is to rewrite AllowAdditions as public Boolean AllowAdditions2 { get; set; }. This shorthand method creates a standard property that has an internal private variable and uses the same code shown in the example. You can’t access the private variable and using this setup can make debugging a bit harder at times. Still, this shorthand method is a great way to reduce the amount of typing you do for properties that will never have anything but the default code associated with them.
The _BallList variable is a List of type BallData. Each element contains the information for one ball in the list. The BallList property only allows get access as a security feature. You don’t want anyone to supply their own list of balls; instead, you want to manage the list with your class. It’s essential to control the data in such a way as to make your class reliable and secure. This way, the developer using your class can access the list of balls, but can’t force the object holding the list to do anything other than supply the data as output.
Sometimes a property won’t have a variable associated with it. In fact, you’ll find many such properties in real-world classes. The BallCount property doesn’t directly manipulate _BallList. Instead, it returns the number of elements in _BallList so that the caller knows whether there are any balls to process. Theoretically, the caller could obtain the same information quite easily, but there’s a chance that the callers list of balls is outdated. Providing this property ensures that the count the caller gets is the right one.
These aren’t the only ways to work with properties. You’ll see another property example in the Defining a Structure section of the chapter.
Structures serve a number of essential purposes. However, the most important reason to use them is to create structured data elements in your application. Unlike a class, structures only contain data elements for the most part. You define a structure using the struct keyword. Like enumerations, structures usually reside outside the class (within the namespace) to make them easier to access. Example 8-4 shows an example of a structure.
Example 8-4. Creating a structure to hold ball data
// Define a structure to hold the ball information.
public struct BallData
{
    // It's possible to define Color and Size as fields
    // because their content is strictly controlled by the
    // enumeration.
    public BallColor Color;
    public BallSize Size;

    // Use a private field and a public property for the Name.
    private String _Name;
    public String Name
    {
        get
        {
            return _Name;
        }
        set
        {
            // Check the name length for potential problems.
            if (value.Length <= 10)

                // When the name is the right length, use it.
                _Name = value;
            else

                // Otherwise, tell the developer using the class
                // that there is an exception.
                throw new
                    ArgumentOutOfRangeException(
                        "Provide a string that is ten characters long.");
        }
    }
}
This structure contains three data entries: Color, Size, and Name. Color and Size are relatively safe entries because the information they contain is strictly controlled by the associated enumerations. Someone using the class won’t be able to provide unwanted information in either of these two entries.
However, Name is simply a String. Someone could provide the wrong kind of information when working with it. The name could be too long, filled with spaces, or damaging in some other way. A developer with nefarious intent could even send a script instead of a name, just to see what would happen. In this case, the code simply verifies that Name isn’t too long. However, in a production application you’d include additional checks to ensure that the data is correct.
Important
This class is also the first use you’ve seen of an exception. A class has no outside access. You can’t easily capture incorrect input and ask the user to fix it. Even overcoming errors through retries and other means is fraught with potential problems because you don’t know how the caller is using the class. In most cases, the safe course is to throw an exception. Always use the most specific and pertinent exception that you can. In this case, the code relies on the ArgumentOutOfRangeException exception because the Name is too long. Some classes rely on custom exception handling to provide even more specific information. For the purposes of this example, you’ll see standard .NET exceptions used.
Many classes provide events to alert the caller to specific conditions. When you think about events, think about actions because that’s what events are all about. Events typically have five elements:
Delegate. A delegate is a description of a method used to raise and handle events. It’s a signature that consists of the return type, delegate name, and calling arguments—just like any other method you’ve used. However, a delegate is just a signature. It describes the information for the event and its handler, but it contains no working code. You declare a delegate using the delegate keyword.
Event declaration. The event declaration associates a delegate with an event name. When someone wants to raise an event, they use the event name, but the arguments for the event are determined by the delegate. As with a delegate, an event declaration contains no working code. You declare an event using the event keyword.
Event raising. You signify when an event occurs by raising that event. Essentially, raising an event looks much like calling a method. If the event requires arguments, you must supply them as part of the call. The Developing Methods section of the chapter shows how to raise the events defined in this section.
Associating an event with a method. The IDE automatically performs this task for you in many cases. For example, when you go to the Events tab of the Properties window and double-click the Click event to create an event handler, the IDE automatically creates the code required to associate the Button class Click event with the method in the application. The Handling Class Events section of this chapter shows how to perform this task manually with the example class.
Event handling. When an event occurs, an application can choose to handle it by declaring a method that has the same signature as the event’s delegate. All of the examples in the book so far have event handlers. For example, all of the examples have methods that handle user clicks. You’ll see a typical event handler for this class in the Handling Class Events section of the chapter.
This section discusses how to create the delegate and the event declaration for three events: OnBallAdded, OnBallDeleted, and OnEndOfBalls. These events signal changes in _BallList that a developer may need to know about. Example 8-5 shows the code required to perform this task.
Example 8-5. Raising events as needed to indicate activity
// Tell the user when balls are added.
public delegate void BallAdded(BallData Ball);
public event BallAdded OnBallAdded;

// Tell the user when balls are deleted.
public delegate void BallDeleted(BallData Ball);
public event BallDeleted OnBallDeleted;

// Indicate there are no more balls in the list.
public delegate void EndOfBalls();
public event EndOfBalls OnEndOfBalls;
This doesn’t look like much code, but a lot is going on behind the scenes. As you can see, the first line declares a delegate in each case. The delegate could return a value, but normally it doesn’t. Many delegates do require input arguments, such as the BallData type uses for two of the delegates.
The second line contains the event declaration. Each declaration is public so developers working with the class can access the events. The event keyword comes next. The third element is the name of a delegate to associate with the event that controls the event signature. Finally, the code provides an event name. Most event names start with the word On, followed by the name of their associated delegate. However, nothing says that you absolutely must follow this policy.
When creating a class, most developers create the groundwork, as this example has done. All of the elements are in place now for creating methods that finalize the class interaction with the application. Example 8-6 shows the classes provided with this example.
Example 8-6. Adding methods that manage the BallList
// Create methods for adding and removing balls.
public List<BallData> AddBall(BallData NewBall)
{
    // Verify that we can add the ball.
    if (_AllowAdditions)
    {

        // Add the new ball.
        _BallList.Add(NewBall);

        // Raise an event to indicate the addition.
        if (OnBallAdded != null)
            OnBallAdded(NewBall);

        // Return the updated list.
        return _BallList;
    }
    else
    {
        // Tell the developer there is a problem.
        throw new InvalidOperationException("Additions not allowed.");
    }
}

public List<BallData> DeleteBall(BallData OldBall)
{
    // Verify that there is a ball to delete.
    if (_BallList.Count == 0)
        throw new InvalidOperationException("There are no balls to delete!");

    // Verify that deletions are allowed.
    if (_AllowDeletions)
    {
        // Remove the existing ball.
        _BallList.Remove(OldBall);

        // Raise an event to indicate the deletion.
        if (OnBallDeleted != null)
            OnBallDeleted(OldBall);

        // Raise an event if this is the last ball.
        if (_BallList.Count == 0)
            if (OnEndOfBalls != null)
                OnEndOfBalls();

        // Return the updated list.
        return _BallList;
    }
    else
    {
        // Tell the developer there is a problem.
        throw new InvalidOperationException("Deletions not allowed.");
    }
}

// Define a method for obtaining a list of ball names.
public List<String> GetNames()
{
    // Create an empty list to hold the name.
    List<String> Names = new List<String>();

    // Obtain a list of names from the internal list.
    foreach (BallData Item in _BallList)
        Names.Add(Item.Name);

    // Return the resulting list.
    return Names;
}

// Define a method for returning a specific ball.
public BallData GetBall(String Name)
{
    // Check each item in the list for the name.
    foreach (BallData Item in _BallList)

        // If the name matches, return the item to the
        // caller and exit the loop.
        if (Item.Name == Name)
        {
            return Item;
        }

    // Otherwise, throw an exception to indicate that the
    // ball wasn't found.
    throw new KeyNotFoundException("The ball name doesn't exist.");
}
Because of the way the class is constructed, it must have the following two methods: AddBall() and DeleteBall(). Otherwise, the class user could never interact sufficiently with _BallList to make the class usable. Many classes have methods such as these that must be in place to make the class useful. You should make a list of them as part of defining the class. In both cases, the method determines whether an addition or deletion is allowed. If it’s allowed, the code adds or deletes a ball as required, and then raises an appropriate event—either OnBallAdded() or OnBallDeleted(). The method then returns the current _BallList to the caller for further processing if necessary. When additions or deletions aren’t allowed, the method throws an exception.
Warning
Many developers forget to check whether an event actually has a handler. If you try to raise an event without an associated handler, the code will generate an exception. Because some events are buried and not called often, this sort of bug can remain hidden for a long time and be very hard to find. Always check event handlers against a null value (such as if (OnBallAdded != null), to ensure that the event actually has an event handler assigned to it.
Deleting a ball is a special operation. You can keep adding balls to the list until the system runs out of memory (a very long time for modern systems). However, you can’t delete balls that don’t exist. The DeleteBall() method looks for this problem and throws an exception if that condition occurs. To help prevent someone from trying to delete a ball when the list is empty, the method also raises the OnEndOfBalls() event when the list is exhausted after a previous deletion. The caller can handle this event and disable deletions in the application by using it.
The GetNames() method has a number of uses. The most obvious use is to populate a list box in the calling application with the names of balls currently in the list. A second use is to obtain a list of possible names to delete. An application may decide to delete all balls that begin with the letter S, which would require obtaining a list of the ball names first. The GetNames() method returns a List of type String to the caller that’s obtained by accessing each ball in _BallList using the foreach loop and adding its name to the list. If there are no names in the list because there are no balls in the list, the method returns an empty list, which is what the caller will expect.
The GetBall() has just one use for the most part. When you want to delete a ball from the list, you must supply a BallData object to the DeleteBall() method. It’s possible to obtain this information directly using a local _BallList object, but it’s better to call the class for the information so that you can ensure that the data is both current and correct. In this case, the code uses a foreach loop to locate a ball with the required name. It then returns the BallData object to the caller when found. If the object isn’t found, the method raises an exception that the application should handle.
You have a shiny new class to use with an application, but no application to test it. The purpose of this section is to create an application that tests the class you just created. The following sections show how to add an application project to an existing solution, add the test library to it, and then build an interface you can use to test the class.
Generally, you start by creating a new project in a new solution. However, this time you’ll add a project to an existing solution. The following procedure is a little different from what you’ve done in the past, but real-world applications often use this approach.
Adding an Application Project to an Existing Solution
Right-click the solution entry (Solution ‘UseLibrary’) in Solution Explore and choose Add | New Project. The Add New Project dialog box appears. However, in this case, the Location information is already filled out.
Select Visual C# in the left pane and Windows Forms Application in the middle pane. You’ll see a description of the template in the right pane.
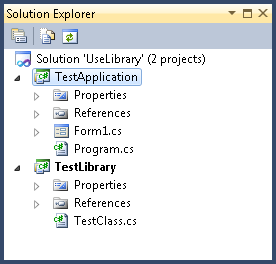
Type TestApplication in the Name field and click OK. The IDE creates a new project for you consisting of a single form. Notice that Solution Explorer now shows two projects instead of the usual one, as shown here.
It’s incredibly important to perform this next task or you won’t be able to test the class later. When a solution has multiple projects in it, only one of those projects is the startup project—the one that starts when you start the debugger. A class can’t execute on its own—only applications can do that. Right now, the class is set as the startup project, so clicking Start Debugging will display the error dialog box shown in Figure 8-2.

Of course, you’ve just added an executable to the solution, so something is available to execute. The answer to this problem is to set TestApplication as the startup project. Right-click TestApplication in Solution Explorer and choose Set As Startup Project to set this application as the startup project. Solution Explorer should now have TestApplication in bold print, as shown in Figure 8-3.

Even though TestLibrary and TestApplication reside in the same solution, TestApplication can’t use TestLibrary right now. You must create a reference to TestLibrary before TestApplication can use it. The following steps help you create a TestLibrary reference.
Creating a TestLibrary reference
Right-click References in the TestApplication project and choose Add Reference. Click the Projects tab. You’ll see a list of projects (other than the current project) associated with the solution, as shown here.
Highlight TestLibrary and click OK. Visual Studio adds the required TestLibrary reference to the TestApplication project.

This application manages to use a single form for adding, deleting, and displaying the various balls. It does use a message box to display a list of all of the balls, but the message box is a standard one and doesn’t require the addition of a form. A production application might rely on several forms to perform the same task for the sake of clarity—to ensure that the user understands each of the tasks separately from the others. However, a single form does work just fine in this case.
In this case, you need a total of six buttons to perform the various tasks. The Next and Previous buttons let you move between balls to display the information individually. The Add and Delete buttons add and remove balls from the list. The Show Names buttons displays a list of all of the balls in the list using a message box. Finally, the Quit button exits the application.
Each ball has three data elements: Name, Color, and Size. The application uses a text box for the name because you can choose any name that fulfills the criterion for a name—any text fewer than 10 characters. The Color and Size values are provided by comboboxes. You don’t want the user to choose just any color or size—the user must choose just one specific entry. Table 8-1 shows how to configure the controls for this example.
Table 8-1. TestApplication Control Configuration
Control Name | Property Name | Value |
|---|---|---|
button1 | (Name) | btnNext |
Text | &Next | |
Enabled | False | |
button2 | (Name) | btnPrevious |
Text | &Previous | |
Enabled | False | |
button3 | (Name) | btnAdd |
Text | &Add | |
button4 | (Name) | btnDelete |
Text | &Delete | |
button5 | (Name) | btnShow |
Text | &Show Names | |
button6 | (Name) | btnQuit |
Text | &Quit | |
label1 | (Name) | lblBallName |
Text | &Ball Name | |
textBox1 | (Name) | txtBallName |
label2 | (Name) | lblColor |
Text | &Color | |
comboBox1 | (Name) | cbColor |
DropDownStyle | DropDownList | |
label3 | (Name) | lblSize |
Text | Si&ze | |
comboBox2 | (Name) | cbSize |
DropDownStyle | DropDownList | |
Form1 | Text | Testing TestClass |
CancelButton | btnQuit | |
FormBorderStyle | FixedDialog |
Organize this form carefully. It’s one of the more complex forms in the book so far. Your form should look like the one shown in Figure 8-4.

At this point, you’re ready to start adding code to the application. This application actually has two phases. The first phase is to add code to the Click event handlers for each of the buttons. You’ve performed this task in every other application in the book so far. The second phase is to add event handlers and associated code for each of the TestClass event handlers. This phase requires the creation of some specialized code, but the IDE makes things quite simple, so don’t worry. The following sections lead you through each of the code additions.
As in most cases, you need to add a using statement to your code to make certain classes available. In this case, the only class you need to make available is TestClass. Consequently, you add the following using statement:
using TestLibrary;
The application needs to perform a few tasks when it starts. For example, it must instantiate a copy of the TestClass for use with the application. Of course, you’ll create a number of global variables used with the application methods. Example 8-7 shows the code needed for this purpose.
Example 8-7. Adding code to the constructor
// Create an instance of TestClass.
TestClass TheClass;

// The current ball.
List<BallData> CurrentBalls;

// The selected ball within the list.
Int32 SelectedBall;

public Form1()
{
    InitializeComponent();

    // Initialize the TestClass.
    TheClass = new TestClass();

    // Set the source of information for the comboboxes.
    cbColor.Items.AddRange(Enum.GetNames(typeof(BallColor)));
    cbSize.Items.AddRange(Enum.GetNames(typeof(BallSize)));

    // Create an empty ball list.
    CurrentBalls = new List<BallData>();

    // Set the selected ball number.
    SelectedBall = 0;
}
The first global variable is TheClass, which is the instance of TestClass used for this application. The constructor instantiates TheClass without any balls added to it.
You’ll use CurrentBalls to store a list of the balls currently in TheClass. This information is especially useful when debugging the application, but it also comes in handy for display purposes. Because there aren’t any balls in TheClass at the outset, CurrentBalls is initialized to a blank list in the constructor.
Because it’s important to keep track of the current ball in the list, the application creates SelectedBall. This value is updated every time the user adds or deletes balls, and also when the user moves from one ball to another using the Next and Previous buttons. In short, SelectedBall always points to the ball displayed on screen.
The constructor also has some odd-looking code that initializes the list of items in cbColor and cbSize. The Enum.GetNames() method obtains a list of names based on the strings inside of BallColor and BallSize. These names are presented to cbColor and cbSize as an array of strings, which you add using the AddRange() method. The result is a list of strings like the one shown in Figure 8-5 for cbColor.

It helps to have a centralized means of displaying the ball data. You have to think about two situations. In the first situation there aren’t any balls in the list. When the application starts, there aren’t any balls in the list, so all of the fields should be blank. There won’t be any balls in the list when the user deletes the last ball either, so the fields should again be empty. The second situation is when there are balls in this list. In this case, the code should display the data pointed at by SelectedBall. Example 8-8 shows the code used to display information in these two scenarios.
Example 8-8. Interacting with the user interface
private void DisplayCurrentBall()
{
    if (TheClass.BallCount == 0)
    {
        // Clear the form.
        txtBallName.Text = "";
        cbColor.SelectedIndex = -1;
        cbSize.SelectedIndex = -1;

        // Disable the Next and Previous buttons.
        btnNext.Enabled = false;
        btnPrevious.Enabled = false;
    }
    else
    {

        // Enable or disable the Next and Previous buttons as needed.
        btnNext.Enabled = true;
        btnPrevious.Enabled = true;
        if (SelectedBall == TheClass.BallCount - 1)
            btnNext.Enabled = false;
        if (SelectedBall == 0)
            btnPrevious.Enabled = false;

        // Obtain the information for the selected element.
        BallData ThisBall = CurrentBalls.ElementAt(SelectedBall);

        // Place the information in the form.
        txtBallName.Text = ThisBall.Name;
        cbSize.SelectedItem = ThisBall.Size.ToString();
        cbColor.SelectedItem = ThisBall.Color.ToString();
    }
}
One of the questions that people ask relatively often online is how to clear the content of a combo box once you set it. The answer is to set the SelectedIndex property value to -1. For some reason, setting the Text or SelectedText property won’t work. Clearing a text box is much easier. You simply set its Text property to a blank string, as shown.
Part of the process for working with the balls is to ensure that the Next and Previous buttons are set properly. The code begins by enabling both of them. When specific conditions are true, such as SelectedBall pointing to the beginning of the list, the associated button is disabled. When there’s zero or one ball, neither of the buttons is enabled because there aren’t any other balls to see. Otherwise, you’ll see the correct buttons enabled.
When displaying ball information, you need specifics about a particular ball. The code uses the ElementAt() method to obtain this information from CurrentBalls using SelectedBall as the selector. When the code obtains this information, it can transfer the information directly to the user interface as shown.
A central part of the application is adding and removing balls from the list. Otherwise, the application can’t exercise any of its other functions. Example 8-9 shows the code used to add and remove balls.
Example 8-9. Changing the ball list
private void btnAdd_Click(object sender, EventArgs e)
{
    // Don't allow blank values.
    if ((txtBallName.Text == "") | (cbColor.Text == "") | (cbSize.Text == ""))
    {
        MessageBox.Show("You must provide values for all three fields.");
        return;
    }

    // Crate a new BallData structure.
    BallData NewBall = new BallData();

    // Fill it with data.
    try
    {
        // The name may not meet the criterion.
        NewBall.Name = txtBallName.Text;
    }
    catch (ArgumentOutOfRangeException AOORE)
    {
        // If not, display an error message, display the
        // previous data, and exit.
        MessageBox.Show(AOORE.Message);
        DisplayCurrentBall();
        return;
    }
    NewBall.Color = (BallColor)cbColor.SelectedIndex;
    NewBall.Size = (BallSize)cbSize.SelectedIndex;

    // Create the new ball.
    CurrentBalls = TheClass.AddBall(NewBall);

    // Change the ball selection.
    SelectedBall = CurrentBalls.Count - 1;

    // Display the ball information.
    DisplayCurrentBall();
}

private void btnDelete_Click(object sender, EventArgs e)
{
    // Create a blank BallData object.
    BallData DeleteBall = new BallData();

    // Obtain the correct ball to delete based on the entry
    // in the text box.
    try
    {
        DeleteBall = TheClass.GetBall(txtBallName.Text);
    }
    catch (KeyNotFoundException KNFE)
    {
        // Display an error message if the ball isn't found and
        // exit the event handler.
        MessageBox.Show(KNFE.Message);
        return;
    }

    // Use the information to delete the ball.
    try
    {
        CurrentBalls = TheClass.DeleteBall(DeleteBall);
    }
    catch (InvalidOperationException IOE)
    {
        // Display an error message if necessary.
        MessageBox.Show(IOE.Message);
    }

    // Check the number of remaining balls.
    if (TheClass.BallCount > 0)
    {
        // Reset the selected ball and redisplay if possible.
        SelectedBall = 0;
        DisplayCurrentBall();
    }
    else
        DisplayCurrentBall();
}
The first task to perform when adding a ball is to ensure that the entry is at least complete. The initial if statement checks for values in each of the fields. When any of the fields are blank, the application tells the user to provide additional information. More advanced applications would actually highlight the field missing the data. The point is that you must perform checks like this when adding information to any sort of data source. Even the most conscientious user will occasionally forget to provide required information.
The next step is to create a new BallData object, NewBall, to fill with data. Remember that the Name entry is actually a property that checks for invalid input, so you must place this part of the code within a try ... catch block, as shown. Make sure you catch the correct exception, which is ArgumentOutOfRangeException in this case. Because you don’t want the incorrect information displayed on-screen, the code calls DisplayCurrentBall() to reset the display to show correct information. If the Name property check succeeds, the code finishes adding the information to NewBall. It then calls AddBall() to create the ball, updates SelectedBall, and calls DisplayCurrentBall() to show the ball information on-screen.
Deleting a ball follows a different process than adding one. The application doesn’t force the user to try to remember the specifics about a ball—just the ball name. It then uses the GetBall() method to obtain a BallData object from the class that contains the full ball information. If two balls in the list have precisely the same name, the application deletes the first one. In a production application you can add code that displays a list of all of the balls that have the correct name and tell the user to choose one. The example takes this route in the interest of simplicity and because many real-world applications work precisely this way. When the name the user has requested doesn’t exist, the class throws a KeyNotFoundException and the application must be ready to handle it.
After the application obtains a BallData object, it uses it to call DeleteBall(). Again, a potential exception is associated with this call, so you must provide code to handle it. Handling each potential exception separately makes it possible to create a more reliable application and one that provides better information to the user about the source of problems.
It’s possible that deleting the requested ball will empty the list. Consequently, the code relies on the BallCount property to check for additional balls. If there’s an additional ball, the code sets SelectedBall to 0 and displays the first ball in the list by calling DisplayCurrentBall(). When there aren’t any balls to display, the code simply calls DisplayCurrentBall() to clear the fields and disable the Next and Previous buttons.
Most of the hard work has been done for this application. All you really need now is a way to move between the ball entries. Example 8-10 shows how to perform this task.
Example 8-10. Displaying the balls one at a time
private void btnNext_Click(object sender, EventArgs e)
{
    // If we're not at the end of the list, increment the
    // selected ball count and display the new information.
    if (SelectedBall != TheClass.BallCount - 1)
    {
        SelectedBall++;
        DisplayCurrentBall();
    }
}

private void btnPrevious_Click(object sender, EventArgs e)
{
    // If we're not at the beginning of the list, decrement the
    // selected ball count and display the new information.
    if (SelectedBall != 0)
    {
        SelectedBall--;
        DisplayCurrentBall();
    }
}
In both cases, the code determines whether there’s actually a next or previous ball in the list. If there is, the code changes the value of SelectedBall and calls DisplayCurrentBall() to display it.
Users may want to see a list of all of the balls. The form that the application uses is a detail form, but many users will want some form of grid. Because the example is so simple, you can get by using a message box for the task. However, in a real-world application with complex data requirements, you’d use multiple forms to perform the task. Example 8-11 shows how to display a list of ball names for this example.
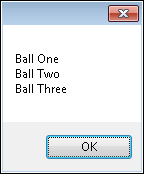
Example 8-11. Displaying a list of ball names
private void btnShow_Click(object sender, EventArgs e)
{
    // Obtain a list of the ball names.
    List<String> BallNames = TheClass.GetNames();

    // Create a string from the array.
    String Result = "";
    foreach (String Item in BallNames)
        Result += Item + "
";

    // Display them in a message box.
    MessageBox.Show(Result);
}
The call to GetNames() provides a List of type String. The code uses a foreach loop to change this List into a single String, Result, with suitable formatting. When the String is complete, the code displays a message box like the one shown in Figure 8-6 with three ball entries.
TestClass has three events that the application should handle. This is not because the application is incomplete as it is right now, but simply because this is your test harness application and must test every aspect of the application. Plus, you’ll want to know how to work with events found within classes at some point. To perform this task, you must add some code to the constructor. The IDE helps add this code, but you’ll need to get it started. The following procedure shows how to add the event handlers.
Creating Class-Based Event Handlers
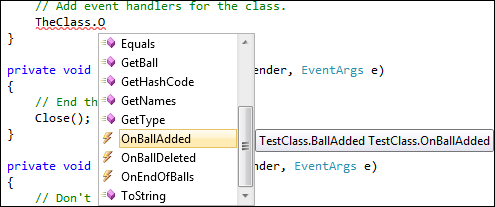
Add a line to the end of the constructor. Type TheClass.O and you’ll see a list of events like the one shown here.
Double-click OnBallAdded in the list. You see the entry added to your code.
Type +=. The IDE will suggest the code needed to create the event handler connection, as shown here.
Press Tab. The IDE will create the required code for you. The IDE will then suggest the next part of the task, which is to generate the event handler as shown here.
Press Tab. The IDE creates the event handler for you.
Perform steps 1 through 6 for OnBallDeleted and OnEndOfBalls. In each case, the IDE will help you create the required event handler linkage with the event in the class.


At this point, you have three event handlers that won’t do very much except to say they aren’t implemented. You need to add some code to them. The application doesn’t require the events for the tasks that it’s performing, so a simple message box will work just fine. Example 8-12 shows the code you need for this part of the application.
Example 8-12. Adding code for class events
void TheClass_OnEndOfBalls()
{
    MessageBox.Show("End of the list!");
}

void TheClass_OnBallDeleted(BallData Ball)
{
    MessageBox.Show("The ball was deleted.");
}

void TheClass_OnBallAdded(BallData Ball)
{
    MessageBox.Show("The ball was added.");
}
As you can see, each event handler reports on a status change. The user will get feedback now saying that the task completed successfully.
This test harness lets you test the application thoroughly. Every feature that the class provides appears somewhere in the application so that you can see it work. Before you can do anything, you need to add some balls to the list. Start your application by clicking Start Debugging. You’ll see a blank application form appear. Try adding a new ball with Ball One as the name, Red as the color, and Small as the size. When you click Add, you’ll see a confirmation dialog box and the new entry, as shown in Figure 8-7.
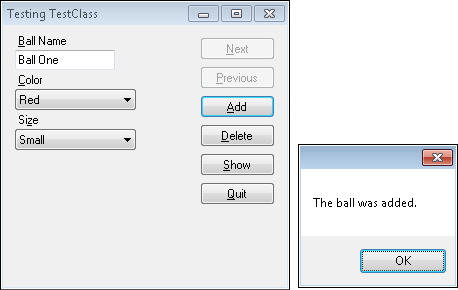
Figure 8-7. The Testing TestClass application makes it possible to see how the class functions work.
Click OK to remove the message box. Now try clicking Delete. The application displays a confirmation message. Click OK in the message box. Because this is the last record in the list, you’ll see an end of the list message box next. Click OK again and you’ll see that the form goes back to a blank display.
Spend some time adding a few balls to the list. Each time you’ll see confirmation messages. After you add the second ball, the Previous button will become enabled. You’ll be able to check the functionality of the Next and Previous buttons at this point.
Try adding a ball that has a name that’s too large and you’ll see that the application displays the appropriate error message. You can also try adding an entry with a blank field (the Name field will work at this point). Again, the application will display an appropriate error message.
Once you’re sure that the application works as expected, you can start setting some breakpoints to trace through it. Because you have the source code for the class, you can actually trace into the class and see how it works when the application calls a method. Set a breakpoint in each of the application event handlers to check out their operation.
This chapter has helped you understand, create, and test a library. You’ve been using libraries from the start, but now you have a better understanding of precisely what a library is and how you can create one of your own. Libraries are an essential part of the modern coding experience. If developers had to rewrite every line of code required to create every application, some applications would never be written because they would take far too long to complete. Of course, it’s easy to abuse libraries. Remember that libraries should contain only reusable resources—those that many applications can use or a single application relies upon in multiple modules.
A large part of writing a library is creating a black box that’s easy for someone to understand without understanding the content of the library. Someone shouldn’t have to know how you wrote the code for a library to use it. If you were to write a library to hold the code used to move between the next and previous items in the Developing the EmbeddedSource Application application in Chapter 7, how would you do it? Would it be possible to write this library in such a way that it would also work with the REST application in Chapter 6? Even if you don’t actually write the code for such a library, spend some time thinking about how you’d accomplish this task. Explore other applications in the book and determine whether there’s a potential for library code in them.
You may or may not work much at the command line. At one time, the command line was the only environment supplied with a computer—you typed a command and the computer complied by performing the requested task. The command line still exists—access it by choosing Start | All Programs | Accessories | Command Prompt. When you display the command prompt, you can execute commands such as Dir (to obtain a listing of the contents of the current folder). GUI applications such as Notepad also provide a command line interface so that you can perform tasks with them using automation such as batch files. Chapter 9, shows how to build applications that work at the command prompt. Whether your application relies on a GUI or a text interface doesn’t matter—any application can provide a command-line interface that helps administrators automate the tasks that the application performs.