After completing this chapter, you’ll be able to:
Describe how Language Integrated Query (LINQ) makes application development easy
Create an application that uses LINQ to work with information in a List control
Write code that relies on LINQ
Test an application that uses LINQ
Trace through the application to see how it works
Extend the first application to provide additional functionality
THE PURPOSE OF MOST APPLICATIONS is to manipulate some sort of data. Manipulation can take many forms—everything from displaying the data in a certain form to changing it. Whenever you look at a user interface, it displays some type of data. Even a simple message box (one of those tiny dialog boxes that Windows seems to display for any and every reason) conveys data by displaying a particular message on screen. After you read the message, you click OK to dismiss the message box, which essentially destroys the data it contained. On the other hand, when you fill out a form, you select or enter data for each form field. When you click OK, the application stores your responses somewhere else, where the application or a person will likely evaluate and act upon it. Webpages contain data as well, and convey information in a number of ways. In short, every application you’ve ever used manipulates data in some fashion. So it’s not too surprising to find that the first program you write in this book will manipulate data.
At one time, developers had to concern themselves with all kinds of arcane details about manipulating data. Today, technologies such as Language Integrated Query (LINQ) make it possible to concentrate more on the data and how you want to work with it, than on the actual machine operations used to perform a task. When working with these new technologies, you tell the language what you want it to accomplish and the language worries about how to do it. Things aren’t quite that easy, but they’re very close; in this chapter you’ll find that that’s precisely how you create an application.
Because the language itself does so much work for you, it’s easy to forget that the task must still be performed. Consequently, this chapter helps you understand what’s going on in the background, just as you discovered in Chapter 1 and Chapter 2 when you looked at how the IDE automatically writes code for your designs based on what you do in the designer. Fortunately, it’s very easy to see what LINQ is doing in the background. Visual Studio comes with a special feature called the debugger that makes it easy to see what LINQ (or any other part of your application, for that matter) is doing.
LINQ has an unfortunate name. It sounds complicated, when it really isn’t. When you think about LINQ, think about asking the application a question, because that’s what you’re doing. You’re telling the application that you want to obtain certain information and you’re leaving it up to the application code to worry about how to perform the task.
To obtain information, you need a data source, which can be anything from a list box on a form to a special storage location you create in your application to a database found on some other computer. All you need is a data source and a question to use LINQ. This chapter uses a special control, the ListBox, that provides a data source. However, you can use a host of different data sources; you’ll see a number of suitable data sources in this book.
Before you can use LINQ, you need to know a few things about it. First, LINQ is a declarative language—you declare what you want the language to do and it determines how to do it. There are many other declarative languages—you may have heard of one called Structured Query Language (SQL), which developers use to query databases such as SQL Server—Microsoft’s database program. Even if you haven’t heard of any other declarative languages, you’ll find that they’re easy to use.
For more information, see “declarative language” in the accompanying Start Here! Fundamentals of Microsoft .NET Programming book. To obtain your copy, see the section titled Free eBook Reference in the introduction to this book, or turn to the instruction page at the back of the book.
Second, you need to know a few special words. Consider them the “magic words” that LINQ requires you to say to get it to perform useful work. These words aren’t anything strange, like “abracadabra”—they’re words you commonly use, so they’re easy to remember.
from. You need to tell LINQ where to obtain the information that it provides as output. So you say, “Get it from here.” Technically, the from keyword points to a variable—a kind of temporary storage container.
in. This keyword tells LINQ that the data source is in some sort of container. A data source can be any number of things, such as a database. To make things simple, this chapter relies on a special kind of control to act as a data source, but don’t worry about that now.
select. It’s important to tell LINQ to obtain something from the query. The select keyword tells LINQ what to choose (or select) based on the content of the temporary storage container. If you like, you can choose to use all the content of the temporary storage container.
You need one additional keyword to complete the picture. This one is a little odd looking, but you’ll remember it quite easily because it’s only three letters, var. The var keyword tells the application to create a storage container (a variable) to hold the results of the LINQ query. You don’t care what kind of container LINQ creates, as long as it’s the kind of container that the query needs. In most cases, LINQ can determine the right sort of container and create it for you, so you don’t have to worry about anything.
At this point, you can put all the various pieces together to form a sort of question (a query), which you will ask LINQ to solve. This code won’t actually work, but it demonstrates generally how the real LINQ queries that you create later will look.
var Result = from OutputContainer
             in DataSource
             select OutputContainer
In this case, Result will eventually contain everything found in DataSource. If DataSource contains One, Two, Three as three separate items, Result will eventually contain all of three of those items because the query says, “Store each item in DataSource to OutputContainer, then select OutputContainer and put it in Result.” Don’t worry too much about how this all works right now—you’ll see it in greater detail later. All you need to know now is that you’re asking LINQ a question based on a source of information and LINQ provides an answer.
The best way to understand how to use LINQ is to create another program. In most cases, you start a program by creating a project, adding some controls, and then configuring the controls. In fact, this part of the process is precisely the same as the steps you followed in Chapter 1, and Chapter 2. Both chapters led you through a series of steps that created a project, added controls to it, and then performed some configuration. You’ll get to experiment with some new controls in this project, including:
Label. Displays some text that describes what to do with other controls. Most applications contain at least one Label. This example uses one Label to identify the ListBox and another to identify the TextBox. Button controls contain text inside them, so they don’t need Label controls for identification purposes.
Button. A pushbutton that a user can click to make things happen. The most common Button controls are OK and Cancel—you see them used all over the place in Windows. In this case, you will use a click-on-one Button control to tell LINQ to answer a question and another to end the application.
TextBox. Used to hold text of any sort. Whenever you fill out a form, the blanks used to hold the text you type are all TextBox controls. A TextBox control can also show the results of some task, which is how this application uses the TextBox. Later examples will show other uses for TextBox controls because TextBox controls are really quite flexible.
The steps to create the List project are similar to those for the examples in Chapter 1. You begin by starting up your copy of Visual C# 2010 Express. These steps will help you configure the project.
Click New Project. You’ll see the New Project dialog box shown here.
Select Visual C# in the left pane and Windows Forms Application in the middle pane. You’ll see a description of the template in the right pane. Do not click OK until you provide a name for the new project.
Type ListProject1 in the Name field and click OK. The IDE creates a new project for you, consisting of a single form.

The Windows Forms example in Chapter 1 contained a single control. This example includes several controls. An interesting aspect of applications is that they have a feature called tab order. When you start an application, the control with the lowest tab order is always selected first. When you press Tab, the focus (the control selected within the application) always shifts to the control with the next highest tab order. Well-designed applications always use a logical tab order—normally the tab order starts from the left and moves toward the right and starts from the top and moves toward the bottom—much like the text you’re reading on this page. With this in mind, click the Toolbox tab and click Auto Hide to keep it displayed. Double-click the controls you need to add them to the project in the following order:
Button
Button
Label
TextBox
Label
TextBox
Note
When you double-click a control to add it to a form, the IDE places them right on top of each other in a seemingly random order. This is completely normal. You’ll configure the controls later, so the ordering and position aren’t important now. All you’re looking for is a collection of controls on the display. The chapter will always show how the controls are supposed to appear after you configure them so that you can make sure your controls match the controls used for the example.
After you add the controls you need, close the Toolbox by clicking Auto Hide. Then you look at your form. What a mess! The controls are all over the place and some are overlapping others. At this point, you want arrange the controls so that they look like other applications you may have used in the past. To move a control, click it and drag it to a new location on-screen.
To resize a control, click the control to select it. You’ll see resizing handles, as in Figure 3-1.

Each one of the little squares around the outside edge of the ListBox control is a resizing handle. Click a resizing handle and drag it to change the control size. You can tell when you’ve selected a resizing handle because the mouse cursor changes to a double-ended arrow that indicates the direction the resizing handle will change the control size.
The IDE also makes it easy to give your application a professional appearance. Whenever a control is close to another control or the edge of the form, you will see little lines called guides appear. These lines help you place the control optimally on the form. Figure 3-2 shows an example of how one of the Label controls looks with the positioning aids displayed.

The positioning aids appear as two light lines—one pointing up from the Label toward the top of the form and another pointing left from the Label to the left side of the form. When you see these positioning aids, you know that your control is in an optimal position on the form. You can’t completely position every control on the form just yet because you have to perform some configuration first. However, you can complete most of the positioning. Work with your form until it looks like the one shown in Figure 3-3.

The examples in Chapter 1 and Chapter 2 showed you how to configure controls. Just as a reminder, you select the control you want to work with in the designer, click the Properties tab to open it, and then click Auto Hide to keep the Properties window displayed. This example has four controls for you to configure. Table 3-1 shows how to configure each of the controls.
Table 3-1. ListBox1 Control Configuration
Control Name | Property Name | Value |
|---|---|---|
button1 | (Name) | btnTest |
Text | &Test | |
button2 | (Name) | btnCancel |
Text | C&ancel | |
label1 | Text | &Selections |
txtBox1 | (Name) | txtSelections |
Multiline | True | |
Size.Height | 95 | |
label2 | Text | &Output |
txtBox1 | (Name) | txtOutput |
Multiline | True | |
ReadOnly | True | |
Size.Height | 95 |
The txtSelections and txtOutput controls have an interesting new configuration requirement. Click the Size property and you’ll notice that an arrow appears on the left side of it. Click the arrow and you’ll see two sub-properties: Width and Height. You need to set the Height sub-property of the Size property to 95 for this example.
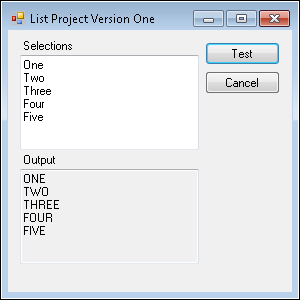
The txtSelections control also has a special configuration requirement. Click the Lines property. Notice that this property has a value of String[ ] Array, which simply means that it has a list of items associated with it. To set this property, you click the ellipsis (. . .) on the right side to display the String Collection Editor. Place one item on each line of the String Collection Editor, as shown in Figure 3-4.

Click OK when you’re finished entering the five items. At this point the controls are all configured for use and your form should look like the one shown in Figure 3-5.
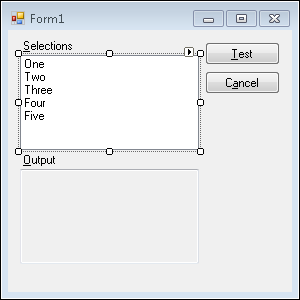
Of course, you’ll also want to provide some different text for the form’s title bar so that it reflects the actual purpose of the application. Select the form. Choose the Text property in the Properties window, and type List Project Version One.
It’s finally time to add some code to your example. Don’t worry—this example won’t require that you become a computer science major. In fact, you may be surprised at just how much you can do with very little code using C#.
One of the essentials that you must know about is events. An event is something that happens to the control. For example, when a user clicks a Button, a Click event occurs. You can add code that the application executes every time the event occurs. For example, you can tell your application to display a message box every time the user clicks a particular Button. The code you assign to the Button’s Click event is called an event handler because it does something about the event. The following sections describe several techniques for adding code to event handlers associated with controls in this example.
Every control has a default event associated with it. When working with a Button, it’s the Click event. The default event is the event that the user is likely to want handled most often. Visual Studio makes it easy to create an event handler for the default event for a control. All you need to do is double-click the control. Try it now with btnCancel and you’ll see the Code window appear, as shown in Figure 3-6.

Notice that Visual Studio automatically places the cursor in a position to start typing. The IDE also automatically generates the event handler code for you and gives the event handler a name. The event handler is named btnCancel_Click() in this case because it handles the Click event of the Button named btnCancel. The event handler contains some other code that you don’t need to worry about now. This other code is arguments—data provided to the event handler. You’ll rarely use it for applications of this sort.
It’s time to add code to the btnCancel_Click() event handler. The purpose of the btnCancel button is to end the application. It cancels the task that you’re doing so that you can do something else. There are many ways to end the application, but here you’ll use the most common method for this application. Simply type Close(); at the cursor position. That’s it: you tell the form to close, which ends the program when you’re working with the last form in the application (and this is the one and only form).
You should have noticed something special when you typed the C that begins Close(). The editor automatically displays a list of items that begin with the letter C for you so that you don’t have to remember difficult keywords, as shown in Figure 3-7.

This feature is called IntelliSense and it’s always available to you. The box that appears next to the list is also important. It tells you about the currently selected entry in the list. In this case, you discover that the Close() method closes the form. The Code window has a wealth of such features that you’ll discover as the book progresses. For now, all you need to know is that the btnCancel_Click() event handler is completed.
What happens if you don’t want to use a default event, or you simply aren’t sure what the default event is? In this case, select the control in the Designer, click the Properties tab to display the Properties window, and click Auto Hide. Click Events, and you will see a list of events associated with that control. In fact, try it right now with btnTest. Figure 3-8 shows the events associated with btnTest.
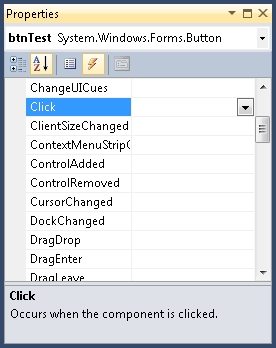
The Properties window even provides a brief description of each event. In this case, it tells you that the Click event occurs whenever a user clicks the Button. To create a new event handler for this event, double-click its entry. As before, you’ll see the Code window appear with the cursor in the right position to begin typing.
One of the things you should do as you learn to work with Visual Studio is right-click objects, which then typically display a shortcut menu. Visual Studio’s shortcut menus contain all sorts of helpful items and actions. For example, if you right-click a form in Solution Explorer, you’ll see menu options that let you view the Designer (where you can add controls and configure them) or the Code editor (where you can add code to event handlers), as shown in Figure 3-9.

You’ll find that many objects have an entry for viewing code. For example, right-click any of the controls in the Designer and you’ll find a View Code option. Choose this option and you’ll see the Code Editor as you’d expect.
You’ve already worked with an Code Editor feature named IntelliSense when you wrote the code for the btnCancel_Click() event handler. The Code Editor, like every other part of Visual Studio, has a number of other interesting features that you need to know about. This section doesn’t discuss them all, but you’ll learn about some features that will come in handy now.
One of the more important features is the ability use a mouseover action to quickly find information about any method you work with in your code. The resulting tooltip window shows the most common usage of the method, a description of the method, and the exceptions associated with the method. An exception is an event that occurs when something goes wrong. For instance, suppose you try to divide a number by zero. Because that operation is undefined, the application generates an exception that tells you that the code has attempted to do something wrong. Don’t worry too much about exceptions for now—you’ll discover them in later examples in the book (starting with Chapter 5).
Many developers find that keeping their hands on the keyboard is far more productive than using the mouse to select items in the editor. For example, you can select some text by pressing Shift+Right Arrow, press Ctrl+C to copy it to the clipboard, move to a new location by pressing the arrow keys, and then paste it in a new location by pressing Ctrl+V. The Visual Studio menus tell you about many of these shortcuts. You can also find a list of Visual Studio 2010 shortcuts at http://msdn.microsoft.com/library/da5kh0wa.aspx.
Another interesting feature is the ability to right-click everything and find a menu that contains interesting options. For example, right-click the Close() method and you’ll see a menu with the entries shown in Figure 3-10.
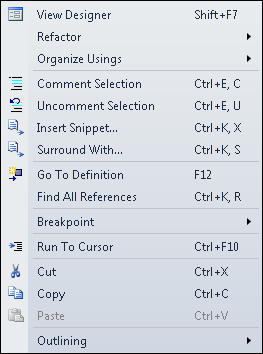
Some of these entries will see use in other chapters, but you can use some of them immediately. For example, select View Designer to see the Designer associated with the code you’re looking at.
If you think a particular piece of code is causing problems, you can choose Comment Selection. The code remains, but the IDE turns it into a comment so the compiler ignores it and you can see how the application works without that code. Try it now. You’ll see that the IDE adds two slashes in front of Close(); to turn it into a comment. Now right-click Close() again and choose Uncomment Selection. The IDE removes the two slashes. You can use this feature with a whole block of code by highlighting the block, right-clicking, and choosing Comment Selection or Uncomment Selection from the menu.
For more information, see “comment” in the accompanying Start Here! Fundamentals of Microsoft .NET Programming book. To obtain your copy, see the section titled Free eBook Reference in the introduction to this book, or turn to the instruction page at the back of the book.
Tip
The shortcut menu also contains options for Cut, Copy, and Paste. You use these options just like you would in any editor. Many developers will copy working code and paste it into another location to save time. Even if the code isn’t precisely what the developer needs, making small modifications to working code is far easier than starting from scratch.
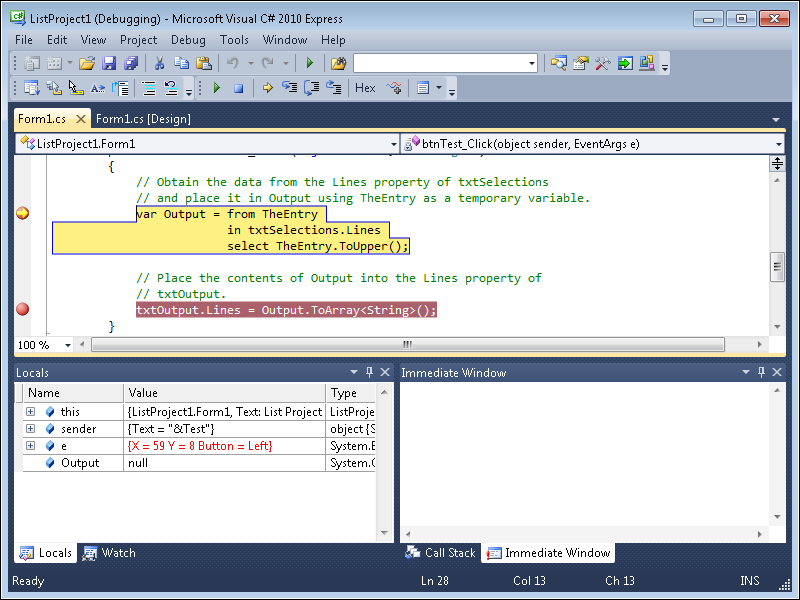
The btnCancel_Click() event handler already has some code in it. However, you haven’t written any code for the btnTest_Click() event handler. In this case, the example does something simple. It examines each of the entries in txtSelections, changes them to uppercase, and then puts the result in txtOutput. At one time, a developer would have written all kinds of hard-to-decipher code to perform this task, but Example 3-1 shows that you can use a simple LINQ statement and one additional line of code to perform this task in C#.
Example 3-1. Using LINQ to manipulate data
private void btnTest_Click(object sender, EventArgs e)
{
    // Obtain the data from the Lines property of txtSelections
    // and place it in Output using TheEntry as a temporary variable.
    var Output = from TheEntry
                 in txtSelections.Lines
                 select TheEntry.ToUpper();

    // Place the contents of Output into the Lines property of
    // txtOutput.
    txtOutput.Lines = Output.ToArray<String>();
}
As with the btnCancel_Click() event handler, the example begins with the code that the IDE automatically generates for you. Don’t worry about it for right now—you’ll see how it works later in the book.
The var Output code simply creates a variable (essentially a storage container) to hold the output from the LINQ query. As you’ll remember from the discussion in the Understanding LINQ section, txtSelections.Lines is the data source. This is the same property you configured earlier with One, Two, Three, Four, and Five on separate lines—each of those elements is a separate data item that’s processed in the LINQ query. Each entry in txtSelections.Lines, such as the value One, is placed in a temporary variable named TheEntry. The code uses the TheEntry.ToUpper() method to change the content in TheEntry to uppercase.
When you create a LINQ query, the results appear immediately in the variable you create, but then nothing happens to that content. Output contains the preliminary results of the query and then the example uses them later in a specific way. In this case, the example outputs the information to txtOutput.Lines property, which is a list of items just like the txtSelections.Lines property. You could just as easily configure the txtOutput.Lines property using the String Collection Editor, but this approach lets you do something with the property when the application runs.
Remember that the Lines property has a value of String[] Array. So, you must create information of this sort to store it in the Lines property. You already know that Output contains the result of the LINQ query. A call to the Output.ToArray<String>() simply creates a String[] Array to put in the Lines property from the content in Output. In short, Visual Studio tells you what it wants—you need to find a way to provide it.
You’ve put a lot of work into this example so far and don’t really have much to show for it. That’s about to change. Click Start Debugging on the Standard toolbar, press F5, or choose Debug | Start Debugging (F5). The application will start and you’ll see a dialog box like the one shown in Figure 3-11.

As you can see, your program looks just like any other little program you might have used in the past—except you know how this one was put together. Click Test. The Selections list stays the same, but notice that the Output list changes and that the output is in uppercase as expected, as shown in Figure 3-12.
You can even type new entries into Selections and see them in the output. For example, place your cursor at the last line in Selections and type Hello. Now click Test again and you’ll see that Hello is processed and placed in Output, as shown in Figure 3-13.

Figure 3-13. You can add entries to the Selections field, click Test, and see the entry added to Output.
At this point, you should try the other button. Click Cancel. Notice that the program ends, just as you’d expect it to. So your first application does something interesting with very little code.
When you started your application in Testing the List Application, you probably clicked Start Debugging. Of course, it would be nice to know precisely what debugging is and why it’s important to your application. Debugging is a way to look at your application in detail to see how it works. The term comes from the idea of removing bugs from your code. A bug is some sort of error that keeps the code from working right. However, you don’t need to limit yourself to looking for bugs. Think of the debugger as a tool that lets you take a detailed look at your code. That’s what the professionals do. Often, a professional will use the debugger simply to look at how someone else has created code and discover how it works. In fact, that’s how you use the debugger in the following sections.
When you use a debugger to explore an application, you’re tracing it. Tracing is an extremely useful technique for learning how applications work and professional developers frequently employ the technique. It’s one thing to read how something works—seeing it work is quite different. Suddenly, the light bulb goes on and you discover that you know something about the application and have learned something new about programming as well.
Note
To trace through an application, you need to have its source code. You then build the application to create an executable. The source code is like a blueprint and the build process uses the blueprint to create the executable. That’s what happens when you start the debugger—it automatically builds the application for you. It’s also possible to perform this process separately by choosing Debug | Build Solution or pressing F6.
In the Testing the List Application section of this chapter, you ran the example application. Even though you couldn’t see it, the debugger also ran when you started the application. To see what the debugger can show you, you must place a stop sign in the application called a breakpoint. A breakpoint tells the debugger to stop at a certain point so that you can see what’s going on beneath the hood.
There are many ways to create breakpoints, but to trace an application you only need one of them. The easiest way to create such a breakpoint is to click in the left margin area next to the line of code you want to review. Try it now with the LINQ query in the example application. Click in the left margin area (it appears light gray in the Code Editor) and you’ll see a red circle appear, as shown in Figure 3-14.

Figure 3-14. Breakpoints are highlighted in red so that you can’t confuse them with other sorts of entries.
Notice that the breakpoint also highlights the affected code. In this case, it highlights the entire LINQ query. When debugger stops here, it treats the entire LINQ query as a single entry.
Another way to create a breakpoint is to right-click the line where you want to stop, and choose Breakpoint | Insert Breakpoint from the context menu. As before, you’ll see a red circle appear in the left margin area. Try this technique with the next line of code. Again, the IDE highlights the entire line in red.
Yet another way to create a breakpoint is by placing your cursor on the line where you want to stop, then pressing F9 or choosing Debug | Toggle Breakpoint. In sum, breakpoints are important enough that Microsoft wants to be sure you can place them wherever you want.
Removing a breakpoint when you are done using it is just as easy as creating one. You can use any of these methods:
Click in the left margin area.
Right-click the line and choose Breakpoint | Delete Breakpoint.
Place the cursor on the line of interest and press F9 or choose Debug | Toggle Breakpoint.
You now have two breakpoints in place for the sample application. Normally, you’d use just one for such a small application, but using two is fine also. Start the application by clicking Start Debugging on the Standard toolbar, pressing F5, or choosing Debug | Start Debugging. The application will start and you’ll see the dialog box, just as you did before. Now click Test and something new will happen—the application will stop and you’ll see the debugger, as shown in Figure 3-15.
The application has stopped at the first breakpoint, much as you’d expect. The LINQ query is now highlighted in yellow and you see a little yellow arrow in the red circle in the left margin. This is the instruction pointer—it tells you which instruction the debugger will execute next. So the query hasn’t happened yet.
At this point, most developers look at the application data because the overriding purpose of applications is to manipulate data in some way. Variables act as the storage containers for data, so you normally look at the data by working with the variables. Visual Studio offers more than a few ways to examine your application’s data. Notice the Locals window in the lower-left corner of the figure. This window contains a list of the variables in use by the btnTest_Click() event handler. Output is the last variable in the list. Notice that the current value of Output is null, which means it contains nothing.
Note
You’ve been introduced to a number of different Visual Studio windows at this point, so it’s worth mentioning that you can reach any of these windows through the View menu. Select View | Other Windows for a full list. This feature is particularly useful when you have closed a window for space or convenience reasons and then want to reopen it.
You can’t see txtSelections or txtOutput in the Locals window because they aren’t local to the btnTest_Click() event handler. These two controls appear outside of the event handler. In the lower-right corner you see the Immediate window. You can type questions there and get a response from the debugger. For example, try typing ? txtSelections.Lines. Notice that IntelliSense is also available in the Immediate window. As soon as you type txtSelections, IntelliSense displays a list of items you can choose from. Press Enter, and you’ll see what txtSelections.Lines contains, as shown in Figure 3-16.
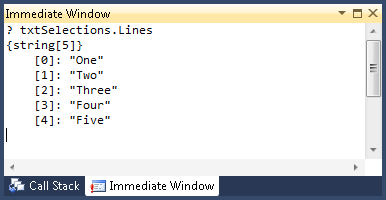
The output tells you that txtSelections.Lines contains a list of five items as a String[] array. You can also see each of the values and the position each value has in the list. You can use this technique with local variables too. Type ? Output and press Enter. The Immediate window will also report that Output contains a null value. You should perform one final check before moving on. Type ? txtOutput.Lines and press Enter. You might expect that this value is also going to be null, but you see {string[0]} instead. This output tells you that the property isn’t empty, but that the list it contains is empty—it contains zero items.
Part of tracing an application is to see how things change. So it’s time to go to the next step. Click Continue on the Standard toolbar (the green, right-pointing arrow), press F5, or choose Debug | Continue. The yellow highlight and its associated arrow will move to the second breakpoint. Try typing the three commands in the Immediate window that you tried before. You’ll notice that Output is no longer null—it contains some odd-looking data, but it does contain data now. So the previous step filled Output with data. However, txtOutput.Lines is still an empty list.
At this point, you no longer have any breakpoints set. It would be nice to see txtOutput.Lines change, but there doesn’t seem to be any way to do it. Click Step Over on the Debug toolbar, press F10, or choose Debug | Step Over. The Step Over command moves the instruction pointer to the next line. Anything required to do that happens in the background. Notice that the instruction pointer does, in fact, move to the next line, which is a closing curly bracket. The curly bracket is also highlighted. Check on the value of txtOutput.Lines again and you’ll see that it has changed. It contains precisely the information that you’d expect—the content of txtSelections.Lines in uppercase.
Another part of discovering how applications work is to play with them. To think about how something might work, develop a theory and then test it. You need to answer the question of what could happen if something occurs. Interestingly enough, you already have the knowledge to do just that. It’s possible for you to change something and see what happens when you do. The following sections examine two simple theories and help you test them.
In the Viewing Application Data section, you ended the debugging session with the instruction pointer at the curly brace at the end of the btnTest_Click() event handler. If you’re still there, you’re ready to go. If not, use the information in that section to get the instruction pointer to that location in the code. It’s at this point that the txtOutput.Lines property contains the output you expect from the application. However, what would happen if you changed the txtOutput.Text property and gave it another value? Type txtOutput.Text = “Hello World” in the Immediate window and press Enter. You’ll see Hello World appear immediately after the command. Unfortunately, that doesn’t tell you anything about the application. Click Continue to tell the application to finish the btnTest_Click() event handler code. The Output text box will contain something other than the text you expected as shown in Figure 3-17.
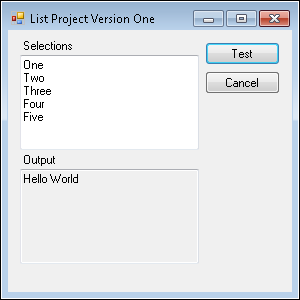
This little test has shown you something interesting. It’s possible to affect the content of the text box using various properties (both Lines and Text in this case). In addition, if something in your code works other than it should, it could produce unexpected results in the output. Many novice developers end up spending hours trying to figure out this little principle, but you’ve discovered it with your first application. Amazing!
Graphical environments can sometimes prove confusing until you play with them for a while. For example, you know that when you click a button, the application automatically highlights it. The act of highlighting the button is called giving it the focus. Any control can receive the focus. Generally, only one control has the focus at any given time. You know that when you’re testing the sample application, anytime you click Test, it receives the focus and the application highlights it.
You might wonder whether some other control could receive the focus, even if you’ve already selected something else. Give it a try. Click Test. The debugger will stop at the first breakpoint you created. (Get rid of the second breakpoint by clicking the red circle in the left margin—you don’t need it any longer.) Try giving the Cancel button the focus. Type btnCancel.Focus() in the Immediate window and press Enter. You’ll see true appear under the command you typed. Click Continue. The Cancel button does indeed have the focus, as shown in Figure 3-18.
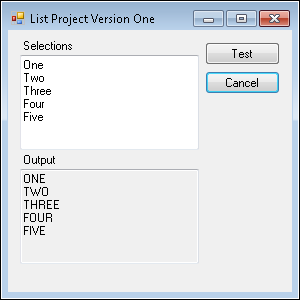
Figure 3-18. The Immediate window also makes it possible to execute commands that change control appearance.
This same technique works with any other control in the application. Give it a try—it’s fun. For example, if you type txtSelections.Focus() and press Enter, you’ll see that all of the text within the Selections text box is selected when you click Continue. Understanding how focus works is another important lesson in creating great applications. At this point, you can click Cancel to end the application. If you’re in the debugger, you can click Stop Debugging, press Shift+F5, or choose Debug | Stop Debugging instead.
The second list project is going to build on the first one. You’ll use essentially the same interface, but you’ll extend the code to perform some additional tasks. The following sections tell you how to build this extended version, describe how to test it, and then help you discover some new programming principles using it.
This second list project uses the same approach as the first list project. Simply follow instructions found in the Starting the List Project section of this chapter. Instead of naming your project ListProject1, name it ListProject2.
In the Adding the Controls section of this chapter, you add a number of controls to List Project 1. Of course, you’ll always have to go through this process for new projects where you don’t already have a template. However, what happens (as in this case) when you want to create another project with essentially the same controls? It’s possible to copy the controls from one form to another. Simply open List Project 1 and select the controls in the form you created earlier, as shown in Figure 3-19.

Notice that every one of the controls is selected. You can use the Ctrl+click approach to do this or simply lasso the entire group of controls by dragging the mouse cursor to encompass all of them. At this point, you can copy the controls to the clipboard by clicking Copy or by pressing Ctrl+C. Now, choose List Project 2 and click the form to select it. Paste the controls you copied into place by choosing Paste or by pressing Ctrl+V. You’ll see the fully configured controls appear on the form. All you need to do is nudge the controls into place by selecting the entire group and dragging them so that the first Label control is in the right spot in the upper-left corner of the form.
At this point, you have a project with fully configured controls to use. However, you should have noticed something when you worked with List Project 1. The TextBox controls do a wonderful job of displaying the lines of text. However, once you get so many lines displayed in the TextBox, you can’t see the remaining lines and there isn’t any indicator to tell you there are more lines. Try it yourself. Start List Project 1, type Six and Seven on separate lines in Selections, and then click Test. You’ll get the result shown in Figure 3-20.
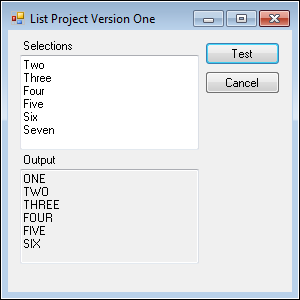
You can’t see Seven in the Output text box. If you select Output and scroll down you can see it, but there isn’t any indicator that the text box contains additional information. Even though the application works, it doesn’t provide all of the information the user requires. Programmers call this a fit and finish problem—you need to finesse the controls to get the desired view. In this case, select txtSelections in List Project 2. Open the Properties window, select the Scrollbars property, and set it to Vertical. Perform the same task with the txtOutput control. You’ve now fixed a problem that would normally confuse the user in your second application.
Tip
Often you won’t even see fit and finish problems as you work with the application because you’ll automatically compensate for any shortcomings the application might have. It’s human nature to do so. That’s just one reason why companies like Microsoft invest so heavily in beta testers. Someone else can often see the warts in your application that you’ve failed to notice because you work with the application constantly.
This is also the second version of the list project. So, you’ll need to change the title bar text. Select the form. Choose the Text property and type List Project Version Two.
There are many ways to modify the simple query shown in Example 3-1. In this case, the example shows how to work with a variable. Remember that a variable is simply a container used to temporarily store data in memory. The variable doesn’t contain the query this time. Instead, it contains a count of the number of items that the query processes. The example outputs this count as part of the information you see in the Output textbox. Example 3-2 shows the extended code for this example.
Example 3-2. Defining a More Advanced Query
private void btnTest_Click(object sender, EventArgs e)
{
    // Create a variable to hold a count of the number of
    // entries in txtSelections.
    var Count = 0;

    // Obtain the data from the Lines property of txtSelections
    // and place it in Output using TheEntry as a temporary variable.
    var Output = from TheEntry
                 in txtSelections.Lines
                 select (Count = Count + 1) + " " + TheEntry.ToUpper();

    // Place the contents of Output into the Lines property of
    // txtOutput.
    txtOutput.Lines = Output.ToArray<String>();
}
The code begins by creating a new variable. Later you’ll discover that you can create a specific kind of container to hold specific kinds of data. For now, the example uses the var keyword to create a variable of unknown type named Count. It also places data in Count—a value of 0.
The query comes next. The basic query is the same as before. However, notice that the select clause contains some additional information. You can make the select clause as complicated as you want. In this case, the code adds 1 to Count and then outputs Count, a space, and TheEntry as uppercase. Creating a complex output like this using the plus sign (+) is called concatenation. Every time LINQ processes one of the entries in txtSelections.Lines, it also adds 1 to Count, so Count will always display the current line number of the txtSelections.Lines entry. If the first line in txtSelections.Lines is One, the output would be 1 ONE (the value of Count, a space, and the word One in uppercase).
The output code is the same as the first example. It outputs the content of Output as an array to txtOutput.Lines. As a result, you see whatever the LINQ query created as output. Figure 3-21 shows a typical example of output from this version of the application.

As you might expect, this example works similarly to the first example, but it also has a few differences. This section traces through the example and points out some of the differences you should notice. In some cases, you’ll find that code you locate online or as part of your daily work is like this too. You can find a simple version of the source code to check first, and then a more complex example that builds on the first example. Begin this part of the example by creating a breakpoint at the var Count = 0; line.
Begin the tracing process by starting the application and clicking Test. Look at the Locals window. You’ll see an entry for Count, as shown in Figure 3-22.

Click Step Over twice. As before, Output will now have a value other than null. This time you want to see how the LINQ query works because it has suddenly become a little more complex. Click Step Into, press F11, or choose Debug | Step Into. You’ll actually move into the LINQ query because the display code must call it to determine what to display on-screen. This is a nice feature of LINQ queries because you can gain a better understanding of why something is or isn’t working. Notice that the Locals window changes to show just TheEntry and Count, as shown in Figure 3-23. (Remember that ThisEntry is type string and Count is type int—this information will come in handy in the Understanding Data Types section of this chapter.)

It may be a mystery as to why Count is 0. Isn’t it supposed to be 1? Remember that the actual output of Count is Count + 1 (or 1 in this case). The code stores this value (Count + 1) into Count for the next query. Click Step Into again. You’ll see that the values have changed to Two and 1. Click Step Into four more times. After each click you’ll see the values in the Locals window update just as you’d expect them to. In short, you’re seeing how a LINQ query actually creates the output.
At this point, you should be back to the txtOutput.Lines = Output.ToArray<String>(); line of the code. Click Continue and you’ll see the output displayed. You can try tracing through the example as many times as needed to start understanding how precisely the code does its work.
So far, the chapter has discussed variables in a non-specific manner. The two tracing sections in the chapter show that variables have a particular type, even though you’ve looked at them as simple containers. It’s true that variables are containers for data, but they contain a specific kind of data. The var keyword creates a variable of unknown type. Although using var makes it easier to write code, the var keyword also makes it harder to read the code. No one knows what kind of data appears in the variable—it’s as if you’ve created a mystery box.
In addition, the var keyword keeps the compiler from performing part of its work. When you tell the compiler what sort of information should appear within a variable, it can verify that the variable does indeed contain that sort of data and that you don’t accidently try to put the wrong kind of data in the variable.
The Tracing Through the Extended Example section of the chapter shows two kinds of variables: string and int. You’ll find that you use these two types of data quite often when you create programs. However, there are many other kinds of data. Table 3-2 provides a brief description of each of these data types. Don’t worry about committing them to memory now—you’ll begin to memorize the data types as you create additional applications throughout the book. In addition, future examples will highlight special features of each data type.
Table 3-2. Common (Built-in) Data Types Found in C#
.NET Framework Name | Range | Description | |
|---|---|---|---|
bool | System.Boolean | true or false | Contains a yes or no answer. It’s a logical value you can use to test the truth of something. |
byte | System.Byte | 0 to 255 | A numeric value that requires eight bits of storage space and stores only positive values. |
sbyte | System.SByte | -128 to 127 | A numeric value that requires eight bits of storage space and can store both positive and negative values. |
ushort | System.UInt16 | 0 to 65,535 | A numeric value that requires 16 bits of storage space and stores only positive values. |
short | System.Int16 | -32,768 to 32,767 | A numeric value that requires 16 bits of storage space and can store both positive and negative values. |
uint | System.UInt32 | 0 to 4,294,967,295 | A numeric value that requires 32 bits of storage space and stores only positive values. |
int | System.Int32 | -2,147,483,648 to 2,147,483,647 | A numeric value that requires 32 bits of storage space and can store both positive and negative values. |
ulong | System.UInt64 | 0 to 18,446,744,073,709,551,615 | A numeric value that requires 64 bits of storage space and stores only positive values. |
long | System.Int64 | –9,223,372,036,854,775,808 to 9,223,372,036,854,775,807 | A numeric value that requires 64 bits of storage space and can store both positive and negative values. |
float | System.Single | ±1.5 × 10-45 to ±3.4 × 1038 | C# supports whole numbers (integer types) and real numbers (floating point numbers with a decimal point). This 32-bit floating-point data type provides a container for smaller numbers. It provides seven significant digits of precision. |
double | System.Double | ±5.0 × 10-324 to ±1.7 × 10308 | This 64-bit floating-point data type provides a container for large numbers. It provides 15 to 16 significant digits of precision. |
decimal | System.Decimal | ±1.0 × 10⁻²⁸ to ±7.9 × 1028 | Computers use base 2 numbers, which don’t always represent decimal (base 10) numbers very well. This 128-bit data type helps you perform financial calculations with greater accuracy. It provides 28 to 29 significant digits of precision. |
char | System.Char | U+0000 to U+ffff | A single 16-bit Unicode character. Characters are tricky because to the computer, they’re simply a number. The application environment gives the number significance as a character. For now, you really don’t need to worry about character sets or their use in applications. You can read more about character sets and see a list of character sets at http://www.i18nguy.com/unicode/codepages.html. |
System.String | N/A | A string is simply a list of characters. You can use it to store words, sentences, entire paragraphs, or any other sequence of characters that you want. Think of a string as simply text, like the text you’re reading right now. | |
object | System.Object | N/A | C# needs a way to model the real world and complex data. Later you’ll discover that you can create a container to hold any kind of data you can imagine and many types of data you haven’t ever seen. All of these special data types rely on the object data type as a starting point. |
Tip
The C# data type name is used only in C#. These types correspond to specific .NET Framework type names. Any language that the .NET Framework supports can use these names. Savvy developers often use the .NET Framework type name to ensure that anyone reading the code can understand it, even if C# isn’t the viewer’s native language.
This is just an overview of data types. You’ll discover that data types are extremely flexible as the book progresses. It’s possible to model any sort of data in C#, even data that you’ve simply made up for the fun of it! You’ll also discover some important considerations for using data types as the book progresses. For now, you have everything you need to work with simple applications. Your knowledge will increase as the complexity of the examples found in the book increases.
It’s time to put your newfound knowledge of data types to work. The code in Example 3-2 is ambiguous because it doesn’t provide specific data types for at last two of the variables. You now know that Count is of type int and TheEntry is of type string. To make your code easier to read and to take full advantage of all of the features of the compiler, you could change the code in Example 3-2 to look like Example 3-3.
Example 3-3. Adding Specific Data Types
private void btnTest_Click(object sender, EventArgs e)
{
    // Create a variable to hold a count of the number of
    // entries in txtSelections.
    int Count = 0;

    // Obtain the data from the Lines property of txtSelections
    // and place it in Output using TheEntry as a temporary variable.
    var Output = from string TheEntry
                 in txtSelections.Lines
                 select (Count = Count + 1) + " " + TheEntry.ToUpper();
    // Place the contents of Output into the Lines property of
    // txtOutput.
    txtOutput.Lines = Output.ToArray<String>();
}
This code doesn’t work any differently from the code you viewed earlier. The only difference is that now it’s easier to read and debug because the data types are specific.
Now that you know more about data types, you might wonder what happens when you type odd data types within a text box. It’s time to experiment a little. Change the LINQ query so it looks like this:
var Output = from TheEntry
             in txtSelections.Lines
             select (Count = Count + 1) + " " + TheEntry.ToUpper()
                + " " + TheEntry.GetType();
The GetType() method tells you what sort of type of information TheEntry contains. This is a very handy way to discover more about data types. Notice also that if a line gets too long (as it is with the select statement) that you can simply continue it on the next line. A good practice is to indent the continuation line so that you know it’s a continuation line. Now, start your application and type true (bool), 1 (int), and 2.3 (float) on three separate lines. Click Text. You’ll see the output shown in Figure 3-24.
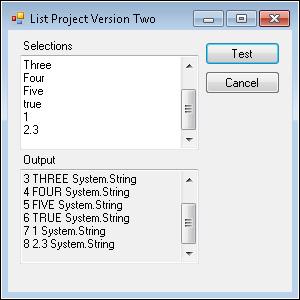
As you can see, the text box treats all data it contains as the string data type (which is the .NET Framework System.String data type), even if you’d normally look at the entry as some other type. The Selecting Specific TextBox Elements section of the chapter discusses this topic in more detail, but you’ll find that you can detect other types of data in text boxes and also convert that data into a specific data type.
The LINQ queries you create can include a where clause. You use the where clause to choose specific entries based on some criterion. For example, you could select entries of a specific length or of a particular data type. That’s what the examples in the following sections show you how to do, but you’ll see a number of additional selection examples in the book.
A simple way to test the where clause is to look for items of a particular length. Of course, you can use this technique to test for all kinds of other things as well. For example, you could use it to test for specific strings or character sequences. In fact, you can use this technique to test for just about anything you want as long as C# provides a means to test it. Example 3-4 shows how you can check for items of a specific length.
Example 3-4. Selecting Specific Entries by Length
private void btnTest_Click(object sender, EventArgs e)
{
    // Create a variable to hold a count of the number of
    // entries in txtSelections.
    int Count = 0;

    // Obtain the data from the Lines property of txtSelections
    // and place it in Output using TheEntry as a temporary variable.
    var Output = from string TheEntry
                 in txtSelections.Lines
                 where TheEntry.Length <= 3
                 select (Count = Count + 1) + " " + TheEntry.ToUpper();

    // Place the contents of Output into the Lines property of
    // txtOutput.
    txtOutput.Lines = Output.ToArray<String>();
}
This code behaves much as the other examples have. However, the where clause tells LINQ not to include any strings that are over three characters in length in the output. The Length property always contains the length of a particular item. In this case, TheEntry contains a single line from txtSelections, so Length contains the length of the text in that line.
Try tracing through this example using the debugger so that you can see how the selection criterion works. You’ll see that the debugger goes to the where clause first. When the where clause is true (the Length is less than or equal to 3) the debugger next goes to the select clause. However, when the where clause is false, the debugger skips the select clause. Try adding a few more lines to your example. Figure 3-25 shows some typical output. (Notice that only One, Two, and Six are selected.)

It’s possible to detect various kinds of text box elements, even though the text box doesn’t work with anything but strings. In this case, you must try to convert the data to a different type. If the conversion works, then the data is the type you want. Example 3-5 shows how to perform this task.
Example 3-5. SelectingT Specific Entries by Type
private void btnTest_Click(object sender, EventArgs e)
{
    // Create a variable to hold a count of the number of
    // entries in txtSelections.
    int Count = 0;

    // Create a variable to hold the converted data.
    int OutputNumber = 0;

    // Obtain the data from the Lines property of txtSelections
    // and place it in Output using TheEntry as a temporary variable.
    var Output = from string TheEntry
                 in txtSelections.Lines
                 where Int32.TryParse(TheEntry, out OutputNumber)
                 select (Count = Count + 1) + " " + OutputNumber.ToString() +
                    " " + OutputNumber.GetType();

    // Place the contents of Output into the Lines property of
    // txtOutput.
    txtOutput.Lines = Output.ToArray<String>();
}
Notice that the code begins by creating the counter variable, Count, and a variable to hold the converted data, OutputNumber. The method used to place data in txtOutput.Lines is the same as before, which leaves the LINQ query.
The where clause contains something new. The .NET Framework data types often have special features. Look at Table 3-2 and you’ll see the System.Int32 data type is the same as the int data type. The Int32.TryParse() method will try to convert the string found in TheEntry into an int. it places this converted data in OutputNumber. Because OutputNumber is an output, you include the special out keyword next to it. C# tells you when to use this special keyword, so don’t worry too much about it. The result of the Int32.TryParse() method is a Boolean value—true or false. When TheEntry contains a value that the Int32.TryParse() method can convert, the result is true, so the LINQ query calls the select clause to output data. Otherwise, LINQ checks the next entry. You can see this for yourself using the tracing technique in the debugger. (Try it now, I’ll wait.)
The select clause is also different. In this case, it sends OutputNumber to txtOutput.Lines. However, remember that Lines only accepts strings. So, you must convert OutputNumber to a string using the ToString() method. This example shows how to convert from a string to a number and back again. Just so you can be sure it really is a number, the example also outputs OutputNumber.GetType(). To make this example work better, the txtSelections control contains some different entries: text, numbers, and a Boolean value, as shown in Figure 3-26.
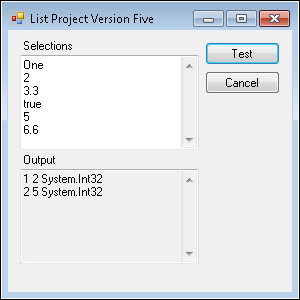
Figure 3-26. Try various sorts of values with the example until you truly understand how the LINQ statement works.
Here’s a brief discussion of these six entries. The first line isn’t output because it’s a string. The second line is output because it’s an int. Now, look at the third line: it looks like it could be an int, but it’s really a float, so it doesn’t convert without data loss. The fourth line is a Boolean value. The fifth line is an int and the sixth is a float, so the output is perfectly predictable.
This chapter has helped you understand how to use the ListBox control as a source of information for a LINQ query. You’ve created an application that takes the information from the ListBox, asks a question about it, and then displays a result on screen. Believe it or not, you’ve learned an essential fact about all applications—they manipulate data of some sort. As long as you keep that in mind, you’ll find that creating applications is significantly easier.
Playing is an important part of learning how to work with code. You’ve just created a simple but interesting example application—much better than the Hello World application that most people start with. Take some time to work through the application using the debugger. Keep tracing through the things that the application does until you understand how it operates. Any good developer uses precisely the same approach to discover new coding techniques, so you’re already using professional techniques with your first application! Try playing with the LINQ query a little to see what happens when you do. For example, trying changing the select criterion to see what happens to the output. The big thing is not to worry about messing up anything—this application is straightforward and simple—nothing bad will happen even if it stops working while you try different things out. You can always get a fresh copy of the application online and start over if you like.
When you go to the library and see a shelf stacked with books, the librarian calls it a collection. Likewise, you go to a friend’s house and see a carefully arranged display of like items and your friend calls it a collection. In fact, collections are part of your daily life—everyone collects something. It turns out that computers also collect like items and store them in collections. That’s what Chapter 4, is all about. You’ll take the information you’ve learned in this chapter and use it to work with groups of like information placed in a special container called a collection.